2006 LAND ROVER FRELANDER 2 ECU
[x] Cancel search: ECUPage 2320 of 3229
Publi s hed: 22-Nov-2011
Handles, Locks, Latches and Entry Systems - Locks, Latches and Entry
Systems
Diagnosi s and Tes ti ng
Principle of Operation
For a detail ed descripti on of the locks , lat ches and ent ry s ys tems and operat ion, refer to the relevant Des cri pt ion andOperat ion s ect ion of t he works hop manual. REFER to: Handles , Locks , Lat ches and Ent ry Sys tems (501-14 Handles , Locks ,Latches and Ent ry Sys t ems, Des cri pt ion and Operati on).
Inspection and Verification
CAUTION: Di agnos is by s ubs ti tut ion from a donor vehicle is NO T acceptabl e. Subs ti tut ion of cont rol modules doesnot guarant ee confirmat ion of a faul t and may al so caus e addit ional fault s in the vehicle bei ng checked and/or the donorvehi cl e.
• NOTE: Check and recti fy bas ic faul ts before beginni ng diagnos t ic rout ines i nvol vi ng pinpoint t es t s.
1. Verify t he cus t omer concern.1.
2. Vis ually ins pect for obvious s igns of mechani cal or electrical damage.2.
Visual Inspection
MechanicalElectricalIncorrectl y aligned door(s ), hood or tai lgateFuel fil ler door lock act uat orHood rel ease handleHood rel ease cablesHood l at ch(es )Exterior door handle(s)Interi or door handle(s )Cable(s)Tail gat e release swit chRear window release s wit ch
Fus esW i ri ng harnessW i ri ng connect or(s )Door l ock act uat or(s )Remote trans mi tt er (key-fob or smart key)Cent ral l ocking s wi tchesCont rol ler Area Net work (CAN) circui tsRadi o frequency (RF) recei verCent ral junct ion box (CJB)Loos e or corroded connect ions
3. If an obvious cause for an obs erved or report ed concern is found, correct t he caus e (if pos s ible) beforeproceeding t o t he next s t ep.3.
4. If t he caus e is not vis ually evi dent , verify t he sympt om and refer t o t he Sympt om Chart, al ternat ively check forDi agnos ti c Trouble Codes (DTCs) and refer t o t he DTC Index.4.
Symptom Chart
SymptomPossible causesActionDoor(s ) wil l not openfrom out s ideExt erior door handl econdit ion/i nst all at ionExt erior release cabl edi s connect ed from ext eriordoor handl e or door l atchDoor l at ch fai lure
Check the ext eri or door handl e condi ti on andi nst all at ionCheck the condit ion and s ecurit y of t he ext eri orreleas e cabl eCheck the operat ion of t he l at ch GO to Pi npoi nt Tes tA.
Door(s ) wil l not openfrom ins ideChi ld l ock(s) engagedInt erior door handlecondit ion/i nst all at ionInt erior rel ease cabledi s connect ed from interiordoor handl e or door l atchDoor l at ch fai lure
Check that t he chi ld locks are dis engagedCheck the interior door handle condit ion andi nst all at ionCheck the condit ion and s ecurit y of t he int eriorreleas e cabl eCheck the operat ion of t he l at ch. GO t o Pinpoint Tes tA.
The mes s age cent eri ndi cat es that t he hood,t he tai lgate or a door i sopen when it appears t obe clos ed
Incorrect s trikeral ignment/adjus tmentAjar s wit ch ci rcuit s hortci rcuit t o groundAjar s wit ch fail ure
Check/adjus t the st ri kers as neces s aryCheck for DTCs i ndi cat ing an ajar swit ch fault . Refert o t he DTC i ndex
Vehicle indicates ami s s-lock when t hehood, t ail gat e and doorsappear t o be clos ed
Fuel flap does notl ock/unlockFuel fl ap cabl e detached frombodyFuel fl ap act uator detachedfrom mounti ng bracketFuel fl ap act uatordi s connect edFuel fl ap act uator fai lure
Check the condit ion and i nst all at ion of t he fuel flapcableCheck the securi ty of t he fuel flap actuat or andbracketCheck the securi ty of t he actuator elect ricalconnect orCheck for DTCs i ndi cat ing a fuel fl ap act uator faul t.Refer t o t he DTC i ndex
Page 2346 of 3229
Fli ck wipeInt ermit tent/Auto (vehicles wi thout/wit h rain s ens or fit t ed)Slow wipeFast wi pe.
The 'Aut o' funct ion requi res an i nput from t he rai n s ens or. The rain s ens or i s mounted on the inner s urface of thewinds hield and trans mi ts an infra-red s ignal to det ermine t he amount of wat er on the out er surface of t he winds hi eld. Avalue i s then t rans mi tt ed to the CJB over the Local Int erconnect Network (LIN) bus .
The CJB als o control s operat ion of t he headlamp was h functi on. For more informat ion, refer t o 'Headl amp W as hers ' bel ow.
The rear s creen wi per s yst em operat es i ndependent ly of t he winds hield wiper s ys t em and i s cont rol led by t he CJB onreceipt of LIN bus mes sages from the RH s teeri ng col umn mul ti -funct ion s wi tch.
• NOTE: The wi nds hield and rear s creen was hers uti li ze the s ame pump meaning only 1 was h functi on, ei ther front or rear,can be performed at any one t ime.
WINDSHIELD WIPER MOTOR
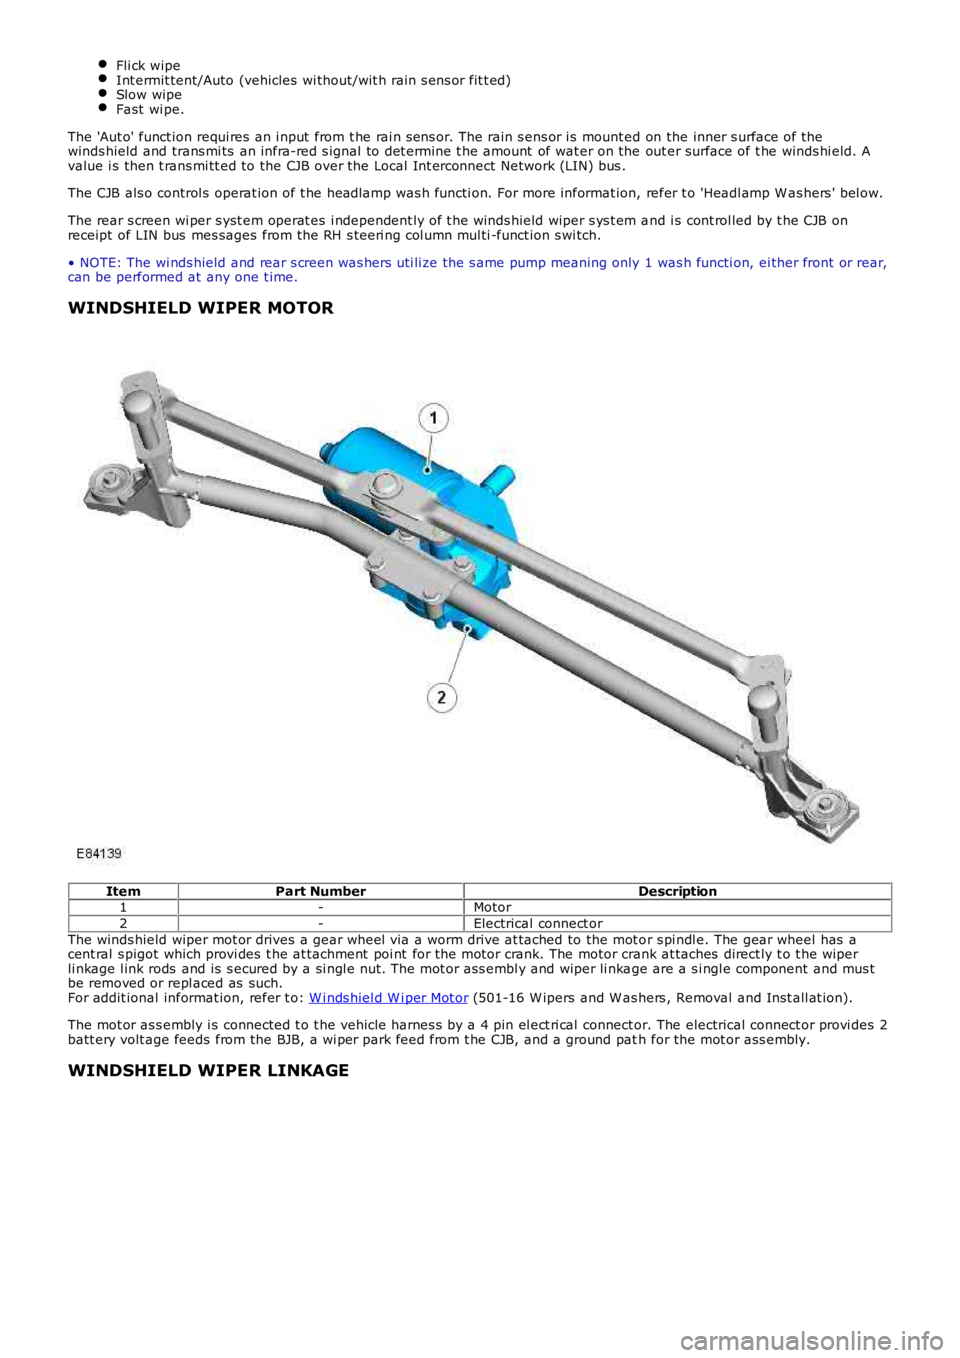
ItemPart NumberDescription1-Motor
2-Electrical connect or
The winds hield wiper mot or drives a gear wheel via a worm drive at tached to the mot or s pi ndl e. The gear wheel has acent ral s pigot which provi des t he at tachment poi nt for the motor crank. The motor crank at taches direct ly t o t he wiperli nkage l ink rods and is s ecured by a si ngl e nut. The mot or ass embl y and wiper li nkage are a s i ngl e component and mus tbe removed or repl aced as such.For addit ional informat ion, refer t o: W i nds hiel d W i per Mot or (501-16 W ipers and W as hers , Removal and Inst all at ion).
The mot or as s embly i s connected t o t he vehicle harnes s by a 4 pin el ect ri cal connector. The electrical connect or provi des 2batt ery volt age feeds from the BJB, a wi per park feed from t he CJB, and a ground path for the mot or ass embly.
WINDSHIELD WIPER LINKAGE
Page 2349 of 3229
The rai n s ens or is connect ed t o t he vehi cl e harnes s by a 3 pi n elect rical connector. The el ect ri cal connector provi des apower feed from the CJB, a LIN bus connecti on to the CJB and a ground pat h.
REAR SCREEN WIPER MOTOR
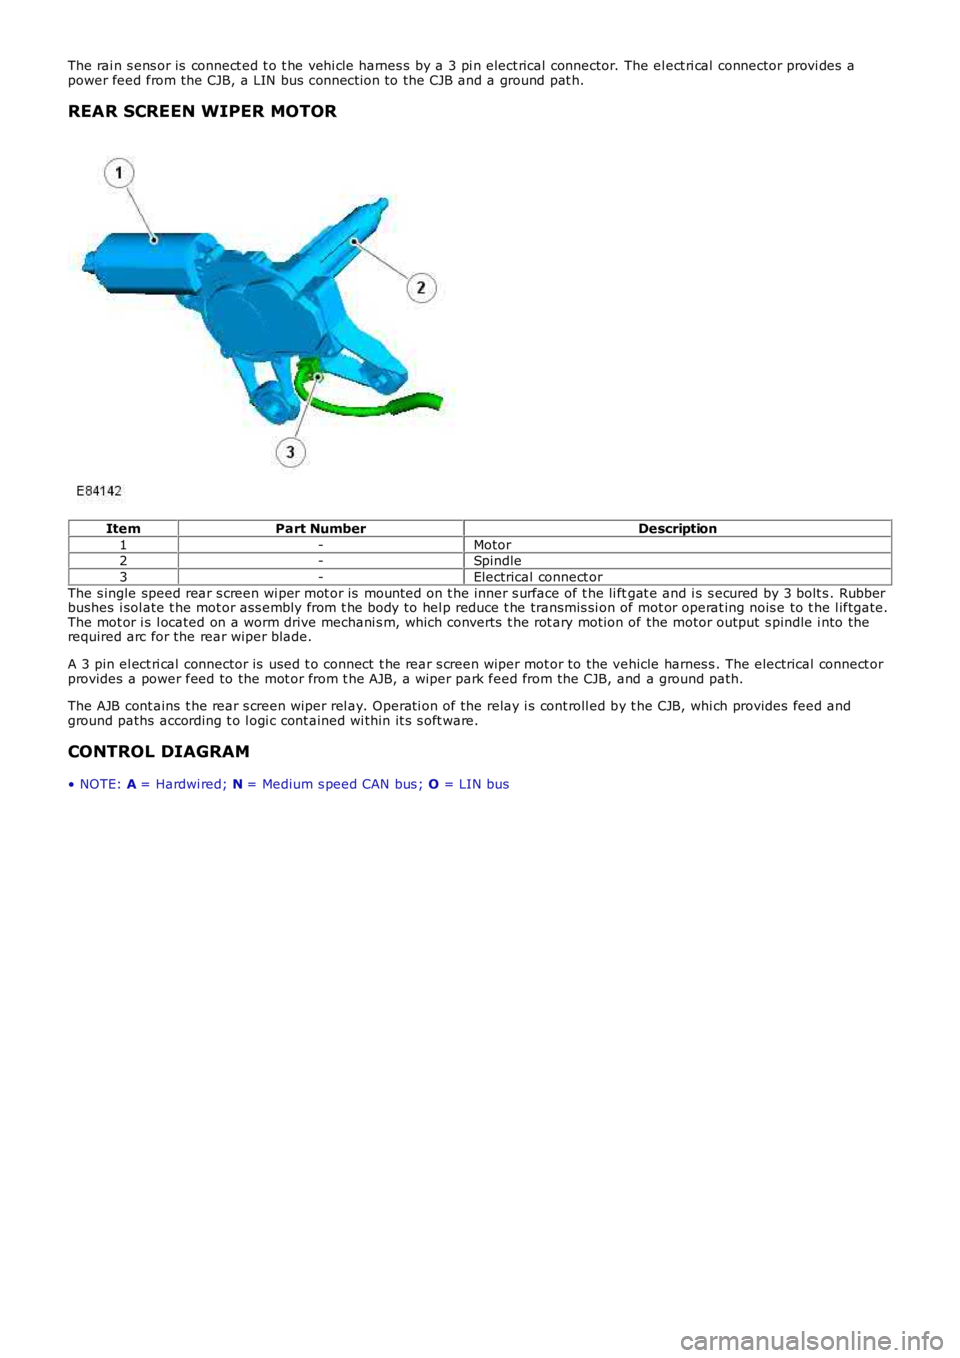
ItemPart NumberDescription
1-Motor2-Spindle
3-Electrical connect or
The s ingle speed rear s creen wi per mot or is mount ed on t he inner s urface of t he li ftgat e and i s s ecured by 3 bolt s . Rubberbushes i sol ate t he mot or ass embly from t he body to hel p reduce t he transmis si on of mot or operat ing nois e to t he l iftgate.The mot or i s l ocated on a worm drive mechani s m, which converts t he rot ary moti on of the motor output s pindle i nto therequired arc for the rear wiper blade.
A 3 pin el ect ri cal connector is used t o connect t he rear s creen wiper mot or to the vehicle harnes s . The electrical connect orprovides a power feed to the mot or from t he AJB, a wiper park feed from the CJB, and a ground path.
The AJB cont ains t he rear s creen wiper rel ay. O perati on of the relay i s cont roll ed by t he CJB, whi ch provides feed andground paths according t o l ogi c cont ained wi thin it s s oft ware.
CONTROL DIAGRAM
• NOTE: A = Hardwi red; N = Medium s peed CAN bus ; O = LIN bus
Page 2372 of 3229
1
12
• NOTE: If DTCs are recorded a nd, aft er performing t he pinpoint tes ts , a fault is not present , an int ermitt ent concern may be t he cause.Always check for loose connect ions a nd corroded t erminals.
DTCDescriptionPossible CauseActionB10EF-12Sunroof Speed Output -circuit short t o powerRoof ope ning panel mot or speedoutput circuit short t o powerRefer t o electrical circuit dia gra ms and check t he (speedoutput) circuit be tween t he cent ral junct ion box and t he roofopening pane l motor for short to power. Repair as requiredB10EF-14Sunroof Speed Output -circuit short t o ground oropen
Roof ope ning panel mot or speedoutput circuit short t o ground oropen circuit
Refer t o electrical circuit dia gra ms and check t he (speedoutput) circuit be tween t he cent ral junct ion box and t he roofopening pane l motor for short to ground or ope n circuit . Repairas requiredB10F2-12Sunroof cont rol - circuitshort to powerRoof ope ning panel mot or (ACC)circuit short to powerRefer t o t he elect rica l circuit diagrams and check t he (ACC)circuit bet ween the cent ral junct ion box and t he roof openingpanel mot or for circuit short to power. Repair as requiredB10F2-14Sunroof cont rol - circuitshort to ground or openRoof ope ning panel mot or (ACC)circuit short to ground or opencircuit
Refer t o t he elect rica l circuit diagrams and check t he (ACC)circuit bet ween the cent ral junct ion box and t he roof openingpanel mot or for circuit short to ground or open circuit. Repair asrequiredB113D-12Sunroof Global Open/CloseControl - circuit s hort t opower
Roof ope ning panel mot or globalopen/close cont rol circui t shortt o power
Refer t o electrical circuit dia gra ms and check t he (global close)circuit bet ween the cent ral junct ion box and t he roof openingpanel mot or for circuit for short t o power. Repa ir as required
B113D-14Sunroof Global Open/CloseControl - circuit s hort t oground or open
Roof ope ning panel mot or globalopen/close cont rol circui t shortt o ground or open circuit
Refer t o electrical circuit dia gra ms and check t he (global close)circuit bet ween the cent ral junct ion box and t he roof openingpanel mot or for circuit for short t o ground or open circuit .Repair as required
Roof Opening Panel Diagnostic Pinpoint
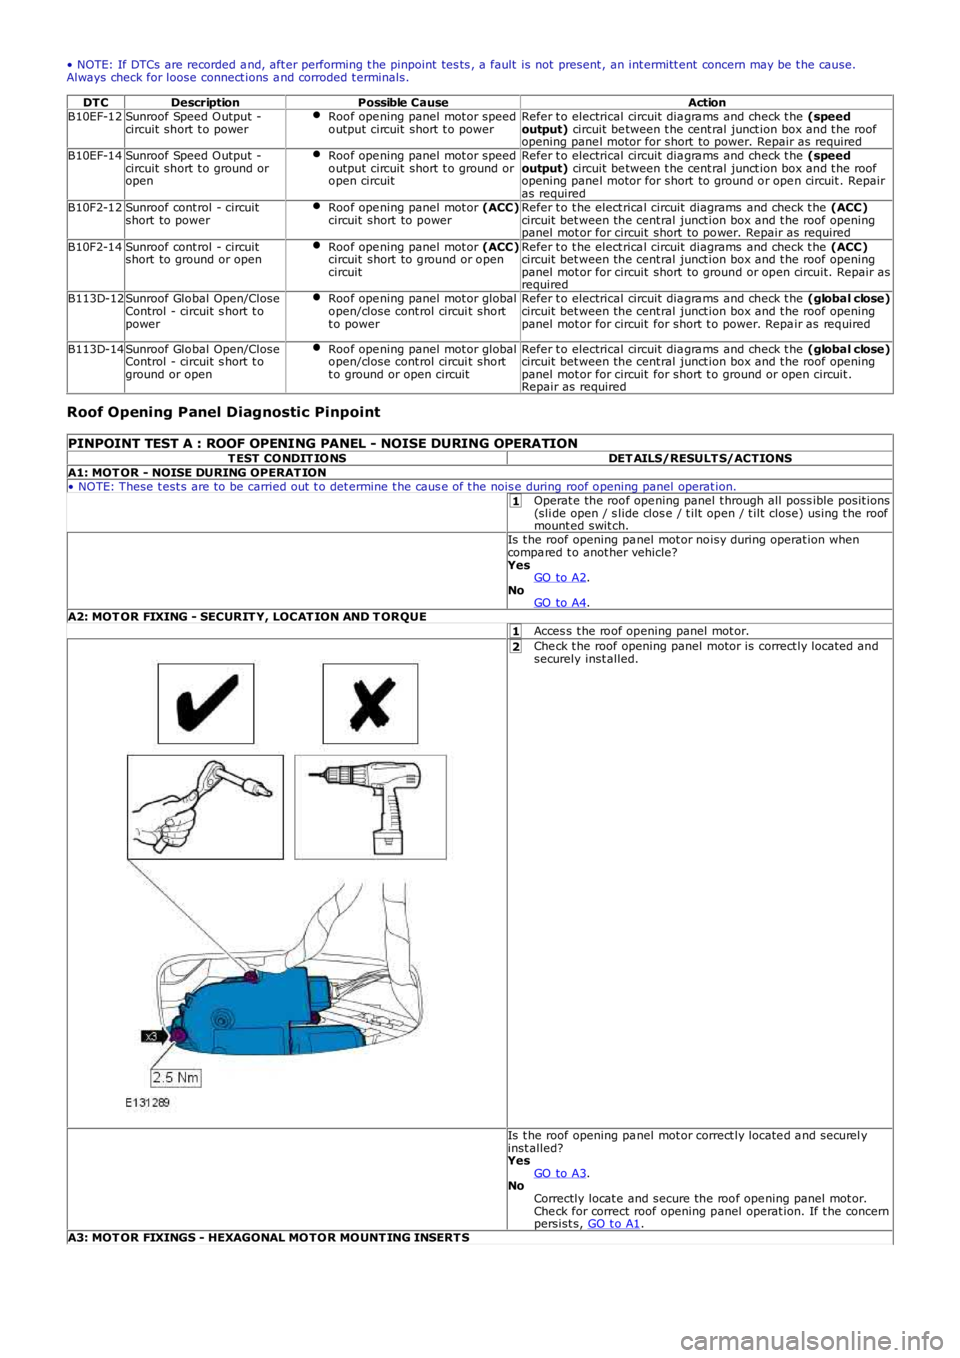
PINPOINT TEST A : ROOF OPENING PANEL - NOISE DURING OPERATIONT EST CONDIT IONSDET AILS/RESULT S/ACTIONSA1: MOT OR - NOISE DURING OPERAT ION• NOTE: These t est s are to be carried out t o det ermine t he caus e of t he nois e during roof opening panel operat ion.Operat e the roof ope ning panel t hrough all poss ible posit ions(sli de open / s lide clos e / t ilt open / t ilt close) using t he roofmount ed swit ch.Is t he roof opening pa nel mot or noisy during operat ion whencompa red t o anot her vehicle?YesGO to A2.NoGO to A4.A2: MOT OR FIXING - SECURIT Y, LOCAT ION AND T ORQUEAcces s t he roof opening panel mot or.Che ck t he roof opening panel motor is correct ly located andsecurely inst alled.
Is t he roof opening pa nel mot or correct ly locate d a nd securel yinst alled?YesGO to A3.NoCorrectly locat e and secure the roof ope ning panel mot or.Che ck for correct roof opening panel operat ion. If t he concernpersist s, GO t o A1.A3: MOT OR FIXINGS - HEXAGONAL MOTOR MOUNT ING INSERT S
Page 2373 of 3229
1
1
1
1
1
1
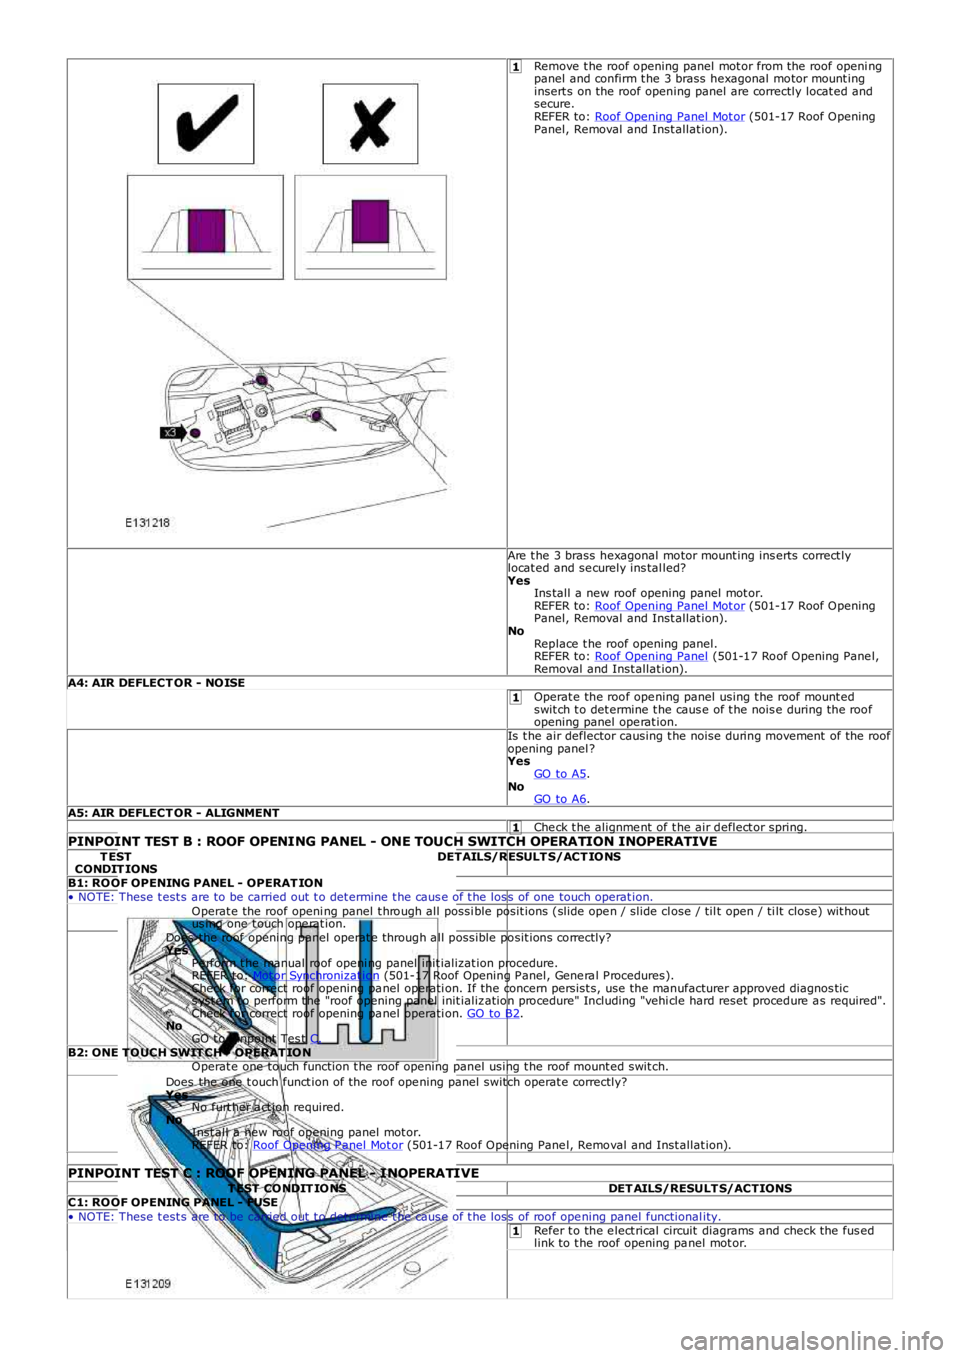
Remove t he roof opening panel mot or from the roof openi ngpanel and confirm t he 3 brass hexagonal motor mount inginsert s on the roof opening panel are correctly locat ed andsecure.REFER to: Roof Opening Panel Mot or (501-17 Roof OpeningPanel, Removal and Inst allat ion).
Are t he 3 brass hexagonal motor mount ing ins erts correct lylocat ed and se curely ins tal led?YesIns tall a new roof opening panel mot or.REFER to: Roof Opening Panel Mot or (501-17 Roof OpeningPanel, Removal and Inst allat ion).NoReplace t he roof opening panel.REFER to: Roof Opening Panel (501-17 Roof Opening Pane l,Removal and Inst allat ion).A4: AIR DEFLECT OR - NOISEOperat e the roof ope ning panel using t he roof mount edswit ch t o det ermine t he caus e of t he nois e during the roofopening panel ope rat ion.Is t he air deflector causing t he noise during movement of the roofopening panel ?YesGO to A5.NoGO to A6.A5: AIR DEFLECT OR - ALIGNMENTChe ck t he alignme nt of t he air deflect or spring.PINPOINT TEST B : ROOF OPENING PANEL - ONE TOUCH SWITCH OPERATION INOPERATIVET ESTCONDIT IONSDETAILS/RESULT S/ACT IONS
B1: ROOF OPENING PANEL - OPERAT ION• NOTE: These t est s are to be carried out t o det ermine t he caus e of t he los s of one touch operat ion.Operat e the roof openi ng panel t hrough all possi ble posit ions (slide ope n / slide close / til t open / ti lt close) wit houtus ing one t ouch ope rat ion.Does the roof opening panel operat e through a ll possible posit ions correctly?YesPe rform t he manual roof openi ng panel init ializat ion procedure.REFER to: Mot or Synchronizat ion (501-17 Roof Opening P anel, Gene ra l P rocedures).Check for correct roof opening pa nel operati on. If the concern persist s, use t he manufacturer approved diagnos tics yst em t o perform t he "roof opening panel init ializ ation procedure" Including "vehi cle hard reset procedure a s required".Check for correct roof opening pa nel operati on. GO to B2.NoGO t o Pinpoint Tes t C.B2: ONE TOUCH SWIT CH - OPERAT IONOperat e one touch function t he roof opening panel using t he roof mount ed swit ch.Does the one t ouch funct ion of the roof ope ning panel switch operat e correctly?YesNo furt her a ct ion required.NoInst all a new roof opening panel mot or.REFER to: Roof Opening P anel Mot or (501-17 Roof Opening Pane l, Removal and Inst allat ion).
PINPOINT TEST C : ROOF OPENING PANEL - INOPERATIVET EST CONDIT IONSDET AILS/RESULT S/ACTIONSC1: ROOF OPENING PANEL - FUSE• NOTE: These t est s are to be carried out t o det ermine t he caus e of t he los s of roof ope ning panel functional ity.Refer t o the e lect rical circuit diagrams and check the fus edlink to t he roof opening pa nel mot or.
Page 2376 of 3229
2
1
1
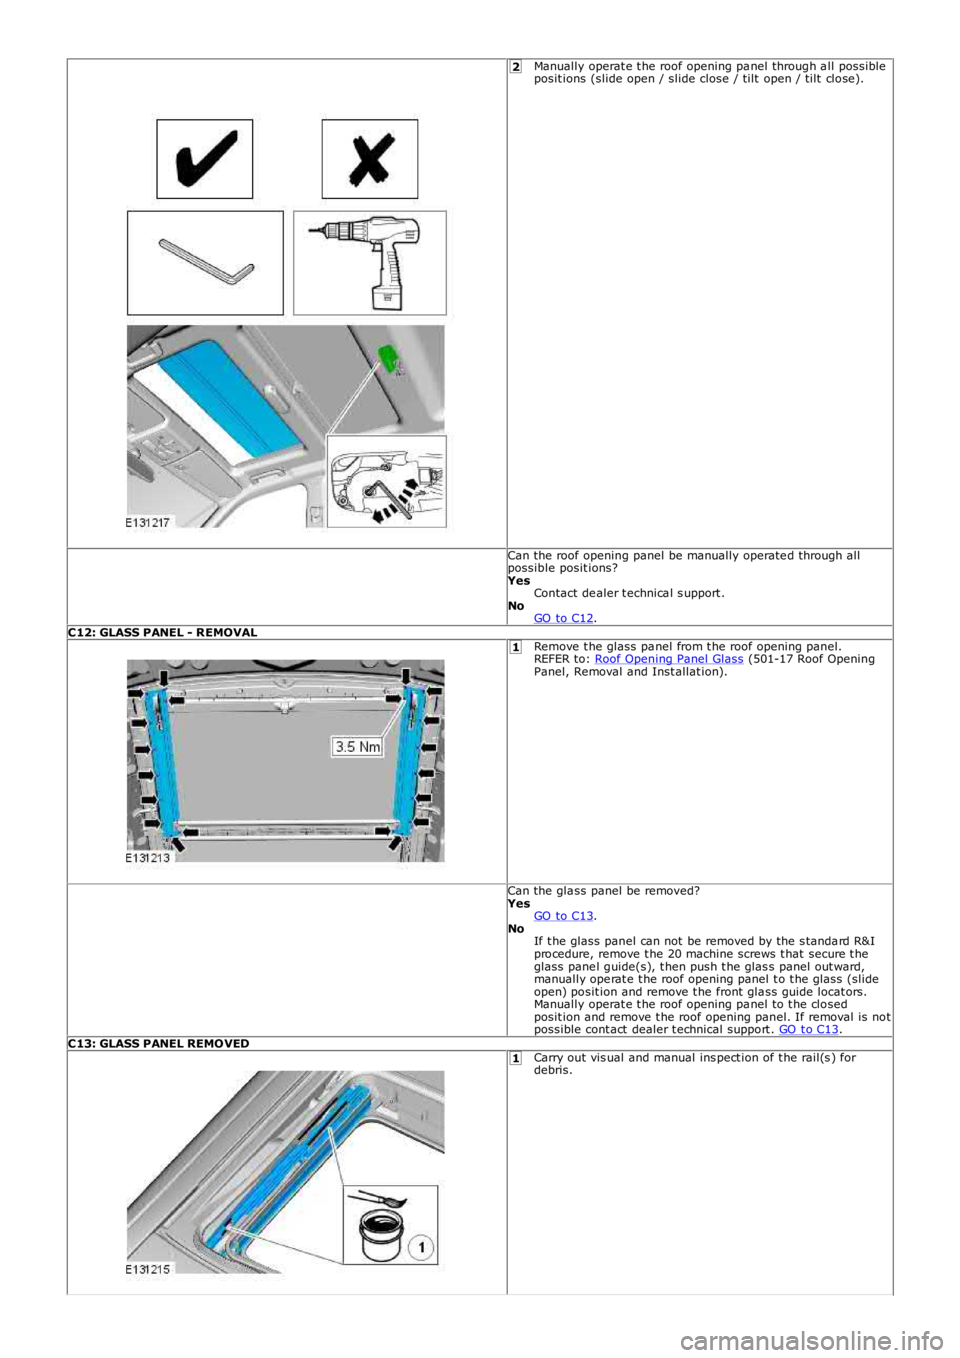
Manually operat e t he roof opening pa nel through a ll possibleposit ions (slide open / slide close / tilt open / tilt close).
Can the roof opening panel be manually operate d through allpossible posit ions?YesContact de aler t echnica l s upport .NoGO to C12.C12: GLASS PANEL - REMOVALRemove t he glass pa nel from t he roof opening panel.REFER to: Roof Opening Panel Glass (501-17 Roof OpeningPanel, Removal and Inst allat ion).
Can the gla ss panel be removed?YesGO to C13.NoIf t he glass panel can not be removed by the s tanda rd R&Iprocedure, remove t he 20 machine screws t hat secure t heglass pane l guide(s), t hen push t he glas s panel out ward,manually ope rat e t he roof opening panel t o t he glass (slideopen) posit ion and remove t he front gla ss guide locat ors.Manually operat e t he roof opening pa nel to t he closedposit ion and remove t he roof opening panel. If removal is notpossible cont act dealer t echnical support . GO t o C13.C13: GLASS PANEL REMOVEDCarry out vis ual and manual ins pect ion of t he rail(s ) fordebris.
Page 2378 of 3229
1
1
1
2
3
4
1
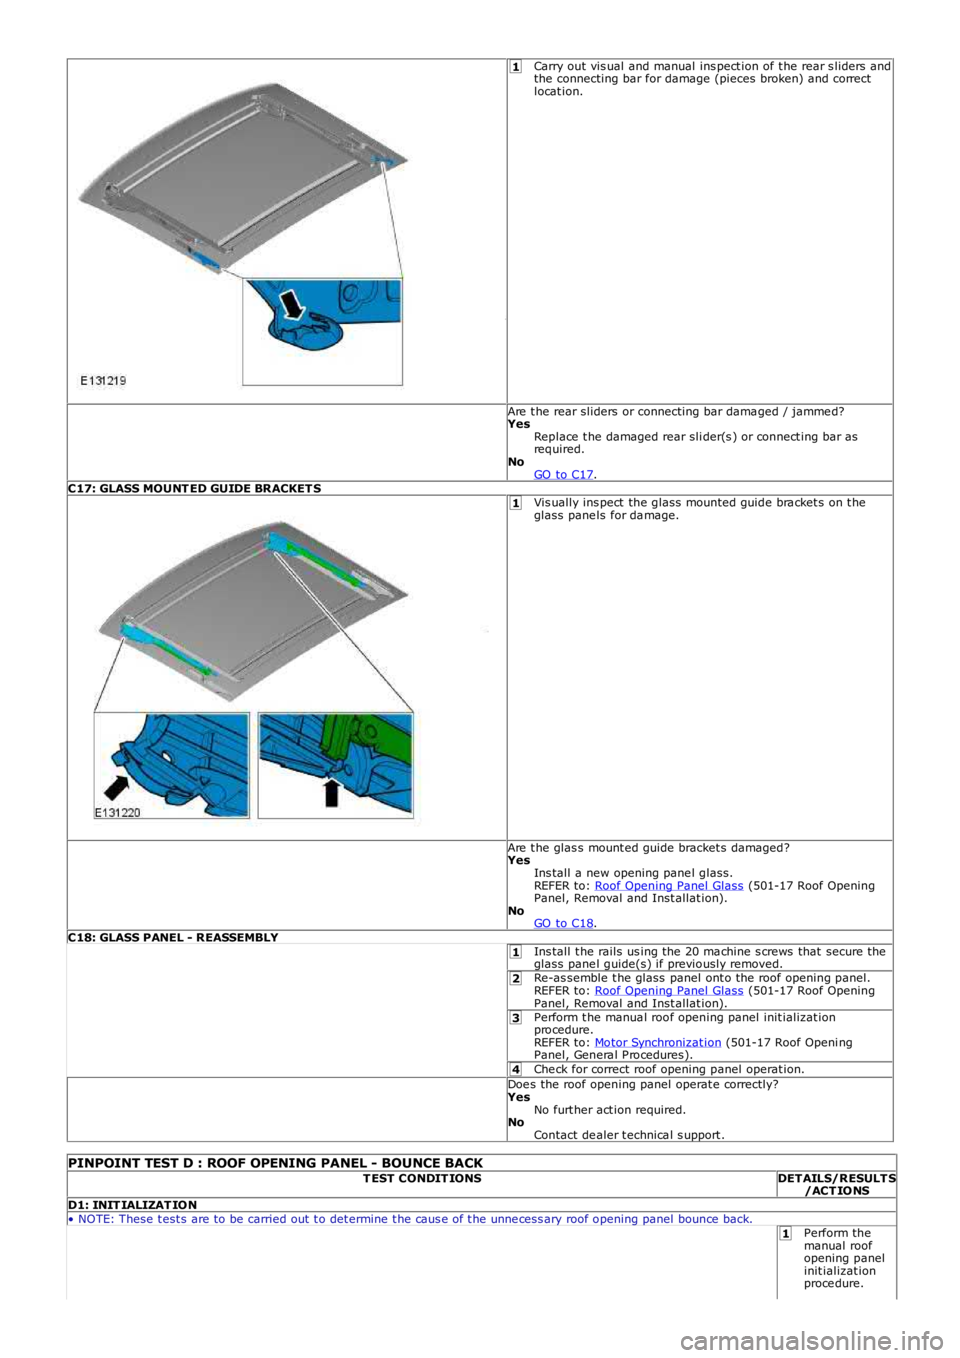
Carry out vis ual and manual ins pect ion of t he rear s liders andthe connecting bar for damage (pieces broken) and correctlocat ion.
Are t he rear sliders or connecting bar dama ged / jamme d?YesReplace t he damaged rear sli der(s ) or connect ing bar asrequired.NoGO to C17.C17: GLASS MOUNT ED GUIDE BRACKET SVis ually ins pect the glass mounted guide bra cket s on t heglass pane ls for da mage.
Are t he glas s mount ed guide bracket s damaged?YesIns tall a new opening pane l glass.REFER to: Roof Opening Panel Glass (501-17 Roof OpeningPanel, Removal and Inst allat ion).NoGO to C18.C18: GLASS PANEL - REASSEMBLYIns tall t he rails us ing the 20 ma chine s crews that secure theglass pane l guide(s) if previously removed.Re-as semble t he glass panel ont o the roof opening panel.REFER to: Roof Opening Panel Glass (501-17 Roof OpeningPanel, Removal and Inst allat ion).Perform t he manua l roof opening panel init ializat ionprocedure.REFER to: Motor Synchronizat ion (501-17 Roof Openi ngPanel, Genera l P rocedures).Che ck for correct roof opening panel operat ion.Doe s the roof opening panel operat e correctly?YesNo furt her act ion required.NoContact de aler t echnica l s upport .
PINPOINT TEST D : ROOF OPENING PANEL - BOUNCE BACKT EST CONDIT IONSDETAILS/RESULT S/ACT IONSD1: INIT IALIZAT ION• NOTE: These t est s are to be carried out t o det ermine t he caus e of t he unne cess ary roof opening panel bounce back.Perform themanual roofopening panelinit ializat ionproce dure.
Page 2383 of 3229
1
2
3
1
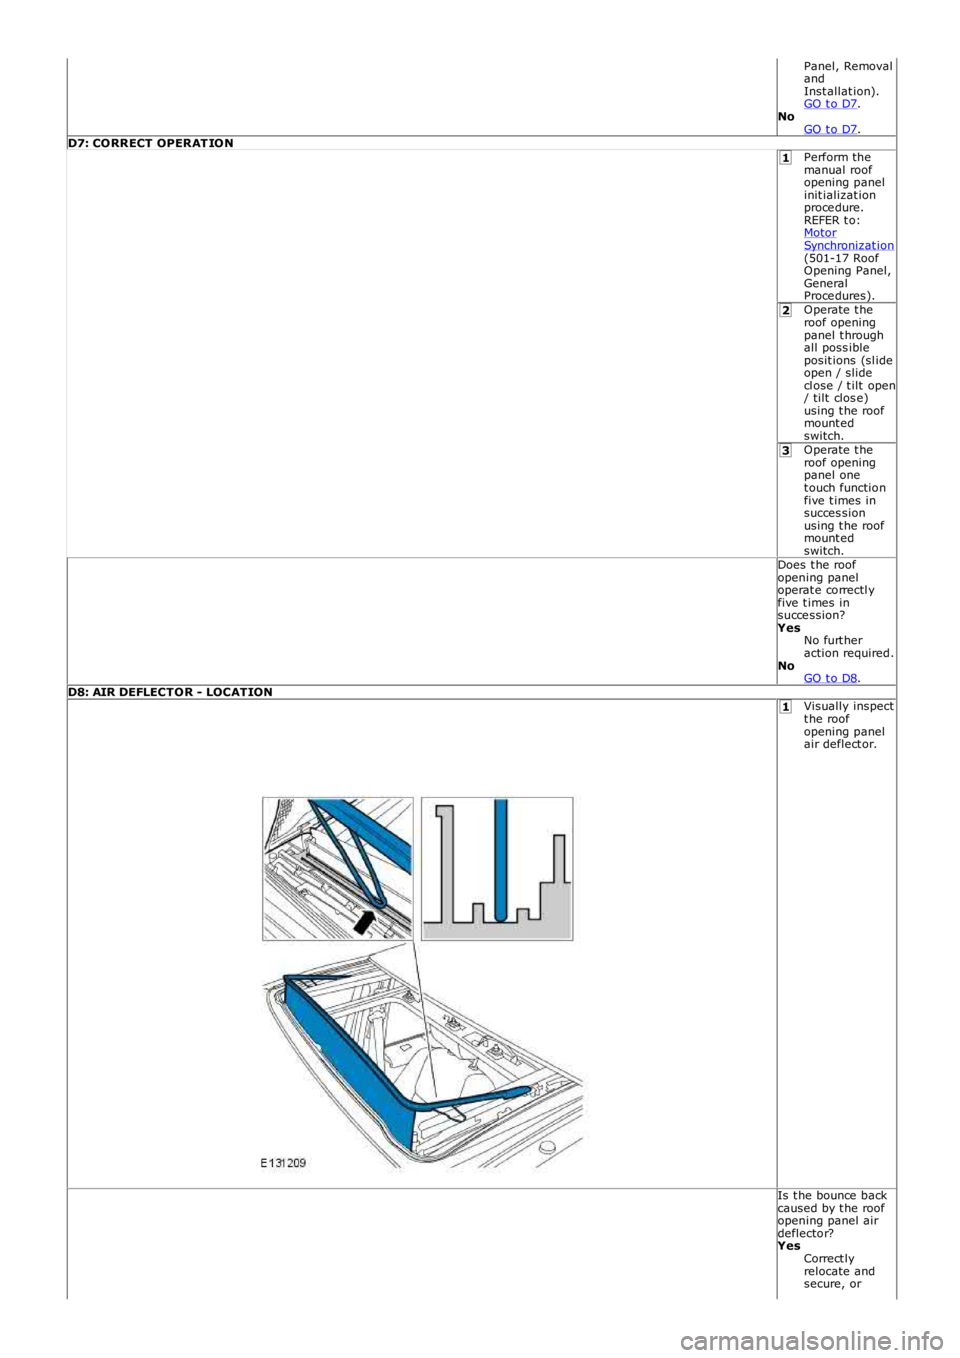
Panel, RemovalandInst allat ion).GO t o D7.NoGO t o D7.D7: CORRECT OPERAT IONPerform themanual roofopening panelinit ializat ionproce dure.REFER t o:MotorSynchronizat ion(501-17 RoofOpening Panel,GeneralProce dures).Operate t heroof openingpanel t hroughall poss ibleposit ions (sl ideopen / slidecl ose / t ilt open/ tilt clos e)using t he roofmount edswitch.Operate t heroof openingpanel onet ouch functionfive t imes insucces sionusing t he roofmount edswitch.Does t he roofopening paneloperat e correctl yfive t imes insucce ssion?YesNo furt heraction required.NoGO t o D8.D8: AIR DEFLECTOR - LOCATIONVisually inspectt he roofopening panelair deflect or.
Is t he bounce backcaused by t he roofopening panel airdeflector?YesCorrect lyrelocate andsecure, or