Page 89 of 173
 2003 Owners Manual INSTRUMENTS & CONTROLS
INSTRUMENTS & CONTROLS INSTRUMENTS & CONTROLS
INSTRUMENTS & CONTROLS
INSTRUMENTS & CONTROLS
2-50 CLASSIC
� JAZZ � ROCK � DEFEAT
�
FM/AMFM/AM
FM/AMFM/AM
FM/AM
6.6.
6.6.
6. BAN")
INSTRUMENTS & CONTROLS
INSTRUMENTS & CONTROLS INSTRUMENTS & CONTROLS
INSTRUMENTS & CONTROLS
INSTRUMENTS & CONTROLS
2-50 CLASSIC
� JAZZ � ROCK � DEFEAT
�
FM/AMFM/AM
FM/AMFM/AM
FM/AM
6.6.
6.6.
6. BAND Selector
BAND Selector BAND Selector
BAND Selector
BAND Selector
Pressing the button changes the AM, FM1
and FM2 bands. The mode selected is shown on the display.
7.7.
7.7.
7. EQUALIZER Button
EQUALIZER Button EQUALIZER Button
EQUALIZER Button
EQUALIZER Button
Press the EQ button to select the CLASSIC,
JAZZ, ROCK and DEFEAT MODE for the de-sired tone quality. Each press of the buttonchanges the display as follows;
8.8.
8.8.
8. Best Station Memory Button (BSM)
Best Station Memory Button (BSM) Best Station Memory Button (BSM)
Best Station Memory Button (BSM)
Best Station Memory Button (BSM)
(If installed)
(If installed) (If installed)
(If installed)
(If installed)
When the BSM button is pressed for two sec-
onds or longer, the six channels from the high-est field intensity are selected next and storedin memory. The stations selected are stored inthe sequence frequency from the first presetkey.
SCAN Button (If installed)
SCAN Button (If installed) SCAN Button (If installed)
SCAN Button (If installed)
SCAN Button (If installed)
When the scan button is pressed, the fre-
quency will increase and the receivable sta-tions will be tuned in one after another, receiv-ing each station for 5 seconds. To stop scan-ning, press the scan button again.
Page 90 of 173
2-51
INSTRUMENTS & CONTROLS
INSTRUMENTS & CONTROLS INSTRUMENTS & CONTROLS
INSTRUMENTS & CONTROLS
INSTRUMENTS & CONTROLS
H290C01E-GAT CASSETTE TAPE PLAYER OPERATION (H280) (If
CASSETTE TAPE PLAYER OPERATION (H280) (If CASSETTE TAPE PLAYER OPERATION (H280) (If
CASSETTE TAPE PLAYER OPERATION (H280) (If
CASSETTE TAPE PLAYER OPERATION (H280) (If II
II
I nstalled)
nstalled) nstalled)
nstalled)
nstalled)
H290A01O
5. EQUALIZER Button
4. TAPE EJECT Button
2. AUTO MUSIC Select Button
3. TAPE PROGRAM Button 6. DOLBY Button
1. FF/REW Button
Page 91 of 173
 2003 Owners Manual INSTRUMENTS & CONTROLS
INSTRUMENTS & CONTROLS INSTRUMENTS & CONTROLS
INSTRUMENTS & CONTROLS
INSTRUMENTS & CONTROLS
2-52 H290D01O-GAT
1.1.
1.1.
1. FF/REW Button
FF/REW Button FF/REW Button
FF/REW Butto")
INSTRUMENTS & CONTROLS
INSTRUMENTS & CONTROLS INSTRUMENTS & CONTROLS
INSTRUMENTS & CONTROLS
INSTRUMENTS & CONTROLS
2-52 H290D01O-GAT
1.1.
1.1.
1. FF/REW Button
FF/REW Button FF/REW Button
FF/REW Button
FF/REW Button
o Fast forward tape winding starts when the FF ( ) button is pressed during the PLAY or REW mode.
o Tape play starts when the FF ( ) button is pressed again during the FF mode.
o Tape rewinding starts when the REW ( ) button is pressed during the PLAY orFF mode.
o Tape play starts when the REW ( ) button pressed again during the REW mode.
2.2.
2.2.
2. AUTO MUSIC Select Button
AUTO MUSIC Select Button AUTO MUSIC Select Button
AUTO MUSIC Select Button
AUTO MUSIC Select Button
Press the button to find the starting point of
each song in a prerecorded music tape. Thequiet space between songs (must have at leasta 4 sec. gap) can be accepted by the AUTOMUSIC Select button.
o Pressing the button will play the beginn- ing of the next music segment.
o Pressing the button will start replay at the beginning of the music just listened to.
3.3.
3.3.
3.
TAPE PROGRAM Button
TAPE PROGRAM Button TAPE PROGRAM Button
TAPE PROGRAM Button
TAPE PROGRAM Button
This allows you to play the reverse side of the
tape by merely depressing the program button. An arrow will appear in the display to show tapedirection. 4.4.
4.4.
4. TAPE EJECT button
TAPE EJECT button TAPE EJECT button
TAPE EJECT button
TAPE EJECT button
o When the button is pressed with the cassette loaded, the cassette is ejected.
o When the button is pressed during the FF/REW mode, the cassette is ejected.
5.5.
5.5.
5. EQ Button
EQ Button EQ Button
EQ Button
EQ Button
Press the EQ button to select the CLASSIC,JAZZ, ROCK and DEFEAT MODE for the de-sired tone quality. Each press of the buttonchanges the display as follows;
6.6.
6.6.
6. DOLBY Button
DOLBY Button DOLBY Button
DOLBY Button
DOLBY Button
If you get background noise during tape PLAY,you can reduce this considerably by merelypressing the DOLBY button. If you want tocancel the DOLBY feature, press the buttonagain. CLASSIC
� JAZZ � ROCK � DEFEAT
�
Page 92 of 173
2-53
INSTRUMENTS & CONTROLS
INSTRUMENTS & CONTROLS INSTRUMENTS & CONTROLS
INSTRUMENTS & CONTROLS
INSTRUMENTS & CONTROLS
H290E01E-GAT COMPACT DISC PLAYER OPERATION (H280) (If
COMPACT DISC PLAYER OPERATION (H280) (If COMPACT DISC PLAYER OPERATION (H280) (If
COMPACT DISC PLAYER OPERATION (H280) (If
COMPACT DISC PLAYER OPERATION (H280) (If II
II
I nstalled)
nstalled) nstalled)
nstalled)
nstalled)
H290A01O
5. EQUALIZER Button
3. TRACK UP/DOWN
1. CD Select Button 4. REPEAT
2. FF/REW Button
6. CD EJELT Button
7. SCAN Button (If installed)
Page 93 of 173
 2003 Owners Manual INSTRUMENTS & CONTROLS
INSTRUMENTS & CONTROLS INSTRUMENTS & CONTROLS
INSTRUMENTS & CONTROLS
INSTRUMENTS & CONTROLS
2-54 H290F01O-GAT
1.1.
1.1.
1. CD Select Button
CD Select Button CD Select Button
CD")
INSTRUMENTS & CONTROLS
INSTRUMENTS & CONTROLS INSTRUMENTS & CONTROLS
INSTRUMENTS & CONTROLS
INSTRUMENTS & CONTROLS
2-54 H290F01O-GAT
1.1.
1.1.
1. CD Select Button
CD Select Button CD Select Button
CD Select Button
CD Select Button
o Insert the CD with the label facing upward.
o Insert the CD to start CD playback, during radio operation or cassette tape playing.
o When a disc is in the CD deck, if you press the play button the CD player will begin playing even if the radio or cassette playeris being used.
o The CD player can be used when the igni- tion switch is in either the "ON" or "ACC"position.
2.2.
2.2.
2. FF/REW ( / )
FF/REW ( / ) FF/REW ( / )
FF/REW ( / )
FF/REW ( / )
If you want to fast forward or reverse through
the compact disc track, push and hold in the FF( ) or REW ( ) button.
When you release the button, the compact disc
player will resume playing.
3.3.
3.3.
3. TRACK UP/DOWN
TRACK UP/DOWN TRACK UP/DOWN
TRACK UP/DOWN
TRACK UP/DOWN
o The desired track on the disc currently be- ing played can be selected using the tracknumber.
o Press button once to skip forward to the beginning of the next track. Press buttononce to skip back to the beginning of thetrack. 4.4.
4.4.
4. REPEAT
REPEAT REPEAT
REPEAT
REPEAT
o To repeat the music you are listening to, press the RPT button. To cancel , pressagain.
o If you do not release RPT operation when the track ends, it will automatically be re-played. This process will be continued until you push the button again.
5.5.
5.5.
5.
EQUALIZER Button
EQUALIZER Button EQUALIZER Button
EQUALIZER Button
EQUALIZER Button
Press the EQ button to select the CLASSIC,
JAZZ, ROCK and DEFEAT MODE for the de-sired tone quality. Each press of the buttonchanges the display as follows; NOTE:
NOTE: NOTE:
NOTE:
NOTE:
oo
oo
o To assure proper operation of the unit,
To assure proper operation of the unit, To assure proper operation of the unit,
To assure proper operation of the unit,
To assure proper operation of the unit,
keep the vehicle interior temperature
keep the vehicle interior temperature keep the vehicle interior temperature
keep the vehicle interior temperature
keep the vehicle interior temperature
within a normal range by using the
within a normal range by using the within a normal range by using the
within a normal range by using the
within a normal range by using the
vehicle's air conditioning or heating sys-
vehicle's air conditioning or heating sys- vehicle's air conditioning or heating sys-
vehicle's air conditioning or heating sys-
vehicle's air conditioning or heating sys-
tem.tem.
tem.tem.
tem.
oo
oo
o When replacing the fuse, replace it with a
When replacing the fuse, replace it with a When replacing the fuse, replace it with a
When replacing the fuse, replace it with a
When replacing the fuse, replace it with a
fuse having the correct capacity.
fuse having the correct capacity. fuse having the correct capacity.
fuse having the correct capacity.
fuse having the correct capacity.
oo
oo
o The preset station frequencies are all
The preset station frequencies are all The preset station frequencies are all
The preset station frequencies are all
The preset station frequencies are all
erased when the car battery is discon-
erased when the car battery is discon- erased when the car battery is discon-
erased when the car battery is discon-
erased when the car battery is discon-
nected. Therefore, all data will have to be
nected. Therefore, all data will have to be nected. Therefore, all data will have to be
nected. Therefore, all data will have to be
nected. Therefore, all data will have to be
set again if this should occur.
set again if this should occur. set again if this should occur.
set again if this should occur.
set again if this should occur.
oo
oo
o Do not add any oil to the rotating parts.
Do not add any oil to the rotating parts. Do not add any oil to the rotating parts.
Do not add any oil to the rotating parts.
Do not add any oil to the rotating parts.
Keep magnets, screwdrivers and other
Keep magnets, screwdrivers and other Keep magnets, screwdrivers and other
Keep magnets, screwdrivers and other
Keep magnets, screwdrivers and other
metallic objects away from the tape
metallic objects away from the tape metallic objects away from the tape
metallic objects away from the tape
metallic objects away from the tape
mechanism and head.
mechanism and head. mechanism and head.
mechanism and head.
mechanism and head.
oo
oo
o This equipment is designed to be used
This equipment is designed to be used This equipment is designed to be used
This equipment is designed to be used
This equipment is designed to be used
only in a 12 volt DC battery system with
only in a 12 volt DC battery system with only in a 12 volt DC battery system with
only in a 12 volt DC battery system with
only in a 12 volt DC battery system with
negative ground.
negative ground. negative ground.
negative ground.
negative ground.
oo
oo
o This unit is made of precision parts. Do
This unit is made of precision parts. Do This unit is made of precision parts. Do
This unit is made of precision parts. Do
This unit is made of precision parts. Do
not attempt to disassemble or adjust any
not attempt to disassemble or adjust any not attempt to disassemble or adjust any
not attempt to disassemble or adjust any
not attempt to disassemble or adjust any
parts.
parts. parts.
parts.
parts.
oo
oo
o When driving your vehicle, be sure to
When driving your vehicle, be sure to When driving your vehicle, be sure to
When driving your vehicle, be sure to
When driving your vehicle, be sure to
keep the volume of the unit set low
keep the volume of the unit set low keep the volume of the unit set low
keep the volume of the unit set low
keep the volume of the unit set low
enough to allow you to hear sounds com-
enough to allow you to hear sounds com- enough to allow you to hear sounds com-
enough to allow you to hear sounds com-
enough to allow you to hear sounds com-
ing from the outside.
ing from the outside. ing from the outside.
ing from the outside.
ing from the outside.
oo
oo
o Do not expose this equipment (including
Do not expose this equipment (including Do not expose this equipment (including
Do not expose this equipment (including
Do not expose this equipment (including
the speakers and tape) to water or exces-
the speakers and tape) to water or exces- the speakers and tape) to water or exces-
the speakers and tape) to water or exces-
the speakers and tape) to water or exces-
sive moisture.
sive moisture. sive moisture.
sive moisture.
sive moisture.
CLASSIC
� JAZZ � ROCK � DEFEAT
�
6.6.
6.6.
6.
CD EJECT Button
CD EJECT Button CD EJECT Button
CD EJECT Button
CD EJECT Button
When the button is pressed with the CD
loaded, the CD is ejected.
7.7.
7.7.
7. SCAN Button (If installed)
SCAN Button (If installed) SCAN Button (If installed)
SCAN Button (If installed)
SCAN Button (If installed)
o Press the SCAN button to playback the first 10 seconds of each track.
o Press the SCAN button again within 10 sec. for the desired track.
Page 94 of 173
 2003 Owners Manual 2-55
INSTRUMENTS & CONTROLS
INSTRUMENTS & CONTROLS INSTRUMENTS & CONTROLS
INSTRUMENTS & CONTROLS
INSTRUMENTS & CONTROLS
B890A01P-AAT AUDIO FAULT CODE
AUDIO FAULT CODE AUDIO FAULT CODE
AUDIO FAULT CO")
2-55
INSTRUMENTS & CONTROLS
INSTRUMENTS & CONTROLS INSTRUMENTS & CONTROLS
INSTRUMENTS & CONTROLS
INSTRUMENTS & CONTROLS
B890A01P-AAT AUDIO FAULT CODE
AUDIO FAULT CODE AUDIO FAULT CODE
AUDIO FAULT CODE
AUDIO FAULT CODE
If you see any error indication in the display while using the CD or Tape mode, find the cause in the chart below. If you cannot clear the error indication,
take the car to your Hyundai dealer.
INDICATION CAUSE SOLUTION
Er2 Er3 Er6 Er8 HHH CDP DECK MECHANICAL ERROR (EJECT ERROR, LOADING ERROR) FOCUS ERROR DATA READ ERROR DISC ERROR TAPE DECK ERROR TAPE EJECT ERROR TEMPERATURE IS TOO HIGH After resetting the audio, push the eject button. If disc is not ejected, consult your hyundai dealer. Make sure the disc is not scratched or damaged.
Press the eject button and pull out the disc. Then insert a normal CD disc.
Check if the disc is inserted correctly in the CD player. Make sure the disc is
not scratched or damaged.
After resetting the audio, push the eject button. If tape is not ejected, consult your hyundai dealer. Fault code will reset automatically when the temperature returns to
normal.
Page 95 of 173
 2003 Owners Manual INSTRUMENTS & CONTROLS
INSTRUMENTS & CONTROLS INSTRUMENTS & CONTROLS
INSTRUMENTS & CONTROLS
INSTRUMENTS & CONTROLS
2-56 B850A01F-AAT
CARE OF DISC
CARE OF DISC CARE OF DISC
CARE OF DISC
CARE OF DISC
Pr")
INSTRUMENTS & CONTROLS
INSTRUMENTS & CONTROLS INSTRUMENTS & CONTROLS
INSTRUMENTS & CONTROLS
INSTRUMENTS & CONTROLS
2-56 B850A01F-AAT
CARE OF DISC
CARE OF DISC CARE OF DISC
CARE OF DISC
CARE OF DISC
Proper Handling
Proper Handling Proper Handling
Proper Handling
Proper Handling Storage
Storage Storage
Storage
Storage
When not in use, place your discs in their individual case and store them in a cool placeaway from the sun, heat, and dust. Do not grip or pull out the disc with your hand
while the disc is being pulled into the unit by theSelf Loading mechanism.Do not pull the unit from the dash immediately
after a disc is inserted or the Eject Switch hasbeen pressed. If the unit is pulled out before an operation is completed, the disc will be unstable
in the unit and may be damaged. Do not at-tempt to insert a disc into the unit when the unit
is out of the dash or the power is off.
Keep Your Discs Clean
Keep Your Discs Clean Keep Your Discs Clean
Keep Your Discs Clean
Keep Your Discs Clean B860A01A-AAT
CARE OF CASSETTE TAPES
CARE OF CASSETTE TAPES CARE OF CASSETTE TAPES
CARE OF CASSETTE TAPES
CARE OF CASSETTE TAPES
Handle your disc as shown. Do not drop the
disc. Hold the disc so you will not leave finger-prints on the surface. If the surface is scratched,
it may cause the pickup to skip signal tracks.
Do not affix tape, paper, or gummed labels onthe disc. Do not write on the disc.
Damaged Disc
Damaged Disc Damaged Disc
Damaged Disc
Damaged Disc
Do not attempt to play damaged, warped or
cracked discs. It could severely damage theplayback mechanism. Proper care of your cassette tapes will extendthe tape life and increase your listening enjoy-ment. Always protect your tapes and cassettecases from direct sunlight, severely cold and
dusty conditions. When not in use, cassettesshould always be stored in the protective cas-sette case in which they were originally sup-plied. When the vehicle is very hot or cold,allow the interior temperature to become more
comfortable before listening to your cassettes.
o Never leave a cassette inserted in the play- er when not being played. This could dam-age the tape player unit and the cassettetape.
o We strongly recommend against the use of tapes longer than C-60 (60 minutes total).Tapes such as C-120 or C-180 are very thin
and do not perform as well in the automotiveenvironment.
Fingerprints, dust, or soil on the surface could
cause the pickup to skip signal tracks. Wipe thesurface clean with a clean soft cloth. If thesurface is heavily soiled, dampen a clean softcloth in a solution of mild neutral detergent towipe it clean. See drawing.
B850A01L
B850A02L
B860A01L
Page 96 of 173
 2003 Owners Manual 2-57
INSTRUMENTS & CONTROLS
INSTRUMENTS & CONTROLS INSTRUMENTS & CONTROLS
INSTRUMENTS & CONTROLS
INSTRUMENTS & CONTROLS
o Be sure that the cassette label is not loose
or peeling off or tape ejection")
2-57
INSTRUMENTS & CONTROLS
INSTRUMENTS & CONTROLS INSTRUMENTS & CONTROLS
INSTRUMENTS & CONTROLS
INSTRUMENTS & CONTROLS
o Be sure that the cassette label is not loose
or peeling off or tape ejection may be diffi- cult.
o Never touch or soil the actual audio tape surfaces.
o Keep all magnetized objects, such as elec- tric motors, speakers or transformers awayfrom your cassette tapes and tape playerunit.
o Store cassettes in a cool, dry place with the open side facing down to prevent dust fromsettling in the cassette body.
o Avoid repeated fast reverse usage to replay one given tune or tape section. This cancause poor tape winding to occur, and even-tually cause excessive internal drag and pooraudio quality in the cassette. If this occurs, itcan sometimes be corrected by fast windingthe tape from end to end several times. If thisdoes not correct the problem, do not continueto use the tape in your vehicle. o The playback head, capstan and pinch roll-
ers will develop a coating of tape residuethat can result in deterioration of soundquality, such as a wavering sound. Theyshould be cleaned monthly using a commer-cially available head cleaning tape or spe-
cial solution available from audio specialtyshops. Follow the supplier's directions care-
fully and never oil any part of the tape playerunit.
o Always be sure that the tape is tightly wound on its reel before inserting in the player.
Rotate a pencil in the drive sprockets to
wind up any slack.
FUAR053B
Head
Cotton applicator
B860A01P
NOTE:
NOTE: NOTE:
NOTE:
NOTE:
Look at a tape before you insert it. If the tape
Look at a tape before you insert it. If the tape Look at a tape before you insert it. If the tape
Look at a tape before you insert it. If the tape
Look at a tape before you insert it. If the tape is loose, tighten
is loose, tighten is loose, tighten
is loose, tighten
is loose, tighten it by turning one of the
it by turning one of the it by turning one of the
it by turning one of the
it by turning one of the
hubs with a pencil or your finger. If the label
hubs with a pencil or your finger. If the label hubs with a pencil or your finger. If the label
hubs with a pencil or your finger. If the label
hubs with a pencil or your finger. If the label
is is
is is
is peeling off, do not put it in the drive
peeling off, do not put it in the drive peeling off, do not put it in the drive
peeling off, do not put it in the drive
peeling off, do not put it in the drive
mechanism when you try to eject it.
mechanism when you try to eject it. mechanism when you try to eject it.
mechanism when you try to eject it.
mechanism when you try to eject it.
Do not leave tape sitting where they are
Do not leave tape sitting where they are Do not leave tape sitting where they are
Do not leave tape sitting where they are
Do not leave tape sitting where they areexposed to hot warm or, high humidity,
exposed to hot warm or, high humidity, exposed to hot warm or, high humidity,
exposed to hot warm or, high humidity,
exposed to hot warm or, high humidity,
such as on top of the dashboard or in the
such as on top of the dashboard or in the such as on top of the dashboard or in the
such as on top of the dashboard or in the
such as on top of the dashboard or in the
player. If a tape is exposed to
player. If a tape is exposed to player. If a tape is exposed to
player. If a tape is exposed to
player. If a tape is exposed to extreme heat
extreme heat extreme heat
extreme heat
extreme heat
or cold, let it reach a moderate temperature
or cold, let it reach a moderate temperature or cold, let it reach a moderate temperature
or cold, let it reach a moderate temperature
or cold, let it reach a moderate temperature
before putting it
before putting it before putting it
before putting it
before putting it in the player.
in the player. in the player.
in the player.
in the player.
B860A02L
 1
1 2
2 3
3 4
4 5
5 6
6 7
7 8
8 9
9 10
10 11
11 12
12 13
13 14
14 15
15 16
16 17
17 18
18 19
19 20
20 21
21 22
22 23
23 24
24 25
25 26
26 27
27 28
28 29
29 30
30 31
31 32
32 33
33 34
34 35
35 36
36 37
37 38
38 39
39 40
40 41
41 42
42 43
43 44
44 45
45 46
46 47
47 48
48 49
49 50
50 51
51 52
52 53
53 54
54 55
55 56
56 57
57 58
58 59
59 60
60 61
61 62
62 63
63 64
64 65
65 66
66 67
67 68
68 69
69 70
70 71
71 72
72 73
73 74
74 75
75 76
76 77
77 78
78 79
79 80
80 81
81 82
82 83
83 84
84 85
85 86
86 87
87 88
88 89
89 90
90 91
91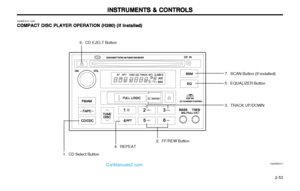 92
92 93
93 94
94 95
95 96
96 97
97 98
98 99
99 100
100 101
101 102
102 103
103 104
104 105
105 106
106 107
107 108
108 109
109 110
110 111
111 112
112 113
113 114
114 115
115 116
116 117
117 118
118 119
119 120
120 121
121 122
122 123
123 124
124 125
125 126
126 127
127 128
128 129
129 130
130 131
131 132
132 133
133 134
134 135
135 136
136 137
137 138
138 139
139 140
140 141
141 142
142 143
143 144
144 145
145 146
146 147
147 148
148 149
149 150
150 151
151 152
152 153
153 154
154 155
155 156
156 157
157 158
158 159
159 160
160 161
161 162
162 163
163 164
164 165
165 166
166 167
167 168
168 169
169 170
170 171
171 172
172 2003 Owners Manual 2-51
INSTRUMENTS & CONTROLS
INSTRUMENTS & CONTROLS INSTRUMENTS & CONTROLS
INSTRUMENTS & CONTROLS
INSTRUMENTS & CONTROLS
H290C01E-GAT CASSETTE TAPE PLAYER OPERATION (H280) (If
CASSETTE TAPE PLAYER O")
 2003 Owners Manual 2-53
INSTRUMENTS & CONTROLS
INSTRUMENTS & CONTROLS INSTRUMENTS & CONTROLS
INSTRUMENTS & CONTROLS
INSTRUMENTS & CONTROLS
H290E01E-GAT COMPACT DISC PLAYER OPERATION (H280) (If
COMPACT DISC PLAYER OPE")