Page 81 of 173
 2003 Owners Manual INSTRUMENTS & CONTROLS
INSTRUMENTS & CONTROLS INSTRUMENTS & CONTROLS
INSTRUMENTS & CONTROLS
INSTRUMENTS & CONTROLS
2-42 3.3.
3.3.
3. BASS Control Knob
BASS Control Knob BASS Control Knob
BASS Control")
INSTRUMENTS & CONTROLS
INSTRUMENTS & CONTROLS INSTRUMENTS & CONTROLS
INSTRUMENTS & CONTROLS
INSTRUMENTS & CONTROLS
2-42 3.3.
3.3.
3. BASS Control Knob
BASS Control Knob BASS Control Knob
BASS Control Knob
BASS Control Knob
Press to pop the knob out and turn to the left or right for the desired bass tone.
TREB (Treble Control) Knob
TREB (Treble Control) Knob TREB (Treble Control) Knob
TREB (Treble Control) Knob
TREB (Treble Control) Knob
Pull the bass control knob further out. Turn tothe left or right for the desired treble tone.
4.4.
4.4.
4.
SCAN Button
SCAN Button SCAN Button
SCAN Button
SCAN Button
When the scan button is pressed, the fre-quency will increase and the receivable sta-tions will be tuned in one after another, receiv-ing each station for 5 seconds. To stop scan-ning, press the scan button again.
5. TUNE (Manual) Select Button
5. TUNE (Manual) Select Button 5. TUNE (Manual) Select Button
5. TUNE (Manual) Select Button
5. TUNE (Manual) Select Button
Press the ( ) side or ( ) side to increase or todecrease the frequency. Press either buttonand hold down to continuously scroll. Releasebutton once the desired station is reached.
SEEK Operation (Automatic Channel
SEEK Operation (Automatic Channel SEEK Operation (Automatic Channel
SEEK Operation (Automatic Channel
SEEK Operation (Automatic Channel
Selection)
Selection) Selection)
Selection)
Selection)
Press the TUNE select button for 0.5 sec ormore, and releasing will automatically tune thenext available station with beep sound. When the ( ) side is pressed longer than 0.5 second and releasing will automatically tunethe next higher frequency and when the ( )side is pressed longer than 0.5 second andreleasing will automatically tune the next lowerfrequency. 6. BAND Selector
6. BAND Selector 6. BAND Selector
6. BAND Selector
6. BAND Selector
Pressing the button changes the AM, FM1and FM2 bands. The mode selected is dis-played on LCD.
7. PRESET STATION SELECT Button
7. PRESET STATION SELECT Button 7. PRESET STATION SELECT Button
7. PRESET STATION SELECT Button
7. PRESET STATION SELECT Button
Six (6) stations for AM, FM or FM2 respectivelycan be preset in the electronic memory circuiton this unit.
HOW TO PRESET STATIONS
HOW TO PRESET STATIONS HOW TO PRESET STATIONS
HOW TO PRESET STATIONS
HOW TO PRESET STATIONS
Six AM and twelve FM stations may be pro-grammed into the memory of the radio. Then,by simply pressing the band select button and/or one of the six station select buttons, you mayrecall any of these stations instantly. To pro-gram the stations, follow these steps:
o Press band selector to set the band for AM, FM or FM2.
o Select the desired station to be stored by seek, scan or manual tuning.
o Determine the preset station select button you wish to use to access that station.
o Press the station select button for more than two seconds. A select button indicator willshow in the display indicating which selectbutton you have depressed. The frequencydisplay will flash after it has been stored intothe memory.
H260B02E-AAT
1.1.
1.1.
1. POWER ON-OFF Control Knob
POWER ON-OFF Control Knob POWER ON-OFF Control Knob
POWER ON-OFF Control Knob
POWER ON-OFF Control Knob
The radio unit may be operated when the igni-
tion key is in the "ACC" or "ON" position. Pressthe knob to switch the power on. The LCDshows the radio frequency in the radio mode orthe CD track indicator in either the CD mode orCD AUTO CHANGER mode. To switch thepower off, press the knob again.
VOLUME Control
VOLUME Control VOLUME Control
VOLUME Control
VOLUME Control
Rotate the knob clockwise to increase the vol-
ume and turn the knob counterclockwise toreduce the volume.
BALANCE Control
BALANCE Control BALANCE Control
BALANCE Control
BALANCE Control
Pull and turn the control knob clockwise to
emphasize right speaker sound (Left speakersound will be attenuated). When the controlknob is turned counterclockwise, left speakersound will be emphasized. (Right speaker soundwill be attenuated)
2. FAD (Fader Control) Knob
2. FAD (Fader Control) Knob 2. FAD (Fader Control) Knob
2. FAD (Fader Control) Knob
2. FAD (Fader Control) Knob
Turn the control knob counterclockwise to em-
phasize front speaker sound. (Rear speakersound will be attenuated) When the controlknob is turned clockwise, rear speaker soundwill be emphasized. (Front speaker sound willbe attenuated)
FM/AM
Page 82 of 173
2-43
INSTRUMENTS & CONTROLS
INSTRUMENTS & CONTROLS INSTRUMENTS & CONTROLS
INSTRUMENTS & CONTROLS
INSTRUMENTS & CONTROLS
You should then release the button, and proceed to program the next desired station.A total of 18 stations can be programmed byselecting one AM and two FM stations perbutton.
o When completed, any preset station may be recalled by selecting AM, FM or FM2 bandand the appropriate station button.
Page 83 of 173
INSTRUMENTS & CONTROLS
INSTRUMENTS & CONTROLS INSTRUMENTS & CONTROLS
INSTRUMENTS & CONTROLS
INSTRUMENTS & CONTROLS
2-44
H260B01O-AAT COMPACT DISC PLAYER OPERATION (H260) (If
COMPACT DISC PLAYER OPERATION (H260) (If COMPACT DISC PLAYER OPERATION (H260) (If
COMPACT DISC PLAYER OPERATION (H260) (If
COMPACT DISC PLAYER OPERATION (H260) (If II
II
I nstalled)
nstalled) nstalled)
nstalled)
nstalled)
H260A01O
1.Playing CD
2. FF/REW Button
3. TRACK UP/DOWN
4. SCAN Button
5. REPEAT Button
6. EJECT Button
Page 84 of 173
 2003 Owners Manual 2-45
INSTRUMENTS & CONTROLS
INSTRUMENTS & CONTROLS INSTRUMENTS & CONTROLS
INSTRUMENTS & CONTROLS
INSTRUMENTS & CONTROLS
B260D01O-AAT 1.1.
1.1.
1. Playing CD
Playing CD Playing CD
Playing CD
Playing")
2-45
INSTRUMENTS & CONTROLS
INSTRUMENTS & CONTROLS INSTRUMENTS & CONTROLS
INSTRUMENTS & CONTROLS
INSTRUMENTS & CONTROLS
B260D01O-AAT 1.1.
1.1.
1. Playing CD
Playing CD Playing CD
Playing CD
Playing CD
o Insert the CD with the label facing upward.
o Insert the CD to start CD playback, during radio operation.
o When a disc is in the CD deck, if you press the play button, the CD player will begin playing even if the radio is being used.
o The CD player can be used when the igni- tion switch is in either the "ON" or "ACC"position.
2.2.
2.2.
2. FF/REW ( / )
FF/REW ( / ) FF/REW ( / )
FF/REW ( / )
FF/REW ( / )
If you want to fast forward or reverse through
the compact disc track, push and hold in the FF( ) or REW ( ) button.
When you release the button, the compact disc
player will resume playing.
3.3.
3.3.
3.
TRACK UP/DOWN
TRACK UP/DOWN TRACK UP/DOWN
TRACK UP/DOWN
TRACK UP/DOWN
o The desired track on the disc currently be- ing played can be selected using the tracknumber.
o Press once to skip forward to the beginn- ing of the next track. Press once to skipback to the beginning of the track.
4.4.
4.4.
4. SCAN Button
SCAN Button SCAN Button
SCAN Button
SCAN Button
o Press the SCAN button to playback the first 10 seconds of each track.
o Press the SCAN button again within 10 sec. for the desired track. 5.5.
5.5.
5. REPEAT Button
REPEAT Button REPEAT Button
REPEAT Button
REPEAT Button
o To repeat the music you are listening to, press the RPT button. To cancel , pressagain.
o If you do not release RPT operation, when the track ends, it will automatically be re-played.This process will be continued until youpush the button again.
6.6.
6.6.
6.
EJECT Button
EJECT Button EJECT Button
EJECT Button
EJECT Button
When the EJECT button is pressed with theCD loaded, the CD is ejected. NOTE:
o To assure proper operation of the unit, keep the vehicle interior temperature within a normal range by using thevehicle's air conditioning or heating sys-tem.
o When replacing the fuse, replace it with a fuse having the correct capacity.
o The preset station frequencies are all erased when the car battery is discon-nected. Therefore, all data will have to beset again if this should occur.
o Do not add any oil to the rotating parts. Keep magnets, screwdrivers and othermetallic objects away from the tapemechanism and head.
o This equipment is designed to be used only in a 12 volt DC battery system withnegative ground. o This unit is made of precision parts. Do
not attempt to disassemble or adjust anyparts.
o When driving your vehicle, be sure to keep the volume of the unit set lowenough to allow you to hear sounds com-ing from the outside.
o Do not expose this equipment (including the speakers) to water or excessive mois-ture.
Page 85 of 173
INSTRUMENTS & CONTROLS
INSTRUMENTS & CONTROLS INSTRUMENTS & CONTROLS
INSTRUMENTS & CONTROLS
INSTRUMENTS & CONTROLS
2-46
B260E01E-AAT CD AUTO CHANGER (H260) (If
CD AUTO CHANGER (H260) (If CD AUTO CHANGER (H260) (If
CD AUTO CHANGER (H260) (If
CD AUTO CHANGER (H260) (If II
II
I nstalled)
nstalled) nstalled)
nstalled)
nstalled)
H260A01O
1. CD Select Button
4. FF/REW Button
3. TRACK UP/DOWN
6. SCAN Button
5. REPEAT Button
2. DISC Select Button
Page 86 of 173
 2003 Owners Manual 2-47
INSTRUMENTS & CONTROLS
INSTRUMENTS & CONTROLS INSTRUMENTS & CONTROLS
INSTRUMENTS & CONTROLS
INSTRUMENTS & CONTROLS
B260F01P-AAT
o To use the CD auto changer.
1. Open the sliding lid of the CD a")
2-47
INSTRUMENTS & CONTROLS
INSTRUMENTS & CONTROLS INSTRUMENTS & CONTROLS
INSTRUMENTS & CONTROLS
INSTRUMENTS & CONTROLS
B260F01P-AAT
o To use the CD auto changer.
1. Open the sliding lid of the CD auto chang- er.
2. To eject the compact disc magazine, press the EJECT button located inside the CD auto changer.
3. Insert the discs into the magazine.
4. Push the magazine into the CD auto changer and close the sliding lid.
o The CD auto changer can be used when the ignition switch is in either the "ON" or "ACC" position.
1. CD Select Button
1. CD Select Button 1. CD Select Button
1. CD Select Button
1. CD Select Button
When the CD changer magazine contains discs,
press the "CD" button and the CD changer canbe used even if the radio is being used. TheHyundai CD changer can hold up to eight discs.The disc number will be lit, and the track num-ber, and elapsed time will be displayed.
2. DISC Select Button
2. DISC Select Button 2. DISC Select Button
2. DISC Select Button
2. DISC Select Button
To select the CD you want, push " " to
change the disc number. 3. TRACK UP/DOWN
3. TRACK UP/DOWN 3. TRACK UP/DOWN
3. TRACK UP/DOWN
3. TRACK UP/DOWN
o The desired track on the disc currently be-
ing played can be selected using the track number.
o Press once to skip forward to the begin- ning of the next track. Press once to skipback to the beginning of the track.
4. FF/REW ( / )
4. FF/REW ( / ) 4. FF/REW ( / )
4. FF/REW ( / )
4. FF/REW ( / )
If you want to fast forward or reverse through
the compact disc track, push and hold in the FF( ) or REW ( ) button.
When you release the button, the compact disc
player will resume playing.
5. REPEAT
5. REPEAT 5. REPEAT
5. REPEAT
5. REPEAT
o To repeat the music you are listening to,
press the RPT button. To cancel , press again.
o If you do not release RPT operation when the track ends, it will automatically be re-played. This process will be continued until you push the button again.
6. SCAN Button
6. SCAN Button 6. SCAN Button
6. SCAN Button
6. SCAN Button
o Press the SCAN button to playback the first
10 seconds of each track.
o Press the SCAN button again within 10 sec. for the desired track. NOTE:
o When replacing the fuse, replace it with a fuse having the correct capacity.
o This equipment is designed to be used only in a 12 volt DC battery system with negative ground.
o This unit is made of precision parts. Do not attempt to disassemble or adjust anyparts.
o When driving your vehicle, be sure to keep the volume of the unit set lowenough to allow you to hear sounds com-ing from the outside.
TUNEDISC
Page 87 of 173
INSTRUMENTS & CONTROLS
INSTRUMENTS & CONTROLS INSTRUMENTS & CONTROLS
INSTRUMENTS & CONTROLS
INSTRUMENTS & CONTROLS
2-48 H290A01E-GAT
STEREO RADIO OPERATION (H280) (If
STEREO RADIO OPERATION (H280) (If STEREO RADIO OPERATION (H280) (If
STEREO RADIO OPERATION (H280) (If
STEREO RADIO OPERATION (H280) (If II
II
I nstalled)
nstalled) nstalled)
nstalled)
nstalled)
H290A01O
1. POWER ON/OFF VOLUME Control Knob
8. BEST STATION MEMORY
or SCAN Button (If installed)
5. PRESET Buttons
4. TUNE/SEEK Select Button
6. BAND Select Button 7. EQUALIZER Button
3. TREBLE/FAD Konb
2. BASS/BALANCE Control Knob
Page 88 of 173
 2003 Owners Manual 2-49
INSTRUMENTS & CONTROLS
INSTRUMENTS & CONTROLS INSTRUMENTS & CONTROLS
INSTRUMENTS & CONTROLS
INSTRUMENTS & CONTROLS
H290B01P-GAT 1.1.
1.1.
1. POWER ON-OFF Control Knob
POWER ON-OFF Control Knob")
2-49
INSTRUMENTS & CONTROLS
INSTRUMENTS & CONTROLS INSTRUMENTS & CONTROLS
INSTRUMENTS & CONTROLS
INSTRUMENTS & CONTROLS
H290B01P-GAT 1.1.
1.1.
1. POWER ON-OFF Control Knob
POWER ON-OFF Control Knob POWER ON-OFF Control Knob
POWER ON-OFF Control Knob
POWER ON-OFF Control Knob
The radio unit may be operated when the igni-
tion key is in the "ACC" or "ON" position. Press the button to switch the power on. The displayshows the radio frequency in the radio mode orthe tape direction indicator in the tape mode, orCD track either the CD mode or CD AUTOCHANGER mode. To switch the power off,press the button again.
VOLUME Control
VOLUME Control VOLUME Control
VOLUME Control
VOLUME Control
Rotate the knob clockwise to increase the vol-
ume and turn the knob counterclockwise toreduce the volume.
2.2.
2.2.
2.
BASS/BALANCE Control Knob
BASS/BALANCE Control Knob BASS/BALANCE Control Knob
BASS/BALANCE Control Knob
BASS/BALANCE Control Knob
BASS Control Knob
BASS Control Knob BASS Control Knob
BASS Control Knob
BASS Control Knob
Press to pop the knob out. To increase the
bass, rotate the knob clockwise, while to de-crease the bass, rotate the knob counterclock-wise.
BALANCE Control knob
BALANCE Control knob BALANCE Control knob
BALANCE Control knob
BALANCE Control knob
Further pull the popped-up knob. Rotate the
knob clockwise to emphasize right speakersound. (Left speaker sound will be attenuated)When the control knob is turned counterclock-wise, left speaker sound will be emphasized(Right speaker sound will be attenuated). 3.3.
3.3.
3. TREBLE/FAD Knob
TREBLE/FAD Knob TREBLE/FAD Knob
TREBLE/FAD Knob
TREBLE/FAD Knob
TREBLE Control Knob
TREBLE Control Knob TREBLE Control Knob
TREBLE Control Knob
TREBLE Control Knob
Press to pop the knob out and turn to the left or
right for the desired treble tone.
FAD (Fader Control) Knob (Minibus
FAD (Fader Control) Knob (Minibus FAD (Fader Control) Knob (Minibus
FAD (Fader Control) Knob (Minibus
FAD (Fader Control) Knob (Minibus
only)
only) only)
only)
only)
Further pull the popped-up knob. Turn the con-
trol knob counterclockwise to emphasize frontspeaker sound. (Rear speaker sound will beattenuated) When the control knob is turnedclockwise, rear speaker sound will be empha-sized. (Front speaker sound will be attenuated)
4.4.
4.4.
4.
TUNE (Manual) Select Button
TUNE (Manual) Select Button TUNE (Manual) Select Button
TUNE (Manual) Select Button
TUNE (Manual) Select Button
Press the ( ) side or ( ) side to increase or to
decrease the frequency. With the button helddown for 0.5 sec. or more, the stop signal(broadcasting radio wave) is ignored and chan-nel selection continues.
SEEK Operation (Automatic Channel
SEEK Operation (Automatic Channel SEEK Operation (Automatic Channel
SEEK Operation (Automatic Channel
SEEK Operation (Automatic Channel
Selection)
Selection) Selection)
Selection)
Selection)
Press the TUNE select button for 1 sec or
more, and releasing will automatically tune thenext available station with beep sound. When the ( ) side is pressed longer than 1
second and releasing will automatically tunethe next higher frequency and when the ( )side is pressed longer than 1 second and re-leasing will automatically tune the next lowerfrequency. 5.5.
5.5.
5. PRESET STATION Select Buttons
PRESET STATION Select Buttons PRESET STATION Select Buttons
PRESET STATION Select Buttons
PRESET STATION Select Buttons
Six (6) stations for AM, FM and FM2 respec-
tively can be preset in the electronic memorycircuit.
HOW TO PRESET STATIONS
HOW TO PRESET STATIONS HOW TO PRESET STATIONS
HOW TO PRESET STATIONS
HOW TO PRESET STATIONS
Six AM and twelve FM stations may be pro-
grammed into the memory of the radio. Then,by simply pressing the band select button and/or one of the six station select buttons, you mayrecall any of these stations instantly. To pro-gram the stations, follow these steps:
o Press band selector to set the band for AM, FM and FM2.
o Select the desired station to be stored by seek or manual tuning.
o Determine the preset station select button you wish to use to access that station.
o Press the station select button for more than two seconds. A select button indicator will show in the display indicating which selectbutton you have depressed. The frequencydisplay will flash after it has been stored intothe memory with beep sound. You shouldthen release the button, and proceed toprogram the next desired station. A total of18 stations can be programmed by selectingone AM and two FM station per button.
o When completed, any preset station may be recalled by selecting AM, FM or FM2 bandand the appropriate station button.
 1
1 2
2 3
3 4
4 5
5 6
6 7
7 8
8 9
9 10
10 11
11 12
12 13
13 14
14 15
15 16
16 17
17 18
18 19
19 20
20 21
21 22
22 23
23 24
24 25
25 26
26 27
27 28
28 29
29 30
30 31
31 32
32 33
33 34
34 35
35 36
36 37
37 38
38 39
39 40
40 41
41 42
42 43
43 44
44 45
45 46
46 47
47 48
48 49
49 50
50 51
51 52
52 53
53 54
54 55
55 56
56 57
57 58
58 59
59 60
60 61
61 62
62 63
63 64
64 65
65 66
66 67
67 68
68 69
69 70
70 71
71 72
72 73
73 74
74 75
75 76
76 77
77 78
78 79
79 80
80 81
81 82
82 83
83 84
84 85
85 86
86 87
87 88
88 89
89 90
90 91
91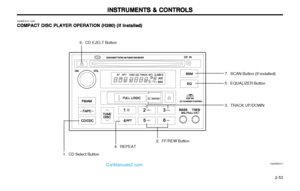 92
92 93
93 94
94 95
95 96
96 97
97 98
98 99
99 100
100 101
101 102
102 103
103 104
104 105
105 106
106 107
107 108
108 109
109 110
110 111
111 112
112 113
113 114
114 115
115 116
116 117
117 118
118 119
119 120
120 121
121 122
122 123
123 124
124 125
125 126
126 127
127 128
128 129
129 130
130 131
131 132
132 133
133 134
134 135
135 136
136 137
137 138
138 139
139 140
140 141
141 142
142 143
143 144
144 145
145 146
146 147
147 148
148 149
149 150
150 151
151 152
152 153
153 154
154 155
155 156
156 157
157 158
158 159
159 160
160 161
161 162
162 163
163 164
164 165
165 166
166 167
167 168
168 169
169 170
170 171
171 172
172 2003 Owners Manual 2-43
INSTRUMENTS & CONTROLS
INSTRUMENTS & CONTROLS INSTRUMENTS & CONTROLS
INSTRUMENTS & CONTROLS
INSTRUMENTS & CONTROLS
You should then release the button, and proceed to program the next desired st")
 2003 Owners Manual INSTRUMENTS & CONTROLS
INSTRUMENTS & CONTROLS INSTRUMENTS & CONTROLS
INSTRUMENTS & CONTROLS
INSTRUMENTS & CONTROLS
2-44
H260B01O-AAT COMPACT DISC PLAYER OPERATION (H260) (If
COMPACT DISC PLAYER OPERA")
 2003 Owners Manual INSTRUMENTS & CONTROLS
INSTRUMENTS & CONTROLS INSTRUMENTS & CONTROLS
INSTRUMENTS & CONTROLS
INSTRUMENTS & CONTROLS
2-46
B260E01E-AAT CD AUTO CHANGER (H260) (If
CD AUTO CHANGER (H260) (If CD AUTO CHA")
 2003 Owners Manual INSTRUMENTS & CONTROLS
INSTRUMENTS & CONTROLS INSTRUMENTS & CONTROLS
INSTRUMENTS & CONTROLS
INSTRUMENTS & CONTROLS
2-48 H290A01E-GAT
STEREO RADIO OPERATION (H280) (If
STEREO RADIO OPERATION (H280) (I")