Page 113 of 173
 2003 Owners Manual STARTING & OPERATING
STARTING & OPERATING STARTING & OPERATING
STARTING & OPERATING
STARTING & OPERATING
3-16 D180H01P-GAT
Parking brake
Parking brake Parking brake
Parking brake
Parking brake
If the")
STARTING & OPERATING
STARTING & OPERATING STARTING & OPERATING
STARTING & OPERATING
STARTING & OPERATING
3-16 D180H01P-GAT
Parking brake
Parking brake Parking brake
Parking brake
Parking brake
If the atmospheric temperature is below freez- ing, park the vehicle with the gearshift lever in1st or reverse and do not engage the parkingbrake. If the parking brake is engaged and thereis moisture on the brake linings, the liningscould become frozen to the brake drums, mak-ing it impossible to release the parking brake.
C160G02A-AAT
To Keep Locks from Freezing
To Keep Locks from Freezing To Keep Locks from Freezing
To Keep Locks from Freezing
To Keep Locks from Freezing
To keep the locks from freezing, squirt anapproved de-icer fluid or glycerine into the keyopening. If a lock is covered with ice, squirt itwith an approved de-icing fluid to remove theice. If the lock is frozen internally, you may beable to thaw it out by using a heated key.Handle the heated key with care to avoid burn-ing your fingers.
NOTE:
NOTE: NOTE:
NOTE:
NOTE:
The proper temperature for using the immo-
The proper temperature for using the immo- The proper temperature for using the immo-
The proper temperature for using the immo-
The proper temperature for using the immo-
bilizer key is from -40°C to 80°C. If you heat
bilizer key is from -40°C to 80°C. If you heat bilizer key is from -40°C to 80°C. If you heat
bilizer key is from -40°C to 80°C. If you heat
bilizer key is from -40°C to 80°C. If you heat
the immobilizer key over 80°C to open the
the immobilizer key over 80°C to open the the immobilizer key over 80°C to open the
the immobilizer key over 80°C to open the
the immobilizer key over 80°C to open the
frozen lock, it may cause damage to the
frozen lock, it may cause damage to the frozen lock, it may cause damage to the
frozen lock, it may cause damage to the
frozen lock, it may cause damage to the
transponder in its head.
transponder in its head. transponder in its head.
transponder in its head.
transponder in its head. D180G01P-GAT
Door locks
Door locks Door locks
Door locks
Door locks
To prevent the door locks from freezing up, the lock cylinders should be masked with tape,etc., when washing the vehicle in cold weatherto prevent the entrance of water.
D180E01P-GAT
Wiper blades
Wiper blades Wiper blades
Wiper blades
Wiper blades
Before operating the wipers, check the wiperblades to confirm that they are not frozen to thewindshield or tailgate. If the blades are frozen tothe windshield or tailgate, do not operate thewipers until the ice has melted and the bladesare freed. D180F01P-GAT
Ventilation slots
Ventilation slots Ventilation slots
Ventilation slots
Ventilation slots
The ventilation slots in the headlight housing on the assistant seat side should be brushed clearafter a heavy snowfall so that the operation ofthe heating and ventilation systems will not beimpaired.
anyway, will only deliver a fraction of the startercurrent which is normally available. It is recommended that you have the battery checked by an authorized HYUNDAI dealerbefore the start of cold weather and, if neces-sary, have it charged. This not only ensures reliable starting, but a battery which is kept fully charged also has alonger life. D180D01P-GAT
Washer fluid
Washer fluid Washer fluid
Washer fluid
Washer fluid
To ensure proper operation of the windshield or rear window at low temperatures, anti-freezeshould be added to the washer fluid at a rate ofone part antifreeze to one part water.
D180A01P-GAT
DURING COLD WEATHER
DURING COLD WEATHER DURING COLD WEATHER
DURING COLD WEATHER
DURING COLD WEATHER
Engine oil
Engine oil Engine oil
Engine oil
Engine oil
The engine oil can become very thick at low
temperatures, thus making it difficult to start theengine.
Change to a thinner oil designed for winter use
before the start of cold weather; for the appro-priate oil viscosity, refer to the "Consumer Infor-mation" section.
D180B01P-GATEngine coolant
Engine coolant Engine coolant
Engine coolant
Engine coolant
If the temperature in your area drops below
freezing, there is the danger that the coolant inthe engine or radiator could freeze and causesevere damage to the engine and/or radiator. Be sure to add a sufficient amount of antifreeze
to the coolant to prevent it from freezing.
The engine coolant mixture used at the factory
is intended to be left in the cooling system andprovides protection against freezing for tem-perature as low as approximately -30°C (-20°F).The concentration should be checked beforethe start of cold weather and anti-freeze addedto the system if necessary
D180C01P-GATBattery
Battery Battery
Battery
Battery
The capacity of the battery is reduced at low
temperatutes.
This is an inevitable result of its chemical and
physical properties. This is why a very coldbattery, particularly one that is not fully charged
Page 114 of 173
 2003 Owners Manual 3-17
STARTING & OPERATING
STARTING & OPERATING STARTING & OPERATING
STARTING & OPERATING
STARTING & OPERATING
D180L01P-GAT Tire chains
Tire chains Tire chains
Tire chains
Tire chains
If tire chains")
3-17
STARTING & OPERATING
STARTING & OPERATING STARTING & OPERATING
STARTING & OPERATING
STARTING & OPERATING
D180L01P-GAT Tire chains
Tire chains Tire chains
Tire chains
Tire chains
If tire chains are to be used, be sure that they
are mounted on the rear wheels.
Use only tire chains which are designed for use
with the tires mounted on the vehicle; use of the incorrect size or type of chain could result indamage to the vehicle body.
Before driving over long stretches of road which
are free of snow, you should remove the chainsto avoid damage to the tires.
NOTE:
NOTE: NOTE:
NOTE:
NOTE:
The laws and regulations concerning tire
The laws and regulations concerning tire The laws and regulations concerning tire
The laws and regulations concerning tire
The laws and regulations concerning tire chains vary. Find out and follow the laws
chains vary. Find out and follow the laws chains vary. Find out and follow the laws
chains vary. Find out and follow the laws
chains vary. Find out and follow the laws
and regulations in your area.
and regulations in your area. and regulations in your area.
and regulations in your area.
and regulations in your area.
When parking on a steep slope, turn the front
wheels in towards the kerb and chock the wheels.
D180I01P-GATWashing the vehicle
Washing the vehicle Washing the vehicle
Washing the vehicle
Washing the vehicle
The salt and other chemicals spread on winter
roads in some areas can have a detrimentaleffect on a vehicle body. You should thereforewash the vehicle as often as convenient inaccordance with our care-instruction. Have apreservative applied and the underfloor protec-tion checked at an authorized HYUNDAI dealerbefore and after the cold weather season. D180M02P-GAT
ADDITIONAL EQUIPMENT
ADDITIONAL EQUIPMENT ADDITIONAL EQUIPMENT
ADDITIONAL EQUIPMENT
ADDITIONAL EQUIPMENT
It is a good idea to carry a shovel or a short-handled spade in the vehicle during the winterso that you can clear away snow if you getstuck. A small hand-brush for sweeping snowoff the windscreen and rear window is alsouseful.
HAI3001
CAUTION:(If installed)
CAUTION:(If installed) CAUTION:(If installed)
CAUTION:(If installed)
CAUTION:(If installed)
White smoke may arise from the fuel fired
White smoke may arise from the fuel fired White smoke may arise from the fuel fired
White smoke may arise from the fuel fired
White smoke may arise from the fuel fired
heater outlet in the driver's front wheel hous-
heater outlet in the driver's front wheel hous- heater outlet in the driver's front wheel hous-
heater outlet in the driver's front wheel hous-
heater outlet in the driver's front wheel hous-
ing during winter driving. This is a normal
ing during winter driving. This is a normal ing during winter driving. This is a normal
ing during winter driving. This is a normal
ing during winter driving. This is a normal
condition.
condition. condition.
condition.
condition.
But, If a black (or gray) smoke is generated
But, If a black (or gray) smoke is generated But, If a black (or gray) smoke is generated
But, If a black (or gray) smoke is generated
But, If a black (or gray) smoke is generated
heavily, have the fuel fired heater checked
heavily, have the fuel fired heater checked heavily, have the fuel fired heater checked
heavily, have the fuel fired heater checked
heavily, have the fuel fired heater checked
by your Hyundai dealer.
by your Hyundai dealer. by your Hyundai dealer.
by your Hyundai dealer.
by your Hyundai dealer.
If the engine stops while the fuel fired heater
If the engine stops while the fuel fired heater If the engine stops while the fuel fired heater
If the engine stops while the fuel fired heater
If the engine stops while the fuel fired heater
is operating, whizzing noise may be heard
is operating, whizzing noise may be heard is operating, whizzing noise may be heard
is operating, whizzing noise may be heard
is operating, whizzing noise may be heard
from the lower of the battery in the engine
from the lower of the battery in the engine from the lower of the battery in the engine
from the lower of the battery in the engine
from the lower of the battery in the engine
compartment.
compartment. compartment.
compartment.
compartment.
NOTE:
NOTE: NOTE:
NOTE:
NOTE:
The laws and regulations concerning snow
The laws and regulations concerning snow The laws and regulations concerning snow
The laws and regulations concerning snow
The laws and regulations concerning snow tires (driving speed, required use, type, etc.)
tires (driving speed, required use, type, etc.) tires (driving speed, required use, type, etc.)
tires (driving speed, required use, type, etc.)
tires (driving speed, required use, type, etc.)
vary. Find out and follow the laws and reg-
vary. Find out and follow the laws and reg- vary. Find out and follow the laws and reg-
vary. Find out and follow the laws and reg-
vary. Find out and follow the laws and reg-
ulations in your area.
ulations in your area. ulations in your area.
ulations in your area.
ulations in your area.
D180K01P-GAT Snow tires
Snow tires Snow tires
Snow tires
Snow tires
The use of snow tires is recommended for
driving in snow and ice. To preserve driving stability, mount snow tires of the same size andtread pattern on all four wheels.
Snow tires worn more than 50% are no longer
suitable for use as snow tires.
Snow tires which do not meet specifications
must not be used. D180J01P-GAT
Weather strip
Weather strip Weather strip
Weather strip
Weather strip
To prevent freezing of the weather strip on the
doors, the roof, etc., they should be treated withsilicone grease.
Page 115 of 173
 2003 Owners Manual STARTING & OPERATING
STARTING & OPERATING STARTING & OPERATING
STARTING & OPERATING
STARTING & OPERATING
3-18 (1) Position the vehicle so that one wheel is on
a dry paved surface and the other on ice,")
STARTING & OPERATING
STARTING & OPERATING STARTING & OPERATING
STARTING & OPERATING
STARTING & OPERATING
3-18 (1) Position the vehicle so that one wheel is on
a dry paved surface and the other on ice, snow, mud, etc. Drive the vehicle, and observe the operation of the limited-slip differential. The vehicle should not become stuck if the differential is functioning properly.
(2) Depress the accelerator pedal gradually, and then when traction is good, depress itforcefully. If the vehicle accelerates well, thedifferential is functioning properly.
CAUTION:
CAUTION: CAUTION:
CAUTION:
CAUTION:
(1)(1)
(1)(1)
(1) Never start the engine while one of the
Never start the engine while one of the Never start the engine while one of the
Never start the engine while one of the
Never start the engine while one of the
rear wheels is jacked up and the other in
rear wheels is jacked up and the other in rear wheels is jacked up and the other in
rear wheels is jacked up and the other in
rear wheels is jacked up and the other in
contact with the ground; doing so may
contact with the ground; doing so may contact with the ground; doing so may
contact with the ground; doing so may
contact with the ground; doing so may
cause the vehicle to jump forward.
cause the vehicle to jump forward. cause the vehicle to jump forward.
cause the vehicle to jump forward.
cause the vehicle to jump forward.
(2)(2)
(2)(2)
(2) If one of the rear wheels begins to spin in
If one of the rear wheels begins to spin in If one of the rear wheels begins to spin in
If one of the rear wheels begins to spin in
If one of the rear wheels begins to spin in
mud, snow, etc., the vehicle can some-
mud, snow, etc., the vehicle can some- mud, snow, etc., the vehicle can some-
mud, snow, etc., the vehicle can some-
mud, snow, etc., the vehicle can some-
times be driven out by depressing the
times be driven out by depressing the times be driven out by depressing the
times be driven out by depressing the
times be driven out by depressing the
accelerator pedal further; however, avoid
accelerator pedal further; however, avoid accelerator pedal further; however, avoid
accelerator pedal further; however, avoid
accelerator pedal further; however, avoid
running the engine continuously at high
running the engine continuously at high running the engine continuously at high
running the engine continuously at high
running the engine continuously at high
rpm because doing so could damage the
rpm because doing so could damage the rpm because doing so could damage the
rpm because doing so could damage the
rpm because doing so could damage the
limited-slip differential.
limited-slip differential. limited-slip differential.
limited-slip differential.
limited-slip differential.
D190A02P-GAT
LIMITED-SLIP DIFFERENTIAL
LIMITED-SLIP DIFFERENTIAL LIMITED-SLIP DIFFERENTIAL
LIMITED-SLIP DIFFERENTIAL
LIMITED-SLIP DIFFERENTIAL
(If installed)
(If installed) (If installed)
(If installed)
(If installed) A limited-slip differential, if equipped, is for the
rear wheel differential only. The features of this limited-slip differential are described below:
Just as with a conventional differential, the
wheel on one side is allowed to turn at adifferent speed from the wheel on the other sidewhen the vehicle is cornering. The differencebetween the limited-slip differential and a con-ventional differential is that if the wheel on oneside of the vehicle loses traction, a greateramount of torque is applied to the rear wheel onthe other side to improve traction.
NOTE:
NOTE: NOTE:
NOTE:
NOTE:
In a stationary position, the L.S.D will oper-
In a stationary position, the L.S.D will oper- In a stationary position, the L.S.D will oper-
In a stationary position, the L.S.D will oper-
In a stationary position, the L.S.D will oper- ate when the torque difference between the
ate when the torque difference between the ate when the torque difference between the
ate when the torque difference between the
ate when the torque difference between the
rear right wheel and the left wheel is from
rear right wheel and the left wheel is from rear right wheel and the left wheel is from
rear right wheel and the left wheel is from
rear right wheel and the left wheel is from
5Kgf·m to 9 Kgf·m.
5Kgf·m to 9 Kgf·m. 5Kgf·m to 9 Kgf·m.
5Kgf·m to 9 Kgf·m.
5Kgf·m to 9 Kgf·m.
The following procedures can be used to con-
firm that the limited-slip differential is function- ing properly: This is due to cleaning process for fuel fired
This is due to cleaning process for fuel fired This is due to cleaning process for fuel fired
This is due to cleaning process for fuel fired
This is due to cleaning process for fuel fired
heater and a normal operation.
heater and a normal operation. heater and a normal operation.
heater and a normal operation.
heater and a normal operation.
It will takes about 1- 3 minutes according to
It will takes about 1- 3 minutes according to It will takes about 1- 3 minutes according to
It will takes about 1- 3 minutes according to
It will takes about 1- 3 minutes according to
fuel quantity in the fuel fired heater fuel line.
fuel quantity in the fuel fired heater fuel line. fuel quantity in the fuel fired heater fuel line.
fuel quantity in the fuel fired heater fuel line.
fuel quantity in the fuel fired heater fuel line.
Page 116 of 173
 2003 Owners Manual IN CASE OF EMERGENCY
IN CASE OF EMERGENCY IN CASE OF EMERGENCY
IN CASE OF EMERGENCY
IN CASE OF EMERGENCY
4-1
TruckMinibus/Van
E010C03P-GATTools
Tools Tools
Tools
Tools
E000A01P-GAT
4.4.
4.4.
4. IN C")
IN CASE OF EMERGENCY
IN CASE OF EMERGENCY IN CASE OF EMERGENCY
IN CASE OF EMERGENCY
IN CASE OF EMERGENCY
4-1
TruckMinibus/Van
E010C03P-GATTools
Tools Tools
Tools
Tools
E000A01P-GAT
4.4.
4.4.
4. IN CASE OF
IN CASE OF IN CASE OF
IN CASE OF
IN CASE OF
EMERGENCY
EMERGENCY EMERGENCY
EMERGENCY
EMERGENCY
E010A01P-GAT TOOLS AND JACK
TOOLS AND JACK TOOLS AND JACK
TOOLS AND JACK
TOOLS AND JACK
To provide for cases of emergency, always
remember where the tools and jack are stowed and how the jack is removed for use.
E010B02P-GATStorage places
Storage places Storage places
Storage places
Storage places
The tool box is at the right rear corner of the
luggage compartment. (Minibus, Van) or on thefloor behind the seat (truck).
1. Tools
2. Jack
1
2 To remove
To remove To remove
To remove
To remove
Turn the knob clockwise, and then remove the
lid.
Remove the securing nut, and then take out the
jack.
E010C03P-1
3
4
1. Tool case
2. Screwdriver
3. Wheel nut wrench
4. Spare wheel carrier wrench (Truck only)
E020A01P
E020A01P-GAT
JACK
JACK JACK
JACK
JACK
E010B01P-1
Truck
Minibus/Van
E030A01P-GAT
JACK HANDLE
JACK HANDLE JACK HANDLE
JACK HANDLE
JACK HANDLE
To use the jack handle
To use the jack handle To use the jack handle
To use the jack handle
To use the jack handle
GS40040A
E010B01P-1
TruckMinibus/Van
44
44
4
Page 117 of 173
 2003 Owners Manual IN CASE OF EMERGENCY
IN CASE OF EMERGENCY IN CASE OF EMERGENCY
IN CASE OF EMERGENCY
IN CASE OF EMERGENCY
4-2 E040A02P-GAT
JACKING UP THE VEHICLE
JACKING UP THE VEHICLE JACKING UP THE VEHICLE
JACKING U")
IN CASE OF EMERGENCY
IN CASE OF EMERGENCY IN CASE OF EMERGENCY
IN CASE OF EMERGENCY
IN CASE OF EMERGENCY
4-2 E040A02P-GAT
JACKING UP THE VEHICLE
JACKING UP THE VEHICLE JACKING UP THE VEHICLE
JACKING UP THE VEHICLE
JACKING UP THE VEHICLE
GS40050A
1. Loosen the holding nut and pull out the
handle.
GS40060A
2. Insert the opposite end of the handle, andthen tighten the holding nut.
E040A01P-1
2WD
The method for jacking up the vehicle should be remembered in order to change a tire in theevent of a puncture and in order to install tirechains.
E040A02P-GAG
4WD
After stopping the engine and applying the
parking brake on a flat level surface, also use chocks to hold the wheels.
E040A03P-GAGRR
Position the jack only at the specified points indicated in the illustration, and the use of thejack at other points could damage the vehiclebody.
GS40080A
Jack handleRelief valve
Using the jack handle, turn the relief valve clockwise until it reaches a stop.
The jack handle is stored as shown in thefigure. To assemble, follow the steps below.
Page 118 of 173
 2003 Owners Manual IN CASE OF EMERGENCY
IN CASE OF EMERGENCY IN CASE OF EMERGENCY
IN CASE OF EMERGENCY
IN CASE OF EMERGENCY
4-3
GS40090A
Notch of handle
Pressure piston
Then fit the handle into the pressure piston, an")
IN CASE OF EMERGENCY
IN CASE OF EMERGENCY IN CASE OF EMERGENCY
IN CASE OF EMERGENCY
IN CASE OF EMERGENCY
4-3
GS40090A
Notch of handle
Pressure piston
Then fit the handle into the pressure piston, and
align the groove of the handle with the notch of the holder.
Move the jack handle up and down to raise the
piston.
Using a jack handle, turn the relief valve coun-
terclockwise slowly to lower the piston.
Press the piston down all the way, and turn the
relief valve clockwise as far as possible.
GS40100A
CAUTION:
CAUTION: CAUTION:
CAUTION:
CAUTION:
(1)(1)
(1)(1)
(1)
Use only the jack included with the ve-
Use only the jack included with the ve- Use only the jack included with the ve-
Use only the jack included with the ve-
Use only the jack included with the ve-
hicle and use it only for changing a wheel.
hicle and use it only for changing a wheel. hicle and use it only for changing a wheel.
hicle and use it only for changing a wheel.
hicle and use it only for changing a wheel.
(2)(2)
(2)(2)
(2)
Position the jack on a hard level surface.
Position the jack on a hard level surface. Position the jack on a hard level surface.
Position the jack on a hard level surface.
Position the jack on a hard level surface.
(3)(3)
(3)(3)
(3)
If the relief valve is loosened by turning
If the relief valve is loosened by turning If the relief valve is loosened by turning
If the relief valve is loosened by turning
If the relief valve is loosened by turning
it 2 or more times in the counterclock-
it 2 or more times in the counterclock- it 2 or more times in the counterclock-
it 2 or more times in the counterclock-
it 2 or more times in the counterclock-
wise direction, the jack’s oil will leak and
wise direction, the jack’s oil will leak and wise direction, the jack’s oil will leak and
wise direction, the jack’s oil will leak and
wise direction, the jack’s oil will leak and
the jack cannot be used.
the jack cannot be used. the jack cannot be used.
the jack cannot be used.
the jack cannot be used.
(4)(4)
(4)(4)
(4)
This jack is hydraulic, and the ram is a
This jack is hydraulic, and the ram is a This jack is hydraulic, and the ram is a
This jack is hydraulic, and the ram is a
This jack is hydraulic, and the ram is a
two-stage type. When both rams are
two-stage type. When both rams are two-stage type. When both rams are
two-stage type. When both rams are
two-stage type. When both rams are
raised and the stop mark(Green paint)
raised and the stop mark(Green paint) raised and the stop mark(Green paint)
raised and the stop mark(Green paint)
raised and the stop mark(Green paint)
of the upper ram becomes visible, stop
of the upper ram becomes visible, stop of the upper ram becomes visible, stop
of the upper ram becomes visible, stop
of the upper ram becomes visible, stop
jacking immediately.
jacking immediately. jacking immediately.
jacking immediately.
jacking immediately.
Further extension of the ram may dam-
Further extension of the ram may dam- Further extension of the ram may dam-
Further extension of the ram may dam-
Further extension of the ram may dam-
age the jack.
age the jack. age the jack.
age the jack.
age the jack.
(5)(5)
(5)(5)
(5) When the jack is used, be sure that there
When the jack is used, be sure that there When the jack is used, be sure that there
When the jack is used, be sure that there
When the jack is used, be sure that there
is no one in or under the vehicle.
is no one in or under the vehicle. is no one in or under the vehicle.
is no one in or under the vehicle.
is no one in or under the vehicle. (6)(6)
(6)(6)
(6) When jacking up the vehicle, do so only
When jacking up the vehicle, do so only When jacking up the vehicle, do so only
When jacking up the vehicle, do so only
When jacking up the vehicle, do so only
until the tires are slightly lifted from the
until the tires are slightly lifted from the until the tires are slightly lifted from the
until the tires are slightly lifted from the
until the tires are slightly lifted from the
ground. It is dangerous to jack up the
ground. It is dangerous to jack up the ground. It is dangerous to jack up the
ground. It is dangerous to jack up the
ground. It is dangerous to jack up the
vehicle more than that much.
vehicle more than that much. vehicle more than that much.
vehicle more than that much.
vehicle more than that much.
(7)(7)
(7)(7)
(7) It is very dangerous if the jack somehow
It is very dangerous if the jack somehow It is very dangerous if the jack somehow
It is very dangerous if the jack somehow
It is very dangerous if the jack somehow
slips, so never leave the vehicle in the
slips, so never leave the vehicle in the slips, so never leave the vehicle in the
slips, so never leave the vehicle in the
slips, so never leave the vehicle in the
jacked-up position, and never shake the
jacked-up position, and never shake the jacked-up position, and never shake the
jacked-up position, and never shake the
jacked-up position, and never shake the
vehicle while it is raised.
vehicle while it is raised. vehicle while it is raised.
vehicle while it is raised.
vehicle while it is raised.
E040B01P-GAT To jack up vehicle on 4-wheel drive
To jack up vehicle on 4-wheel drive To jack up vehicle on 4-wheel drive
To jack up vehicle on 4-wheel drive
To jack up vehicle on 4-wheel drive
GS40110A
Do not crank the engine while jacking up the
vehicle.
The tire on the ground may turn and the vehicle
may roll off the jack.
Page 119 of 173
 2003 Owners Manual IN CASE OF EMERGENCY
IN CASE OF EMERGENCY IN CASE OF EMERGENCY
IN CASE OF EMERGENCY
IN CASE OF EMERGENCY
4-4
E050A01P-GAT SPARE WHEEL (If installed)
SPARE WHEEL (If installed) SPARE WHEEL (If installe")
IN CASE OF EMERGENCY
IN CASE OF EMERGENCY IN CASE OF EMERGENCY
IN CASE OF EMERGENCY
IN CASE OF EMERGENCY
4-4
E050A01P-GAT SPARE WHEEL (If installed)
SPARE WHEEL (If installed) SPARE WHEEL (If installed)
SPARE WHEEL (If installed)
SPARE WHEEL (If installed) E050B01P-GAT
To reinstall the spare tire
To reinstall the spare tire To reinstall the spare tire
To reinstall the spare tire
To reinstall the spare tire 1. Set the spare tire on the center of the hanger. 2. Raise the hanger and hook it onto the holder.
CAUTION:
CAUTION: CAUTION:
CAUTION:
CAUTION:
The spare wheel should always be securely
The spare wheel should always be securely The spare wheel should always be securely
The spare wheel should always be securely
The spare wheel should always be securely
in position.
in position. in position.
in position.
in position.
If a flat tire is changed, put the flat tire in the
If a flat tire is changed, put the flat tire in the If a flat tire is changed, put the flat tire in the
If a flat tire is changed, put the flat tire in the
If a flat tire is changed, put the flat tire in the
spare wheel mounting position, and use the
spare wheel mounting position, and use the spare wheel mounting position, and use the
spare wheel mounting position, and use the
spare wheel mounting position, and use the
wheel nut wrench to secure it firmly.
wheel nut wrench to secure it firmly. wheel nut wrench to secure it firmly.
wheel nut wrench to secure it firmly.
wheel nut wrench to secure it firmly. E050C01P-GAT
SPARE WHEEL (TRUCK)
SPARE WHEEL (TRUCK) SPARE WHEEL (TRUCK)
SPARE WHEEL (TRUCK)
SPARE WHEEL (TRUCK)
E050C01P
1. Connect the spare wheel carrier wrench with the wheel nut wrench.
2. Insert the spare wheel carrier wrench into the hole in the spare tire carrier then turn the wheel nut wrench counterclockwise, and thespare tire comes down.
E050C02P
steel wire
hook
tire support
E050A02P
Check the air pressure of the spare tire fre-
quently and make sure it is ready for emer- gency use at any time.
Maintaining the spare wheel at the highest
specified air pressure will ensure that it canalways be used under any conditions (city/-high-speed driving, varying load weight, etc.).
The spare wheel is stored under the floor of the
cargo space.
To remove the spare wheel, follow the proce-
dures described below.
1. Use the wheel nut wrench to loosen the holder mounting bolt.
2. Lift up the hanger and separate it from the holder, and then lower the hanger and re- move the spare tire.
E050B02P
Page 120 of 173
 2003 Owners Manual IN CASE OF EMERGENCY
IN CASE OF EMERGENCY IN CASE OF EMERGENCY
IN CASE OF EMERGENCY
IN CASE OF EMERGENCY
4-5
3. Disconnect the steel wire from the tire sup-port hook after the spare tire comes down")
IN CASE OF EMERGENCY
IN CASE OF EMERGENCY IN CASE OF EMERGENCY
IN CASE OF EMERGENCY
IN CASE OF EMERGENCY
4-5
3. Disconnect the steel wire from the tire sup-port hook after the spare tire comes down completely.
4. To install the spare tire, build the spare tire as following.
E050C03P
E050C04P
5. Connect the steel wire with the support hook. 6. Insert the spare wheel carrier wrench into
the hole in the spare tire carrier then turn the wheel nut wrench clockwise.
7. After the spare tire fully raised, tighten by hand to about 30 kg f (295 N).
Then, remove the spare wheel carrier wrenchwith care not to turn it in the reverse direc-tion. Now, ensure that the tire is secured inposition.
CAUTION:
CAUTION: CAUTION:
CAUTION:
CAUTION:
If you cannot secure the spare tire in posi-
If you cannot secure the spare tire in posi- If you cannot secure the spare tire in posi-
If you cannot secure the spare tire in posi-
If you cannot secure the spare tire in posi- tion, load it on the cargo deck and ask your
tion, load it on the cargo deck and ask your tion, load it on the cargo deck and ask your
tion, load it on the cargo deck and ask your
tion, load it on the cargo deck and ask your
nearest service shop for inspection.
nearest service shop for inspection. nearest service shop for inspection.
nearest service shop for inspection.
nearest service shop for inspection.
E050C05P
rear wheel tire
wheel carrier guide
front wheel tire tire support
hook
tire support
steel wire
E050D01P-GAT
SPARE TIRE ANTI-THEFT DEVICE
SPARE TIRE ANTI-THEFT DEVICE SPARE TIRE ANTI-THEFT DEVICE
SPARE TIRE ANTI-THEFT DEVICE
SPARE TIRE ANTI-THEFT DEVICE
(If installed)
(If installed) (If installed)
(If installed)
(If installed)
FFT903C
Latch plate
Spare wheel carrier mount-ing bracket
This device is designed to protect the spare tire
theft. After fitting the latch plate hole in spare wheel
carrier mounting bracket with a spare wheelcarrier wrench, lock with a key bought person-ally.
 1
1 2
2 3
3 4
4 5
5 6
6 7
7 8
8 9
9 10
10 11
11 12
12 13
13 14
14 15
15 16
16 17
17 18
18 19
19 20
20 21
21 22
22 23
23 24
24 25
25 26
26 27
27 28
28 29
29 30
30 31
31 32
32 33
33 34
34 35
35 36
36 37
37 38
38 39
39 40
40 41
41 42
42 43
43 44
44 45
45 46
46 47
47 48
48 49
49 50
50 51
51 52
52 53
53 54
54 55
55 56
56 57
57 58
58 59
59 60
60 61
61 62
62 63
63 64
64 65
65 66
66 67
67 68
68 69
69 70
70 71
71 72
72 73
73 74
74 75
75 76
76 77
77 78
78 79
79 80
80 81
81 82
82 83
83 84
84 85
85 86
86 87
87 88
88 89
89 90
90 91
91 92
92 93
93 94
94 95
95 96
96 97
97 98
98 99
99 100
100 101
101 102
102 103
103 104
104 105
105 106
106 107
107 108
108 109
109 110
110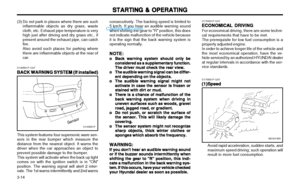 111
111 112
112 113
113 114
114 115
115 116
116 117
117 118
118 119
119 120
120 121
121 122
122 123
123 124
124 125
125 126
126 127
127 128
128 129
129 130
130 131
131 132
132 133
133 134
134 135
135 136
136 137
137 138
138 139
139 140
140 141
141 142
142 143
143 144
144 145
145 146
146 147
147 148
148 149
149 150
150 151
151 152
152 153
153 154
154 155
155 156
156 157
157 158
158 159
159 160
160 161
161 162
162 163
163 164
164 165
165 166
166 167
167 168
168 169
169 170
170 171
171 172
172