Page 97 of 173
 2003 Owners Manual INSTRUMENTS & CONTROLS
INSTRUMENTS & CONTROLS INSTRUMENTS & CONTROLS
INSTRUMENTS & CONTROLS
INSTRUMENTS & CONTROLS
2-58
B870A01A-GAT ANTENNA
ANTENNA ANTENNA
ANTENNA
ANTENNA
Fixed Rod Antenna (If insta")
INSTRUMENTS & CONTROLS
INSTRUMENTS & CONTROLS INSTRUMENTS & CONTROLS
INSTRUMENTS & CONTROLS
INSTRUMENTS & CONTROLS
2-58
B870A01A-GAT ANTENNA
ANTENNA ANTENNA
ANTENNA
ANTENNA
Fixed Rod Antenna (If installed)
Fixed Rod Antenna (If installed) Fixed Rod Antenna (If installed)
Fixed Rod Antenna (If installed)
Fixed Rod Antenna (If installed)
Your car uses a fixed rod antenna to receive
both AM and FM broadcast signals.
This antenna is a removable type. To remove
the antenna, turn the antenna counterclock- wise. To install the antenna, turn the antennaclockwise.
CAUTION:
CAUTION: CAUTION:
CAUTION:
CAUTION:
Be sure to remove the antenna before wash-
Be sure to remove the antenna before wash- Be sure to remove the antenna before wash-
Be sure to remove the antenna before wash-
Be sure to remove the antenna before wash- ing the car in an automatic car wash or the
ing the car in an automatic car wash or the ing the car in an automatic car wash or the
ing the car in an automatic car wash or the
ing the car in an automatic car wash or the
antenna may be damaged.
antenna may be damaged. antenna may be damaged.
antenna may be damaged.
antenna may be damaged. B870B01Y-AAT
Power Antenna (If installed)
Power Antenna (If installed) Power Antenna (If installed)
Power Antenna (If installed)
Power Antenna (If installed)
B870C01A-GAT
Manual Antenna
Manual Antenna Manual Antenna
Manual Antenna
Manual Antenna
B870C01P
Your car uses a manual stainless steel antenna
to receive both AM and FM broadcast signals. Pull up the antenna using your fingers, asshown in the drawing.
NOTE:
NOTE: NOTE:
NOTE:
NOTE:
Before entering an automatic car wash or a
Before entering an automatic car wash or a Before entering an automatic car wash or a
Before entering an automatic car wash or a
Before entering an automatic car wash or a place with a low height clearance, be sure
place with a low height clearance, be sure place with a low height clearance, be sure
place with a low height clearance, be sure
place with a low height clearance, be sure
that the antenna is fully retracted.
that the antenna is fully retracted. that the antenna is fully retracted.
that the antenna is fully retracted.
that the antenna is fully retracted.B870B01P
The antenna will automatically be extended when the radio power switch is turned on whilethe ignition key is in either the "ON" or "ACC"position. The antenna will automatically be re-tracted and stored when either the radio powerswitch is turned off or the ignition key is set tothe "LOCK" position.
NOTE:
NOTE: NOTE:
NOTE:
NOTE:
oo
oo
o Before turning on the radio, make sure
Before turning on the radio, make sure Before turning on the radio, make sure
Before turning on the radio, make sure
Before turning on the radio, make sure
that no one is near the antenna.
that no one is near the antenna. that no one is near the antenna.
that no one is near the antenna.
that no one is near the antenna.
oo
oo
o Before entering an automatic car wash
Before entering an automatic car wash Before entering an automatic car wash
Before entering an automatic car wash
Before entering an automatic car wash
or a place with a low height clearance, be
or a place with a low height clearance, be or a place with a low height clearance, be
or a place with a low height clearance, be
or a place with a low height clearance, be
sure that the antenna is retracted and
sure that the antenna is retracted and sure that the antenna is retracted and
sure that the antenna is retracted and
sure that the antenna is retracted and
stored.
stored. stored.
stored.
stored.
oo
oo
o
If the antenna is dirty, be sure to clean it
If the antenna is dirty, be sure to clean it If the antenna is dirty, be sure to clean it
If the antenna is dirty, be sure to clean it
If the antenna is dirty, be sure to clean it
in order to avoid an operation malfunc-
in order to avoid an operation malfunc- in order to avoid an operation malfunc-
in order to avoid an operation malfunc-
in order to avoid an operation malfunc-
tion.
tion. tion.
tion.
tion.
B870A01F
Page 98 of 173
 2003 Owners Manual 3-1
STARTING & OPERATING
STARTING & OPERATING STARTING & OPERATING
STARTING & OPERATING
STARTING & OPERATING
D010A01P-GAT PRECAUTION FOR EXHAUST FUMES
PRECAUTION FOR EXHAUST FUMES PRECAUTION FOR EXH")
3-1
STARTING & OPERATING
STARTING & OPERATING STARTING & OPERATING
STARTING & OPERATING
STARTING & OPERATING
D010A01P-GAT PRECAUTION FOR EXHAUST FUMES
PRECAUTION FOR EXHAUST FUMES PRECAUTION FOR EXHAUST FUMES
PRECAUTION FOR EXHAUST FUMES
PRECAUTION FOR EXHAUST FUMES
WHILE STARTING AND DRIVING
WHILE STARTING AND DRIVING WHILE STARTING AND DRIVING
WHILE STARTING AND DRIVING
WHILE STARTING AND DRIVING
1. Do not breathe exhaust fumes containing
carbons monoxide when starting or driving. Carbon monoxide is a colorless, odorlessgas and can cause unconsciousness ordeath by asphyxiation.
2. Open all the windows fully and get the back door closed if you smell exhaust fumesinside the vehicle. Have the cause immedi-ately located and corrected.
3. Check the exhaust system, from time to time, for holes or loose connections if youhear a change in the exhaust sound, or ifsomething has hit the exhaust system.
4. Do not race the engine in a garage or enclosed area any longer than it takes tostart the engine and drive the vehicle in orout. The sealed exhaust fume may make aparticularly dangerous situation.
5. Avoid idling the engine for prolonged periods with people inside the car. If it is unavoid-able, however, be sure to do so in an openarea and adjust the heating or cooling sys-tem to force outside into the vehicle. 6. Make sure that the ventilation air intakes
located just in front of the windshield arekept clear of snow, ice, leaves or otherobstructions, to assure proper operation ofthe ventilation system.
7. Get the back door closed while driving. An incompletely closed back door may causeexhaust fumes to be drawn into the vehicle.If you must drive with the back door open toaccommodate a large object, close the win-dows, open the dashboard vents and havethe heating or cooling system deliver freshair into the vehicle by turning the fan to highspeeds with the air intake control lever set inthe "Fresh" position (Minibus, Van). LOCK
LOCK LOCK
LOCK
LOCK ::
::
: The engine stops and the steeringwheel is locked. The key can be in-serted and removed only at this posi-tion.
ACC
ACC ACC
ACC
ACC ::
::
: The engine stops, but the radio, ciga-rette lighter, etc., can be operated.
ONON
ONON
ON
::
::
: The engine is running and all electricalsystems can be operated.
START
START START
START
START ::
::
: The starter motor operates. After theengine has started, release the keyand it will automatically return to the"ON" position.
CAUTION:
CAUTION: CAUTION:
CAUTION:
CAUTION: (1) If the engine is stopped while driving, the
(1) If the engine is stopped while driving, the (1) If the engine is stopped while driving, the
(1) If the engine is stopped while driving, the
(1) If the engine is stopped while driving, the
brake servomechanism will cease to func-
brake servomechanism will cease to func- brake servomechanism will cease to func-
brake servomechanism will cease to func-
brake servomechanism will cease to func-
tion and braking efficiency will deterio-
tion and braking efficiency will deterio- tion and braking efficiency will deterio-
tion and braking efficiency will deterio-
tion and braking efficiency will deterio-
rate.
rate. rate.
rate.
rate.
(2) Do not leave the key at the "ON" position
(2) Do not leave the key at the "ON" position (2) Do not leave the key at the "ON" position
(2) Do not leave the key at the "ON" position
(2) Do not leave the key at the "ON" position
for a long time when the engine is not
for a long time when the engine is not for a long time when the engine is not
for a long time when the engine is not
for a long time when the engine is not
running; doing so will cause the battery
running; doing so will cause the battery running; doing so will cause the battery
running; doing so will cause the battery
running; doing so will cause the battery
to be discharged.
to be discharged. to be discharged.
to be discharged.
to be discharged.
(3)(3)
(3)(3)
(3) Do not turn the key to the "START" posi-
Do not turn the key to the "START" posi- Do not turn the key to the "START" posi-
Do not turn the key to the "START" posi-
Do not turn the key to the "START" posi-
tion when the engine is running; doing
tion when the engine is running; doing tion when the engine is running; doing
tion when the engine is running; doing
tion when the engine is running; doing
so could damage the starter motor.
so could damage the starter motor. so could damage the starter motor.
so could damage the starter motor.
so could damage the starter motor.
D000A01P-GAT
3.3.
3.3.
3. ST
ST ST
ST
ST AR
AR AR
AR
AR TING &
TING & TING &
TING &
TING &
OPERA
OPERA OPERA
OPERA
OPERA TING
TING TING
TING
TING
D020A01P-GATIGNITION SWITCH
IGNITION SWITCH IGNITION SWITCH
IGNITION SWITCH
IGNITION SWITCH
GT30010A
33
33
3
Page 99 of 173
 2003 Owners Manual STARTING & OPERATING
STARTING & OPERATING STARTING & OPERATING
STARTING & OPERATING
STARTING & OPERATING
3-2 3. On vehicles equipped with the diesel pre-
heat indication lamp, turn the ignition key to")
STARTING & OPERATING
STARTING & OPERATING STARTING & OPERATING
STARTING & OPERATING
STARTING & OPERATING
3-2 3. On vehicles equipped with the diesel pre-
heat indication lamp, turn the ignition key to the "ON" position. The diesel-preheat indi-cation lamp will first illuminate in amber, andthen after a short time, the amber illumina-tion will go off, indicating that preheating iscompleted.
NOTE:
NOTE: NOTE:
NOTE:
NOTE:
If the engine were not started 10 seconds
If the engine were not started 10 seconds If the engine were not started 10 seconds
If the engine were not started 10 seconds
If the engine were not started 10 seconds
after the preheating is completed, turn the
after the preheating is completed, turn the after the preheating is completed, turn the
after the preheating is completed, turn the
after the preheating is completed, turn the
ignition key once more to the "LOCK" posi-
ignition key once more to the "LOCK" posi- ignition key once more to the "LOCK" posi-
ignition key once more to the "LOCK" posi-
ignition key once more to the "LOCK" posi-
tion, and then to the "ON" position, in order
tion, and then to the "ON" position, in order tion, and then to the "ON" position, in order
tion, and then to the "ON" position, in order
tion, and then to the "ON" position, in order
to preheat again.
to preheat again. to preheat again.
to preheat again.
to preheat again.
TO LOCK
TO LOCK TO LOCK
TO LOCK
TO LOCK Remove the key at the "LOCK" position.Slightly turn the steering wheel until it is locked.
TO UNLOCK
TO UNLOCK TO UNLOCK
TO UNLOCK
TO UNLOCKTurn the key to the "ACC" position while mov-
ing the steering wheel slightly.
CAUTION:
CAUTION: CAUTION:
CAUTION:
CAUTION:
If the key is accidentally removed, the steer-
If the key is accidentally removed, the steer- If the key is accidentally removed, the steer-
If the key is accidentally removed, the steer-
If the key is accidentally removed, the steer-ing wheel will lock making it impossible to
ing wheel will lock making it impossible to ing wheel will lock making it impossible to
ing wheel will lock making it impossible to
ing wheel will lock making it impossible to
control the vehicle.
control the vehicle. control the vehicle.
control the vehicle.
control the vehicle. D030A02P-GAT
STARTING THE ENGINE
STARTING THE ENGINE STARTING THE ENGINE
STARTING THE ENGINE
STARTING THE ENGINE
D030A02P-GAG
1. Apply the parking brake.
C050B01HP
Amber lamp OFF
Amber lamp ON
D030A01P-1
GT30020A
D020B01P-GAT How to lock and unlock the steering
How to lock and unlock the steering How to lock and unlock the steering
How to lock and unlock the steering
How to lock and unlock the steering
wheel
wheel wheel
wheel
wheel
2. If your Hyundai is equipped with a manual
transmission, place the shift lever in neutral and depress the clutch pedal fully. If yourHyundai has an automatic transmission,place the shift lever in "P" (park).
Page 100 of 173
 2003 Owners Manual 3-3
STARTING & OPERATING
STARTING & OPERATING STARTING & OPERATING
STARTING & OPERATING
STARTING & OPERATING
GT30060A
4. Operate the accelerator pedal as described
below in accordance with the atmos")
3-3
STARTING & OPERATING
STARTING & OPERATING STARTING & OPERATING
STARTING & OPERATING
STARTING & OPERATING
GT30060A
4. Operate the accelerator pedal as described
below in accordance with the atmospheric temperature and/or engine condition.
(1) When the atmospheric temperature is moderate or the engine is warm: Start the engine without depressing the accelerator pedal.
(2) When the atmospheric temperature is low and the engine is cold: Start the engine while depressing the accelerator pedal. If the atmospherictemperature is very low, setting the igni-tion switch to ON for one or two sec-onds before attempting to start the en-gine will make it easier to start.
5. Start the engine D041A02P-GAT
STARTING AND STOPPING THE EN-
STARTING AND STOPPING THE EN- STARTING AND STOPPING THE EN-
STARTING AND STOPPING THE EN-
STARTING AND STOPPING THE EN-
GINE FOR TURBO CHARGER OR
GINE FOR TURBO CHARGER OR GINE FOR TURBO CHARGER OR
GINE FOR TURBO CHARGER OR
GINE FOR TURBO CHARGER OR
TURBO CHARGER INTERCOOLER
TURBO CHARGER INTERCOOLER TURBO CHARGER INTERCOOLER
TURBO CHARGER INTERCOOLER
TURBO CHARGER INTERCOOLER
(If installed)
(If installed) (If installed)
(If installed)
(If installed)
(1) Do not race the engine or sudden accelerate the engine immediately after start it. If theengine is cold, allow the engine to idle forseveral seconds before it is driven to ensuresufficient lubrication of the turbo chargerunit.
(2) After high speed or extended driving, requir- ing a heavy engine load, the engine shouldbe allowed to idle, as shown in the chartbelow, before turning it off. This idle time will allow the turbo charger to cool prior to shutting the engine off.
Required Idle Time
Required Idle Time Required Idle Time
Required Idle Time
Required Idle Time
High speed driving Driving Condition
Driving Condition Driving Condition
Driving Condition
Driving Condition
Normal drivingNot necessary About 20 seconds About 1 minute
Up to 100km/h
Up to 80 km/h
Steep mountain slopes or contin- ued driving in excess of 100km/h About 2 minutes
WARNING:
WARNING: WARNING:
WARNING:
WARNING:
Do not turn the engine off immediately after
Do not turn the engine off immediately after Do not turn the engine off immediately after
Do not turn the engine off immediately after
Do not turn the engine off immediately after
it has been subjected to a heavy load. Doing
it has been subjected to a heavy load. Doing it has been subjected to a heavy load. Doing
it has been subjected to a heavy load. Doing
it has been subjected to a heavy load. Doing
so may cause severe damage to the engine
so may cause severe damage to the engine so may cause severe damage to the engine
so may cause severe damage to the engine
so may cause severe damage to the engine
or turbo charger unit.
or turbo charger unit. or turbo charger unit.
or turbo charger unit.
or turbo charger unit.
D040A01P-GAT
Tips for starting
Tips for starting Tips for starting
Tips for starting
Tips for starting
(1) Do not operate the starter motor continu-
ously for longer than ten seconds; doing so could run down the battery. If the enginedoes not start, turn the ignition switch backto "LOCK", wait a few minutes, and then tryagain.
(2) If the engine cannot be started because the battery is weak or dead, refer to the emer-gency starting section for instructions onEmergency Starting.
(3) After starting the engine, do not keep the engine idling without driving. Once when the atmospheric temperature is very low, warm up the engine at a high idlingspeed to ensure proper circulation of the oil.
CAUTION:
CAUTION: CAUTION:
CAUTION:
CAUTION:
(1)(1)
(1)(1)
(1) Do not run the engine at high rpm or
Do not run the engine at high rpm or Do not run the engine at high rpm or
Do not run the engine at high rpm or
Do not run the engine at high rpm or
drive the vehicle at high speed until the
drive the vehicle at high speed until the drive the vehicle at high speed until the
drive the vehicle at high speed until the
drive the vehicle at high speed until the
engine has had a chance to warm up.
engine has had a chance to warm up. engine has had a chance to warm up.
engine has had a chance to warm up.
engine has had a chance to warm up.
(2)(2)
(2)(2)
(2) Release the ignition key as soon as the
Release the ignition key as soon as the Release the ignition key as soon as the
Release the ignition key as soon as the
Release the ignition key as soon as the
engine starts to avoid damaging the
engine starts to avoid damaging the engine starts to avoid damaging the
engine starts to avoid damaging the
engine starts to avoid damaging the
starter motor.
starter motor. starter motor.
starter motor.
starter motor.
Page 101 of 173
 2003 Owners Manual STARTING & OPERATING
STARTING & OPERATING STARTING & OPERATING
STARTING & OPERATING
STARTING & OPERATING
3-4 D050C02P-GAT
Good Driving Practices
Good Driving Practices Good Driving Practices
Good Driv")
STARTING & OPERATING
STARTING & OPERATING STARTING & OPERATING
STARTING & OPERATING
STARTING & OPERATING
3-4 D050C02P-GAT
Good Driving Practices
Good Driving Practices Good Driving Practices
Good Driving Practices
Good Driving Practices
o Never take the vehicle out of gear and coast
down a hill. This is extremely hazardous. Always leave the vehicle in gear.
o Don't "ride" the brakes. This can cause them to overheat and malfunction. Instead,when you are driving down a long hill, slowdown and shift to a lower gear. When you dothis, engine braking will help slow the car.
o Slow down before shifting to a lower gear. This will help avoid over-running the engine,which can cause damage.
o Slow down when you encounter cross winds. This gives you much better control of yourcar.
o Be sure the vehicle is completely stopped before you attempt to shift into reverse. Thetransmission can be damaged if you do not.To shift into reverse, depress the clutch,move the shift lever to neutral, wait threeseconds, then shift to the reverse position.
o Exercise extreme caution when driving on a slippery surface. Be especially careful whenbraking, accelerating or shifting gears. On a slippery surface, an abrupt change in engine speed can cause the drive wheels tolose traction and the vehicle to go out ofcontrol.
D050A02P-GAT
MANUAL TRANSMISSION
MANUAL TRANSMISSION MANUAL TRANSMISSION
MANUAL TRANSMISSION
MANUAL TRANSMISSION
YN20060A
The shift pattern is shown on the gearshift lever knob. Be sure to always fully depress the clutchpedal before attempting to shift to lever. To shift into reverse from 5th gear,move the gearshift lever to neutral, and then shift it intoreverse.
NOTE:
NOTE: NOTE:
NOTE:
NOTE:
oo
oo
o
During cold weather, shifting may be dif-
During cold weather, shifting may be dif- During cold weather, shifting may be dif-
During cold weather, shifting may be dif-
During cold weather, shifting may be dif-
ficult until the transmission lubricant has
ficult until the transmission lubricant has ficult until the transmission lubricant has
ficult until the transmission lubricant has
ficult until the transmission lubricant has
warmed up. This is normal and not harm-
warmed up. This is normal and not harm- warmed up. This is normal and not harm-
warmed up. This is normal and not harm-
warmed up. This is normal and not harm-
ful to the transmission.
ful to the transmission. ful to the transmission.
ful to the transmission.
ful to the transmission.
oo
oo
o
If you 've come to a complete stop and
If you 've come to a complete stop and If you 've come to a complete stop and
If you 've come to a complete stop and
If you 've come to a complete stop and
it's hard to shift into 1st or R(Reverse),
it's hard to shift into 1st or R(Reverse), it's hard to shift into 1st or R(Reverse),
it's hard to shift into 1st or R(Reverse),
it's hard to shift into 1st or R(Reverse),
put the shift lever in N(Neutral) position
put the shift lever in N(Neutral) position put the shift lever in N(Neutral) position
put the shift lever in N(Neutral) position
put the shift lever in N(Neutral) position
and let up on the clutch. Press the clutch
and let up on the clutch. Press the clutch and let up on the clutch. Press the clutch
and let up on the clutch. Press the clutch
and let up on the clutch. Press the clutch
pedal back down, and then shift into 1st
pedal back down, and then shift into 1st pedal back down, and then shift into 1st
pedal back down, and then shift into 1st
pedal back down, and then shift into 1st
or R(Reverse) gear position.
or R(Reverse) gear position. or R(Reverse) gear position.
or R(Reverse) gear position.
or R(Reverse) gear position. D050B01P-GAT
Using the Clutch
Using the Clutch Using the Clutch
Using the Clutch
Using the Clutch
The clutch should be pressed all the way to the floor before shifting, then released slowly. Donot rest your foot on the clutch pedal whiledriving. This can cause unnecessary wear. Do not partially engage the clutch to hold the vehicle on an incline. This causes unnecessarywear. Use the parking brake to hold the vehicle on an incline. Do not operate the clutch pedal rapidlyand repeatedly.
oo
oo
o Do not use the shift lever as a handrest
Do not use the shift lever as a handrest Do not use the shift lever as a handrest
Do not use the shift lever as a handrest
Do not use the shift lever as a handrest
during driving, as this can result in pre-
during driving, as this can result in pre- during driving, as this can result in pre-
during driving, as this can result in pre-
during driving, as this can result in pre-
mature wear of the transmission shift
mature wear of the transmission shift mature wear of the transmission shift
mature wear of the transmission shift
mature wear of the transmission shift
forks.
forks. forks.
forks.
forks.
CAUTION:
CAUTION: CAUTION:
CAUTION:
CAUTION:
Do not move the gearshift lever into reverse
Do not move the gearshift lever into reverse Do not move the gearshift lever into reverse
Do not move the gearshift lever into reverse
Do not move the gearshift lever into reverse
while the vehicle is moving forward; doing
while the vehicle is moving forward; doing while the vehicle is moving forward; doing
while the vehicle is moving forward; doing
while the vehicle is moving forward; doing
so will damage the transmission.
so will damage the transmission. so will damage the transmission.
so will damage the transmission.
so will damage the transmission.
Page 102 of 173
 2003 Owners Manual 3-5
STARTING & OPERATING
STARTING & OPERATING STARTING & OPERATING
STARTING & OPERATING
STARTING & OPERATING
CAUTION:
CAUTION: CAUTION:
CAUTION:
CAUTION:
oo
oo
o
The risk of rollover is greatly inc")
3-5
STARTING & OPERATING
STARTING & OPERATING STARTING & OPERATING
STARTING & OPERATING
STARTING & OPERATING
CAUTION:
CAUTION: CAUTION:
CAUTION:
CAUTION:
oo
oo
o
The risk of rollover is greatly increased if
The risk of rollover is greatly increased if The risk of rollover is greatly increased if
The risk of rollover is greatly increased if
The risk of rollover is greatly increased if
you
you you
you
you
lose control of your vehicle at high-
lose control of your vehicle at high- lose control of your vehicle at high-
lose control of your vehicle at high-
lose control of your vehicle at high-
way speeds.
way speeds. way speeds.
way speeds.
way speeds.
oo
oo
o Loss of control often occurs if two or
Loss of control often occurs if two or Loss of control often occurs if two or
Loss of control often occurs if two or
Loss of control often occurs if two or
more wheels drop off the roadway and
more wheels drop off the roadway and more wheels drop off the roadway and
more wheels drop off the roadway and
more wheels drop off the roadway and
the driver oversteers to reenter the road-
the driver oversteers to reenter the road- the driver oversteers to reenter the road-
the driver oversteers to reenter the road-
the driver oversteers to reenter the road-
way.
way. way.
way.
way.
oo
oo
o In the event your vehicle leaves the road-
In the event your vehicle leaves the road- In the event your vehicle leaves the road-
In the event your vehicle leaves the road-
In the event your vehicle leaves the road-
way, do not steer sharply. Instead, slow
way, do not steer sharply. Instead, slow way, do not steer sharply. Instead, slow
way, do not steer sharply. Instead, slow
way, do not steer sharply. Instead, slow
down before pulling back into the travel
down before pulling back into the travel down before pulling back into the travel
down before pulling back into the travel
down before pulling back into the travel
lanes.
lanes. lanes.
lanes.
lanes.
oo
oo
o In a collision crash, an unbelted person
In a collision crash, an unbelted person In a collision crash, an unbelted person
In a collision crash, an unbelted person
In a collision crash, an unbelted person
is significantly more likely to die than a
is significantly more likely to die than a is significantly more likely to die than a
is significantly more likely to die than a
is significantly more likely to die than a
person wearing a seatbelt.
person wearing a seatbelt. person wearing a seatbelt.
person wearing a seatbelt.
person wearing a seatbelt.
D050D01P-GAT Changing Gears
Changing Gears Changing Gears
Changing Gears
Changing Gears
GS30090A
50 100 150
km/h
1st 2nd 3rd 4th 5th
Always use care to change the gear with the vehicle speed matched to the engine speed. Proper shifting will improve fuel economy andprolong engine life. Avoid shifting down at excessively high speed, doing so could damage the engine.
NOTE:
NOTE: NOTE:
NOTE:
NOTE:
:Economical driving range
:Economical driving range :Economical driving range
:Economical driving range
:Economical driving range
:Possible driving range
:Possible driving range :Possible driving range
:Possible driving range
:Possible driving range
D060A01P-GAT
AUTOMATIC TRANSMISSION
AUTOMATIC TRANSMISSION AUTOMATIC TRANSMISSION
AUTOMATIC TRANSMISSION
AUTOMATIC TRANSMISSION
(Minibus, Van) (If installed)
(Minibus, Van) (If installed) (Minibus, Van) (If installed)
(Minibus, Van) (If installed)
(Minibus, Van) (If installed)
D060A01P-GAG
Button
The highly efficient Hyundai automatic trans- mission has four forward speeds and one re-verse speed. It has a conventional shift patternas shown in the illustration. At night, with the side markers or headlights switched on, the appropriate symbol on thequadrant will be illuminated according to therange selected. CAUTION:
CAUTION: CAUTION:
CAUTION:
CAUTION:
Never shift into "R" or "P" position while
Never shift into "R" or "P" position while Never shift into "R" or "P" position while
Never shift into "R" or "P" position while
Never shift into "R" or "P" position while
the vehicle is moving.
the vehicle is moving. the vehicle is moving.
the vehicle is moving.
the vehicle is moving.
Depress the brake pedal and push the
Depress the brake pedal and push the Depress the brake pedal and push the
Depress the brake pedal and push the
Depress the brake pedal and push the
button when shifting.
button when shifting. button when shifting.
button when shifting.
button when shifting.
Push the button when shifting.
Push the button when shifting. Push the button when shifting.
Push the button when shifting.
Push the button when shifting.
The selector lever can be shifted freely.
The selector lever can be shifted freely. The selector lever can be shifted freely.
The selector lever can be shifted freely.
The selector lever can be shifted freely.
For optimum fuel economy, accelerate gradu-ally. The transmission will automatically shift tothe second, third and overdrive gears.
D060B01P-GAT The function of each position is as
The function of each position is as The function of each position is as
The function of each position is as
The function of each position is as
follows:
follows: follows:
follows:
follows:
oo
oo
o
P (Park):
P (Park): P (Park):
P (Park):
P (Park):
Use to hold the vehicle in place when parking or while starting the engine; shift the selector leverto the "P" position. Whenever parking the car,apply the parking brake and shift the selectorlever to the "P" position.
CAUTION:
CAUTION: CAUTION:
CAUTION:
CAUTION:
Never place the selector lever in the "P"
Never place the selector lever in the "P" Never place the selector lever in the "P"
Never place the selector lever in the "P"
Never place the selector lever in the "P"
position unless the vehicle is fully stopped.
position unless the vehicle is fully stopped. position unless the vehicle is fully stopped.
position unless the vehicle is fully stopped.
position unless the vehicle is fully stopped.
Failure to observe this caution will cause
Failure to observe this caution will cause Failure to observe this caution will cause
Failure to observe this caution will cause
Failure to observe this caution will cause
severe damage to the transmission.
severe damage to the transmission. severe damage to the transmission.
severe damage to the transmission.
severe damage to the transmission. D060C01P-GAT
oo
oo
o R (Reverse):
R (Reverse): R (Reverse):
R (Reverse):
R (Reverse):
Use for backing up the vehicle. Bring the vehi- cle to a complete stop before shifting the selec-tor lever to "R" position.
Page 103 of 173
 2003 Owners Manual STARTING & OPERATING
STARTING & OPERATING STARTING & OPERATING
STARTING & OPERATING
STARTING & OPERATING
3-6 NOTE:
NOTE: NOTE:
NOTE:
NOTE:
oo
oo
o
For smooth operation, depress the brake
For smooth op")
STARTING & OPERATING
STARTING & OPERATING STARTING & OPERATING
STARTING & OPERATING
STARTING & OPERATING
3-6 NOTE:
NOTE: NOTE:
NOTE:
NOTE:
oo
oo
o
For smooth operation, depress the brake
For smooth operation, depress the brake For smooth operation, depress the brake
For smooth operation, depress the brake
For smooth operation, depress the brake
pedal when shifting from NEUTRAL or
pedal when shifting from NEUTRAL or pedal when shifting from NEUTRAL or
pedal when shifting from NEUTRAL or
pedal when shifting from NEUTRAL or
PARK to a forward or reverse gear.
PARK to a forward or reverse gear. PARK to a forward or reverse gear.
PARK to a forward or reverse gear.
PARK to a forward or reverse gear.
oo
oo
o The ignition key must be in the "ON"
The ignition key must be in the "ON" The ignition key must be in the "ON"
The ignition key must be in the "ON"
The ignition key must be in the "ON"
position and the brake pedal fully de-
position and the brake pedal fully de- position and the brake pedal fully de-
position and the brake pedal fully de-
position and the brake pedal fully de-
pressed in order to move the shift lever
pressed in order to move the shift lever pressed in order to move the shift lever
pressed in order to move the shift lever
pressed in order to move the shift lever
from the "P" (Park)position to any of the
from the "P" (Park)position to any of the from the "P" (Park)position to any of the
from the "P" (Park)position to any of the
from the "P" (Park)position to any of the
other positions.
other positions. other positions.
other positions.
other positions.
oo
oo
o It is always possible to shift from "R",
It is always possible to shift from "R", It is always possible to shift from "R",
It is always possible to shift from "R",
It is always possible to shift from "R",
"N", "D", "2", "L" positions to "P" posi-
"N", "D", "2", "L" positions to "P" posi- "N", "D", "2", "L" positions to "P" posi-
"N", "D", "2", "L" positions to "P" posi-
"N", "D", "2", "L" positions to "P" posi-
tion.
tion. tion.
tion.
tion.
CAUTION:
CAUTION: CAUTION:
CAUTION:
CAUTION:
oo
oo
o Shift into "R" and "P" only when the
Shift into "R" and "P" only when the Shift into "R" and "P" only when the
Shift into "R" and "P" only when the
Shift into "R" and "P" only when the
vehicle has completely stopped.
vehicle has completely stopped. vehicle has completely stopped.
vehicle has completely stopped.
vehicle has completely stopped.
oo
oo
o Do not accelerate the engine in the re-
Do not accelerate the engine in the re- Do not accelerate the engine in the re-
Do not accelerate the engine in the re-
Do not accelerate the engine in the re-
verse or any of the forward positions
verse or any of the forward positions verse or any of the forward positions
verse or any of the forward positions
verse or any of the forward positions
with the brakes applied.
with the brakes applied. with the brakes applied.
with the brakes applied.
with the brakes applied.
oo
oo
o
Always apply the footbrake when shift-
Always apply the footbrake when shift- Always apply the footbrake when shift-
Always apply the footbrake when shift-
Always apply the footbrake when shift-
ing from "P" or "N" to "R", "D", "2" or
ing from "P" or "N" to "R", "D", "2" or ing from "P" or "N" to "R", "D", "2" or
ing from "P" or "N" to "R", "D", "2" or
ing from "P" or "N" to "R", "D", "2" or
"L" position.
"L" position. "L" position.
"L" position.
"L" position.
oo
oo
o
Do not use the P(Park) position in place
Do not use the P(Park) position in place Do not use the P(Park) position in place
Do not use the P(Park) position in place
Do not use the P(Park) position in place
of the parking brake. Always set the park-
of the parking brake. Always set the park- of the parking brake. Always set the park-
of the parking brake. Always set the park-
of the parking brake. Always set the park-
ing brake, shift the transmission into
ing brake, shift the transmission into ing brake, shift the transmission into
ing brake, shift the transmission into
ing brake, shift the transmission into
P(Park) and turn off the ignition when
P(Park) and turn off the ignition when P(Park) and turn off the ignition when
P(Park) and turn off the ignition when
P(Park) and turn off the ignition when
you leave the vehicle, even momentarily.
you leave the vehicle, even momentarily. you leave the vehicle, even momentarily.
you leave the vehicle, even momentarily.
you leave the vehicle, even momentarily.
Never leave the vehicle unattended while
Never leave the vehicle unattended while Never leave the vehicle unattended while
Never leave the vehicle unattended while
Never leave the vehicle unattended while
the engine is running.
the engine is running. the engine is running.
the engine is running.
the engine is running.
oo
oo
o Check the automatic transmission fluid
Check the automatic transmission fluid Check the automatic transmission fluid
Check the automatic transmission fluid
Check the automatic transmission fluid
level regularly, and add fluid as neces-
level regularly, and add fluid as neces- level regularly, and add fluid as neces-
level regularly, and add fluid as neces-
level regularly, and add fluid as neces-
sary.
sary. sary.
sary.
sary.
D060D01P-GAT
oo
oo
o N (Neutral):
N (Neutral): N (Neutral):
N (Neutral):
N (Neutral):
In the "N" position, the transmission is in neu- tral, which means that no gears are engaged.The engine can be started with the shift lever in"N" position, although this is not recommendedexcept if the engine stalls while the car ismoving. D060E01P-GAT
oo
oo
o D (Drive):
D (Drive): D (Drive):
D (Drive):
D (Drive):
Use for normal driving. The transmission will automatically shift through a four-gear sequence,giving best economy and power. Never down-shift manually to "2" position or "L" positionwhen vehicle speed is more than 96 km/h (60mph). D060F01P-GAT
oo
oo
o
2 (Second gear):
2 (Second gear): 2 (Second gear):
2 (Second gear):
2 (Second gear):
Use for driving on slippery road, hill climbing or engine braking downhill. "2" automatically shiftsbetween 1st and 2nd gears.This means that no shift-up to 3rd gear isperformed. However, the shift-up to 3rd gear isdone when the vehicle speed exceeds a certainvalue to prevent the engine from over-running. Manually move the selector to "D" returning to normal driving condition. D060G01P-GAT
oo
oo
o L (Low gear):
L (Low gear): L (Low gear):
L (Low gear):
L (Low gear):
Use for driving up a very steep grade or for
engine braking when descending steep hills.When downshifting to "L", the transmission willtemporarily remain in second gear until thevehicle has slowed enough for low gear toengage. Do not exceed 50 km/h (31 mph) in lowgear.
"L" engages 1st gear only. However, shift-up to
2nd is performed when the vehicle exceeds acertain speed, and as the speed increases,shift-up to 3rd gear occurs to prevent over-running the engine.
D060H01P-GAT CAUTION:
CAUTION: CAUTION:
CAUTION:
CAUTION:
oo
oo
o P (Park):
P (Park): P (Park):
P (Park):
P (Park):
Use this range to park the vehicle. This
Use this range to park the vehicle. This Use this range to park the vehicle. This
Use this range to park the vehicle. This
Use this range to park the vehicle. This range is also used when engine is started
range is also used when engine is started range is also used when engine is started
range is also used when engine is started
range is also used when engine is started
and warmed up.
and warmed up. and warmed up.
and warmed up.
and warmed up.
oo
oo
o N (Neutral):
N (Neutral): N (Neutral):
N (Neutral):
N (Neutral):
The engine can be started in this range, but
The engine can be started in this range, but The engine can be started in this range, but
The engine can be started in this range, but
The engine can be started in this range, butthe use of P range is recommended for safer
the use of P range is recommended for safer the use of P range is recommended for safer
the use of P range is recommended for safer
the use of P range is recommended for safer
start up.
start up. start up.
start up.
start up.
Page 104 of 173
 2003 Owners Manual 3-7
STARTING & OPERATING
STARTING & OPERATING STARTING & OPERATING
STARTING & OPERATING
STARTING & OPERATING
D070A01P-GAT DRIVING WITH ELECTRONIC DUAL-
DRIVING WITH ELECTRONIC DUAL- DRIVING WITH ELE")
3-7
STARTING & OPERATING
STARTING & OPERATING STARTING & OPERATING
STARTING & OPERATING
STARTING & OPERATING
D070A01P-GAT DRIVING WITH ELECTRONIC DUAL-
DRIVING WITH ELECTRONIC DUAL- DRIVING WITH ELECTRONIC DUAL-
DRIVING WITH ELECTRONIC DUAL-
DRIVING WITH ELECTRONIC DUAL-
RANGE AUTOMATIC TRANSMISSION
RANGE AUTOMATIC TRANSMISSION RANGE AUTOMATIC TRANSMISSION
RANGE AUTOMATIC TRANSMISSION
RANGE AUTOMATIC TRANSMISSION
(If installed)
(If installed) (If installed)
(If installed)
(If installed)
D070A01P-1
The electronically controlled dual-range (Pow-
er/Normal) 4 speed automatic transmission is available for you Hyundai.
According to the road conditions, set the switch
at the "NORMAL", "POWER" or "HOLD" modefor normal driving, for greater power driving orfor shift stage hold driving.
Each time you press the switch, the "NOR-
MAL", "POWER" and "HOLD" modes will switchalternately. The "POWER" and "HOLD" indica-tor in the instrument panel comes on or off.Normally, drive your vehicle in the "NORMAL"mode where the switch is not pressed. (The"PWR" and "HOLD" indicators go out.) D070B01P-GAT
"Normal" Mode
"Normal" Mode "Normal" Mode
"Normal" Mode
"Normal" Mode The "N" (Normal) mode offers quiet and smooth auto-shifting with outstanding fuel economy.The "N" (Normal) mode is recommended fornormal driving. Set the driving pattern selectorswitch to the "N" (Normal) position. Push theselector lever to the "D" range and depress theaccelerator pedal slowly. If you need rapidacceleration, fully depress the accelerator ped-al. D070C01P-GAT
"Power" Mode
"Power" Mode "Power" Mode
"Power" Mode
"Power" Mode
D070C01P-1
In the "Power" mode, you can obtain full poten- tial of the engine for maximum acceleration anddriveability. The "Power" mode is recommend-ed for higher speeds than the "Normal" mode,driving in mountainous areas and for strongacceleration. Set the driving pattern selectorswitch to the "Power" position. D070D01P-GAT
"Hold" mode
"Hold" mode "Hold" mode
"Hold" mode
"Hold" mode
D070D01P-1
Select the "HOLD" mode when starting your
vehicle on a road surface slippery from snow or the like, and the vehicle will start smoothly insecond gear.
When you need quick acceleration or engine
braking power on a downhill grade, or when youare going to go up a long hill, press the "Hold"switch once again to cancel the "Hold" function.
When "Hold" button is depressed, "Hold" indi-
cator light in the instrument cluster will illumi-nate and automatic shifting will be performed inthe range from 2nd gear to 3rd gear only, asshown in the table.
Position
1 2 34Shifting gear 2 2 33
 1
1 2
2 3
3 4
4 5
5 6
6 7
7 8
8 9
9 10
10 11
11 12
12 13
13 14
14 15
15 16
16 17
17 18
18 19
19 20
20 21
21 22
22 23
23 24
24 25
25 26
26 27
27 28
28 29
29 30
30 31
31 32
32 33
33 34
34 35
35 36
36 37
37 38
38 39
39 40
40 41
41 42
42 43
43 44
44 45
45 46
46 47
47 48
48 49
49 50
50 51
51 52
52 53
53 54
54 55
55 56
56 57
57 58
58 59
59 60
60 61
61 62
62 63
63 64
64 65
65 66
66 67
67 68
68 69
69 70
70 71
71 72
72 73
73 74
74 75
75 76
76 77
77 78
78 79
79 80
80 81
81 82
82 83
83 84
84 85
85 86
86 87
87 88
88 89
89 90
90 91
91 92
92 93
93 94
94 95
95 96
96 97
97 98
98 99
99 100
100 101
101 102
102 103
103 104
104 105
105 106
106 107
107 108
108 109
109 110
110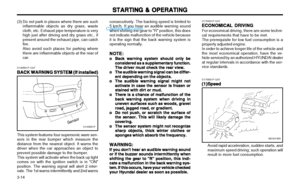 111
111 112
112 113
113 114
114 115
115 116
116 117
117 118
118 119
119 120
120 121
121 122
122 123
123 124
124 125
125 126
126 127
127 128
128 129
129 130
130 131
131 132
132 133
133 134
134 135
135 136
136 137
137 138
138 139
139 140
140 141
141 142
142 143
143 144
144 145
145 146
146 147
147 148
148 149
149 150
150 151
151 152
152 153
153 154
154 155
155 156
156 157
157 158
158 159
159 160
160 161
161 162
162 163
163 164
164 165
165 166
166 167
167 168
168 169
169 170
170 171
171 172
172