Page 121 of 173

IN CASE OF EMERGENCY
IN CASE OF EMERGENCY IN CASE OF EMERGENCY
IN CASE OF EMERGENCY
IN CASE OF EMERGENCY
4-6
GS40160A
Flat tire
GT40170A
E060A05P-GAG
2WD 4WD
1. Comply with local regulations concerning
the protection of broken-down vehicles by switching on the hazard warning flashers,setting up a warning triangle flashing signallamp, etc., at an adequate distance from thevehicle.
Others in the vehicle should get out of the
vehicle and wait in a safe place.
2. Position the vehicle on a flat, hard surface and apply the parking brake.
To prevent the vehicle from rolling when it is
raised on the jack, chock the wheel diago-nally opposite to that being changed.
3. Prepare the spare wheel, jack and wheel nut wrench. 4. The spare tire should be placed, for safety,
under the vehicle and near the jack forconvenient access when ready to bemounted.
5. Loosen the wheel nuts with the wheel nut wrench as shown in the drawing. Do notremove the wheel nuts yet.
GT40140A
C260A01P-GAG
E060A02P-GAT
IF A TIRE IS FLATENED
IF A TIRE IS FLATENED IF A TIRE IS FLATENED
IF A TIRE IS FLATENED
IF A TIRE IS FLATENED
If a tire must be changed due to a flat, do so
only after first following every precaution for safety parking the vehicle in a place where it isnot a traffic hazard or dangerous to you andyour vehicle’s occupants, on a flat surface, andin such a way that you will not be injured by anypart of the vehicle while changing the tire.
Page 122 of 173
IN CASE OF EMERGENCY
IN CASE OF EMERGENCY IN CASE OF EMERGENCY
IN CASE OF EMERGENCY
IN CASE OF EMERGENCY
4-7
GS40210A
E060A08P-GAG
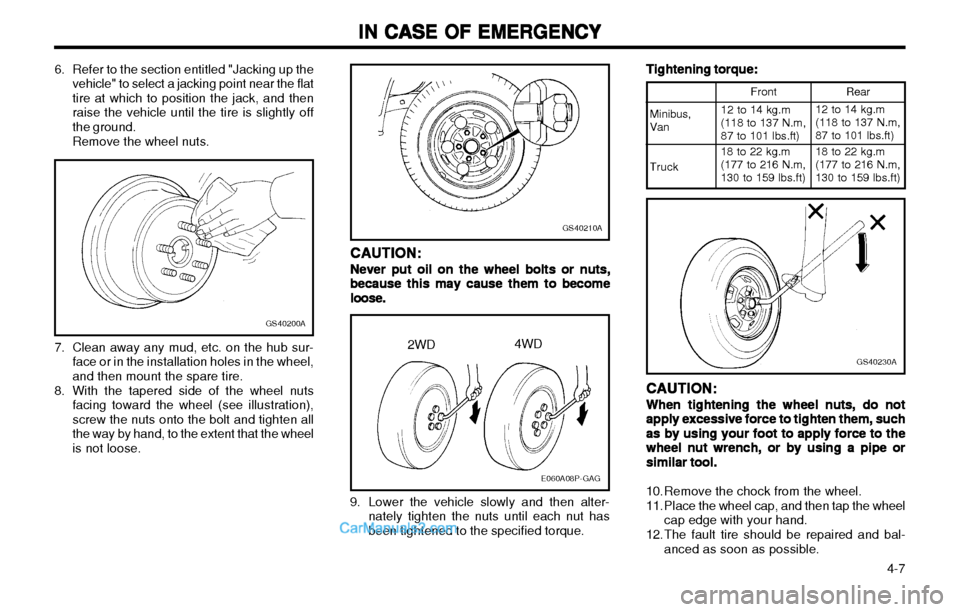
2WD4WD Tightening torque:
Tightening torque: Tightening torque:
Tightening torque:
Tightening torque:GS40230A
GS40200A
Rear
Front
Minibus, Van 12 to 14 kg.m (118 to 137 N.m, 87 to 101 lbs.ft)12 to 14 kg.m (118 to 137 N.m, 87 to 101 lbs.ft)
Truck 18 to 22 kg.m (177 to 216 N.m, 130 to 159 lbs.ft) 18 to 22 kg.m (177 to 216 N.m, 130 to 159 lbs.ft)
CAUTION:
CAUTION: CAUTION:
CAUTION:
CAUTION:
Never put oil on the wheel bolts or nuts,
Never put oil on the wheel bolts or nuts, Never put oil on the wheel bolts or nuts,
Never put oil on the wheel bolts or nuts,
Never put oil on the wheel bolts or nuts, because this may cause them to become
because this may cause them to become because this may cause them to become
because this may cause them to become
because this may cause them to become
loose.
loose. loose.
loose.
loose.
9. Lower the vehicle slowly and then alter-
nately tighten the nuts until each nut has been tightened to the specified torque. CAUTION:
CAUTION: CAUTION:
CAUTION:
CAUTION:
When tightening the wheel nuts, do not
When tightening the wheel nuts, do not When tightening the wheel nuts, do not
When tightening the wheel nuts, do not
When tightening the wheel nuts, do not
apply excessive force to tighten them, such
apply excessive force to tighten them, such apply excessive force to tighten them, such
apply excessive force to tighten them, such
apply excessive force to tighten them, such
as by using your foot to apply force to the
as by using your foot to apply force to the as by using your foot to apply force to the
as by using your foot to apply force to the
as by using your foot to apply force to the
wheel nut wrench, or by using a pipe or
wheel nut wrench, or by using a pipe or wheel nut wrench, or by using a pipe or
wheel nut wrench, or by using a pipe or
wheel nut wrench, or by using a pipe or
similar tool.
similar tool. similar tool.
similar tool.
similar tool.
10. Remove the chock from the wheel.
11. Place the wheel cap, and then tap the wheel cap edge with your hand.
12. The fault tire should be repaired and bal- anced as soon as possible.
6. Refer to the section entitled "Jacking up the
vehicle" to select a jacking point near the flattire at which to position the jack, and thenraise the vehicle until the tire is slightly offthe ground. Remove the wheel nuts.
7. Clean away any mud, etc. on the hub sur- face or in the installation holes in the wheel, and then mount the spare tire.
8. With the tapered side of the wheel nuts facing toward the wheel (see illustration),screw the nuts onto the bolt and tighten allthe way by hand, to the extent that the wheelis not loose.
Page 123 of 173
IN CASE OF EMERGENCY
IN CASE OF EMERGENCY IN CASE OF EMERGENCY
IN CASE OF EMERGENCY
IN CASE OF EMERGENCY
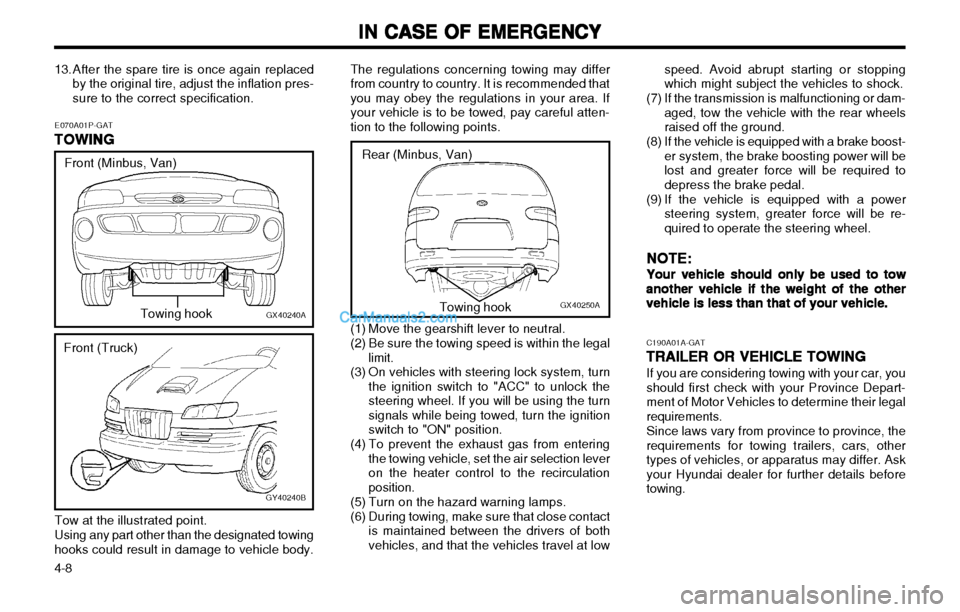
4-8 The regulations concerning towing may differ from country to country. It is recommended thatyou may obey the regulations in your area. Ifyour vehicle is to be towed, pay careful atten-tion to the following points.
C190A01A-GATTRAILER OR VEHICLE TOWING
TRAILER OR VEHICLE TOWING TRAILER OR VEHICLE TOWING
TRAILER OR VEHICLE TOWING
TRAILER OR VEHICLE TOWING
If you are considering towing with your car, youshould first check with your Province Depart-ment of Motor Vehicles to determine their legal requirements.Since laws vary from province to province, the requirements for towing trailers, cars, othertypes of vehicles, or apparatus may differ. Askyour Hyundai dealer for further details beforetowing.
GX40250A
Rear (Minbus, Van)Towing hook
(1) Move the gearshift lever to neutral.
(2) Be sure the towing speed is within the legal limit.
(3) On vehicles with steering lock system, turn the ignition switch to "ACC" to unlock the steering wheel. If you will be using the turnsignals while being towed, turn the ignitionswitch to "ON" position.
(4) To prevent the exhaust gas from entering the towing vehicle, set the air selection leveron the heater control to the recirculationposition.
(5) Turn on the hazard warning lamps.
(6) During towing, make sure that close contact is maintained between the drivers of both vehicles, and that the vehicles travel at low speed. Avoid abrupt starting or stoppingwhich might subject the vehicles to shock.
(7) If the transmission is malfunctioning or dam- aged, tow the vehicle with the rear wheelsraised off the ground.
(8) If the vehicle is equipped with a brake boost- er system, the brake boosting power will belost and greater force will be required todepress the brake pedal.
(9) If the vehicle is equipped with a power steering system, greater force will be re-quired to operate the steering wheel.
NOTE:
NOTE: NOTE:
NOTE:
NOTE:
Your vehicle should only be used to tow
Your vehicle should only be used to tow Your vehicle should only be used to tow
Your vehicle should only be used to tow
Your vehicle should only be used to tow another vehicle if the weight of the other
another vehicle if the weight of the other another vehicle if the weight of the other
another vehicle if the weight of the other
another vehicle if the weight of the other
vehicle is less than that of your vehicle.
vehicle is less than that of your vehicle. vehicle is less than that of your vehicle.
vehicle is less than that of your vehicle.
vehicle is less than that of your vehicle.
E070A01P-GAT
TOWING
TOWING TOWING
TOWING
TOWING
GX40240A
Front (Minbus, Van)
Towing hook
Tow at the illustrated point. Using any part other than the designated towing
hooks could result in damage to vehicle body.
GY40240B
Front (Truck)
13. After the spare tire is once again replaced
by the original tire, adjust the inflation pres- sure to the correct specification.
Page 124 of 173

IN CASE OF EMERGENCY
IN CASE OF EMERGENCY IN CASE OF EMERGENCY
IN CASE OF EMERGENCY
IN CASE OF EMERGENCY
4-9
C190E04P-GAT
Trailer Weight Limit
Trailer Weight Limit Trailer Weight Limit
Trailer Weight Limit
Trailer Weight Limit
SSA2200BTongue load Total trailer weight
Tongue loads can be increased or decreased by redistributing the load in the trailer. This canbe verified by checking the total weight of theloaded trailer and then checking the load on thetongue.
SSA2200D
Gross axle weight Gross vehicle weight
C190B01S-AAT
Trailer Hitches
Trailer Hitches Trailer Hitches
Trailer Hitches
Trailer Hitches
Select the proper hitch and ball combination,
making sure that its location is compatible with that of the trailer or vehicle being towed. Use aquality non-equalizing hitch which distributesthe tongue load uniformly throughout the chas-sis.
The hitch should be bolted securely to the car
and installed by a qualified technician. DO NOTUSE A HITCH DESIGNED FOR TEMPORARYINSTALLATION AND NEVER USE ONE THATATTACHES ONLY TO THE BUMPER.
C190C01P-GATTrailer Brakes
Trailer Brakes Trailer Brakes
Trailer Brakes
Trailer Brakes
If your trailer is equipped with a braking system,make sure it conforms to federal and/or localregulations and that it is properly installed andoperating correctly.
NOTE:
NOTE: NOTE:
NOTE:
NOTE:
If you tow a trailer or vehicle, your car will
If you tow a trailer or vehicle, your car will If you tow a trailer or vehicle, your car will
If you tow a trailer or vehicle, your car will
If you tow a trailer or vehicle, your car will
require more frequent maintenance due to
require more frequent maintenance due to require more frequent maintenance due to
require more frequent maintenance due to
require more frequent maintenance due to
the additional load. See "Maintenance Un-
the additional load. See "Maintenance Un- the additional load. See "Maintenance Un-
the additional load. See "Maintenance Un-
the additional load. See "Maintenance Un-
der Severe Usage Conditions" on page 6-8.
der Severe Usage Conditions" on page 6-8. der Severe Usage Conditions" on page 6-8.
der Severe Usage Conditions" on page 6-8.
der Severe Usage Conditions" on page 6-8. C190D01A-GAT
Safety Chains
Safety Chains Safety Chains
Safety Chains
Safety Chains
Should the hitch connection between your car
and the trailer or vehicle you are towing fail, thetrailer or vehicle could wander dangerouslyacross other lanes of traffic and ultimately col-lide with another vehicle.
To eliminate this potentially dangerous situa-
tion, safety chains, attached between your carand the trailer or towed vehicle, are required inmost provinces.
CAUTION:
CAUTION: CAUTION:
CAUTION:
CAUTION:
Do not do any towing with your car during
Do not do any towing with your car during Do not do any towing with your car during
Do not do any towing with your car during
Do not do any towing with your car during its first 2,000 km (1,200 miles) in order to
its first 2,000 km (1,200 miles) in order to its first 2,000 km (1,200 miles) in order to
its first 2,000 km (1,200 miles) in order to
its first 2,000 km (1,200 miles) in order to
allow the engine to properly break in. Fail-
allow the engine to properly break in. Fail- allow the engine to properly break in. Fail-
allow the engine to properly break in. Fail-
allow the engine to properly break in. Fail-
ure to heed this caution may result in seri-
ure to heed this caution may result in seri- ure to heed this caution may result in seri-
ure to heed this caution may result in seri-
ure to heed this caution may result in seri-
ous engine or transmission damage.
ous engine or transmission damage. ous engine or transmission damage.
ous engine or transmission damage.
ous engine or transmission damage. CAUTION:
CAUTION: CAUTION:
CAUTION:
CAUTION:
oo
oo
o
Never connect a trailer brake system di-
Never connect a trailer brake system di- Never connect a trailer brake system di-
Never connect a trailer brake system di-
Never connect a trailer brake system di-
rectly to the vehicle brake system.
rectly to the vehicle brake system. rectly to the vehicle brake system.
rectly to the vehicle brake system.
rectly to the vehicle brake system.
oo
oo
o When towing a trailer on steep grades (in
When towing a trailer on steep grades (in When towing a trailer on steep grades (in
When towing a trailer on steep grades (in
When towing a trailer on steep grades (in
excess of 12%) pay close attention to the
excess of 12%) pay close attention to the excess of 12%) pay close attention to the
excess of 12%) pay close attention to the
excess of 12%) pay close attention to the
engine coolant temperature gauge to
engine coolant temperature gauge to engine coolant temperature gauge to
engine coolant temperature gauge to
engine coolant temperature gauge to
ensure the engine does not overheat. If
ensure the engine does not overheat. If ensure the engine does not overheat. If
ensure the engine does not overheat. If
ensure the engine does not overheat. If
the needle of the coolant temperature
the needle of the coolant temperature the needle of the coolant temperature
the needle of the coolant temperature
the needle of the coolant temperature
gauge moves across the dial towards
gauge moves across the dial towards gauge moves across the dial towards
gauge moves across the dial towards
gauge moves across the dial towards
"H" (HOT), pull over and stop as soon as
"H" (HOT), pull over and stop as soon as "H" (HOT), pull over and stop as soon as
"H" (HOT), pull over and stop as soon as
"H" (HOT), pull over and stop as soon as
it is safe to do so, and allow the engine to
it is safe to do so, and allow the engine to it is safe to do so, and allow the engine to
it is safe to do so, and allow the engine to
it is safe to do so, and allow the engine to
idle until it cools down. You may proceed
idle until it cools down. You may proceed idle until it cools down. You may proceed
idle until it cools down. You may proceed
idle until it cools down. You may proceed
once the engine has cooled sufficiently.
once the engine has cooled sufficiently. once the engine has cooled sufficiently.
once the engine has cooled sufficiently.
once the engine has cooled sufficiently.
Page 125 of 173
IN CASE OF EMERGENCY
IN CASE OF EMERGENCY IN CASE OF EMERGENCY
IN CASE OF EMERGENCY
IN CASE OF EMERGENCY
4-10
C190E01P
�
�
Coupling point
5.5.
5.5.
5.
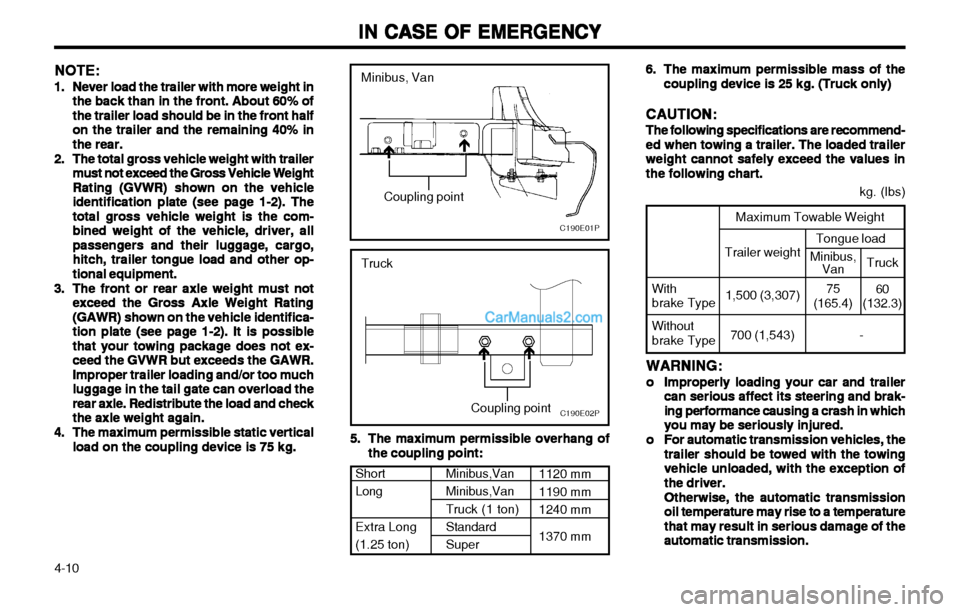
The maximum permissible overhang of
The maximum permissible overhang of The maximum permissible overhang of
The maximum permissible overhang of
The maximum permissible overhang of
the coupling point:
the coupling point: the coupling point:
the coupling point:
the coupling point:
Minibus, Van
6.6.
6.6.
6. The maximum permissible mass of the
The maximum permissible mass of the The maximum permissible mass of the
The maximum permissible mass of the
The maximum permissible mass of the
coupling device is 25 kg. (Truck only)
coupling device is 25 kg. (Truck only) coupling device is 25 kg. (Truck only)
coupling device is 25 kg. (Truck only)
coupling device is 25 kg. (Truck only)
CAUTION:
CAUTION: CAUTION:
CAUTION:
CAUTION:
The following specifications are recommend-
The following specifications are recommend- The following specifications are recommend-
The following specifications are recommend-
The following specifications are recommend-
ed when towing a
ed when towing a ed when towing a
ed when towing a
ed when towing a trailer. The loaded trailer
trailer. The loaded trailer trailer. The loaded trailer
trailer. The loaded trailer
trailer. The loaded trailer
weight cannot safely exceed the values in
weight cannot safely exceed the values in weight cannot safely exceed the values in
weight cannot safely exceed the values in
weight cannot safely exceed the values in
the following chart
the following chart the following chart
the following chart
the following chart ..
..
.
Short Long Extra Long (1.25 ton)
Minibus,Van Minibus,Van Truck (1 ton) Standard Super 1120 mm1190 mm 1240 mm 1370 mm
kg. (lbs)
Maximum Towable Weight
Trailer weight Tongue load
With brake Type
Without brake Type
1,500 (3,307)
700 (1,543) 75
(165.4)
-
WARNING:
WARNING: WARNING:
WARNING:
WARNING:
oo
oo
o
Improperly loading your car and trailer
Improperly loading your car and trailer Improperly loading your car and trailer
Improperly loading your car and trailer
Improperly loading your car and trailer
can serious affect
can serious affect can serious affect
can serious affect
can serious affect its steering and brak-
its steering and brak- its steering and brak-
its steering and brak-
its steering and brak-
ing performance causing a crash in which
ing performance causing a crash in which ing performance causing a crash in which
ing performance causing a crash in which
ing performance causing a crash in which
you may be seriously injured.
you may be seriously injured. you may be seriously injured.
you may be seriously injured.
you may be seriously injured.
oo
oo
o
For automatic transmission vehicles, the
For automatic transmission vehicles, the For automatic transmission vehicles, the
For automatic transmission vehicles, the
For automatic transmission vehicles, the
trailer should be towed with the towing
trailer should be towed with the towing trailer should be towed with the towing
trailer should be towed with the towing
trailer should be towed with the towing
vehicle unloaded, with the exception of
vehicle unloaded, with the exception of vehicle unloaded, with the exception of
vehicle unloaded, with the exception of
vehicle unloaded, with the exception of
the driver.
the driver. the driver.
the driver.
the driver.
Otherwise, the automatic transmission
Otherwise, the automatic transmission Otherwise, the automatic transmission
Otherwise, the automatic transmission
Otherwise, the automatic transmission
oil temperature may rise to a temperature
oil temperature may rise to a temperature oil temperature may rise to a temperature
oil temperature may rise to a temperature
oil temperature may rise to a temperature
that may result in serious damage of the
that may result in serious damage of the that may result in serious damage of the
that may result in serious damage of the
that may result in serious damage of the
automatic transmission.
automatic transmission. automatic transmission.
automatic transmission.
automatic transmission.
C190E02P
Minibus,
Van Truck
60
(132.3)
� �
Coupling point
Truck
NOTE:
NOTE: NOTE:
NOTE:
NOTE:
1.1.
1.1.
1.
Never load the trailer with more weight in
Never load the trailer with more weight in Never load the trailer with more weight in
Never load the trailer with more weight in
Never load the trailer with more weight in
the back
the back the back
the back
the back
than in the front. About 60% of
than in the front. About 60% of than in the front. About 60% of
than in the front. About 60% of
than in the front. About 60% of
the trailer load should be in the front half
the trailer load should be in the front half the trailer load should be in the front half
the trailer load should be in the front half
the trailer load should be in the front half
on the trailer and the remaining 40% in
on the trailer and the remaining 40% in on the trailer and the remaining 40% in
on the trailer and the remaining 40% in
on the trailer and the remaining 40% in
the rear.
the rear. the rear.
the rear.
the rear.
2.2.
2.2.
2. The total gross vehicle weight with trailer
The total gross vehicle weight with trailer The total gross vehicle weight with trailer
The total gross vehicle weight with trailer
The total gross vehicle weight with trailer
must not exceed the
must not exceed the must not exceed the
must not exceed the
must not exceed the Gross Vehicle Weight
Gross Vehicle Weight Gross Vehicle Weight
Gross Vehicle Weight
Gross Vehicle Weight
Rating (GVWR) shown on the vehicle
Rating (GVWR) shown on the vehicle Rating (GVWR) shown on the vehicle
Rating (GVWR) shown on the vehicle
Rating (GVWR) shown on the vehicle
identification plate
identification plate identification plate
identification plate
identification plate (see page 1-2). The
(see page 1-2). The (see page 1-2). The
(see page 1-2). The
(see page 1-2). The
total gross vehicle weight
total gross vehicle weight total gross vehicle weight
total gross vehicle weight
total gross vehicle weight
is the com-
is the com- is the com-
is the com-
is the com-
bined weight of the vehicle, driver, all
bined weight of the vehicle, driver, all bined weight of the vehicle, driver, all
bined weight of the vehicle, driver, all
bined weight of the vehicle, driver, all
passengers and their luggage,
passengers and their luggage, passengers and their luggage,
passengers and their luggage,
passengers and their luggage,
cargo,
cargo, cargo,
cargo,
cargo,
hitch, trailer tongue load and other op-
hitch, trailer tongue load and other op- hitch, trailer tongue load and other op-
hitch, trailer tongue load and other op-
hitch, trailer tongue load and other op-
tional equipment.
tional equipment. tional equipment.
tional equipment.
tional equipment.
3.3.
3.3.
3.
The front or rear axle weight must not
The front or rear axle weight must not The front or rear axle weight must not
The front or rear axle weight must not
The front or rear axle weight must not
exceed the Gross Axle Weight
exceed the Gross Axle Weight exceed the Gross Axle Weight
exceed the Gross Axle Weight
exceed the Gross Axle Weight
Rating
Rating Rating
Rating
Rating
(GAWR) shown on the vehicle identifica-
(GAWR) shown on the vehicle identifica- (GAWR) shown on the vehicle identifica-
(GAWR) shown on the vehicle identifica-
(GAWR) shown on the vehicle identifica-
tion plate (see page 1-2). It is possible
tion plate (see page 1-2). It is possible tion plate (see page 1-2). It is possible
tion plate (see page 1-2). It is possible
tion plate (see page 1-2). It is possible
that your towing package does not ex-
that your towing package does not ex- that your towing package does not ex-
that your towing package does not ex-
that your towing package does not ex-
ceed
ceed ceed
ceed
ceed the GVWR but exceeds the GAWR.
the GVWR but exceeds the GAWR. the GVWR but exceeds the GAWR.
the GVWR but exceeds the GAWR.
the GVWR but exceeds the GAWR.
Improper trailer loading and/or too much
Improper trailer loading and/or too much Improper trailer loading and/or too much
Improper trailer loading and/or too much
Improper trailer loading and/or too much
luggage
luggage luggage
luggage
luggage in the tail gate can overload the
in the tail gate can overload the in the tail gate can overload the
in the tail gate can overload the
in the tail gate can overload the
rear axle. Redistribute the load and check
rear axle. Redistribute the load and check rear axle. Redistribute the load and check
rear axle. Redistribute the load and check
rear axle. Redistribute the load and check
the the
the the
the axle weight again.
axle weight again. axle weight again.
axle weight again.
axle weight again.
4.4.
4.4.
4. The maximum permissible static vertical
The maximum permissible static vertical The maximum permissible static vertical
The maximum permissible static vertical
The maximum permissible static vertical
load on the coupling device is 75 kg.
load on the coupling device is 75 kg. load on the coupling device is 75 kg.
load on the coupling device is 75 kg.
load on the coupling device is 75 kg.
Page 126 of 173
IN CASE OF EMERGENCY
IN CASE OF EMERGENCY IN CASE OF EMERGENCY
IN CASE OF EMERGENCY
IN CASE OF EMERGENCY
4-11
9. If the trailer has electric brakes, start your
vehicle and trailer moving, and then apply the trailer brake controller by hand to besure the brakes are working. This lets you
check your electrical connection at the sametime.
10. During your trip, check occasionally to be sure that the load is secure, and that thelights and any trailer brakes are still working.
11. Avoid jerky starts, sudden acceleration or sudden stops.
12. Avoid sharp turns and rapid lane changes.
13. Avoid holding the brake pedal down too long or too frequently. This could cause the brakes to overheat, resulting in reduced brakingefficiency.
14. When going down a hill, shift into a lower gear and use the engine braking effect.When ascending a long grade, downshift the
transmission to a lower gear and reducespeed to reduce chances of engine over-
loading and/or overheating.
15. If you have to stop while going uphill, do not hold the vehicle in place by pressing on theaccelerator. This can cause the automatictransmission to overheat. Use the parkingbrake or footbrake.
NOTE:
NOTE: NOTE:
NOTE:
NOTE:
When towing, check transmission fluid more
When towing, check transmission fluid more When towing, check transmission fluid more
When towing, check transmission fluid more
When towing, check transmission fluid more frequently.
frequently. frequently.
frequently.
frequently. CAUTION:
CAUTION: CAUTION:
CAUTION:
CAUTION:
If overheating should occur when towing,
If overheating should occur when towing, If overheating should occur when towing,
If overheating should occur when towing,
If overheating should occur when towing,(temperature gauge
(temperature gauge (temperature gauge
(temperature gauge
(temperature gauge
reads near red zone),
reads near red zone), reads near red zone),
reads near red zone),
reads near red zone),
taking the following action may reduce or
taking the following action may reduce or taking the following action may reduce or
taking the following action may reduce or
taking the following action may reduce or
eliminate
eliminate eliminate
eliminate
eliminate
the problem.
the problem. the problem.
the problem.
the problem.
1.1.
1.1.
1. Turn off the air conditioner.
Turn off the air conditioner. Turn off the air conditioner.
Turn off the air conditioner.
Turn off the air conditioner.
2.2.
2.2.
2. Reduce highway speed.
Reduce highway speed. Reduce highway speed.
Reduce highway speed.
Reduce highway speed.
3.3.
3.3.
3. Select a lower gear when going uphill.
Select a lower gear when going uphill. Select a lower gear when going uphill.
Select a lower gear when going uphill.
Select a lower gear when going uphill.
4.4.
4.4.
4. While in stop and go traffic, place the
While in stop and go traffic, place the While in stop and go traffic, place the
While in stop and go traffic, place the
While in stop and go traffic, place the
gear selection in park
gear selection in park gear selection in park
gear selection in park
gear selection in park or neutral and idle
or neutral and idle or neutral and idle
or neutral and idle
or neutral and idle
the engine at a higher speed.
the engine at a higher speed. the engine at a higher speed.
the engine at a higher speed.
the engine at a higher speed.
C190F01A-GAT
Trailer or Vehicle Towing Tips
Trailer or Vehicle Towing Tips Trailer or Vehicle Towing Tips
Trailer or Vehicle Towing Tips
Trailer or Vehicle Towing Tips
1. Before towing, check hitch and safety chain
connections as well as proper operation of the trailer running lights, brake lights, andturn signals.
2. Always drive your vehicle at a moderate speed (Less than 100 km/h).
3. Trailer towing requires more fuel than nor- mal conditions.
4. To maintain engine braking efficiency and electrical charging performance, do not usefifth gear (manual transmission) or overdrive(automatic transmission).
5. Always secure items in the trailer to prevent load shift while driving.
6. Check the condition and air pressure of all tires on the trailer and your car. Low tirepressure can seriously affect the handling.
Also check the spare tire.
7. The vehicle/trailer combination is more af- fected by crosswind and buffeting. Whenbeing passed by a large vehicle, keep aconstant speed and steer straight ahead. Ifthere is too much wind buffeting slow downto get out of the other vehicle’s air turbu-lence.
8. When parking your car and trailer, especial- ly on a hill, be sure to follow all the normalprecautions. Turn your front wheel into the
curb, set the parking brake firmly, and putthe transmission in 1st or Reverse (manual)or Park (automatic). In addition, place wheel
chocks at each of the trailer’s tires. D030A01A-AAT
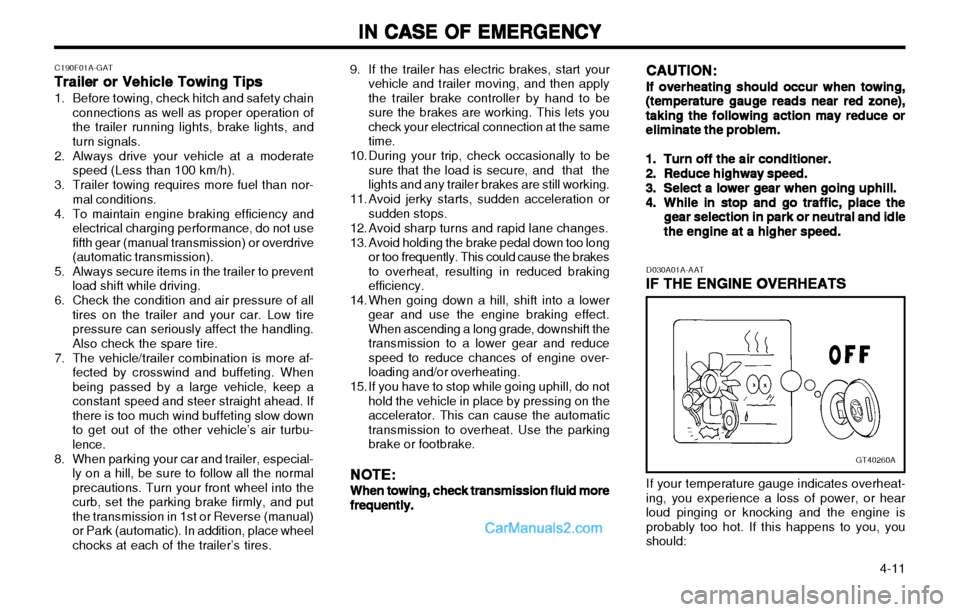
IF THE ENGINE OVERHEATS
IF THE ENGINE OVERHEATS IF THE ENGINE OVERHEATS
IF THE ENGINE OVERHEATS
IF THE ENGINE OVERHEATS
GT40260A
If your temperature gauge indicates overheat-
ing, you experience a loss of power, or hear loud pinging or knocking and the engine isprobably too hot. If this happens to you, youshould:
Page 127 of 173

IN CASE OF EMERGENCY
IN CASE OF EMERGENCY IN CASE OF EMERGENCY
IN CASE OF EMERGENCY
IN CASE OF EMERGENCY
4-12 normal for cold water to be draining from it when you stop).
WARNING:
WARNING: WARNING:
WARNING:
WARNING:
While the engine is running, keep hair, hands,
While the engine is running, keep hair, hands, While the engine is running, keep hair, hands,
While the engine is running, keep hair, hands,
While the engine is running, keep hair, hands,
long hair and
long hair and long hair and
long hair and
long hair and clothing away from moving
clothing away from moving clothing away from moving
clothing away from moving
clothing away from moving
parts such as the fan and drive belts to
parts such as the fan and drive belts to parts such as the fan and drive belts to
parts such as the fan and drive belts to
parts such as the fan and drive belts to
prevent
prevent prevent
prevent
prevent injury.
injury. injury.
injury.
injury.
5. If the water pump drive belt is broken or engine coolant is leaking out, stop the en-gine immediately and call the nearestHyundai dealer for assistance.
WARNING:
WARNING: WARNING:
WARNING:
WARNING:
Do not remove the radiator cap when the
Do not remove the radiator cap when the Do not remove the radiator cap when the
Do not remove the radiator cap when the
Do not remove the radiator cap when the
engine is hot. This
engine is hot. This engine is hot. This
engine is hot. This
engine is hot. This can allow coolant to be
can allow coolant to be can allow coolant to be
can allow coolant to be
can allow coolant to be
blown out of the opening and cause serious
blown out of the opening and cause serious blown out of the opening and cause serious
blown out of the opening and cause serious
blown out of the opening and cause serious
burns.
burns. burns.
burns.
burns.
GS40280A
6. If you cannot find the cause of the overheat-
ing, wait until the engine temperature has returned to normal. Then, if engine coolant
has been lost, carefully remove the radiator
cap and add engine coolant to bring the fluidlevel in the reservoir up to the halfway mark.
7. Proceed with caution, keeping alert for fur- ther signs of overheating. If overheating hap-pens again, call a Hyundai dealer for assis-tance.
CAUTION:
CAUTION: CAUTION:
CAUTION:
CAUTION:
Serious loss of engine coolant indicates
Serious loss of engine coolant indicates Serious loss of engine coolant indicates
Serious loss of engine coolant indicates
Serious loss of engine coolant indicates
there is a leak in
there is a leak in there is a leak in
there is a leak in
there is a leak in the cooling system and this
the cooling system and this the cooling system and this
the cooling system and this
the cooling system and this
should be checked as soon as possible by a
should be checked as soon as possible by a should be checked as soon as possible by a
should be checked as soon as possible by a
should be checked as soon as possible by a
Hyundai
Hyundai Hyundai
Hyundai
Hyundai dealer.
dealer. dealer.
dealer.
dealer.
GS40270A
3. If engine coolant is running out under the car
or steam is coming out from the hood, stop the engine. Do not open the hood until theengine coolant has stopped running or thesteaming has stopped. If there is no visibleloss of engine coolant and no steam, leavethe engine running and check to be sure theengine cooling fan is operating. If the fan isnot running, turn the engine off.
4. Check to see if the water pump drive belt is missing. If it is not missing, check to seethat it is tight. If the drive belt seems to besatisfactory, check for engine coolant leak-ing from the radiator, hoses or under the car.(If the air conditioning had been in use, it is
1. Pull off the road and stop as soon as it is
safe to do so.
2. Place the gear selector lever in "P" (auto- matic), or neutral (manual transmission) andset the parking brake. If the air conditioning
is on, turn it off.
Page 128 of 173
IN CASE OF EMERGENCY
IN CASE OF EMERGENCY IN CASE OF EMERGENCY
IN CASE OF EMERGENCY
IN CASE OF EMERGENCY
4-13
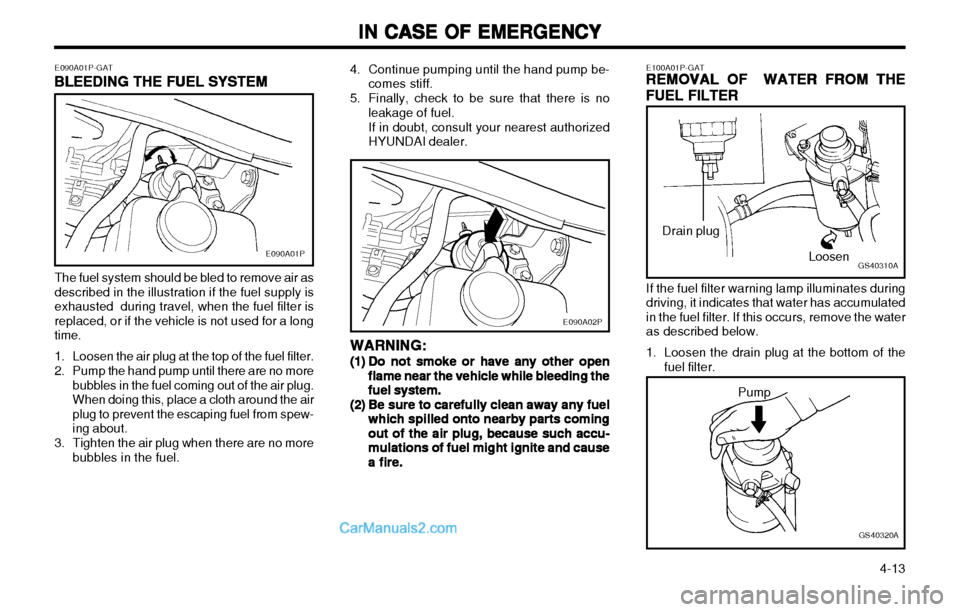
E090A01P-GATBLEEDING THE FUEL SYSTEM
BLEEDING THE FUEL SYSTEM BLEEDING THE FUEL SYSTEM
BLEEDING THE FUEL SYSTEM
BLEEDING THE FUEL SYSTEM
E090A01P
The fuel system should be bled to remove air as described in the illustration if the fuel supply isexhausted during travel, when the fuel filter isreplaced, or if the vehicle is not used for a longtime.
1. Loosen the air plug at the top of the fuel filter.
2. Pump the hand pump until there are no more bubbles in the fuel coming out of the air plug. When doing this, place a cloth around the airplug to prevent the escaping fuel from spew-ing about.
3. Tighten the air plug when there are no more bubbles in the fuel.
E100A01P-GATREMOVAL OF WATER FROM THE
REMOVAL OF WATER FROM THE REMOVAL OF WATER FROM THE
REMOVAL OF WATER FROM THE
REMOVAL OF WATER FROM THE
FUEL FILTER
FUEL FILTER FUEL FILTER
FUEL FILTER
FUEL FILTER
GS40310ALoosen
Drain plug
If the fuel filter warning lamp illuminates during driving, it indicates that water has accumulatedin the fuel filter. If this occurs, remove the wateras described below.
1. Loosen the drain plug at the bottom of the fuel filter.
GS40320A
Pump
4. Continue pumping until the hand pump be-
comes stiff.
5. Finally, check to be sure that there is no leakage of fuel. If in doubt, consult your nearest authorized HYUNDAI dealer.
WARNING:
WARNING: WARNING:
WARNING:
WARNING:
(1)(1)
(1)(1)
(1) Do not smoke or have any other open
Do not smoke or have any other open Do not smoke or have any other open
Do not smoke or have any other open
Do not smoke or have any other open
flame near the vehicle while bleeding the
flame near the vehicle while bleeding the flame near the vehicle while bleeding the
flame near the vehicle while bleeding the
flame near the vehicle while bleeding the
fuel system.
fuel system. fuel system.
fuel system.
fuel system.
(2)(2)
(2)(2)
(2) Be sure to carefully clean away any fuel
Be sure to carefully clean away any fuel Be sure to carefully clean away any fuel
Be sure to carefully clean away any fuel
Be sure to carefully clean away any fuel
which spilled onto nearby parts coming
which spilled onto nearby parts coming which spilled onto nearby parts coming
which spilled onto nearby parts coming
which spilled onto nearby parts coming
out of the air plug, because such accu-
out of the air plug, because such accu- out of the air plug, because such accu-
out of the air plug, because such accu-
out of the air plug, because such accu-
mulations of fuel might ignite and cause
mulations of fuel might ignite and cause mulations of fuel might ignite and cause
mulations of fuel might ignite and cause
mulations of fuel might ignite and cause
a fire.
a fire. a fire.
a fire.
a fire.
E090A02P
 1
1 2
2 3
3 4
4 5
5 6
6 7
7 8
8 9
9 10
10 11
11 12
12 13
13 14
14 15
15 16
16 17
17 18
18 19
19 20
20 21
21 22
22 23
23 24
24 25
25 26
26 27
27 28
28 29
29 30
30 31
31 32
32 33
33 34
34 35
35 36
36 37
37 38
38 39
39 40
40 41
41 42
42 43
43 44
44 45
45 46
46 47
47 48
48 49
49 50
50 51
51 52
52 53
53 54
54 55
55 56
56 57
57 58
58 59
59 60
60 61
61 62
62 63
63 64
64 65
65 66
66 67
67 68
68 69
69 70
70 71
71 72
72 73
73 74
74 75
75 76
76 77
77 78
78 79
79 80
80 81
81 82
82 83
83 84
84 85
85 86
86 87
87 88
88 89
89 90
90 91
91 92
92 93
93 94
94 95
95 96
96 97
97 98
98 99
99 100
100 101
101 102
102 103
103 104
104 105
105 106
106 107
107 108
108 109
109 110
110 111
111 112
112 113
113 114
114 115
115 116
116 117
117 118
118 119
119 120
120 121
121 122
122 123
123 124
124 125
125 126
126 127
127 128
128 129
129 130
130 131
131 132
132 133
133 134
134 135
135 136
136 137
137 138
138 139
139 140
140 141
141 142
142 143
143 144
144 145
145 146
146 147
147 148
148 149
149 150
150 151
151 152
152 153
153 154
154 155
155 156
156 157
157 158
158 159
159 160
160 161
161 162
162 163
163 164
164 165
165 166
166 167
167 168
168 169
169 170
170 171
171 172
172


