Page 57 of 173
INSTRUMENTS & CONTROLS
INSTRUMENTS & CONTROLS INSTRUMENTS & CONTROLS
INSTRUMENTS & CONTROLS
INSTRUMENTS & CONTROLS
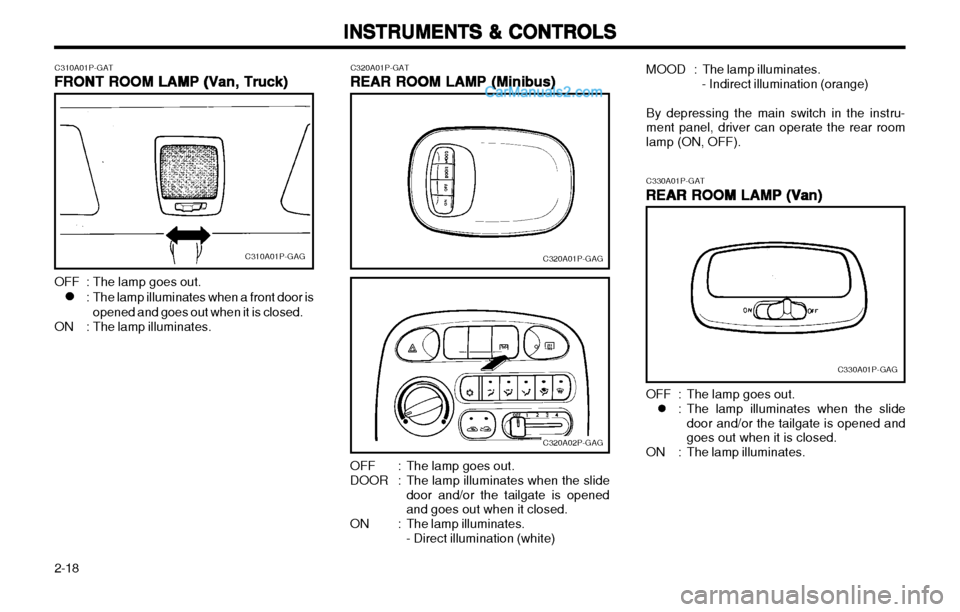
2-18 C320A01P-GAT
REAR ROOM LAMP (Minibus)
REAR ROOM LAMP (Minibus) REAR ROOM LAMP (Minibus)
REAR ROOM LAMP (Minibus)
REAR ROOM LAMP (Minibus)
C320A01P-GAG
C320A02P-GAGC330A01P-GAT
REAR ROOM LAMP (Van)
REAR ROOM LAMP (Van) REAR ROOM LAMP (Van)
REAR ROOM LAMP (Van)
REAR ROOM LAMP (Van)
C330A01P-GAG
OFF : The lamp goes out. � : The lamp illuminates when the slide
door and/or the tailgate is opened and goes out when it is closed.
ON : The lamp illuminates.
OFF : The lamp goes out.
DOOR : The lamp illuminates when the slide
door and/or the tailgate is opened and goes out when it closed.
ON : The lamp illuminates.
- Direct illumination (white) MOOD : The lamp illuminates.
- Indirect illumination (orange)
By depressing the main switch in the instru-ment panel, driver can operate the rear roomlamp (ON, OFF).
OFF : The lamp goes out.
� � : The lamp illuminates when a front door is
opened and goes out when it is closed.
ON : The lamp illuminates. C310A01P-GAT
FRONT ROOM LAMP (Van, Truck)
FRONT ROOM LAMP (Van, Truck) FRONT ROOM LAMP (Van, Truck)
FRONT ROOM LAMP (Van, Truck)
FRONT ROOM LAMP (Van, Truck)
C310A01P-GAG
Page 58 of 173
2-19
INSTRUMENTS & CONTROLS
INSTRUMENTS & CONTROLS INSTRUMENTS & CONTROLS
INSTRUMENTS & CONTROLS
INSTRUMENTS & CONTROLS
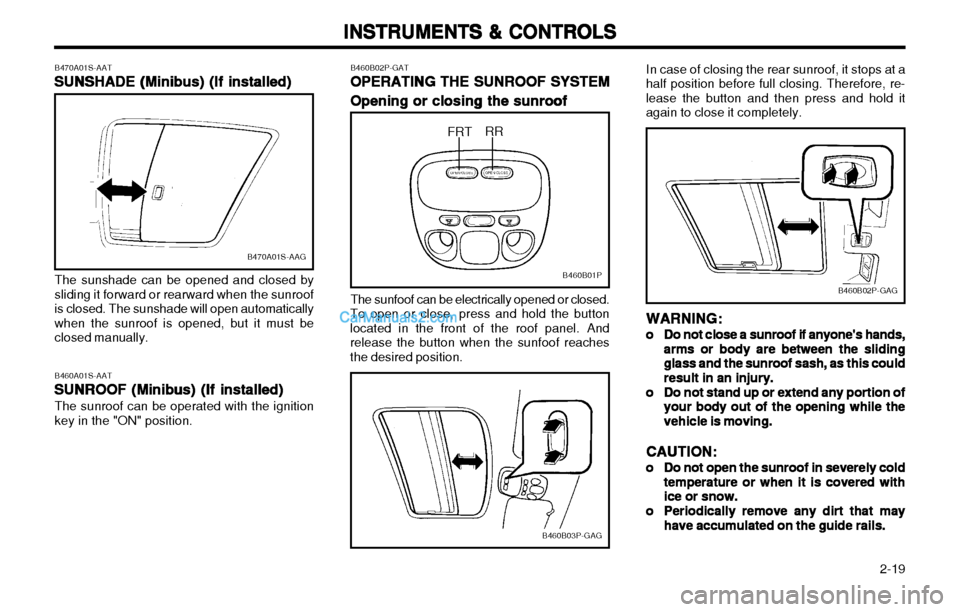
B470A01S-AAT SUNSHADE (Minibus) (If installed)
SUNSHADE (Minibus) (If installed) SUNSHADE (Minibus) (If installed)
SUNSHADE (Minibus) (If installed)
SUNSHADE (Minibus) (If installed)
B470A01S-AAG
The sunshade can be opened and closed by
sliding it forward or rearward when the sunroof
is closed. The sunshade will open automaticallywhen the sunroof is opened, but it must beclosed manually. B460A01S-AAT
SUNROOF (Minibus) (If installed)
SUNROOF (Minibus) (If installed) SUNROOF (Minibus) (If installed)
SUNROOF (Minibus) (If installed)
SUNROOF (Minibus) (If installed)
The sunroof can be operated with the ignition
key in the "ON" position. B460B02P-GAT
OPERATING THE SUNROOF SYSTEM
OPERATING THE SUNROOF SYSTEM OPERATING THE SUNROOF SYSTEM
OPERATING THE SUNROOF SYSTEM
OPERATING THE SUNROOF SYSTEM
Opening or closing the sunroof
Opening or closing the sunroof Opening or closing the sunroof
Opening or closing the sunroof
Opening or closing the sunroofB460B01P
FRT RR
The sunfoof can be electrically opened or closed.
To open or close, press and hold the button located in the front of the roof panel. Andrelease the button when the sunfoof reachesthe desired position.
B460B03P-GAG
B460B02P-GAG
In case of closing the rear sunroof, it stops at a
half position before full closing. Therefore, re- lease the button and then press and hold itagain to close it completely.
WARNING:
WARNING: WARNING:
WARNING:
WARNING:
oo
oo
o Do not close a sunroof if anyone's hands,
Do not close a sunroof if anyone's hands, Do not close a sunroof if anyone's hands,
Do not close a sunroof if anyone's hands,
Do not close a sunroof if anyone's hands,
arms or body are between the sliding
arms or body are between the sliding arms or body are between the sliding
arms or body are between the sliding
arms or body are between the sliding
glass and the sunroof sash, as this could
glass and the sunroof sash, as this could glass and the sunroof sash, as this could
glass and the sunroof sash, as this could
glass and the sunroof sash, as this could
result in an injury.
result in an injury. result in an injury.
result in an injury.
result in an injury.
oo
oo
o Do not stand up or extend any portion of
Do not stand up or extend any portion of Do not stand up or extend any portion of
Do not stand up or extend any portion of
Do not stand up or extend any portion of
your body out of the opening while the
your body out of the opening while the your body out of the opening while the
your body out of the opening while the
your body out of the opening while the
vehicle is moving.
vehicle is moving. vehicle is moving.
vehicle is moving.
vehicle is moving.
CAUTION:
CAUTION: CAUTION:
CAUTION:
CAUTION:
oo
oo
o Do not open the sunroof in severely cold
Do not open the sunroof in severely cold Do not open the sunroof in severely cold
Do not open the sunroof in severely cold
Do not open the sunroof in severely cold
temperature or when it is covered with
temperature or when it is covered with temperature or when it is covered with
temperature or when it is covered with
temperature or when it is covered with
ice or snow.
ice or snow. ice or snow.
ice or snow.
ice or snow.
oo
oo
o Periodically remove any dirt that may
Periodically remove any dirt that may Periodically remove any dirt that may
Periodically remove any dirt that may
Periodically remove any dirt that may
have accumulated on the guide rails.
have accumulated on the guide rails. have accumulated on the guide rails.
have accumulated on the guide rails.
have accumulated on the guide rails.
Page 59 of 173

INSTRUMENTS & CONTROLS
INSTRUMENTS & CONTROLS INSTRUMENTS & CONTROLS
INSTRUMENTS & CONTROLS
INSTRUMENTS & CONTROLS
2-20
B460E01P-GAG
B460E01P-GAT Rear sunroof
Rear sunroof Rear sunroof
Rear sunroof
Rear sunroof
The rear sunroof can be electrically opened or closed. To open or to close, press and hold thebutton located on the center of the roof panel.Release the button when the sunroof reachesthe desired position. As a precaution whenclosing , it stops at a half position before fullyclosing. Therefore, release the button and thenpress it again to close it completely.Manual Operation of Sunroof
Manual Operation of Sunroof Manual Operation of Sunroof
Manual Operation of Sunroof
Manual Operation of Sunroof
If the sunroof does not electrically operate:
1. Remove the plastic cover in the roof panel.
2. Insert the hexagonal head wrench in to the socket. This wrench can be founded in the tool bag at the right corner of the vehicle.
3. Turn the wrench clockwise to open or counter clockwise to close. C340A01P-GAT
SUNVISOR
SUNVISOR SUNVISOR
SUNVISOR
SUNVISOR
C340A01P-GAG
Vanity Mirror
Your Hyundai is equipped with sunvisors to give the driver and front passenger either fron-tal or sideward shade. The sunvisors are installed on both sides. To reduce glare or to shut out direct rays of thesun, turn the sunvisor down to block the annoy-ance. A vanity mirror is provided on the back of the sunvisor for the front passenger. (If installed) CAUTION:
CAUTION: CAUTION:
CAUTION:
CAUTION:
Do not place the sunvisor in such a manner
Do not place the sunvisor in such a manner Do not place the sunvisor in such a manner
Do not place the sunvisor in such a manner
Do not place the sunvisor in such a manner
that it obscures visibility or the roadway,
that it obscures visibility or the roadway, that it obscures visibility or the roadway,
that it obscures visibility or the roadway,
that it obscures visibility or the roadway,
traffic or other objects.
traffic or other objects. traffic or other objects.
traffic or other objects.
traffic or other objects.
oo
oo
o After washing the car or after there being
After washing the car or after there being After washing the car or after there being
After washing the car or after there being
After washing the car or after there being
rain, be sure to wipe off any water that is
rain, be sure to wipe off any water that is rain, be sure to wipe off any water that is
rain, be sure to wipe off any water that is
rain, be sure to wipe off any water that is
on the sunroof before operating it.
on the sunroof before operating it. on the sunroof before operating it.
on the sunroof before operating it.
on the sunroof before operating it.
SSA1330D
B460D01P-GAT
Manual Operation of Sunroof
Manual Operation of Sunroof Manual Operation of Sunroof
Manual Operation of Sunroof
Manual Operation of Sunroof
If the sunroof does not electrically operate:
1. Remove the rectangular plastic cover in the front of the roof panel.
2. Insert the hexagonal head wrench into the socket. This wrench can be found in the tool bag at the right corner of the vehicle.
3. Turn the wrench clockwise to open or coun- terclockwise to close.
Page 60 of 173

2-21
INSTRUMENTS & CONTROLS
INSTRUMENTS & CONTROLS INSTRUMENTS & CONTROLS
INSTRUMENTS & CONTROLS
INSTRUMENTS & CONTROLS
B630A02P-GAT ROOF RACK (Minibus) (If installed)
ROOF RACK (Minibus) (If installed) ROOF RACK (Minibus) (If installed)
ROOF RACK (Minibus) (If installed)
ROOF RACK (Minibus) (If installed)
C630A01P-GAG
If your Hyundai has a roof rack, you can load things on top of your vehicle. Crossrails andfixing components to adapt roof rack on yourvehicle may be obtained from an authorizedHyundai dealer. Hyundai dealers are prepared to provide high quality service that may be required.
CAUTION:
CAUTION: CAUTION:
CAUTION:
CAUTION:
oo
oo
o The following specifications are recom-
The following specifications are recom- The following specifications are recom-
The following specifications are recom-
The following specifications are recom-
mended when loading cargo or luggage.
mended when loading cargo or luggage. mended when loading cargo or luggage.
mended when loading cargo or luggage.
mended when loading cargo or luggage.
ROOF RACK
80 kg (174 lb)
oo
oo
o Loading cargo or luggage above 80 kg
Loading cargo or luggage above 80 kg Loading cargo or luggage above 80 kg
Loading cargo or luggage above 80 kg
Loading cargo or luggage above 80 kg
(174 lb) on the roof rack may damage
(174 lb) on the roof rack may damage (174 lb) on the roof rack may damage
(174 lb) on the roof rack may damage
(174 lb) on the roof rack may damage
your vehicle.
your vehicle. your vehicle.
your vehicle.
your vehicle.
When you carry large objects, never let
When you carry large objects, never let When you carry large objects, never let
When you carry large objects, never let
When you carry large objects, never let
them hang over the rear or the sides of
them hang over the rear or the sides of them hang over the rear or the sides of
them hang over the rear or the sides of
them hang over the rear or the sides of
your vehicle.
your vehicle. your vehicle.
your vehicle.
your vehicle.
GS30130A
Lever
B520A01A-AAT
DAY/NIGHT INSIDE REARVIEW MIR-
DAY/NIGHT INSIDE REARVIEW MIR- DAY/NIGHT INSIDE REARVIEW MIR-
DAY/NIGHT INSIDE REARVIEW MIR-
DAY/NIGHT INSIDE REARVIEW MIR-
ROR (If installed)
ROR (If installed) ROR (If installed)
ROR (If installed)
ROR (If installed)
Your Hyundai is equipped with a day/night
inside rearview mirror.
The "night" position is selected by flipping the
tab at the bottom of the mirror toward you. In the "night" position, the glare of headlights of cars behind you is reduced.
oo
oo
o To prevent damage or loss of cargo as
To prevent damage or loss of cargo as To prevent damage or loss of cargo as
To prevent damage or loss of cargo as
To prevent damage or loss of cargo as
you are driving, check now and then to
you are driving, check now and then to you are driving, check now and then to
you are driving, check now and then to
you are driving, check now and then to
make sure the luggage carrier and cargo
make sure the luggage carrier and cargo make sure the luggage carrier and cargo
make sure the luggage carrier and cargo
make sure the luggage carrier and cargo
are still securely fastened.
are still securely fastened. are still securely fastened.
are still securely fastened.
are still securely fastened.
oo
oo
o
Always drive your vehicle at a moderate
Always drive your vehicle at a moderate Always drive your vehicle at a moderate
Always drive your vehicle at a moderate
Always drive your vehicle at a moderate
speed.
speed. speed.
speed.
speed.
oo
oo
o To use the roof rails as a roof rack, you
To use the roof rails as a roof rack, you To use the roof rails as a roof rack, you
To use the roof rails as a roof rack, you
To use the roof rails as a roof rack, you
must fit the roof rails with two or more
must fit the roof rails with two or more must fit the roof rails with two or more
must fit the roof rails with two or more
must fit the roof rails with two or more
crossrails or equivalent.
crossrails or equivalent. crossrails or equivalent.
crossrails or equivalent.
crossrails or equivalent. C370A01P-GAT
OUTSIDE REAR VIEW MIRROR
OUTSIDE REAR VIEW MIRROR OUTSIDE REAR VIEW MIRROR
OUTSIDE REAR VIEW MIRROR
OUTSIDE REAR VIEW MIRROR
Manual Type (If installed)
Manual Type (If installed) Manual Type (If installed)
Manual Type (If installed)
Manual Type (If installed) Before driving away, always check that your mirror is positioned so you can see directlybehind you. When using the mirror, alwaysexercise caution when attempting to judge thedistance of vehicles behind you.
HSR2319
Page 61 of 173

INSTRUMENTS & CONTROLS
INSTRUMENTS & CONTROLS INSTRUMENTS & CONTROLS
INSTRUMENTS & CONTROLS
INSTRUMENTS & CONTROLS
2-22 B510D01Y-AAT
OUTSIDE REARVIEW MIRROR HEAT-
OUTSIDE REARVIEW MIRROR HEAT- OUTSIDE REARVIEW MIRROR HEAT-
OUTSIDE REARVIEW MIRROR HEAT-
OUTSIDE REARVIEW MIRROR HEAT-
ER (If installed)
ER (If installed) ER (If installed)
ER (If installed)
ER (If installed)
B510D01Y-AAG
The outside rearview mirror heater is actuated
in connection with rear window defroster. So, toheat the outside rearview mirror glass, push inthe switch for rear window defroster. The rear-
view mirror glass will be heated for defrosting ordefogging and will give you improved rear vi-
sion in all weather conditions. Push the switch
again to turn the heater off. The outside rear-view mirror heater automatically turns itself offafter 15 minutes. B450A01S-AAT
DRINK HOLDER (If installed)
DRINK HOLDER (If installed) DRINK HOLDER (If installed)
DRINK HOLDER (If installed)
DRINK HOLDER (If installed)
The drink holder is located on the front mainconsole for holding cups or cans in its holes.
The drink holder can be used by pushing it at itstop edge. CAUTION:
CAUTION: CAUTION:
CAUTION:
CAUTION:
Place the drink holder in its original position
Place the drink holder in its original position Place the drink holder in its original position
Place the drink holder in its original position
Place the drink holder in its original position
while not in
while not in while not in
while not in
while not in
use.use.
use.use.
use.
WARNING:
WARNING: WARNING:
WARNING:
WARNING:
Do not place anything else on the drink
Do not place anything else on the drink Do not place anything else on the drink
Do not place anything else on the drink
Do not place anything else on the drink
holder. Such objects
holder. Such objects holder. Such objects
holder. Such objects
holder. Such objects can be thrown out,
can be thrown out, can be thrown out,
can be thrown out,
can be thrown out,
possibly injuring persons in the vehicle dur-
possibly injuring persons in the vehicle dur- possibly injuring persons in the vehicle dur-
possibly injuring persons in the vehicle dur-
possibly injuring persons in the vehicle dur-
ing sudden
ing sudden ing sudden
ing sudden
ing sudden braking or in an accident.
braking or in an accident. braking or in an accident.
braking or in an accident.
braking or in an accident.
C370B01P-GAT
Electric Type (If installed)
Electric Type (If installed) Electric Type (If installed)
Electric Type (If installed)
Electric Type (If installed)
The outside rear view mirror can be adjusted in
any direction to give the maximum rear-viewvision.
The remote control outside rear view mirror
switch controls the adjustments for both rightand left door mirror.
To adjust the position of either mirror:
To adjust the position of either mirror: To adjust the position of either mirror:
To adjust the position of either mirror:
To adjust the position of either mirror:
1. Move the selecting switch to the "R" (or "L")
position to activate the adjustable mecha- nism for the adjusting door mirror.
2. Now, adjust mirror angle by depressing the appropriate perimeter switch as illustrated.
HSR2320HSR2318
Page 62 of 173
2-23
INSTRUMENTS & CONTROLS
INSTRUMENTS & CONTROLS INSTRUMENTS & CONTROLS
INSTRUMENTS & CONTROLS
INSTRUMENTS & CONTROLS
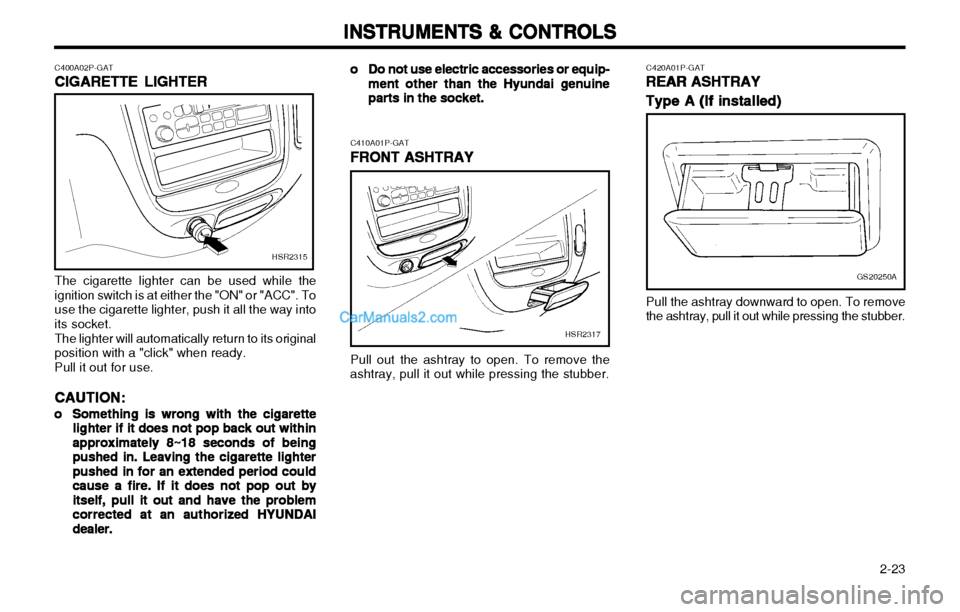
C400A02P-GAT
CIGARETTE LIGHTER
CIGARETTE LIGHTER CIGARETTE LIGHTER
CIGARETTE LIGHTER
CIGARETTE LIGHTER The cigarette lighter can be used while the ignition switch is at either the "ON" or "ACC". Touse the cigarette lighter, push it all the way intoits socket. The lighter will automatically return to its original position with a "click" when ready. Pull it out for use.
CAUTION:
CAUTION: CAUTION:
CAUTION:
CAUTION:
oo
oo
o Something is wrong with the cigarette
Something is wrong with the cigarette Something is wrong with the cigarette
Something is wrong with the cigarette
Something is wrong with the cigarette
lighter if it does not pop back out within
lighter if it does not pop back out within lighter if it does not pop back out within
lighter if it does not pop back out within
lighter if it does not pop back out within
approximately 8~18 seconds of being
approximately 8~18 seconds of being approximately 8~18 seconds of being
approximately 8~18 seconds of being
approximately 8~18 seconds of being
pushed in. Leaving the cigarette lighter
pushed in. Leaving the cigarette lighter pushed in. Leaving the cigarette lighter
pushed in. Leaving the cigarette lighter
pushed in. Leaving the cigarette lighter
pushed in for an extended period could
pushed in for an extended period could pushed in for an extended period could
pushed in for an extended period could
pushed in for an extended period could
cause a fire. If it does not pop out by
cause a fire. If it does not pop out by cause a fire. If it does not pop out by
cause a fire. If it does not pop out by
cause a fire. If it does not pop out by
itself, pull it out and have the problem
itself, pull it out and have the problem itself, pull it out and have the problem
itself, pull it out and have the problem
itself, pull it out and have the problem
corrected at an authorized HYUNDAI
corrected at an authorized HYUNDAI corrected at an authorized HYUNDAI
corrected at an authorized HYUNDAI
corrected at an authorized HYUNDAI
dealer.
dealer. dealer.
dealer.
dealer. C410A01P-GAT
FRONT ASHTRAY
FRONT ASHTRAY FRONT ASHTRAY
FRONT ASHTRAY
FRONT ASHTRAY
Pull out the ashtray to open. To remove the
ashtray, pull it out while pressing the stubber. oo
oo
o Do not use electric accessories or equip-
Do not use electric accessories or equip- Do not use electric accessories or equip-
Do not use electric accessories or equip-
Do not use electric accessories or equip-
ment other than the Hyundai genuine
ment other than the Hyundai genuine ment other than the Hyundai genuine
ment other than the Hyundai genuine
ment other than the Hyundai genuine
parts in the socket.
parts in the socket. parts in the socket.
parts in the socket.
parts in the socket.
HSR2315
HSR2317
GS20250A
C420A01P-GAT
REAR ASHTRAY
REAR ASHTRAY REAR ASHTRAY
REAR ASHTRAY
REAR ASHTRAY
Type A (If installed)
Type A (If installed) Type A (If installed)
Type A (If installed)
Type A (If installed)
Pull the ashtray downward to open. To remove
the ashtray, pull it out while pressing the stubber.
Page 63 of 173

INSTRUMENTS & CONTROLS
INSTRUMENTS & CONTROLS INSTRUMENTS & CONTROLS
INSTRUMENTS & CONTROLS
INSTRUMENTS & CONTROLS
2-24
C610A02P-GAG
Lever type23 4
1
There are four controls for the heating and cooling system. They are:
1. Fan Speed Control. This is used to turn the fan on and select thefan speed.
C610A01P-GAT
HEATING AND COOLING
HEATING AND COOLING HEATING AND COOLING
HEATING AND COOLING
HEATING AND COOLING
Rotary and push button type
C610A01P-GAG43
21
C430A01P-GAT
Type B (If installed)
Type B (If installed) Type B (If installed)
Type B (If installed)
Type B (If installed) C440A01P-GAT
DIGITAL CLOCK (If installed)
DIGITAL CLOCK (If installed) DIGITAL CLOCK (If installed)
DIGITAL CLOCK (If installed)
DIGITAL CLOCK (If installed)
C440A01P-GAGC430A01P-GAG
To use the ashtray, open up the lid. To remove the ashtray, open the lid and lift
upward holding the lid. The digital clock indicates the time while the
ignition switch is at either the "ON" or "ACC" position.
Set the time by pressing the various buttons as
described below.
HH
HH
H --
--
- To adjust the hours
MM
MM
M --
--
- To adjust the minutes
RR
RR
R --
--
- To reset the minutes to zero.
Example: 10 : 01 - 10 : 29 ................... change to 10 : 00 10 : 30 - 10 : 59 ................... change to 11 : 00
Page 64 of 173

2-25
INSTRUMENTS & CONTROLS
INSTRUMENTS & CONTROLS INSTRUMENTS & CONTROLS
INSTRUMENTS & CONTROLS
INSTRUMENTS & CONTROLS
C640A01P-GATVENTILATION
VENTILATION VENTILATION
VENTILATION
VENTILATION To operate the ventilation system:
o Set the air intake control to the "Fresh"
position.
o To direct all intake air to the dashboard vents, set the air flow control to the "Face" position.
o Adjust the fan speed control to the desired speed.
o Set the temperature control between "Cool" and "Warm".
C620A01P-GAT
HEATING CONTROLS
HEATING CONTROLS HEATING CONTROLS
HEATING CONTROLS
HEATING CONTROLS
For normal heater operation, move the air in-
take control to the "Fresh" position and the airflow control to the "Floor" position.
For faster heating, the air intake control should
be placed in the intermediate position between"Fresh" and "Recirc".
For quickest heating, the control should be in
the "Recirc" position.
If the windows fog up, move the air flow control
to the "Def" (defroster) position and the airintake control to "Fresh". For maximum heat, move the temperature con-
trol to "Warm". C630A01P-GAT
BI-LEVEL HEATING
BI-LEVEL HEATING BI-LEVEL HEATING
BI-LEVEL HEATING
BI-LEVEL HEATING
Your Hyundai is equipped with bi-level heating
controls. This makes it possible to have coolerair from the dashboard vents and warmer airfrom the floor outlets at the same time. To usethis feature,
o Set the air intake control at the "Fresh" position.
o Set the air flow control at the "Bi-Level" position.
o Set the temperaute control between "Cool" and "Warm"
2. Air Intake Control.
This allows you to select fresh ( ) outside air or to recirculate ( ) inside air.
3. Air Flow Control. This is used to direct the flow of air. Air canbe directed to the floor, dashboard outlets orwindshield. Five symbols are used to repre-sent Face ( ), Bi-Level ( ), Floor ( ),Floor-Defrost ( ) and Defrost ( ) airpositions.
4. Temperature Control This is used to turn the heater on and offand to select the degree of heating desired.
B710B01A-AAT
CENTER VENTILATOR
CENTER VENTILATOR CENTER VENTILATOR
CENTER VENTILATOR
CENTER VENTILATOR
B710B01P
The center ventilators are located in the middle
of the dashboard.
To change the direction of the airflow, turn the
control knob on the middle of the ventilator as desired.
 1
1 2
2 3
3 4
4 5
5 6
6 7
7 8
8 9
9 10
10 11
11 12
12 13
13 14
14 15
15 16
16 17
17 18
18 19
19 20
20 21
21 22
22 23
23 24
24 25
25 26
26 27
27 28
28 29
29 30
30 31
31 32
32 33
33 34
34 35
35 36
36 37
37 38
38 39
39 40
40 41
41 42
42 43
43 44
44 45
45 46
46 47
47 48
48 49
49 50
50 51
51 52
52 53
53 54
54 55
55 56
56 57
57 58
58 59
59 60
60 61
61 62
62 63
63 64
64 65
65 66
66 67
67 68
68 69
69 70
70 71
71 72
72 73
73 74
74 75
75 76
76 77
77 78
78 79
79 80
80 81
81 82
82 83
83 84
84 85
85 86
86 87
87 88
88 89
89 90
90 91
91 92
92 93
93 94
94 95
95 96
96 97
97 98
98 99
99 100
100 101
101 102
102 103
103 104
104 105
105 106
106 107
107 108
108 109
109 110
110 111
111 112
112 113
113 114
114 115
115 116
116 117
117 118
118 119
119 120
120 121
121 122
122 123
123 124
124 125
125 126
126 127
127 128
128 129
129 130
130 131
131 132
132 133
133 134
134 135
135 136
136 137
137 138
138 139
139 140
140 141
141 142
142 143
143 144
144 145
145 146
146 147
147 148
148 149
149 150
150 151
151 152
152 153
153 154
154 155
155 156
156 157
157 158
158 159
159 160
160 161
161 162
162 163
163 164
164 165
165 166
166 167
167 168
168 169
169 170
170 171
171 172
172


