2003 Hyundai H-1 (Grand Starex) air condition
[x] Cancel search: air conditionPage 34 of 173

1-27
BEFORE DRIVING YOUR VEHICLE
BEFORE DRIVING YOUR VEHICLE BEFORE DRIVING YOUR VEHICLE
BEFORE DRIVING YOUR VEHICLE
BEFORE DRIVING YOUR VEHICLE
Age Group Seating Position
(Van for 3 Passengers)Front Passenger
Outboard Front Passenger
Center
0 : Up to 10 kg (0 ~ 9 months) 0+ : Up to 13 kg(0 ~ 2 years)I : 9kg to 18kg(9 months ~4 years) II & III : 15kg to
36kg (4 ~12 years)X X X X X X X X3rd
Seat
Age Group Seating Position
(Minibus for 9 Passengers)Front Passenger 2nd Seat
0 : Up to 10 kg (0 ~ 9 months)0+ : Up to 13 kg(0 ~ 2 years)I : 9kg to 18kg (9 months ~ 4 years)II & III : 15kg to
36kg (4 ~12 years)
OutboardcenterLeft
Seat Right
Seat
centerOutb-
oard cen-
ter
X X X X X X X XU U U
UF UF UF UF UF X X X XX X X XUF UF UF UF
UF UF UF UF
0 : Up to 10 kg (0 ~ 9 months)0+ : Up to 13 kg (0 ~ 2 years) I : 9kg to 18kg(9 months ~4 years)II & III : 15kg to
36kg (4 ~ 12 years) 3rd
Center
3rd
Outboard
Age Group Seating Position
(Minibus for 7 Passengers)Front
Passenger 2nd
Left Seat
G230G03P-GAT Child Seat Restraint Suitability For Seat Po-
Child Seat Restraint Suitability For Seat Po- Child Seat Restraint Suitability For Seat Po-
Child Seat Restraint Suitability For Seat Po-
Child Seat Restraint Suitability For Seat Po-
sition
sition sition
sition
sition Use child safety seats that have been officially approved and are appropriate for your children.
2nd
Right Seat
X X X
UF U U U
UF U U U
UF X X X X
portion of the belt is tight around the child restraint system and the shoulder portion of thebelt is positioned so that it cannot interfere withthe child's head or neck. After installation of thechild restraint system, try to move it in alldirections to be sure the child restraint systemis securely installed.
If you need to tighten the belt, pull more web-
bing toward the retractor. When you unbucklethe seat belt and allow it to retract, the retractorwill automatically revert back to its normal seatedpassenger emergency locking usage condition.
NOTE:
NOTE: NOTE:
NOTE:
NOTE:
oo
oo
o Before installing the child restraint sys-
Before installing the child restraint sys- Before installing the child restraint sys-
Before installing the child restraint sys-
Before installing the child restraint sys-
tem, read the instructions supplied by
tem, read the instructions supplied by tem, read the instructions supplied by
tem, read the instructions supplied by
tem, read the instructions supplied by
the child restraint system manufacturer.
the child restraint system manufacturer. the child restraint system manufacturer.
the child restraint system manufacturer.
the child restraint system manufacturer.
oo
oo
o If the seat belt does not operate as de-
If the seat belt does not operate as de- If the seat belt does not operate as de-
If the seat belt does not operate as de-
If the seat belt does not operate as de-
scribed, have the system checked imme-
scribed, have the system checked imme- scribed, have the system checked imme-
scribed, have the system checked imme-
scribed, have the system checked imme-
diately by your authorized Hyundai dealer.
diately by your authorized Hyundai dealer. diately by your authorized Hyundai dealer.
diately by your authorized Hyundai dealer.
diately by your authorized Hyundai dealer.
WARNING:
WARNING: WARNING:
WARNING:
WARNING:
Do not install any child restraint system in
Do not install any child restraint system in Do not install any child restraint system in
Do not install any child restraint system in
Do not install any child restraint system in the front passenger seat. Should an acci-
the front passenger seat. Should an acci- the front passenger seat. Should an acci-
the front passenger seat. Should an acci-
the front passenger seat. Should an acci-
dent occur and cause the passenger side
dent occur and cause the passenger side dent occur and cause the passenger side
dent occur and cause the passenger side
dent occur and cause the passenger side
airbag to deploy, it could severely injure or
airbag to deploy, it could severely injure or airbag to deploy, it could severely injure or
airbag to deploy, it could severely injure or
airbag to deploy, it could severely injure or
kill an infant or child seated in an infant or
kill an infant or child seated in an infant or kill an infant or child seated in an infant or
kill an infant or child seated in an infant or
kill an infant or child seated in an infant or
child seat. Therefore, only use a child re-
child seat. Therefore, only use a child re- child seat. Therefore, only use a child re-
child seat. Therefore, only use a child re-
child seat. Therefore, only use a child re-
straint system in the rear seat of your ve-
straint system in the rear seat of your ve- straint system in the rear seat of your ve-
straint system in the rear seat of your ve-
straint system in the rear seat of your ve-
hicle.
hicle. hicle.
hicle.
hicle.
Page 37 of 173

BEFORE DRIVING YOUR VEHICLE
BEFORE DRIVING YOUR VEHICLE BEFORE DRIVING YOUR VEHICLE
BEFORE DRIVING YOUR VEHICLE
BEFORE DRIVING YOUR VEHICLE
1-30 The SRS service reminder indicator (SRI) on the instrument panel will blink for about 6 sec-onds after the ignition key is turned to the "ON" position or after the engine is started, after which the SRI should go out.
FUA1112A
The airbag modules are located both in the center of the steering wheel and in the frontpassenger’s panel above the glove box. When
the SRSCM detects a considerable impact tothe front of the vehicle, it will automaticallydeploy the airbags.
oo
oo
o The SRS airbag system must deploy very
The SRS airbag system must deploy very The SRS airbag system must deploy very
The SRS airbag system must deploy very
The SRS airbag system must deploy very
rapidly to provide protection in a crash. If
rapidly to provide protection in a crash. If rapidly to provide protection in a crash. If
rapidly to provide protection in a crash. If
rapidly to provide protection in a crash. If
an occupant is out of position because of
an occupant is out of position because of an occupant is out of position because of
an occupant is out of position because of
an occupant is out of position because of
not wearing a seat belt, the airbag may
not wearing a seat belt, the airbag may not wearing a seat belt, the airbag may
not wearing a seat belt, the airbag may
not wearing a seat belt, the airbag may
forcefully contact the occupant causing
forcefully contact the occupant causing forcefully contact the occupant causing
forcefully contact the occupant causing
forcefully contact the occupant causing
serious or fatal injuries.
serious or fatal injuries. serious or fatal injuries.
serious or fatal injuries.
serious or fatal injuries.
B240B02P-AAT SRS Components and Functions
SRS Components and Functions SRS Components and Functions
SRS Components and Functions
SRS Components and Functions
FUA1111B
The SRS consists of the following components:
- Driver’s Side Airbag Module - Passenger’s Side Airbag Module - SRS Service Reminder Indicator (SRI)- SRS Control Module (SRSCM)
The SRSCM continually monitors all elements
while the ignition is "ON" to determine if afrontal or near-frontal impact is severe enoughto require airbag deployment.
NOTE:
NOTE: NOTE:
NOTE:
NOTE:
Be sure to read information about the SRS
Be sure to read information about the SRS Be sure to read information about the SRS
Be sure to read information about the SRS
Be sure to read information about the SRS
on the labels provided
on the labels provided on the labels provided
on the labels provided
on the labels provided
on the backside of
on the backside of on the backside of
on the backside of
on the backside of
the sun visor and in the glove box.
the sun visor and in the glove box. the sun visor and in the glove box.
the sun visor and in the glove box.
the sun visor and in the glove box.
WARNING:
WARNING: WARNING:
WARNING:
WARNING:
oo
oo
o As its name implies, the SRS is designed
As its name implies, the SRS is designed As its name implies, the SRS is designed
As its name implies, the SRS is designed
As its name implies, the SRS is designed
to work with, and be supplemental to, the
to work with, and be supplemental to, the to work with, and be supplemental to, the
to work with, and be supplemental to, the
to work with, and be supplemental to, the
driver’s and the passenger’s three point
driver’s and the passenger’s three point driver’s and the passenger’s three point
driver’s and the passenger’s three point
driver’s and the passenger’s three point
seat belt systems and is not a substitute
seat belt systems and is not a substitute seat belt systems and is not a substitute
seat belt systems and is not a substitute
seat belt systems and is not a substitute
for them. Therefore your seat belts must
for them. Therefore your seat belts must for them. Therefore your seat belts must
for them. Therefore your seat belts must
for them. Therefore your seat belts must
be worn at all times while the vehicle is in
be worn at all times while the vehicle is in be worn at all times while the vehicle is in
be worn at all times while the vehicle is in
be worn at all times while the vehicle is in
motion. In addition, the airbags deploy
motion. In addition, the airbags deploy motion. In addition, the airbags deploy
motion. In addition, the airbags deploy
motion. In addition, the airbags deploy
only in certain frontal impact conditions
only in certain frontal impact conditions only in certain frontal impact conditions
only in certain frontal impact conditions
only in certain frontal impact conditions
severe enough to likely cause significant
severe enough to likely cause significant severe enough to likely cause significant
severe enough to likely cause significant
severe enough to likely cause significant
injury to the vehicle occupants.
injury to the vehicle occupants. injury to the vehicle occupants.
injury to the vehicle occupants.
injury to the vehicle occupants.
oo
oo
o The SRS is designed to deploy the airbags
The SRS is designed to deploy the airbags The SRS is designed to deploy the airbags
The SRS is designed to deploy the airbags
The SRS is designed to deploy the airbags
only when an impact is sufficiently se-
only when an impact is sufficiently se- only when an impact is sufficiently se-
only when an impact is sufficiently se-
only when an impact is sufficiently se-
vere and when the impact angle is less
vere and when the impact angle is less vere and when the impact angle is less
vere and when the impact angle is less
vere and when the impact angle is less
than 30° from the forward longitudinal
than 30° from the forward longitudinal than 30° from the forward longitudinal
than 30° from the forward longitudinal
than 30° from the forward longitudinal
axis of the vehicle and will not deploy in
axis of the vehicle and will not deploy in axis of the vehicle and will not deploy in
axis of the vehicle and will not deploy in
axis of the vehicle and will not deploy in
side, rear or rollover impacts. Additional-
side, rear or rollover impacts. Additional- side, rear or rollover impacts. Additional-
side, rear or rollover impacts. Additional-
side, rear or rollover impacts. Additional-
ly, the airbags will only deploy once.
ly, the airbags will only deploy once. ly, the airbags will only deploy once.
ly, the airbags will only deploy once.
ly, the airbags will only deploy once.
Thus, seat belts must be worn at all
Thus, seat belts must be worn at all Thus, seat belts must be worn at all
Thus, seat belts must be worn at all
Thus, seat belts must be worn at all
times.
times. times.
times.
times.
oo
oo
o For maximum safety protection in all
For maximum safety protection in all For maximum safety protection in all
For maximum safety protection in all
For maximum safety protection in all
types of crashes, all occupants including
types of crashes, all occupants including types of crashes, all occupants including
types of crashes, all occupants including
types of crashes, all occupants including
the driver should always wear their seat
the driver should always wear their seat the driver should always wear their seat
the driver should always wear their seat
the driver should always wear their seat
belts whether or not an airbag is also
belts whether or not an airbag is also belts whether or not an airbag is also
belts whether or not an airbag is also
belts whether or not an airbag is also
provided at their seating position to min-
provided at their seating position to min- provided at their seating position to min-
provided at their seating position to min-
provided at their seating position to min-
imize the risk of severe injury or death in
imize the risk of severe injury or death in imize the risk of severe injury or death in
imize the risk of severe injury or death in
imize the risk of severe injury or death in
the event of a crash. Do not sit or lean
the event of a crash. Do not sit or lean the event of a crash. Do not sit or lean
the event of a crash. Do not sit or lean
the event of a crash. Do not sit or lean
unnecessarily close to the airbag while
unnecessarily close to the airbag while unnecessarily close to the airbag while
unnecessarily close to the airbag while
unnecessarily close to the airbag while
the vehicle is in motion.
the vehicle is in motion. the vehicle is in motion.
the vehicle is in motion.
the vehicle is in motion.
Page 40 of 173

2-1
INSTRUMENTS & CONTROLS
INSTRUMENTS & CONTROLS INSTRUMENTS & CONTROLS
INSTRUMENTS & CONTROLS
INSTRUMENTS & CONTROLS
C020A01P-1
1. Side air vent
2. Multi-function light switch
3. Horn/Driver's Side Airbag (If installed)
4. Windshield wiper/washer switch (If installed)
5. Hazard warning switch
6. Front fog light switch (If installed)
7. 4WD Switch (If installed)
8. Rear fog light switch (If installed)
9. Rear window defroster switch
10.Center air vent louver 11. Passenger's Side Airbag (If installed)
12. Glove box
13. Headlamp leveling device switch
(If installed)
14. ECT switch (A/T Only)
15. Hood release lever
16. Panel brightness control knob (=RHEOSTAT) (If installed)
17. Seat warmer switch (If installed)
18. Choke knob (If installed) 19. Steering wheel tilt lever (If installed)
20. Ignition switch
21. Rear heater switch (If installed)
22. Heater/air conditioner control panel
23. Cigarette lighter
24. Air conditioner switch (If installed)
25. Ashtray
26. Audio system (If installed)
27. Drink holder
28. Digital clock (If installed) CAUTION:
CAUTION: CAUTION:
CAUTION:
CAUTION:
When installing the container of liquid air
When installing the container of liquid air When installing the container of liquid air
When installing the container of liquid air
When installing the container of liquid air refresher inside a vehicle, do not place it
refresher inside a vehicle, do not place it refresher inside a vehicle, do not place it
refresher inside a vehicle, do not place it
refresher inside a vehicle, do not place it
near the instrument cluster nor on the crash
near the instrument cluster nor on the crash near the instrument cluster nor on the crash
near the instrument cluster nor on the crash
near the instrument cluster nor on the crash
pad surface. If there is any leakage from the
pad surface. If there is any leakage from the pad surface. If there is any leakage from the
pad surface. If there is any leakage from the
pad surface. If there is any leakage from the
air refresher onto these areas (Instrument
air refresher onto these areas (Instrument air refresher onto these areas (Instrument
air refresher onto these areas (Instrument
air refresher onto these areas (Instrument
cluster, crash pad or air ventilator), it may
cluster, crash pad or air ventilator), it may cluster, crash pad or air ventilator), it may
cluster, crash pad or air ventilator), it may
cluster, crash pad or air ventilator), it may
damage these parts. If the liquid from air
damage these parts. If the liquid from air damage these parts. If the liquid from air
damage these parts. If the liquid from air
damage these parts. If the liquid from air
refresher does leak onto these areas, wash
refresher does leak onto these areas, wash refresher does leak onto these areas, wash
refresher does leak onto these areas, wash
refresher does leak onto these areas, wash
them with water immediately.
them with water immediately. them with water immediately.
them with water immediately.
them with water immediately.
C000A01P-GAT
2.2.
2.2.
2.
INSTR
INSTR INSTR
INSTR
INSTR
UMENTS & CONTR
UMENTS & CONTR UMENTS & CONTR
UMENTS & CONTR
UMENTS & CONTR
OLS
OLS OLS
OLS
OLS
12
31 051 0
12 4 6 9 78
C020A02P-GAT
POSITIONS OF SWITCHES AND LEVERS (M
POSITIONS OF SWITCHES AND LEVERS (M POSITIONS OF SWITCHES AND LEVERS (M
POSITIONS OF SWITCHES AND LEVERS (M
POSITIONS OF SWITCHES AND LEVERS (M inibus, Van)
inibus, Van) inibus, Van)
inibus, Van)
inibus, Van)
14
24 26
13 15 17 16 18 19 20 21 22 23 25 27
28
11
22
22
2
Page 41 of 173
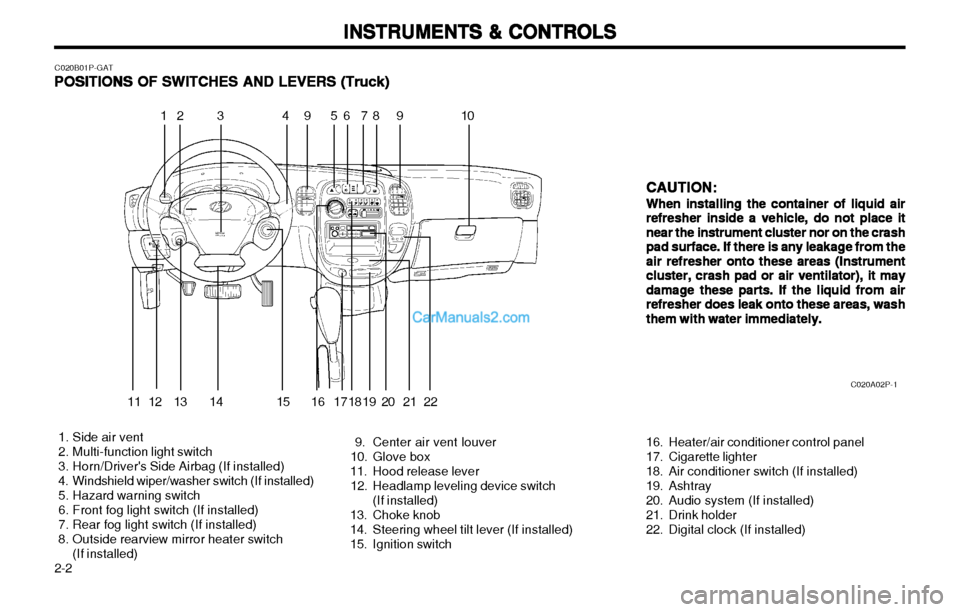
INSTRUMENTS & CONTROLS
INSTRUMENTS & CONTROLS INSTRUMENTS & CONTROLS
INSTRUMENTS & CONTROLS
INSTRUMENTS & CONTROLS
2-2
C020A02P-1
1. Side air vent
2. Multi-function light switch
3. Horn/Driver's Side Airbag (If installed)
4. Windshield wiper/washer switch (If installed)
5. Hazard warning switch
6. Front fog light switch (If installed)
7. Rear fog light switch (If installed)
8. Outside rearview mirror heater switch (If installed) 9. Center air vent louver
10. Glove box
11. Hood release lever
12. Headlamp leveling device switch (If installed)
13. Choke knob
14. Steering wheel tilt lever (If installed)
15. Ignition switch 16. Heater/air conditioner control panel
17. Cigarette lighter
18. Air conditioner switch (If installed)
19. Ashtray
20. Audio system (If installed)
21. Drink holder
22. Digital clock (If installed)CAUTION:
CAUTION: CAUTION:
CAUTION:
CAUTION:
When installing the container of liquid air
When installing the container of liquid air When installing the container of liquid air
When installing the container of liquid air
When installing the container of liquid air
refresher inside a vehicle, do not place it
refresher inside a vehicle, do not place it refresher inside a vehicle, do not place it
refresher inside a vehicle, do not place it
refresher inside a vehicle, do not place it
near the instrument cluster nor on the crash
near the instrument cluster nor on the crash near the instrument cluster nor on the crash
near the instrument cluster nor on the crash
near the instrument cluster nor on the crash
pad surface. If there is any leakage from the
pad surface. If there is any leakage from the pad surface. If there is any leakage from the
pad surface. If there is any leakage from the
pad surface. If there is any leakage from the
air refresher onto these areas (Instrument
air refresher onto these areas (Instrument air refresher onto these areas (Instrument
air refresher onto these areas (Instrument
air refresher onto these areas (Instrument
cluster, crash pad or air ventilator), it may
cluster, crash pad or air ventilator), it may cluster, crash pad or air ventilator), it may
cluster, crash pad or air ventilator), it may
cluster, crash pad or air ventilator), it may
damage these parts. If the liquid from air
damage these parts. If the liquid from air damage these parts. If the liquid from air
damage these parts. If the liquid from air
damage these parts. If the liquid from air
refresher does leak onto these areas, wash
refresher does leak onto these areas, wash refresher does leak onto these areas, wash
refresher does leak onto these areas, wash
refresher does leak onto these areas, wash
them with water immediately.
them with water immediately. them with water immediately.
them with water immediately.
them with water immediately.
11 39
5 1 0
12 4 6 9 78
C020B01P-GAT
POSITIONS OF SWITCHES AND LEVERS (T
POSITIONS OF SWITCHES AND LEVERS (T POSITIONS OF SWITCHES AND LEVERS (T
POSITIONS OF SWITCHES AND LEVERS (T
POSITIONS OF SWITCHES AND LEVERS (T ruck)
ruck) ruck)
ruck)
ruck)
13
12 14 16 15 17 18 19 20 21 22
Page 66 of 173

2-27
INSTRUMENTS & CONTROLS
INSTRUMENTS & CONTROLS INSTRUMENTS & CONTROLS
INSTRUMENTS & CONTROLS
INSTRUMENTS & CONTROLS
C680A02P-GAG
C690A01P-GAT
Dehumidified heating
Dehumidified heating Dehumidified heating
Dehumidified heating
Dehumidified heating
C690A01P-GAG
C680A01P-GAG
C680A01P-GAT
AIR CONDITIONER OPERATION
AIR CONDITIONER OPERATION AIR CONDITIONER OPERATION
AIR CONDITIONER OPERATION
AIR CONDITIONER OPERATION
(If installed)
(If installed) (If installed)
(If installed)
(If installed)
Cooling
Cooling Cooling
Cooling
Cooling
To use the air conditioner to cool interior:
o Set the side vent control to "OFF", to shut off outside air entry. o Turn on the fan control switch.
o Turn on the air conditioner switch by push-
ing in on the switch. The air conditioner indicator light should come on at the sametime.
o Set the air intake control to the "Fresh" position.
o Set the temperature control to the "Cool" position. ("Cool" provides maximum cooling. The tem- perature may be moderated by moving thecontrol toward "Warm".)
o Adjust the fan control to the desired speed. For greater cooling, turn the fan control toone of the higher speeds or temporarilyselect the "Recirc" position on the air intakecontrol.
C690A02P-GAG
For dehumidified heating:
o Turn on the fan control switch.
o Turn on the air conditioner switch by pushing in on the switch. The air conditioner indicator light should come on at the same time.
o Set the air intake control to "Fresh".
o Set the air flow control to "Face".
o Adjust the fan control to the desired speed. For more rapid action, set the fan at one of the higher speeds.
o Adjust the temperature control to provide the desired amount of warmth.
Page 67 of 173

INSTRUMENTS & CONTROLS
INSTRUMENTS & CONTROLS INSTRUMENTS & CONTROLS
INSTRUMENTS & CONTROLS
INSTRUMENTS & CONTROLS
2-28 C730A01P-GAT
CONTROL PANEL
CONTROL PANEL CONTROL PANEL
CONTROL PANEL
CONTROL PANEL
C730A01P-1
213
REAR HEATER & A/CON (ROTARY TYPE)
C730A02P-1
REAR HEATER & A/CON (LEVER TYPE)
1
2 3
1.1.
1.1.
1. Mode selector lever
Mode selector lever Mode selector lever
Mode selector lever
Mode selector lever Air flow can be switched in three modes. Three symbols are used to represent FloorHeat, Bi-level and Vent Air position.
C700A01P-GAT
Operation Tips
Operation Tips Operation Tips
Operation Tips
Operation Tips
o If the interior of the vehicle is hot when you
first get in, open the windows for a few minutes to expel the hot air.
o When you are using the air conditioning system, keep all windows closed to keephot air out.
o When you must drive slowly, as in heavy traffic, shift to a lower gear. This increasesengine speed, which in turn increases thespeed of the air conditioning compressor.
o When driving up long grades, turn occa- sionally the air conditioner off to avoid thepossibility of the engine overheating.
o During winter months or in periods when the air conditioner is not used regularly, turn onthe air conditioner switch occasionally for afew minutes. This will help circulate thelubricants and keep your system in peakoperating condition.
C710A01P-GAT REAR HEATER (If installed)
REAR HEATER (If installed) REAR HEATER (If installed)
REAR HEATER (If installed)
REAR HEATER (If installed)
The rear heater can be operated with the igni-
tion switch at the "ON" position by depressingthe main switch in the instrument panel. C720A01P-GAT
Main switch for the rear heater
Main switch for the rear heater Main switch for the rear heater
Main switch for the rear heater
Main switch for the rear heater
C720A01P-GAG
The main switch for the rear heater is installed
in the instrument panel.
The main switch should be used to switch the
power of the rear heater ON and OFF.
The power is switched ON when the button is
pressed, and the lamp within the switch is illuminated. Illumination will stop and the powerwill be switched OFF when the button is pressedonce again.
Page 68 of 173

2-29
INSTRUMENTS & CONTROLS
INSTRUMENTS & CONTROLS INSTRUMENTS & CONTROLS
INSTRUMENTS & CONTROLS
INSTRUMENTS & CONTROLS
C750A03P-GATOVERHEAD AIR CONDITIONING
OVERHEAD AIR CONDITIONING OVERHEAD AIR CONDITIONING
OVERHEAD AIR CONDITIONING
OVERHEAD AIR CONDITIONING
(If installed)
(If installed) (If installed)
(If installed)
(If installed)
C750A01P-1
1
The overhead air conditioner can be operated
with the ignition switch at the "ON" position by depressing the main switch in the instrumentpanel.
1. Blower knob
The blower can be operated at three speeds to regulate the amount of air forced throughthe vehicle. The overhead air conditionerwill not operate if the knob is set to the "O". The blower speed will increase as the knob is moved to the right.
2.2.
2.2.
2. Temperature controller
Temperature controller Temperature controller
Temperature controller
Temperature controller
Lever type - Select the desired tempera-
ture by sliding the lever left or right.
Rotary type - Select the desired tempera- ture by turn the knob left orright.
Red - High temperaute (heating)
Blue - Ambient temperature(ventilating)
3.3.
3.3.
3. Blower controller
Blower controller Blower controller
Blower controller
Blower controllerThe blower can be operated (when the ignition key and main switch for the rearheater is at the "ON" position) at threespeeds to regulate the amount of air forcedthrough the vehicle. The blower speed will increase as the switch is moved to the right.
C740A01P-GAT REAR AIR CONDITIONING (If installed)
REAR AIR CONDITIONING (If installed) REAR AIR CONDITIONING (If installed)
REAR AIR CONDITIONING (If installed)
REAR AIR CONDITIONING (If installed)
The rear air conditioner can be operated with
the ignition switch at the "ON" position by de-pressing the main switch in the instrument panel.
1. Air conditioning switch
The air conditioning is turned on or off by pushing the button.
2. The operations of the rear air conditioner is identical to AIR CONDITIONER OPERRA-TION of page 2-27.
C760A01P-GAG
B760A02P-GAT
AIR FILTER (FOR EVAPORATOR AND
AIR FILTER (FOR EVAPORATOR AND AIR FILTER (FOR EVAPORATOR AND
AIR FILTER (FOR EVAPORATOR AND
AIR FILTER (FOR EVAPORATOR AND
BLOWER UNIT) (If installed)
BLOWER UNIT) (If installed) BLOWER UNIT) (If installed)
BLOWER UNIT) (If installed)
BLOWER UNIT) (If installed)
The air filter is located in the air intake duct
behind the windshield washer reservoir. It oper- ates to prevent the pollutant entering the car.
C760B01PClamp
Air intake duct
Air intake duct
Air Filter
Air intake duct
Engine room
Evaporator unit
Blower unit
Air Filter Inside ofvehicle
Page 69 of 173

INSTRUMENTS & CONTROLS
INSTRUMENTS & CONTROLS INSTRUMENTS & CONTROLS
INSTRUMENTS & CONTROLS
INSTRUMENTS & CONTROLS
2-30 Replacement instructions:
1. Open the hood.
2. Remove the clamps (5 EA) on the air in- take duct and replace the filter.
3. Installation is the reverse order of the disas- sembly.
CAUTION:
CAUTION: CAUTION:
CAUTION:
CAUTION:
oo
oo
o Replace the filter every 20,000 km (12,000
Replace the filter every 20,000 km (12,000 Replace the filter every 20,000 km (12,000
Replace the filter every 20,000 km (12,000
Replace the filter every 20,000 km (12,000
miles) or once a year. If the car is being
miles) or once a year. If the car is being miles) or once a year. If the car is being
miles) or once a year. If the car is being
miles) or once a year. If the car is being
driven in severe conditions such as dusty,
driven in severe conditions such as dusty, driven in severe conditions such as dusty,
driven in severe conditions such as dusty,
driven in severe conditions such as dusty,
rough roads, more frequent air filter in-
rough roads, more frequent air filter in- rough roads, more frequent air filter in-
rough roads, more frequent air filter in-
rough roads, more frequent air filter in-
spections and changes are required.
spections and changes are required. spections and changes are required.
spections and changes are required.
spections and changes are required.
oo
oo
o When the air flow rate is suddenly de-
When the air flow rate is suddenly de- When the air flow rate is suddenly de-
When the air flow rate is suddenly de-
When the air flow rate is suddenly de-
creased, it must be checked at autho-
creased, it must be checked at autho- creased, it must be checked at autho-
creased, it must be checked at autho-
creased, it must be checked at autho-
rized dealer.
rized dealer. rized dealer.
rized dealer.
rized dealer.