1973 DATSUN B110 clutch
[x] Cancel search: clutchPage 55 of 513

c
Inspection
and
adJu
Stmenf
trouble
first
check
the
linhge
f
no
1
i
jI
fect
is
found
in
the
lin1
age
check
of
manu
a
l
liiiJ
i
the
inhibitor
switch
Th
d
1F
aI
S
t
th
I
I
f
e
a
JU
i
J
u
epara
e
e
range
se
eet
ever
rom
Iy
important
ii
s3
ns
etion
of
oil
the
lower
shift
rod
and
turn
the
range
1
level
for
the
automatiC
tran
smission
select
lever
to
N
Therefore
great
care
should
be
exer
Note
In
the
position
N
the
slot
of
cised
because
defective
adjustment
will
the
manual
shaft
is
vertical
result
in
the
breakdown
of
the
trans
By
the
use
of
the
tester
check
the
two
bIack
yellow
BY
wires
from
the
inhibitor
switch
in
the
ranges
N
and
P
and
the
two
red
bIack
RB
wires
in
the
range
R
for
continuity
Turn
range
select
lever
to
both
directions
from
each
lever
set
position
and
check
each
continuity
range
It
is
normal
if
the
electricity
is
on
while
the
lever
is
within
an
angle
of
about
3
0
on
both
sides
from
each
lever
set
line
How
ever
if
its
continuity
range
is
obvi
ously
unequal
on
both
sides
the
adjustment
is
required
f
any
malfunction
is
found
un
screw
the
fastening
nut
of
the
range
selector
lever
and
two
fastening
bolts
of
the
switch
body
and
then
remove
the
machine
screw
under
the
switch
body
Adjust
the
manual
shaft
correct
ly
to
the
position
N
by
means
of
the
selector
lever
When
the
slot
of
the
shaft
becomes
vertical
the
detent
works
to
position
the
shaft
correctly
with
a
click
sound
Move
the
switch
slightly
aside
so
that
the
screw
hole
will
be
aligned
with
the
pin
hole
of
the
internal
rotor
combined
with
the
manual
shaft
and
check
their
alignment
by
inserting
a
1
5
0101
0
0591
in
diameter
pin
into
the
holes
If
the
alignment
is
made
correct
1
5ten
the
switch
body
with
the
bolts
pull
out
the
pin
and
tighten
up
the
screw
again
into
the
hole
and
fasten
the
selector
lever
as
before
Check
over
again
the
continuity
with
the
tester
If
the
malfunction
still
remains
replace
the
inhibitor
switch
mission
Inspection
Pull
the
selector
lever
toward
you
and
turn
it
so
far
as
p
to
1
range
where
clicks
will
be
felt
by
hand
This
is
the
detent
of
manual
valve
in
the
body
and
indicates
the
correct
posi
tion
of
the
lever
Inspect
whether
the
pointer
of
selector
dial
corresponds
to
this
point
and
also
whether
the
lever
comes
in
alignment
with
the
stepping
of
posi
tion
plate
when
it
is
released
Adjustment
This
procedure
can
be
accom
plished
by
referring
to
Removal
and
nstallation
Checking
and
adjusting
inhibitor
switch
The
inhibitor
switch
serves
to
light
the
reverse
lamp
in
the
range
R
of
the
transmission
operation
and
also
to
rotate
the
starter
motor
in
the
ranges
N
and
P
j
r@
I
If
r
f
B
@
I
Jt
@
@
c
v@
i
r
fji
AT109
1
Inhibitor
switch
2
Manual
shaft
3
Washer
4
Nut
5
Manual
plate
Fig
AT
II
0
Con
truction
of
inhibitor
witch
6
Washer
7
Nut
8
Inhibitor
switch
9
Range
select
lever
Check
whether
the
reverse
lamp
and
the
starter
motor
operate
normal
ly
in
these
ranges
If
there
is
any
t
ki
A
mm
ATIC
TRANSMISSION
STALL
TEST
The
purpose
of
this
test
is
to
check
the
transmission
and
engine
for
trou
ble
by
measuring
the
maximwn
num
bers
of
revolutions
of
the
engine
while
vehicle
is
held
in
a
stalled
condition
and
the
carburetor
is
in
full
throttle
operation
with
the
selector
lever
in
AT
51
rang
s
D
2
and
I
respectively
and
by
com
pairing
the
measured
re
sults
with
the
standard
values
Standard
stall
revolution
1
750
to
2
000
rpm
Components
to
be
tested
and
test
items
1
Clutches
brake
and
band
in
trans
mission
for
slipping
2
Torque
converter
for
function
3
Engine
for
overall
property
Stall
test
procedures
Before
testing
check
the
enigne
oil
and
torque
converter
oil
warm
up
the
engine
cooling
water
to
the
suitable
temperature
by
warming
up
ope
ration
at
1
200
rpm
with
the
selector
lever
in
the
range
P
for
several
minutes
and
warm
up
the
torque
converter
oil
to
the
suitable
temperature
60
to
IOOoC
140
to
2120F
1
Mount
the
engine
tachometer
at
a
location
that
allows
good
visibility
from
the
driver
s
seat
and
put
a
mark
on
specified
revolutions
on
the
meter
2
Secure
the
front
and
rear
wheels
completely
with
chocks
and
apply
the
hand
brake
Be
sure
to
depress
the
brake
pedal
firmly
with
the
left
foot
before
depressing
down
the
accelerator
pedal
3
Throw
the
selector
lever
into
the
range
D
4
Slowly
depress
the
accelerator
pedal
down
till
the
throttle
valve
is
fully
opened
Quickly
read
and
record
the
engine
revolution
when
the
engine
begins
to
rotate
steadily
and
then
release
the
accelerator
pedal
5
Turn
the
selector
lever
into
N
and
operate
the
enigne
at
approxi
mately
1
200
rpm
for
more
than
one
minute
to
cool
down
the
torque
con
verter
oil
and
coolant
6
Make
similar
stall
tests
in
the
ranges
2
I
and
R
Note
The
stall
test
operation
as
spec
ified
in
the
item
4
should
be
made
within
five
seconds
If
it
takes
too
long
the
oil
deterio
rates
and
the
clutches
brake
Page 56 of 513

and
band
are
adversely
af
fected
Sufficient
cooling
time
should
be
given
between
each
test
for
the
four
ranges
0
2
I
and
R
Judgement
I
High
stall
revolution
more
than
standard
revolution
If
the
engine
revolution
in
staU
condition
is
higher
than
the
standard
values
it
indicates
that
one
or
more
clutches
in
the
transmission
are
slip
ping
and
therefore
nO
further
test
is
required
For
the
following
abnormalities
the
respective
causes
3re
presumed
High
rpm
in
all
ranges
Low
line
pre
ure
High
rpm
in
D
2
and
I
and
normal
rpm
in
R
Rear
clutch
slipping
High
pm
in
D
and
2
and
normal
rpm
in
lOne
way
clutch
slipping
High
rpm
in
R
only
Front
clutch
or
low
and
reverse
brake
slipping
To
determine
which
is
slipping
either
front
clutch
or
low
and
reverse
brake
a
road
test
is
needed
If
while
coasting
after
starting
with
the
lever
in
I
range
engine
braking
does
not
work
properly
it
is
deter
mined
the
low
and
reverse
brake
is
slipping
Otherwise
the
front
clutch
is
slipping
The
slipping
of
the
band
brake
is
difficult
to
ascertain
However
if
it
occurs
with
the
lever
in
2
range
the
enigne
revolution
increases
up
to
the
same
level
as
in
1st
speed
and
therefore
it
can
be
found
out
by
careful
observation
It
is
impossible
to
check
it
in
the
stall
test
Z
Standard
stall
revolution
If
the
enigne
revolution
in
stall
condition
is
within
the
standard
values
the
control
elements
are
nor
mally
operating
in
the
ranges
0
2
I
and
R
Also
the
engine
and
one
way
clutch
of
the
torque
converter
are
normal
in
perfonnance
and
operation
The
one
way
clutch
of
the
torque
Gear
shift
Propeller
shaft
rpm
D
D
1
840
to
2
340
D
DJ
3
340
to
3
840
DJ
D
3
460
to
2
960
D
0
1
790
to
1
290
D
D
330
to
830
D
OJ
l
720
to
2
220
DJ
D2
or
1
350
to
850
DJ
D
D
0
700
Max
I
I
1
860
to
1
360
CHASSIS
converter
however
sometimes
sticks
This
should
be
determined
in
the
road
test
3
Low
stall
revolution
less
than
standard
revolution
If
the
engine
revolution
in
stall
condition
is
lower
than
the
standard
values
it
indicates
that
the
engine
is
in
abnormal
condition
or
the
torque
con
verter
s
one
way
clutch
is
slipping
4
Other
I
If
the
accelerating
performance
is
poor
until
vehicle
speed
of
approxi
mately
50
km
h
30
MPH
is
attained
and
then
normal
beyond
that
speed
it
can
be
judged
that
the
torque
con
verter
s
one
way
dutch
is
slipping
2
If
the
torque
converter
s
one
way
clutch
sticks
vehicle
speed
can
not
exceed
approximately
80
km
h
Car
speed
at
gear
shift
Throttle
opening
mmHg
Kick
down
0
Half
throttle
200
Full
throttle
0
Minimum
throttle
450
I
50
MPH
in
the
road
test
In
such
a
case
the
torque
converter
oH
tempera
ture
rises
up
abnormally
and
s
o
s
pecial
care
is
required
13
If
the
transmission
does
not
operate
properly
in
all
vehicle
speeds
it
indicates
poor
engine
perfonnance
ROAD
TEST
An
accurate
knowledge
of
the
auto
matic
transmission
is
prerequisite
to
its
exact
diagnosis
by
a
road
test
It
is
recommended
to
prepare
a
diagnosis
guide
chart
in
which
are
written
the
standard
vehicle
speeds
for
each
stage
of
the
up
and
down
shiftings
Measured
vehicle
speeds
are
to
be
filled
in
the
adjoining
column
in
each
testing
Also
it
is
advisable
to
mount
a
stopper
for
positioning
the
throttle
opening
I
I
1
860
to
1
360
I
Reduce
the
speed
by
shifting
to
range
from
D
range
output
shaft
2
000
rpm
Note
Car
speed
can
be
calculated
by
the
following
fonnula
2
x
7r
x
r
x
Npx
60
v
RF
X
1
000
where
V
Car
speed
km
h
Np
Propeller
shaft
revolution
rpm
RF
Final
gear
ratio
r
Tire
effective
radius
m
11
The
ratio
of
circumference
of
a
circle
to
its
diameter
3
14
AT
52
Page 57 of 513

Checking
speed
changing
condition
The
driver
s
feeling
during
gear
changes
should
also
be
checked
at
tentively
1
A
sharp
shock
or
unsmoothness
are
felt
during
a
gear
change
2
A
gear
change
is
made
with
a
long
and
dragging
feeling
These
indicate
that
the
throttle
pressure
is
too
low
or
some
valve
connected
to
the
throttle
is
defective
Checking
items
during
speed
change
1
In
D
range
gear
changes
DI
o
D2
D3
are
effected
In
R
range
the
speed
does
not
increase
2
The
kick
down
operates
properly
3
By
moving
the
lever
from
D
into
I
gear
changes
D3
2
12
II
are
effected
In
the
ranges
12
and
II
the
engine
braking
works
properly
4
In
the
speed
does
not
in
crease
5
Should
be
quickly
fixed
at
2
range
6
In
P
vehicle
can
be
parked
properly
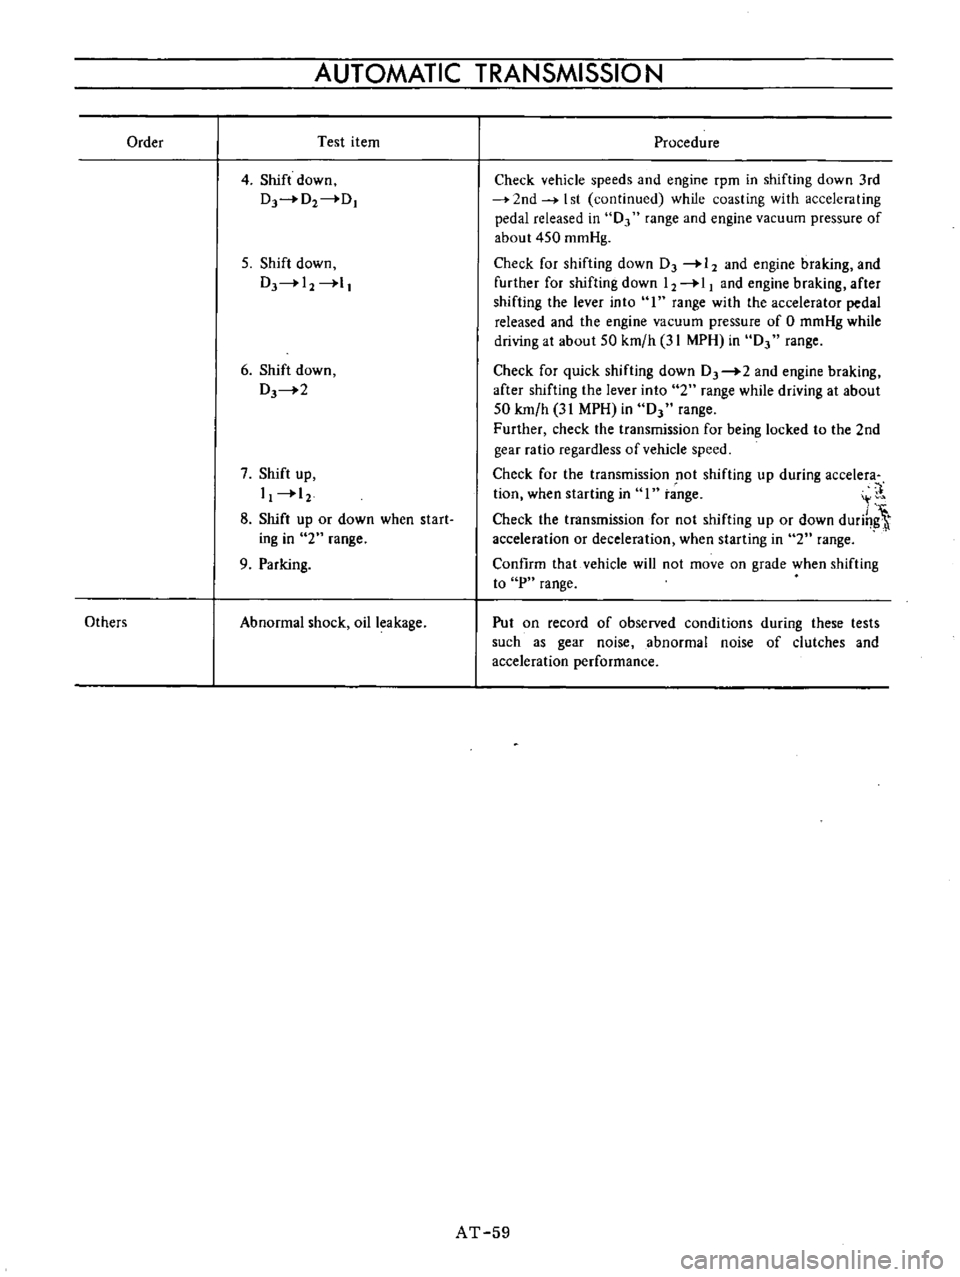
If
any
malfunction
occurs
in
the
second
gear
during
the
road
test
that
is
if
vehicle
shakes
drags
or
sling
in
shifting
up
from
DI
directly
to
D3
or
in
shifting
up
from
D
to
W
I
r
I
1
1
I
2
31
I
I
I
I
I
t
Lh
I
I
I
I
1000
lsOo
2000
2500
Output
shaft
speed
rpm
AUTOMATIC
TRANSMISSION
D2
the
brake
band
should
be
ad
justed
If
these
troubles
remain
after
Shift
schedule
o
Full
throttlell
e
2100
E
E
200
is
Z
cu
300
mmHg
soo
o
soo
LINE
PRESSURE
TEST
When
any
slipping
occurs
in
clutch
or
brake
or
the
feeling
during
a
speed
change
is
not
correct
the
line
pressure
must
be
checked
Measuring
the
line
pressure
is
done
by
a
pressu
re
gauge
attached
to
two
pressure
measuring
holes
after
re
moving
blind
plugs
located
at
trans
mission
case
See
Figure
AT
112
The
line
pressure
measurement
is
begun
at
idling
and
taken
step
by
step
by
enlarging
the
throttle
opening
1
A
sharp
shock
in
up
shifting
or
too
high
changing
speeds
are
caused
mostly
by
too
high
throttle
pressure
2
Slipping
or
incapability
of
opera
Line
pressure
governor
feed
pressure
At
cut
back
point
After
cut
back
Throttle
opening
under
approximately
over
approximately
15
kmfh
9
MPH
35
kmfh
22
MPH
Unit
mmHg
Unit
kg
cm2
psi
Unit
kg
cm2
psi
Full
throttle
0
94
to
11
0
134
to
156
5
5
to
6
5
78
to
92
Minimum
throttle
450
3
0
to
4
0
43
to
57
3
0
to
4
0
43
to
57
Full
throttle
0
10
0
to
12
0
142
to
171
5
5
to
7
0
78
to
100
Minimum
throttle
450
6
0
to
12
0
85toI71
5
5
to
7
0
78
to
100
Full
throttle
0
14
0
to
16
0
199
to
228
14
0
to
16
0
199
to
228
Minimum
throttle
450
3
0
to
5
5
4310
78
3
0
to
5
5
43
to
78
Range
D
2
R
the
brake
band
is
adjusted
check
the
servo
piston
seal
for
oil
leakage
3
30ixI
3500
000
AT110
Fig
A
T
llI
Shift
schedule
tion
is
mostly
due
to
oil
pressure
leakage
within
the
gear
trains
or
spool
valve
AT113
I
Line
pressure
2
Governor
reed
3
Servo
release
pressure
Fig
A
T
112
MeCJ8uring
line
pressure
Notes
a
The
line
pressure
during
idling
corresponds
to
the
oil
pressure
before
cut
down
at
minimum
throttle
b
The
oil
pressure
After
cut
back
means
that
after
the
pressure
modifier
valve
has
operated
AT
53
Page 58 of 513

Judgement
in
measurmg
line
pressure
I
Low
idling
line
pressures
in
the
ranges
D
2
loR
and
P
It
can
be
artributed
to
trouble
in
the
pressure
supply
system
or
too
low
output
of
power
caused
by
1
A
worn
oil
pump
2
An
oil
pressure
leakage
in
the
oil
pump
valve
body
or
case
3
A
sticking
regulator
valve
2
Low
idling
line
pressures
in
cer
tain
ranges
only
It
is
caused
pressumabIy
by
an
oil
leakage
in
the
devices
or
circuits
con
nected
to
the
relevant
ranges
1
When
there
is
an
oil
leakage
in
the
rear
clutch
and
governor
the
line
pressures
in
D
2
and
I
are
low
but
the
pressure
is
normal
in
R
2
When
an
oil
leakage
occurs
in
the
low
and
reverse
brake
circuit
the
line
pressures
in
R
and
p
are
low
but
the
pressure
is
normal
in
0
2
and
I
3
High
idling
line
pressures
It
is
presumed
to
be
caused
by
an
increased
vacuum
throttle
pressure
owing
to
a
leakage
in
the
vacuum
tube
or
diaphragm
or
by
an
increased
line
pressure
due
to
a
sticking
regulator
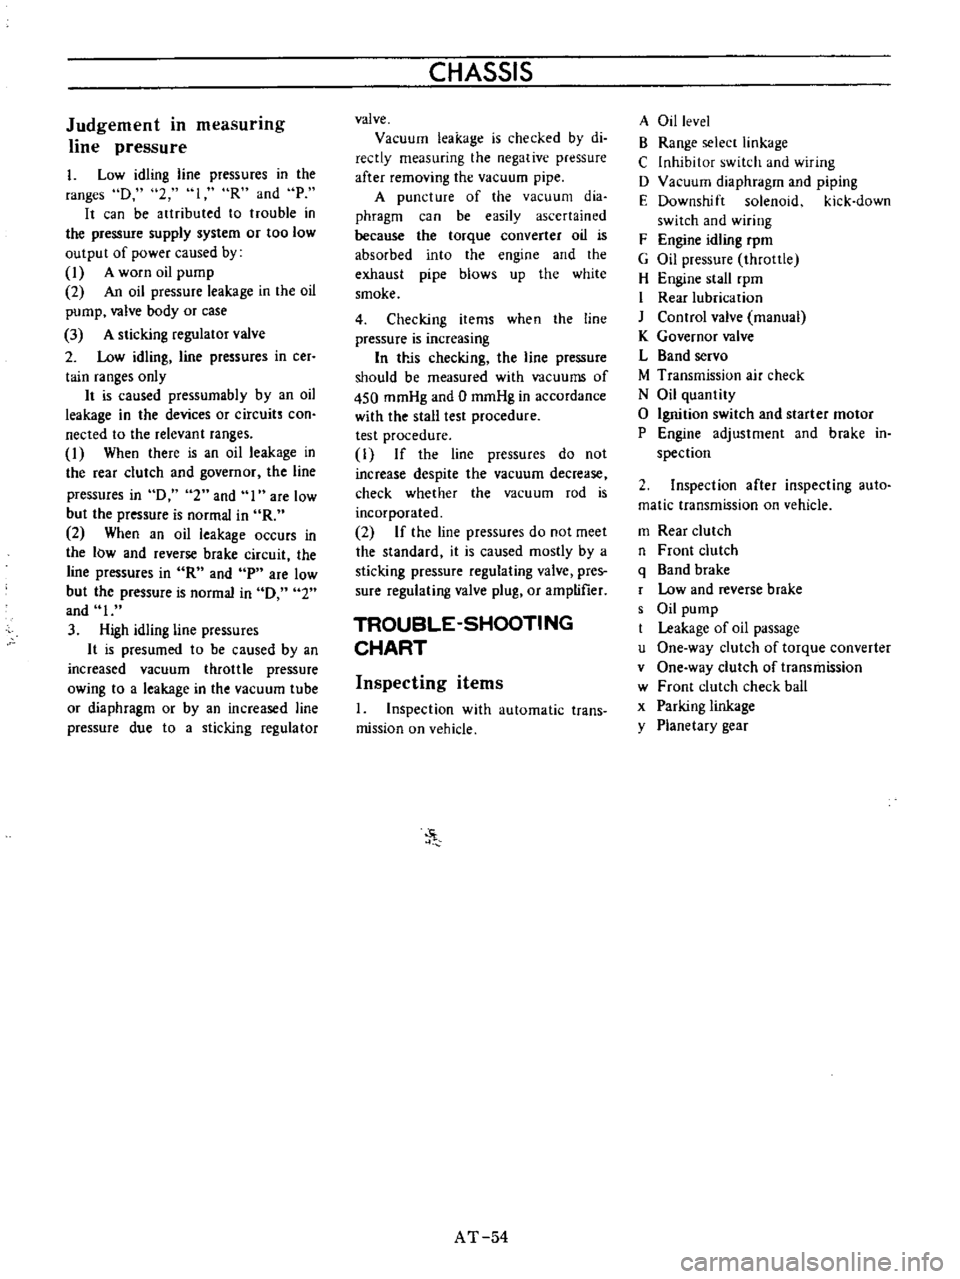
CHASSIS
valve
Vacuum
leakage
is
checked
by
di
reetly
measuring
the
negative
pressure
after
removing
the
vacuum
pipe
A
puncture
of
the
vacuum
dia
phragm
can
be
easily
ascertained
because
the
torque
converter
oil
is
absorbed
into
the
engine
and
the
exhaust
pipe
blows
up
the
white
smoke
4
Checking
items
when
the
line
pressure
is
increasing
In
trJs
checking
the
line
pressure
should
be
measured
with
vacuums
of
450
mmHg
and
0
mmHg
in
accordance
with
the
stall
test
procedure
test
procedure
1
If
the
line
pressures
do
not
increase
despite
the
vacuum
decrease
check
whether
the
vacuum
rod
is
incorporated
2
If
the
line
pressures
do
not
meet
the
standard
it
is
caused
mostly
by
a
sticking
pressure
regulating
valve
pres
sure
regulating
valve
plug
or
amptifier
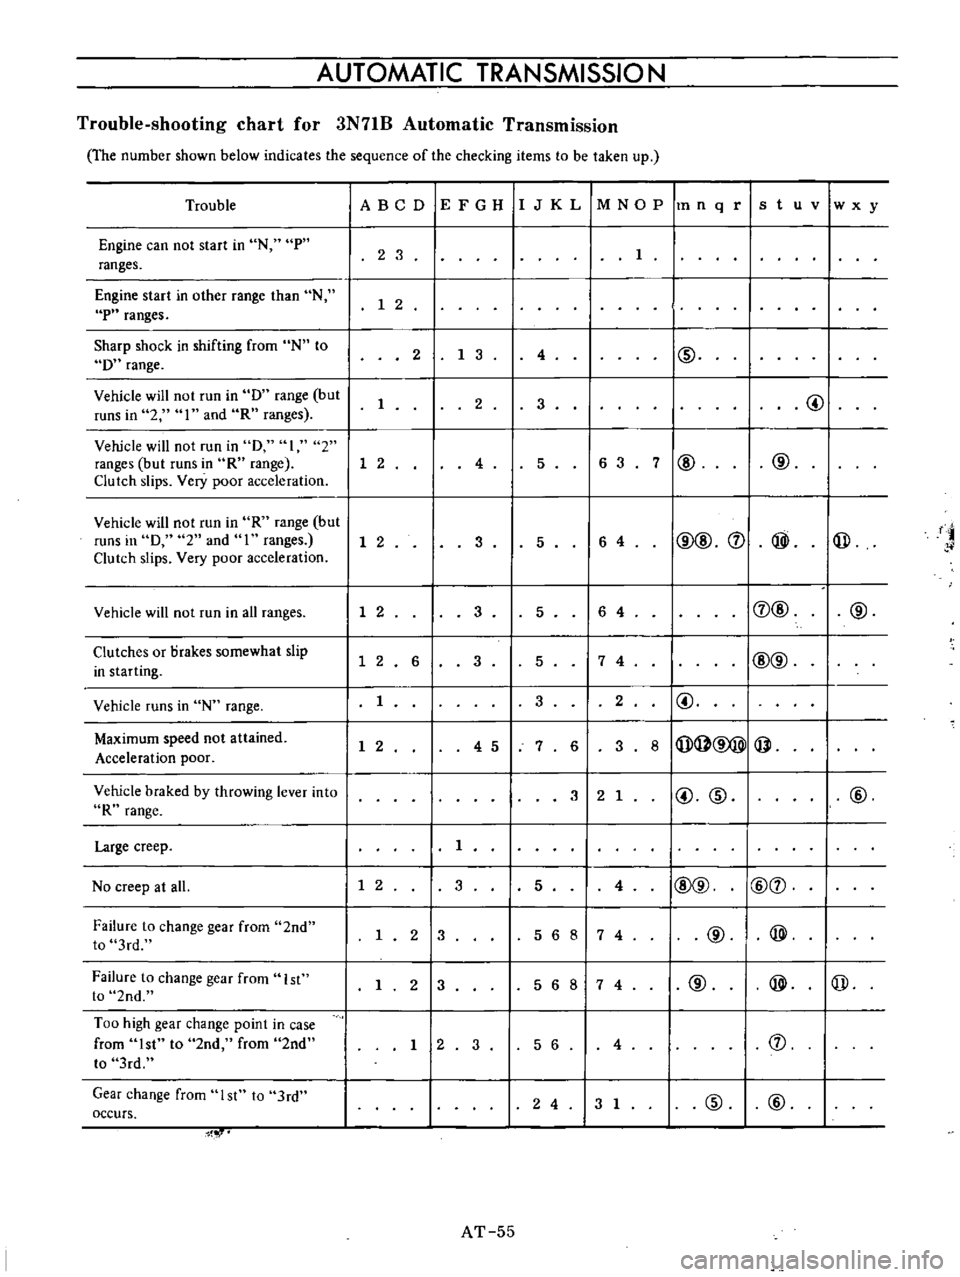
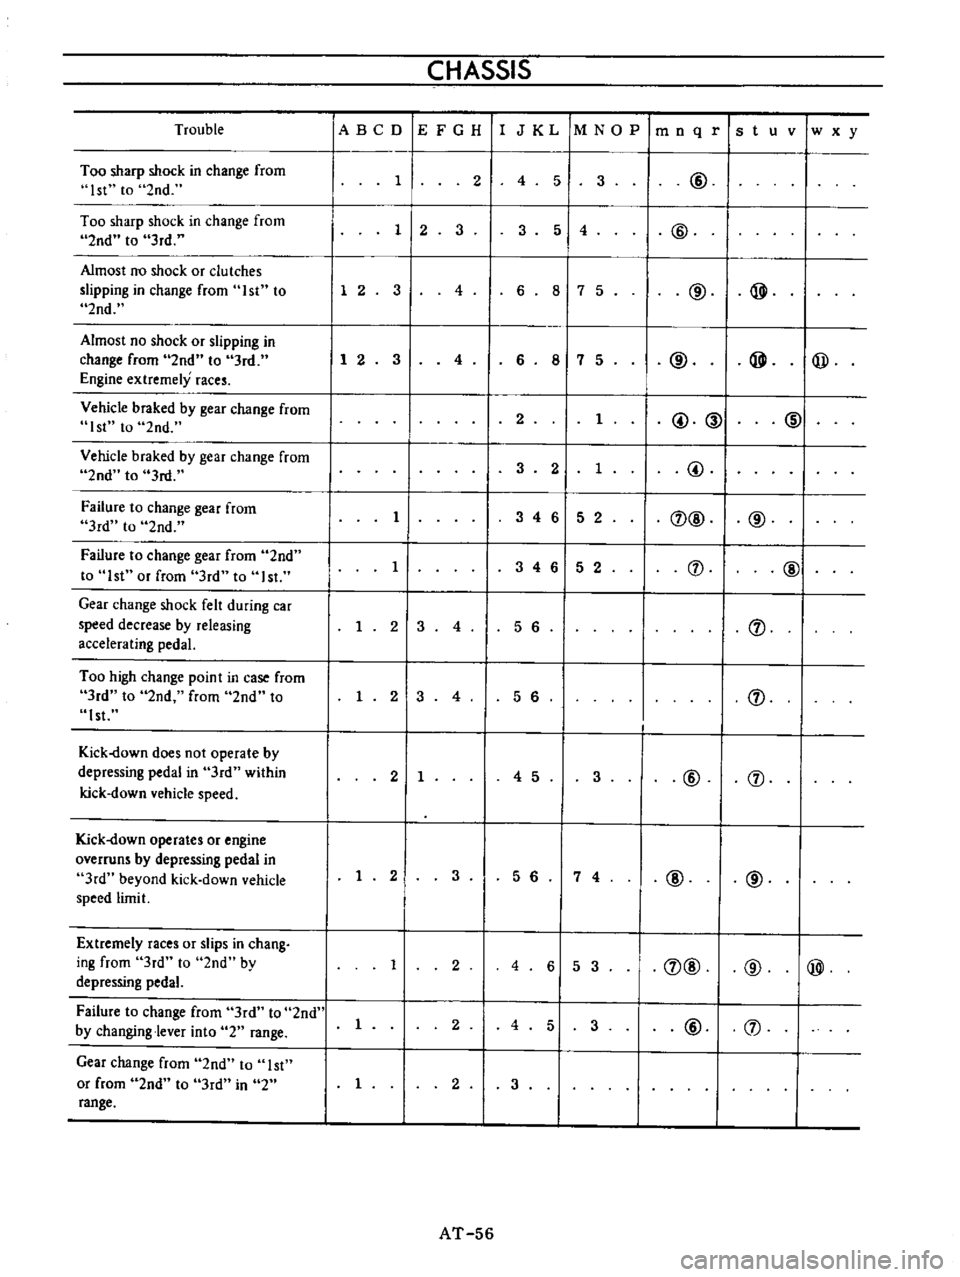
TROUBLE
SHOOTING
CHART
Inspecting
items
1
Inspection
with
automatic
trans
mission
on
vehicle
J
AT
54
A
Oil
level
B
Range
selecr
linkage
C
Inhibitor
switch
and
wiring
D
Vacuum
diaphragm
and
piping
E
Downshift
solenoid
kick
down
switch
and
wiring
F
Engine
idling
rpm
G
Oil
pressure
throttle
H
Engine
stall
rpm
I
Rear
lubrication
J
Control
valve
manual
K
Governor
valve
L
Band
servo
M
Transmission
air
check
N
Oil
quantity
o
Ignition
switch
and
starter
motor
P
Engine
adjustment
and
brake
in
spection
2
Inspection
after
inspecting
auto
matic
transmission
on
vehicle
m
Rear
clutch
n
Front
clutch
q
Band
brake
r
Low
and
reverse
brake
s
Oil
pump
Leakage
of
oil
passage
u
One
way
clutch
of
torque
converter
v
One
way
clutch
of
transmission
w
Front
clutch
check
ball
x
Parking
linkage
y
Planetary
gear
Page 59 of 513

AUTOMATIC
TRANSMISSIO
N
Trouble
shooting
chart
for
3N71B
Automatic
Transmission
The
number
shown
below
indicates
the
sequence
of
the
checking
items
to
be
taken
up
Trouble
Engine
can
not
start
in
N
P
ranges
Engine
start
in
other
range
than
N
P
ranges
Sharp
shock
in
shifting
from
N
to
D
range
Vehicle
will
not
run
in
D
range
but
runs
in
2
I
and
R
ranges
Vehicle
will
not
run
in
D
I
2
ranges
but
runs
in
R
range
1
2
Clutch
slips
Very
poor
acceleration
Vehicle
will
not
run
in
R
range
but
runs
in
0
2
and
I
ranges
1
2
Clutch
slips
Very
poor
acceleration
Vehicle
will
not
run
in
all
ranges
Clutches
or
Drakes
somewhat
slip
in
starting
Vehicle
runs
in
N
range
Maximum
speed
not
attained
Acceleration
poor
Vehicle
braked
by
throwing
lever
into
R
range
Large
creep
No
creep
at
all
Failure
to
change
gear
from
2nd
to
3rd
Failure
to
change
gear
from
1st
to
2nd
Too
high
gear
change
point
in
case
from
1st
to
2nd
from
2nd
to
3rd
Gear
change
from
st
to
3rd
occurs
W
IABCDIEFGH
IJKL
MNOP
mnqrlstuv
wxy
2
3
I
1
2
2
I
1
3
4
@
1
2
3
4
63
7
@
5
@
@
3
6
4
@@
j
@
@
t
5
1
2
3
5
6
4
1
2
6
3
5
7
4
I
2
@
3
8
@@@
@
@
3
I
2
4
5
7
6
3
2
1
@@
I
I
I@@
I
2
3
5
4
1
2
3
56874
123
56874
@
1
2
3
5
6
4
2
4
13
1
AT
55
j
@
@
I@@
I
@
@
I
I
@
j
@
@
@
j
@
@
Page 60 of 513

CHASSIS
Trouble
IA
BCD
EFGH
I
J
K
L
1M
N
0
p
1m
n
q
r
s
t
u
v
Iw
x
y
Too
sharp
shock
in
change
from
1
2
4
5
3
@
1st
to
2nd
Too
sharp
shock
in
change
from
1
2
3
3
5
4
@
2ndu
to
3rd
Almost
no
shock
or
clutches
slipping
in
change
from
1st
to
1
2
3
4
6
8
7
5
@
@
2nd
Almost
no
shock
or
slipping
in
@
@
@
change
from
2nd
to
3rd
1
2
3
4
6
8
7
5
Engine
extremely
races
Vehicle
braked
by
gear
change
from
2
1
@
@
I
@I
1st
to
2nd
Vehicle
braked
by
gear
change
from
3
2
1
@
I
I
2nd
to
3rd
Failure
to
change
gear
from
1
346
5
2
1
@
@
3rd
to
2nd
Failure
to
change
gear
from
2nd
I
3
4
6
5
2
1
@I
to
Ist
or
from
3rd
to
1st
Gear
change
shock
felt
during
car
I
speed
decrease
by
releasing
2
3
4
5
6
j
I
accelerating
pedaL
Too
high
change
point
in
case
from
j
3rd
to
2nd
from
2nd
to
1
2
3
4
5
6
1st
Kick
down
does
not
operate
by
depressing
pedal
in
3rd
within
2
1
4
5
3
@
1
kick
down
vehicle
speed
Kick
down
operates
or
engine
overruns
by
depressing
pedal
in
@
@
3rd
beyond
kick
down
vehicle
1
2
3
5
6
7
4
speed
limi
t
Extremely
races
or
slips
in
chang
ing
from
3rd
to
2nd
by
1
2
4
6
5
3
j
@
@
@I
depressing
pedaL
Failure
to
change
from
3rd
to
2nd
j
1
2
4
51
3
@
I
j
by
changing
lever
into
2
range
Gear
change
from
2nd
to
1st
or
from
2nd
to
3rd
in
2
1
2
3
range
AT
56
Page 63 of 513

Order
Others
AUTOMATIC
TRANSMISSION
Test
item
4
Shift
down
Dr4D2
DI
5
Shift
down
DJ
I2
l
6
Shift
down
DJ
2
7
Shift
up
I
12
8
Shift
up
or
down
when
start
ing
in
2
range
9
Parking
Abnormal
shock
oil
leakage
Procedure
Check
vehicle
speeds
and
engine
rpm
in
shifting
down
3rd
2nd
I
st
continued
while
coasting
with
acceleraling
pedal
released
in
0
range
and
engine
vacuum
pressure
of
about
450
mmHg
Check
for
shifting
down
DJ
12
and
engine
braking
and
further
for
shifting
down
12
11
and
engine
braking
after
shifting
the
lever
into
I
range
with
the
accelerator
pedal
released
and
the
engine
vacuum
pressure
of
0
mmHg
while
driving
at
about
SO
km
h
31
MPH
in
DJ
range
Check
for
quick
shifting
down
DJ
2
and
engine
braking
after
shifting
the
lever
into
2
range
while
driving
at
about
50
km
h
31
MPH
in
DJ
range
Further
check
the
transmission
for
being
locked
to
the
2nd
gear
ratio
regardless
of
vehicle
speed
Check
for
the
transmission
not
shifting
up
during
acceIera
tion
when
starting
in
1
t
nge
It
Check
the
transmission
for
not
shifting
up
or
down
durih
t
acceleration
or
deceleration
when
starting
in
2
range
Confirm
that
vehicle
will
not
move
on
grade
when
shifting
to
P
range
Put
on
record
of
observed
conditions
during
these
tests
such
as
gear
noise
abnormal
noise
of
clutches
and
acceleration
performance
AT
59
Page 64 of 513

CHASSIS
SERVICE
DATA
AND
SPECIFICATIONS
General
specifications
Torque
converter
Type
Stall
torque
ratio
Transmission
Type
Control
elements
Gear
ratio
Selector
positions
Oil
pump
Type
Number
of
pump
Oil
Capacity
Hydraulic
control
system
Lubrication
system
Cooling
system
Multiple
disc
clutch
Band
brake
Multiple
disc
brake
One
way
clutch
1st
lnd
3rd
Reverse
P
Park
R
Reverse
N
Neutral
D
Drive
1
lnd
lock
I
Lock
up
AT
60
Symmetrical3
element
I
stage
l
phase
torque
converter
coupling
2
0
I
3
speed
forward
and
one
speed
reverse
with
planetary
gear
train
1
I
I
I
2
458
1
458
1
000
2
182
The
transmission
is
placed
in
neutral
The
output
shaft
is
fixed
The
engine
can
be
started
Backward
running
The
transmission
is
in
neutral
The
engine
can
be
started
Up
or
downshifts
automatically
to
and
from
1st
lnd
and
top
Fixed
at
2nd
Fixed
at
low
or
downshifts
from
2nd
Internally
intermeslting
involute
gear
pump
Automatic
transmission
fluid
Dexron
type
5
5
liters
57
8
U
S
qts
47
8
Imp
qts
Approximately
1
7
liters
27
8
U
S
qts
2
3
8
Imp
qts
in
torque
converter
Controlled
by
detecting
the
negative
pressure
of
intake
manifold
and
the
revolution
speed
of
output
shaft
Forced
lubrication
by
an
oil
pwnp
Air
cooled