1973 DATSUN B110 heating
[x] Cancel search: heatingPage 118 of 513
REAR
AXLE
REAR
SUSPENSION
y
Jo
r
J
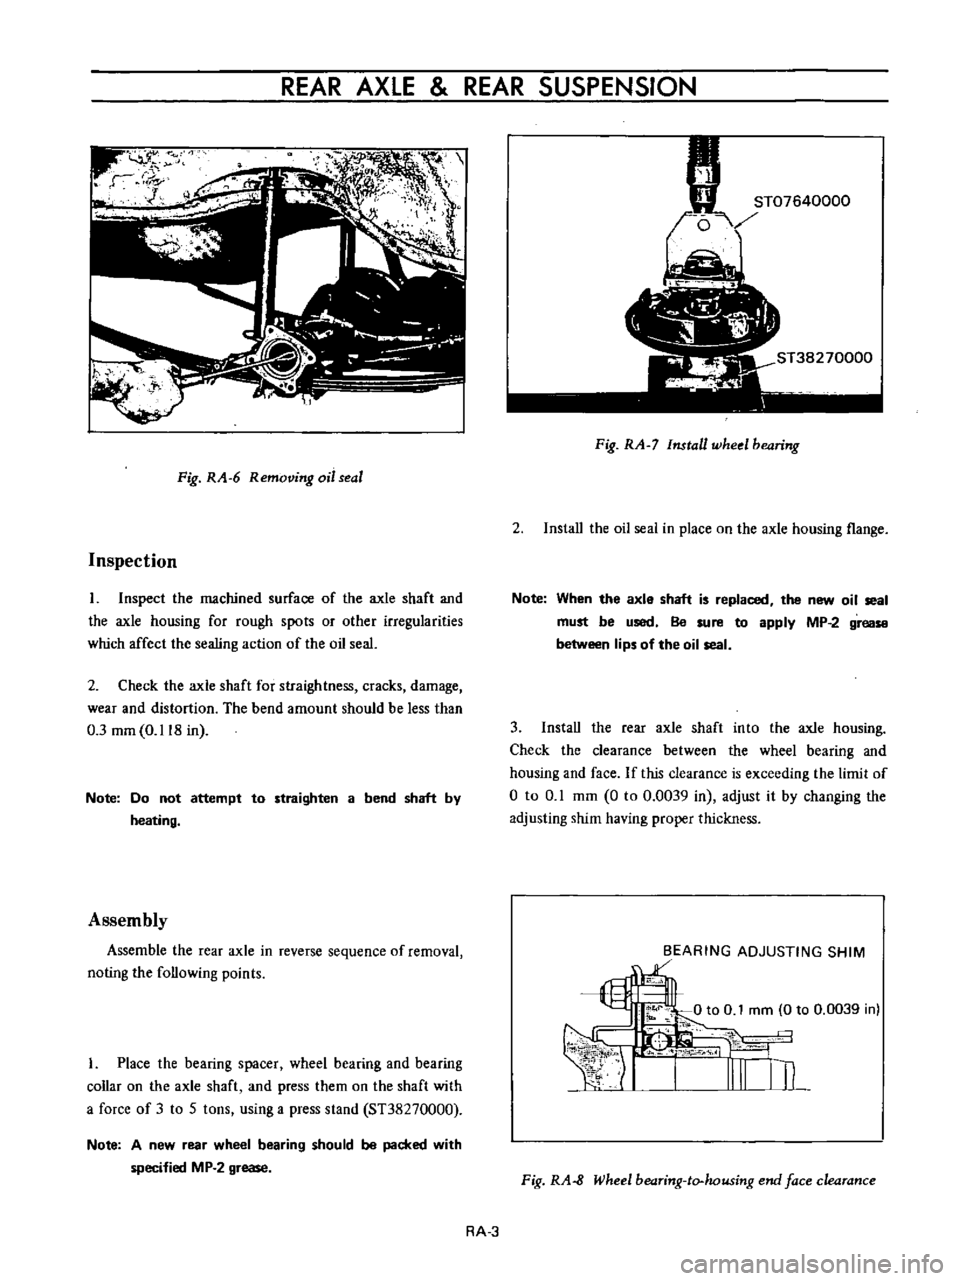
Fig
RA
6
Removing
oil
seal
Inspection
I
Inspect
the
machined
surface
of
the
axle
shaft
and
the
axle
housing
for
rough
spots
or
other
irregularities
which
affect
the
sealing
action
of
the
oil
seal
2
Check
the
axle
shaft
for
straightness
cracks
damage
wear
and
distortion
The
bend
amount
should
be
less
than
0
3
mm
0
118
in
Note
Do
not
attempt
to
straighten
a
bend
shaft
by
heating
Assembly
Assemble
the
rear
axle
in
reverse
sequence
of
removal
noting
the
following
points
I
Place
the
bearing
spacer
wheel
bearing
and
bearing
collar
on
the
axle
shaft
and
press
them
on
the
shaft
with
a
force
of
3
to
5
tons
using
a
press
stand
ST38270000
Note
A
new
rear
wheel
bearing
should
be
packed
with
specified
MP
2
grease
Fig
RA
7
Install
wheel
bearing
2
Install
the
oil
seai
in
place
on
the
axle
housing
flange
Note
When
the
axle
shaft
is
replaced
the
new
oil
seal
must
be
used
Be
sure
to
apply
MP
2
grease
between
lips
of
the
oil
seal
3
Install
the
rear
axle
shaft
into
the
axle
housing
Check
the
clearance
between
the
wheel
bearing
and
housing
and
face
If
this
clearance
is
exceeding
the
limit
of
o
to
0
1
mm
0
to
0
0039
in
adjust
it
by
changing
the
adjusting
shim
having
proper
thickness
BEARING
ADJUSTING
SHIM
1
Fig
RA
8
Wheel
bearing
to
housing
end
face
clearance
RA
3
Page 133 of 513
7
Remove
the
brake
disc
installation
bolt
and
remove
the
brake
disc
from
the
spindle
8
Disassemble
the
wheel
cylinders
Inspection
l
Drums
If
they
show
score
excessive
out
of
round
and
so
forth
reconditioning
by
machining
is
required
Brake
drum
inner
diameter
203
2
mm
8
00
in
Drum
inside
out
of
roundness
Below
0
02
mm
0
0008
in
Max
allowable
drum
inner
diameter
204
5
mm
8
051
in
2
Linings
If
brake
shoe
linings
are
incomp1etedly
seated
soiled
or
greasy
or
deteriorated
due
to
excessive
heating
repair
or
replace
them
If
the
thickness
of
the
lining
is
less
than
1
5
mm
0
0591
in
replace
it
Note
a
If
oil
or
grease
is
found
on
linings
clean
thoroughly
with
carbon
tetrachloride
or
gasoline
b
After
installing
and
bonding
lining
grind
the
lining
face
to
a
diameter
equal
to
the
brake
drum
3
Check
the
adjusting
cams
for
their
smooth
operation
4
Return
springs
If
they
are
considerably
weak
replace
them
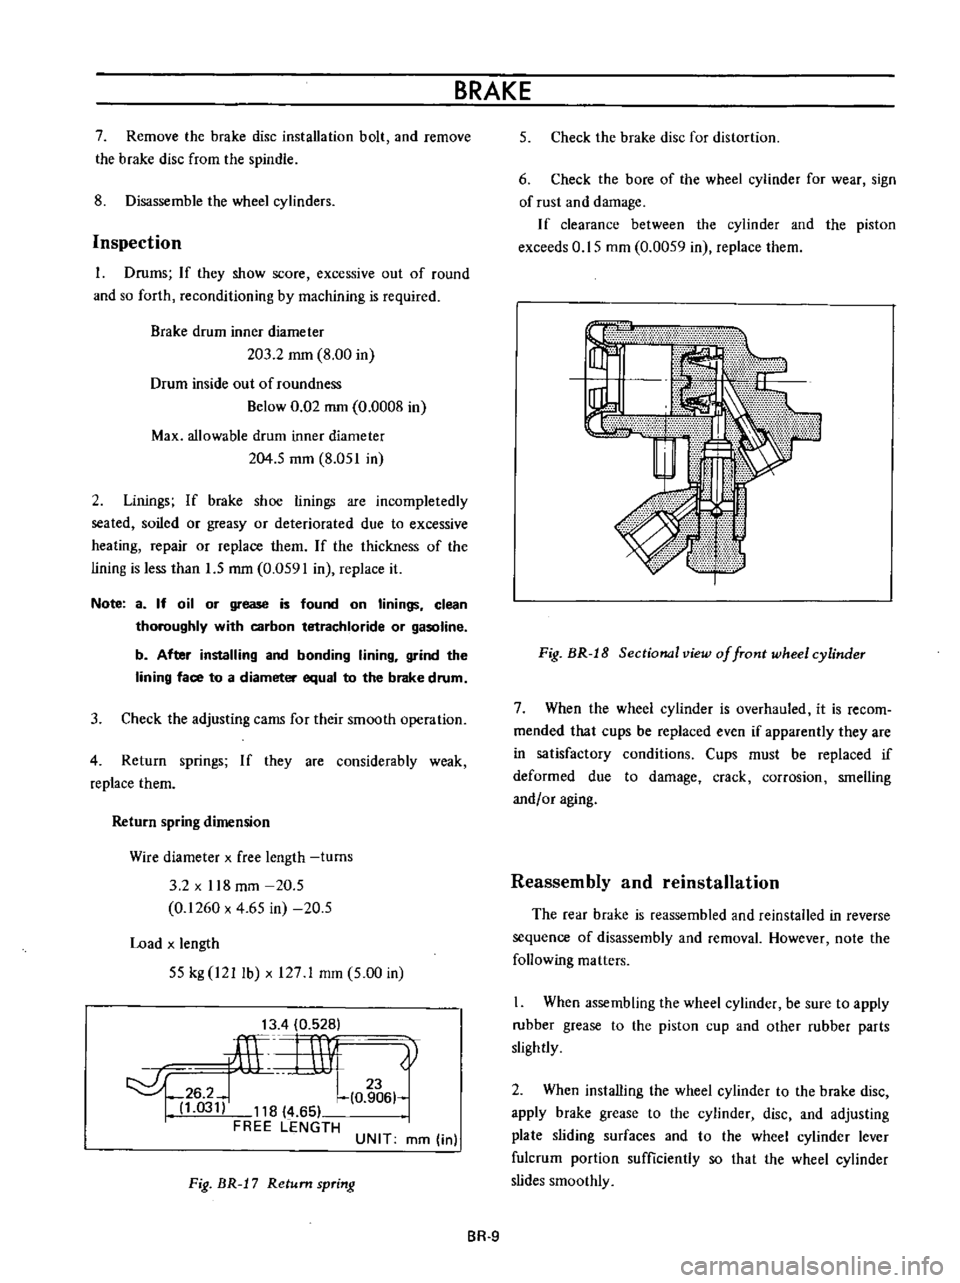
Return
spring
dimension
Wire
diameter
x
free
length
turns
3
2
x
118
mm
20
5
0
1260
x
4
65
in
20
5
Load
x
length
55
kg
I21
lb
x
127
1
mm
5
00
in
13
4
0
528
ilL
rnv
0
t
6
hl
03
118
4
65
FREE
LENGTH
UNIT
mm
in
Fig
BR
J
7
Return
spring
BRAKE
5
Check
the
brake
disc
for
distortion
6
Check
the
bore
of
the
wheel
cylinder
for
wear
sign
of
rust
and
damage
If
clearance
between
the
cylinder
and
the
piston
exceeds
0
15
mm
0
0059
in
replace
them
Fig
BR
J
8
Sectional
view
of
front
wheel
cylinder
7
When
the
wheel
cylinder
is
overhauled
it
is
recom
mended
that
cups
be
replaced
even
if
apparently
they
are
in
satisfactory
conditions
Cups
must
be
replaced
if
deformed
due
to
damage
crack
corrosion
smelling
andf
or
aging
Reassembly
and
reinstallation
The
rear
brake
is
reassembled
and
reinstalled
in
reverse
sequence
of
disassembly
and
removal
However
note
the
following
matters
When
assembling
the
wheel
cylinder
be
sure
to
apply
rubber
grease
to
the
piston
cup
and
other
rubber
parts
slightly
2
When
installing
the
wheel
cylinder
to
the
brake
disc
apply
brake
grease
to
the
cylinder
disc
and
adjusting
plate
sliding
surfaces
and
to
the
wheel
cylinder
lever
fulcrum
portion
sufficiently
so
that
the
wheel
cylinder
slides
smoothly
BR
9
Page 135 of 513

BRAKE
CYLINDER
SIDE
PISTON
SIDE
COMPR
ESSION
DECOMPRESSION
Movement
exceeding
the
elastic
displacement
is
released
with
slipping
on
the
seal
surface
Returns
in
elastic
displacement
of
the
seal
Fig
BR
21
Piston
seal
automatic
adjusting
operation
Brake
pad
Replacement
1
Jack
up
front
unit
of
the
vehicle
and
remove
lhe
front
wheeL
2
Remove
clip
from
the
retaining
pin
and
supporting
the
brake
pad
remove
the
retaining
pin
and
coil
spring
I
I
Brake
pad
2
Retaining
pin
I
31
Clip
Fig
BR
22
Removing
retaining
pin
3
Unhook
the
hanger
spring
and
withdraw
the
brake
pad
and
shim
with
a
pair
of
pliers
BR
ll
Fig
HR
2
Withdrawing
brake
pad
and
shim
Note
When
the
brake
pad
is
removed
do
not
depress
the
brake
pedal
or
otherwise
the
piston
will
come
out
Inspection
Clearance
between
the
brake
pad
and
rotor
is
adjusted
automatically
Check
the
brake
pad
for
wear
after
the
first
10
000
km
6
000
miles
driving
and
every
5
000
km
3
000
miles
thereafter
1
Clean
the
brake
pad
with
carbon
tetrachloride
or
gasoline
2
When
oil
and
or
grease
is
heavily
sticked
on
the
pad
or
when
deteriorated
or
deformed
due
to
overheating
replace
the
pad
with
a
new
one
3
When
thickness
of
the
friction
material
pad
is
less
than
1
6
mm
0
0630
in
replace
Replace
when
total
pad
thickness
is
less
than
6
1
mm
0
2402
in
Note
Replace
pads
as
a
set
Replacement
at
only
one
position
may
cause
uneven
brake
effect
It
is
recommended
that
rotation
of
pads
be
made
periodically
4
Check
the
rotor
Refer
to
Rotor
inspection
Reinstallation
1
Clean
the
calipers
and
piston
pad
installing
parts
Note
Do
not
use
mineral
oil
Be
careful
not
to
apply
oil
on
the
rotor
2
Depress
the
piston
into
the
cylinder
so
that
new
pad
can
be
installed
Page 149 of 513

Pedal
yields
under
slight
pressure
Excessive
pedal
travel
All
brakes
drag
One
brake
drags
Unbalanced
brakes
BRAKE
Use
of
a
brake
fluid
with
a
boiling
point
which
is
too
low
Reservoir
filler
cap
ven
t
hole
clogged
This
promotes
a
vacuum
in
master
cylinder
that
sucks
in
air
through
rear
seal
Deteriorated
check
valve
External
leaks
Master
cylinder
leaks
through
primary
cap
System
has
not
been
bled
Improperly
adjusted
clearance
Fluid
level
in
master
cylinder
is
too
low
Thermal
expansion
of
drums
due
to
over
heating
Insufficient
shoe
tlrdrum
clearance
Weak
shoe
return
springs
Brake
shoe
return
no
free
travel
Seized
master
cylinder
piston
Loose
or
damaged
wheel
bearings
Weak
broken
or
unhooked
brake
shoe
return
springs
Insufficient
clearance
between
brake
shoe
and
drum
Grease
or
oil
on
linings
Seized
piston
in
wheel
cylinder
Tires
improperly
inflated
Loose
wheel
bearing
BR
25
Change
with
the
specified
brake
fluid
and
bleed
system
Clean
reservoir
filler
cap
and
bleed
the
system
Fit
a
new
check
valve
and
bleed
the
system
Check
master
cylinder
piping
and
wheel
cylinder
for
leaks
and
make
necessary
re
pairs
Overhaul
master
cylinder
Bleed
the
system
Adjust
shoe
to
drum
clearance
Full
up
with
specified
brake
fluid
Bleed
the
system
if
required
Allow
drums
to
cool
off
Check
brake
shoe
linings
and
drums
Replace
damaged
parts
Adjust
clearance
Replace
the
springs
Adjust
pedal
height
Service
the
master
cylinder
replace
the
piston
and
bleed
the
system
Adjust
or
replace
wheel
bearings
Replace
spring
Adjust
brakes
Clean
brake
mechanism
replace
lining
and
correct
cause
of
grease
or
oil
getting
on
lining
Service
the
wheel
cylinder
and
bleed
the
system
Inflate
tires
to
correct
pressure
Adjust
wheel
bearing
Page 224 of 513
BODY
Removal
and
installation
The
rear
window
electric
defroster
glass
is
removed
from
or
installed
on
its
position
in
the
same
manner
as
that
for
the
standard
rear
window
glass
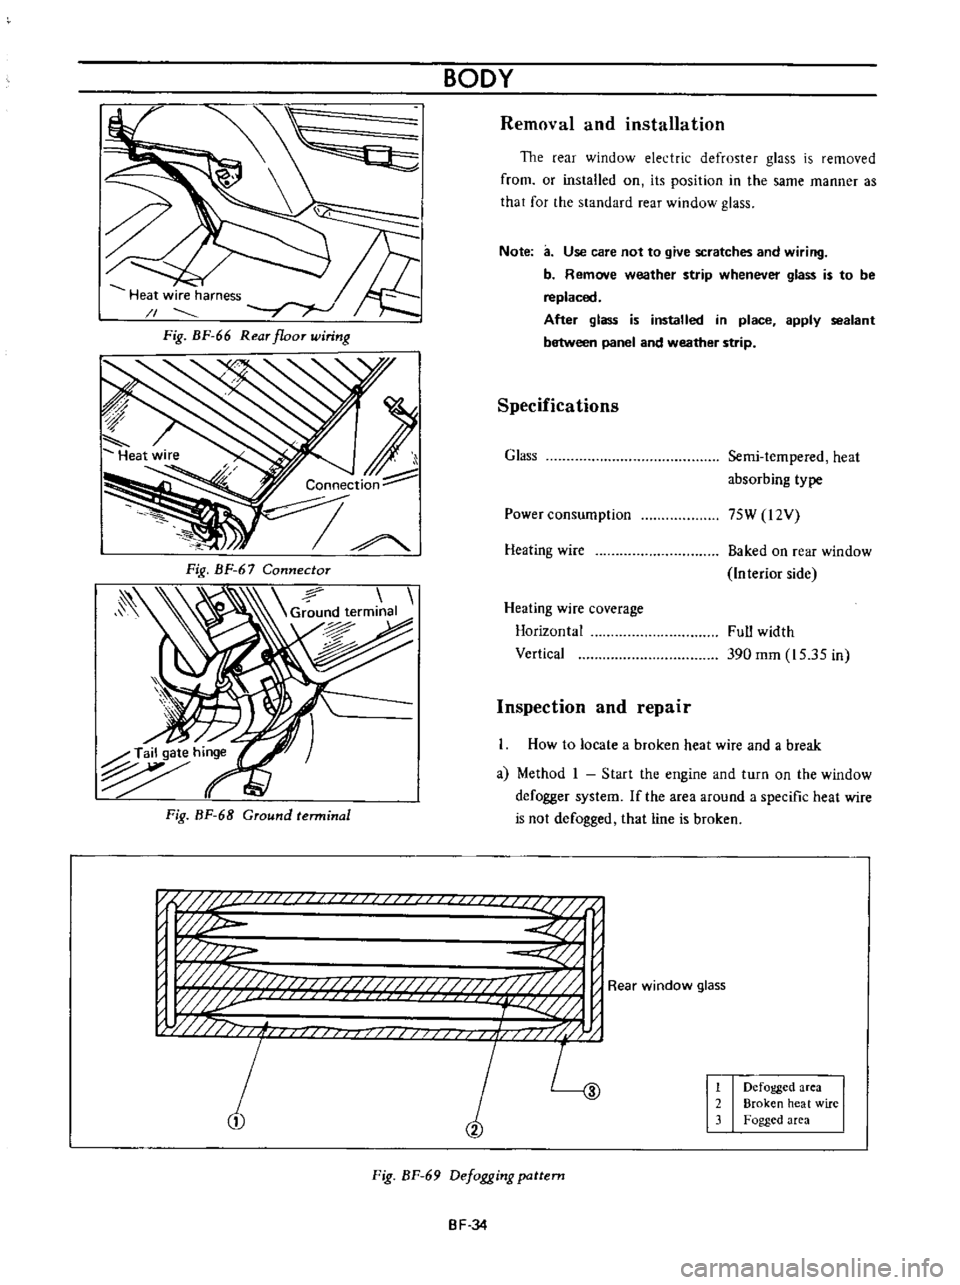
Heat
wire
harness
1
Fig
BF
66
Rear
floor
wiring
Note
a
Use
care
not
to
give
scratches
and
wiring
b
Remove
weather
strip
whenever
glass
is
to
be
replaced
After
glass
is
installed
in
place
apply
sealant
between
panel
and
weather
strip
1
Connection
Specifications
Glass
Semi
tempered
heat
absorbing
type
Power
consumption
75W
l2V
Heating
wire
Baked
on
rear
window
Interior
side
Heating
wire
coverage
Horizontal
Vertical
Full
width
390
mm
15
35
in
Inspection
and
repair
Ground
terminal
How
to
locate
a
broken
heat
wire
and
a
break
a
Method
I
Start
the
engine
and
turn
on
the
window
defogger
system
If
the
area
around
a
specific
heat
wire
is
not
defogged
that
line
is
broken
n
if
U
i
p
w
w
j
w
j
fj
f
i
j
L
1
2
Defogged
area
Broken
heat
wire
Fogged
area
Fig
BF
69
Defogging
pattern
BF
34
Page 335 of 513
Air
intake
system
in
trouble
Overheating
Overcooling
Others
NOISY
ENGINE
Car
knocking
Car
knock
when
coasting
ENGINE
Diny
ur
clogged
fuel
strainer
Fuel
pump
will
not
work
properly
Clogged
carburetor
jets
Clogged
air
cleaner
Air
inhaling
from
manifold
gasket
or
carbu
retor
gasket
Insufficient
coolant
Loosened
fan
belt
Worn
or
defective
fan
belt
Defective
thermostat
Defective
water
pump
Clogged
or
leaky
radiator
Defective
radiator
filler
cap
Air
mixing
into
cooling
system
Improper
grade
engine
oil
Incorrect
ignition
timing
Defective
carburetor
lean
mixture
Defective
thermostat
Low
octane
fuel
Improper
tire
pressure
Dragging
brake
Slipping
clutch
Overloading
to
engine
Carbon
knocking
Timing
knocking
Fuel
knocking
Preignition
misusing
of
spark
plug
Incorrect
throttle
opener
adjustment
Trouble
in
PCV
valve
ET
30
Replace
Repair
or
replace
Disassemble
and
clean
Replace
element
Replace
gasket
Replenish
Adjust
Replace
Replace
Replace
Flush
repair
or
replace
Replace
Retighten
each
part
of
cooling
system
Replace
with
proper
grade
oil
Adjust
Overhaul
carburetor
Replace
Replace
with
specified
octane
fuel
Adjust
to
the
specified
pressure
Adjust
Adjust
Use
right
gear
in
driving
Disassemble
cylinder
head
and
remove
carbon
Adjust
ignition
timing
Use
specified
octane
fuel
Use
specified
spark
plug
Adjust
throttle
opener
Replace
PCV
valve
Page 352 of 513
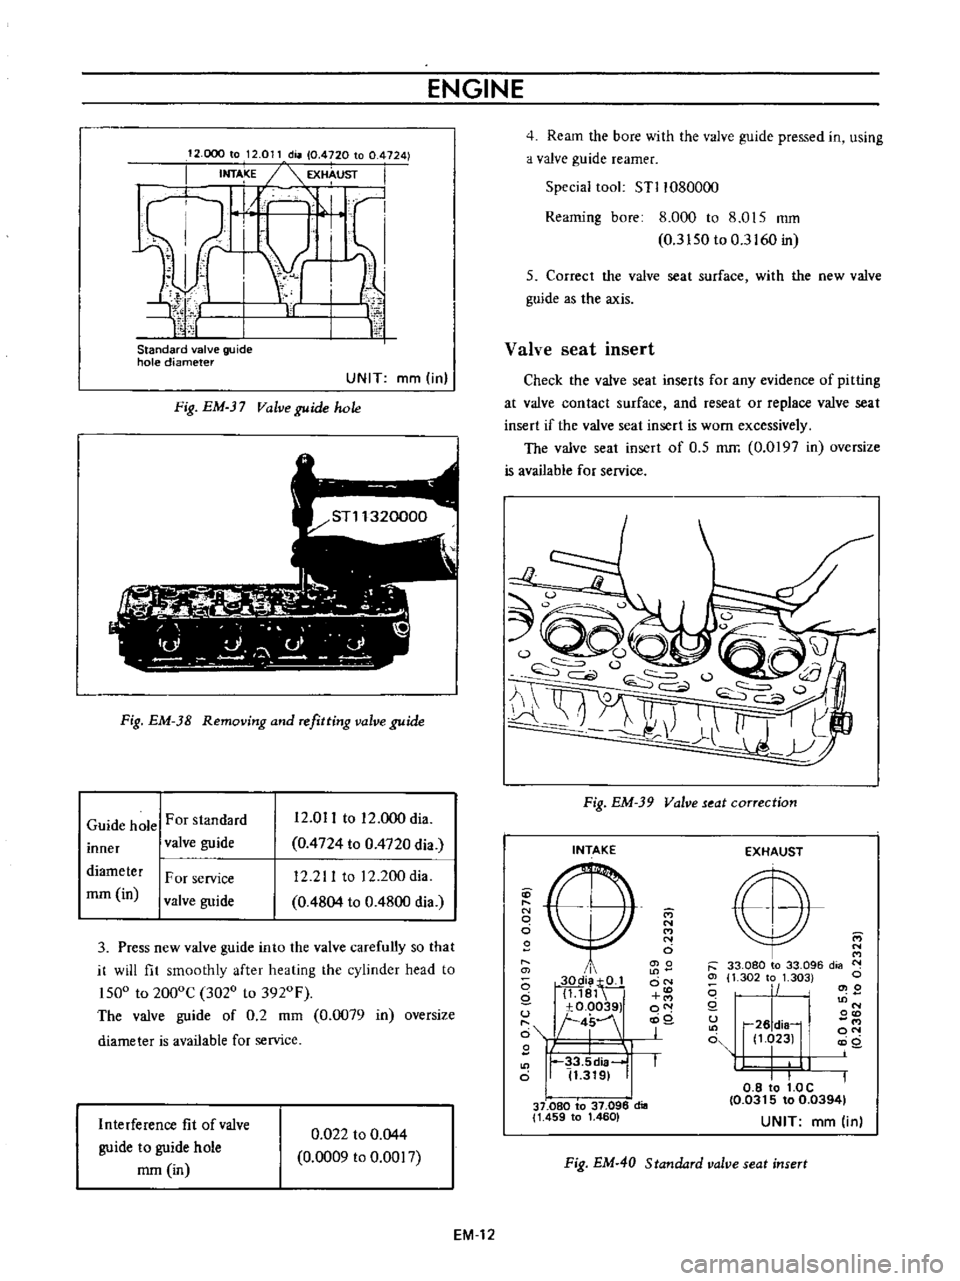
ENGINE
12
000
to
12
011
dia
0
4720
to
0
4724
I
t
r
1
1
1
ftlM
e
f
i1i
e
e
I
Standard
alve
guide
hole
diameter
UNIT
mm
in
Fig
EM
Valve
guide
hole
Fig
EM
38
Removing
and
refitting
valve
guide
Guide
hole
For
standard
inner
valve
guide
12
011
to
12
000
dia
0
4724
to
0
4720
dia
12
211
to
12
200dia
0
4804
to
0
4800
dia
diameter
rom
in
F
or
service
valve
guide
3
Press
new
valve
guide
into
the
valve
carefully
so
that
it
will
fit
smoothly
after
heating
the
cylinder
head
to
ISOo
to
2000C
3020
to
3920F
The
valve
guide
of
0
2
mm
0
0079
in
oversize
diameter
is
available
for
service
Interference
fit
of
valve
guide
to
guide
hole
mm
in
0
022
to
0
044
0
0009
to
0
0017
4
Ream
the
bore
with
the
valve
guide
pressed
in
using
a
valve
guide
reamer
Special
tool
STl1080000
Reaming
bore
8
000
to
8
015
mm
0
3
ISO
to
0
3160
in
5
Correct
the
valve
seat
surface
with
the
new
valve
guide
as
the
axis
Valve
seat
insert
Check
the
valve
seat
inserts
for
any
evidence
of
pitting
at
valve
contact
surface
and
reseat
or
replace
valve
seat
insert
if
the
valve
seat
insert
is
worn
excessively
The
valve
seat
insert
of
O
S
mrr
0
0197
in
oversize
is
available
for
service
Fig
EM
39
Valve
seat
correction
INTAKE
D
N
o
o
i
i
o
2Q
Qi
tQJ
g
1
181
u
xO
00391
t
4
I
J
1
11
33
5d
a
o
I
11
3191
37
080
to
37
096
dill
1
459
to
1
460
M
N
M
N
o
0
0
ON
o
0
j
EXHAUST
E
r
33
080
to
33
096
dia
N
Ol
1
302
to
1
303
c
i
1
2
I
N
0
r26
dia
11
023
0
0
8
to
1
0C
10
0315
to
0
03941
UNIT
mm
in
Cl
Q
u
o
Fig
EM
40
Standard
valve
seat
insert
EM
12
Page 457 of 513
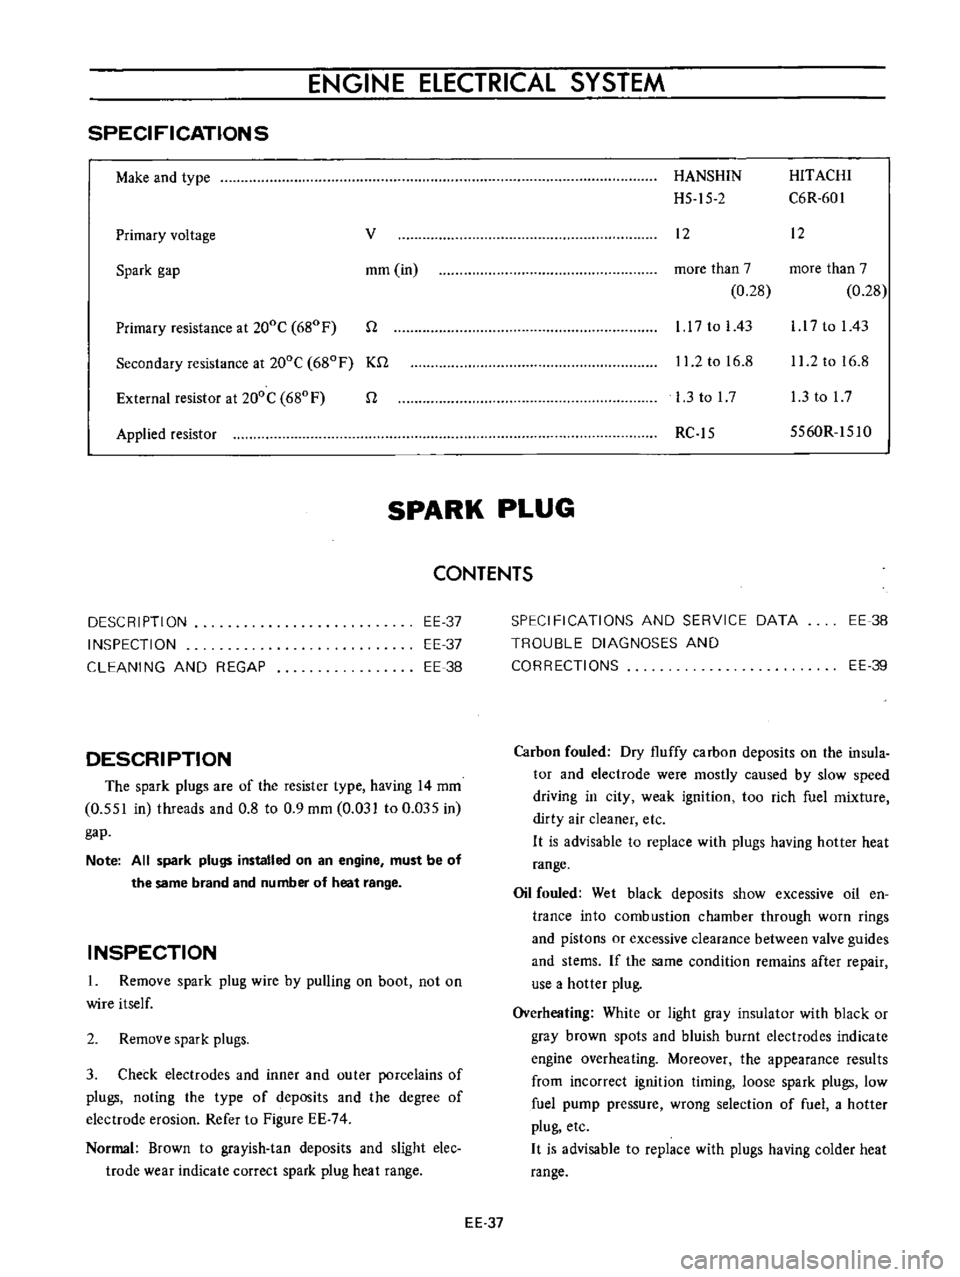
ENGINE
ElECTRICAL
SYSTEM
SPECIFICATIONS
Make
and
type
Primary
voltage
v
Spark
gap
mm
in
Primary
resistance
at
200C
680
F
n
Secondary
resistance
at
200C
680F
Kn
External
resistor
at
200C
680
F
n
Applied
resistor
HANSHIN
HITACHI
H5
15
2
C6R
601
12
12
more
than
7
more
than
7
0
28
0
28
1
17
to
I
43
l
l
7
to
I
43
11
2
to
16
8
11
2
to
16
8
l
3tol7
l
3tol7
RC
15
5560R
151O
SPARK
PLUG
CONTENTS
DESCRIPTION
INSPECTION
CLEANING
AND
REGAP
EE
37
EE
37
EE
38
DESCRIPTION
The
spark
plugs
are
of
the
resister
type
having
14
mm
0
551
in
threads
and
0
8
to
0
9
mm
0
031
to
0
Q35
in
gap
Note
All
spark
plugs
installed
on
an
engine
must
be
of
the
same
brand
and
number
of
heat
range
INSPECTION
1
Remove
spark
plug
wire
by
pulling
on
boot
not
on
wire
itself
2
Remove
spark
plugs
3
Check
electrodes
and
inner
and
outer
porcelains
of
plugs
noting
the
type
of
deposits
and
the
degree
of
electrode
erosion
Refer
to
Figure
EE
74
Normal
Brown
to
grayish
tan
deposits
and
slight
elec
trode
wear
indicate
correct
spark
plug
heat
range
SPECIFICATIONS
AND
SERVICE
DATA
TROUBLE
DIAGNOSES
AND
CORRECTIONS
EE
38
EE
39
Carbon
fouled
Dry
fluffy
carbon
deposits
on
the
insula
tor
and
electrode
were
mostly
caused
by
slow
speed
driving
in
city
weak
ignition
too
rich
fuel
mixture
dirty
air
cleaner
etc
H
is
advisable
to
replace
with
plugs
having
hotter
heat
range
Oil
fouled
Wet
black
deposits
show
excessive
oil
en
trance
into
combustion
chamber
through
worn
rings
and
pistons
or
excessive
clearance
between
valve
guides
and
stems
If
the
same
condition
remains
after
repair
use
a
hotter
plug
Overheating
White
or
light
gray
insulator
with
black
or
gray
brown
spots
and
bluish
burnt
electrodes
indicate
engine
overheating
Moreover
the
appearance
results
from
incorrect
ignition
timing
loose
spark
plugs
low
fuel
pump
pressure
wrong
selection
of
fuel
a
hotter
plug
etc
H
is
advisable
to
replace
with
plugs
having
colder
heat
range
EE
37