Page 225 of 338
223
508RXH_en_Chap08_info-pratiques_ed01-2014
Very cold climate screen
FittingRemoval
Removable protective screen which prevents the accumulation of snow at the radiator cooling fan.
Do not forget to remove the very cold
climate screen:
- when the ambient temperature exceeds
10° C (for example: in summer,
...),
- when towing,- at speeds above 75 mph (120 km/h).
F Offer up the screen to the front of the top section of the front bumper upper grille.
F
P
ress on the screen to engage its fixing
clips. F
us e a screwdriver as a lever to unclip each
retaining clip in turn.
Before fitting or removing the screen,
ensure that the engine is off and the cooling
fan has stopped. It is recommended that
the screen be fitted and removed by a
P
e
uge
Ot
dealer or a qualified workshop.
8
Practical information
Page 226 of 338

224
508RXH_en_Chap08_info-pratiques_ed01-2014
Accessories
A wide range of accessories and genuine parts is available from the PeugeOt dealer network.th
ese accessories and parts have been tested and approved for reliability and safety.
th
ey are all suitable for your vehicle and benefit from P
e
uge
Ot'
s recommendation and warranty.
"Comfort":
cool box, smoker's kit, 230 V socket, torch...
"Transport solutions":
booster seats and child seats, boot tray, roof
box, ski carrier, towbar-mounted bicycle carrier,
towbars (swan-neck, quickly detachable ball,
folding), harnesses, sliding floor, utility vehicle
conversion kit, ...
th
e trailer towbar and its harness should
preferably be fitted by a P
e
uge
Ot
dealer.
"Style":
spoiler, front and rear mud flaps, aluminium
gear lever knob, alloy wheels (16, 17, 18 and
19 inch), body kit, door mirror shells, door air
deflectors, ...
*
t
o a
void any risk of jamming of the pedals:
-
e
nsure that the mat is positioned and
secured correctly,
-
n
ever fit one mat on top of another.
"Safety and security":
speed limiter/cruise control, anti-theft alarm,
microwave unit, window etching, wheel security
bolts, breathalyser, first aid kit, warning
triangle, high visibility vest, stolen vehicle
tracking system, winter equipment (17 inch
wheels for snow chains), reversing camera,
front and rear parking sensors, boot spacers...
"Protection":
mats*, seat covers, vehicle covers, sun blinds,
boot net, load protection net, dog guard, door
and boot sill protectors, resin side rubbing
strips...
Practical information
Page 227 of 338

225
508RXH_en_Chap08_info-pratiques_ed01-2014
the fitting of electrical equipment
or accessories which are not
recommended by P
e
uge
Ot
may result
in a failure of your vehicle's electronic
system and excessive electrical
consumption.
Please note this precaution. You
are advised to contact a P
e
uge
Ot
representative to be shown the range
of recommended equipment and
accessories.Installation of radio
communication transmitters
Before installing any after-market radio
communication transmitter, you can
contact a P
e
uge
Ot
dealer for the
specification of transmitters which can
be fitted (frequency, maximum power,
aerial position, specific installation
requirements), in line with the
Vehicle
e
l
ectromagnetic Compatibility
Directive (2004/104/
eC
). Depending on the legislation in force in
the country, certain safety equipment
may be compulsory: high visibility
safety vests, warning triangles,
breathalyzers, spare bulbs, spare fuses,
a fire extinguisher, a first aid kit, mud
flaps at the rear of the vehicle.
You can also obtain products for cleaning and
maintenance (exterior and interior) and topping
up fluids (screenwash, ...), as well as refills
(cartridge for temporary tyre repair kit...) from
P
e
uge
Ot d
ealers.
"Multimedia":
audio systems, portable navigation system, ta
kara/Sony portable video screen, Bluetooth
system, speakers, DVD player, Wi-Fi, driving
aids, video support, microwave unit...
8
Practical information
Page 228 of 338

226
508RXH_en_Chap09_verifications_ed01-2014
PeugeOt & t O tA L,
A PARtNeRSHIP tO DeL IVe R
Be
tte R
P
e
RFORMANC
e
!
Innovation, the key to success
the tOtAL Research and Development and
Pe
ugeOt teams work together to develop high
quality lubricants that meet the requirements
of P
e
uge
Ot
vehicles. For you, this is the
assurance that the performance of your engine
is optimised while also ensuring its durability.
th
e 208 HYbrid F
e
demonstrates the ability of
P
e
uge
Ot
and
tOtA
L to develop innovative
technologies and provide other ways of moving
towards the future.
208 HYbrid FE, a technology demonstrator with exceptional characteristics: 1.9 l/100 km
( 148.7 mpg) and 0 to 100 km/h (0 to 62 mph) in 8 seconds.
Reduced exhaust emissions,
a true reality
tOtAL lubricants are formulated to optimise the
efficiency of engines and the protection of the
emissions post-treatment systems. It is important
to observe the servicing recommendations
made by P
e
uge
Ot
to assure correct operation.
RECOMMENDS
Checks
Page 229 of 338
227
508RXH_en_Chap09_verifications_ed01-2014
Opening the bonnet
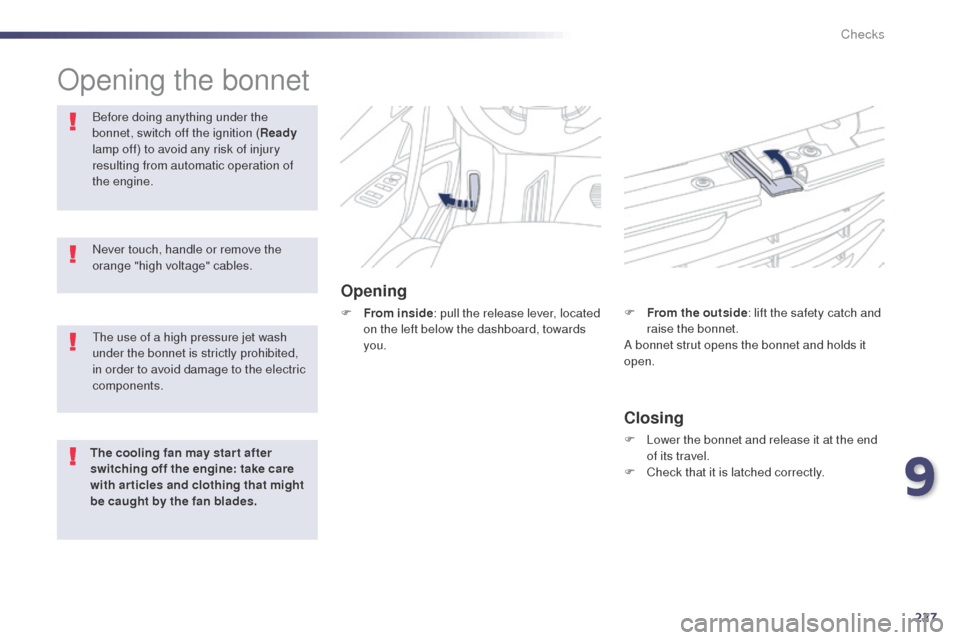
Opening
F From inside: pull the release lever, located
on the left below the dashboard, towards
you.
Before doing anything under the
bonnet, switch off the ignition (
Ready
lamp off) to avoid any risk of injury
resulting from automatic operation of
the engine.
Closing
F Lower the bonnet and release it at the end of its travel.
F
C
heck that it is latched correctly.
F
F
rom the outside
: lift the safety catch and
raise the bonnet.
A bonnet strut opens the bonnet and holds it
open.
Never touch, handle or remove the
orange "high voltage" cables.
th
e use of a high pressure jet wash
under the bonnet is strictly prohibited,
in order to avoid damage to the electric
components.
The cooling fan may star t after
switching off the engine: take care
with articles and clothing that might
be caught by the fan blades.
9
Checks
Page 230 of 338

228
508RXH_en_Chap09_verifications_ed01-2014
On vehicles fitted with HDi engines, the fuel
system must be primed if you run out of fuel;
refer to the corresponding engine compartment
view.
Running out of fuel (Diesel)
If the tank on your vehicle is fitted with
a misfuel prevention device, refer to the
"Misfuel prevention (Diesel)" section.F
F ill the fuel tank with at least five litres of
Diesel.
F
O
pen the bonnet.
F
I
f necessary, unclip the style cover for
access to the priming pump.
F
S
lacken the bleed screw.
F
S
queeze and release the priming pump
repeatedly until fuel appears in the
transparent pipe.
F
t
i
ghten the bleed screw.
F
O
perate the starter until the engine starts
(if the engine fails to start at the first
attempt, wait around 15 seconds before
trying again).
F
I
f the engine fails to start after a few
attempts, operate the priming pump again,
then the starter.
F
P
ut the style cover back in position and
clip it in place, ensuring that it has clipped
c o r r e c t l y.
F
C
lose the bonnet.
2 litre HDi engine
If the engine does not start first time,
don't keep trying but start the procedure
again from the beginning.
Before doing anything under the
bonnet, switch off the ignition (Ready
lamp off) to avoid any risk of injury
resulting from automatic operation of
the engine.
Checks
Page 231 of 338
229
508RXH_en_Chap09_verifications_ed01-2014
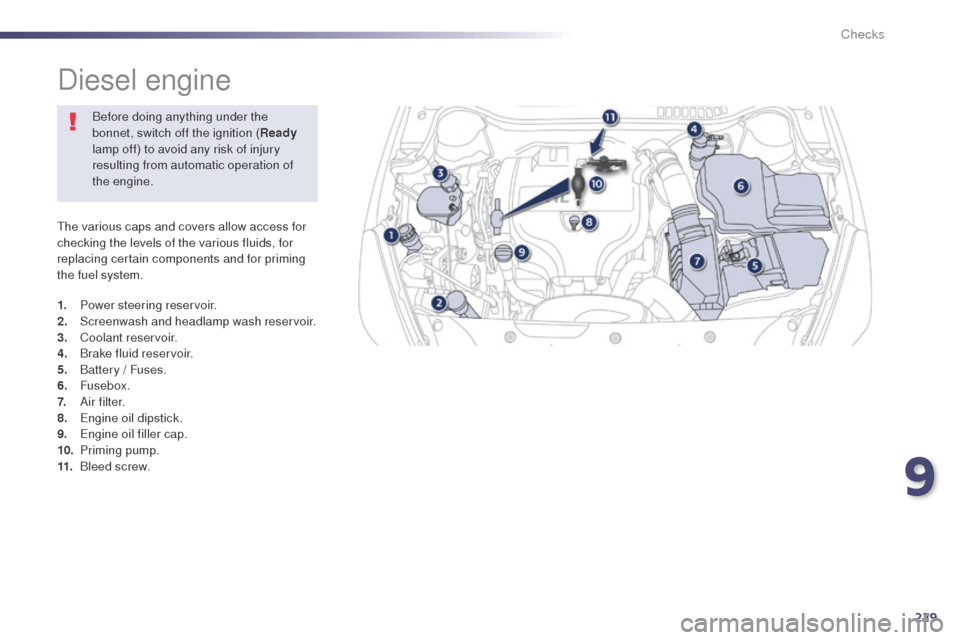
the various caps and covers allow access for
checking the levels of the various fluids, for
replacing certain components and for priming
the fuel system.
Diesel engine
1. Power steering reservoir.
2. Screenwash and headlamp wash reservoir.
3.
C
oolant reservoir.
4.
B
rake fluid reservoir.
5.
B
attery / Fuses.
6.
Fusebox.
7.
A
i r f i l t e r.
8.
e
n
gine oil dipstick.
9.
e
n
gine oil filler cap.
10.
P
riming pump.
11.
B
leed screw.Before doing anything under the
bonnet, switch off the ignition (
Ready
lamp off) to avoid any risk of injury
resulting from automatic operation of
the engine.
9
Checks
Page 232 of 338

230
508RXH_en_Chap09_verifications_ed01-2014
Checking levels
Before doing anything under the
bonnet, switch off the ignition (Ready
lamp off) to avoid any risk of injury
resulting from automatic operation of
the engine.
Engine oil level
the check is carried out either when
the ignition is switched on using the
oil level indicator in the instrument
panel for vehicles with and electric oil
level gauge, or using the dipstick.
to e
nsure that the reading is correct,
your vehicle must be parked on a level
sur face and the engine having been off
for more than 30 minutes.
It is normal to top up the oil level between
two services (or oil changes). P
e
uge
Ot
recommends that you check the level, and top
up if necessary, every 3 000 miles (5 000 kms). Check all of these levels regularly, in line with the warranty and maintenance record. t
o
p them up if necessary, unless other wise indicated.
If a level drops significantly, have the corresponding system checked by a P
e
uge
Ot
dealer or a qualified workshop.
ta
ke care when working under the bonnet, as certain areas of the engine may be extremely hot (risk of burns) and the cooling fan could start at
any time (even with the ignition off).
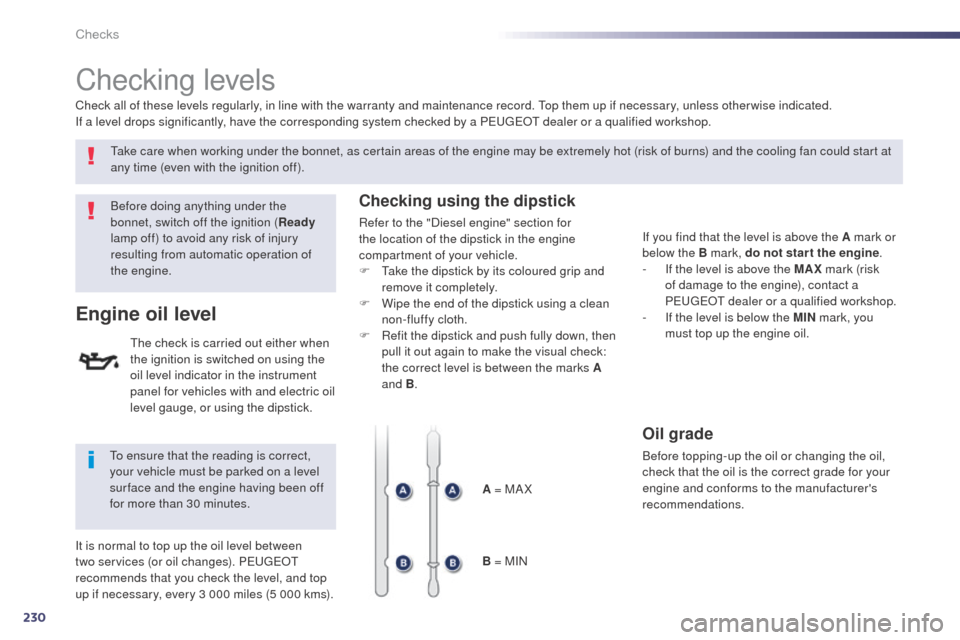
Checking using the dipstick
Refer to the "Diesel engine" section for
the location of the dipstick in the engine
compartment of your vehicle.
F
t
a
ke the dipstick by its coloured grip and
remove it completely.
F
W
ipe the end of the dipstick using a clean
non-fluffy cloth.
F
R
efit the dipstick and push fully down, then
pull it out again to make the visual check:
the correct level is between the marks A
and B .
A = MA X
B = MIN If you find that the level is above the A mark or
below the B mark, do not star t the engine
.
-
I
f the level is above the MAX mark (risk
of damage to the engine), contact a
P
e
uge
Ot
dealer or a qualified workshop.
-
I
f the level is below the MIN mark, you
must top up the engine oil.
Oil grade
Before topping-up the oil or changing the oil,
check that the oil is the correct grade for your
engine and conforms to the manufacturer's
recommendations.
Checks