Page 329 of 416
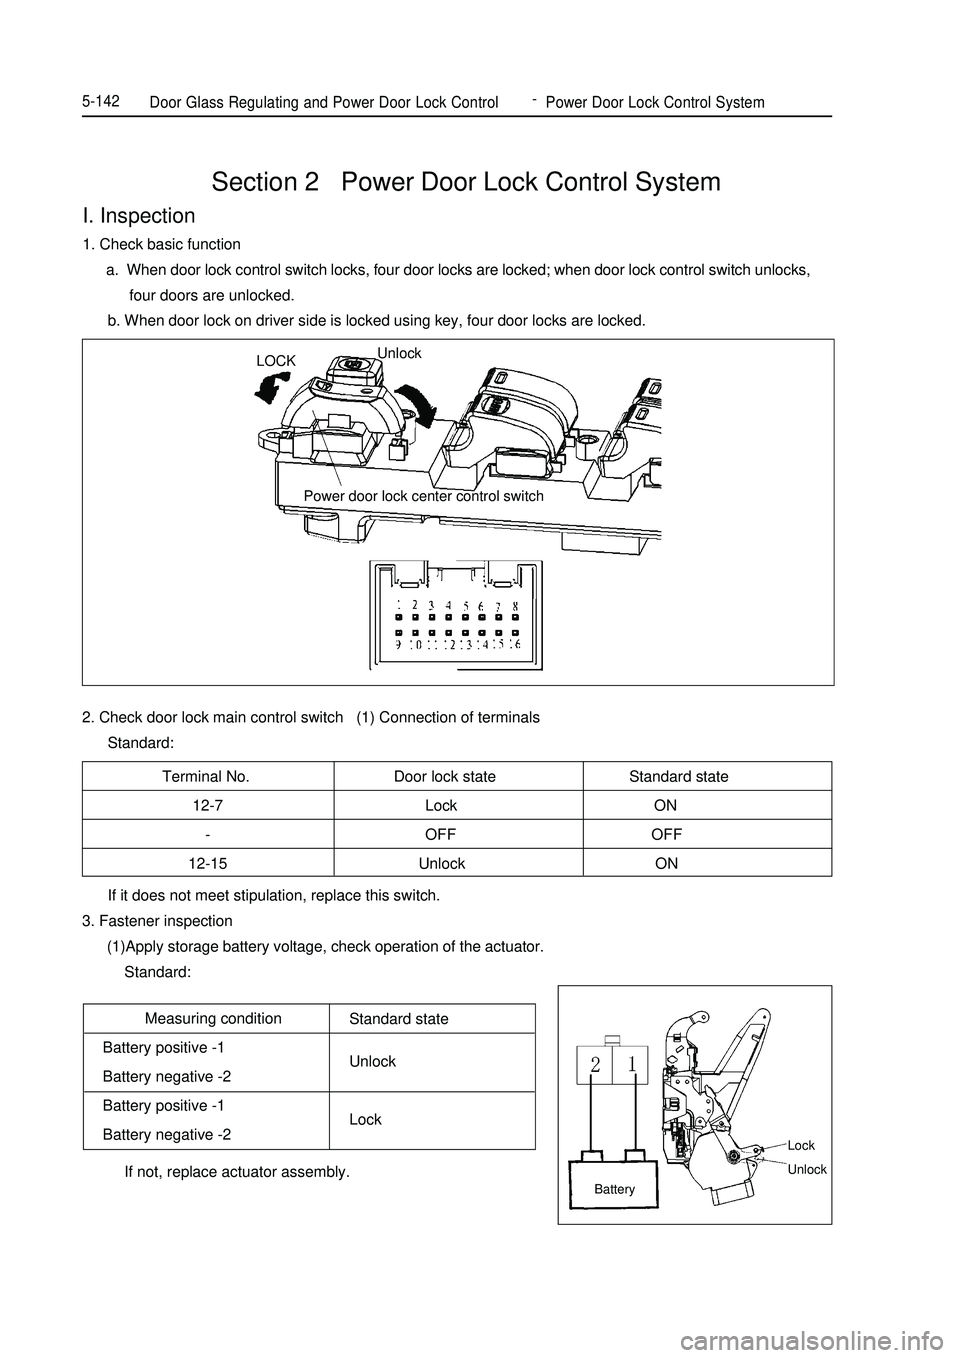
2. Check door lock main control switch (1) Connection of terminals
Standard:Section 2 Power Door Lock Control SystemI. Inspection1. Check basic function
a. When door lock control switch locks, four door locks are locked; when door lock control switch unlocks,
four doors are unlocked.
b. When door lock on driver side is locked using key, four door locks are locked.Terminal No. Door lock state Standard state
12-7 Lock ON
- OFF OFF
12-15 Unlock ONMeasuring condition
Battery positive -1
Battery negative -2
Battery positive -1
Battery negative -2Door Glass Regulating and Power Door Lock Control-
Power Door Lock Control System5-142 If it does not meet stipulation, replace this switch.
3. Fastener inspection
(1)Apply storage battery voltage, check operation of the actuator.
Standard:
If not, replace actuator assembly.Standard state
Unlock
LockLOCKUnlock
Power door lock center control switchBatteryLock
Unlock
Page 330 of 416
I. Component View3721
Non-reusable partsFront seat-belt buckle assy.Interior & Exterior Trim and Accessory -Front Seat Assembly6-1N.
m :Specified torquePart VI Interior & Exterior Trim and AccessoryChapter 1 Front Seat AssemblyHeadrest
Front seat (L)
Cushion trim
Seat cushion
Seat cushion frame
Seat rail handleInner seat rail cover
Seat backrest cushion
Outer seat rail cover
Seat backrest trim
C-ring
C-ring
Headrest bracket
Front seat adjuster
Angle adjuster inside cover FL seat cushion inside stopper
FL seat cushion stopper
Release lever
Page 331 of 416

Interior & Exterior Trim and Accessory -Front Seat Assembly6-21.Remove the front seat
a. Remove the headrest;
b. Remove the inner and outer seat rail covers;
c. Unfix 4 screws;
d. Disconnect the connector on the back of seat cushion;
e. Remove the front seat.
2. Remove the left front seat cushion outer stopper
a. Unfix the release lever;
b. Loosen 3 clips and then unfasten the outer stopper.
3. Remove the left front seat cushion inner stopper
a. Unfix the screw;
b. Loosen the clip and then unfasten the inner stopper.
4. Remove the left front seat-belt buckle assembly
a. Disconnect the connecting wiring harness;
b. Unfix the screw and then unfasten the seat-belt buckle assembly.
5. Remove the left front backrest trim
a. Turn the backrest over and unfix the C-rings;
b. Remove 2 headrest brackets;
c. Remove the backrest trim.
6. Remove the left front seat cushion trim
a. Remove the C-rings from the back of seat cushion;
b. Remove the seat cushion trim.
7. Remove the seat adjuster
a. Remove the seat rail handle;
b. Unfix the screw and then unfasten the seat rail.
8. Install the front seat assembly
Tips:
Install in reverse order of removal.
Install seat cushion frame with 4 bolts, Torgue:21N.m.
Install FL seat belt buckle assembly. Torgue:43N.m.II. Removal and installation of front seat assembly The operation procedure on the right side is identical with that on the left side.
Page 332 of 416
Chapter 2 Rear Row Seat AssemblyI. Component Viewrear row seat cushion lockInterior & Exterior Trim and Accessory -Rear Row Seat Assembly6-3headrest pillow
support of headrest pillow
frame of right-rear seatback
cover (cushion) of right-
rear seatback
side hinge of rear seat
arch ring
central hingelock-up handle of seatback
support of lock-up handle of seatback
assembly of right-rear seatback lock-up
assembly of left-rear seatback lock-up
cover (cushion) of left-rear
seatbackframe of left-
rear seatback
side hinge of rear seat
central bracket of rear
seat cushion
Page 333 of 416
Interior & Exterior Trim and Accessory -Rear Row Seat Assembly6-4II. Removal & Installation of Rear Seat Assembly1. Remove the rear seat cushion assembly
a. Pull out the front part of seat cushion upwards.
b. Release the wire harness of seat cushion from the central
protuberance, and remove the seat cushion assembly.
2. Remove the assembly of left-rear seatback
a. Fold the seatback;
b. Remove the clamp, and uncover the seat;
c. Remove the 2 bolts and seatback assembly.
3. Remove the assembly of right-rear seatback
Tip:
Apply the procedures the same as aforesaid for the left side.
4. Remove the assembly of left-rear seatback lockup
Remove the 2 bolts and the seatback lockup device off the
seatback frame.
5. Remove the assembly of right-rear seatback lockup
Tip:
Apply the procedures the same as aforesaid for the left side.
6. Install the assembly of rear seatback
Tip:
Follow the sequence reverse to removal.
All the bolts shall be installed with the torque: 18N.m.
Page 334 of 416
Chapter 3 Front Seat BeltSeat Belt Reminder SystemI. Component View
II. Fault diagnosis
Possible causes
1. GAUGE fuse;
2. Instrument cluster;
3. Left front buckle assembly
4. Wiring harnessSymptom
Driver's seat belt lamp is not onIII. Alarm system inspection
1. To inspect the left front buckle assembly
Check the conductivity of left front buckle assemblyTerminal Number Seat Belt Required
1<=>2Insert OFF
1<=>2Release ON If you find that the result of the inspection is not the same as
required, you can replace the left front buckle assembly.DriverÕs seat belt reminder lamp
Left front buckleInterior & Exterior Trim and Accessory
-Front Seat Belt6-5
Page 335 of 416
Detach and Mount Front Seat BeltI.Component View40~6040~60
Pulley cover
Lower trim20 Buckle assy.40~60 Front seat assy.Front seat belt
assy. Trim Remote adjuster assy.
for seat beltFront doorsill shieldFront door frame
weather stripRear door frame
weather strip
Rear doorsill shield
N.
m :Specified torque47Interior & Exterior Trim and Accessory
-Front Seat Belt6-6II. Belt replacement
Notes: Installation is basically the reverse of removal and different operation(s) in the process of installation,
if any, will be pointed out specifically.
1. Remove the negative terminal of battery;
2. Detach the front seat assembly;
Loosen the front lock bolt and remove the buckle assembly from inside the front seat;
3. Use the screwdriver to detach the center pillar lower trim; Cut two clips and 4 buckles and remove the trim;
Page 336 of 416

Interior & Exterior Trim and Accessory -Front Seat Belt6-7Pulley coverUnlock
Lock Notes:
Wrap the sharp end of screwdriver up with adhesive tape before
operation.
4. Use screwdriver to pry open the seat belt pulley cover;
5. Unscrew the bolt and detach the seat belt ring from the car;
6. Disconnect the pre-load insertion of seat belt on the bottom edge
of the middle pillar;
7. Detach the front seat belt from the car;
8. Unfix the clip using the screwdriver and detach the trim from the
right middle pillar;
9.Unscrew two bolts using the spanner and detach the remote adjuster
assembly.
Notice:Only the ignition switch turns to "OFF" position and the battery negative should be disconncted more than
90s, the seat belt with pretensioner can be removed.
III. Seat belt with ELR and pre-tensioner
Seat belt with ELR and pre-tensioner is provided with pre-tensioner which works together with the airbag.
The pre-tensioner is part of airbag assembly. The pre-tensioner is mounted in the retractor and controlled by SDM.
When the front bumping force of the car exceeds a specific value, the pre-tensioner and airbag can be triggered
at the same time. To maintain the pre-tension type of seat belt (retractor), observe all the "Alarm" and
"Operation Instruction".
Warning:
Do not try to remove or repair seat belt pre-tensioner. If any abnormal situations take place, replace the whole
assembly with a new one.
Before working, be sure to read through "Attention for Maintenance", and observe them during working. Any
ignorance can cause injury or the failure of seat belt pre-tensioner.
IV. Inspect Operations of Seat Belt Alarm Lamp (on Driver's side)
1. Turn on the ignition switch and check if the seat belt alarm lamp flashes;
2. Fasten the belt buckle and check if the belt alarm lamp goes out;
3. Turn off the ignition switch;
4. Disconnect the seat belt buckle;
5. Turn on the ignition switch;
6. Connect wiring terminal and make earth connection, and inspect the lamp status of the seat belt. Seat belt lamp:
flashing.
V. Inspect Seat Belt
1. Confirm whether the seat belt is properly mounted.
2. Inspect whether the metal part of seat belt is damaged.
3. If the car vibrates in accidents, pull out the seat belt from the retractor and determine whether the seat belt is
scratched (load limit retractor does not work) by visual inspection and touching.
4.Inspection contents before outer seat belt instalation:When ELR
lock,check the gradient of ELR. Check and make sure the seat belt
can not be locked from any aspect within 15°.When you move the
belt ring device beyond 45° slowly,the seat belt should be locked.
5.After installation check the seat belt lock in this way that draw the
seat belt from belt ring quiekly and the seat belf can be locked
normally.
Attention:
Should the seat belt not comply with the technical specification,
you should replace it.