Page 2113 of 5267
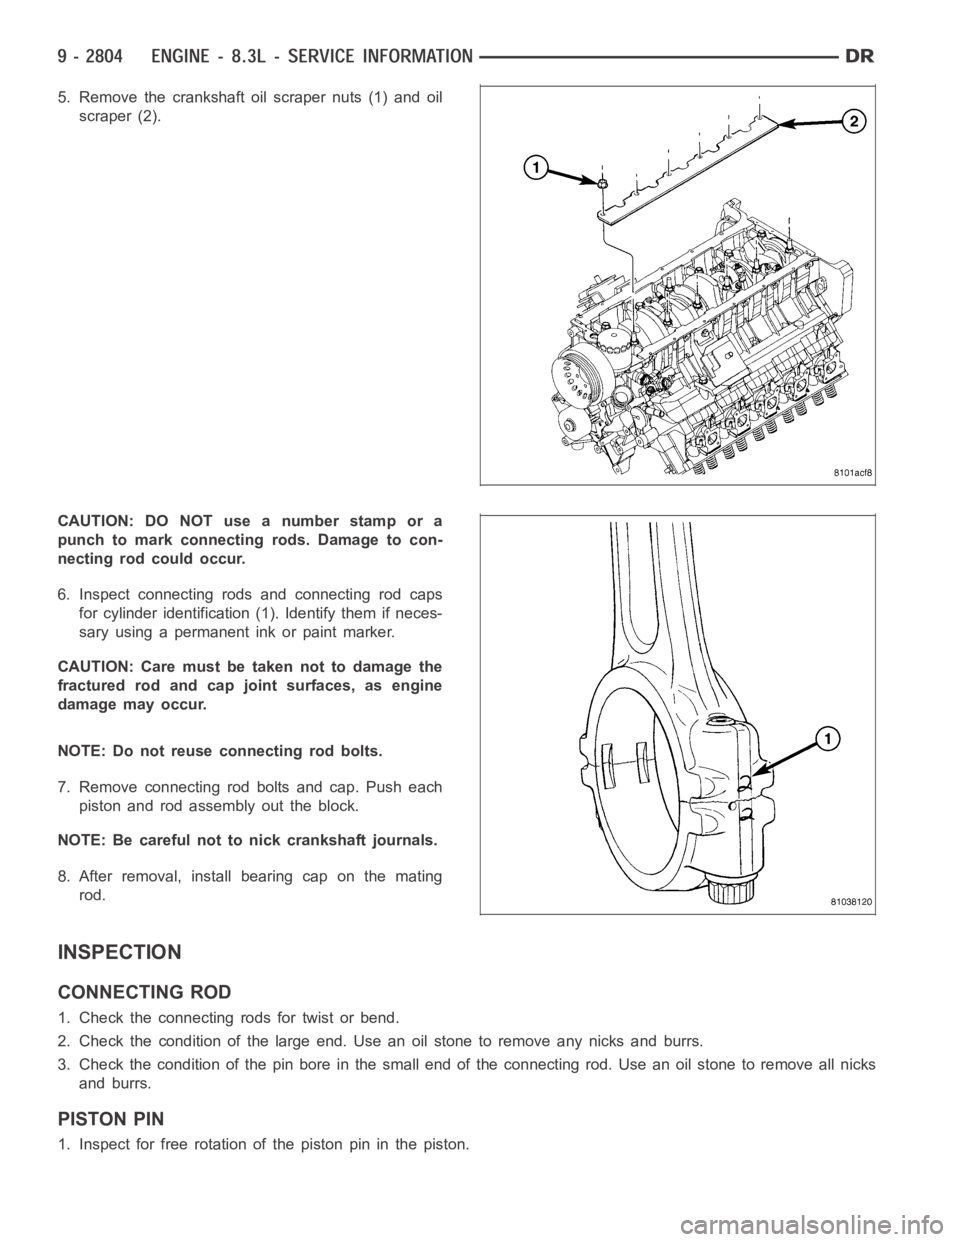
5. Remove the crankshaft oil scraper nuts (1) and oil
scraper (2).
CAUTION: DO NOT use a number stamp or a
punch to mark connecting rods. Damage to con-
necting rod could occur.
6. Inspect connecting rods and connecting rod caps
for cylinder identification (1). Identify them if neces-
sary using a permanent ink or paint marker.
CAUTION: Care must be taken not to damage the
fractured rod and cap joint surfaces, as engine
damage may occur.
NOTE: Do not reuse connecting rod bolts.
7. Remove connecting rod bolts and cap. Push each
piston and rod assembly out the block.
NOTE: Be careful not to nick crankshaft journals.
8. After removal, install bearing cap on the mating
rod.
INSPECTION
CONNECTING ROD
1. Check the connecting rods for twist or bend.
2. Check the condition of the large end. Use an oil stone to remove any nicks and burrs.
3. Check the condition of the pin bore in the small end of the connecting rod.Useanoilstonetoremoveallnicks
and burrs.
PISTON PIN
1. Inspect for free rotation of the piston pin in the piston.
Page 2116 of 5267
RINGS-PISTON
STANDARD PROCEDURE - MEASURING PISTON RING CLEARANCES
1. Wipe cylinder bore clean. Insert ring and push
down with piston to ensure it is square in bore. The
ring gap measurement must be made with the ring
positioning at least 12 mm (0.50 in.) from bottom of
cylinder bore. Check gap with feeler gauge (1).
(Refer to 9 - ENGINE - SPECIFICATIONS) for pis-
ton ring specifications.
2. Check piston ring side clearance. (Refer to 9 -
ENGINE - SPECIFICATIONS) for piston ring
specifications.
REMOVAL
1. Using a suitable ring expander, remove upper and
intermediate piston rings.
2. Remove the upper oil ring side rail, lower oil ring
side rail and then oil ring expander from piston.
3. Clean ring grooves of any carbon deposits.
Page 2119 of 5267
BEARINGS-CONNECTING ROD
DESCRIPTION
The bearing caps are not interchangeable and should be paint marked or scribed at removal to insure correct
assembly.
The bearing shells must be installed so that the tangs are in the machined grooves in the rods and caps.
Limits of taper or out-of-round on any crankshaft journals should be held to 0.013 mm (0.0005 in.). Bearings are
available in 0.025 mm (0.001 in.), 0.051 mm (0.002 in.), 0.076 mm (0.003 in.), 0.254 mm (0.010 in.) and 0.305 mm
(0.012 in.) undersize.Install the bearings in pairs. Do not use a new bearing half with an old bearing half. Do
not file the rods or bearing caps.
STANDARD PROCEDURE
CONNECTING ROD BEARING - FITTING
Fit all rods on one bank until complete. Do not alternate from one bank to another, because when the rods are
assembled to pistons correctly, they are not interchangeable from one bank to another.
The bearing caps are not interchangeable and should be marked at removal toinsure correct assembly.
The bearing shells must be installed so that the tangs are in the machined grooves in the rods and caps.
Limits of taper or out-of-round on any crankshaft journals should be held to 0.013 mm (0.0005 in.). Bearings are
available in 0.025 mm (0.001 in.), 0.051 mm (0.002 in.), 0.076 mm (0.003 in.), 0.254 mm (0.010 in.) and 0.305 mm
(0.012 in.) undersize.Install the bearings in pairs. Do not use a new bearing half with an old bearing half. Do
not file the rods or bearing caps.
1. (Refer to 9 - ENGINE/ENGINE BLOCK/CONNECTING ROD BEARINGS - STANDARD PROCEDURE) - Mea-
suring Connecting Rod Bearing Clearance to determine bearing clearance.
2. Before installing the connecting rod cap bolts, the bolt threads shouldbe oiled with engine oil.
3. Install bolts finger tight, then alternately torque each bolt to assemble the cap properly.
4. Tighten the connecting rod bolts to 68 Nꞏm (50 ft. lbs.).
MEASURING CONNECTING ROD BEARING CLEARANCE
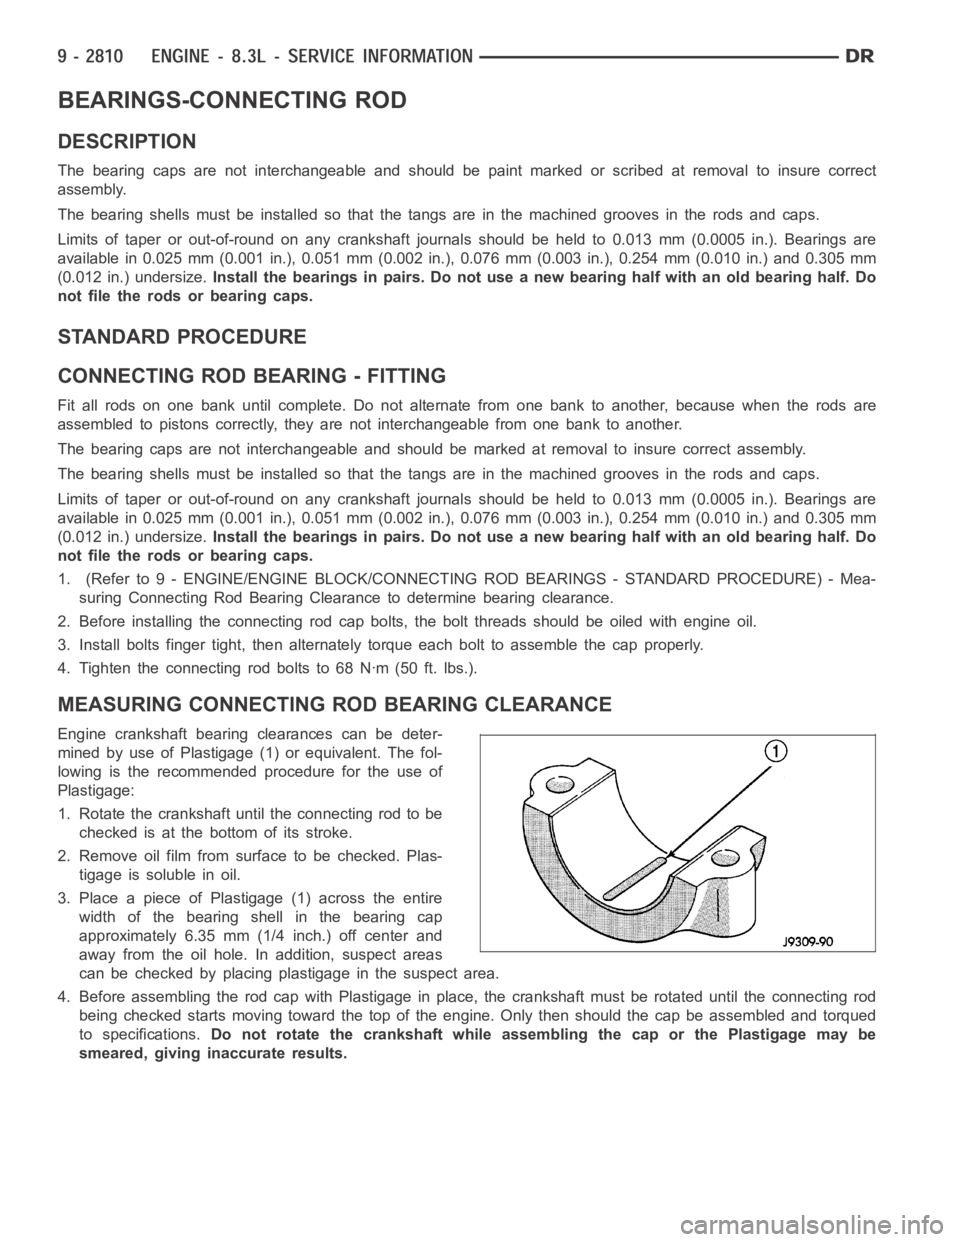
Engine crankshaft bearing clearances can be deter-
mined by use of Plastigage (1) or equivalent. The fol-
lowing is the recommended procedure for the use of
Plastigage:
1. Rotate the crankshaft until the connecting rod to be
checked is at the bottom of its stroke.
2. Remove oil film from surface to be checked. Plas-
tigage is soluble in oil.
3. Place a piece of Plastigage (1) across the entire
width of the bearing shell in the bearing cap
approximately 6.35 mm (1/4 inch.) off center and
away from the oil hole. In addition, suspect areas
can be checked by placing plastigage in the suspect area.
4. Before assembling the rod cap with Plastigage in place, the crankshaft must be rotated until the connecting rod
being checked starts moving toward the top of the engine. Only then should the cap be assembled and torqued
to specifications.Do not rotate the crankshaft while assembling the cap or the Plastigage maybe
smeared, giving inaccurate results.
Page 2120 of 5267
5. Remove the bearing cap and compare the width of
the flattened Plastigage with the metric scale pro-
vided on the package. Locate the band closest to
the same width. This band shows the amount of
clearance in thousandths of a millimeter. Differ-
ences in readings between the ends indicate the
amount of taper present. Record all readings taken.
(Refer to 9 - ENGINE - SPECIFICATIONS).Plasti-
gage generally is accompanied by two scales.
One scale is in inches, the other is a metric
scale.
6. Plastigage is available in a variety of clearance ranges. The 0.025-0.076 mm (.001-.003 inch) is usually the most
appropriate for checking engine bearing proper specifications.
Page 2126 of 5267
BEARINGS-CRANKSHAFT MAIN
DESCRIPTION
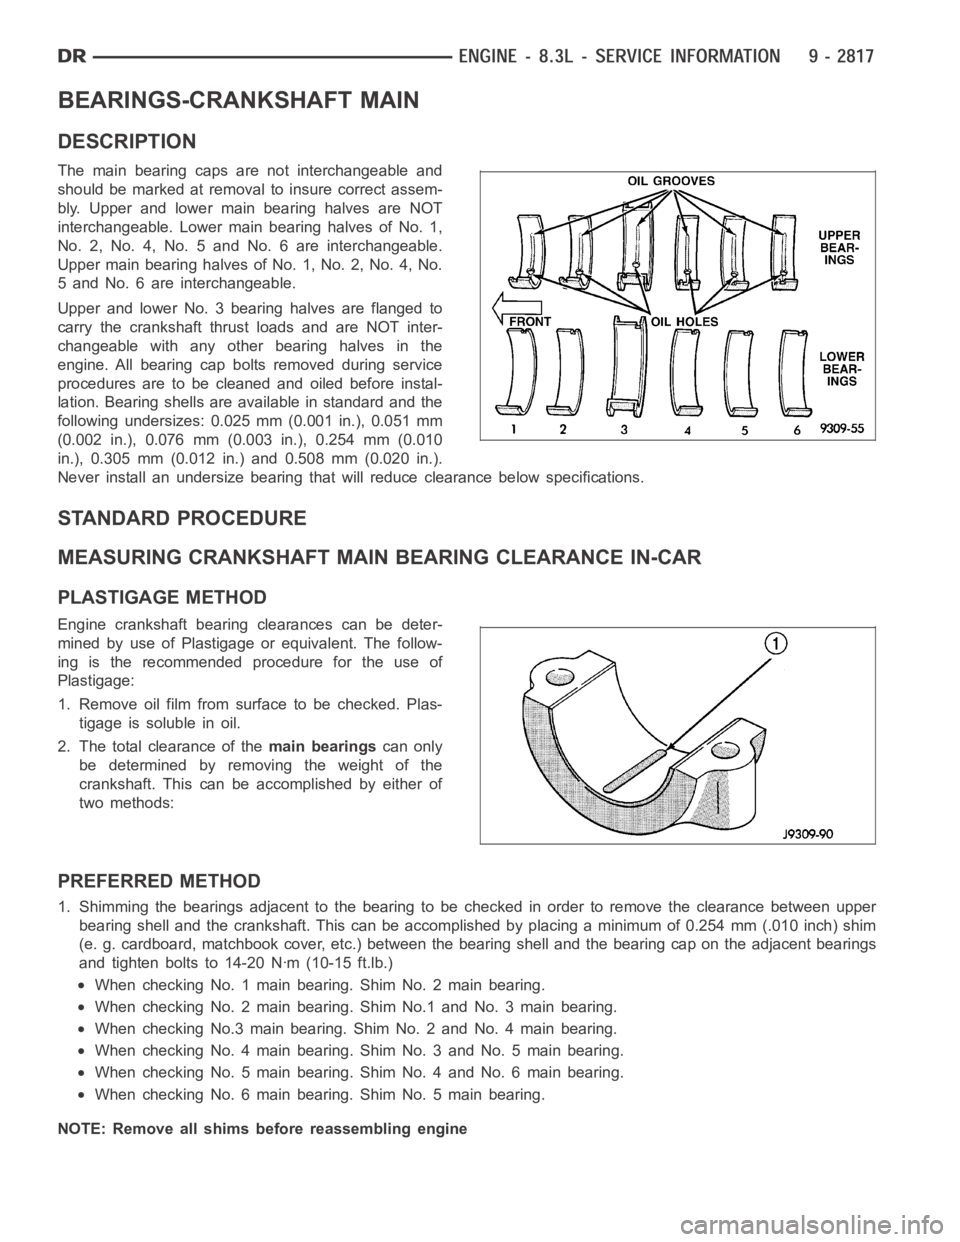
The main bearing caps are not interchangeable and
should be marked at removalto insure correct assem-
bly. Upper and lower main bearing halves are NOT
interchangeable. Lower main bearing halves of No. 1,
No. 2, No. 4, No. 5 and No. 6 are interchangeable.
Upper main bearing halves of No. 1, No. 2, No. 4, No.
5 and No. 6 are interchangeable.
Upper and lower No. 3 bearing halves are flanged to
carry the crankshaft thrust loads and are NOT inter-
changeable with any other bearing halves in the
engine. All bearing cap bolts removed during service
procedures are to be cleaned and oiled before instal-
lation. Bearing shells are available in standard and the
following undersizes: 0.025 mm (0.001 in.), 0.051 mm
(0.002 in.), 0.076 mm (0.003 in.), 0.254 mm (0.010
in.), 0.305 mm (0.012 in.) and 0.508 mm (0.020 in.).
Never install an undersize bearing that will reduce clearance below specifications.
STANDARD PROCEDURE
MEASURING CRANKSHAFT MAIN BEARING CLEARANCE IN-CAR
PLASTIGAGE METHOD
Engine crankshaft bearing clearances can be deter-
mined by use of Plastigage or equivalent. The follow-
ing is the recommended procedure for the use of
Plastigage:
1. Remove oil film from surface to be checked. Plas-
tigage is soluble in oil.
2. The total clearance of themain bearingscan only
be determined by removing the weight of the
crankshaft. This can be accomplished by either of
two methods:
PREFERRED METHOD
1. Shimming the bearings adjacent to the bearing to be checked in order to remove the clearance between upper
bearing shell and the crankshaft. Thiscanbeaccomplishedbyplacingaminimum of 0.254 mm (.010 inch) shim
(e. g. cardboard, matchbook cover, etc.) between the bearing shell and thebearing cap on the adjacent bearings
and tighten bolts to 14-20 Nꞏm (10-15 ft.lb.)
When checking No. 1 main bearing. Shim No. 2 main bearing.
When checking No. 2 main bearing. Shim No.1 and No. 3 main bearing.
When checking No.3 main bearing. Shim No. 2 and No. 4 main bearing.
When checking No. 4 main bearing. Shim No. 3 and No. 5 main bearing.
When checking No. 5 main bearing. Shim No. 4 and No. 6 main bearing.
When checking No. 6 main bearing. Shim No. 5 main bearing.
NOTE: Remove all shims before reassembling engine
Page 2127 of 5267
ALTERNATIVE METHOD
1. With the weight of the crankshaft being supported
by a jack under the counterweight adjacent to the
bearing being checked.
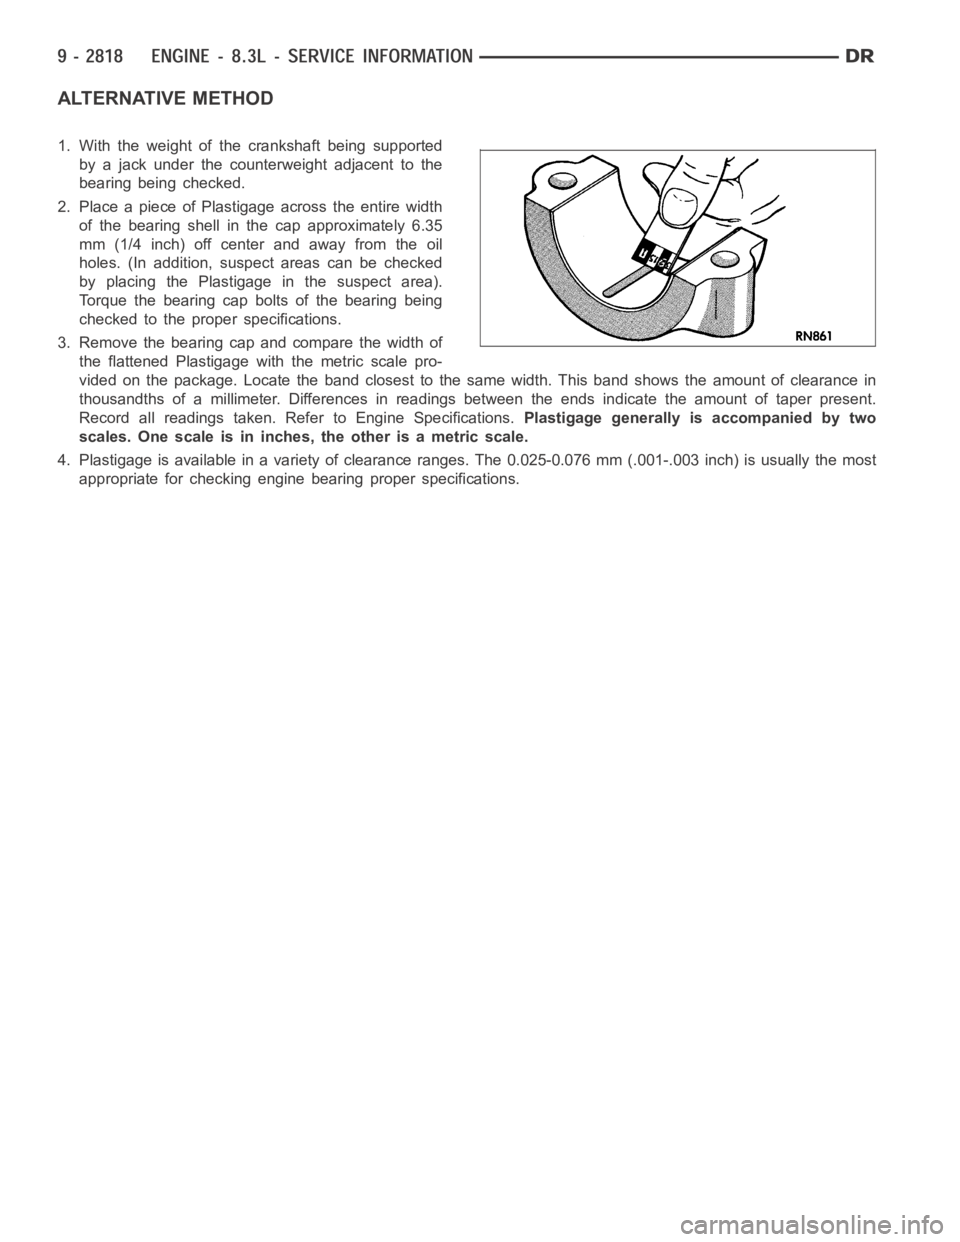
2. Place a piece of Plastigage across the entire width
of the bearing shell in the cap approximately 6.35
mm (1/4 inch) off center and away from the oil
holes. (In addition, suspect areas can be checked
by placing the Plastigage in the suspect area).
Torque the bearing cap bolts of the bearing being
checked to the proper specifications.
3. Remove the bearing cap and compare the width of
the flattened Plastigage with the metric scale pro-
vided on the package. Locate the band closest to the same width. This band shows the amount of clearance in
thousandths of a millimeter. Differences in readings between the ends indicate the amount of taper present.
Record all readings taken. Refer to Engine Specifications.Plastigage generally is accompanied by two
scales. One scale is in inches, the other is a metric scale.
4. Plastigage is available in a variety of clearance ranges. The 0.025-0.076 mm (.001-.003 inch) is usually the most
appropriate for checking engine bearing proper specifications.
Page 2128 of 5267
CRANKSHAFT
STANDARD PROCEDURE
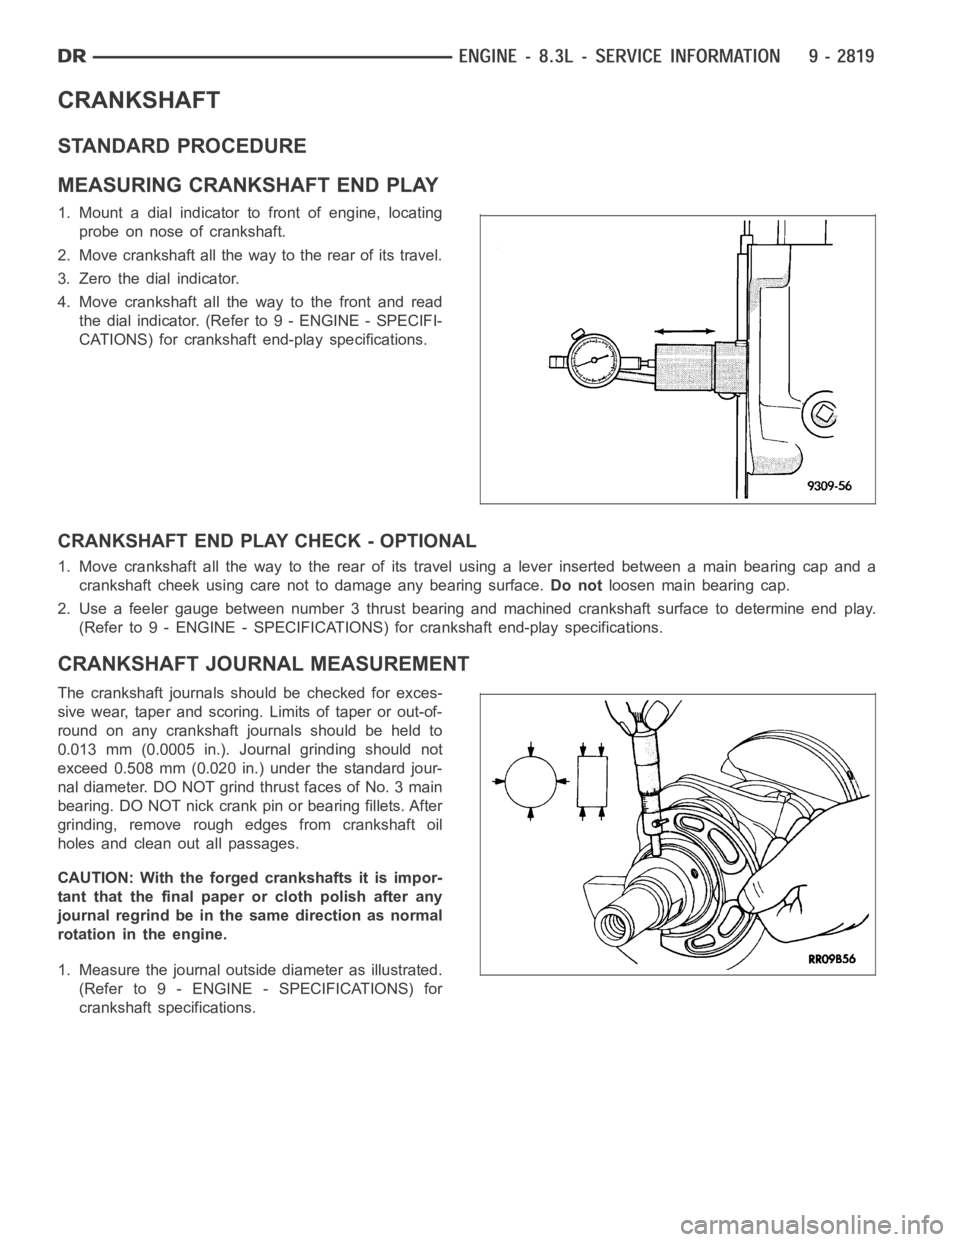
MEASURING CRANKSHAFT END PLAY
1. Mount a dial indicator to front of engine, locating
probe on nose of crankshaft.
2. Move crankshaft all the way to the rear of its travel.
3. Zero the dial indicator.
4. Move crankshaft all the way to the front and read
the dial indicator. (Referto 9 - ENGINE - SPECIFI-
CATIONS) for crankshaft end-play specifications.
CRANKSHAFT END PLAY CHECK - OPTIONAL
1. Move crankshaft all the way to the rear of its travel using a lever inserted between a main bearing cap and a
crankshaft cheek using care not to damage any bearing surface.Do notloosen main bearing cap.
2. Use a feeler gauge between number 3 thrust bearing and machined crankshaft surface to determine end play.
(Refer to 9 - ENGINE - SPECIFICATIONS) for crankshaft end-play specifications.
CRANKSHAFT JOURNAL MEASUREMENT
The crankshaft journals should be checked for exces-
sive wear, taper and scoring. Limits of taper or out-of-
round on any crankshaft journals should be held to
0.013 mm (0.0005 in.). Journal grinding should not
exceed 0.508 mm (0.020 in.) under the standard jour-
nal diameter. DO NOT grind thrust faces of No. 3 main
bearing. DO NOT nick crank pin or bearing fillets. After
grinding, remove rough edges from crankshaft oil
holes and clean out all passages.
CAUTION: With the forged crankshafts it is impor-
tant that the final paper or cloth polish after any
journal regrind be in the same direction as normal
rotation in the engine.
1. Measure the journal outside diameter as illustrated.
(Refer to 9 - ENGINE - SPECIFICATIONS) for
crankshaft specifications.
Page 2131 of 5267
INSPECTION
1. The crankshaft journals should be checked for excessive wear, taper andscoring. Limits of taper or out-of-round
on any crankshaft journals should be held to 0.025 mm (0.001 in.). Journal grinding should not exceed 0.508 mm
(0.020 inch) under the standard journal diameter. DO NOT grind thrust faces of No. 3 main bearing. DO NOT
nick crank pin or bearing fillets. After grinding, remove rough edges fromcrankshaft oil holes and clean out all
passages.
CAUTION: With the forged crankshafts it is important that the final paper or cloth polish after any journal
regrind be in the same direction as normal rotation in the engine.
2. Check and clean all oil holes for blockage and debris.
INSTALLATION
1. Install upper main bearing shells into engine block.
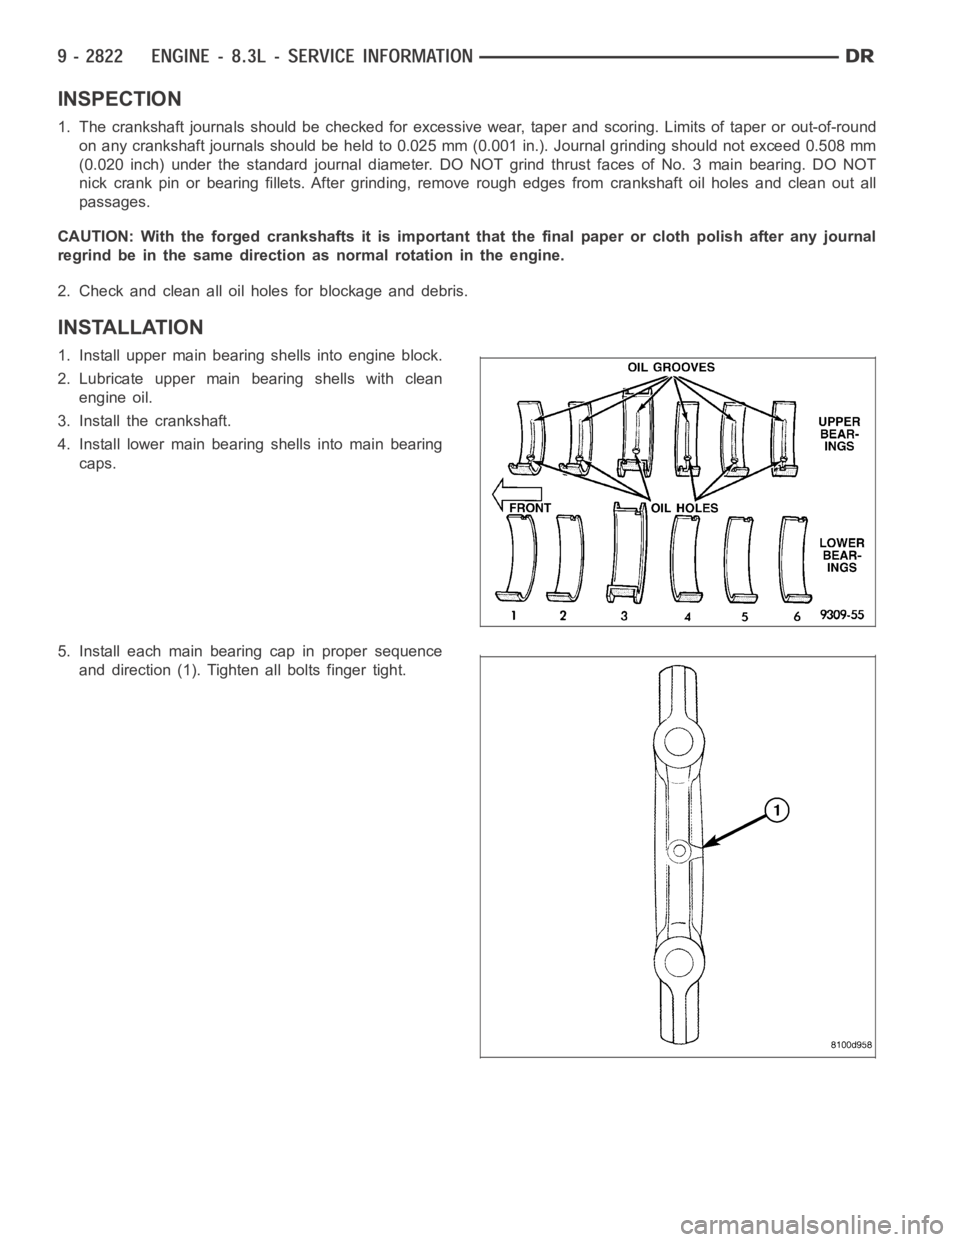
2. Lubricate upper main bearing shells with clean
engine oil.
3. Install the crankshaft.
4. Install lower main bearing shells into main bearing
caps.
5. Install each main bearing cap in proper sequence
and direction (1). Tighten all bolts finger tight.