2006 DODGE RAM SRT-10 battery
[x] Cancel search: batteryPage 2903 of 5267
When Monitored:
Every 7 msec with:
1) Engine speed greater than 500 RPM.
2) Battery voltage between 10 and 16 volts.
Set Condition:
CAN C BUS messages are not received for 10 seconds.
Theory of Operation
The NGC controller communicates over the CAN C BUS. The transmission controller continuously monitors BUS
activity. The CAN C BUS is also used to communicate transmission MIL statusto the Engine Controller. If the
Engine Controller is unable to communicate with the Transmission Controller, a DTC will set and the Engine Con-
troller will illuminate the MIL.
Diagnose the U0002 CAN C BUS OFF PERFORMANCE as the U0001 CAN C BUS CIRCUIT test in 8-ELEC-
TRICAL/ELECTRONIC CONTROL MODULES - DIAGNOSIS AND TESTING for diagnostic procedures and for
further possible causes.
Page 2905 of 5267
When Monitored:
Every 7 msec with:
1) Engine speed greater than 500 RPM.
2) Battery voltage between 10 and 16 volts.
Set Condition:
CAN C BUS messages are not received for 10 seconds.
Theory of Operation
The NGC controller communicates over the CAN C BUS. The transmission controller continuously monitors BUS
activity. The CAN C BUS is also used to communicate transmission MIL statusto the Engine Controller. If the
Engine Controller is unable to communicate with the Transmission Controller, a DTC will set and the Engine Con-
troller will illuminate the MIL.
Refer to 8-ELECTRICAL/ELECTRONIC CONTROL MODULES - DIAGNOSIS AND TESTING for diagnostic pro-
cedures and for further possible causes.
Page 2907 of 5267
When Monitored:
Every 7 msec with:
1) Engine speed greater than 500 RPM.
2) Battery voltage between 10 and 16 volts.
Set Condition:
CAN C BUS messages are not received for 10 seconds.
Theory of Operation
The NGC controller communicates over the CAN C BUS. The transmission controller continuously monitors BUS
activity. The CAN C BUS is also used to communicate transmission MIL statusto the Engine Controller. If the
Engine Controller is unable to communicate with the Transmission Controller, a DTC will set and the Engine Con-
troller will illuminate the MIL.
Refer to 8-ELECTRICAL/ELECTRONIC CONTROL MODULES - DIAGNOSIS AND TESTING for diagnostic pro-
cedures and for further possible causes.
Page 2908 of 5267
STANDARD PROCEDURE
PRE-DIAGNOSTIC TROUBLESHOOTING PROCEDURE - 42RLE
For a complete wiring diagramRefer to Section 8W.
1.
Perform the following steps prior to any diagnostic procedure:
Many transmission symptoms can be caused by a low fluid level. If the fluid level is low, locate and repair any
leaks and fill the transmission to the proper fluid level. Refer to the Service Information for the proper repair
and fluid fill procedures.
Testing should only be performed with the battery fully charged to avoid false diagnosis.
With the scan tool, read Engine (PCM) DTCs. If Engine DTCs are present, refer to the Driveability Category
and perform to the appropriate diagnostic procedure(s) before proceeding.
With the scan tool, read Transmission (TCM) DTCs. Record all Stored, Active, and Pending DTC information.
Diagnose any Pending DTC as a matured DTC.
With the scan tool, read DTC EVENT DATA.Use this data to identify the conditions in which the DTC was set.
Note: Performing a Battery Disconnect will clear all DTC EVENT DATA and reset all learned Transmis-
sion values to the controllers default values, which may temporarily result in erratic shift schedules.
With the scan tool, perform the Shift Lever Position Test. If the test does not pass, refer to the diagnostic
procedure for P0706-Check Shifter Signal.
For Gear Ratio Error DTCs, use the scan tool to read and record the Clutch Volume Index (CVI) information.
Use the wiring diagram as a guide, inspect the wiring and connectors related to this circuit and repair as nec-
essary.
Refer to the When Monitored and Set Conditions for this DTC. DTCs can set at ignition on, at start up, driving
under specific conditions, and after controller diagnostic monitors haverun.
Refer to applicable Technical Service Bulletins (TSBs) for controller software update information. Some condi-
tions can be corrected by upgrading the Engine (PCM) or Transmission (TCM)controller software.
Check for any Service Information Tune-ups or Service Bulletins for any possible causes that may apply.
Were there any repairs made that fixed the vehicle?
Ye s>>
Testing complete.
Perform 42RLE VERIFICATION TEST - VER1(Referto21-TRANSMISSION/TRANSAXLE/AUTO-
MATIC - 42RLE - STANDARD PROCEDURE)
No>>
Refer to the Transmission category and perform the appropriate diagnostic procedure(s). (Refer to 21 -
TRANSMISSION/TRANSAXLE/AUTOMATIC - 42RLE - DIAGNOSIS AND TESTING)
Page 2925 of 5267
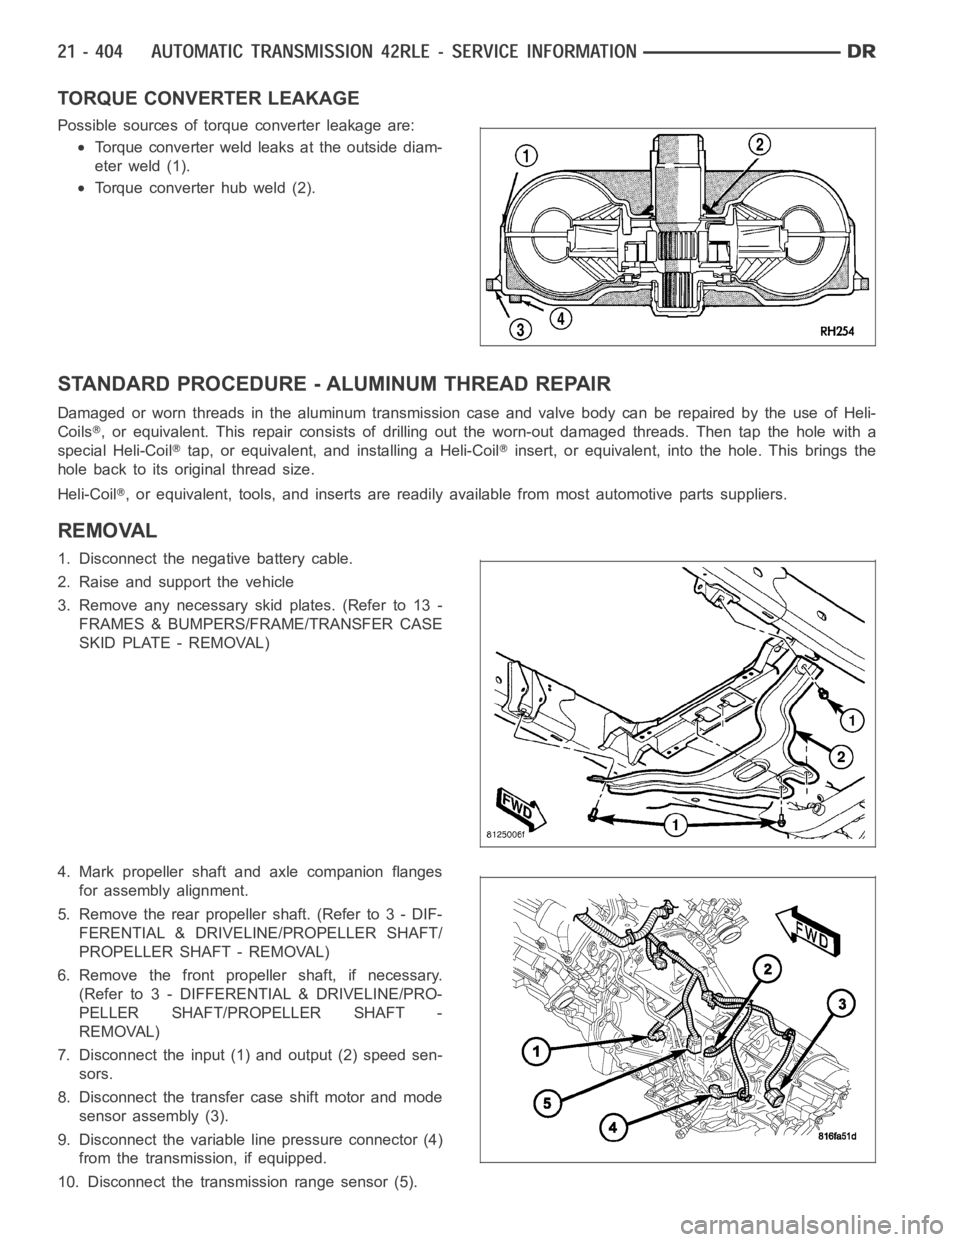
TORQUE CONVERTER LEAKAGE
Possible sources of torque converter leakage are:
Torque converter weld leaks at the outside diam-
eter weld (1).
Torque converter hub weld (2).
STANDARD PROCEDURE - ALUMINUM THREAD REPAIR
DamagedorwornthreadsinthealuminumtransmissioncaseandvalvebodycanberepairedbytheuseofHeli-
Coils
, or equivalent. This repair consists of drilling out the worn-out damagedthreads. Then tap the hole with a
special Heli-Coil
tap, or equivalent, and installing a Heli-Coilinsert, or equivalent, into the hole. This brings the
hole back to its original thread size.
Heli-Coil
, or equivalent, tools, and inserts are readily available from most automotive parts suppliers.
REMOVAL
1. Disconnect the negative battery cable.
2. Raise and support the vehicle
3. Remove any necessary skid plates. (Refer to 13 -
FRAMES & BUMPERS/FRAME/TRANSFER CASE
SKID PLATE - REMOVAL)
4. Mark propeller shaft and axle companion flanges
for assembly alignment.
5. Remove the rear propeller shaft. (Refer to 3 - DIF-
FERENTIAL & DRIVELINE/PROPELLER SHAFT/
PROPELLER SHAFT - REMOVAL)
6. Remove the front propeller shaft, if necessary.
(Refer to 3 - DIFFERENTIAL & DRIVELINE/PRO-
PELLER SHAFT/PROPELLER SHAFT -
REMOVAL)
7. Disconnect the input (1) and output (2) speed sen-
sors.
8. Disconnect the transfer case shift motor and mode
sensor assembly (3).
9. Disconnect the variable line pressure connector (4)
from the transmission, if equipped.
10. Disconnect the transmission range sensor (5).
Page 3073 of 5267
RELAY-TRANSMISSION CONTROL
DESCRIPTION
The relay is supplied fused B+ voltage, energized by the TCM, and is used to supply power to the solenoid pack
when the transmission is in normal operating mode.
OPERATION
When the relay is “off”, no power is supplied to the solenoid pack and the transmission is in “limp-in” mode. After a
controller reset, the TCM energizes the relay. Prior to this, the TCM verifies that the contacts are open by checking
for no voltage at the switched batteryterminals. After this is verified, the voltage at the solenoid pack pressure
switches is checked. After the relay is energized, the TCM monitors the terminals to verify that the voltage is greater
than 3 volts.
Page 3077 of 5267
SENSOR-TRANSMISSION TEMPERATURE
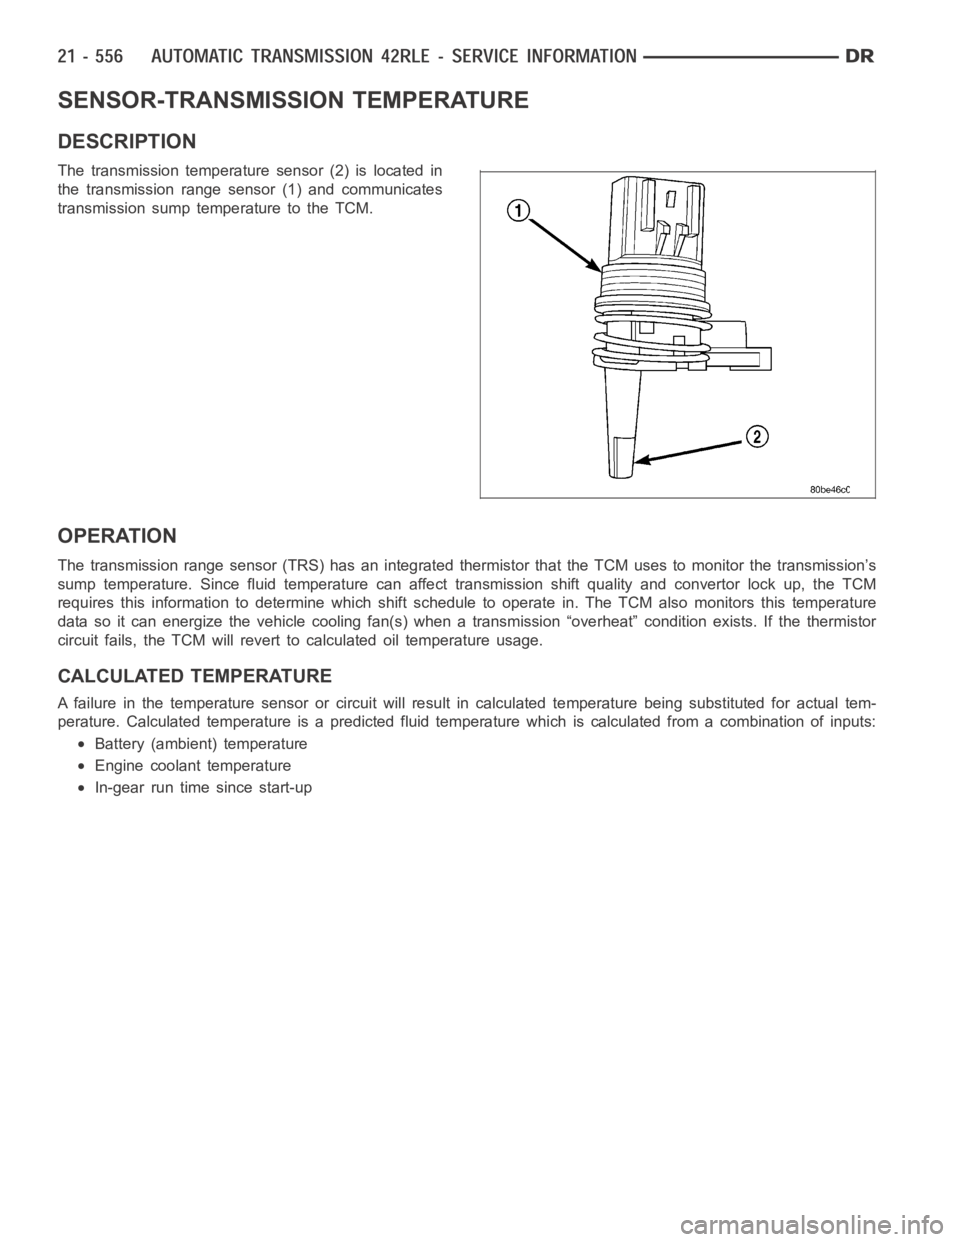
DESCRIPTION
The transmission temperature sensor (2) is located in
the transmission range sensor (1) and communicates
transmission sump temperature to the TCM.
OPERATION
The transmission range sensor (TRS) has an integrated thermistor that theTCM uses to monitor the transmission’s
sump temperature. Since fluid temperature can affect transmission shiftquality and convertor lock up, the TCM
requires this information to determine which shift schedule to operate in. The TCM also monitors this temperature
data so it can energize the vehicle cooling fan(s) when a transmission “overheat” condition exists. If the thermistor
circuit fails, the TCM will revert to calculated oil temperature usage.
CALCULATED TEMPERATURE
A failure in the temperature sensor or circuit will result in calculated temperature being substituted for actual tem-
perature. Calculated temperature is a predicted fluid temperature whichis calculated from a combination of inputs:
Battery (ambient) temperature
Engine coolant temperature
In-gear run time since start-up
Page 3101 of 5267
page page
AUTOMATIC TRANSMISSION - 545RFE -
ELECTRICAL DIAGNOSTICS
DIAGNOSIS AND TESTING
P0122-TPS/APP CIRCUIT LOW............. 582
P0123-TPS/APP CIRCUIT HIGH............. 584
P0124-TPS/APP INTERMITTENT ............ 586
P0218-HIGH TEMPERATURE OPERATION
ACTIVATED............................... 588
P0562-BATTERY VOLTAGE LOW ............ 589
P0602-CONTROL MODULE PROGRAMMING
ERROR/NOT PROGRAMMED............... 594
P0604-INTERNAL CONTROL MODULE RAM . 595
P0605-INTERNAL CONTROL MODULE ROM . 596
P0613-INTERNAL TCM ..................... 597
P0706-TRANSMISSION RANGE SENSOR
RATIONALITY............................. 598
P0711-TRANSMISSION TEMPERATURE
SENSOR PERFORMANCE.................. 602
P0712-TRANSMISSION TEMPERATURE
SENSOR LOW............................. 605
P0713-TRANSMISSION TEMPERATURE
SENSOR HIGH............................ 608
P0714-TRANSMISSION TEMPERATURE
SENSOR INTERMITTENT................... 611
P0715-INPUT SPEED SENSOR 1 CIRCUIT . . . 614
P0720-OUTPUT SPEED SENSOR CIRCUIT . . 620
P0725-ENGINE SPEED SENSOR CIRCUIT . . . 626
P0731-GEAR RATIO ERROR IN 1ST ......... 628
P0732-GEAR RATIO ERROR IN 2ND ........ 631
P0733-GEAR RATIO ERROR IN 3RD ........ 637
P0734-GEAR RATIO ERROR IN 4TH ........ 643
P0735-GEAR RATIO ERROR IN 5TH ........ 647
P0736-GEAR RATIO ERROR IN REVERSE . . . 650
P0740-TCC OUT OF RANGE ................ 653
P0750-LR SOLENOID CIRCUIT............. 655
P0755-2C SOLENOID CIRCUIT............. 659
P0760-OD SOLENOID CIRCUIT ............. 663
P0765-UD SOLENOID CIRCUIT ............. 667
P0770-4C SOLENOID CIRCUIT............. 671
P0841-LR PRESSURE SWITCH
RATIONALITY............................. 675
P0845-2C HYDRAULIC PRESSURE TEST .... 682
P0846-2C PRESSURE SWITCH
RATIONALITY............................. 690
P0868-LINE PRESSURE LOW .............. 697
P0869-LINE PRESSURE HIGH .............. 703
P0870-OD HYDRAULIC PRESSURE TEST . . . 709
P0871-OD PRESSURE SWITCH
RATIONALITY............................. 717
P0875-UD HYDRAULIC PRESSURE TEST . . . 726P0876-UD PRESSURE SWITCH
RATIONALITY............................. 734
P0882-TCM POWER INPUT LOW ........... 741
P0883-TCM POWER INPUT HIGH ........... 745
P0884-POWER UPAT SPEED .............. 749
P0890-SWITCHED BATTERY ............... 751
P0932-LINE PRESSURE SENSOR CIRCUIT . . 755
P0934-LINE PRESSURE SENSOR CIRCUIT
LOW...................................... 758
P0935-LINE PRESSURE SENSOR CIRCUIT
HIGH..................................... 763
P0944-LOSS OF HYDRAULIC PUMP PRIME . 768
P0987-4C HYDRAULIC PRESSURE TEST . . . . 770
P0988-4C PRESSURE SWITCH
RATIONALITY............................. 778
P128B-TCM POWER CONTROL CIRCUIT 2
LOW - TIPM............................... 784
P128C-TCM POWER CONTROL CIRCUIT 2
HIGH - TIPM............................... 787
P128D-TCM POWER CONTROL CIRCUIT 2
OPEN - TIPM.............................. 790
P128E-TCM POWER CONTROL CIRCUIT 2
OVERCURRENT - TIPM.................... 793
P1684-BATTERY WAS DISCONNECTED . . . . . 797
P1715-RESTRICTED MANUAL VALVE IN T3
RANGE................................... 799
P1736-GEAR RATIO ERROR IN 2ND PRIME . 800
P1775-SOLENOID SWITCH VALVE
LATCHED IN TCC POSITION................ 805
P1776-SOLENOID SWITCH VALVE
LATCHED IN LR POSITION................. 809
P1790-FAULT IMMEDIATELY AFTER SHIFT . . 813
P1794-SPEED SENSOR GROUND ERROR . . 814
P2700-INADEQUATE ELEMENT VOLUME LR . 818
P2701-INADEQUATE ELEMENT VOLUME 2C . 820
P2702-INADEQUATE ELEMENT VOLUME
OD....................................... 822
P2703- INADEQUATE ELEMENT VOLUME
UD
........................................ 824
P2704-INADEQUATE ELEMENT VOLUME 4C . 826
P2706-MS SOLENOID CIRCUIT............. 828
U0002-CAN C BUS OFF PERFORMANCE . . . . 832
U0100-NO COMMUNICATION WITH THE
ECM/PCM................................. 834
U0121-LOST COMMUNICATION WITH ABS . . 836
U0141 LOST COMMUNICATION WITH FCM . . 838
STANDARD PROCEDURE
45RFE/545RFE PRE-DIAGNOSTIC
TROUBLESHOOTING PROCEDURE......... 840
45RFE/545RFE TRANSMISSION
VERIFICATION TEST - VER 1............... 841