Page 4161 of 5267
10. Install spring (2) onto shift rail (1).
11. Insert magnet (1) in front case pocket (2).
REAR CASE
1. Install the oil pick-up tube and screen into the rear
case half.
2. Apply bead of Mopar
Gasket Maker, or equivalent,
to mating surface of front case. Keep sealer bead
width to maximum of 3/16 inch. Do not use exces-
sive amount of sealer as excess will be displaced
into case interior.
3. Align mainshaft with he rear output shaft bearing
and align shift rail with bore in rear case. Then
install rear case (2). Verify that the case alignment
dowels correctly seat into their mating recesses.
Page 4164 of 5267
3. Apply bead of MoparGasket Maker, or equivalent,
to mating surface of rear extension housing. Keep
sealer bead width to maximum of 3/16 inch. Do not
use excessive amount of sealer as excess could
be displaced into output bearing.
4. Install extension housing (2) onto the rear case half
(1).
5. Install rear extension bolts (2). Tighten the bolts to
27-34 Nꞏm (20-25 ft.lbs.).
Page 4205 of 5267

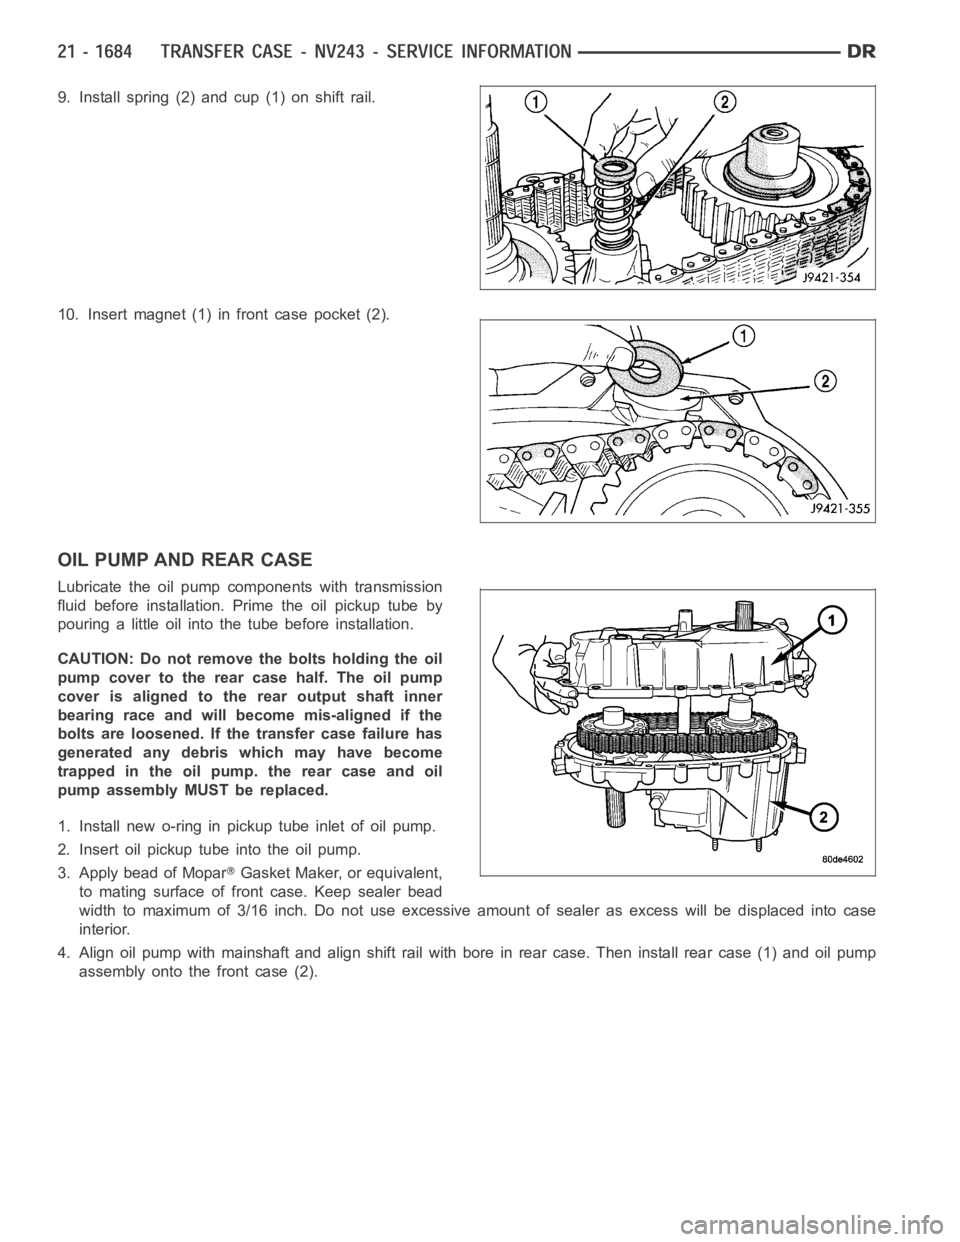
9. Install spring (2) and cup (1) on shift rail.
10. Insert magnet (1) in front case pocket (2).
OIL PUMP AND REAR CASE
Lubricate the oil pump components with transmission
fluid before installation. Prime the oil pickup tube by
pouring a little oil into the tube before installation.
CAUTION: Do not remove the bolts holding the oil
pump cover to the rear case half. The oil pump
cover is aligned to the rear output shaft inner
bearing race and will become mis-aligned if the
bolts are loosened. If the transfer case failure has
generated any debris which may have become
trapped in the oil pump. the rear case and oil
pump assembly MUST be replaced.
1. Install new o-ring in pickup tube inlet of oil pump.
2. Insert oil pickup tube into the oil pump.
3. Apply bead of Mopar
Gasket Maker, or equivalent,
to mating surface of front case. Keep sealer bead
width to maximum of 3/16 inch. Do not use excessive amount of sealer as excess will be displaced into case
interior.
4. Align oil pump with mainshaft and align shift rail with bore in rear case.Then install rear case (1) and oil pump
assembly onto the front case (2).
Page 4207 of 5267

REAR EXTENSION
1. Install new seal in rear extension housing seal with
Installer D-163 and Universal Handle C-4171..
2. Apply bead of Mopar
Gasket Maker, or equivalent,
to mating surface of rear extension housing. Keep
sealer bead width to maximum of 3/16 inch. Do not
use excessive amount of sealer as excess could
be displaced into output bearing.
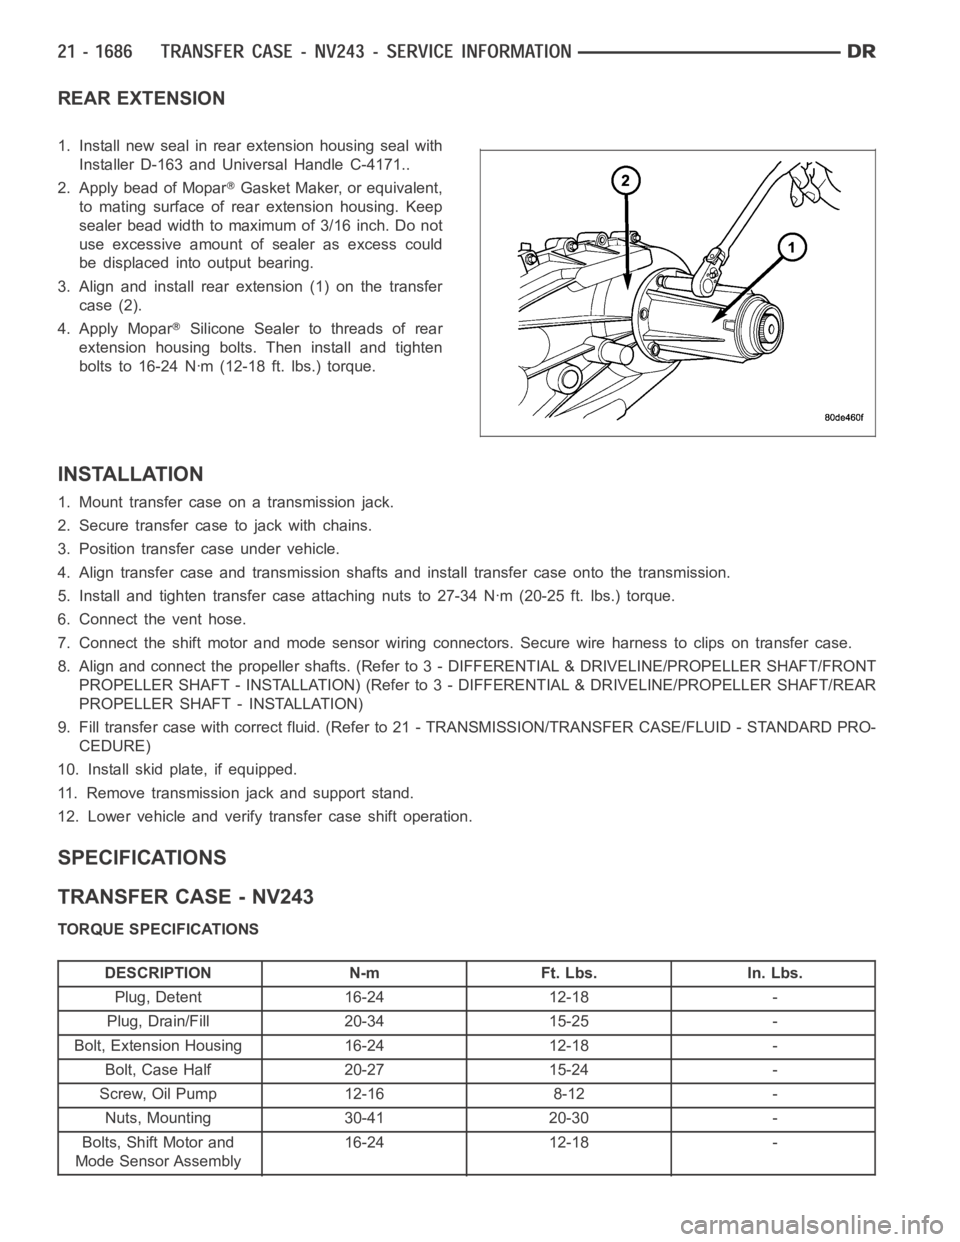
3. Align and install rear extension (1) on the transfer
case (2).
4. Apply Mopar
Silicone Sealer to threads of rear
extension housing bolts. Then install and tighten
bolts to 16-24 Nꞏm (12-18 ft. lbs.) torque.
INSTALLATION
1. Mount transfer case on a transmission jack.
2. Secure transfer case to jack with chains.
3. Position transfer case under vehicle.
4. Align transfer case and transmission shafts and install transfer case onto the transmission.
5. Install and tighten transfer case attaching nuts to 27-34 Nꞏm (20-25 ft.lbs.) torque.
6. Connect the vent hose.
7. Connect the shift motor and mode sensor wiring connectors. Secure wire harness to clips on transfer case.
8. Align and connect the propeller shafts. (Refer to 3 - DIFFERENTIAL & DRIVELINE/PROPELLER SHAFT/FRONT
PROPELLER SHAFT - INSTALLATION) (Refer to 3 - DIFFERENTIAL & DRIVELINE/PROPELLER SHAFT/REAR
PROPELLER SHAFT - INSTALLATION)
9. Fill transfer case with correct fluid. (Refer to 21 - TRANSMISSION/TRANSFER CASE/FLUID - STANDARD PRO-
CEDURE)
10. Install skid plate, if equipped.
11. Remove transmission jack and support stand.
12. Lower vehicle and verify transfer case shift operation.
SPECIFICATIONS
TRANSFER CASE - NV243
TORQUE SPECIFICATIONS
DESCRIPTION N-m Ft. Lbs. In. Lbs.
Plug, Detent 16-24 12-18 -
Plug, Drain/Fill 20-34 15-25 -
Bolt, Extension Housing 16-24 12-18 -
Bolt, Case Half 20-27 15-24 -
Screw, Oil Pump 12-16 8-12 -
Nuts, Mounting 30-41 20-30 -
Bolts, Shift Motor and
Mode Sensor Assembly16-24 12-18 -
Page 4249 of 5267

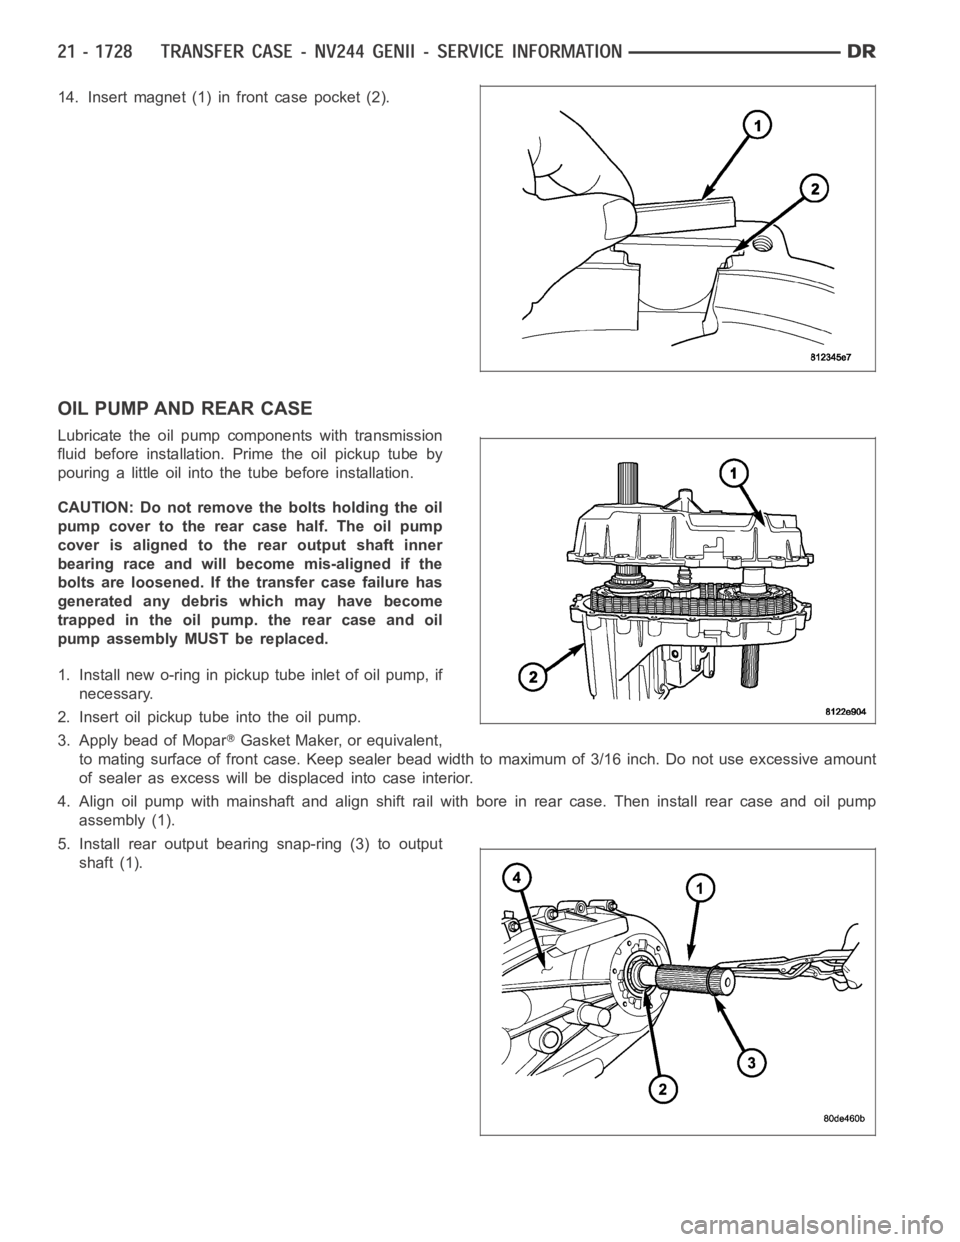
14. Insert magnet (1) in front case pocket (2).
OIL PUMP AND REAR CASE
Lubricate the oil pump components with transmission
fluid before installation. Prime the oil pickup tube by
pouring a little oil into the tube before installation.
CAUTION: Do not remove the bolts holding the oil
pump cover to the rear case half. The oil pump
cover is aligned to the rear output shaft inner
bearing race and will become mis-aligned if the
bolts are loosened. If the transfer case failure has
generated any debris which may have become
trapped in the oil pump. the rear case and oil
pump assembly MUST be replaced.
1. Install new o-ring in pickup tube inlet of oil pump, if
necessary.
2. Insert oil pickup tube into the oil pump.
3. Apply bead of Mopar
Gasket Maker, or equivalent,
to mating surface of front case. Keep sealer bead width to maximum of 3/16 inch. Do not use excessive amount
of sealer as excess will be displaced into case interior.
4. Align oil pump with mainshaft and align shift rail with bore in rear case.Then install rear case and oil pump
assembly (1).
5. Install rear output bearing snap-ring (3) to output
shaft (1).
Page 4251 of 5267

REAR EXTENSION
1. Install new seal in rear extension housing seal with
Seal Installer D-163 and Universal Handle C-4171.
Verify that the weep hole in the rubber is oriented
downward.
2. Apply bead of Mopar
Gasket Maker, or equivalent,
to mating surface of rear extension housing. Keep
sealer bead width to maximum of 3/16 inch. Do not
use excessive amount of sealer as excess could
be displaced into output bearing.
3. Align and install rear extension (1) on the transfer
case (2).
4. Apply Mopar
Silicone Sealer to threads of rear
extension housing bolts. Then install and tighten
bolts to 16-24 Nꞏm (12-18 ft. lbs.) torque.
INSTALLATION
1. Mount transfer case on a transmission jack.
2. Secure transfer case to jack with chains.
3. Position transfer case under vehicle.
4. Align transfer case and transmission shafts and install transfer case onto the transmission.
5. Install and tighten transfer case attaching nuts to 27-34 Nꞏm (20-25 ft.lbs.) torque.
6. Connect the vent hose.
7. Connect the shift motor and mode sensor wiring connectors. Secure wire harness to clips on transfer case.
8. Align and connect the propeller shafts. (Refer to 3 - DIFFERENTIAL & DRIVELINE/PROPELLER SHAFT/FRONT
PROPELLER SHAFT - INSTALLATION) (Refer to 3 - DIFFERENTIAL & DRIVELINE/PROPELLER SHAFT/REAR
PROPELLER SHAFT - INSTALLATION)
9. Fill transfer case with correct fluid. (Refer to 21 - TRANSMISSION/TRANSFER CASE/FLUID - STANDARD PRO-
CEDURE)
10. Install skid plate, if equipped.
11. Remove transmission jack and support stand.
12. Lower vehicle and verify transfer case shift operation.
SPECIFICATIONS
TRANSFER CASE - NV244 GENII
TORQUE SPECIFICATIONS
DESCRIPTION N-m Ft. Lbs. In. Lbs.
Plug, Detent 16-24 12-18 -
Plug, Drain/Fill 20-34 15-25 -
Bolt, Extension Housing 16-24 12-18 -
Bolt, Case Half 25-28 18-21 -
Screw, Oil Pump 14-19 10-14 -
Nuts, Mounting 30-41 20-30 -
Bolts, Shift Motor and
Mode Sensor Assembly16-24 12-18 -
Page 4298 of 5267
10. Insert magnet (1) in front case pocket (2).
REAR CASE
1. Install the oil pick-up tube and screen into the rear
case half.
2. Apply bead of Mopar
Gasket Maker, or equivalent,
to mating surface of front case. Keep sealer bead
width to maximum of 3/16 inch. Do not use exces-
sive amount of sealer as excess will be displaced
into case interior.
3. Align mainshaft with the rear output shaft bearing
and align shift rail with bore in rear case. Then
install rear case (2). Verify that the case alignment
dowels correctly seat into their mating recesses.
4. Install 4-5 rear case (2) to front case (1) bolts (3) to
hold rear case in position. Tighten bolts snug but
not to specified torque at this time.
CAUTION: Verify that shift rail, and case alignment
dowels are seated before installing any bolts.
Case could be cracked if shaft rail or dowels are
misaligned.
5. Tighten bolts to 27-34 Nꞏm (20-25 ft. lbs.).
Page 4300 of 5267
2. Engage the oil pump pick-up tube (2) into the oil
pump (1). Verify that the pick-up tube o-ring is on
the tube and is correctly installed to the oil pump.
3. Apply bead of Mopar
Gasket Maker, or equivalent,
to mating surface of rear extension housing. Keep
sealer bead width to maximum of 3/16 inch. Do not
use excessive amount of sealer as excess could
be displaced into output bearing.
4. Install extension housing (2) onto the rear case half
(1).
5. Install rear extension bolts (2). Tighten the bolts to
27-34 Nꞏm (20-25 ft.lbs.).