2006 DODGE RAM SRT-10 dimensions
[x] Cancel search: dimensionsPage 1961 of 5267
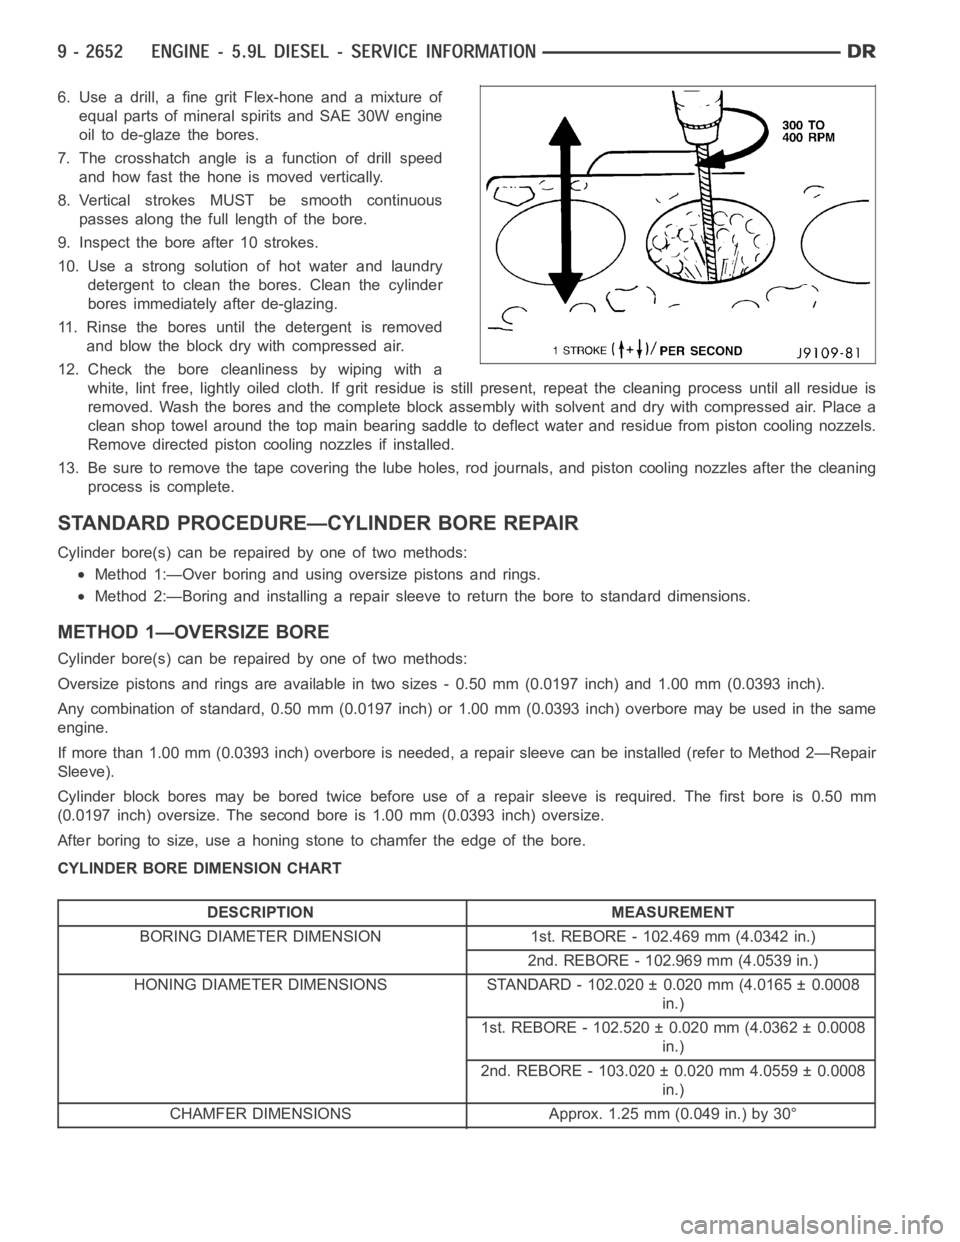
6. Use a drill, a fine grit Flex-hone and a mixture of
equal parts of mineral spirits and SAE 30W engine
oil to de-glaze the bores.
7. The crosshatch angle is a function of drill speed
and how fast the hone is moved vertically.
8. Vertical strokes MUST be smooth continuous
passes along the full length of the bore.
9. Inspect the bore after 10 strokes.
10. Use a strong solution of hot water and laundry
detergent to clean the bores. Clean the cylinder
bores immediately after de-glazing.
11. Rinse the bores until the detergent is removed
and blow the block dry with compressed air.
12. Check the bore cleanliness by wiping with a
white, lint free, lightly oiled cloth. If grit residue is still present, repeat the cleaning process until all residue is
removed. Wash the bores and the complete block assembly with solvent and dry with compressed air. Place a
clean shop towel around the top main bearing saddle to deflect water and residue from piston cooling nozzels.
Remove directed piston cooling nozzles if installed.
13. Be sure to remove the tape covering the lube holes, rod journals, and piston cooling nozzles after the cleaning
process is complete.
STANDARD PROCEDURE—CYLINDER BORE REPAIR
Cylinder bore(s) can be repaired by one of two methods:
Method 1:—Over boring and using oversize pistons and rings.
Method 2:—Boring and installing a repair sleeve to return the bore to standard dimensions.
METHOD 1—OVERSIZE BORE
Cylinder bore(s) can be repaired by one of two methods:
Oversize pistons and rings are available in two sizes - 0.50 mm (0.0197 inch) and 1.00 mm (0.0393 inch).
Any combination of standard, 0.50 mm (0.0197 inch) or 1.00 mm (0.0393 inch)overbore may be used in the same
engine.
If more than 1.00 mm (0.0393 inch) overbore is needed, a repair sleeve can beinstalled (refer to Method 2—Repair
Sleeve).
Cylinder block bores may be bored twice before use of a repair sleeve is required. The first bore is 0.50 mm
(0.0197 inch) oversize. The second bore is 1.00 mm (0.0393 inch) oversize.
After boring to size, use a honing stone to chamfer the edge of the bore.
CYLINDER BORE DIMENSION CHART
DESCRIPTION MEASUREMENT
BORING DIAMETER DIMENSION 1st. REBORE - 102.469 mm (4.0342 in.)
2nd. REBORE - 102.969 mm (4.0539 in.)
HONING DIAMETER DIMENSIONS STANDARD - 102.020 ± 0.020 mm (4.0165 ± 0.0008
in.)
1st. REBORE - 102.520 ± 0.020 mm (4.0362 ± 0.0008
in.)
2nd. REBORE - 103.020 ± 0.020 mm 4.0559 ± 0.0008
in.)
CHAMFER DIMENSIONS Approx. 1.25 mm (0.049 in.) by 30°
Page 1962 of 5267
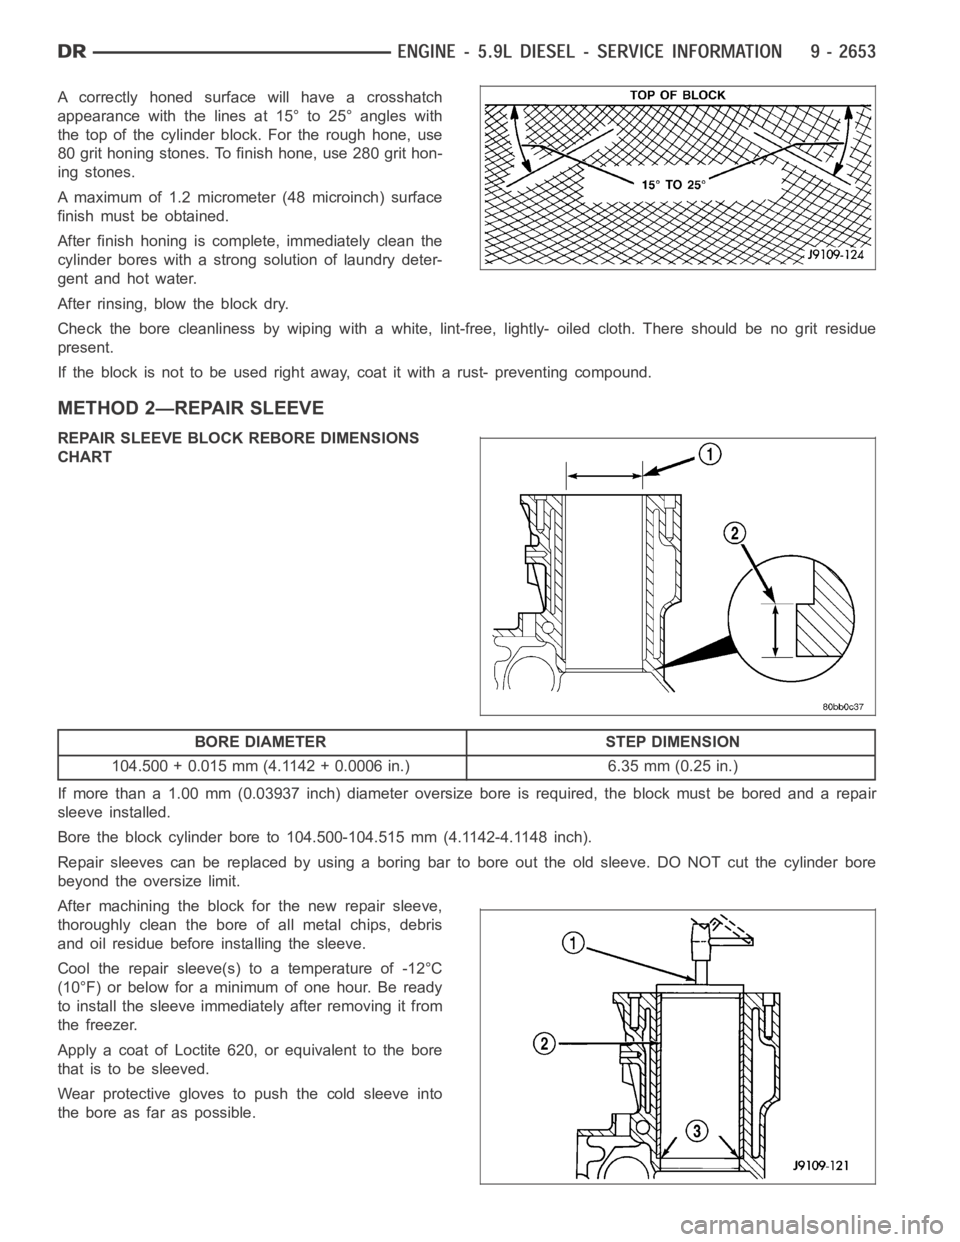
A correctly honed surface will have a crosshatch
appearance with the lines at 15° to 25° angles with
the top of the cylinder block. For the rough hone, use
80 grit honing stones. To finish hone, use 280 grit hon-
ing stones.
A maximum of 1.2 micrometer (48 microinch) surface
finish must be obtained.
After finish honing is complete, immediately clean the
cylinder bores with a strong solution of laundry deter-
gent and hot water.
After rinsing, blow the block dry.
Check the bore cleanliness by wiping with a white, lint-free, lightly- oiled cloth. There should be no grit residue
present.
If the block is not to be used right away, coat it with a rust- preventing compound.
METHOD 2—REPAIR SLEEVE
REPAIR SLEEVE BLOCK REBORE DIMENSIONS
CHART
BORE DIAMETER STEP DIMENSION
104.500 + 0.015 mm (4.1142 + 0.0006 in.) 6.35 mm (0.25 in.)
If more than a 1.00 mm (0.03937 inch) diameter oversize bore is required, the block must be bored and a repair
sleeve installed.
Bore the block cylinder bore to 104.500-104.515 mm (4.1142-4.1148 inch).
Repair sleeves can be replaced by using a boring bar to bore out the old sleeve. DO NOT cut the cylinder bore
beyond the oversize limit.
After machining the block for the new repair sleeve,
thoroughly clean the bore of all metal chips, debris
and oil residue before installing the sleeve.
Cool the repair sleeve(s) to a temperature of -12°C
(10°F) or below for a minimum of one hour. Be ready
to install the sleeve immediately after removing it from
the freezer.
Apply a coat of Loctite 620, or equivalent to the bore
that is to be sleeved.
Wear protective gloves to push the cold sleeve into
the bore as far as possible.
Page 1963 of 5267
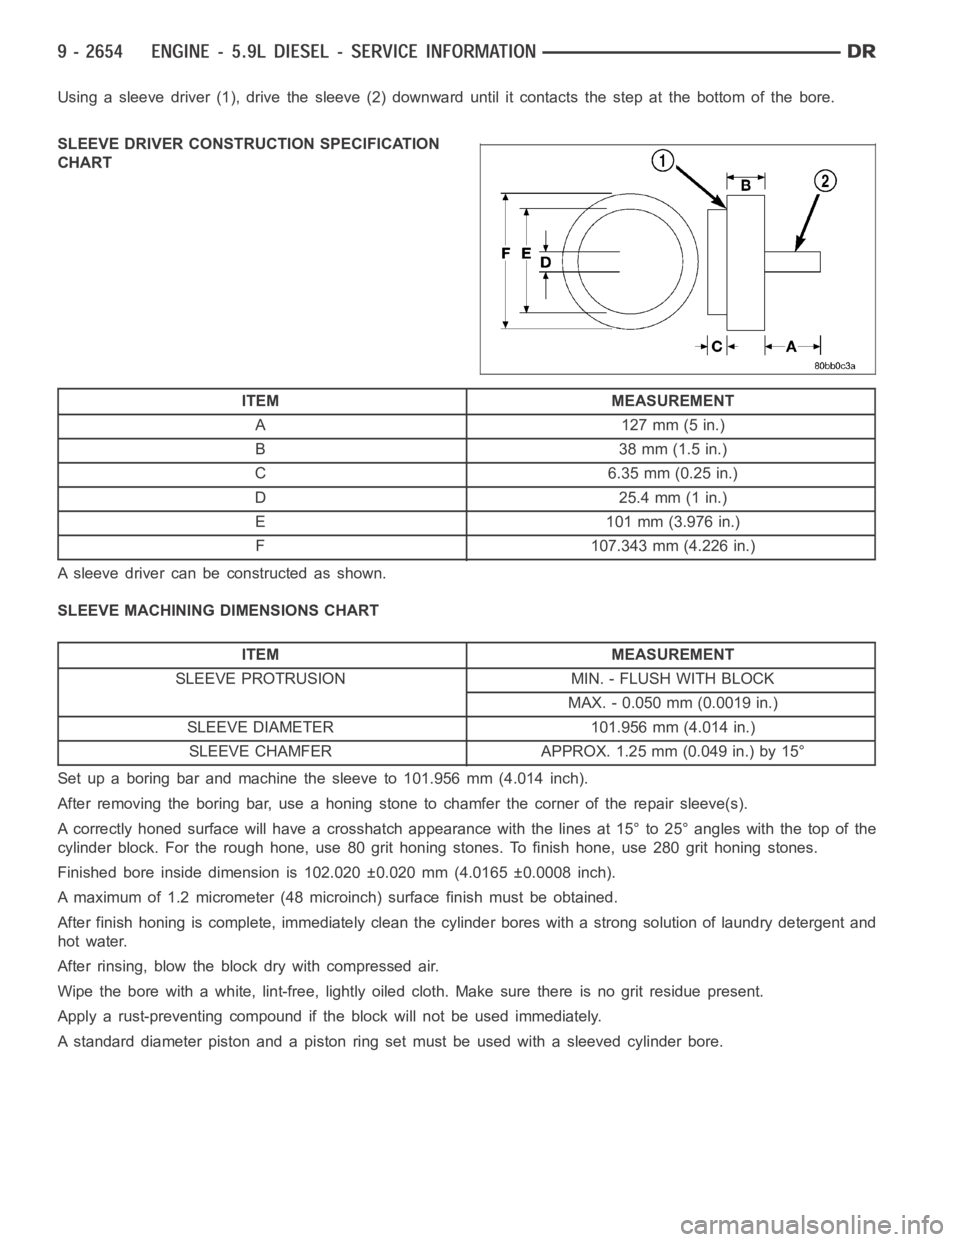
Using a sleeve driver (1), drive the sleeve (2) downward until it contacts the step at the bottom of the bore.
SLEEVE DRIVER CONSTRUCTION SPECIFICATION
CHART
ITEM MEASUREMENT
A127mm(5in.)
B 38mm(1.5in.)
C 6.35 mm (0.25 in.)
D 25.4 mm (1 in.)
E 101 mm (3.976 in.)
F 107.343 mm (4.226 in.)
A sleeve driver can be constructed as shown.
SLEEVE MACHINING DIMENSIONS CHART
ITEM MEASUREMENT
SLEEVE PROTRUSION MIN. - FLUSH WITH BLOCK
MAX. - 0.050 mm (0.0019 in.)
SLEEVE DIAMETER 101.956 mm (4.014 in.)
SLEEVE CHAMFER APPROX. 1.25 mm (0.049 in.) by 15°
Set up a boring bar and machine the sleeve to 101.956 mm (4.014 inch).
After removing the boring bar, use a honing stone to chamfer the corner of the repair sleeve(s).
A correctly honed surface will have a crosshatch appearance with the linesat 15° to 25° angles with the top of the
cylinder block. For the rough hone, use 80 grit honing stones. To finish hone, use 280 grit honing stones.
Finished bore inside dimension is 102.020 ±0.020 mm (4.0165 ±0.0008 inch).
A maximum of 1.2 micrometer (48 microinch) surface finish must be obtained.
After finish honing is complete, immediately clean the cylinder bores with a strong solution of laundry detergent and
hot water.
After rinsing, blow the block dry with compressed air.
Wipe the bore with a white, lint-free, lightly oiled cloth. Make sure thereis no grit residue present.
Apply a rust-preventing compound if the block will not be used immediately.
A standard diameter piston and a piston ring set must be used with a sleeved cylinder bore.
Page 1964 of 5267
STANDARD PROCEDURE - CAM BORE REPAIR
For standard bushings, not oversized, maximum front
cam bushing bore diameter is 59.248 mm. (2.3326
in.). DO NOT bore the intermediate cam bore to the
front cam bore oversize dimensions. Maximum front
camshaft bushing installed diameter is 54.147 mm.
(2.1318 in.). Minimum installed diameter is 54.083
mm. (2.1293 in.). Maximum intermediate camshaft
bore diameter is 54.164 mm. (2.1324 in.).
A surface finish of 2.3 micrometers (92 microinch)
must be maintained. Not more than 20% of an area of
any one bore may be 3.2 micrometers (126 micro-
inch).
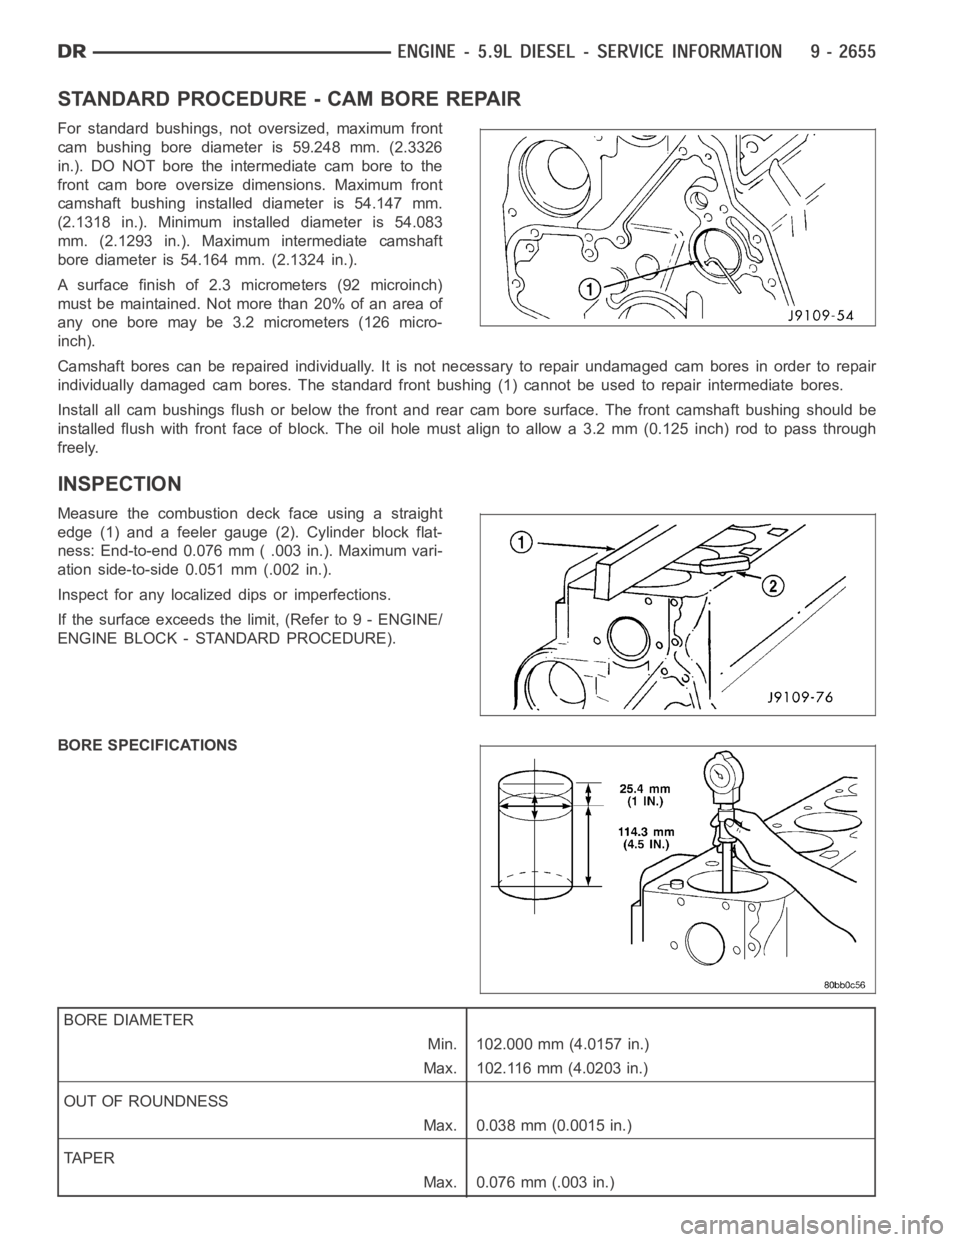
Camshaft bores can be repaired individually. It is not necessary to repairundamaged cam bores in order to repair
individually damaged cam bores. The standard front bushing (1) cannot be used to repair intermediate bores.
Install all cam bushings flush or below the front and rear cam bore surface.The front camshaft bushing should be
installed flush with front face of block. The oil hole must align to allow a 3.2 mm (0.125 inch) rod to pass through
freely.
INSPECTION
Measure the combustion deck face using a straight
edge (1) and a feeler gauge (2). Cylinder block flat-
ness: End-to-end 0.076 mm ( .003 in.). Maximum vari-
ation side-to-side 0.051 mm (.002 in.).
Inspect for any localized dips or imperfections.
If the surface exceeds the limit, (Refer to 9 - ENGINE/
ENGINE BLOCK - STANDARD PROCEDURE).
BORE SPECIFICATIONS
BORE DIAMETER
Min. 102.000 mm (4.0157 in.)
Max. 102.116 mm (4.0203 in.)
OUT OF ROUNDNESS
Max. 0.038 mm (0.0015 in.)
TA P E R
Max. 0.076 mm (.003 in.)
Page 1968 of 5267
INSPECTION
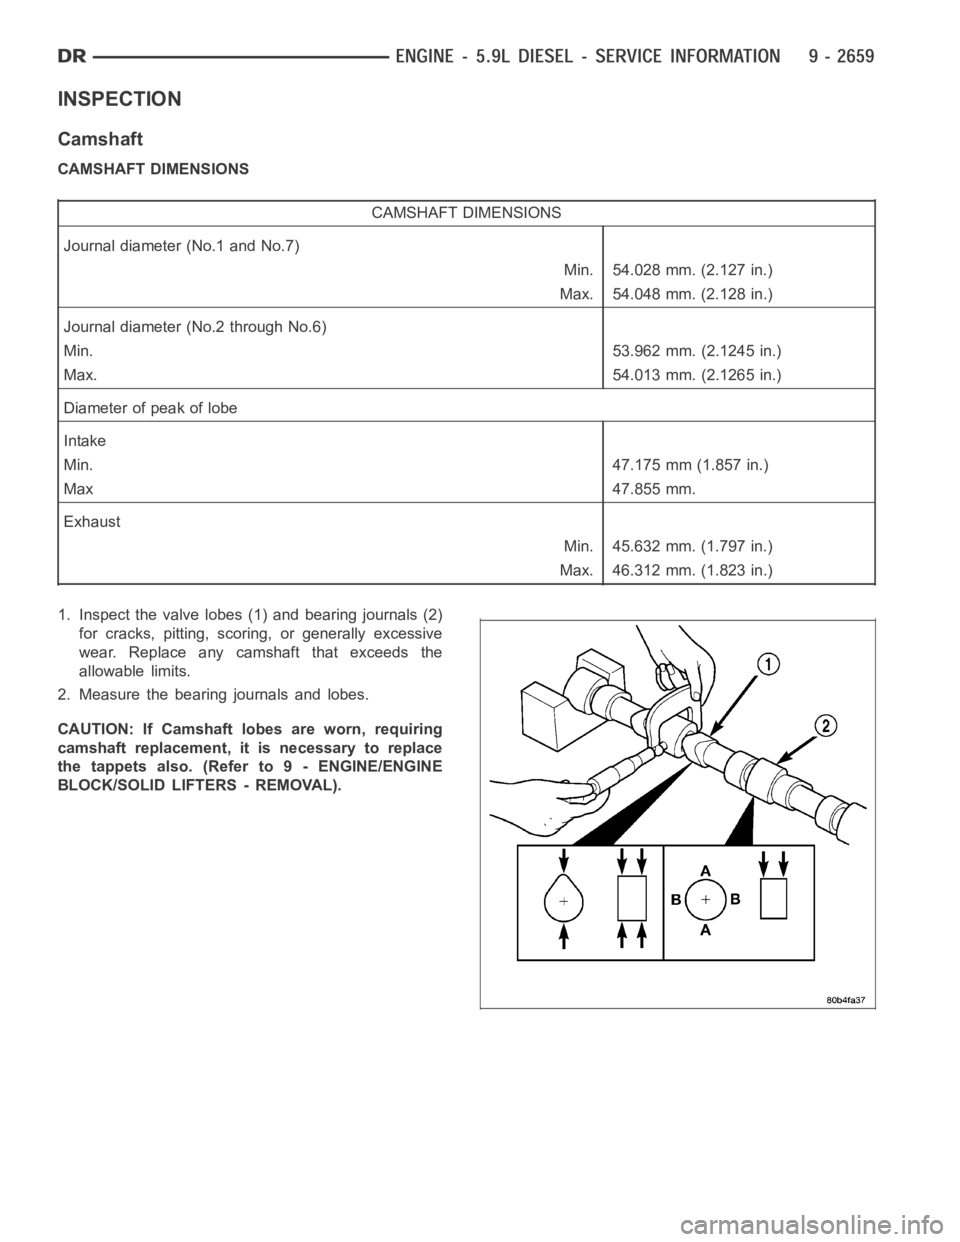
Camshaft
CAMSHAFT DIMENSIONS
CAMSHAFT DIMENSIONS
Journal diameter (No.1 and No.7)
Min. 54.028 mm. (2.127 in.)
Max. 54.048 mm. (2.128 in.)
Journal diameter (No.2 through No.6)
Min.53.962 mm. (2.1245 in.)
Max.54.013 mm. (2.1265 in.)
Diameter of peak of lobe
Intake
Min.47.175 mm (1.857 in.)
Max47.855 mm.
Exhaust
Min. 45.632 mm. (1.797 in.)
Max. 46.312 mm. (1.823 in.)
1. Inspect the valve lobes (1) and bearing journals (2)
for cracks, pitting, scoring, or generally excessive
wear. Replace any camshaft that exceeds the
allowable limits.
2. Measure the bearing journals and lobes.
CAUTION: If Camshaft lobes are worn, requiring
camshaft replacement, it is necessary to replace
the tappets also. (Refer to 9 - ENGINE/ENGINE
BLOCK/SOLID LIFTERS - REMOVAL).
Page 2174 of 5267
FRAME & BUMPERS
TABLE OF CONTENTS
page page
FRAMES & BUMPERS
SPECIFICATIONS
TORQUE .................................... 2
FRONT AIR DAM
REMOVAL ..................................... 3
INSTALLATION ................................ 3
FRONT BUMPER
REMOVAL ..................................... 4
INSTALLATION ................................ 4
FRONT FASCIA
REMOVAL ..................................... 5
INSTALLATION ................................ 6
REAR BUMPER
REMOVAL ..................................... 7
INSTALLATION ................................ 8
FASCIA-FRONT SRT-10
REMOVAL ..................................... 9
INSTALLATION ................................ 11
FASCIA-REAR SRT-10
REMOVAL .................................... 14
INSTALLATION ............................... 15
FRAME
WARNING
WARNINGS ................................ 17
STANDARD PROCEDURE
HYDROFORM FENDER RAIL REPAIR ........ 18REAR FRAME H-SECTION REPLACEMENT . . . 27
SPECIFICATIONS
WELD PROCESS ........................... 33
FRAME DIMENSIONS ....................... 34
TORQUE ................................... 45
FRONT CROSSMEMBER
REMOVAL .................................... 46
INSTALLATION ............................... 48
FRONT SKID PLATE
REMOVAL .................................... 50
INSTALLATION ............................... 51
FRONT TOW HOOK ASSEMBLY
REMOVAL .................................... 52
INSTALLATION ............................... 53
TRANSMISSION CROSSMEMBER
REMOVAL .................................... 54
INSTALLATION ............................... 56
TRAILER HITCH
REMOVAL .................................... 58
INSTALLATION ............................... 60
TRANSFER CASE SKID PLATE
REMOVAL .................................... 62
INSTALLATION ............................... 63
Page 2204 of 5267
CAUTION: Do not use any flame or plasma cutting equipment to cut the frame inthis procedure. The inac-
curate and high temperatures achieved during flame or plasma cutting willchange the metal characteristics
and may weaken the frame and/or repair location.
12. Carefully remove the H-section welds using a grinder or equivalent tool.
13. Remove the H-section and clean any remaining welds from the frame.
14. Trial fit the replacement part.
15. Remove all e-coat from within 25 mm (1.0 in.) of the weld area.
16. Using the appropriate measuring equipment, position the replacementpart and verify correct positioning in all
three (X,Y, and Z) planes of space. (Refer to 13 - FRAME & BUMPERS/FRAME - SPECIFICATIONS - FRAME
DIMENSIONS)
CAUTION: Shield the surrounding area and components from exposure to the welding spatter and heat.
17. Weld the replacement H-section into position. The welding should be performedinaskip(stitch)typemethod
to minimize the heat buildup followingI-CAR or the American Welding Society welding procedures and utilizing
the process specifications at the end of this section. (Refer to 13 - FRAME &BUMPERS/FRAME - SPECIFI-
CATIONS - WELDING)
18. Dress the welded area and apply corrosion resistant coatings inside and out.
a. Inside the rail, inject a creeping wax based rust inhibitor compound through the existing holes in the frame
ensuring 100% coverage including the mating face between the frame and replacement H-section.
b. Apply a durable top coat to the outside of the repair area.
19. Position the wiring harness back.
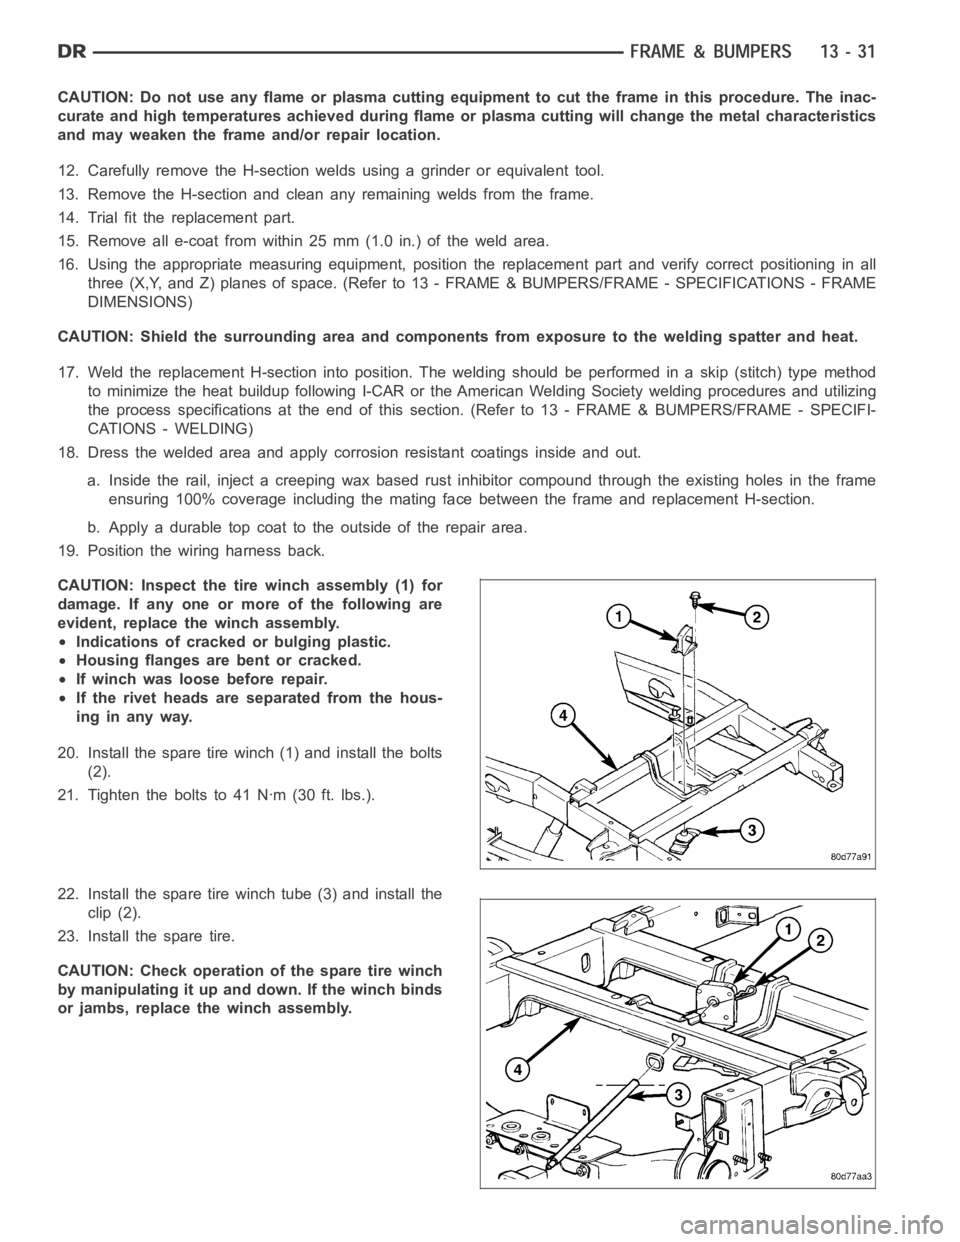
CAUTION: Inspect the tire winch assembly (1) for
damage. If any one or more of the following are
evident, replace the winch assembly.
Indications of cracked or bulging plastic.
Housing flanges are bent or cracked.
If winch was loose before repair.
If the rivet heads are separated from the hous-
inginanyway.
20. Install the spare tire winch (1) and install the bolts
(2).
21. Tightentheboltsto41Nꞏm(30ft.lbs.).
22. Install the spare tire winch tube (3) and install the
clip (2).
23. Install the spare tire.
CAUTION: Check operation of the spare tire winch
by manipulating it up and down. If the winch binds
or jambs, replace the winch assembly.
Page 2207 of 5267
*First choice - Gas Metal Arc Welding Process:Butt joints - apply two layers (passes) of weld metal. First pass
should only fill approximately1⁄2the thickness. Vertical position welds - maintain electrode wire at leading edge of
weld puddle while traveling down hill to produce maximum penetration intothe sleeve. These techniques work for
FCAW as well.
**E7018new electrodes may be exposed to the atmosphere for up to ten hours with no harmful effect.
Reconditioning schedules should come from the manufacturer.
FRAME DIMENSIONS
NOTE: Frame dimensions are listed in metric scale. All dimensions are fromcenter to center of Principal
Locating Point (PLP), or from center to center of PLP and fastener location.
VEHICLE PREPARATION
Position the vehicle on a level work surface. Using screw or bottle jacks, adjust the vehicle PLP heights to the
specified dimension above a level work surface. Vertical dimensions can be taken from the work surface to the
locations indicated were applicable.
INDEX
DESCRIPTION FIGURE
1500 STANDARD CAB - 2 WHEEL DRIVE 1
1500 STANDARD CAB - 4 WHEEL DRIVE 2
1500 QUAD CAB - 2 WHEEL DRIVE 3
1500 QUAD CAB - 4 WHEEL DRIVE 4
140.5 IN WHEELBASE - HEAVY DUTY - 2 WHEEL DRIVE 5
140.5 IN WHEELBASE - HEAVY DUTY - 4 WHEEL DRIVE 6
160.5 IN WHEELBASE - 2500 - 2 WHEEL DRIVE 7
160.5 IN WHEELBASE - 2500 - 4 WHEEL DRIVE 8
160.5 IN WHEELBASE - 3500 - 2 WHEEL DRIVE 9
160.5 IN WHEELBASE - 3500 - 2 WHEEL DRIVE 10