2006 DODGE RAM SRT-10 automatic transmission
[x] Cancel search: automatic transmissionPage 2908 of 5267
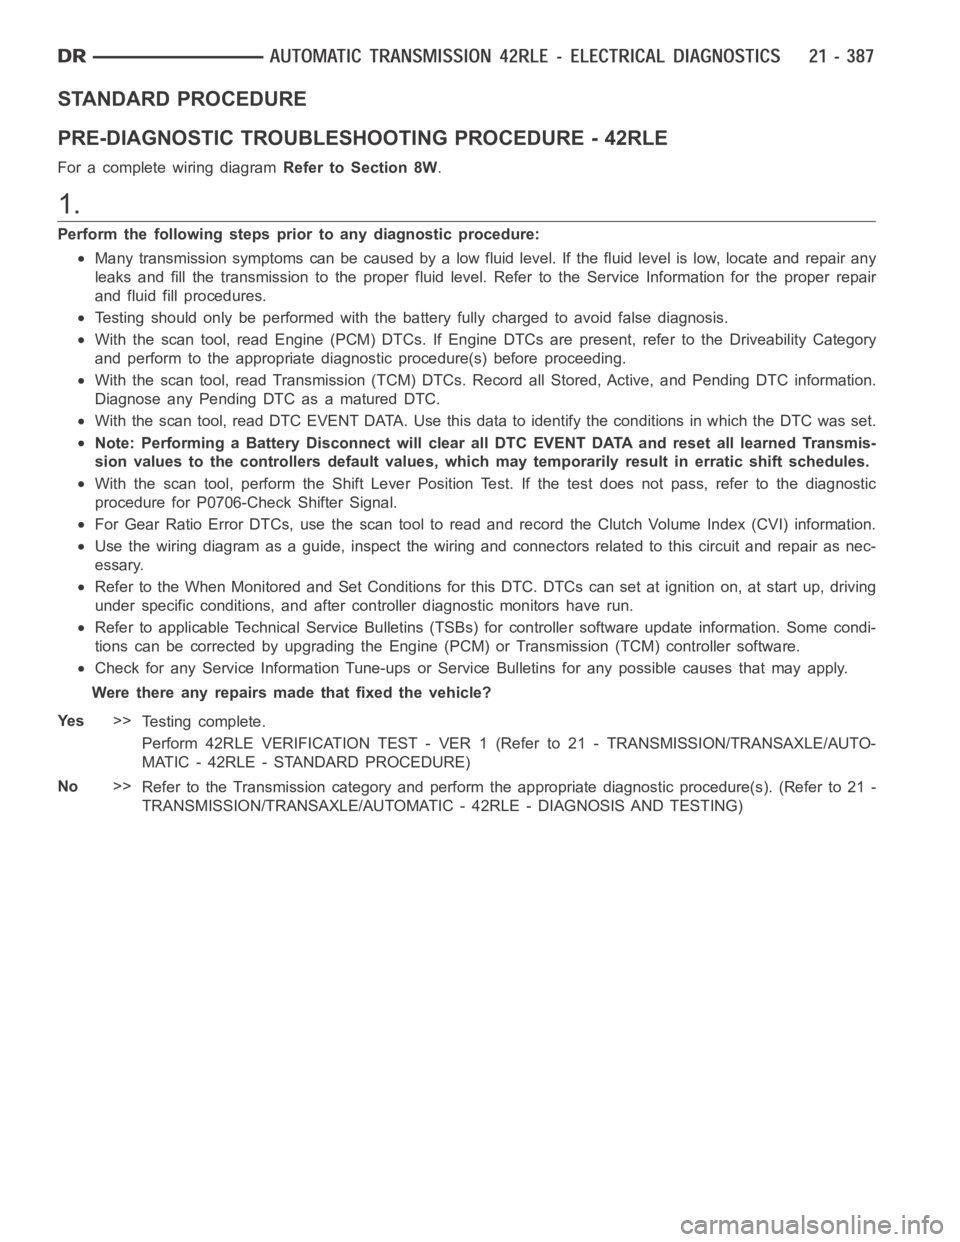
STANDARD PROCEDURE
PRE-DIAGNOSTIC TROUBLESHOOTING PROCEDURE - 42RLE
For a complete wiring diagramRefer to Section 8W.
1.
Perform the following steps prior to any diagnostic procedure:
Many transmission symptoms can be caused by a low fluid level. If the fluid level is low, locate and repair any
leaks and fill the transmission to the proper fluid level. Refer to the Service Information for the proper repair
and fluid fill procedures.
Testing should only be performed with the battery fully charged to avoid false diagnosis.
With the scan tool, read Engine (PCM) DTCs. If Engine DTCs are present, refer to the Driveability Category
and perform to the appropriate diagnostic procedure(s) before proceeding.
With the scan tool, read Transmission (TCM) DTCs. Record all Stored, Active, and Pending DTC information.
Diagnose any Pending DTC as a matured DTC.
With the scan tool, read DTC EVENT DATA.Use this data to identify the conditions in which the DTC was set.
Note: Performing a Battery Disconnect will clear all DTC EVENT DATA and reset all learned Transmis-
sion values to the controllers default values, which may temporarily result in erratic shift schedules.
With the scan tool, perform the Shift Lever Position Test. If the test does not pass, refer to the diagnostic
procedure for P0706-Check Shifter Signal.
For Gear Ratio Error DTCs, use the scan tool to read and record the Clutch Volume Index (CVI) information.
Use the wiring diagram as a guide, inspect the wiring and connectors related to this circuit and repair as nec-
essary.
Refer to the When Monitored and Set Conditions for this DTC. DTCs can set at ignition on, at start up, driving
under specific conditions, and after controller diagnostic monitors haverun.
Refer to applicable Technical Service Bulletins (TSBs) for controller software update information. Some condi-
tions can be corrected by upgrading the Engine (PCM) or Transmission (TCM)controller software.
Check for any Service Information Tune-ups or Service Bulletins for any possible causes that may apply.
Were there any repairs made that fixed the vehicle?
Ye s>>
Testing complete.
Perform 42RLE VERIFICATION TEST - VER1(Referto21-TRANSMISSION/TRANSAXLE/AUTO-
MATIC - 42RLE - STANDARD PROCEDURE)
No>>
Refer to the Transmission category and perform the appropriate diagnostic procedure(s). (Refer to 21 -
TRANSMISSION/TRANSAXLE/AUTOMATIC - 42RLE - DIAGNOSIS AND TESTING)
Page 2909 of 5267
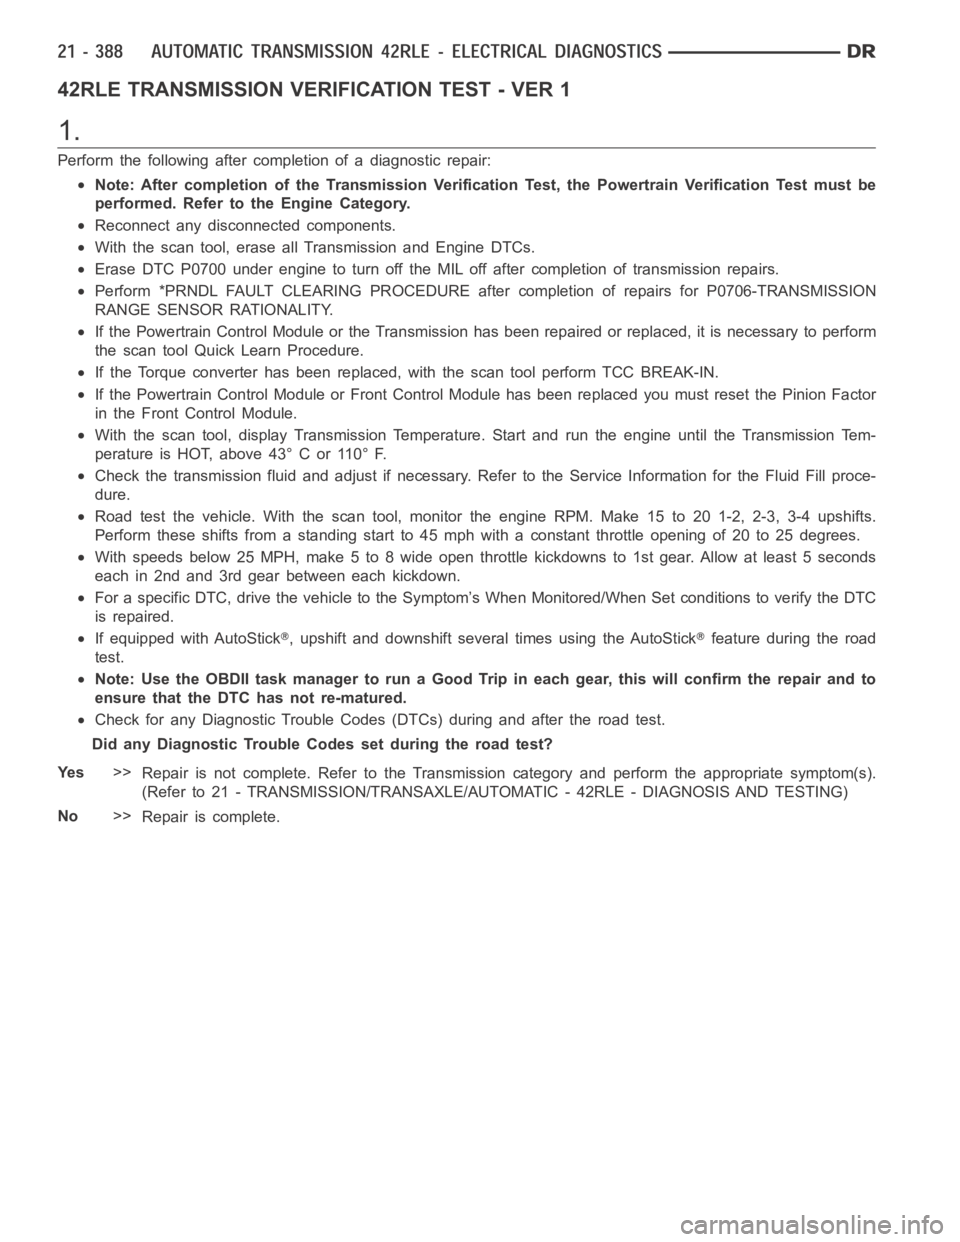
42RLE TRANSMISSION VERIFICATION TEST - VER 1
1.
Perform the following after completion of a diagnostic repair:
Note: After completion of the Transmission Verification Test, the Powertrain Verification Test must be
performed. Refer to the Engine Category.
Reconnect any disconnected components.
With the scan tool, erase all Transmission and Engine DTCs.
Erase DTC P0700 under engine to turn off the MIL off after completion of transmission repairs.
Perform *PRNDL FAULT CLEARING PROCEDURE after completion of repairs for P0706-TRANSMISSION
RANGE SENSOR RATIONALITY.
If the Powertrain Control Module or the Transmission has been repaired or replaced, it is necessary to perform
the scan tool Quick Learn Procedure.
If the Torque converter has been replaced, with the scan tool perform TCC BREAK-IN.
If the Powertrain Control Module or Front Control Module has been replacedyoumustresetthePinionFactor
in the Front Control Module.
With the scan tool, display Transmission Temperature. Start and run the engine until the Transmission Tem-
perature is HOT, above 43° C or 110° F.
Check the transmission fluid and adjust if necessary. Refer to the ServiceInformation for the Fluid Fill proce-
dure.
Road test the vehicle. With the scan tool, monitor the engine RPM. Make 15 to20 1-2, 2-3, 3-4 upshifts.
Perform these shifts from a standing start to 45 mph with a constant throttleopeningof20to25degrees.
With speeds below 25 MPH, make 5 to 8 wide open throttle kickdowns to 1st gear. Allow at least 5 seconds
each in 2nd and 3rd gear between each kickdown.
For a specific DTC, drive the vehicle to the Symptom’s When Monitored/WhenSet conditions to verify the DTC
is repaired.
If equipped with AutoStick, upshift and downshift several times using the AutoStickfeature during the road
test.
Note: Use the OBDII task manager to run a Good Trip in each gear, this will confirm the repair and to
ensure that the DTC has not re-matured.
Check for any Diagnostic Trouble Codes (DTCs) during and after the road test.
Did any Diagnostic Trouble Codes set during the road test?
Ye s>>
Repair is not complete. Refer to the Transmission category and perform theappropriate symptom(s).
(Refer to 21 - TRANSMISSION/TRANSAXLE/AUTOMATIC - 42RLE - DIAGNOSIS AND TESTING)
No>>
Repair is complete.
Page 2910 of 5267
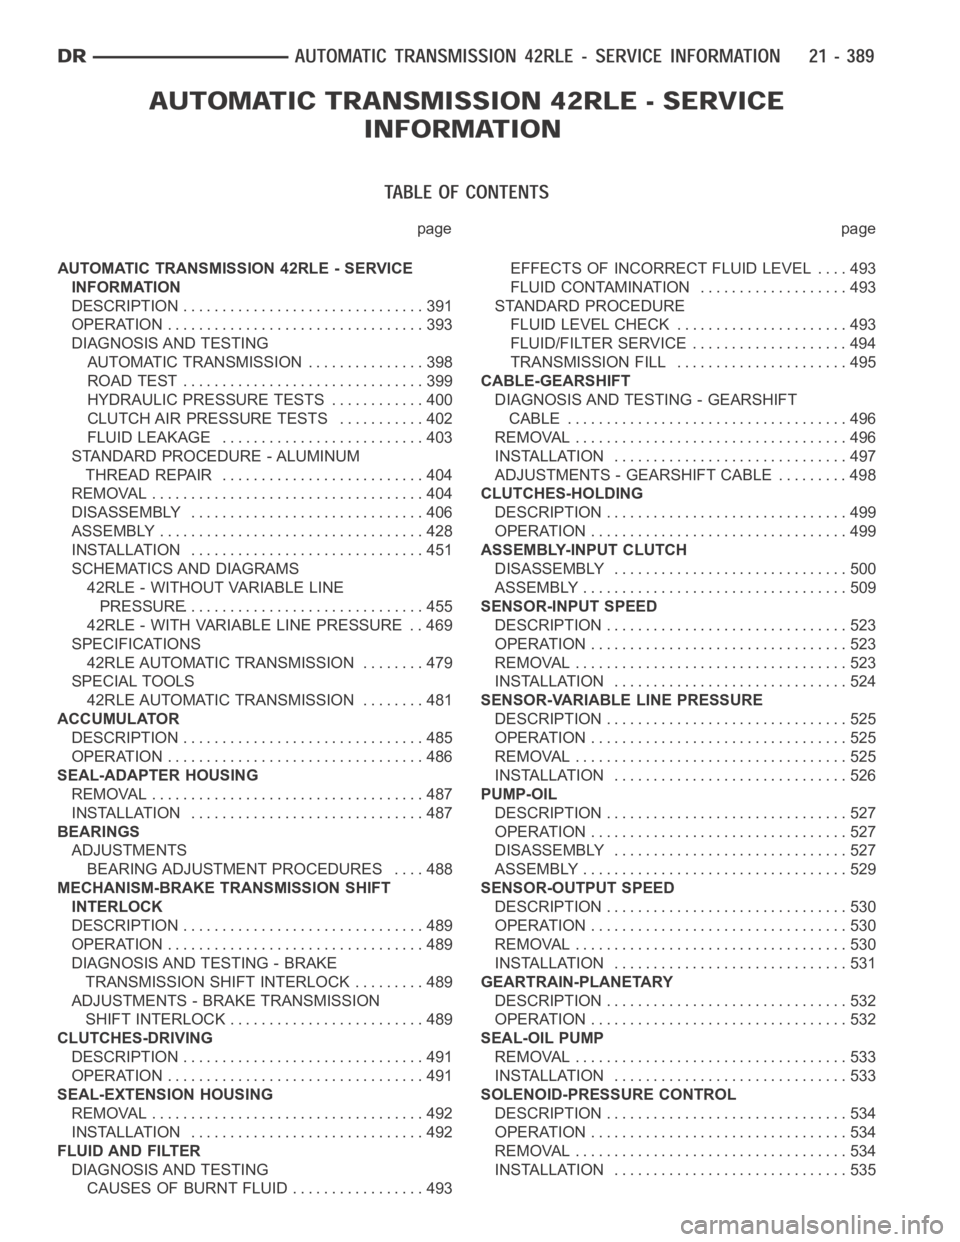
page page
AUTOMATIC TRANSMISSION 42RLE - SERVICE
INFORMATION
DESCRIPTION ............................... 391
OPERATION ................................. 393
DIAGNOSIS AND TESTING
AUTOMATIC TRANSMISSION ............... 398
ROAD TEST ............................... 399
HYDRAULIC PRESSURE TESTS............ 400
CLUTCH AIR PRESSURE TESTS........... 402
FLUID LEAKAGE.......................... 403
STANDARD PROCEDURE - ALUMINUM
THREAD REPAIR .......................... 404
REMOVAL ................................... 404
DISASSEMBLY .............................. 406
ASSEMBLY .................................. 428
INSTALLATION .............................. 451
SCHEMATICS AND DIAGRAMS
42RLE - WITHOUT VARIABLE LINE
PRESSURE............................... 455
42RLE - WITH VARIABLE LINE PRESSURE . . 469
SPECIFICATIONS
42RLE AUTOMATIC TRANSMISSION ........ 479
SPECIAL TOOLS
42RLE AUTOMATIC TRANSMISSION ........ 481
ACCUMULATOR
DESCRIPTION ............................... 485
OPERATION ................................. 486
SEAL-ADAPTER HOUSING
REMOVAL ................................... 487
INSTALLATION .............................. 487
BEARINGS
ADJUSTMENTS
BEARING ADJUSTMENT PROCEDURES.... 488
MECHANISM-BRAKE TRANSMISSION SHIFT
INTERLOCK
DESCRIPTION ............................... 489
OPERATION ................................. 489
DIAGNOSIS AND TESTING - BRAKE
TRANSMISSION SHIFT INTERLOCK ......... 489
ADJUSTMENTS - BRAKE TRANSMISSION
SHIFT INTERLOCK ......................... 489
CLUTCHES-DRIVING
DESCRIPTION ............................... 491
OPERATION ................................. 491
SEAL-EXTENSION HOUSING
REMOVAL ................................... 492
INSTALLATION .............................. 492
FLUID AND FILTER
DIAGNOSIS AND TESTING
CAUSES OF BURNT FLUID ................. 493EFFECTS OF INCORRECT FLUID LEVEL . . . . 493
FLUID CONTAMINATION ................... 493
STANDARD PROCEDURE
FLUID LEVEL CHECK...................... 493
FLUID/FILTER SERVICE .................... 494
TRANSMISSION FILL ...................... 495
CABLE-GEARSHIFT
DIAGNOSIS AND TESTING - GEARSHIFT
CABLE .................................... 496
REMOVAL ................................... 496
INSTALLATION .............................. 497
ADJUSTMENTS - GEARSHIFT CABLE ......... 498
CLUTCHES-HOLDING
DESCRIPTION ............................... 499
OPERATION ................................. 499
ASSEMBLY-INPUT CLUTCH
DISASSEMBLY .............................. 500
ASSEMBLY .................................. 509
SENSOR-INPUT SPEED
DESCRIPTION ............................... 523
OPERATION ................................. 523
REMOVAL ................................... 523
INSTALLATION .............................. 524
SENSOR-VARIABLE LINE PRESSURE
DESCRIPTION ............................... 525
OPERATION ................................. 525
REMOVAL ................................... 525
INSTALLATION .............................. 526
PUMP-OIL
DESCRIPTION ............................... 527
OPERATION ................................. 527
DISASSEMBLY .............................. 527
ASSEMBLY .................................. 529
SENSOR-OUTPUT SPEED
DESCRIPTION ............................... 530
OPERATION ................................. 530
REMOVAL ................................... 530
INSTALLATION .............................. 531
GEARTRAIN-PLANETARY
DESCRIPTION ............................... 532
OPERATION ................................. 532
SEAL-OIL PUMP
REMOVAL ................................... 533
INSTALLATION .............................. 533
SOLENOID-PRESSURE CONTROL
DESCRIPTION ............................... 534
OPERATION ................................. 534
REMOVAL ................................... 534
INSTALLATION .............................. 535
Page 2912 of 5267
AUTOMATIC TRANSMISSION 42RLE-SERVICEINFORMATION
DESCRIPTION
Page 2913 of 5267
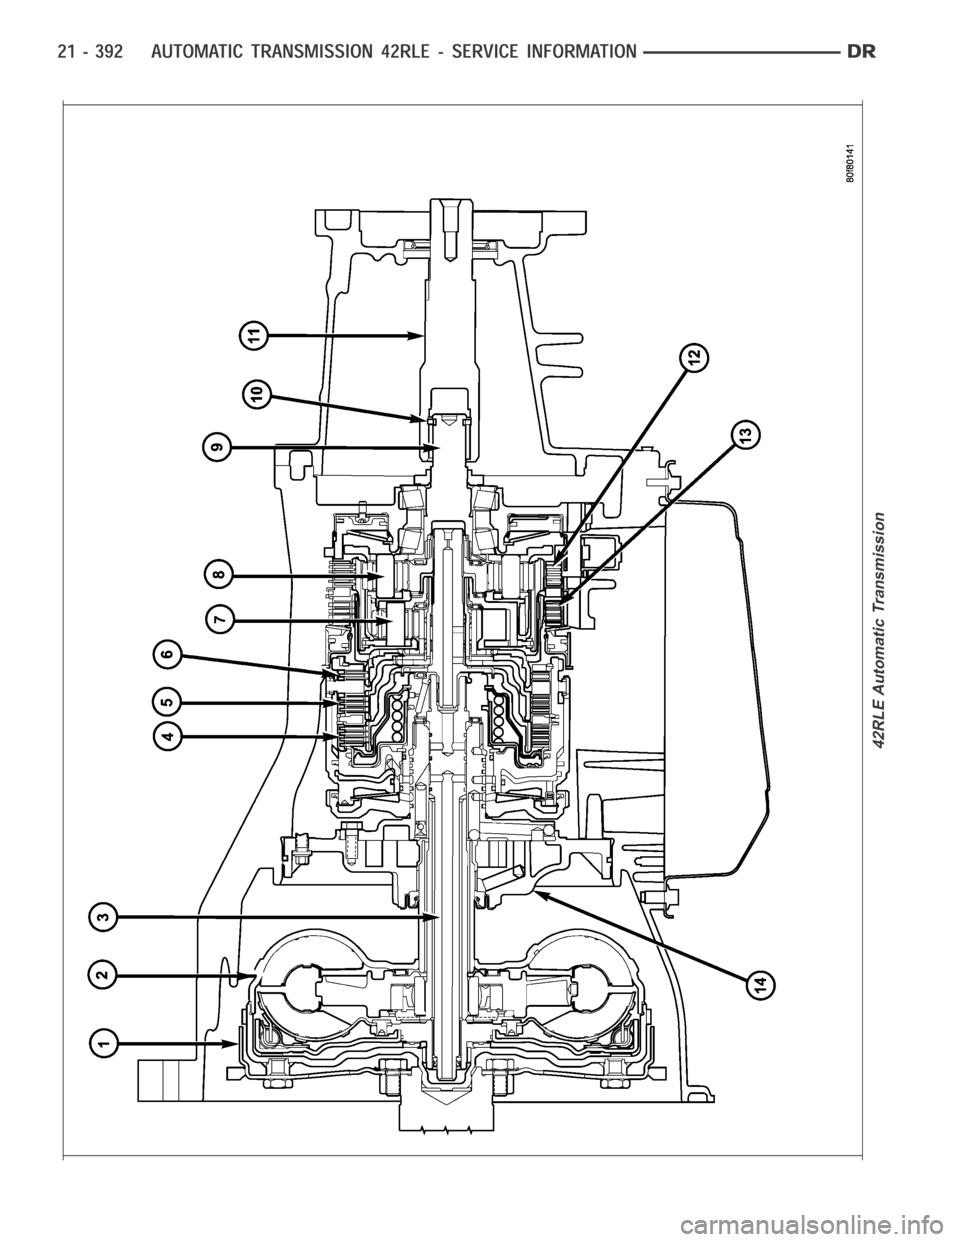
42RLE Automatic Transmission
Page 2919 of 5267
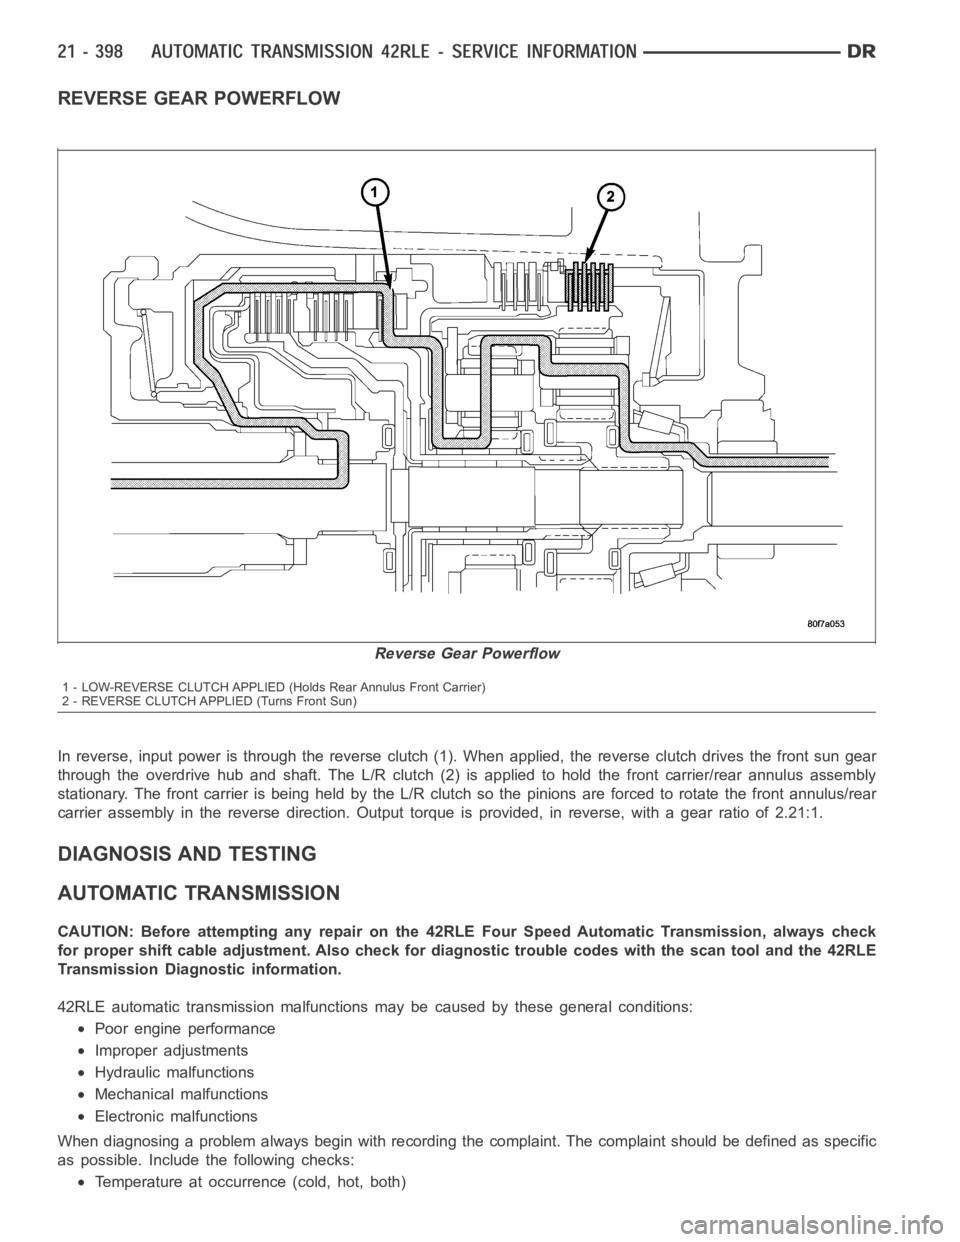
REVERSE GEAR POWERFLOW
In reverse, input power is through the reverse clutch (1). When applied, the reverse clutch drives the front sun gear
through the overdrive hub and shaft. The L/R clutch (2) is applied to hold the front carrier/rear annulus assembly
stationary. The front carrier is being held by the L/R clutch so the pinionsare forced to rotate the front annulus/rear
carrier assembly in the reverse direction. Output torque is provided, in reverse, with a gear ratio of 2.21:1.
DIAGNOSIS AND TESTING
AUTOMATIC TRANSMISSION
CAUTION: Before attempting any repair on the 42RLE Four Speed Automatic Transmission, always check
for proper shift cable adjustment. Also check for diagnostic trouble codes with the scan tool and the 42RLE
Transmission Diagnostic information.
42RLE automatic transmission malfunctions may be caused by these generalconditions:
Poor engine performance
Improper adjustments
Hydraulic malfunctions
Mechanical malfunctions
Electronic malfunctions
When diagnosing a problem always begin with recording the complaint. The complaint should be defined as specific
as possible. Includethe following checks:
Temperature at occurrence (cold, hot, both)
Reverse Gear Powerflow
1 - LOW-REVERSE CLUTCH APPLIED (Holds Rear Annulus Front Carrier)
2 - REVERSE CLUTCH APPLIED (Turns Front Sun)
Page 2923 of 5267
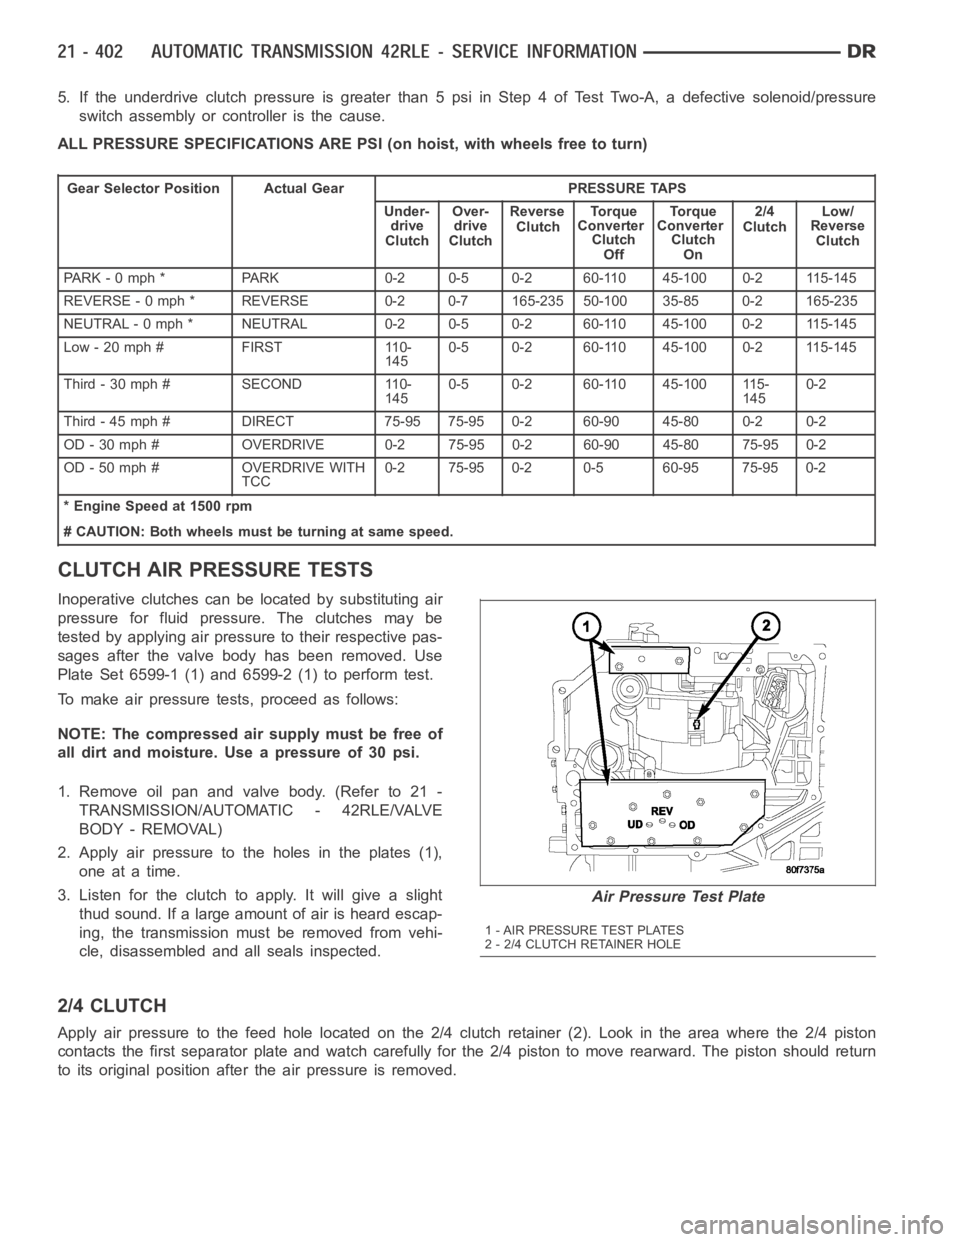
5. Iftheunderdriveclutchpressureisgreaterthan5psiinStep4ofTestTwo-A, a defective solenoid/pressure
switch assembly or controller is the cause.
ALL PRESSURE SPECIFICATIONS ARE PSI (on hoist, with wheels free to turn)
Gear Selector Position Actual Gear PRESSURE TAPS
Under-
drive
ClutchOver-
drive
ClutchReverse
ClutchTo r q u e
Converter
Clutch
OffTo r q u e
Converter
Clutch
On2/4
ClutchLow/
Reverse
Clutch
PARK - 0 mph * PARK 0-2 0-5 0-2 60-110 45-100 0-2 115-145
REVERSE - 0 mph * REVERSE 0-2 0-7 165-235 50-100 35-85 0-2 165-235
NEUTRAL - 0 mph * NEUTRAL 0-2 0-5 0-2 60-110 45-100 0-2 115-145
Low - 20 mph # FIRST 110-
1450-5 0-2 60-110 45-100 0-2 115-145
Third-30mph# SECOND 110-
1450-5 0-2 60-110 45-100 115-
1450-2
Third - 45 mph # DIRECT 75-95 75-95 0-2 60-90 45-80 0-2 0-2
OD - 30 mph # OVERDRIVE 0-2 75-95 0-2 60-90 45-80 75-95 0-2
OD - 50 mph # OVERDRIVE WITH
TCC0-2 75-95 0-2 0-5 60-95 75-95 0-2
* Engine Speed at 1500 rpm
# CAUTION: Both wheels must be turning at same speed.
CLUTCH AIR PRESSURE TESTS
Inoperative clutches can be located by substituting air
pressure for fluid pressure. The clutches may be
tested by applying air pressure to their respective pas-
sages after the valve body has been removed. Use
Plate Set 6599-1 (1) and 6599-2 (1) to perform test.
To make air pressure tests, proceed as follows:
NOTE: The compressed air supply must be free of
all dirt and moisture. Use a pressure of 30 psi.
1. Remove oil pan and valve body. (Refer to 21 -
TRANSMISSION/AUTOMATIC - 42RLE/VALVE
BODY - REMOVAL)
2. Apply air pressure to the holes in the plates (1),
one at a time.
3. Listen for the clutch to apply. It will give a slight
thud sound. If a large amount of air is heard escap-
ing, the transmission must be removed from vehi-
cle, disassembled and all seals inspected.
2/4 CLUTCH
Apply air pressure to the feed hole located on the 2/4 clutch retainer (2). Look in the area where the 2/4 piston
contacts the first separator plate and watch carefully for the 2/4 piston tomoverearward.Thepistonshouldreturn
to its original position after the air pressure is removed.
Air Pressure Test Plate
1 - AIR PRESSURE TEST PLATES
2 - 2/4 CLUTCH RETAINER HOLE
Page 3000 of 5267
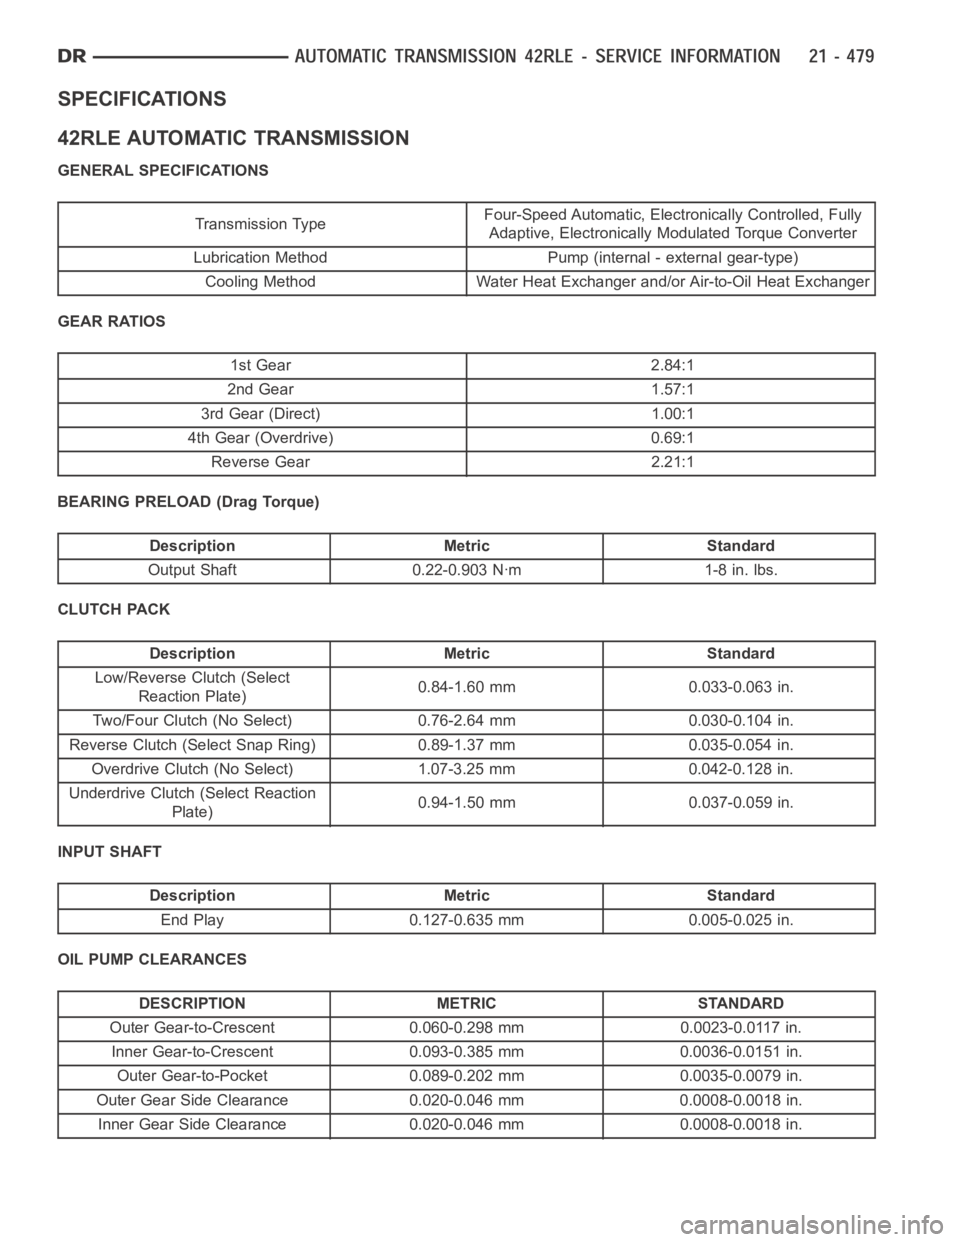
SPECIFICATIONS
42RLE AUTOMATIC TRANSMISSION
GENERAL SPECIFICATIONS
Transmission TypeFour-Speed Automatic, Electronically Controlled, Fully
Adaptive, Electronically Modulated Torque Converter
Lubrication Method Pump (internal - external gear-type)
Cooling Method Water Heat Exchanger and/or Air-to-Oil Heat Exchanger
GEAR RATIOS
1st Gear 2.84:1
2nd Gear 1.57:1
3rd Gear (Direct) 1.00:1
4th Gear (Overdrive) 0.69:1
Reverse Gear 2.21:1
BEARING PRELOAD (Drag Torque)
Description Metric Standard
Output Shaft 0.22-0.903 Nꞏm 1-8 in. lbs.
CLUTCH PACK
Description Metric Standard
Low/Reverse Clutch (Select
Reaction Plate)0.84-1.60 mm 0.033-0.063 in.
Two/Four Clutch (No Select) 0.76-2.64 mm 0.030-0.104 in.
Reverse Clutch (Select Snap Ring) 0.89-1.37 mm 0.035-0.054 in.
Overdrive Clutch (No Select) 1.07-3.25 mm 0.042-0.128 in.
Underdrive Clutch (Select Reaction
Plate)0.94-1.50 mm 0.037-0.059 in.
INPUT SHAFT
Description Metric Standard
End Play 0.127-0.635 mm 0.005-0.025 in.
OIL PUMP CLEARANCES
DESCRIPTION METRIC STANDARD
Outer Gear-to-Crescent 0.060-0.298 mm 0.0023-0.0117 in.
Inner Gear-to-Crescent 0.093-0.385 mm 0.0036-0.0151 in.
Outer Gear-to-Pocket 0.089-0.202 mm 0.0035-0.0079 in.
Outer Gear Side Clearance 0.020-0.046 mm 0.0008-0.0018 in.
Inner Gear Side Clearance 0.020-0.046 mm 0.0008-0.0018 in.