2006 DODGE RAM SRT-10 lock
[x] Cancel search: lockPage 4193 of 5267
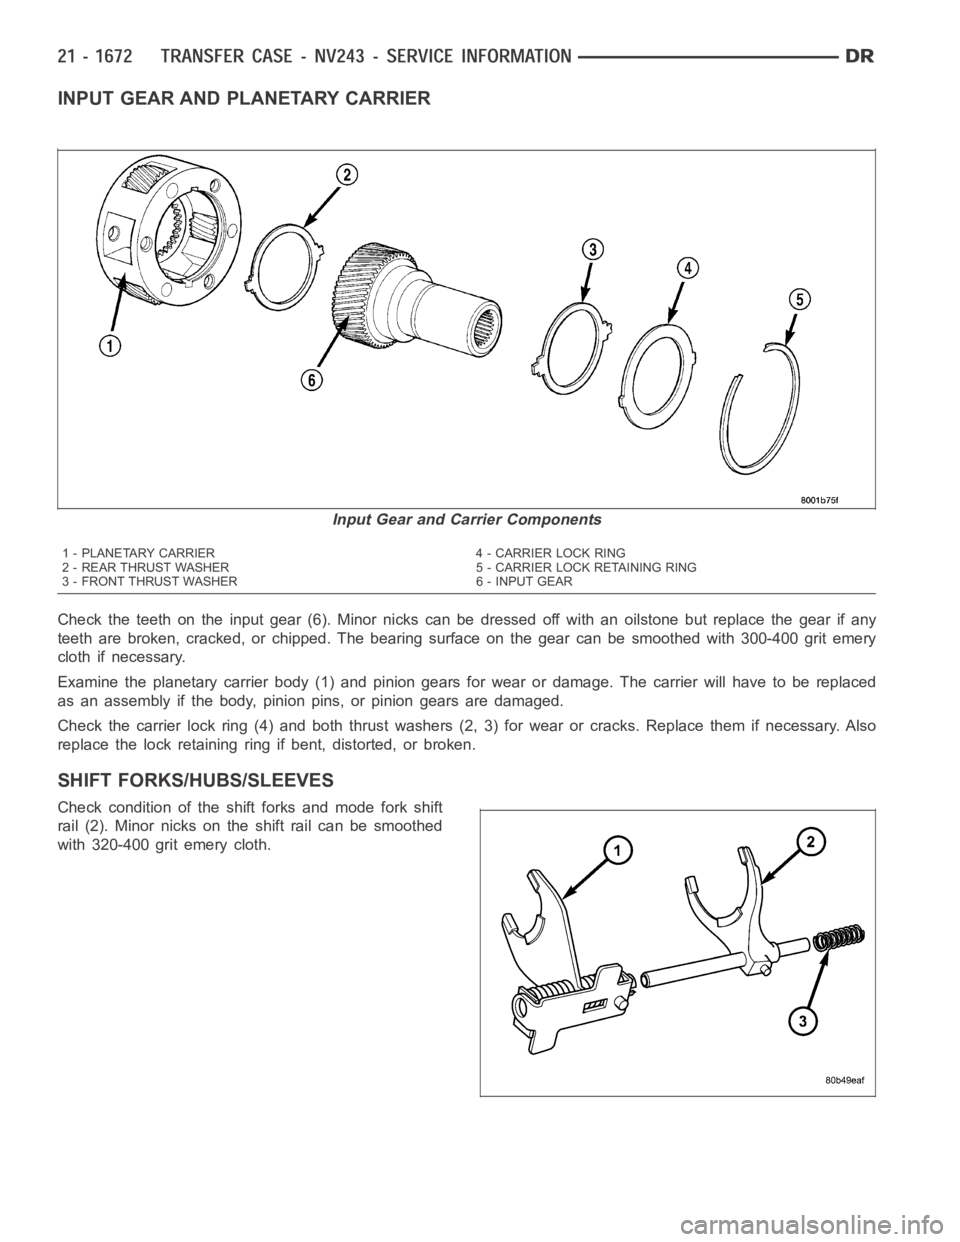
INPUT GEAR AND PLANETARY CARRIER
Check the teeth on the input gear (6). Minor nicks can be dressed off with an oilstone but replace the gear if any
teeth are broken, cracked, or chipped. The bearing surface on the gear can besmoothedwith300-400gritemery
cloth if necessary.
Examine the planetary carrier body (1) and pinion gears for wear or damage.The carrier will have to be replaced
as an assembly if the body, pinion pins, or pinion gears are damaged.
Check the carrier lock ring (4) and both thrust washers (2, 3) for wear or cracks. Replace them if necessary. Also
replace the lock retaining ring if bent, distorted, or broken.
SHIFT FORKS/HUBS/SLEEVES
Check condition of the shift forks and mode fork shift
rail (2). Minor nicks on the shift rail can be smoothed
with 320-400 grit emery cloth.
Input Gear and Carrier Components
1 - PLANETARY CARRIER 4 - CARRIER LOCK RING
2 - REAR THRUST WASHER 5 - CARRIER LOCK RETAINING RING
3 - FRONT THRUST WASHER 6 - INPUT GEAR
Page 4218 of 5267
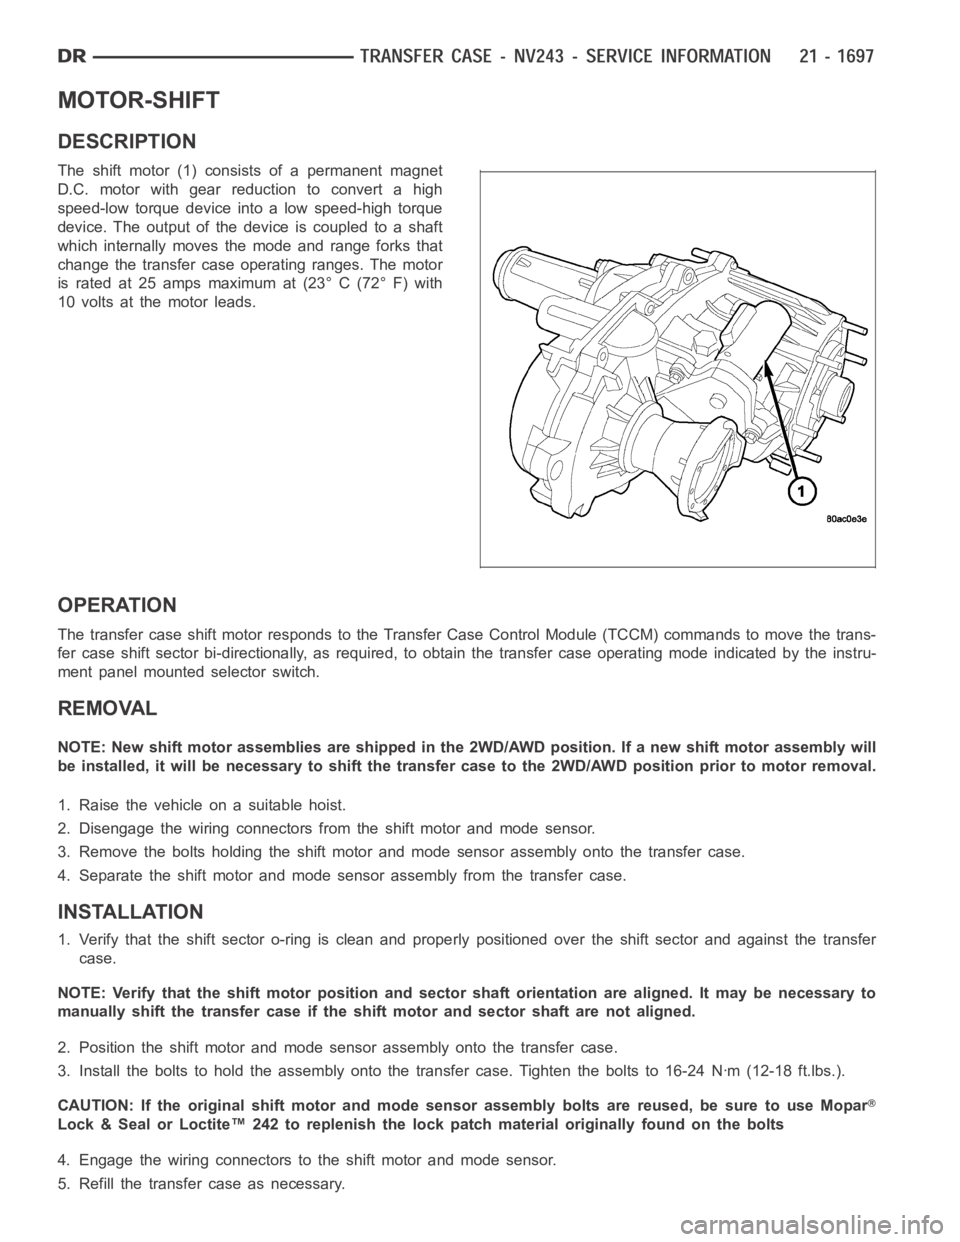
MOTOR-SHIFT
DESCRIPTION
The shift motor (1) consists of a permanent magnet
D.C. motor with gear reduction to convert a high
speed-low torque device into a low speed-high torque
device. The output of the device is coupled to a shaft
which internally moves the mode and range forks that
change the transfer case operating ranges. The motor
is rated at 25 amps maximum at (23° C (72° F) with
10 volts at the motor leads.
OPERATION
The transfer case shift motor responds to the Transfer Case Control Module(TCCM) commands to move the trans-
fer case shift sector bi-directionally, as required, to obtain the transfer case operating mode indicated by the instru-
ment panel mounted selector switch.
REMOVAL
NOTE: New shift motor assemblies are shipped in the 2WD/AWD position. If a new shift motor assembly will
be installed, it will be necessary to shift the transfer case to the 2WD/AWDposition prior to motor removal.
1. Raise the vehicle on a suitable hoist.
2. Disengage the wiring connectors from the shift motor and mode sensor.
3. Remove the bolts holding the shift motor and mode sensor assembly onto the transfer case.
4. Separate the shift motor and mode sensor assembly from the transfer case.
INSTALLATION
1. Verify that the shift sector o-ring is clean and properly positioned over the shift sector and against the transfer
case.
NOTE: Verify that the shift motor position and sector shaft orientation are aligned. It may be necessary to
manually shift the transfer case if the shift motor and sector shaft are notaligned.
2. Position the shift motor and mode sensor assembly onto the transfer case.
3. Install the bolts to hold the assembly onto the transfer case. Tighten the bolts to 16-24 Nꞏm (12-18 ft.lbs.).
CAUTION: If the original shift motor and mode sensor assembly bolts are reused, be sure to use Mopar
Lock & Seal or Loctite™ 242 to replenish the lock patch material originallyfound on the bolts
4. Engage the wiring connectors to the shift motor and mode sensor.
5. Refill the transfer case as necessary.
Page 4222 of 5267
TRANSFER CASE - NV244 GENII - SERVICE INFORMATION
DESCRIPTION
The NV244 GENII is an electronically controlled full and part-time transfer case with no two wheel drive operation.
A differential in the transfer case is used to control torque transfer to the front and rear axles. A low range gear
reduction system provides increased low speed torque capability for off road operation. The low range provides a
2.72:1 reduction ratio.
The geartrain is mounted in two aluminum case halves attached with bolts. The mainshaft front and rear bearings
are mounted in aluminum retainer housings bolted to the case halves.
OPERATING RANGES
NV244 GENII operating ranges are:
AWD (All-Wheel Drive).
4LOCK (Part-time).
4LO.
NEUTRAL.
The AWD mode can be used at any time and on any road surface.
The 4LOCK (Part-time) and 4LO ranges are for off road use only. The only timetheserangescanbeusediswhen
the road surface is covered with snow, ice, or other loose slippery material.
SHIFT MECHANISM
Operating ranges are selected with a dash mounted shift selector switch. The shift selector switch provides a input
to the Front Control Module (FCM) to indicate the driver’s desire to changeoperating ranges. The FCM uses this
input, along with the input from the transfer case mounted mode sensor and information from the vehicle’s bus, to
determine if a shift is permitted. If the FCM decides the shift is permitted, the FCM controls the shift motor, mounted
to the exterior of the transfer case, to perform the shift.
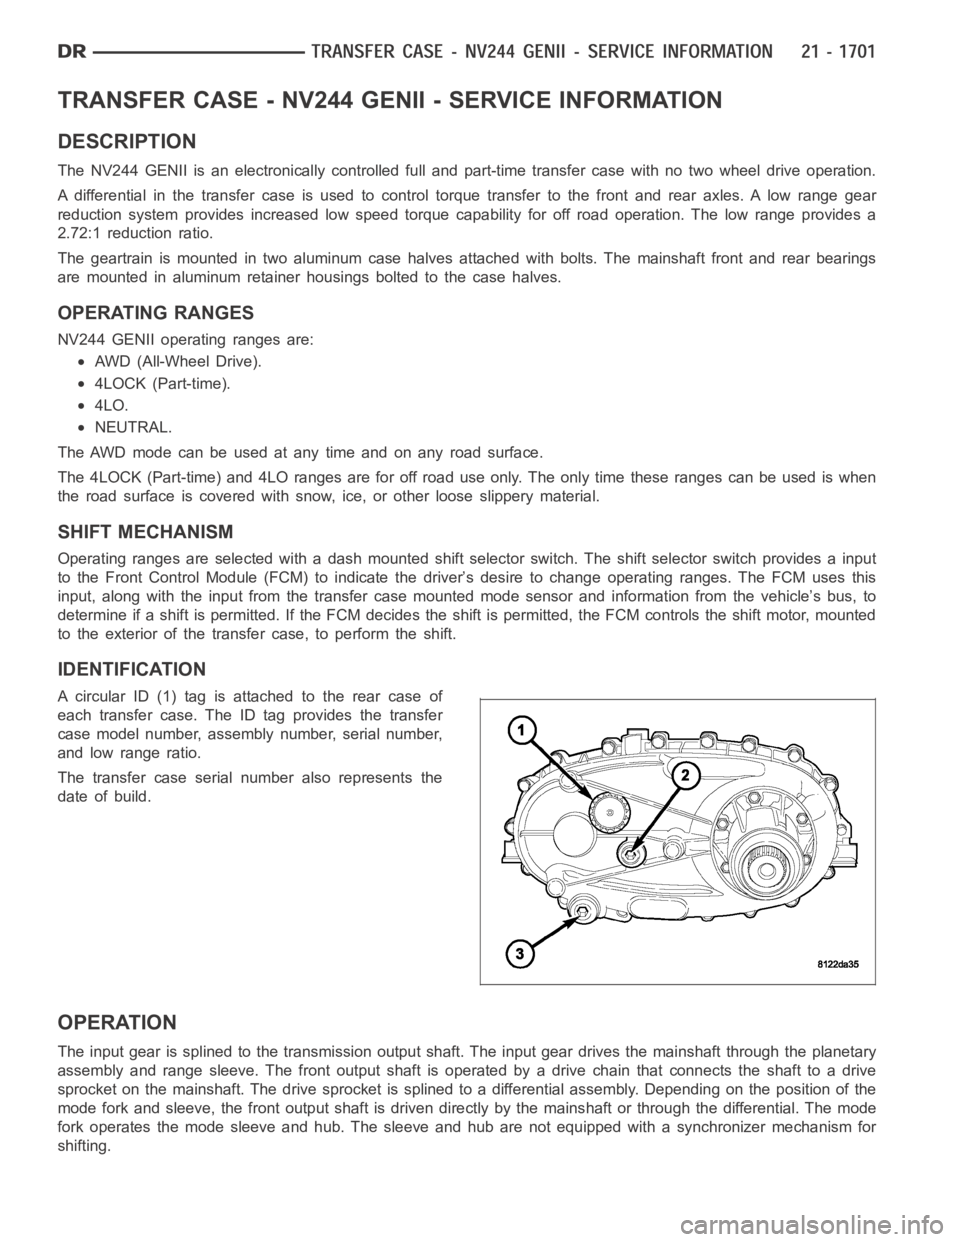
IDENTIFICATION
A circular ID (1) tag is attached to the rear case of
each transfer case. The ID tag provides the transfer
case model number, assembly number, serial number,
and low range ratio.
The transfer case serial number also represents the
date of build.
OPERATION
The input gear is splined to the transmission output shaft. The input gear drives the mainshaft through the planetary
assembly and range sleeve. The front output shaft is operated by a drive chain that connects the shaft to a drive
sprocket on the mainshaft. The drive sprocket is splined to a differentialassembly. Depending on the position of the
mode fork and sleeve, the front output shaft is driven directly by the mainshaft or through the differential. The mode
fork operates the mode sleeve and hub. The sleeve and hub are not equipped with a synchronizer mechanism for
shifting.
Page 4223 of 5267
DIAGNOSIS AND TESTING
TRANSFER CASE - NV244
DIAGNOSIS CHART
CONDITION POSSIBLE CAUSE CORRECTION
Transfer case difficult to shift or will
not shift into desired range.1) Transfer case electronically
controlled shift system malfunction.1) Verify proper operation per the
appropriate diagnostic manual.
2) Insufficient or incorrect lubricant. 2) Drain and refill transfer casewith
the correct quantity of Mopar
AT F
+4, Automatic Transmission Fluid.
3) Internal transfer case
components binding, worn, or
damaged.3) Repair or replace components as
necessary.
Transfer case noisy in all drive
modes.1) Insufficient or incorrect lubricant. 1) Drain and refill transfer casewith
the correct quantity of Mopar
AT F
+4, Automatic Transmission Fluid.
2) Internal transfer case
components binding, worn, or
damaged.2) Repair or replace components as
necessary.
Transfer case noisy while in, or
jumps out of, 4LO.1) Transfer case not completely
engaged in 4LO position.1) While rolling 2-3 MPH and the
transmission in NEUTRAL, or the
clutch depressed on vehicles
equipped with a manual
transmission, shift the transfer case
to the AWD or 4LOCK position, and
then back into the 4LO position.
2) Range fork damaged, inserts
worn, or fork is binding on the shift
rail.2) Repair or replace components as
necessary.
3) Low range gear worn or
damaged.3) Repair or replace components as
necessary.
Lubricant leaking from transfer case
seals or vent.1) Transfer case overfilled. 1) Drain lubricant to the correct
level.
2) Transfer case vent closed or
restricted.2) Clean or replace vent as
necessary.
3) Transfer case seals damaged or
installed incorrectly.3) Replace suspect seal.
Transfer case will not shift through
4LOCK (Part-time) range.1) Incomplete shift due to drivetrain
torque load.1)Driveinastraightlineand
momentarily release the accelerator
pedal to complete the shift.
2) Incorrect tire pressure. 2) Correct tire pressure as
necessary.
3) Excessive tire wear. 3) Correct tire condition as
necessary.
4) Excessive vehicle loading. 4) Correct as necessary.
Page 4237 of 5267
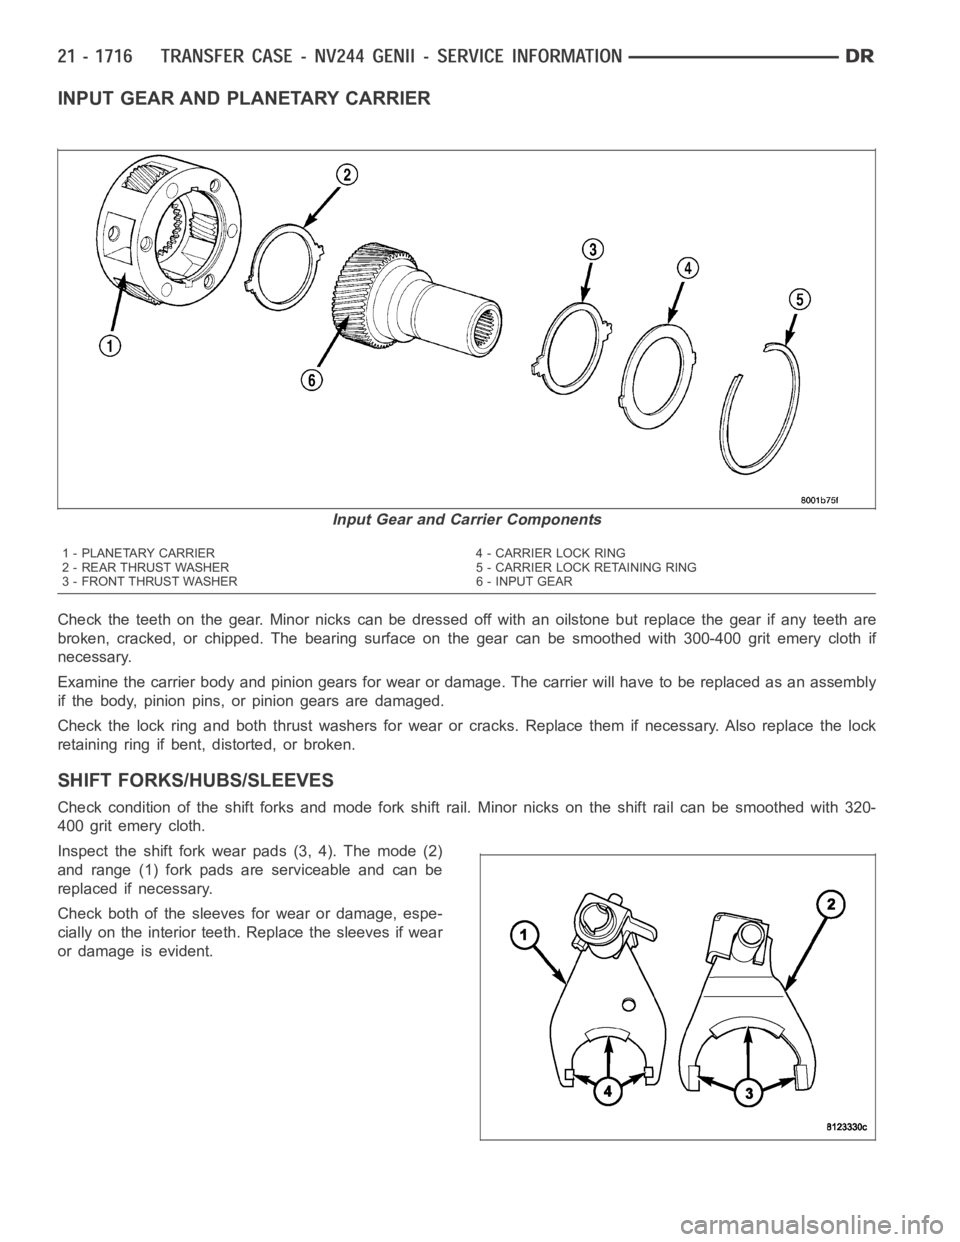
INPUT GEAR AND PLANETARY CARRIER
Check the teeth on the gear. Minor nicks can be dressed off with an oilstone but replace the gear if any teeth are
broken, cracked, or chipped. The bearing surface on the gear can be smoothed with 300-400 grit emery cloth if
necessary.
Examine the carrier body and pinion gears for wear or damage. The carrier will have to be replaced as an assembly
if the body, pinion pins, or pinion gears are damaged.
Check the lock ring and both thrust washers for wear or cracks. Replace themif necessary. Also replace the lock
retaining ring if bent, distorted, or broken.
SHIFT FORKS/HUBS/SLEEVES
Check condition of the shift forks and mode fork shift rail. Minor nicks on the shift rail can be smoothed with 320-
400 grit emery cloth.
Inspect the shift fork wear pads (3, 4). The mode (2)
and range (1) fork pads are serviceable and can be
replaced if necessary.
Check both of the sleeves for wear or damage, espe-
cially on the interior teeth. Replace the sleeves if wear
or damage is evident.
Input Gear and Carrier Components
1 - PLANETARY CARRIER 4 - CARRIER LOCK RING
2 - REAR THRUST WASHER 5 - CARRIER LOCK RETAINING RING
3 - FRONT THRUST WASHER 6 - INPUT GEAR
Page 4250 of 5267
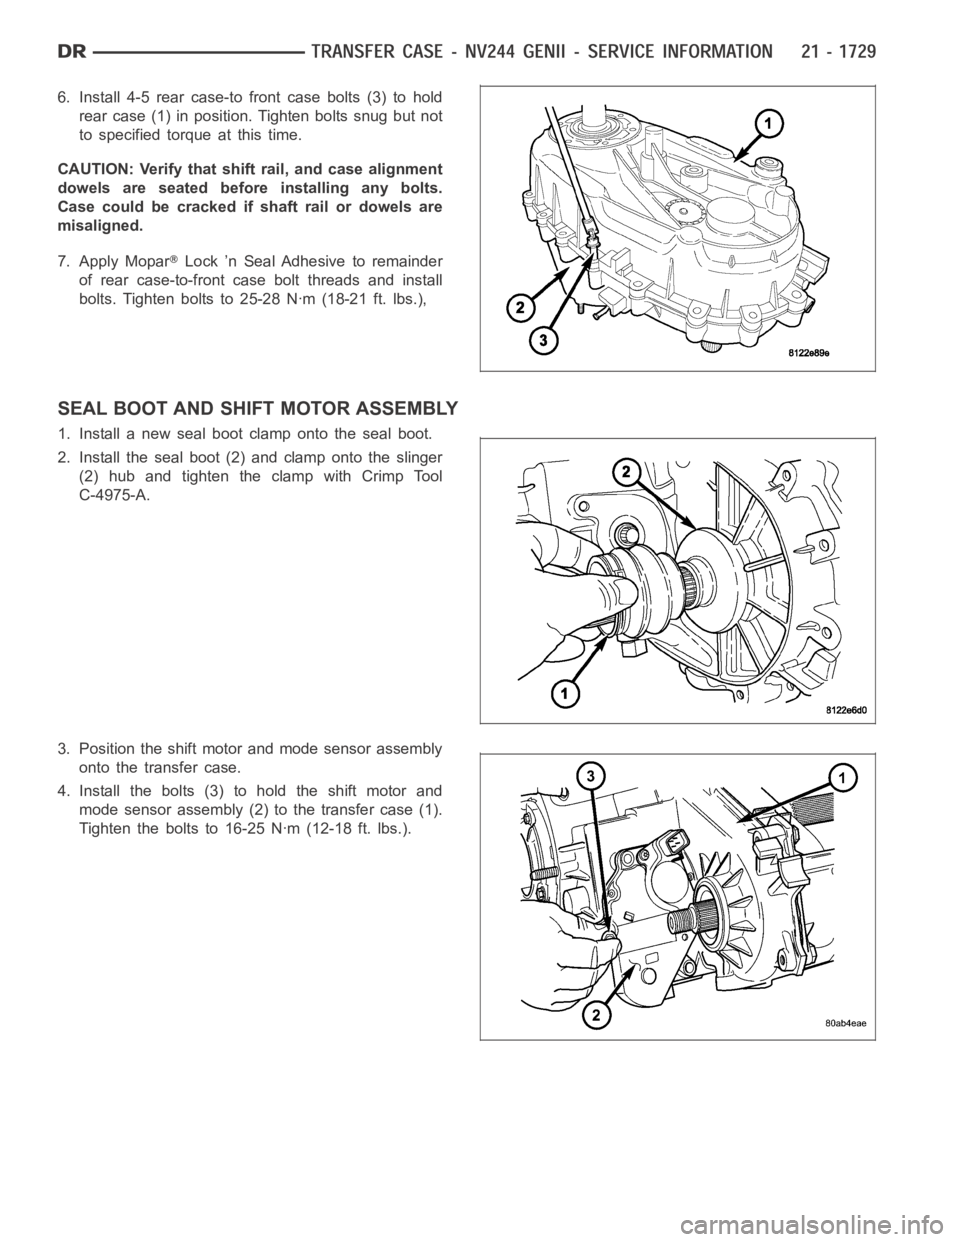
6. Install 4-5 rear case-to front case bolts (3) to hold
rear case (1) in position. Tighten bolts snug but not
to specified torque at this time.
CAUTION: Verify that shift rail, and case alignment
dowels are seated before installing any bolts.
Case could be cracked if shaft rail or dowels are
misaligned.
7. Apply Mopar
Lock ’n Seal Adhesive to remainder
of rear case-to-front case bolt threads and install
bolts. Tighten bolts to 25-28 Nꞏm (18-21 ft. lbs.),
SEAL BOOT AND SHIFT MOTOR ASSEMBLY
1. Install a new seal boot clamp onto the seal boot.
2. Install the seal boot (2) and clamp onto the slinger
(2) hub and tighten the clamp with Crimp Tool
C-4975-A.
3. Position the shift motor and mode sensor assembly
onto the transfer case.
4. Install the bolts (3) to hold the shift motor and
mode sensor assembly (2) to the transfer case (1).
Tighten the bolts to 16-25 Nꞏm (12-18 ft. lbs.).
Page 4262 of 5267
MOTOR-SHIFT
DESCRIPTION
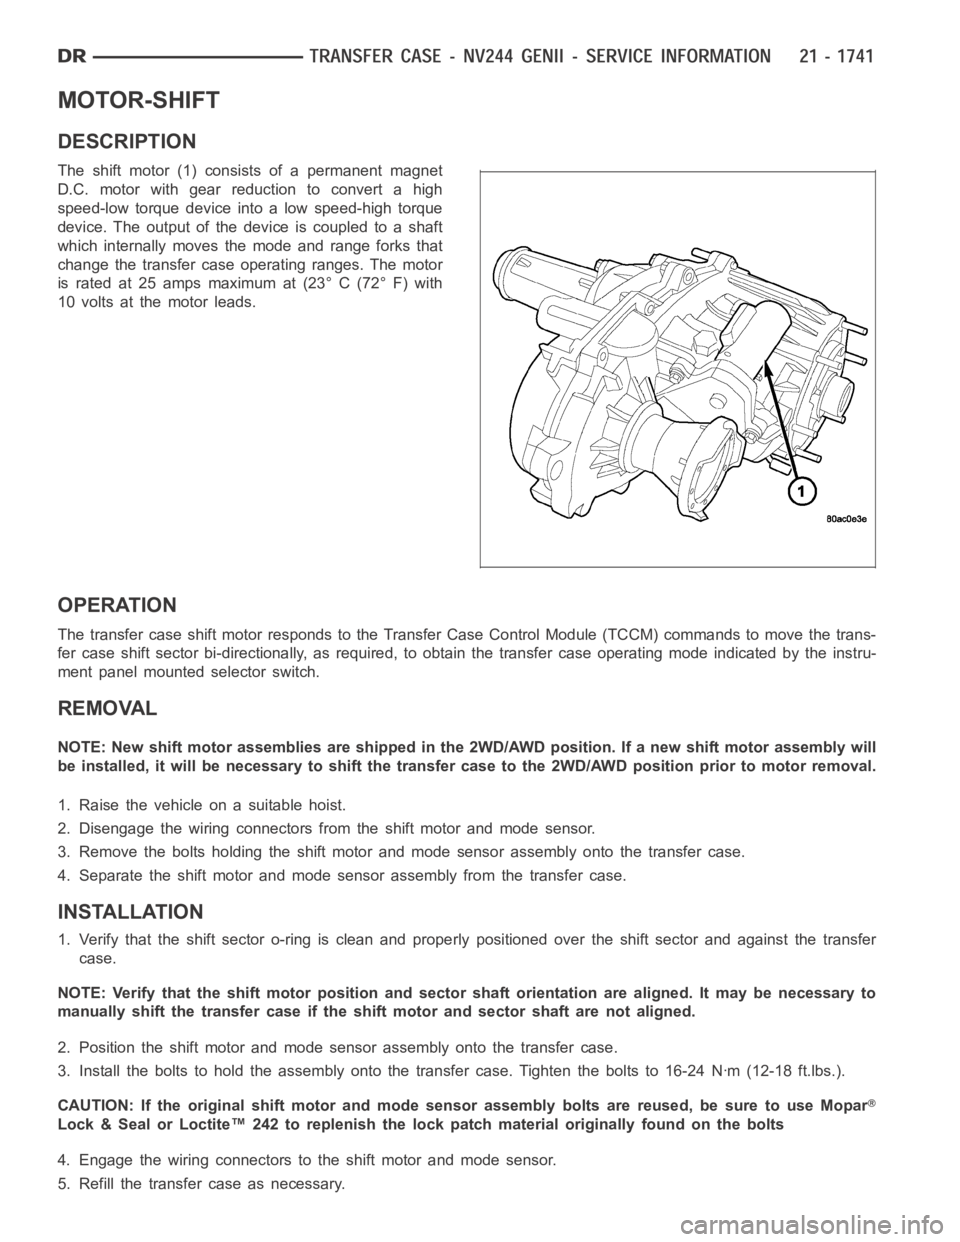
The shift motor (1) consists of a permanent magnet
D.C. motor with gear reduction to convert a high
speed-low torque device into a low speed-high torque
device. The output of the device is coupled to a shaft
which internally moves the mode and range forks that
change the transfer case operating ranges. The motor
is rated at 25 amps maximum at (23° C (72° F) with
10 volts at the motor leads.
OPERATION
The transfer case shift motor responds to the Transfer Case Control Module(TCCM) commands to move the trans-
fer case shift sector bi-directionally, as required, to obtain the transfer case operating mode indicated by the instru-
ment panel mounted selector switch.
REMOVAL
NOTE: New shift motor assemblies are shipped in the 2WD/AWD position. If a new shift motor assembly will
be installed, it will be necessary to shift the transfer case to the 2WD/AWDposition prior to motor removal.
1. Raise the vehicle on a suitable hoist.
2. Disengage the wiring connectors from the shift motor and mode sensor.
3. Remove the bolts holding the shift motor and mode sensor assembly onto the transfer case.
4. Separate the shift motor and mode sensor assembly from the transfer case.
INSTALLATION
1. Verify that the shift sector o-ring is clean and properly positioned over the shift sector and against the transfer
case.
NOTE: Verify that the shift motor position and sector shaft orientation are aligned. It may be necessary to
manually shift the transfer case if the shift motor and sector shaft are notaligned.
2. Position the shift motor and mode sensor assembly onto the transfer case.
3. Install the bolts to hold the assembly onto the transfer case. Tighten the bolts to 16-24 Nꞏm (12-18 ft.lbs.).
CAUTION: If the original shift motor and mode sensor assembly bolts are reused, be sure to use Mopar
Lock & Seal or Loctite™ 242 to replenish the lock patch material originallyfound on the bolts
4. Engage the wiring connectors to the shift motor and mode sensor.
5. Refill the transfer case as necessary.
Page 4282 of 5267
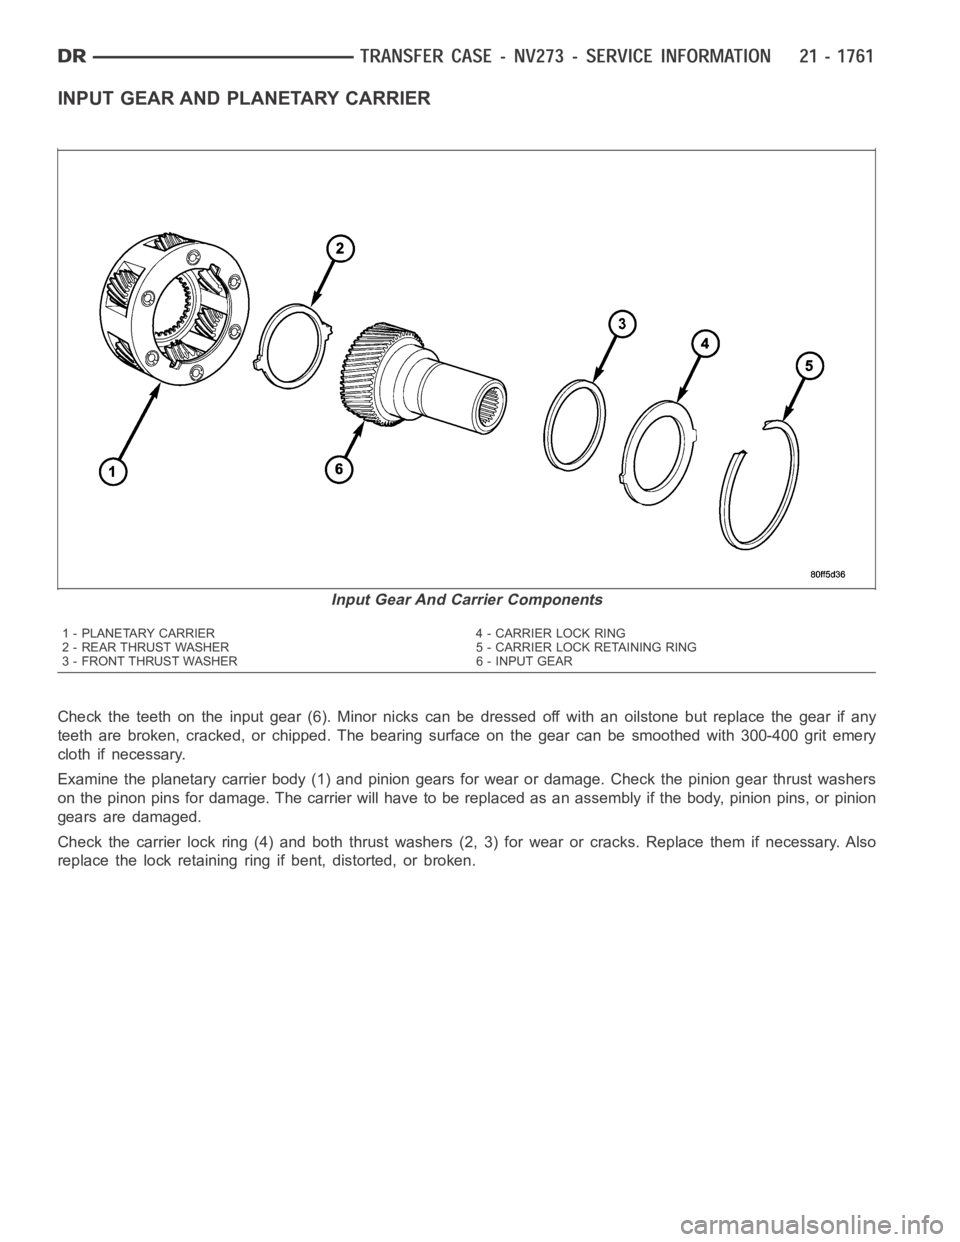
INPUT GEAR AND PLANETARY CARRIER
Check the teeth on the input gear (6). Minor nicks can be dressed off with an oilstone but replace the gear if any
teeth are broken, cracked, or chipped. The bearing surface on the gear can besmoothedwith300-400gritemery
cloth if necessary.
Examine the planetary carrier body (1) and pinion gears for wear or damage.Check the pinion gear thrust washers
on the pinon pins for damage. The carrier will have to be replaced as an assembly if the body, pinion pins, or pinion
gears are damaged.
Check the carrier lock ring (4) and both thrust washers (2, 3) for wear or cracks. Replace them if necessary. Also
replace the lock retaining ring if bent, distorted, or broken.
Input Gear And Carrier Components
1 - PLANETARY CARRIER 4 - CARRIER LOCK RING
2 - REAR THRUST WASHER 5 - CARRIER LOCK RETAINING RING
3 - FRONT THRUST WASHER 6 - INPUT GEAR