Page 2638 of 3171
STEERING COLUMN
PS-11
C
D
E
F
H
I
J
K
L
MA
B
PS
STEERING COLUMNPFP:48810
Removal and InstallationEGS001LI
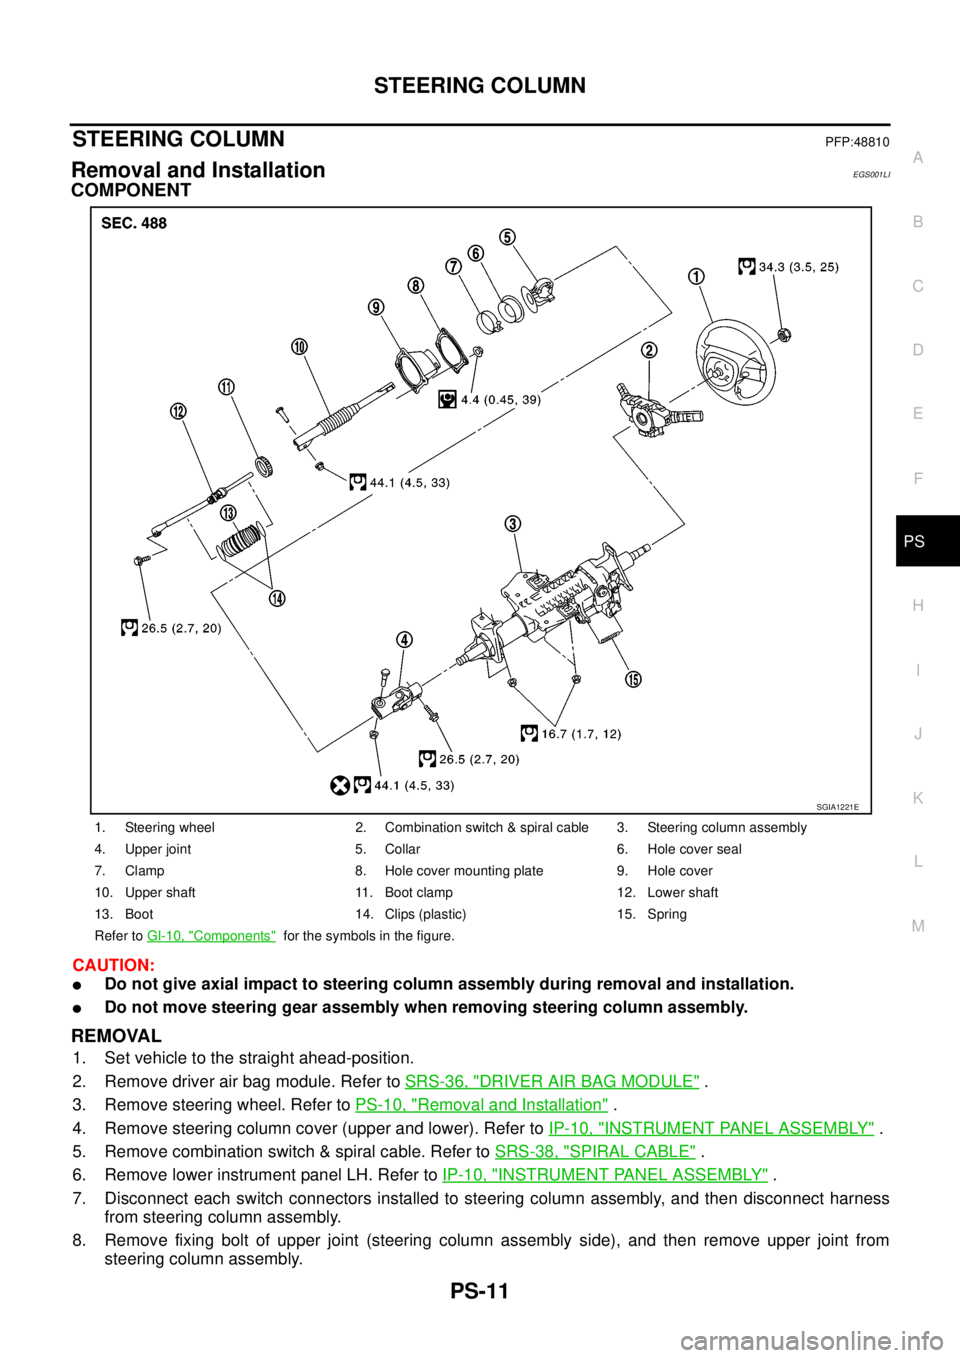
COMPONENT
CAUTION:
lDo not give axial impact to steering column assembly during removal and installation.
lDo not move steering gear assembly when removing steering column assembly.
REMOVAL
1. Set vehicle to the straight ahead-position.
2. Remove driver air bag module. Refer toSRS-36, "
DRIVER AIR BAG MODULE".
3. Remove steering wheel. Refer toPS-10, "
Removal and Installation".
4. Remove steering column cover (upper and lower). Refer toIP-10, "
INSTRUMENT PANEL ASSEMBLY".
5. Remove combination switch & spiral cable. Refer toSRS-38, "
SPIRAL CABLE".
6. Remove lower instrument panel LH. Refer toIP-10, "
INSTRUMENT PANEL ASSEMBLY".
7. Disconnect each switch connectors installed to steering column assembly, and then disconnect harness
from steering column assembly.
8. Remove fixing bolt of upper joint (steering column assembly side), and then remove upper joint from
steering column assembly.
1. Steering wheel 2. Combination switch & spiral cable 3. Steering column assembly
4. Upper joint 5. Collar 6. Hole cover seal
7. Clamp 8. Hole cover mounting plate 9. Hole cover
10. Upper shaft 11. Boot clamp 12. Lower shaft
13. Boot 14. Clips (plastic) 15. Spring
Refer toGI-10, "
Components"for the symbols in the figure.
SGIA1221E
Page 2639 of 3171
PS-12
STEERING COLUMN
9. Remove steering column assembly mounting nuts, and then remove steering column assembly from vehi-
cle.
10. Remove fixing bolt and nut of upper joint (lower side), and then remove upper joint and collar from upper
shaft.
11. Loosen clamp, and then remove hole cover seal from hole cover.
12. Remove mounting nuts of hole cover, and then remove clamp, hole cover mounting plate and hole cover
from dash panel.
13. Raise vehicle.
14. Remove fixing bolt of lower shaft (lower side), and then remove lower shaft and upper shaft from vehicle.
INSPECTION AFTER REMOVAL
lCheck component parts for damage or other malfunctions. Replace if there are.
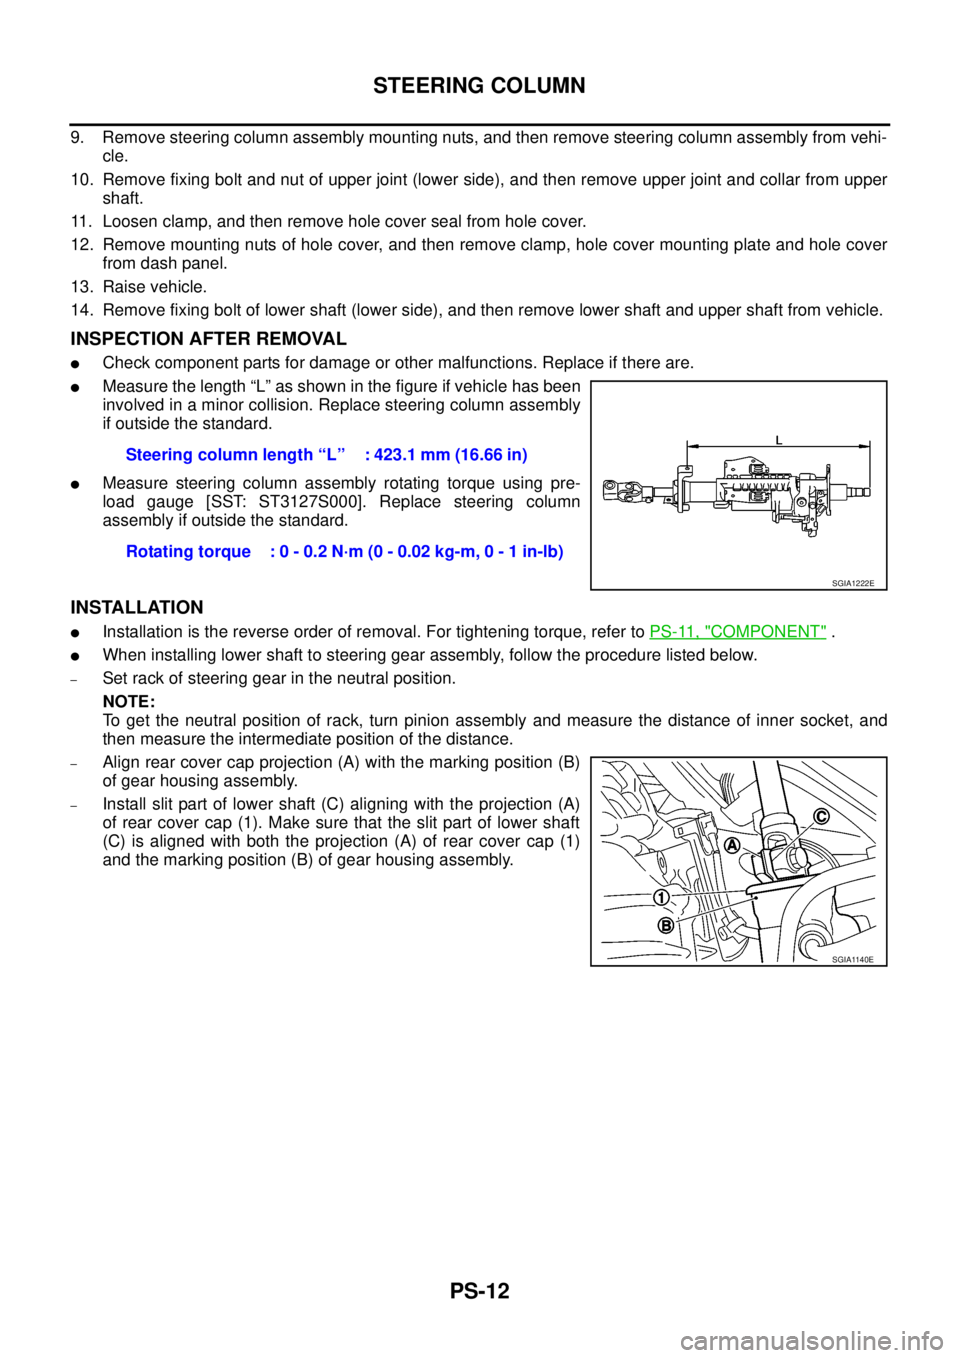
lMeasure the length “L” as shown in the figure if vehicle has been
involved in a minor collision. Replace steering column assembly
if outside the standard.
lMeasure steering column assembly rotating torque using pre-
load gauge [SST: ST3127S000]. Replace steering column
assembly if outside the standard.
INSTALLATION
lInstallation is the reverse order of removal. For tightening torque, refer toPS-11, "COMPONENT".
lWhen installing lower shaft to steering gear assembly, follow the procedure listed below.
–Set rack of steering gear in the neutral position.
NOTE:
To get the neutral position of rack, turn pinion assembly and measure the distance of inner socket, and
then measure the intermediate position of the distance.
–Align rear cover cap projection (A) with the marking position (B)
of gear housing assembly.
–Install slit part of lower shaft (C) aligning with the projection (A)
of rear cover cap (1). Make sure that the slit part of lower shaft
(C) is aligned with both the projection (A) of rear cover cap (1)
and the marking position (B) of gear housing assembly.Steering column length “L” : 423.1 mm (16.66 in)
Rotating torque : 0 - 0.2 N·m (0 - 0.02 kg-m, 0 - 1 in-lb)
SGIA1222E
SGIA1140E
Page 2640 of 3171
STEERING COLUMN
PS-13
C
D
E
F
H
I
J
K
L
MA
B
PS
INSPECTION AFTER INSTALLATION
lCheck tilt mechanism operating range “A” as shown in the fig-
ure.
lMake sure that steering wheel operates smoothly by turning
several times from full left stop to full right stop.Operatingrange“A” :73.8mm(2.906in)
WGIA0083E
Page 2641 of 3171
PS-14
POWER STEERING GEAR AND LINKAGE
POWER STEERING GEAR AND LINKAGE
PFP:49001
Removal and InstallationEGS001LJ
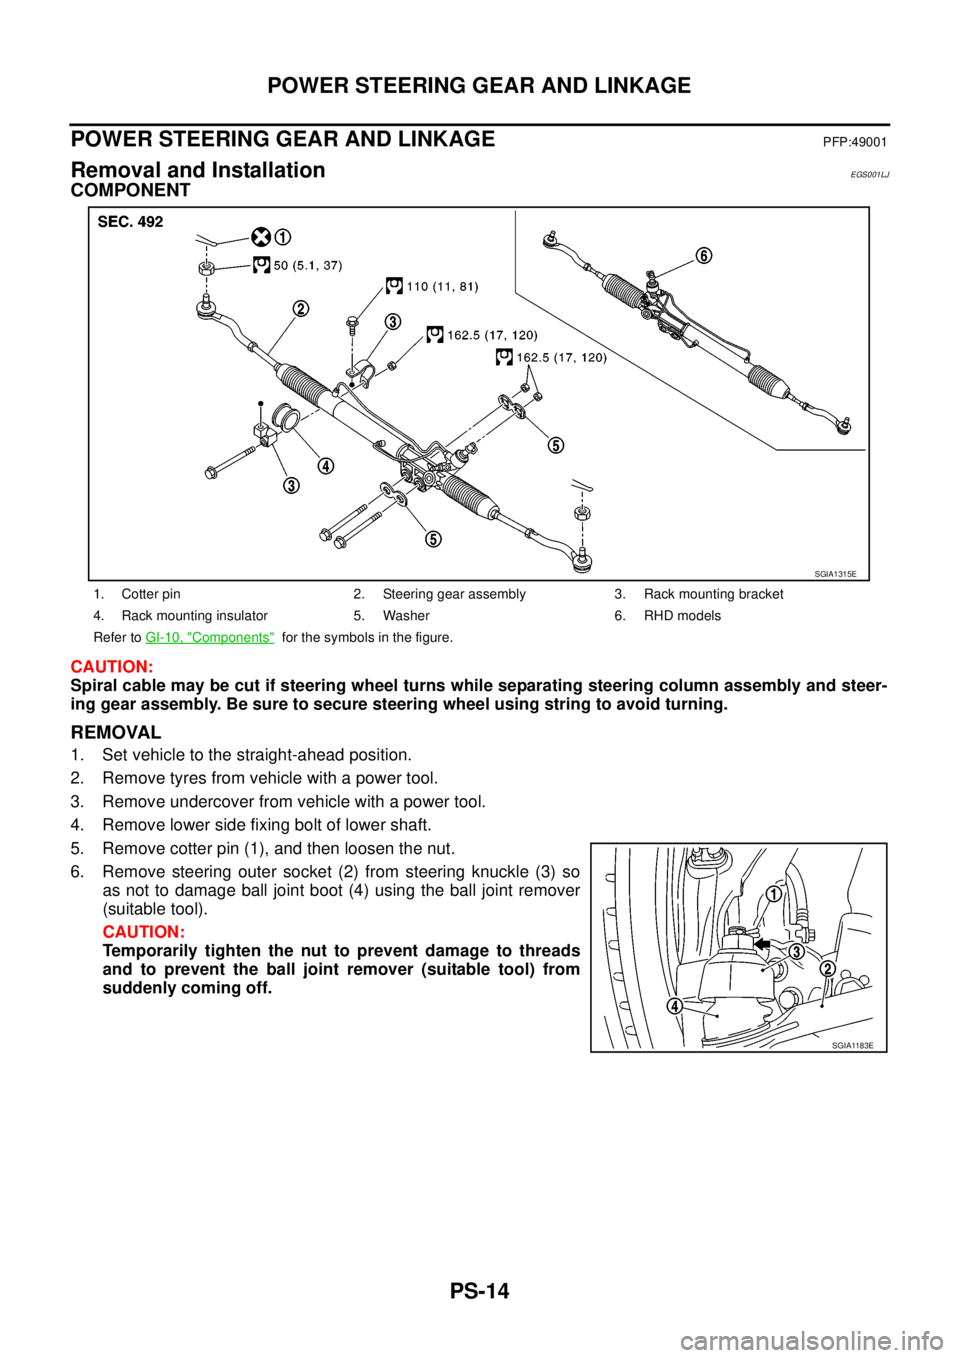
COMPONENT
CAUTION:
Spiral cable may be cut if steering wheel turns while separating steering column assembly and steer-
ing gear assembly. Be sure to secure steering wheel using string to avoid turning.
REMOVAL
1. Set vehicle to the straight-ahead position.
2. Remove tyres from vehicle with a power tool.
3. Remove undercover from vehicle with a power tool.
4. Remove lower side fixing bolt of lower shaft.
5. Remove cotter pin (1), and then loosen the nut.
6. Remove steering outer socket (2) from steering knuckle (3) so
as not to damage ball joint boot (4) using the ball joint remover
(suitable tool).
CAUTION:
Temporarily tighten the nut to prevent damage to threads
and to prevent the ball joint remover (suitable tool) from
suddenly coming off.
1. Cotter pin 2. Steering gear assembly 3. Rack mounting bracket
4. Rack mounting insulator 5. Washer 6. RHD models
Refer toGI-10, "
Components"for the symbols in the figure.
SGIA1315E
SGIA1183E
Page 2642 of 3171
POWER STEERING GEAR AND LINKAGE
PS-15
C
D
E
F
H
I
J
K
L
MA
B
PS
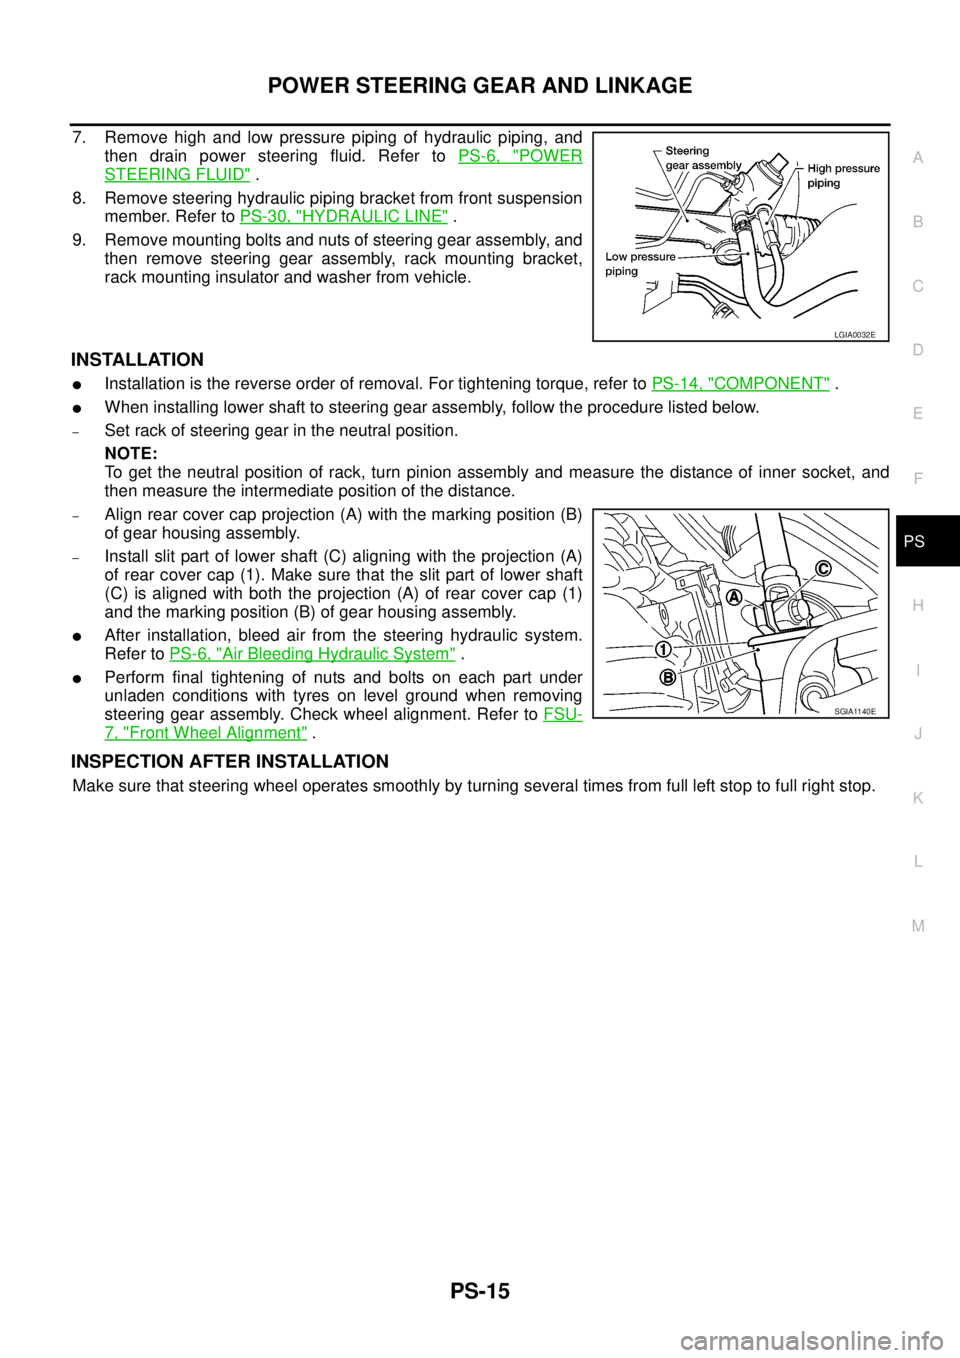
7. Remove high and low pressure piping of hydraulic piping, and
then drain power steering fluid. Refer toPS-6, "
POWER
STEERING FLUID".
8. Remove steering hydraulic piping bracket from front suspension
member. Refer toPS-30, "
HYDRAULIC LINE".
9. Remove mounting bolts and nuts of steering gear assembly, and
then remove steering gear assembly, rack mounting bracket,
rack mounting insulator and washer from vehicle.
INSTALLATION
lInstallation is the reverse order of removal. For tightening torque, refer toPS-14, "COMPONENT".
lWhen installing lower shaft to steering gear assembly, follow the procedure listed below.
–Set rack of steering gear in the neutral position.
NOTE:
To get the neutral position of rack, turn pinion assembly and measure the distance of inner socket, and
then measure the intermediate position of the distance.
–Align rear cover cap projection (A) with the marking position (B)
of gear housing assembly.
–Install slit part of lower shaft (C) aligning with the projection (A)
of rear cover cap (1). Make sure that the slit part of lower shaft
(C) is aligned with both the projection (A) of rear cover cap (1)
and the marking position (B) of gear housing assembly.
lAfter installation, bleed air from the steering hydraulic system.
Refer toPS-6, "
Air Bleeding Hydraulic System".
lPerform final tightening of nuts and bolts on each part under
unladen conditions with tyres on level ground when removing
steering gear assembly. Check wheel alignment. Refer toFSU-
7, "Front Wheel Alignment".
INSPECTION AFTER INSTALLATION
Make sure that steering wheel operates smoothly by turning several times from full left stop to full right stop.
LGIA0032E
SGIA1140E
Page 2643 of 3171
PS-16
POWER STEERING GEAR AND LINKAGE
Disassembly and Assembly
EGS001LK
COMPONENT
CAUTION:
lDisassemble and assemble steering gear assembly by securing the mounting area in a vise using
copper plates.
lClean steering gear assembly with kerosene before disassembling. Be careful to avoid splashing
or applying any kerosene over connector of discharge port or return port.
1. Outer socket 2. Boot clamp 3. Boot
4. Inner socket 5. Boot clamp 6. Gear housing assembly
7. Cylinder tubes 8. Rear cover cap 9. Rear cover
10. O-ring A 11. Pinion assembly 12. Rack oil seal
13. Rack assembly 14. Rack Teflon ring 15. O-ring B
16. End cover assembly
Refer toGI-10, "
Components"and the followings for the symbols in the figure.
:
Apply Type DEXRON
TMIII or equivalent.
:A p p l y G e n u i n e T h r e a d L o c k i n g S e a l a n t , T h r e e B o u n d T B 1111 o r e q u i v a l e n t .
:Apply multi-purpose grease.
SGIA1349E
Page 2644 of 3171
POWER STEERING GEAR AND LINKAGE
PS-17
C
D
E
F
H
I
J
K
L
MA
B
PS
DISASSEMBLY
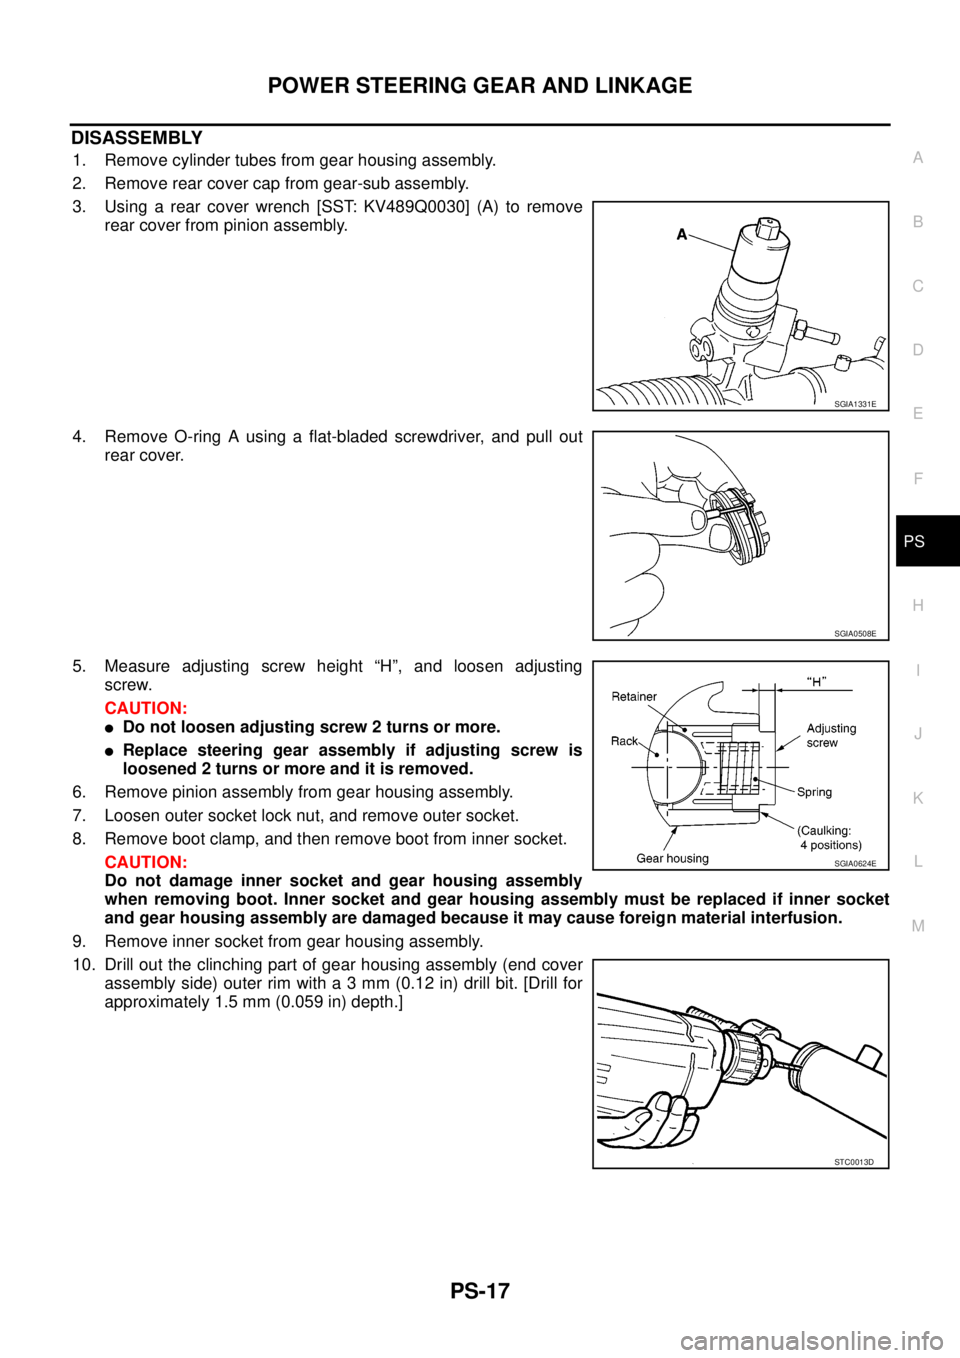
1. Remove cylinder tubes from gear housing assembly.
2. Remove rear cover cap from gear-sub assembly.
3. Using a rear cover wrench [SST: KV489Q0030] (A) to remove
rear cover from pinion assembly.
4. Remove O-ring A using a flat-bladed screwdriver, and pull out
rear cover.
5. Measure adjusting screw height “H”, and loosen adjusting
screw.
CAUTION:
lDo not loosen adjusting screw 2 turns or more.
lReplace steering gear assembly if adjusting screw is
loosened 2 turns or more and it is removed.
6. Remove pinion assembly from gear housing assembly.
7. Loosen outer socket lock nut, and remove outer socket.
8. Remove boot clamp, and then remove boot from inner socket.
CAUTION:
Do not damage inner socket and gear housing assembly
when removing boot. Inner socket and gear housing assembly must be replaced if inner socket
and gear housing assembly are damaged because it may cause foreign material interfusion.
9. Remove inner socket from gear housing assembly.
10. Drill out the clinching part of gear housing assembly (end cover
assemblyside)outerrimwitha3mm(0.12in)drillbit.[Drillfor
approximately 1.5 mm (0.059 in) depth.]
SGIA1331E
SGIA0508E
SGIA0624E
STC0013D
Page 2645 of 3171
PS-18
POWER STEERING GEAR AND LINKAGE
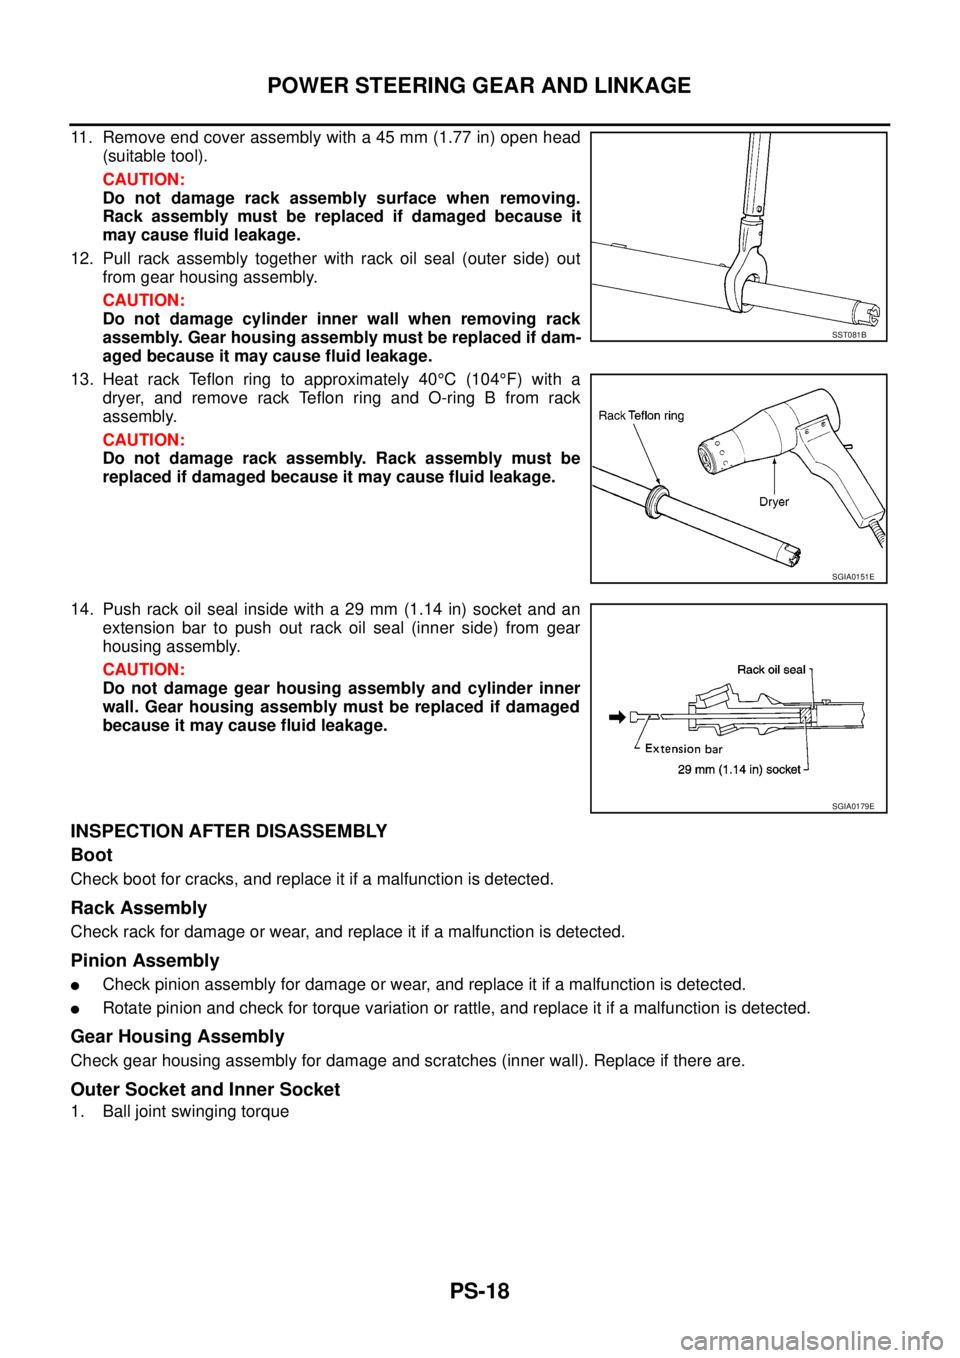
11. Remove end cover assembly with a 45 mm (1.77 in) open head
(suitable tool).
CAUTION:
Do not damage rack assembly surface when removing.
Rack assembly must be replaced if damaged because it
may cause fluid leakage.
12. Pull rack assembly together with rack oil seal (outer side) out
from gear housing assembly.
CAUTION:
Do not damage cylinder inner wall when removing rack
assembly. Gear housing assembly must be replaced if dam-
aged because it may cause fluid leakage.
13. Heat rack Teflon ring to approximately 40°C(104°F) with a
dryer, and remove rack Teflon ring and O-ring B from rack
assembly.
CAUTION:
Do not damage rack assembly. Rack assembly must be
replaced if damaged because it may cause fluid leakage.
14. Push rack oil seal inside with a 29 mm (1.14 in) socket and an
extension bar to push out rack oil seal (inner side) from gear
housing assembly.
CAUTION:
Do not damage gear housing assembly and cylinder inner
wall. Gear housing assembly must be replaced if damaged
because it may cause fluid leakage.
INSPECTION AFTER DISASSEMBLY
Boot
Check boot for cracks, and replace it if a malfunction is detected.
Rack Assembly
Check rack for damage or wear, and replace it if a malfunction is detected.
Pinion Assembly
lCheck pinion assembly for damage or wear, and replace it if a malfunction is detected.
lRotate pinion and check for torque variation or rattle, and replace it if a malfunction is detected.
Gear Housing Assembly
Check gear housing assembly for damage and scratches (inner wall). Replace if there are.
Outer Socket and Inner Socket
1. Ball joint swinging torque
SST081B
SGIA0151E
SGIA0179E