Page 2646 of 3171
POWER STEERING GEAR AND LINKAGE
PS-19
C
D
E
F
H
I
J
K
L
MA
B
PS
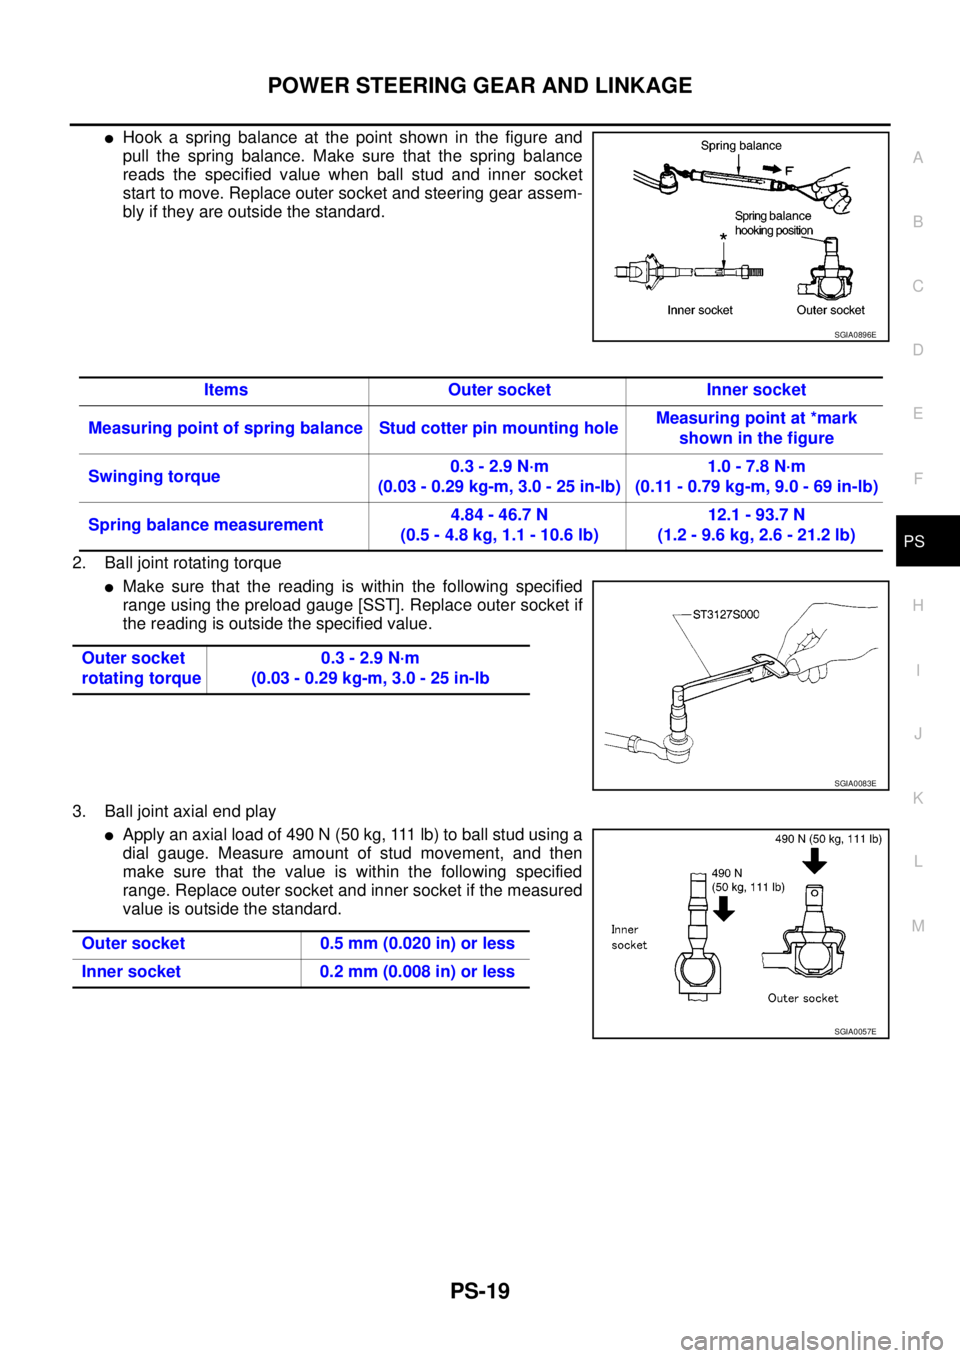
lHook a spring balance at the point shown in the figure and
pull the spring balance. Make sure that the spring balance
reads the specified value when ball stud and inner socket
start to move. Replace outer socket and steering gear assem-
bly if they are outside the standard.
2. Ball joint rotating torque
lMake sure that the reading is within the following specified
range using the preload gauge [SST]. Replace outer socket if
the reading is outside the specified value.
3. Ball joint axial end play
lApply an axial load of 490 N (50 kg, 111 lb) to ball stud using a
dial gauge. Measure amount of stud movement, and then
make sure that the value is within the following specified
range. Replace outer socket and inner socket if the measured
value is outside the standard.
SGIA0896E
Items Outer socket Inner socket
Measuring point of spring balance Stud cotter pin mounting holeMeasuring point at *mark
shown in the figure
Swinging torque0.3 - 2.9 N·m
(0.03 - 0.29 kg-m, 3.0 - 25 in-lb)1.0-7.8N·m
(0.11 - 0.79 kg-m, 9.0 - 69 in-lb)
Spring balance measurement4.84 - 46.7 N
(0.5 - 4.8 kg, 1.1 - 10.6 lb)12.1 - 93.7 N
(1.2 - 9.6 kg, 2.6 - 21.2 lb)
Outer socket
rotating torque0.3 - 2.9 N·m
(0.03 - 0.29 kg-m, 3.0 - 25 in-lb
SGIA0083E
Outer socket 0.5 mm (0.020 in) or less
Inner socket 0.2 mm (0.008 in) or less
SGIA0057E
Page 2647 of 3171
PS-20
POWER STEERING GEAR AND LINKAGE
ASSEMBLY
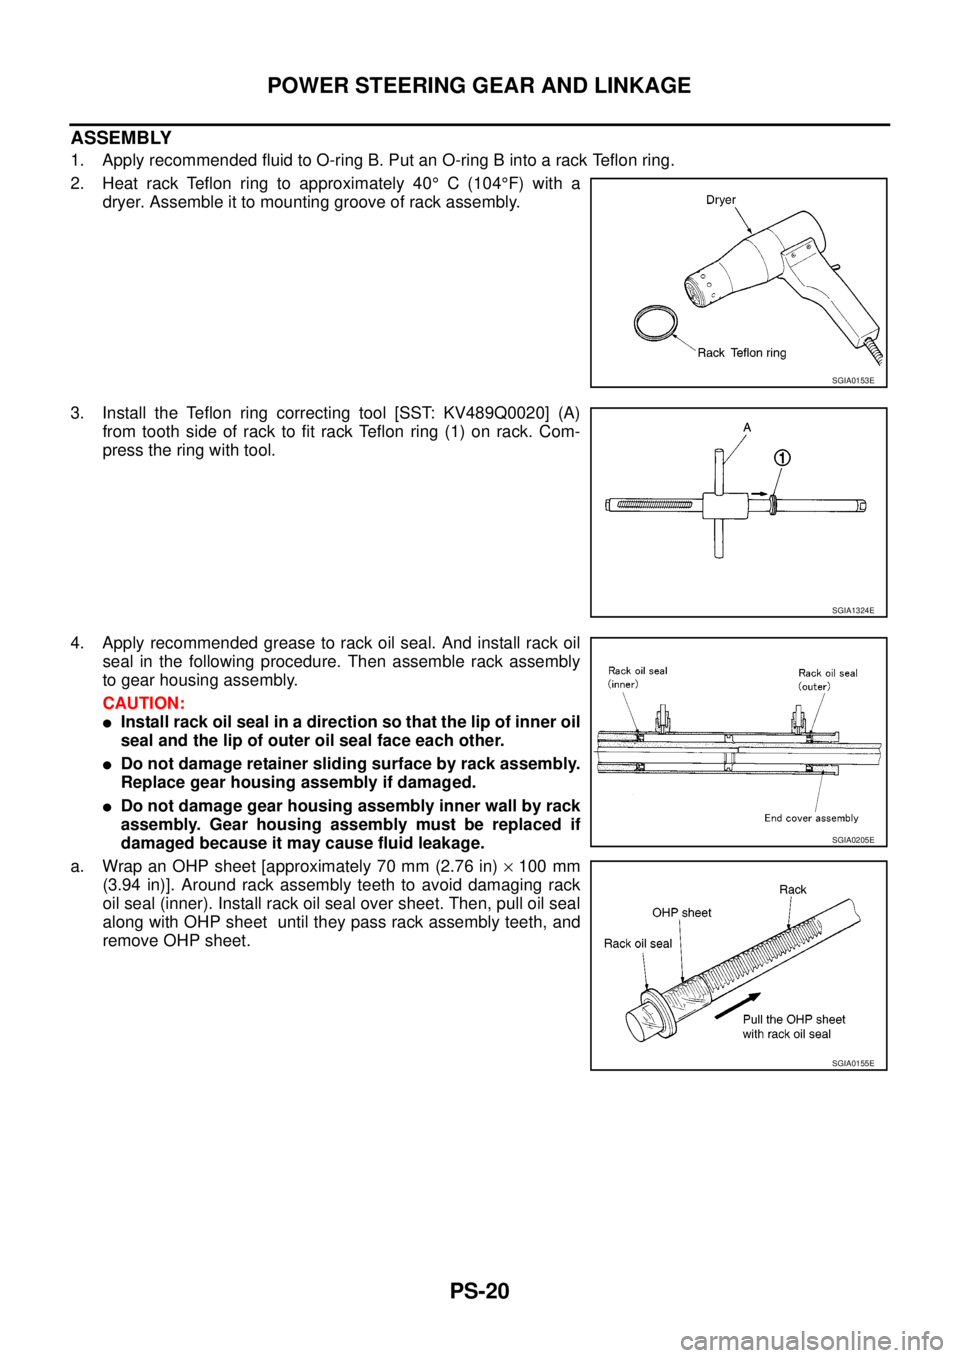
1. Apply recommended fluid to O-ring B. Put an O-ring B into a rack Teflon ring.
2. Heat rack Teflon ring to approximately 40°C(104°F) with a
dryer. Assemble it to mounting groove of rack assembly.
3. Install the Teflon ring correcting tool [SST: KV489Q0020] (A)
from tooth side of rack to fit rack Teflon ring (1) on rack. Com-
press the ring with tool.
4. Apply recommended grease to rack oil seal. And install rack oil
seal in the following procedure. Then assemble rack assembly
to gear housing assembly.
CAUTION:
lInstall rack oil seal in a direction so that the lip of inner oil
seal and the lip of outer oil seal face each other.
lDo not damage retainer sliding surface by rack assembly.
Replace gear housing assembly if damaged.
lDo not damage gear housing assembly inner wall by rack
assembly. Gear housing assembly must be replaced if
damaged because it may cause fluid leakage.
a. Wrap an OHP sheet [approximately 70 mm (2.76 in)´100 mm
(3.94 in)]. Around rack assembly teeth to avoid damaging rack
oil seal (inner). Install rack oil seal over sheet. Then, pull oil seal
along with OHP sheet until they pass rack assembly teeth, and
remove OHP sheet.
SGIA0153E
SGIA1324E
SGIA0205E
SGIA0155E
Page 2648 of 3171
POWER STEERING GEAR AND LINKAGE
PS-21
C
D
E
F
H
I
J
K
L
MA
B
PS
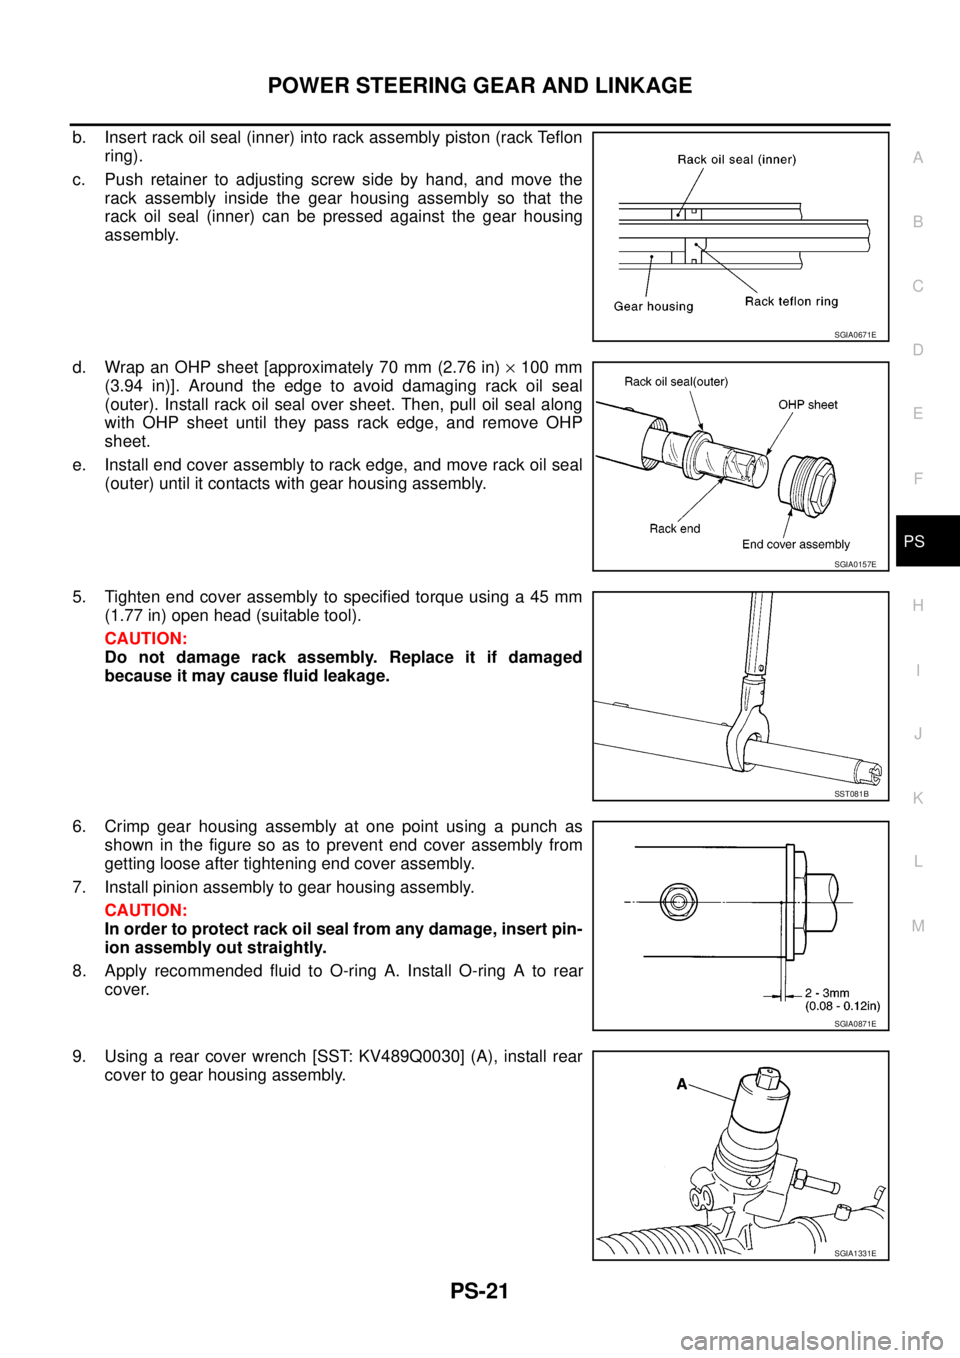
b. Insert rack oil seal (inner) into rack assembly piston (rack Teflon
ring).
c. Push retainer to adjusting screw side by hand, and move the
rack assembly inside the gear housing assembly so that the
rack oil seal (inner) can be pressed against the gear housing
assembly.
d. Wrap an OHP sheet [approximately 70 mm (2.76 in)´100 mm
(3.94 in)]. Around the edge to avoid damaging rack oil seal
(outer). Install rack oil seal over sheet. Then, pull oil seal along
with OHP sheet until they pass rack edge, and remove OHP
sheet.
e. Install end cover assembly to rack edge, and move rack oil seal
(outer) until it contacts with gear housing assembly.
5. Tighten end cover assembly to specified torque using a 45 mm
(1.77 in) open head (suitable tool).
CAUTION:
Do not damage rack assembly. Replace it if damaged
because it may cause fluid leakage.
6. Crimp gear housing assembly at one point using a punch as
shown in the figure so as to prevent end cover assembly from
getting loose after tightening end cover assembly.
7. Install pinion assembly to gear housing assembly.
CAUTION:
In order to protect rack oil seal from any damage, insert pin-
ion assembly out straightly.
8. Apply recommended fluid to O-ring A. Install O-ring A to rear
cover.
9. Using a rear cover wrench [SST: KV489Q0030] (A), install rear
cover to gear housing assembly.
SGIA0671E
SGIA0157E
SST081B
SGIA0871E
SGIA1331E
Page 2649 of 3171
PS-22
POWER STEERING GEAR AND LINKAGE
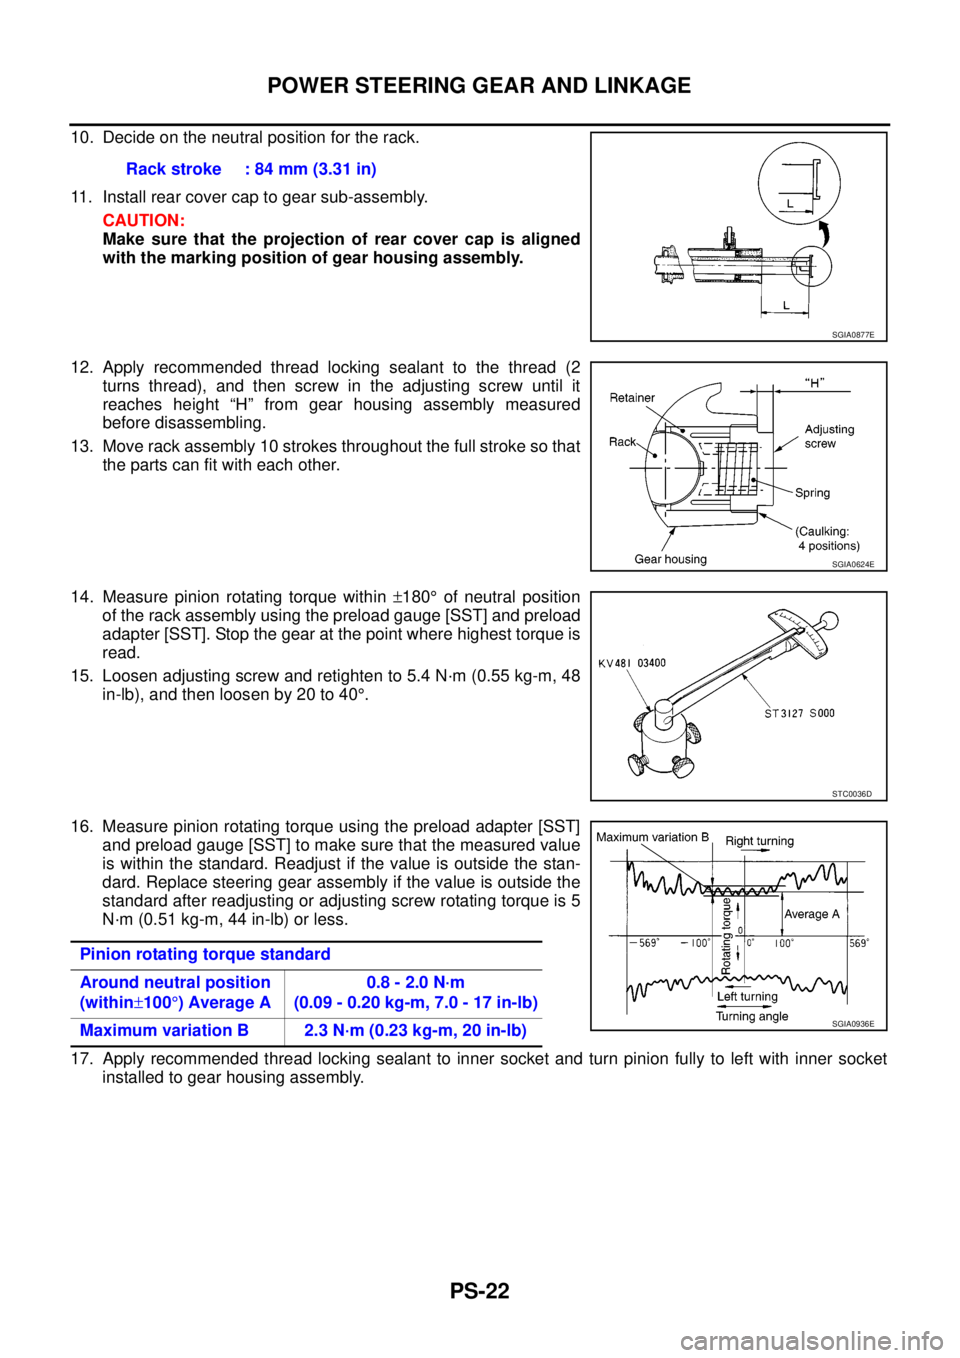
10. Decide on the neutral position for the rack.
11. Install rear cover cap to gear sub-assembly.
CAUTION:
Make sure that the projection of rear cover cap is aligned
with the marking position of gear housing assembly.
12. Apply recommended thread locking sealant to the thread (2
turns thread), and then screw in the adjusting screw until it
reaches height “H” from gear housing assembly measured
before disassembling.
13. Move rack assembly 10 strokes throughout the full stroke so that
the parts can fit with each other.
14. Measure pinion rotating torque within±180°of neutral position
of the rack assembly using the preload gauge [SST] and preload
adapter [SST]. Stop the gear at the point where highest torque is
read.
15. Loosen adjusting screw and retighten to 5.4 N·m (0.55 kg-m, 48
in-lb), and then loosen by 20 to 40°.
16. Measure pinion rotating torque using the preload adapter [SST]
and preload gauge [SST] to make sure that the measured value
is within the standard. Readjust if the value is outside the stan-
dard. Replace steering gear assembly if the value is outside the
standard after readjusting or adjusting screw rotating torque is 5
N·m (0.51 kg-m, 44 in-lb) or less.
17. Apply recommended thread locking sealant to inner socket and turn pinion fully to left with inner socket
installed to gear housing assembly.Rack stroke : 84 mm (3.31 in)
SGIA0877E
SGIA0624E
STC0036D
Pinion rotating torque standard
Around neutral position
(within±100°)AverageA0.8 - 2.0 N·m
(0.09 - 0.20 kg-m, 7.0 - 17 in-lb)
Maximum variation B 2.3 N·m (0.23 kg-m, 20 in-lb)
SGIA0936E
Page 2650 of 3171
POWER STEERING GEAR AND LINKAGE
PS-23
C
D
E
F
H
I
J
K
L
MA
B
PS
18. Set dial gauge as shown in the figure. Measure vertical move-
ment of rack assembly when pinion is turned clockwise with
torque of 19.6 N·m (2.0 kg-m, 14 ft-lb). Readjust adjusting screw
angle if the measured value is outside the standard. Replace
steering gear assembly if the measured value is still outside the
standard or adjusting screw rotating torque is 5 N·m (0.51 kg-m,
44 in-lb) or less.
19. Install large end of boot to gear housing assembly.
20. Install small end of boot to inner socket boot mounting groove.
21. Install boot clamps to boots, as shown in the figure.
SGIA1147E
Measuring pointRack axial direction 5 mm (0.20 in) from housing end surface
Rack radial direction Axial direction of the adjusting screw
Vertical movement 0.265 mm (0.0104 in)
SGIA1325E
AST139
Page 2651 of 3171
PS-24
POWER STEERING GEAR AND LINKAGE
22. Crimp the large-diameter boot clamp using suitable tool.
23. Install cylinder tubes to gear housing assembly.
24. Adjust inner socket to standard length “L”, and then tighten lock
nut to the specified torque. Refer toPS-16, "
COMPONENT".
Check length of inner socket “L” again after tightening lock nut.
Make sure that the length is the standard.
CAUTION:
Adjust toe-in after this procedure. Length achieved after
toe-in adjustment is not necessary the above value.
RAC1133D
Inner socket length “L” : 79 mm (3.11 in)
SGIA0167E
Page 2652 of 3171
POWER STEERING OIL PUMP
PS-25
C
D
E
F
H
I
J
K
L
MA
B
PS
POWER STEERING OIL PUMPPFP:49110
On-Vehicle Inspection and ServiceEGS001LL
CHECKING RELIEF OIL PRESSURE
CAUTION:
Make sure that belt tension is normal before starting the following procedure.
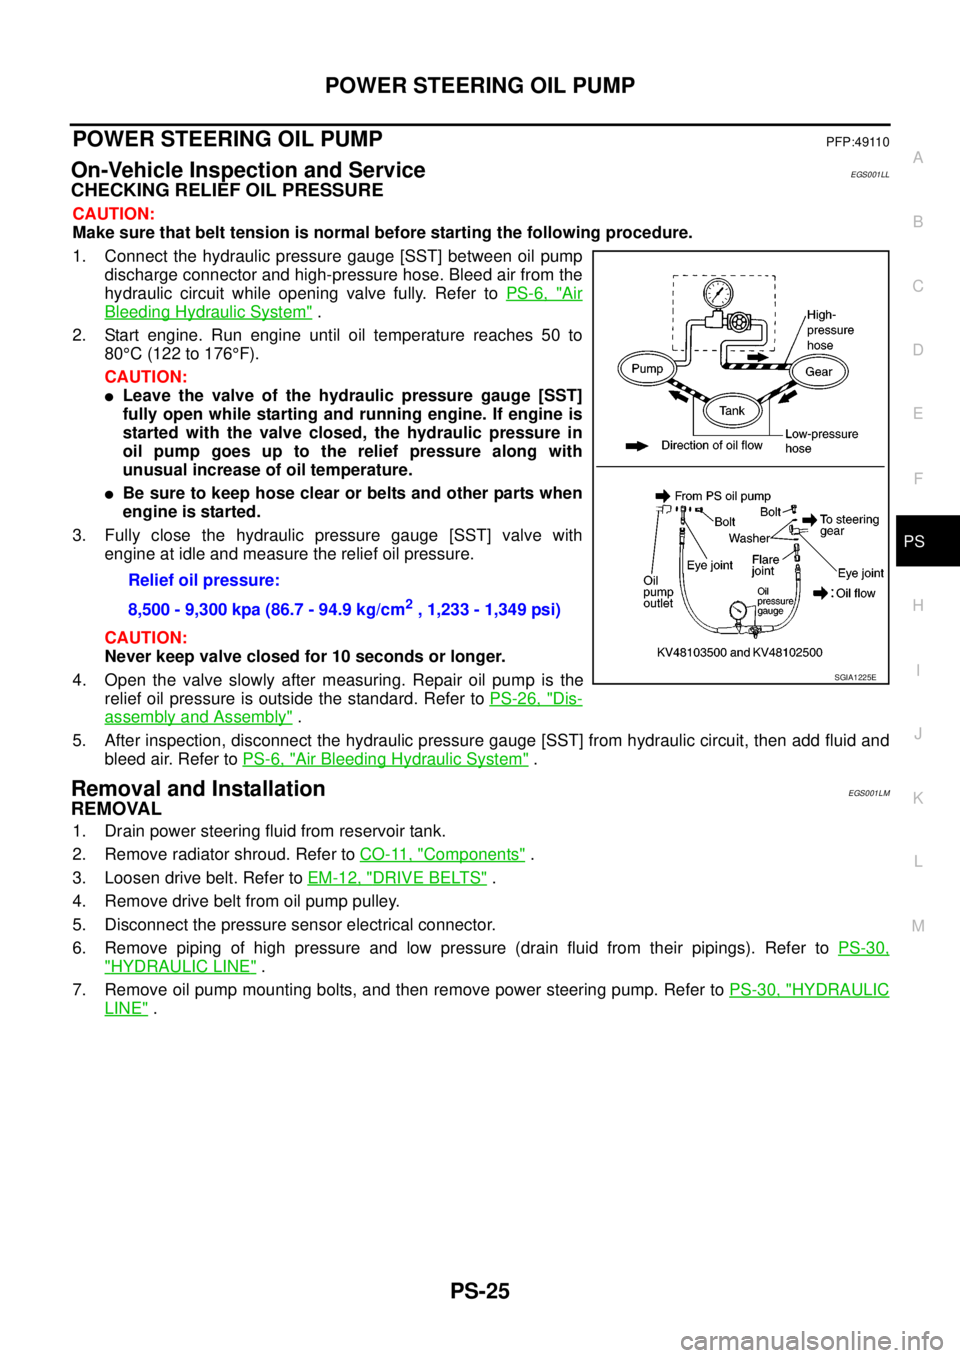
1. Connect the hydraulic pressure gauge [SST] between oil pump
discharge connector and high-pressure hose. Bleed air from the
hydraulic circuit while opening valve fully. Refer toPS-6, "
Air
Bleeding Hydraulic System".
2. Start engine. Run engine until oil temperature reaches 50 to
80°C(122to176°F).
CAUTION:
lLeave the valve of the hydraulic pressure gauge [SST]
fully open while starting and running engine. If engine is
started with the valve closed, the hydraulic pressure in
oil pump goes up to the relief pressure along with
unusual increase of oil temperature.
lBe sure to keep hose clear or belts and other parts when
engineisstarted.
3. Fully close the hydraulic pressure gauge [SST] valve with
engine at idle and measure the relief oil pressure.
CAUTION:
Never keep valve closed for 10 seconds or longer.
4. Open the valve slowly after measuring. Repair oil pump is the
relief oil pressure is outside the standard. Refer toPS-26, "
Dis-
assembly and Assembly".
5. After inspection, disconnect the hydraulic pressure gauge [SST] from hydraulic circuit, then add fluid and
bleed air. Refer toPS-6, "
Air Bleeding Hydraulic System".
Removal and InstallationEGS001LM
REMOVAL
1. Drain power steering fluid from reservoir tank.
2. Remove radiator shroud. Refer toCO-11, "
Components".
3. Loosen drive belt. Refer toEM-12, "
DRIVE BELTS".
4. Remove drive belt from oil pump pulley.
5. Disconnect the pressure sensor electrical connector.
6. Remove piping of high pressure and low pressure (drain fluid from their pipings). Refer toPS-30,
"HYDRAULIC LINE".
7. Remove oil pump mounting bolts, and then remove power steering pump. Refer toPS-30, "
HYDRAULIC
LINE". Relief oil pressure:
8,500 - 9,300 kpa (86.7 - 94.9 kg/cm
2, 1,233 - 1,349 psi)
SGIA1225E
Page 2653 of 3171
PS-26
POWER STEERING OIL PUMP
INSTALLATION
Installation is the reverse order of removal. For tightening torque, refer toPS-30, "HYDRAULIC LINE".
lPerform the following procedure after installing.
–Adjust belt tension. Refer toEM-12, "DRIVE BELTS".
–Bleed air. Refer toPS-6, "Air Bleeding Hydraulic System".
Disassembly and AssemblyEGS001LN
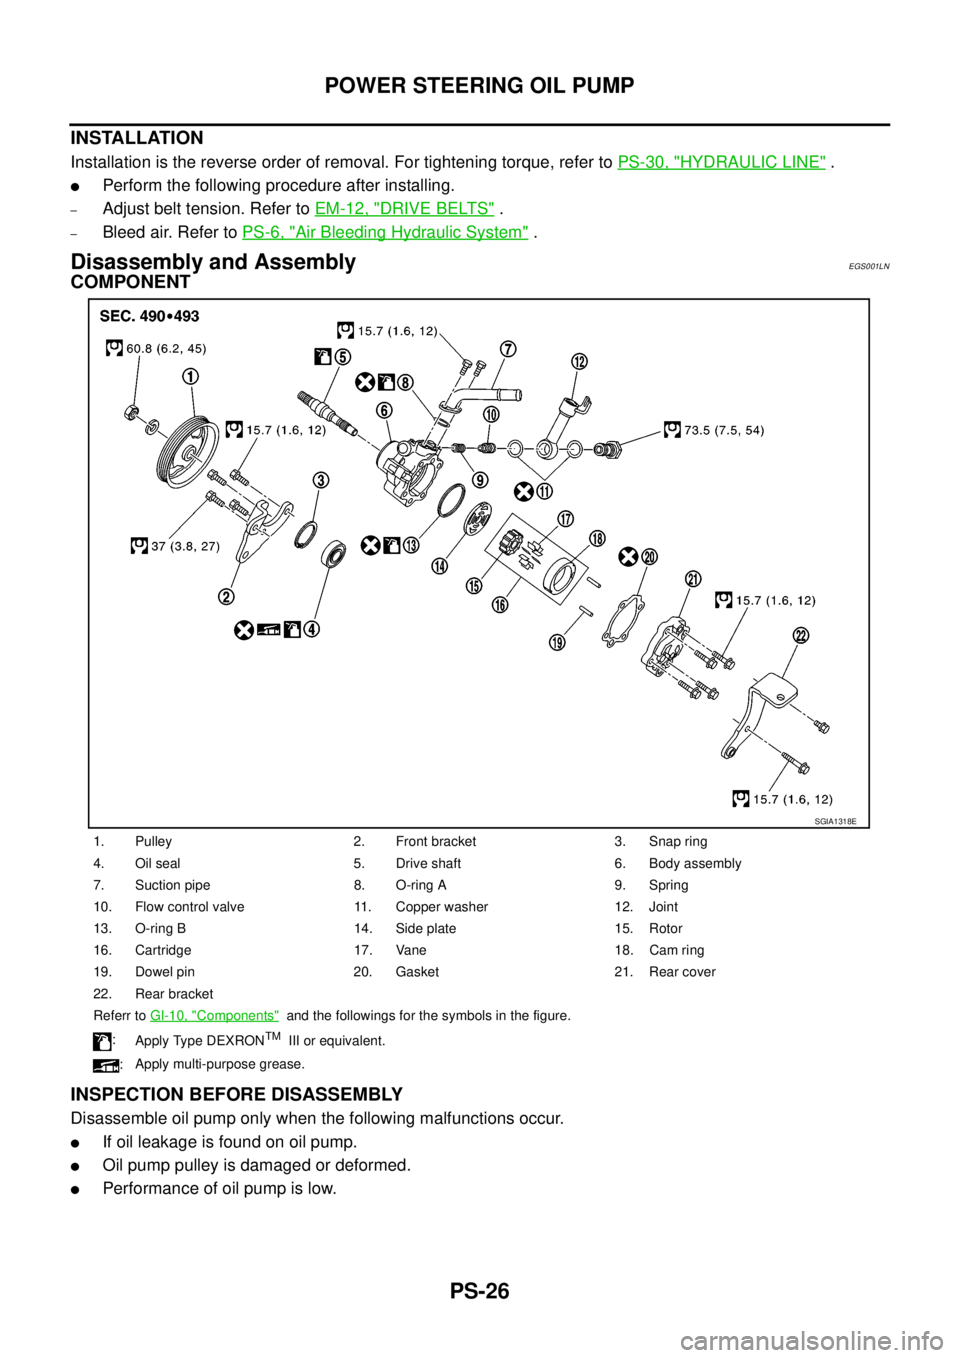
COMPONENT
INSPECTION BEFORE DISASSEMBLY
Disassemble oil pump only when the following malfunctions occur.
lIf oil leakage is found on oil pump.
lOil pump pulley is damaged or deformed.
lPerformance of oil pump is low.
1. Pulley 2. Front bracket 3. Snap ring
4. Oil seal 5. Drive shaft 6. Body assembly
7. Suction pipe 8. O-ring A 9. Spring
10. Flow control valve 11. Copper washer 12. Joint
13. O-ring B 14. Side plate 15. Rotor
16. Cartridge 17. Vane 18. Cam ring
19. Dowel pin 20. Gasket 21. Rear cover
22. Rear bracket
Referr toGI-10, "
Components"and the followings for the symbols in the figure.
:
Apply Type DEXRON
TMIII or equivalent.
:Apply multi-purpose grease.
SGIA1318E