Page 1064 of 2543
MASTER CYLINDER DISASSEMBLY
1. REMOVE RESERVOIR TANK
(a) Using a pin punch and hammer, drive out the slotted spring
pin.
(b) Remove the reservoir tank and grommet.
2. REMOVE PUSH ROD
(a) Pull back the boot, and using snap ring pliers, remove the
snap ring.
(b) Pull out the push rod.
3. REMOVE PISTON
MASTER CYLINDER ASSEMBLY
1. COAT PARTS WITH LITHIUM SOAP BASE GLYCOL
GREASE, AS SHOWN
2. INSERT PISTON INTO CYLINDER
3. INSTALL PUSH ROD ASSEMBLY WITH NEW SNAP RING
4. INSTALL RESERVOIR TANK
(a) Install the reservoir tank and a new grommet.
(b) Using a pin punch and hammer, drive in the slotted spring pin.
± CLUTCHCLUTCH MASTER CYLINDERCL±7
Page 1065 of 2543
CLUTCH RELEASE CYLINDER
(2JZ±GTE)
COMPONENTS
RELEASE CYLINDER REMOVAL
Installation is in the reverse order of removal.
INSTALLATION HINT: After installation, adjust the clutch
pedal and bleed the clutch system.
1. REMOVE CLUTCH HOUSING COVER LH
Remove the 2 bolts.
Torque: 12 NVm (120 kgfVcm, 9 ftVlbf)
2. DISCONNECT CLUTCH LINE
Using SST, disconnect the clutch line union. Use a container
to catch the fluid.
SST 09023±00100
Torque: 15 NVm (155 kgfVcm, 11 ftVlbf)
3. REMOVE 2 BOLTS AND PULL OUT RELEASE CYLINDER
Torque: 12 NVm (120 kgfVcm, 9 ftVlbf)
CL±8± CLUTCHCLUTCH RELEASE CYLINDER (2JZ±GTE)
Page 1066 of 2543
RELEASE CYLINDER DISASSEMBLY
1. PULL OUT PUSH ROD WITH BOOT
2. REMOVE PISTON WITH SPRING
Using compressed air, remove the piston and spring from the
cylinder.
RELEASE CYLINDER ASSEMBLY
1. COAT PISTON WITH LITHIUM SOAP BASE GLYCOL
GREASE, AS SHOWN
2. INSTALL PISTON WITH SPRING INTO CYLINDER
3. INSTALL BOOT WITH PUSH ROD TO CYLINDER
CLUTCH RELEASE CYLINDER
(2JZ±GE)
COMPONENTS
± CLUTCHCLUTCH RELEASE CYLINDER (2JZ±GTE, 2JZ±GE)CL±9
Page 1067 of 2543
RELEASE CYLINDER REMOVAL
Installation is in the reverse order of removal.
INSTALLATION HINT: After installation, adjust the clutch
pedal and bleed the clutch system.
1. DISCONNECT CLUTCH LINE
Using SST, disconnect the clutch line union. Use a container
to catch the fluid.
SST 09023±00100
Torque: 15 NVm (155 kgfVcm, 11 ftVlbf)
2. REMOVE RELEASE CYLINDER WITH 3 BOLTS
Torque:
A: 12 NVm (120 kgfVcm, 9 ftVlbf)
B: 4.9 NVm (50 kgfVcm, 43 in.Vlbf)
RELEASE CYLINDER DISASSEMBLY
1. PULL OUT PUSH ROD WITH BOOT
2. REMOVE PISTON WITH SPRING
Using compressed air, remove the piston and spring from the
cylinder.
RELEASE CYLINDER ASSEMBLY
1. COAT PISTON WITH LITHIUM SOAP BASE GLYCOL
GREASE, AS SHOWN
2. INSTALL PISTON WITH SPRING INTO CYLINDER
3. INSTALL BOOT WITH PUSH ROD TO CYLINDER CL±10
± CLUTCHCLUTCH RELEASE CYLINDER (2JZ±GE)
Page 1068 of 2543
CLUTCH UNIT (2JZ±GTE)
COMPONENTS
CLUTCH UNIT REMOVAL
1. REMOVE TRANSMISSION FROM ENGINE
(See page MT2±5)
HINT: Do not drain the transmission oil.
2. REMOVE RELEASE FORK ASSEMBLY
(a) Remove the release fork assembly from the left side of clutch
housing service hole.
(b) Remove the E±ring from the release fork.
(c) Remove the pin and wave washer from the release fork.
± CLUTCHCLUTCH RELEASE CYLINDER(2JZ±GTE)CL±11
Page 1069 of 2543
3. REMOVE CLUTCH DISC
4. REMOVE CLUTCH COVER ASSEMBLY
5. REMOVE CLUTCH RELEASE BEARING HUB
(a) Using a snap ring expander, remove the snap ring.
(b) Remove the release bearing hub, thrust cone spring and
plate washer.
6. REMOVE CLUTCH RELEASE BEARING
(a) Using a snap ring expander, remove the snap ring.
(b) Remove the release bearing, wave washer and plate washer.
CLUTCH PARTS INSPECTION AND
REPAIR
1. INSPECT CLUTCH DISC FOR WEAR OR DAMAGE
Using calipers, measure the rivet head depth.
Minimum rivet depth:
0.3 mm (0.012 in.)
If a problem is found, replace the clutch disc.
2. INSPECT CLUTCH DISC RUNOUT
Using a dial indicator, check the disc runout.
Maximum runout:
0.8 mm (0.031 in.)
If runout is excessive, replace the clutch disc.
3. INSPECT FLYWHEEL RUNOUT
Using a dial indicator, check the flywheel runout.
Maximum runout:
0.1 mm (0.004 in.)
If runout excessive, replace the flywheel. CL±12
± CLUTCHCLUTCH UNIT (2JZ±GTE)
Page 1070 of 2543
4. INSPECT PILOT BEARING
Turn the bearing by hand while applying force in the axial
direction.
If the bearing sticks or has much resistance, replace the pilot
bearing.
5. IF NECESSARY, REPLACE PILOT BEARING
(a) Remove the 2 bolts at diametrically opposite points.
(b) Using SST, remove the pilot bearing.
SST 09303±35011
(c) Using SST and a hammer, drive in a new pilot bearing.
SST 09301±00110
(d) Install 2 new bolts.
(e) First, torque the 2 bolts uniformly a little at a time.
Torque: 49 NVm (500 kgfVcm, 36 ftVlbf)
(f) Then tighten the 2 bolts an additional 80±100°.
± CLUTCHCLUTCH UNIT (2JZ±GTE)CL±13
Page 1071 of 2543

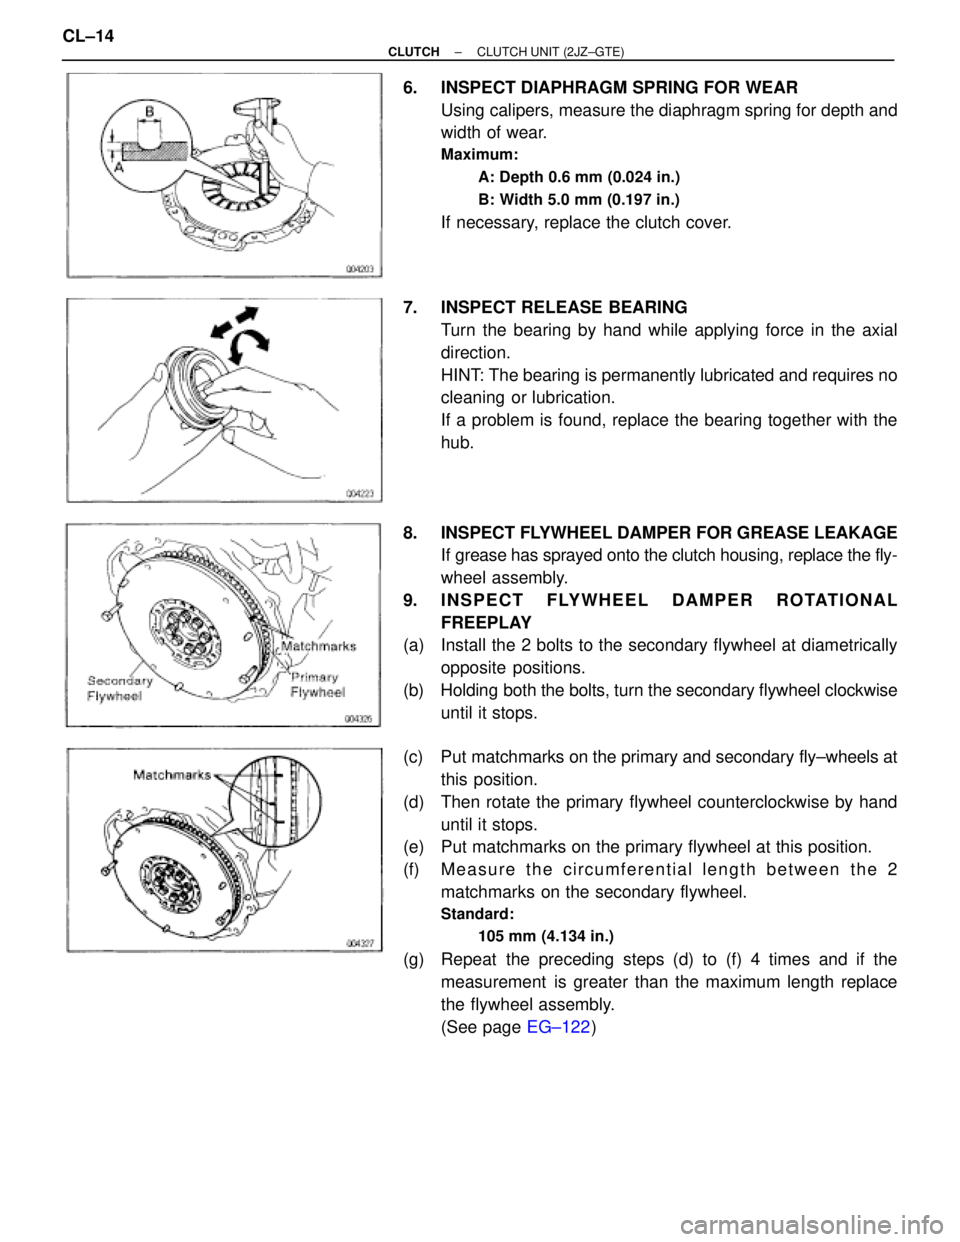
6. INSPECT DIAPHRAGM SPRING FOR WEAR
Using calipers, measure the diaphragm spring for depth and
width of wear.
Maximum:
A: Depth 0.6 mm (0.024 in.)
B: Width 5.0 mm (0.197 in.)
If necessary, replace the clutch cover.
7. INSPECT RELEASE BEARING
Turn the bearing by hand while applying force in the axial
direction.
HINT: The bearing is permanently lubricated and requires no
cleaning or lubrication.
If a problem is found, replace the bearing together with the
hub.
8. INSPECT FLYWHEEL DAMPER FOR GREASE LEAKAGE
If grease has sprayed onto the clutch housing, replace the fly-
wheel assembly.
9. INSPECT FLYWHEEL DAMPER ROTATIONAL
FREEPLAY
(a) Install the 2 bolts to the secondary flywheel at diametrically
opposite positions.
(b) Holding both the bolts, turn the secondary flywheel clockwise
until it stops.
(c) Put matchmarks on the primary and secondary fly±wheels at
this position.
(d) Then rotate the primary flywheel counterclockwise by hand
until it stops.
(e) Put matchmarks on the primary flywheel at this position.
(f) M e a s u r e t h e c i r c u m f e r e n t i a l length between the 2
matchmarks on the secondary flywheel.
Standard:
105 mm (4.134 in.)
(g) Repeat the preceding steps (d) to (f) 4 times and if the
measurement is greater than the maximum length replace
the flywheel assembly.
(See page EG±122) CL±14
± CLUTCHCLUTCH UNIT (2JZ±GTE)