Page 1479 of 1640

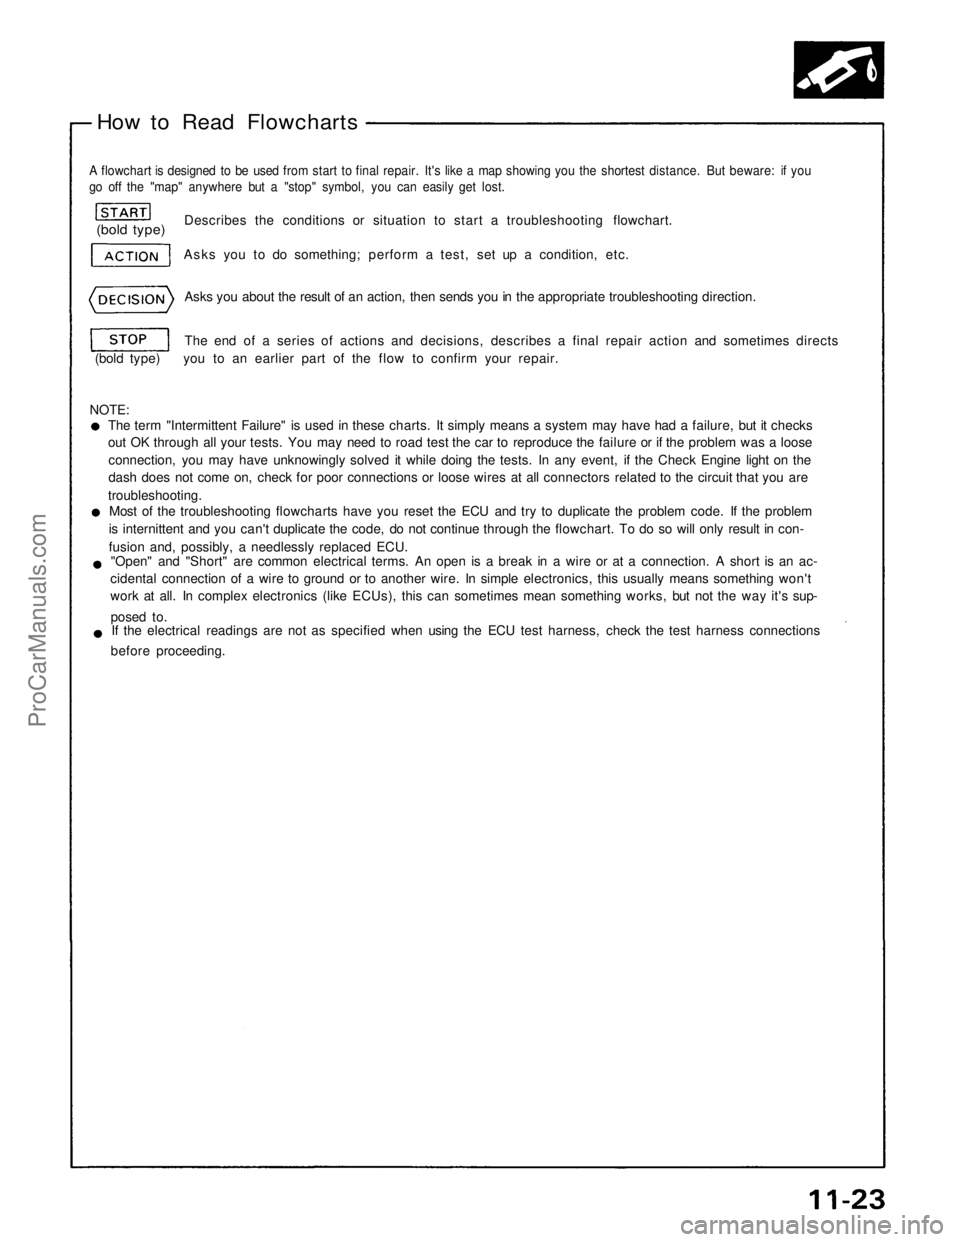
How to Read Flowcharts
A flowchart is designed to be used from start to final repair. It's like a map showing you the shortest distance. But beware: if you
go off the "map" anywhere but a "stop" symbol, you can easily get lost.
Describes the conditions or situation to start a troubleshooting flowchart.
(bold type)
Asks you to do something; perform a test, set up a condition, etc.
Asks you about the result of an action, then sends you in the appropriate troubleshooting direction.
The end of a series of actions and decisions, describes a final repair action and sometimes directs
(bold type) you to an earlier part of the flow to confirm your repair.
NOTE: The term "Intermittent Failure" is used in these charts. It simply means a system may have had a failure, but it checks
out OK through all your tests. You may need to road test the car to reproduce the failure or if the problem was a loose
connection, you may have unknowingly solved it while doing the tests. In any event, if the Check Engine light on the
dash does not come on, check for poor connections or loose wires at all connectors related to the circuit that you are
troubleshooting. Most of the troubleshooting flowcharts have you reset the ECU and try to duplicate the problem code. If the problem
is internittent and you can't duplicate the code, do not continue through the flowchart. To do so will only result in con-
fusion and, possibly, a needlessly replaced ECU. "Open" and "Short" are common electrical terms. An open is a break in a wire or at a connection. A short is an ac-
cidental connection of a wire to ground or to another wire. In simple electronics, this usually means something won't
work at all. In complex electronics (like ECUs), this can sometimes mean something works, but not the way it's sup-
posed to. If the electrical readings are not as specified when using the ECU test harness, check the test harness connections
before proceeding.ProCarManuals.com
Page 1480 of 1640

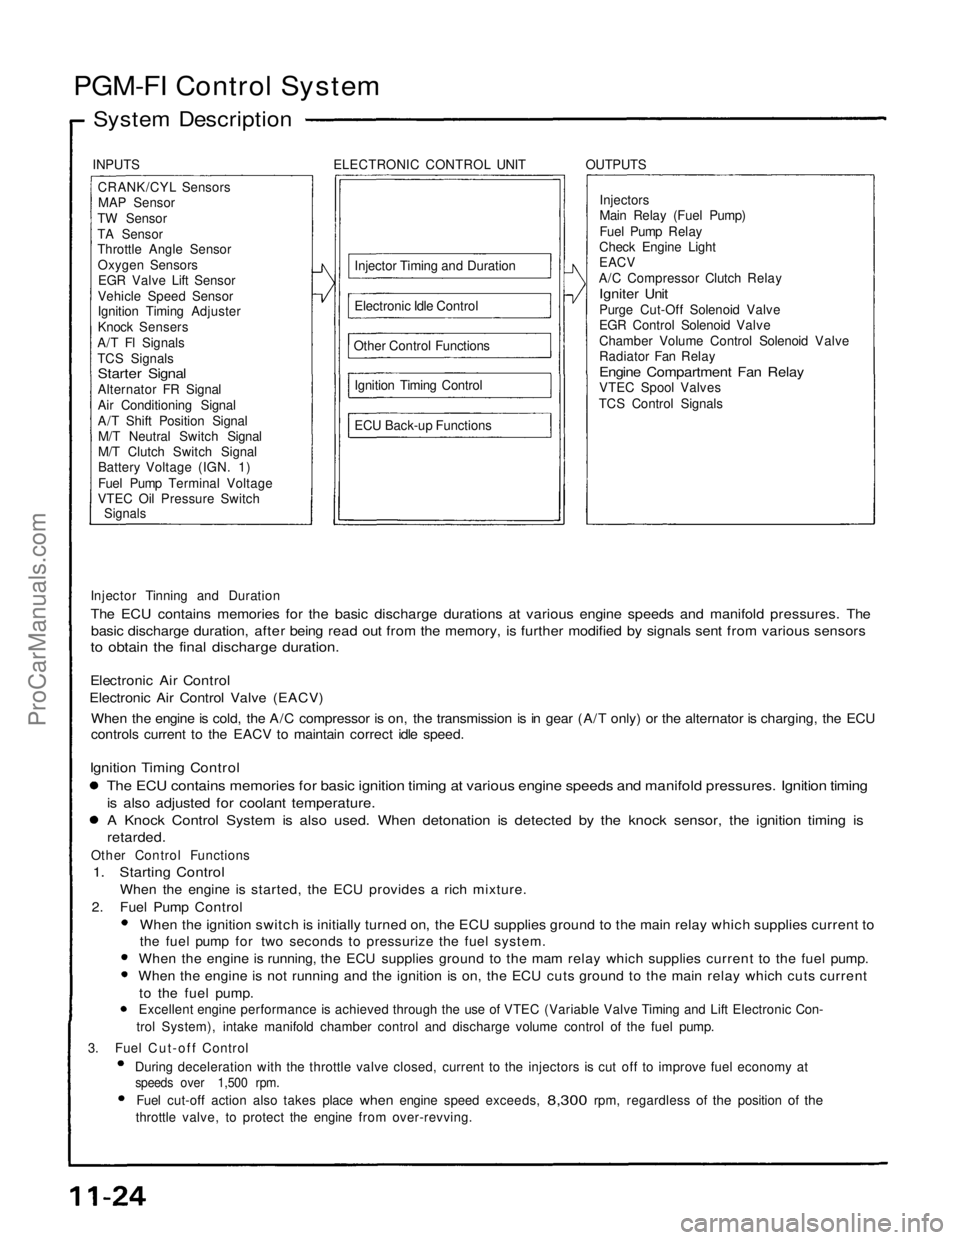
PGM-FI Control System
System Description
INPUTS ELECTRONIC CONTROL UNIT OUTPUTSCRANK/CYL SensorsMAP Sensor
TW Sensor
TA Sensor
Throttle Angle Sensor Oxygen SensorsEGR Valve Lift Sensor
Vehicle Speed Sensor
Ignition Timing Adjuster
Knock Sensers
A/T Fl Signals
TCS Signals
Starter Signal
Alternator FR Signal
Air Conditioning Signal
A/T Shift Position Signal M/T Neutral Switch Signal
M/T Clutch Switch Signal
Battery Voltage (IGN. 1)
Fuel Pump Terminal Voltage
VTEC Oil Pressure Switch
Signals
Injector Timing and Duration
Electronic Idle Control
Other Control Functions Ignition Timing Control
ECU Back-up Functions Injectors
Main Relay (Fuel Pump)
Fuel Pump Relay
Check Engine Light
EACV
A/C Compressor Clutch Relay
Igniter Unit
Purge Cut-Off Solenoid Valve
EGR Control Solenoid Valve
Chamber Volume Control Solenoid Valve
Radiator Fan Relay
Engine Compartment Fan Relay
VTEC Spool Valves
TCS Control Signals
Injector Tinning and Duration
The ECU contains memories for the basic discharge durations at various engine speeds and manifold pressures. The
basic discharge duration, after being read out from the memory, is further modified by signals sent from various sensors
to obtain the final discharge duration.
Electronic Air Control
Electronic Air Control Valve (EACV)
When the engine is cold, the A/C compressor is on, the transmission is in gear (A/T only) or the alternator is charging, the ECU
controls current to the EACV to maintain correct idle speed.
Ignition Timing Control
The ECU contains memories for basic ignition timing at various engine speeds and manifold pressures. Ignition timing
is also adjusted for coolant temperature.
A Knock Control System is also used. When detonation is detected by the knock sensor, the ignition timing is
retarded.
Other Control Functions
1. Starting Control
When the engine is started, the ECU provides a rich mixture.
2. Fuel Pump Control
When the ignition switch is initially turned on, the ECU supplies ground to the main relay which supplies current to
the fuel pump for two seconds to pressurize the fuel system.
When the engine is running, the ECU supplies ground to the mam relay which supplies current to the fuel pump.
When the engine is not running and the ignition is on, the ECU cuts ground to the main relay which cuts current
to the fuel pump.
Excellent engine performance is achieved through the use of VTEC (Variable Valve Timing and Lift Electronic Con-
trol System), intake manifold chamber control and discharge volume control of the fuel pump.
3. Fuel Cut-off Control During deceleration with the throttle valve closed, current to the injectors is cut off to improve fuel economy at
speeds over 1,500 rpm.
Fuel cut-off action also takes place
when
engine speed exceeds,
8,300
rpm, regardless
of the
position
of the
throttle valve, to protect the engine from over-revving.ProCarManuals.com
Page 1481 of 1640

4. A/C Compressor Clutch Relay
When the ECU receives a demand for cooling from the air conditioning system (compressor control unit), it delays
the compressor from being energized, and enriches the mixture to assure smooth transition to the A/C mode.
5. Purge Cut-off Solenoid Valve
When the coolant temperature is below 70 °C (158 °F), the ECU supplies a ground to the purge cut-off solenoid valve
which cuts vacuum to the purge control valve.
6. Chamber Volume Control Solenoid Valve (CVCSV)
When the engine rpm is below 4,800 rpm the CVCSV is activated by a signal from the ECU, intake air flows through
a smaller chamber, then high torque is delivered. At speeds higher than 4,800 rpm, both solenoid valves are deac-
tivated by the ECU, and intake air flows through the a larger chamber in order to increase airflow.
7. EGR Control Solenoid Valve (EGR CSV)
When the EGR is required for control of oxides of nitrogen (NOx) emissions, the ECU supplies ground to the EGR CSV
which supplies regulated vacuum to the EGR valve.
ECU Back-up Functions
1. Fail-Safe Function
When an abnormality occurs in a signal from a sensor, the ECU ignores that signal and assumes a pre-programmed
value that allows the engine to continue to run.
2. Back-up Function
When an abnormality occurs in the ECU itself, the injectors are controlled by a back-up circuit independent of the
system in order to permit minimal diving.
3. Self-diagnosis Function (Check Engine light)
When an abnormality occurs in a signal from a sensor, the ECU lights the Check Engine light and stores the failure
code in erasable memory. When the ignition is initially turned on, the ECU supplies ground for the Check Engine light
for two seconds.ProCarManuals.com
Page 1482 of 1640
PGM-FI Control System
Troubleshooting Flowchart
ECU
Check Engine light never comes
on (even for two seconds) after
ignition is turned on.
Is the oil pressure light on?
Turn the ignition switch OFF.
Inspect No. 5 fuse.
Is No. 5 fuse OK? Replace fuse.
Connect the ECU test harness
between the ECU and connector
(page 11-21).
Connect A13 terminal to body
ground.
Repair open in YEL between
No. 5 fuse and gauge assembly.
A13
Turn the ignition switch ON. Replace the light
bulb.
Repair open in BLU
wire between ECU
(A13) and gauge
assembly.
A23
A24 A26 B2
G101
Less than 1 V
Is Check Engine light on?
Measure voltage between body
ground and the following ter-
minals individually: A23, A24,
A26,
B2.
Is there less than 1V?
Repair open in wire
between ECU and in-
take manifold (G101)
that had more than 1V.
Substitute a known-good ECU and recheck. If symp-
tom/ indication goes away,
replace the original ECU.ProCarManuals.com
Page 1483 of 1640
Idle Control System
NOTE: Across each row in the chart, the sub systems that could be sources of a symptom are ranked in the order they should
be inspected, starting with . Find the symptom in the left column, read across to the most likely source, then refer to
the page listed at the top of that column. If inspection shows the system is OK, try the next system , etc.
If the idle speed is out of specification and the Check Engine light does not blink CODE 14, go to inspection described
on page 11-70.
PAGE
86
70
72
74
76
78
80
82
83 *
System Troubleshooting GuideProCarManuals.com
Page 1486 of 1640
1. When the idle speed is out of specification and the Check Engine light does not blink CODE 14, check the following
items:Adjust the idle speed (page 11- 84)
Air conditioning signal (page 11-72)
Alternator FR signal (page 11-74)
A/T shift position signal (page 11-76) M/T neutral switch signal (page 11-78)
M/T clutch switch signal (page 11- 80)
Starter switch signal (page 11- 82)
Fast idle valve (page 11- 83)
Hoses and connections
EACV and its mounting O-rings
2. If the above items are normal, substitute a known-good EACV and readjust the idle speed (page 11- 84).
If the
idle
speed
still
cannot
be
adjusted
to
specification (and
the
Check Engine
light
does
not
blink
CODE
14)
after
EACV replacement, substitute a known-good ECU and recheck. If symptom goes away, replace the original ECU.ProCarManuals.com
Page 1487 of 1640

Idle Control System
Troubleshooting Flowchart
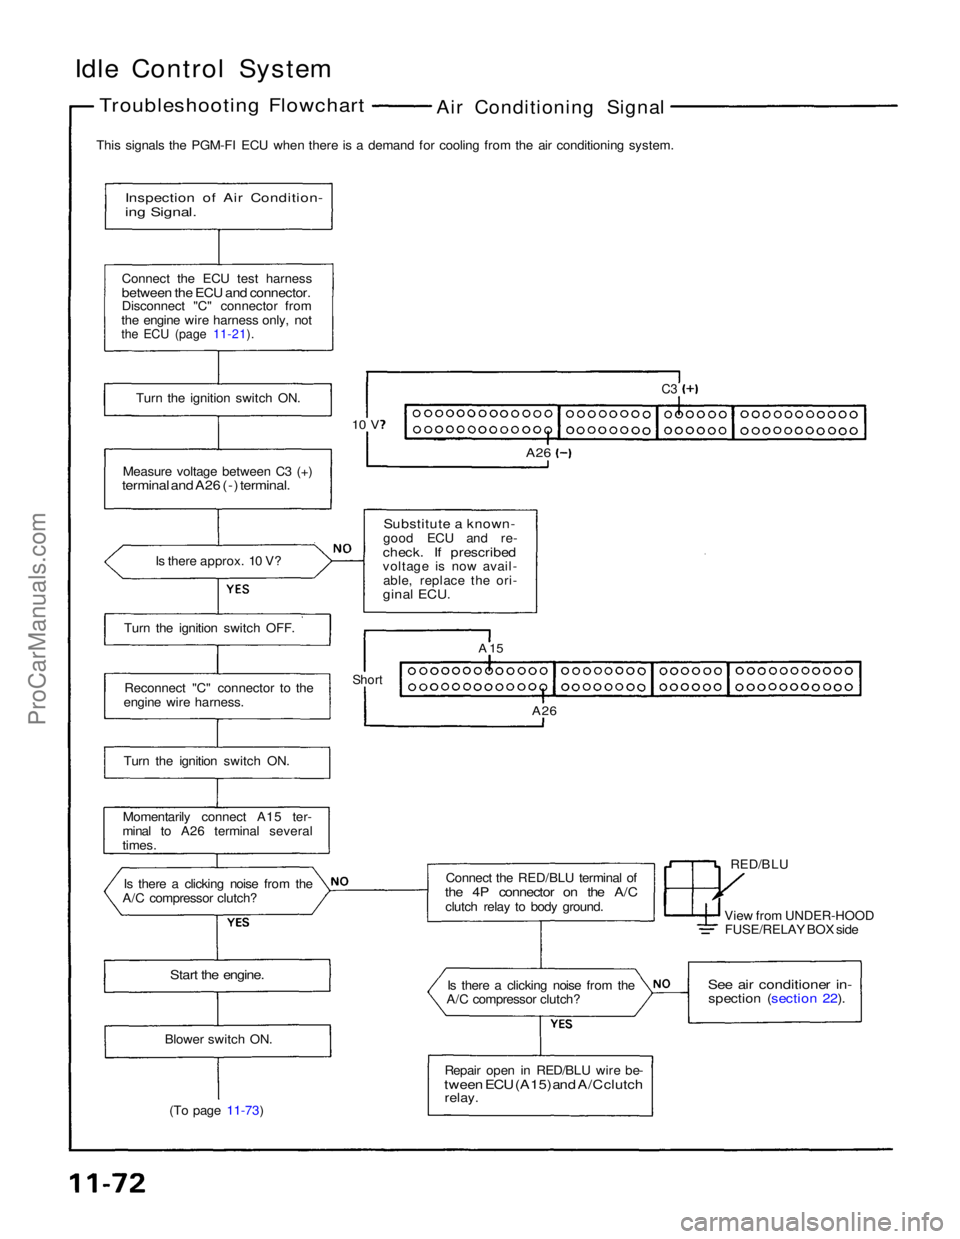
Air Conditioning Signal
This signals the PGM-FI ECU when there is a demand for cooling from the air conditioning system.
Inspection of Air Condition-
ing Signal.
Connect the ECU test harness
between the ECU and connector.
Disconnect "C" connector from
the engine wire harness only, not
the ECU (page 11-21).
Turn the ignition switch ON.
Measure voltage between C3 (+)
terminal and A26 (-) terminal.
Is there approx. 10 V?
Substitute a known-
good ECU and re-
check. If prescribed
voltage is now avail- able, replace the ori-
ginal ECU.
C3
A26
10 V
Turn the ignition switch OFF. Reconnect "C" connector to the
engine wire harness.
Turn the ignition switch ON.
Momentarily connect A15 ter-
minal to A26 terminal several
times.
Is there a clicking noise from the
A/C compressor clutch? Connect the RED/BLU terminal of
the 4P connector on the A/C
clutch relay to body ground. RED/BLU
A 15
Short
A26
View from UNDER-HOODFUSE/RELAY BOX side
Start the engine.
Is there a clicking noise from the
A/C compressor clutch?
See air conditioner in-
spection (section 22).
Repair open in RED/BLU wire be-
tween ECU (A15) and A/C clutch
relay.
Blower switch ON.
(To page 11-73)ProCarManuals.com
Page 1489 of 1640
Idle Control System
Troubleshooting Flowchart Alternator FR Signal
This signals the PGM-FI ECU when the alternator is charging.
Inspection of Alternator FR
signal.
Connect the ECU test harness
between the ECU and connector.
Disconnect "D" connector from
the engine wire harness only, not
the ECU (page 11-21).
Turn the ignition switch ON.
Measure voltage between D9 ( + ) terminal and A26 (-) ter-
minal.
Is there approx. 5 V?
5V
D9
A26
Substitute a known-good ECU and recheck. If pre-
scribed voltage is now avail-
able, replace the original ECU.
Turn the ignition switch OFF.
Reconnect "D" connector to the
engine wire harness.
Warm up engine to normal oper-
ating temperature (cooling fan
comes on).
Voltage
D9
A26
Measure voltage between D9
( + ) terminal and A26 (-) ter-
minal.
Stop the engine.
Does the voltage decrease when
headlights and rear defogger are
turned on ?
Alternator FR signal is OK.
(To page 11-75)ProCarManuals.com