Page 90 of 1640

Removal
NOTE:
Before removing the belt, turn the crankshaft pulley
so the No. 8 piston is at top dead center (TDC) (see
page 6-19 ('91-'93) or ('94-'96)
Inspect the water pump after removing the timing
belt (see page 10-11).
If it is to be reused, mark the direction of rotation on
the belt.
1. Disconnect the battery negative terminal first, then the positive terminal,
2. Remove the right rear wheel/tire.
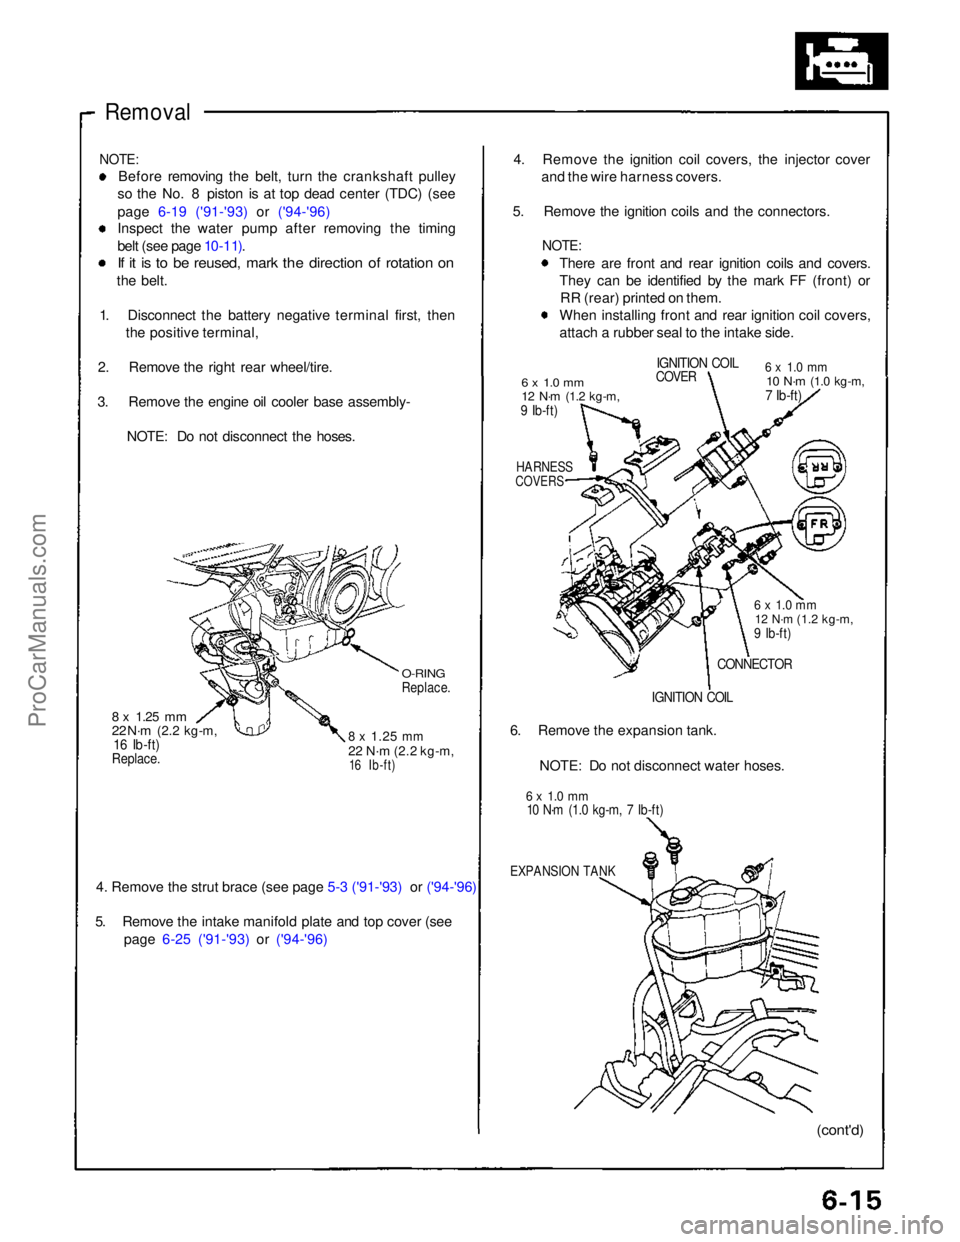
3. Remove the engine oil cooler base assembly- NOTE: Do not disconnect the hoses.
O-RING
Replace.
8 x
1.25
mm
22 N·m
(2.2 kg-m,
16 Ib-ft)
8 x
1.25
mm
22 N·m
(2.2 kg-m,
16 Ib-ft)
Replace.
4. Remove the strut brace (see page 5-3 ('91-'93) or ('94-'96)
5. Remove the intake manifold plate and top cover (see
page 6-25 ('91-'93) or ('94-'96)
4. Remove the ignition coil covers, the injector cover
and the wire harness covers.
5. Remove the ignition coils and the connectors.
NOTE:
There are front and rear ignition coils and covers.
They can be identified by the mark FF (front) orRR (rear) printed on them.
When installing front and rear ignition coil covers,
attach a rubber seal to the intake side.
6 x 1.0 mm
12 N·m
(1.2 kg-m,
9 Ib-ft)
IGNITION COIL
COVER
6 x 1.0 mm
10 N·m
(1.0 kg-m,
7 Ib-ft)
HARNESS
COVERS
6 x 1.0 mm
12 N·m
(1.2 kg-m,
9 Ib-ft)
CONNECTOR
IGNITION COIL
6. Remove the expansion tank.
NOTE: Do not disconnect water hoses.
6 x 1.0 mm
10 N·m (1.0 kg-m, 7 Ib-ft)
EXPANSION TANK
(cont'd)ProCarManuals.com
Page 99 of 1640

Cylinder Heads
Removal
Engine removal is not required for this procedure. Make sure jacks and safety stands are
placed properly and hoist brackets ere attached to cor- rect positions on the engine.
CAUTION: Use a fender cover (special tool) to avoid damaging
painted surfaces. Unplug the wiring connectors carefully while holding
the connector portion to avoid damage.
To avoid damaging the cylinder heads, wait until the
engine coolant temperature drops below 100°F
(38°C) before loosening the retaining bolts. Do not open the engine cover when the roof panel is
stored (NSX-T open top).
NOTE:
Unspecified items are common.
Mark all wiring and hoses to avoid misconnection.
Also, be sure that they do not contact other wiring or
hoses or interfere with other parts.
Inspect the timing belt before removing the cylinder
head.
Turn the crankshaft pulley SO that the No. 1 piston is at top dead center (see page 6-19 ('91-'93) or ('94-'96)).
1. Disconnect the negative terminal from the battery.
2. Remove the expansion tank cap. Use care when removing the expan-
sion tank cap to avoid scalding by engine coolant
or steam.
3. Raise the car, then remove the right rear wheel/tire.
4. Drain the engine coolant (see page 10-5 ). 5. Remove the engine under guard, then remove the
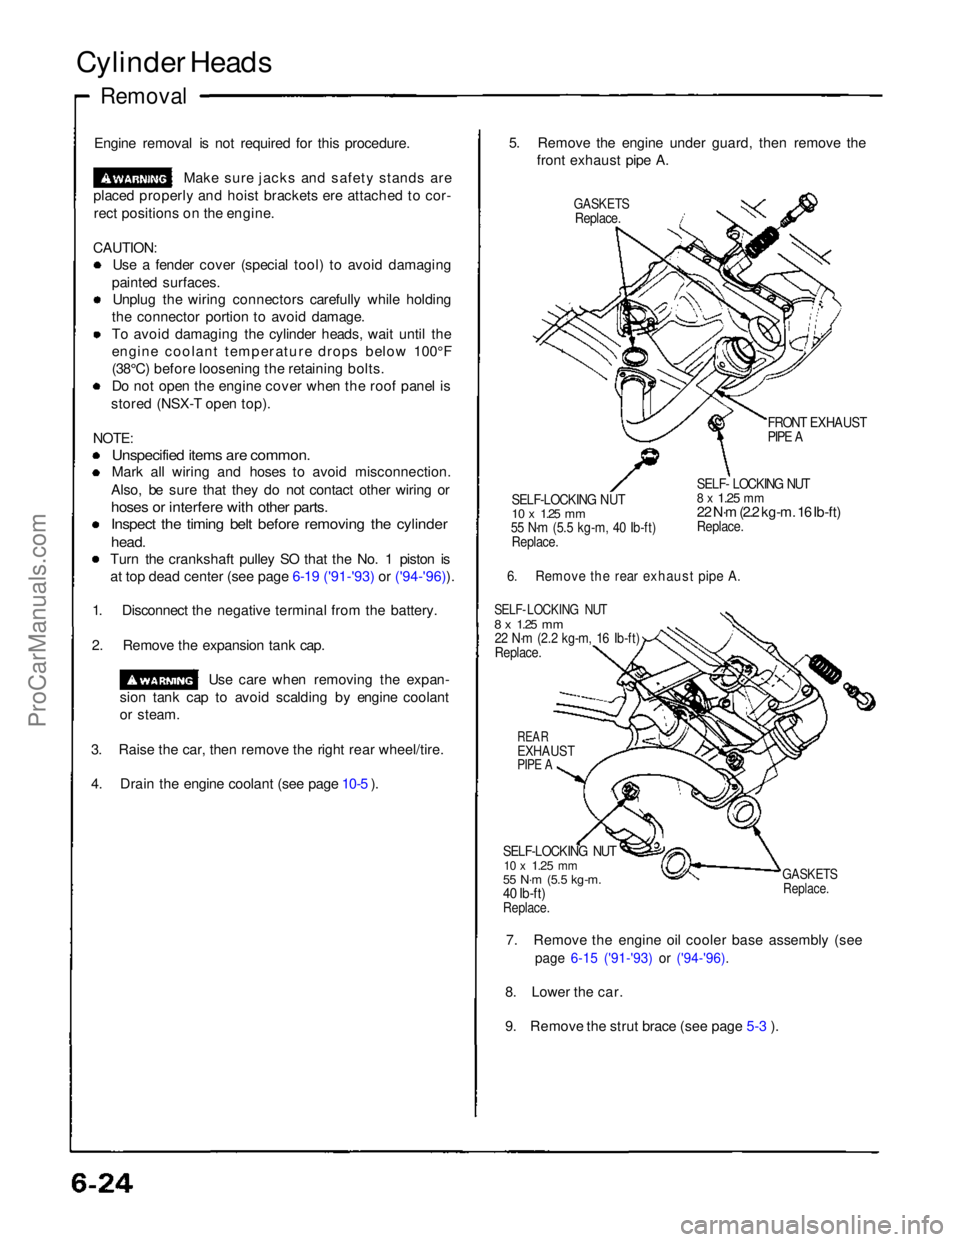
front exhaust pipe A.
GASKETS
Replace.
FRONT EXHAUST
PIPE A
SELF-LOCKING NUT
10 x
1.25
mm
55 N·m (5.5 kg-m, 40 Ib-ft)
Replace.
SELF- LOCKING NUT
8 x
1.25
mm
22 N·m (2.2 kg-m. 16 Ib-ft)
Replace.
6. Remove the rear exhaust pipe A.
SELF- LOCKING NUT
8 x
1.25
mm
22 N·m (2.2 kg-m, 16 Ib-ft)
Replace.
REAR
EXHAUST
PIPE A
SELF-LOCKING NUT
10 x
1.25
mm
55 N·m (5.5 kg-m.
40 Ib-ft)
Replace.
GASKETS
Replace.
7. Remove the engine oil cooler base assembly (see
page 6-15 ('91-'93) or ('94-'96).
8. Lower the car.
9. Remove the strut brace (see page 5-3 ).ProCarManuals.com
Page 1014 of 1640

Cylinder Heads
Removal
Engine removal is not required in this procedure.
CAUTION: To avoid damaging the cylinder heads, wait until the engine coolant temperature drops below 100°F (38°C) before loosening the retaining bolts.
NOTE:
Inspect the timing belt before removing the cylinder
heads.
Turn the crankshaft so that the No. 1 piston is at top
dead center (TDC (page 6-25, 26). Mark all emission hoses before disconnecting them.
1. Disconnect the negative terminal from the battery.
2. Remove the expansion tank cap.
Use care when removing the expan-
sion tank cap to avoid scalding by engine coolant or
steam.
3. Raise the car.
4. Remove the right rear wheel/tire.
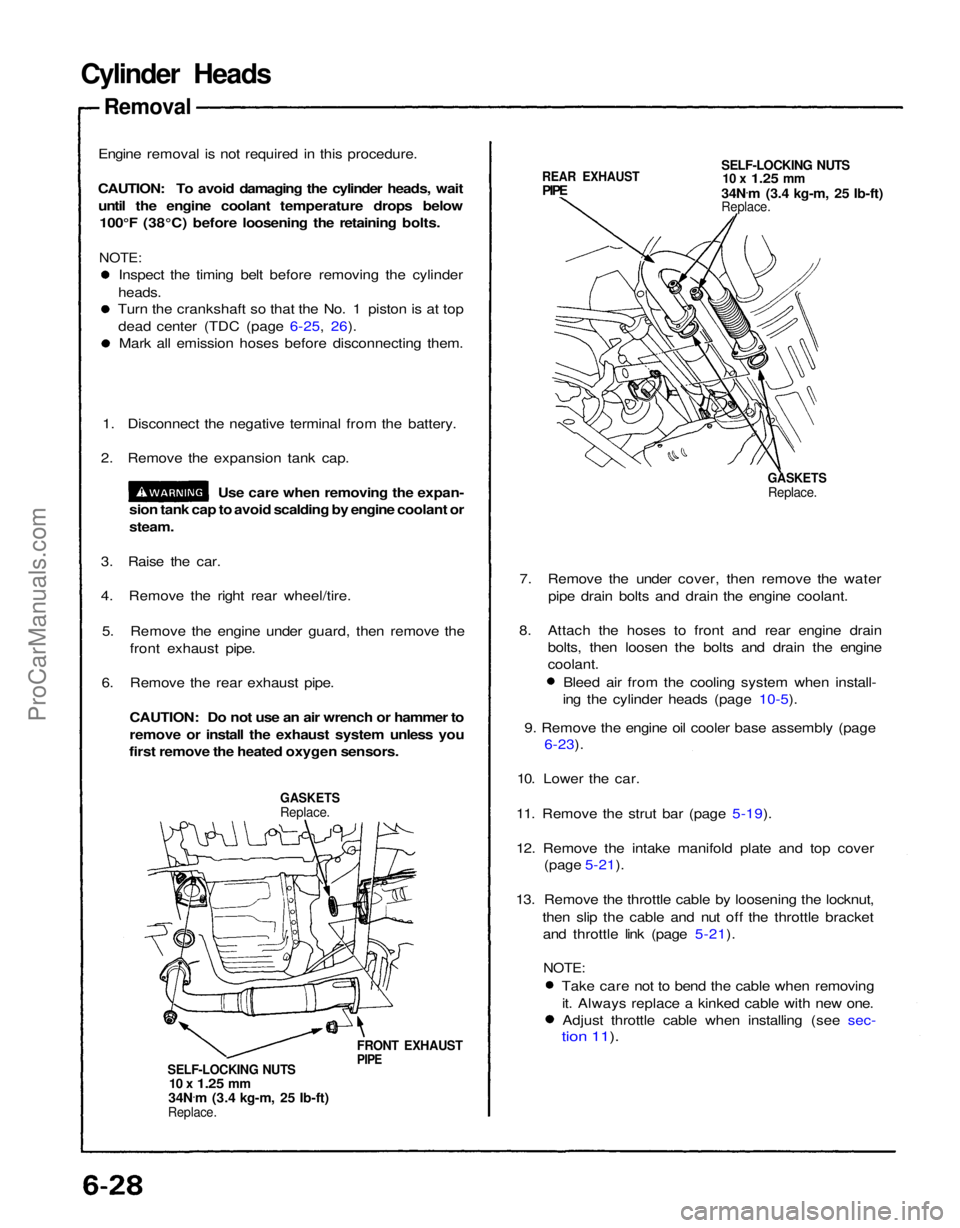
5. Remove the engine under guard, then remove the front exhaust pipe.
6. Remove the rear exhaust pipe.
CAUTION: Do not use an air wrench or hammer to
remove or install the exhaust system unless you
first remove the heated oxygen sensors.
GASKETS
Replace.
FRONT EXHAUST
PIPE
SELF-LOCKING NUTS
10 x
1.25
mm
34N .
m (3.4 kg-m, 25 Ib-ft)
Replace.
REAR EXHAUST
PIPE
SELF-LOCKING NUTS
10 x
1.25
mm
34N .
m (3.4 kg-m, 25 Ib-ft)
Replace.
GASKETS
Replace.
7. Remove the under cover, then remove the water pipe drain bolts and drain the engine coolant.
8. Attach the hoses to front and rear engine drain bolts, then loosen the bolts and drain the engine
coolant.
Bleed air from the cooling system when install-
ing the cylinder heads (page 10-5).
9. Remove the engine oil cooler base assembly (page
6-23).
10. Lower the car.
11. Remove the strut bar (page 5-19).
12. Remove the intake manifold plate and top cover (page 5-21).
13. Remove the throttle cable by loosening the locknut, then slip the cable and nut off the throttle bracketand throttle link (page 5-21).
NOTE:
Take care not to bend the cable when removingit. Always replace a kinked cable with new one.Adjust throttle cable when installing (see sec-
tion 11).ProCarManuals.com