1988 PONTIAC FIERO automatic transmission
[x] Cancel search: automatic transmissionPage 972 of 1825
DRIVEABILITY AND EMISSIONS - FUEL INJEC"F0N 6E-11
@ A/% "On" or "Off" r Air Management
r Engine Coolant Temwrature r Canister Purge
@ Engine crank signal r Exhaust Gas Recirculation (EGR)
@ Exhaust Oxygen(02) Sensor @ Electronic Spark Timing (EST)
r Distributor Reference @ Fuel Control
@ Crankshaft Position @ Idle Air Control (lAC)
@ Engine Speed (RPM) Transmission Converter Clutch (TCC)
Manifold Absolute Pressure (MAP)
@ Park Neutral Switch (PB) Position @ Electric Fuel Pump
r System Voltage Air Conditioning
r Throttle Position (TPS) @ Engine Cooling Fan
r Transmission Gear Position
r Vehicle Speed (VSS) @ "Service Engine Soon" Light
@ Fuel Pump Voltage @ Diagnostic Terminal (ALDL)
r Power Steering Pressure @ Data Output (ALDL)
Mass Air Flow (MAF) @ Electronic Spark Control (ESC)
@ Manifold Air Temperature (MAT) @ Early Fuel Evaporation (EFE)
r EGR Vacuum @ Idle Speed (ISC, ILC,)
@ Engine Knock (ESC)
r Differential Pressure (VAC) 6-1-87
*7S
3429- 6E
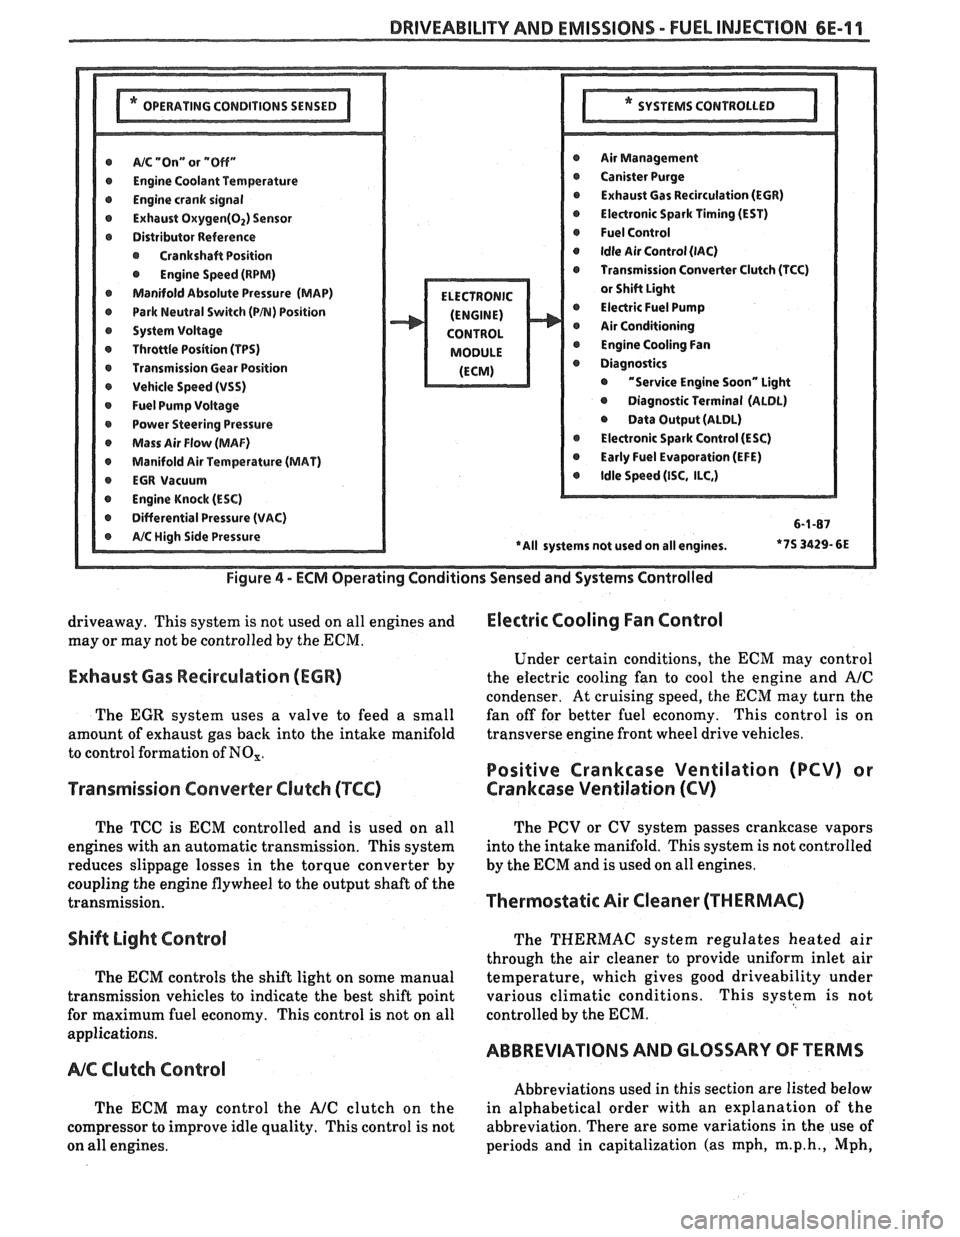
Figure
4 - ECM Operating Conditions Sensed and Systems Controlled
driveaway. This system is not used on all engines and Electric Cooling Fan Control
may or may not be controlled by the ECM.
Under certain conditions, the
ECM may control
Exhaust Gas Recirculation (ECR) the electric cooling fan to cool the engine and A/C
condenser. At cruising speed, the ECM may turn the
The
EGR system uses a valve to feed a small fan
off for better fuel economy. This control is on
amount of exhaust gas back into the intake manifold transverse
engine front wheel drive vehicles.
to control formation of
NO,.
Positive Crankcase Ventilation (PCV) or
Transmission Converter
Clutch (TCC) Crankcase Ventilation (CV)
The TCC is ECM controlled and is used on all
engines with an automatic transmission. This system
reduces slippage losses in the torque converter by
coupling the engine flywheel to the output shaft of the
transmission.
Shift Light Control
The ECM controls the shift light on some manual
transmission vehicles to indicate the best shift point
for maximum fuel economy. This control is not on all
applications.
NC Clutch Control
The ECM may control the AJC clutch on the
compressor to improve idle quality. This control is not
on all engines. The
PCV or CV system passes crankcase vapors
into the intake manifold. This system is not controlled
by the
ECM and is used on all engines.
Thermostatic Air Cleaner (THERMAC)
The THERMAC system regulates heated air
through the air cleaner to provide uniform inlet air
temperature, which gives good driveability under
various climatic conditions. This system is not
controlled by the
ECM.
ABBREVIATIONS AND GLOSSARY OF TERMS
Abbreviations used in this section are listed below
in alphabetical order with an explanation of the
abbreviation. There are some variations in the use of
periods and in capitalization (as mph,
m.p.h., Mph,
Page 990 of 1825
HYDRAULIC DIAGNOSIS 700.R4-1
SECTION 700-R4
AUTOMAT C TRANSM
CONTENTS
GENERAL DESCRIPTION
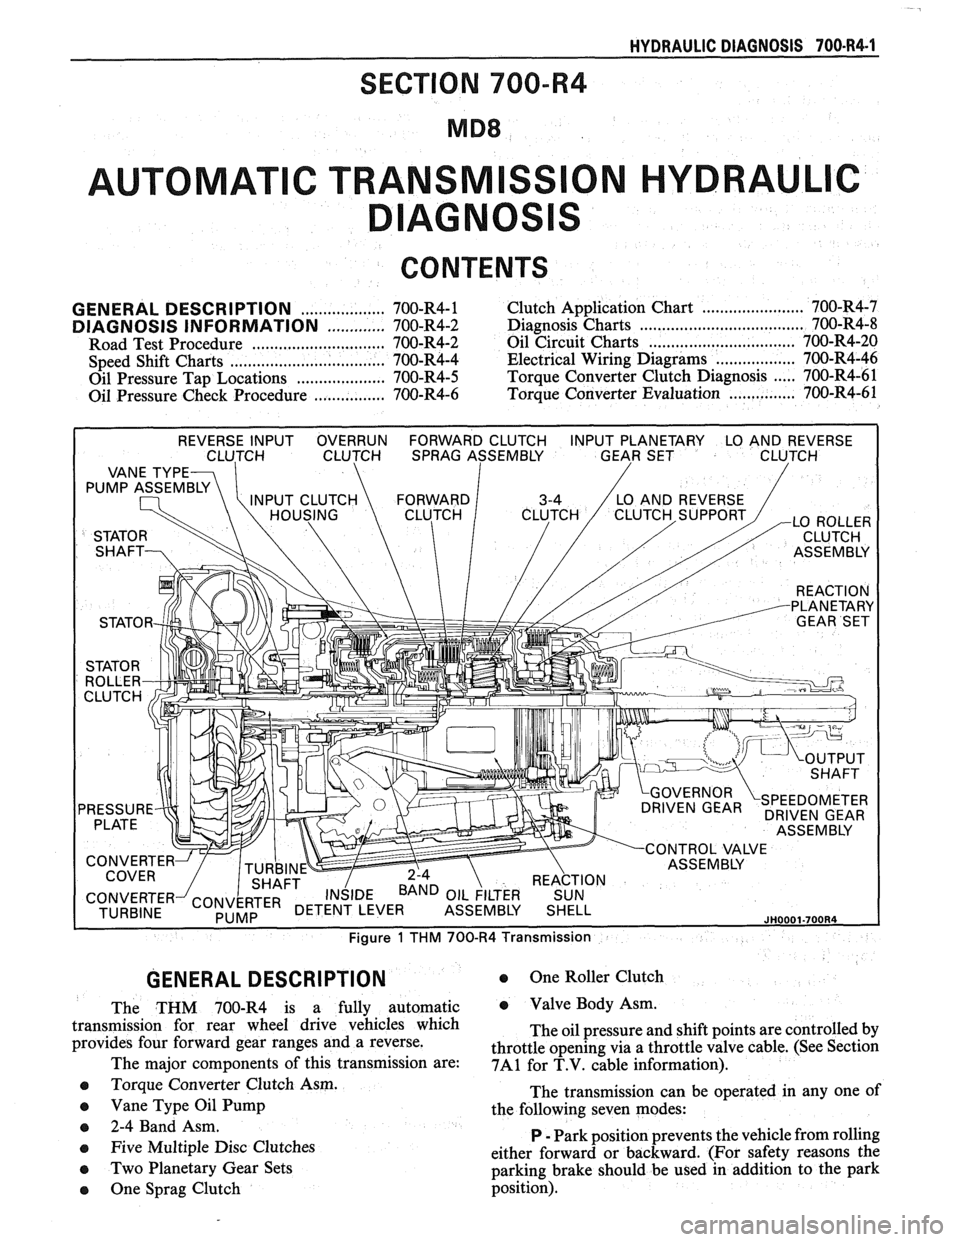
The THM 700-R4 is a fully automatic
transmission for rear wheel drive vehicles which
provides four forward gear ranges and a reverse.
The major components of this transmission are:
e Torque Converter Clutch Asm.
e Vane Type Oil Pump
e 2-4 Band Asm.
e Five Multiple Disc Clutches
0 Two Planetary Gear Sets
0 One Sprag Clutch
0 One Roller Clutch
e Valve Body Asm.
The oil pressure and shift points are controlled by
throttle opening via a throttle valve cable. (See Section
7A1 for T.V. cable information).
The transmission can be operated in any one of
the following seven modes:
P
- Park position prevents the vehicle from rolling
either forward or backward. (For safety reasons the
parking brake should be used in addition to the park
position).
Page 991 of 1825

700-R4-2 HYDRAULIC DIAGNOSIS
R - Reverse allows the vehicle to be operated in
a rearward direction.
N - Neutral allows the engine to be started and
operated without driving the vehicle. If necessary this
position may be selected if the engine must be restarted
with the vehicle moving.
D - Overdrive is used for all normal driving
conditions. It provides four gear ratios plus converter
clutch operation. Downshifts are available for safe
passing by depressing the accelerator.
D - Drive position is used for city traffic, hilly
terrain, and trailer towing. It provides three gear
ranges. Again, downshifts are available by depressing
the accelerator.
2 - Manual second is used to provide acceleration
and engine braking. This range may be selected at any
vehicle speed.
1 - Manual Lo is used to provide maximum
engine
brlking. This range may also be selected at any
vehicle speed.
DIAGNOSIS INFORMATION
ROAD TEST PROCEDURE
e Perform the road test following the sequence
given
e MPH (KPH) shift points will vary with actual
throttle position and driver habits
e Compare the results of the test with speed shift
chart information. Use these results with the
diagnosis information contained in this
Automatic Transmission Hydraulic Diagnosis
Section to evaluate the transmission.
e This test should only be performed when traffic
and road conditions permit
e Observe all traffic safety regulations
Drive and Reverse Engagement Shift Check
1. Start engine
2. Depress brake pedal
3. Move gear selector:
- "Park" (P) to "Reverse" (R)
- "Reverse" (R) to "Neutral"
(N) to "Drive" (D)
Gear selections should be immediate and
not harsh.
Upshifts and Torque Converter Clutch (TCC)
Apply (Figure
2)
With gear selector in "Overdrive" (D)
1. Accelerate using a steady increasing throttle
pressure
2. Note the shift speed point gear engagements for:
- 2nd gear
- 3rd gear
- Overdrive
3. Note the speed shift point for TCC apply. This
should occur while in third gear or overdrive. If
the apply is not noticed, refer to the Preliminary
Torque Converter Clutch Diagnosis information
contained in this section of the Service Manual.
Important
The torque converter clutch will not engage if
engine coolant has not reached a minimum
operating temperature of approximately 54°C
(1 30°F).
Part Throttle Downshift
At vehicle speeds of 40-55 MPH (64-88
KPH) quickly depressed the accelerator to
a half open position and observe:
- TCC releases
- Transmission downshift to 3rd gear
immediately
Full Throttle (Detent) Downshift
At vehicle speeds of 48-55 MPH (77-88
KPH) quickly depress the accelerator to a
wide open position and observe:
- TCC releases
- Transmission downshifts to 2nd gear
immediately
Manual Downshift
1. At vehicle speeds of 40-55 MPH (64 to 88 KPH)
release the accelerator pedal while moving the
gear selector to "Third" gear (D) and observe:
- TCC release
- Transmission downshift to 3rd gear should
be immediate
- Engine should slow vehicle down
2. Move gear selector to "Overdrive" and accelerate
to 40-45 MPH (64-72 KPH). Release the
accelerator pedal while moving the gear selector
to "Second" gear (2) and observe.
- TCC release
- Downshift to second gear should be
immediate
- Engine should slow vehicle down
3. Move gear selector to "Overdrive" (D) and
accelerate to 25 MPH (40 KPH). Release the
accelerator pedal while moving the gear selector
to "First" gear (1) and observe:
- TCC release
- Transmission downshift to 1st gear should
be immediate
- Engine should slow vehicle down
Coastdown Downshift
1. With the gear selector in "Overdrive" (D)
accelerate to 4th gear with TCC applied.
2. Release the accelerator pedal and lightly apply
the brakes to observe:
- TCC release
- Shift points for downshifts.
Manual Gear Range Selection
MANUAL THIRD (D)
1. With vehicle stopped, place gear selector in
"Third" (D) and accelerate to observe:
Page 1050 of 1825
TORQUE CONVERTER CLUTCH (TCC)
DIAGNOSIS
To properly diagnose the Torque Converter
Clutch (TCC) system, perform all electrical
testing first and then the hydraulic testing. Refer
to the Torque Converter Section
6E2-C8 for
additional information.
The TCC is applied by fluid pressure which is
controlled by a solenoid located inside the Automatic
Transmission assembly. The solenoid is energized or
released by making or breaking an electrical circuit
through a combination of switches and sensors.
TCC Electrical Diagnosis
e For electrical diagnosis of TCC, refer to the
specific vehicle section in Section
8A, Electrical
Diagnosis.
e For diagnosis of emission control related
components of TCC, Refer to the specific section
of
6E, Driveability and Emissions.
e For the diagnosis of TCC Hydraulic Controls,
refer to the Procedure and Wiring Diagrams
provided in this section.
Functional Check Procedure
rn Inspect
1. Install a tachometer
2. Operate the vehicle until proper operating
temperature is reached
3. Drive vehicle at 50-55 mph (80-88 Km/h) with
light throttle (road load)
4. Maintaining throttle lightly touch the brake
pedal and check for a slight bump when the TCC
releases and a slight increase in engine RPM.
5. Release the brake, slowly accelerate and check for
a re-apply of the converter clutch and a slight
decrease in engine RPM.
Preliminary Checking Procedure
The purpose of the preliminary checking
procedure is to isolate external (electrical) problems
from internal (electrical or mechanical) ones.
Important
e Use only a scale type ohmmeter. High impedance
type ohmmeters and those with a digital readout
will not work.
e An ALCL scanner may be used to verify the
electrical circuit. Remember, a completed circuit
does not indicate that the solenoid will apply.
e Do not bench test using an automotive type
battery. Accidentally crossed wires will damage
the internal diodes of the TCC solenoid.
HYDRAULIC DIAGNOSIS 700-R4-61
External Controls
rn Inspect
e Connect voltmeter between transmission
connector and ground.
e Turn key "ON"
e If 0 or low voltage is found, refer to Sections 6E
and 8A for electrical diagnosis.
e If 12 volts are present at the connector, refer to
the TCC hydraulic diagnosis.
TORQUE CONVERTER EVALUATION
Torque Converter Stator
The Torque Converter Stator roller clutch can
have one of two different type malfunctions:
A. Stator Assembly freewheels in both
directions.
B. Stator Assembly remains locked up at all
times.
Condition A-Poor Acceleration Low Speed
The vehicle tends to have poor acceleration from
a standstill. At speeds above 30-35 mph (50-55
km/h),
the car may act normal. If poor acceleration is noted,
it should first be determined that the exhaust system
is not blocked, the engine timing is correct and the
transmission is in first
(1st) gear when starting out.
If the engine freely accelerates to high
r.p.m. in
"NEUTRAL" (N), it can be assumed that the engine
and exhaust system are normal. Checking for poor
performance in "Drive" and Reverse will help
determine if the stator is freewheeling at all times.
Condition B-Poor Acceleration High Speed
Engine r.p.m. and car speed limited or restricted
at high speeds. Performance when accelerating from a
standstill is normal. Engine may over-heat. Visual
examination of the converter may reveal a blue color
from over-heating.
If the converter has been removed, the stator
roller clutch can be checked by inserting a finger into
the splined inner race of the roller clutch and trying to
turn the race in both directions. The inner race should
turn freely clockwise, but not turn or be very difficult
to turn counterclockwise.
The Converter Should Be Replaced If:
e Leaks externally, such as at the hub weld area.
e Converter has an imbalance which cannot be
corrected. (Refer to Converter Vibration Test
Procedure).
e Converter is contaminated with engine coolant
containing antifreeze.
The Converter Should Not Be Replaced If:
e The oil has an odor, is discolored, and there is no
evidence of metal or clutch facing particles.
e The threads in one or more of the three converter
bolt holes are damaged.
- Correct with thread insert. (Refer to Section
6A).
Page 1052 of 1825
AUTOMATIC TRANSMISSION 700-R4-1
AUTOMAT C TRANSM
CONTENTS
TRANSMISSION DISASSEMBLY
.............. General Service Information 700-R4-4
........................................... Disassembly 700-R4-4
2-4 Servo Assembly
................................. 700-R4-4
.................................. Servo Pin Length 700-R4-4
........................ Governor And Extension 700-R4-4
Valve Body And Wiring Harness
........... 700-R4-5
................ Transmission End Play Check 700-R4-6
Oil Pump Assembly
................................ 700-R4-7
2-4 Band. Reverse Input Clutch.
.................. Input And Input Gear Set 700-R4-8
Reaction Gear Set
................................. 700-R4- 10
.............. Lo And Reverse Clutch Parts 700-R4-10
COMPONENT REPAIR AND
TRANSMISSION ASSEMBLY
Inner Manual Linkage .......................... 700-R4- 10
........... Manual Shaft Seal Replacement 700-R4-10
Case
...................................................... 700-R4- 13
Third Accumulator Retainer And
Check Ball Assembly
........................ 700-R4- 15
Case Assembly
............................. ., ...... 700-R4- 18
Lo And Reverse Clutch Assembly
....... 700-R4- 18
*Lo and Reverse Clutch Backing
Plate Selection
.................................. 700-R4- 19
..................................... Parking Pawl 700-R4- 18
Reaction Internal Gear And
Carrier Assembly
.............................. 700-R4- 18
Reaction Internal Gear And Support
... 700-R4- 19
Lo And Reverse Support Assembly
..... 700-R4-20
Reaction Sun Gear And Shell
.............. 700-R4-21
Input Internal Gear And Output
.................. Shaft .......................... ... 700-R4-22
................ Input Carrier And Sun Gear 700-R4-24 *Input
Clutch Assembly
....................... 700-R4-25
Check Valve Retainer and Ball
Assembly Replacement Procedures
. . 700-R4-26
Forward Clutch Sprag Assembly
......... 700-R4-30
*3-4 Clutch Assembly
.......................... 700-R4-32
......... "3-4 Clutch Piston Travel Check 700-R4-32
Clutch Air Check
................................. 700-R4-33
......... *Reverse Input Clutch Assembly 700-R4-33
"Reverse Input Clutch
Backin~Plate
Selection ...................................... 700-R4-34
Reverse Input And Input Clutches
...... 700-R4-35
2-4 Band Assembly
.............................. 700-R4-35
*Oil Pump Assembly
............................ 700-R4-36
"Pump Body .......................................... 700-R4-36
Oil Pump Cover
.................................... 700-R4-36
Oil Pump Body And Cover
.................. 700-R4-39
Transmission End Play Check
.............. 700-R4-4 1
....... Valve Body And Associated Parts 700-R4-44
*Control Valve Assembly
..................... 700-R4-45
*2-4 Servo Assembly
............................. 700-R4-5 1
Governor Assembly ............................... 700-R4-52
........................................... Speedometer 700-R4-55
Torque Converter Assembly
................. 700-R4-55
SEALS AND BEARING
....................................... LOCATIONS 700-R4-58
TORQUE SPECIFICATIONS AND
.................. BUSH l NG LOCATIONS 700-R4-59
BUSHING REPLACEMENT
..................................... PROCEDURE 700-R4-60
GOVERNOR BORE REPAIR
PROCEDURE
......................... ............ 700-R4-63
...... ...................... SPECIAL TOOLS .. 700-R4-64
*Designates significant product changes
since the publication of the
1987 Service
Manual .
Page 1055 of 1825
700.R4.4 AUTOMATIC TRANSMISSION
TRANSMISSION DISASSEMBLY
General Service Information
e Teflon Oil Seal Rings
If any seal rings are damaged, cut, or do not
rotate freely in their groove be certain to check
the ring groove for debris, burrs, or damage.
s Thrust Washer Surfaces
The thrust washer and thrust bearing surfaces
may appear to be polished. This is a normal
condition and should not be considered damage.
Thoroughly clean the exterior of the
transmission.
Remove or Disconnect
e 'Torque Converter (1)
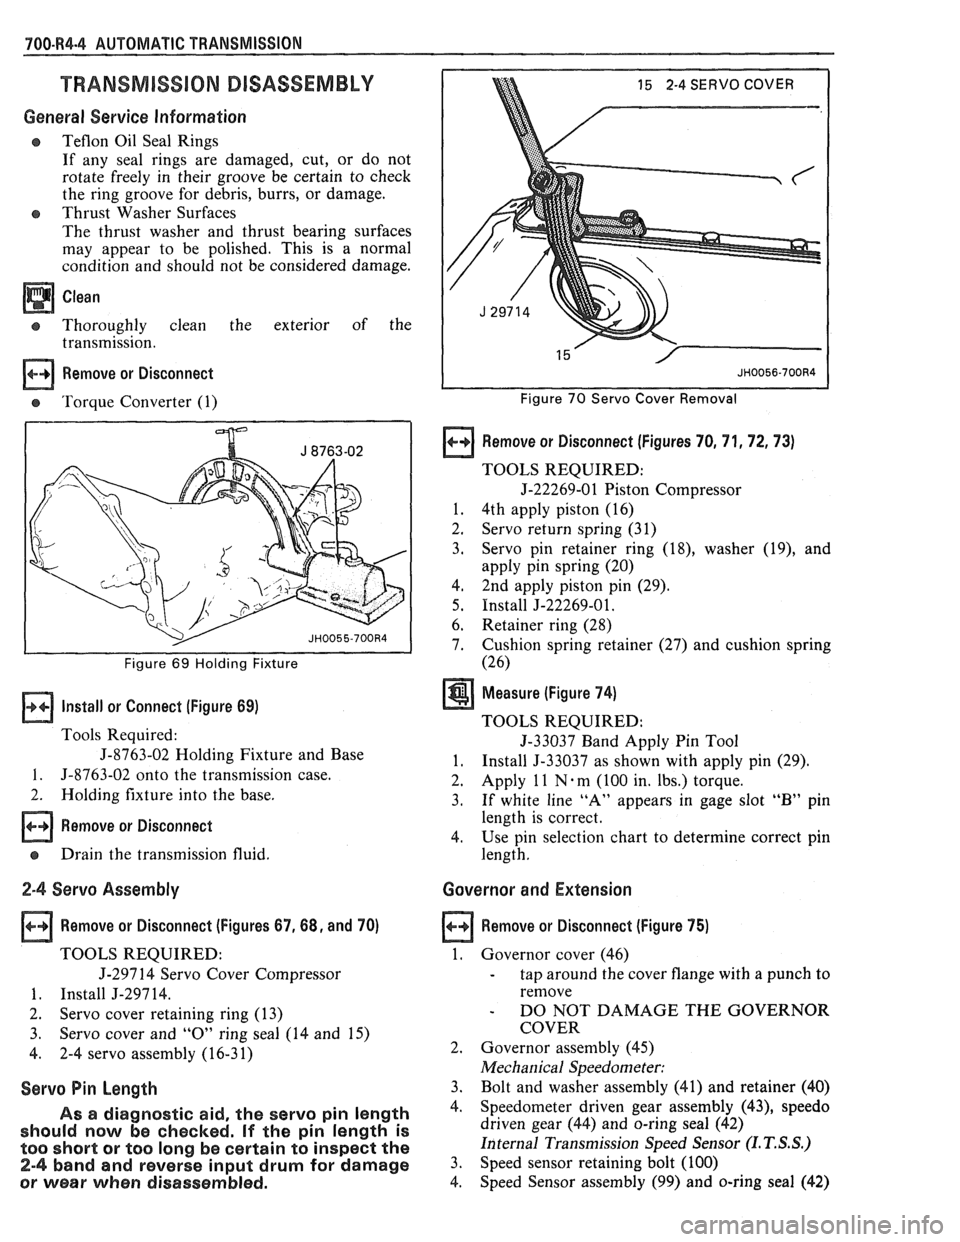
I I Figure 69 Holding Fixture
Install or Connect (Figure 69)
Tools Required:
J-8763-02 Holding Fixture and Base
1. 5-8763-02 onto the transmission case.
2. Holding fixture into the base.
Remove or Disconnect
e Drain the transmission fluid.
2-4 Servo Assembly
Remove or Disconnect (Figures 67,68, and 70)
TOOLS REQUIRED:
J-297 14 Servo Cover Compressor
1. Install J-29714.
2. Servo cover retaining ring (13)
3. Servo cover and
"0" ring seal (14 and 15)
4. 2-4 servo assembly (16-31)
Servo Pin Length
As a diagnostic aid, the servo pin length
should now be checked.
If the pin length is
too short
or too long be certain to inspect the
2-4 band and reverse input drum for damage
or wear when disassembled.
15 2-4 SERVO COVER
Figure 70 Servo Cover Removal
Remove or Disconnect (Figures 70, 71,72,73)
TOOLS REQUIRED:
5-22269-01 Piston Compressor
1. 4th apply piston (16)
2. Servo return spring (31)
3. Servo pin
retainer ring
(18), washer (19), and
apply pin spring (20)
4, 2nd apply piston
pin (29).
5. Install J-22269-01.
6. Retainer ring
(28)
7. Cushion spring
retainer (27) and cushion spring
(26)
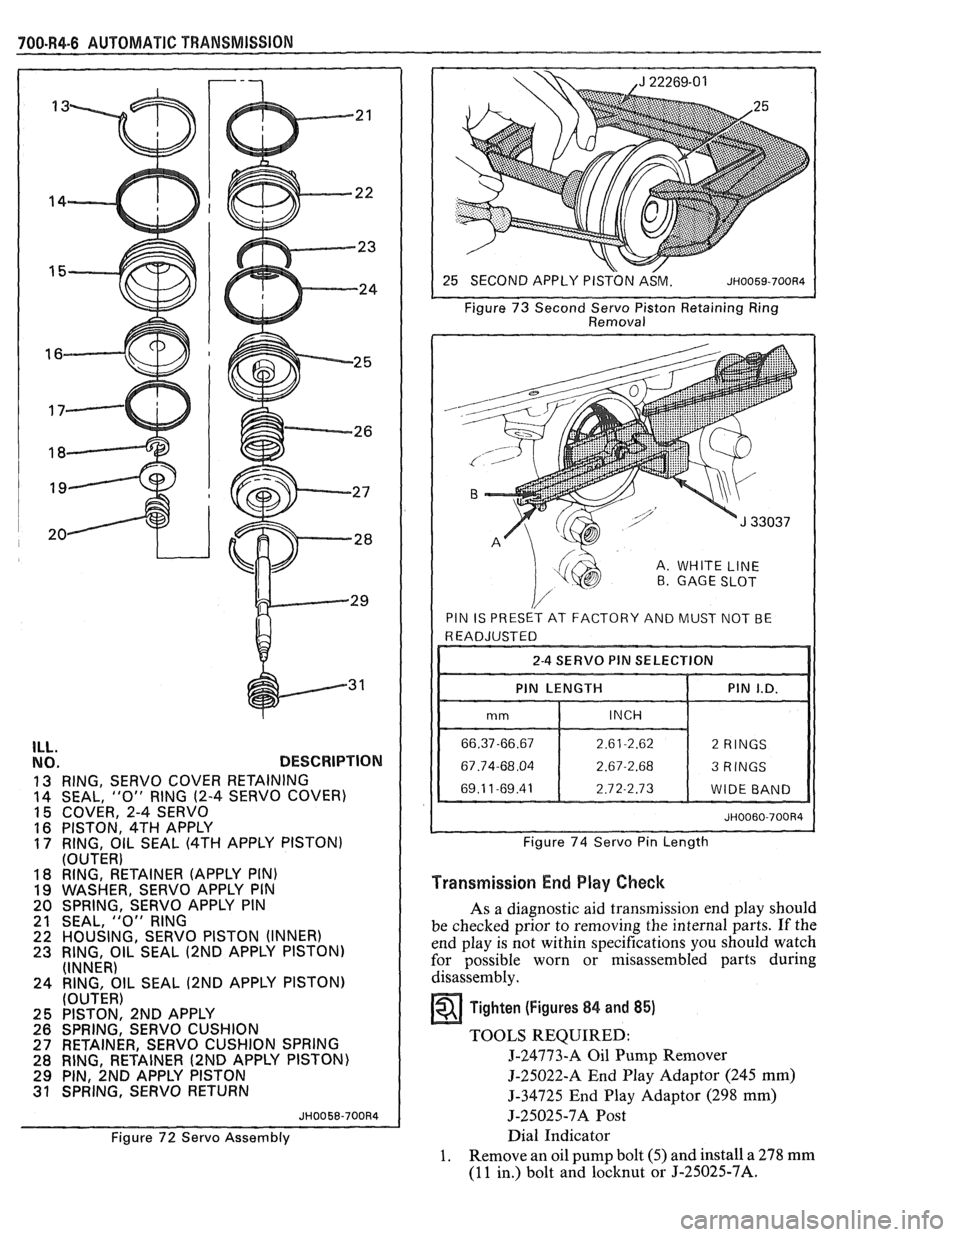
Measure (Figure 74)
TOOLS REQUIRED:
5-33037 Band Apply Pin Tool
1. Install 5-33037 as shown with apply pin (29).
2. Apply
1 1 N . m
(100 in. lbs.) torque.
3. If white line "A" appears in gage slot "B" pin
length is correct.
4. Use pin selection chart to determine correct pin
length.
Governor and Extension
Remove or Disconnect (Figure 75)
1. Governor cover (46)
- tap around the cover flange with a punch to
remove
- DO NOT DAMAGE THE GOVERNOR
COVER
2. Governor assembly (45)
Mechanical Speedometer:
3. Bolt and washer assembly (41) and retainer (40)
4. Speedometer driven gear assembly (43), speedo
driven gear (44) and o-ring seal (42)
Internal Transmission Speed Sensor
(I. T. S.S.)
3. Speed sensor retaining bolt (100)
4. Speed
Sensor assembly
(99) and o-ring seal (42)
Page 1057 of 1825
700.R4-6 AUTOMATIC TRANSMISSION
ILL. NO. DESCRIPTION
13 RING, SERVO COVER RETAINING
14 SEAL, "0" RING (2-4
SERVO COVER)
15 COVER, 2-4 SERVO
16 PISTON, 4TH APPLY 17 RING, OIL SEAL (4TH APPLY PISTON)
(OUTER)
18 RING, RETAINER (APPLY PIN)
19 WASHER, SERVO APPLY PIN
20 SPRING, SERVO APPLY PIN
21 SEAL,
"0" RING 22 HOUSING, SERVO PISTON (INNER) 23 RING, OIL SEAL (2ND APPLY PISTON)
(INNER)
24 RING, OIL SEAL
(2ND APPLY PISTON)
(OUTER)
25 PISTON, 2ND APPLY
26 SPRING, SERVO CUSHION
27 RETAINER, SERVO CUSHION SPRING
28 RING, RETAINER
(2ND APPLY PISTON)
29 PIN, 2ND APPLY PISTON 31 SPRING, SERVO RETURN
JH0058-700R4
Figure 72 Servo Assembly Figure
73 Second
Servo Piston Retaining Ring
Removal
A. WHITE LINE B GAGE SLOT
PIN IS PRESET AT FACTORY AND MUST NOT BE
I I 2-4 SERVO PIN SELECTION I I
I I PIN LENGTH 1 PIN I.D. 11
Figure 74 Servo Pin Length
Transmission End Play Check
As a diagnostic aid transmission end play should
be checked prior to removing the internal parts. If the
end play is not within specifications you should watch
for possible worn or misassembled parts during
disassembly.
Tighten (Figures 84 and 85)
TOOLS REQUIRED:
J-24773-A Oil Pump Remover
5-25022-A End Play Adaptor (245 mm)
5-34725 End Play Adaptor (298 mm)
5-25025-7A Post
Dial Indicator
1. Remove an oil pump bolt (5) and install a 278 mm
(11 in.) bolt and locknut or J-25025-7A.
Page 1058 of 1825
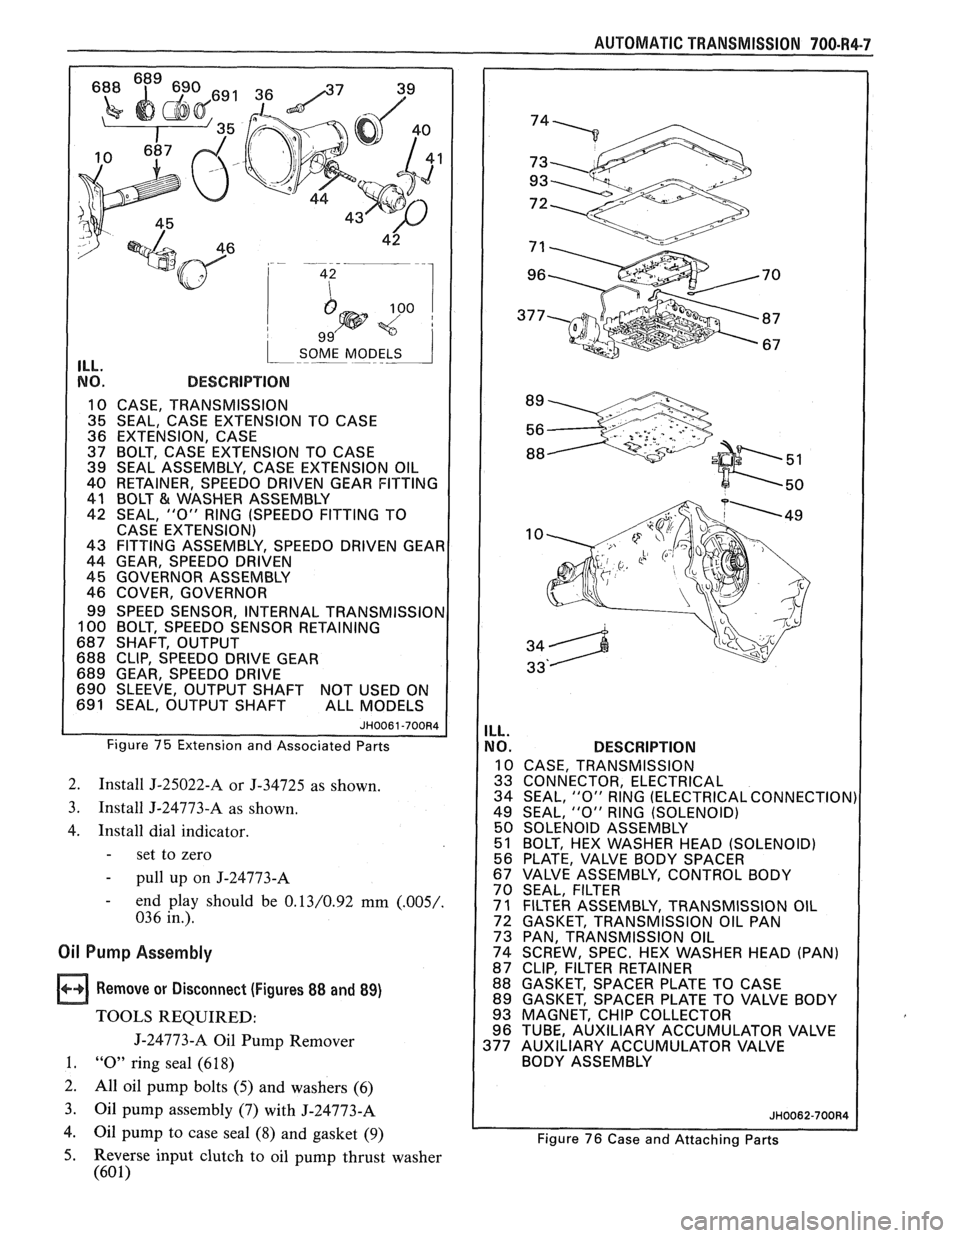
1 SOME MODELS 1 ILL.
NO. DESCRIPTION
10 CASE, TRANSMISSION
1 35 SEAL, CASE EXTENSION TO CASE
36 EXTENSION, CASE
37 BOLT,
CASE EXTENSION TO CASE
39 SEAL ASSEMBLY, CASE EXTENSION OIL
40 RETAINER, SPEEDO
DRIVEN GEAR FITTING
41 BOLT
& WASHER ASSEMBLY
42 SEAL,
"0" RlNG (SPEEDO FITTING TO
CASE EXTENSION)
43 FITTING ASSEMBLY, SPEEDO DRIVEN GEAI
44 GEAR, SPEEDO DRIVEN
45 GOVERNOR ASSEMBLY
46 COVER, GOVERNOR
99 SPEED SENSOR, INTERNAL
TRANSMISSIOI 100 BOLT, SPEEDO SENSOR RETAINING
687 SHAFT, OUTPUT
688 CLIP, SPEEDO DRIVE GEAR
689 GEAR, SPEEDO DRIVE
690 SLEEVE, OUTPUT SHAFT NOT USED ON
691 SEAL, OUTPUT SHAFT ALL MODELS
Figure 75 Extension and Associated Parts
2. Install J-25022-A or J-34725 as shown.
3. Install J-24773-A as shown.
4. Install dial indicator.
- set to zero
- pull up on J-24773-A
- end play should be 0.13/0.92 mm (.005/.
036 in.).
Oil Pump Assembly
Remove or Disconnect (Figures 88 and 89)
TOOLS REQUIRED:
J-24773-A Oil Pump Remover
1. "0" ring seal (6 18)
2.
All oil pump bolts (5) and washers (6)
3.
Oil pump assembly (7) with J-24773-A
4. Oil pump to case seal (8) and gasket (9)
AUTOMATIC TRANSMISSION 700-R4-7
ILL.
NO. DESCRIPTION
10 CASE, TRANSMISSION
33 CONNECTOR, ELECTRICAL
34 SEAL,
"0" RlNG (ELECTRICAL CONNECTION)
49 SEAL,
"0" RlNG (SOLENOID)
50 SOLENOID ASSEMBLY
51 BOLT, HEX WASHER HEAD (SOLENOID)
56 PLATE. VALVE BODY SPACER
/ 67 VALVE' ASSEMBLY, CONTROL BODY
70 SEAL, FILTER
1 71 FILTER ASSEMBLY, TRANSMISSION OIL
72 GASKET, TRANSMISSION OIL PAN
73 PAN, TRANSMISSION OIL
74 SCREW, SPEC. HEX WASHER HEAD (PAN)
87 CLIP, FILTER RETAINER
88 GASKET, SPACER PLATE TO CASE
89 GASKET, SPACER PLATE TO VALVE BODY
93 MAGNET, CHIP COLLECTOR
96 TUBE, AUXILIARY ACCUMULATOR VALVE
377 AUXILIARY ACCUMULATOR VALVE
BODY ASSEMBLY
Figure 76 Case and Attaching Parts
5. Reverse input clutch to oil pump thrust washer
(60 1)