Page 289 of 303
REF•6Tools and Working Facilities
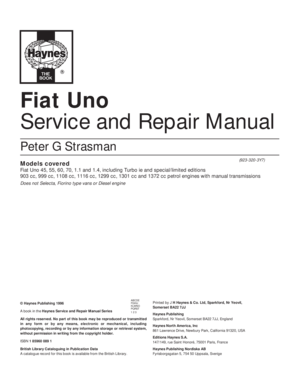
Valve spring compressor Piston ring compressor
Compression testing gaugeClutch plate alignment setBrake shoe steady spring cup removal tool
Piston ring removal/installation toolCylinder bore honeThree-legged hub and bearing puller
Micrometer setVernier calipersDial test indicator and magnetic stand
Sockets and reversible ratchet drive
Page 290 of 303

MDial gauge (see illustration)
MUniversal electrical multi-meter
MCylinder compress")
Tools and Working FacilitiesREF•7
REF
MImpact screwdriver
MMicrometer and/or vernier calipers (see
illustrations)
MDial gauge (see illustration)
MUniversal electrical multi-meter
MCylinder compression gauge
(see illustration)
MClutch plate alignment set (see
illustration)
MBrake shoe steady spring cup removal tool
(see illustration)
MBush and bearing removal/installation set
(see illustration)
MStud extractors (see illustration)
MTap and die set (see illustration)
MLifting tackle
MTrolley jack
Buying tools
For practically all tools, a tool factor is the
best source, since he will have a very
comprehensive range compared with the
average garage or accessory shop. Having
said that, accessory shops often offer
excellent quality tools at discount prices, so it
pays to shop around.
Remember, you don’t have to buy the most
expensive items on the shelf, but it is always
advisable to steer clear of the very cheap
tools. There are plenty of good tools around atreasonable prices, but always aim to
purchase items which meet the relevant
national safety standards. If in doubt, ask the
proprietor or manager of the shop for advice
before making a purchase.
Care and maintenance of tools
Having purchased a reasonable tool kit, it is
necessary to keep the tools in a clean and
serviceable condition. After use, always wipe
off any dirt, grease and metal particles using a
clean, dry cloth, before putting the tools away.
Never leave them lying around after they have
been used. A simple tool rack on the garage
or workshop wall for items such as
screwdrivers and pliers is a good idea. Store
all normal spanners and sockets in a metal
box. Any measuring instruments, gauges,
meters, etc, must be carefully stored where
they cannot be damaged or become rusty.
Take a little care when tools are used.
Hammer heads inevitably become marked,
and screwdrivers lose the keen edge on their
blades from time to time. A little timely
attention with emery cloth or a file will soon
restore items like this to a good serviceable
finish.
Working facilities
Not to be forgotten when discussing toolsis the workshop itself. If anything more than
routine maintenance is to be carried out,
some form of suitable working area becomes
essential.
It is appreciated that many an owner-
mechanic is forced by circumstances to
remove an engine or similar item without the
benefit of a garage or workshop. Having done
this, any repairs should always be done under
the cover of a roof.
Wherever possible, any dismantling should
be done on a clean, flat workbench or table at
a suitable working height.
Any workbench needs a vice; one with a
jaw opening of 100 mm is suitable for most
jobs. As mentioned previously, some clean
dry storage space is also required for tools, as
well as for any lubricants, cleaning fluids,
touch-up paints and so on, which become
necessary.
Another item which may be required, and
which has a much more general usage, is an
electric drill with a chuck capacity of at least 8
mm. This, together with a good range of twist
drills, is virtually essential for fitting
accessories.
Last, but not least, always keep a supply of
old newspapers and clean, lint-free rags
available, and try to keep any working area as
clean as possible.
Bush and bearing removal/installation setStud extractor setTap and die set
Page 291 of 303

REF•8General Repair Procedures
Whenever servicing, repair or overhaul work
is carried out on the car or its components,
observe the following procedures and
instructions. This will assist in carrying out the
operation efficiently and to a professional
standard of workmanship.
Joint mating faces and gaskets
When separating components at their
mating faces, never insert screwdrivers or
similar implements into the joint between the
faces in order to prise them apart. This can
cause severe damage which results in oil
leaks, coolant leaks, etc upon reassembly.
Separation is usually achieved by tapping
along the joint with a soft-faced hammer in
order to break the seal. However, note that
this method may not be suitable where
dowels are used for component location.
Where a gasket is used between the mating
faces of two components, a new one must be
fitted on reassembly; fit it dry unless otherwise
stated in the repair procedure. Make sure that
the mating faces are clean and dry, with all
traces of old gasket removed. When cleaning a
joint face, use a tool which is unlikely to score
or damage the face, and remove any burrs or
nicks with an oilstone or fine file.
Make sure that tapped holes are cleaned
with a pipe cleaner, and keep them free of
jointing compound, if this is being used,
unless specifically instructed otherwise.
Ensure that all orifices, channels or pipes
are clear, and blow through them, preferably
using compressed air.
Oil seals
Oil seals can be removed by levering them
out with a wide flat-bladed screwdriver or
similar implement. Alternatively, a number of
self-tapping screws may be screwed into the
seal, and these used as a purchase for pliers or
some similar device in order to pull the seal free.
Whenever an oil seal is removed from its
working location, either individually or as part
of an assembly, it should be renewed.
The very fine sealing lip of the seal is easily
damaged, and will not seal if the surface it
contacts is not completely clean and free from
scratches, nicks or grooves. If the original
sealing surface of the component cannot be
restored, and the manufacturer has not made
provision for slight relocation of the seal
relative to the sealing surface, the component
should be renewed.
Protect the lips of the seal from any surface
which may damage them in the course of
fitting. Use tape or a conical sleeve where
possible. Lubricate the seal lips with oil before
fitting and, on dual-lipped seals, fill the space
between the lips with grease.
Unless otherwise stated, oil seals must be
fitted with their sealing lips toward the
lubricant to be sealed.
Use a tubular drift or block of wood of the
appropriate size to install the seal and, if the
seal housing is shouldered, drive the seal
down to the shoulder. If the seal housing isunshouldered, the seal should be fitted with
its face flush with the housing top face (unless
otherwise instructed).
Screw threads and fastenings
Seized nuts, bolts and screws are quite a
common occurrence where corrosion has set
in, and the use of penetrating oil or releasing
fluid will often overcome this problem if the
offending item is soaked for a while before
attempting to release it. The use of an impact
driver may also provide a means of releasing
such stubborn fastening devices, when used
in conjunction with the appropriate
screwdriver bit or socket. If none of these
methods works, it may be necessary to resort
to the careful application of heat, or the use of
a hacksaw or nut splitter device.
Studs are usually removed by locking two
nuts together on the threaded part, and then
using a spanner on the lower nut to unscrew
the stud. Studs or bolts which have broken off
below the surface of the component in which
they are mounted can sometimes be removed
using a stud extractor. Always ensure that a
blind tapped hole is completely free from oil,
grease, water or other fluid before installing
the bolt or stud. Failure to do this could cause
the housing to crack due to the hydraulic
action of the bolt or stud as it is screwed in.
When tightening a castellated nut to accept
a split pin, tighten the nut to the specified
torque, where applicable, and then tighten
further to the next split pin hole. Never slacken
the nut to align the split pin hole, unless stated
in the repair procedure.
When checking or retightening a nut or bolt
to a specified torque setting, slacken the nut
or bolt by a quarter of a turn, and then
retighten to the specified setting. However,
this should not be attempted where angular
tightening has been used.
For some screw fastenings, notably
cylinder head bolts or nuts, torque wrench
settings are no longer specified for the latter
stages of tightening, “angle-tightening” being
called up instead. Typically, a fairly low torque
wrench setting will be applied to the
bolts/nuts in the correct sequence, followed
by one or more stages of tightening through
specified angles.
Locknuts, locktabs and washers
Any fastening which will rotate against a
component or housing during tightening
should always have a washer between it and
the relevant component or housing.
Spring or split washers should always be
renewed when they are used to lock a critical
component such as a big-end bearing
retaining bolt or nut. Locktabs which are
folded over to retain a nut or bolt should
always be renewed.
Self-locking nuts can be re-used in non-
critical areas, providing resistance can be felt
when the locking portion passes over the bolt
or stud thread. However, it should be noted
that self-locking stiffnuts tend to lose theireffectiveness after long periods of use, and
should then be renewed as a matter of course.
Split pins must always be replaced with
new ones of the correct size for the hole.
When thread-locking compound is found
on the threads of a fastener which is to be re-
used, it should be cleaned off with a wire
brush and solvent, and fresh compound
applied on reassembly.
Special tools
Some repair procedures in this manual
entail the use of special tools such as a press,
two or three-legged pullers, spring com-
pressors, etc. Wherever possible, suitable
readily-available alternatives to the manu-
facturer’s special tools are described, and are
shown in use. In some instances, where no
alternative is possible, it has been necessary
to resort to the use of a manufacturer’s tool,
and this has been done for reasons of safety
as well as the efficient completion of the repair
operation. Unless you are highly-skilled and
have a thorough understanding of the
procedures described, never attempt to
bypass the use of any special tool when the
procedure described specifies its use. Not
only is there a very great risk of personal
injury, but expensive damage could be
caused to the components involved.
Environmental considerations
When disposing of used engine oil, brake
fluid, antifreeze, etc, give due consideration to
any detrimental environmental effects. Do not,
for instance, pour any of the above liquids
down drains into the general sewage system,
or onto the ground to soak away. Many local
council refuse tips provide a facility for waste
oil disposal, as do some garages. If none of
these facilities are available, consult your local
Environmental Health Department, or the
National Rivers Authority, for further advice.
With the universal tightening-up of legis-
lation regarding the emission of environmen-
tally-harmful substances from motor vehicles,
most vehicles have tamperproof devices fitted
to the main adjustment points of the fuel
system. These devices are primarily designed
to prevent unqualified persons from adjusting
the fuel/air mixture, with the chance of a
consequent increase in toxic emissions. If
such devices are found during servicing or
overhaul, they should, wherever possible, be
renewed or refitted in accordance with the
manufacturer’s requirements or current
legislation.
Note: It is
antisocial and
illegal to dump
oil down the
drain. To find
the location of
your local oil
recycling
bank, call this
number free.
Page 292 of 303

Fault FindingREF•9
REF
Introduction
The vehicle owner who does his or her own
maintenance according to the recommended
schedules should not have to use this section
of the manual very often. Modern component
reliability is such that, provided those items
subject to wear or deterioration are inspected
or renewed at the specified intervals, sudden
failure is comparatively rare. Faults do not
usually just happen as a result of sudden
failure, but develop over a period of time.
Major mechanical failures in particular are
usually preceded by characteristic symptoms
over hundreds or even thousands of miles.
Those components which do occasionally fail
without warning are often small and easily
carried in the vehicle.
With any fault finding, the first step is to
decide where to begin investigations.
Sometimes this is obvious, but on other
occasions a little detective work will be
necessary. The owner who makes half a
dozen haphazard adjustments or
replacements may be successful in curing a
fault (or its symptoms), but he will be none the
wiser if the fault recurs and he may well have
spent more time and money than was
necessary. A calm and logical approach will
be found to be more satisfactory in the long
run. Always take into account any warning
signs or abnormalities that may have been
noticed in the period preceding the fault –
power loss, high or low gauge readings,
unusual noises or smells, etc – and remember
that failure of components such as fuses or
spark plugs may only be pointers to some
underlying fault.
The pages which follow here are intended
to help in cases of failure to start or
breakdown on the road. There is also a Fault
Diagnosis Section at the end of each Chapter
which should be consulted if the preliminary
checks prove unfruitful. Whatever the fault,
certain basic principles apply. These are as
follows:Verify the fault. This is simply a matter of
being sure that you know what the symptoms
are before starting work. This is particularly
important if you are investigating a fault for
someone else who may not have described it
very accurately.
Don’t overlook the obvious. For example,
if the vehicle won’t start, is there petrol in the
tank? (Don’t take anyone else’s word on this
particular point, and don’t trust the fuel gauge
either!) If an electrical fault is indicated, look
for loose or broken wires before digging out
the test gear.
Cure the disease, not the symptom.
Substituting a flat battery with a fully charged
one will get you off the hard shoulder, but if
the underlying cause is not attended to,the
new battery will go the same way. Similarly,
changing oil-fouled spark plugs for a new set
will get you moving again, but remember that
the reason for the fouling (if it wasn’t simply an
incorrect grade of plug) will have to be
established and corrected.
Don’t take anything for granted.
Particularly, don’t forget that a ‘new’
component may itself be defective (especially
if it’s been rattling round in the boot for
months), and don’t leave components out of a
fault diagnosis sequence just because they
are new or recently fitted. When you do finally
diagnose a difficult fault, you’ll probably
realise that all the evidence was there from
the start.
Electrical faults
Electrical faults can be more puzzling than
straightforward mechanical failures, but they
are no less susceptible to logical analysis if
the basic principles of operation are
understood. Vehicle electrical wiring exists in
extremely unfavourable conditions – heat,
vibration and chemical attack and the first
things to look for are loose or corroded
connections and broken or chafed wires,especially where the wires pass through holes
in the bodywork or are subject to vibration.
All metal-bodied vehicles in current
production have one pole of the battery
‘earthed’, ie connected to the vehicle
bodywork, and in nearly all modern vehicles it
is the negative (–) terminal. The various
electrical components – motors, bulb holders,
etc – are also connected to earth, either by
means of a lead or directly by their mountings.
Electric current flows through the component
and then back to the battery via the
bodywork. If the component mounting is
loose or corroded, or if a good path back to
the battery is not available, the circuit will be
incomplete and malfunction will result. The
engine and/or gearbox are also earthed by
means of flexible metal straps to the body or
subframe; if these straps are loose or missing,
starter motor, generator and ignition trouble
may result.
Assuming the earth return to be
satisfactory, electrical faults will be due either
to component malfunction or to defects in the
current supply. Individual components are
dealt with in Chapter 9. If supply wires are
broken or cracked internally this results in an
open-circuit, and the easiest way to check for
this is to bypass the suspect wire temporarily
with a length of wire having a crocodile clip or
suitable connector at each end. Alternatively,
a 12V test lamp can be used to verify the
presence of supply voltage at various points
along the wire and the break can be thus
isolated.
If a bare portion of a live wire touches the
bodywork or other earthed metal part, the
electricity will take the low-resistance path
thus formed back to the battery: this is known
as a short-circuit. Hopefully a short-circuit will
blow a fuse, but otherwise it may cause
burning of the insulation (and possibly further
short-circuits) or even a fire. This is why it is
inadvisable to bypass persistently blowing
fuses with silver foil or wire.
Page 293 of 303

m mBattery terminals loose or corroded
m mBattery earth to body defective
m mEngine earth strap l")
Engine fails to turn when starter
operated
m mFlat battery (recharge use jump leads or
push start)
m mBattery terminals loose or corroded
m mBattery earth to body defective
m mEngine earth strap loose or broken
m mStarter motor (or solenoid) wiring loose or
broken
m mIgnition/starter switch faulty
m mMajor mechanical failure (seizure)
m mStarter or solenoid internal fault (see
Chapter 12)
Starter motor turns engine slowly
m mPartially discharged battery (recharge, use
jump leads, or push start)
m mBattery terminals loose or corroded
m mBattery earth to body defective
m mEngine earth strap loose m mStarter motor (or solenoid) wiring loose
m mStarter motor internal fault (see Chapter 9)
Starter motor spins without
turning engine
m mFlywheel gear teeth damaged or worn
m mStarter motor mounting bolts loose
Engine turns normally but fails to
start
m mDamp or dirty HT leads and distributor cap
(crank engine and check for spark)
m mNo fuel in tank (check for delivery at
carburettor) m mExcessive choke (hot engine) or insufficient
choke (cold engine)
m mFouled or incorrectly gapped spark plugs
(remove, clean and regap)
m mOther ignition system fault (see Chapter 4)
m mOther fuel system fault (see Chapter 3)
m mPoor compression (see Chapter 1)
m mMajor mechanical failure (eg camshaft drive)
Engine fires but will not run
m
mInsufficient choke (cold engine)
m mAir leaks at carburettor or inlet manifold
m mFuel starvation (see Chapter 3)
m mIgnition fault (see Chapter 4)
Engine will not start
REF•10Fault Finding
Spares and tool kit
Most vehicles are supplied only with
sufficient tools for wheel changing; the
Maintenance and minor repairtool kit detailed
in Tools and working facilities,with the
addition of a hammer, is probably sufficient
for those repairs that most motorists would
consider attempting at the roadside. In
addition a few items which can be fitted
without too much trouble in the event of a
breakdown should be carried. Experience and
available space will modify the list below, but
the following may save having to call on
professional assistance:
m mSpark plugs, clean and correctly gapped
m mHT lead and plug cap – long enough to
reach the plug furthest from the distributor
m mDistributor rotor, condenser and contact
breaker points (where applicable)m mDrivebelt(s) — emergency type may
suffice
m mSpare fuses
m mSet of principal light bulbs
m mTin of radiator sealer and hose bandage
m mExhaust bandage
m mRoll of insulating tape
m mLength of soft iron wire
m mLength of electrical flex
m mTorch or inspection lamp (can double as
test lamp)
m mBattery jump leads
m mTow-rope
m mIgnition waterproofing aerosol
m mLitre of engine oil
m mSealed can of hydraulic fluid
m mEmergency windscreen
m mWormdrive clips
m mTube of filler pasteIf spare fuel is carried, a can designed for
the purpose should be used to minimise risks
of leakage and collision damage. A first aid kit
and a warning triangle, whilst not at present
compulsory in the UK, are obviously sensible
items to carry in addition to the above. When
touring abroad it may be advisable to carry
additional spares which, even if you cannot fit
them yourself, could save having to wait while
parts are obtained. The items below may be
worth considering:
m mClutch and throttle cables
m mCylinder head gasket
m mAlternator brushes
m mTyre valve core
One of the motoring organisations will be
able to advise on availability of fuel, etc, in
foreign countries.
A simple test lamp is useful for checking
electrical faultsCarrying a few spares may save you a long walk!
Page 294 of 303

m mCoil failure (check for spark)
m mOther ignition")
Engine cuts out suddenly –
ignition fault
m mLoose or disconnected LT wires
m mWet HT leads or distributor cap (after
traversing water splash)
m mCoil failure (check for spark)
m mOther ignition fault (see Chapter 4)
Engine misfires before cutting out
– fuel fault
m mFuel tank empty
m mFuel pump defective or filter blocked
(check for delivery)
m mFuel tank filler vent blocked (suction will be
evident on releasing cap)
m mCarburettor needle valve sticking
m mCarburettor jets blocked (fuel contami-
nated)
m mOther fuel system fault (see Chapter 3)
Engine cuts out – other causes
m
mSerious overheating
m mMajor mechanical failure (eg camshaft
drive)
Ignition (no-charge) warning light
illuminated
m mSlack or broken drivebelt — retension or
renew (Chapter 9)
Ignition warning light not
illuminated
m mCoolant loss due to internal or external
leakage (see Chapter 2)
m mThermostat defective
m mLow oil level
m mBrakes binding
m mRadiator clogged externally or internally
m mElectric cooling fan not operating correctly
m mEngine waterways clogged
m mIgnition timing incorrect or automatic
advance malfunctioning
m mMixture too weak
Note: Do not add cold water to an overheated
engine or damage may result
Note: Low oil pressure in a high-mileage
engine at tickover is not necessarily a cause
for concern. Sudden pressure loss at speed is
far more significant. In any event check the
gauge or warning light sender before
condemning the engine.
Gauge reads low or warning light
illuminated with engine running
m mOil level low or incorrect grade
m mDefective gauge or sender unit m mWire to sender unit earthed
m mEngine overheating
m mOil filter clogged or bypass valve defective
m mOil pressure relief valve defective
m mOil pick-up strainer clogged
m mOil pump worn or mountings loose
m mWorn main or big-end bearings
Pre-ignition (pinking) on
acceleration
m mIncorrect grade of fuel
m mIgnition timing incorrect
m mDistributor faulty or worn
m mWorn or maladjusted carburettor
m mExcessive carbon build-up in engine
Whistling or wheezing noises
m
mLeaking vacuum hose
m mLeaking carburettor or manifold gasket
m mBlowing head gasket
Tapping or rattling
m
mIncorrect valve clearances (where appli-
cable)
m mWorn valve gear
m mWorn timing chain or belt
m mBroken piston ring (ticking noise)
Knocking or thumping
m
mUnintentional mechanical contact (eg fan
blades)
m mWorn drivebelt
m mPeripheral component fault (generator,
water pump, etc)
m mWorn big-end bearings (regular heavy
knocking, perhaps less under load)
m mWorn main bearings (rumbling and
knocking, perhaps worsening under load)
m mPiston slap (most noticeable when cold)
Engine noises
Low engine oil pressure
Engine overheatsEngine cuts out and will not restart
Fault FindingREF•11
REF
Crank engine and check for spark. Note
use of insulated tool
Page 295 of 303

Buying spare parts
Spare parts are available from many
sources, for example, FIAT garages, other
garages and accessory shops, and motor
factors. Our advice regarding spare parts is as
follows:
Officially appointed FIAT garages -This is
the best source of parts which are peculiar to
your car and otherwise not generally available
(eg complete cylinder heads, internal gearbox
components, badges, interior trim etc). It is
also the only place at which you should buy
parts if your vehicle is still under warranty;
non-FlAT components may invalidate the
warranty. To be sure of obtaining the correct
parts it will always be necessary to give the
partsman your car’s engine number, chassis
number and number for spares, and if
possible, to take the old part along for positive
identification. Many parts are available under
a factory exchange scheme - any parts
returned should always be clean. It obviously
makes good sense to go straight to the
specialists on your car for this type of part for
they are best equipped to supply you. They
will also be able to provide their own FIATservice manual for your car should you require
one.
Other garages and accessory shops - These
are often very good places to buy material
and components needed for the maintenance
of your car (eg oil filters, spark plugs, bulbs,
drivebelts, oils and grease, touch-up paint,
filler paste etc). They also sell accessories,
usually have convenient opening hours,
charge lower prices and can often be found
not far from home.
Motor factors - Good factors stock all of the
more important components which wear out
relatively quickly (eg clutch components,
pistons, valves, exhaust systems, brake
pipes/seals/shoes and pads etc). Motor
factors will often provide new or reconditioned
components on a part exchange basis - this
can save a considerable amount of money.
Vehicle identification
numbers
Modifications are a continuing and
unpublicised process in vehicle manufacture
quite apart from major model changes. Spareparts manuals and lists are compiled upon a
numerical basis, the individual vehicle
numbers being essential to correct identifi-
cation of the component required.
The chassis type and number plate is
located on the wing valance under the bonnet.
The identification data plate is located on the
radiator top rail. The engine type and number
is stamped on the cylinder block. The
paintwork colour code is given on a label
stuck to the inner surface of the tailgate.
REF•12Buying spare parts & Vehicle identification numbers
Manufacturer’s plate legend
Location of under-bonnet identification numbers and plates
A Chassis type and number
B Manufacturer’s plate
C Engine number (903 cc)
D Engine number (1116 cc and 1301 cc)
Engine number on 1116 cc engine
A Name of manufacturer
B Approval number
C Vehicle identification number
D Chassis serial number
E Maximum laden weight
F Maximum laden weight
(vehicle plus trailer)G Maximum front axle weight
H Maximum rear axle weight
I Engine type
L Body type
M Spares reference
N Diesel models only (smoke
coefficient)
Page 296 of 303
A system,
usually electronically controlled, that senses
incipient wheel lockup during braking and
relieves hydraulic pressure at")
Glossary of Technical TermsREF•13
REF
A
ABS (Anti-lock brake system)A system,
usually electronically controlled, that senses
incipient wheel lockup during braking and
relieves hydraulic pressure at wheels that are
about to skid.
Air bag An inflatable bag hidden in the
steering wheel (driver’s side) or the dash or
glovebox (passenger side). In a head-on
collision, the bags inflate, preventing the
driver and front passenger from being thrown
forward into the steering wheel or windscreen.
Air cleanerA metal or plastic housing,
containing a filter element, which removes
dust and dirt from the air being drawn into the
engine.
Air filter elementThe actual filter in an air
cleaner system, usually manufactured from
pleated paper and requiring renewal at regular
intervals.
Allen keyA hexagonal wrench which fits into
a recessed hexagonal hole.
Alligator clipA long-nosed spring-loaded
metal clip with meshing teeth. Used to make
temporary electrical connections.
AlternatorA component in the electrical
system which converts mechanical energy
from a drivebelt into electrical energy to
charge the battery and to operate the starting
system, ignition system and electrical
accessories.
Ampere (amp)A unit of measurement for the
flow of electric current. One amp is the
amount of current produced by one volt
acting through a resistance of one ohm.
Anaerobic sealerA substance used to
prevent bolts and screws from loosening.
Anaerobic means that it does not require
oxygen for activation. The Loctite brand is
widely used.
AntifreezeA substance (usually ethylene
glycol) mixed with water, and added to a
vehicle’s cooling system, to prevent freezing
of the coolant in winter. Antifreeze also
contains chemicals to inhibit corrosion and
the formation of rust and other deposits that
would tend to clog the radiator and coolant
passages and reduce cooling efficiency.
Anti-seize compoundA coating that
reduces the risk of seizing on fasteners that
are subjected to high temperatures, such as
exhaust manifold bolts and nuts.
AsbestosA natural fibrous mineral with great
heat resistance, commonly used in the
composition of brake friction materials.Asbestos is a health hazard and the dust
created by brake systems should never be
inhaled or ingested.
AxleA shaft on which a wheel revolves, or
which revolves with a wheel. Also, a solid
beam that connects the two wheels at one
end of the vehicle. An axle which also
transmits power to the wheels is known as a
live axle.
AxleshaftA single rotating shaft, on either
side of the differential, which delivers power
from the final drive assembly to the drive
wheels. Also called a driveshaft or a halfshaft.
BBall bearingAn anti-friction bearing
consisting of a hardened inner and outer race
with hardened steel balls between two races.
BearingThe curved surface on a shaft or in a
bore, or the part assembled into either, that
permits relative motion between them with
minimum wear and friction.
Big-end bearingThe bearing in the end of
the connecting rod that’s attached to the
crankshaft.
Bleed nippleA valve on a brake wheel
cylinder, caliper or other hydraulic component
that is opened to purge the hydraulic system
of air. Also called a bleed screw.
Brake bleedingProcedure for removing air
from lines of a hydraulic brake system.
Brake discThe component of a disc brake
that rotates with the wheels.Brake drumThe component of a drum brake
that rotates with the wheels.
Brake liningsThe friction material which
contacts the brake disc or drum to retard the
vehicle’s speed. The linings are bonded or
riveted to the brake pads or shoes.
Brake padsThe replaceable friction pads
that pinch the brake disc when the brakes are
applied. Brake pads consist of a friction
material bonded or riveted to a rigid backing
plate.
Brake shoeThe crescent-shaped carrier to
which the brake linings are mounted and
which forces the lining against the rotating
drum during braking.
Braking systemsFor more information on
braking systems, consult the Haynes
Automotive Brake Manual.
Breaker barA long socket wrench handle
providing greater leverage.
BulkheadThe insulated partition between
the engine and the passenger compartment.
CCaliperThe non-rotating part of a disc-brake
assembly that straddles the disc and carries
the brake pads. The caliper also contains the
hydraulic components that cause the pads to
pinch the disc when the brakes are applied. A
caliper is also a measuring tool that can be set
to measure inside or outside dimensions of an
object.
CamshaftA rotating shaft on which a series
of cam lobes operate the valve mechanisms.
The camshaft may be driven by gears, by
sprockets and chain or by sprockets and a
belt.
CanisterA container in an evaporative
emission control system; contains activated
charcoal granules to trap vapours from the
fuel system.
CarburettorA device which mixes fuel with
air in the proper proportions to provide a
desired power output from a spark ignition
internal combustion engine.
CastellatedResembling the parapets along
the top of a castle wall. For example, a
castellated balljoint stud nut.
CastorIn wheel alignment, the backward or
forward tilt of the steering axis. Castor is
positive when the steering axis is inclined
rearward at the top.
Canister
Brake bleeding
Bearing
Air filter
 1
1 2
2 3
3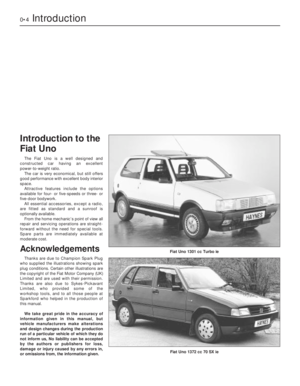 4
4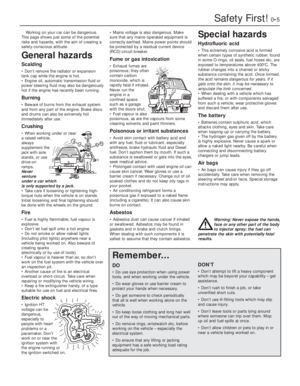 5
5 6
6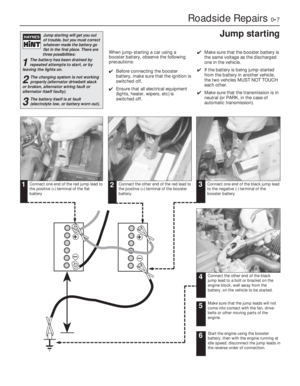 7
7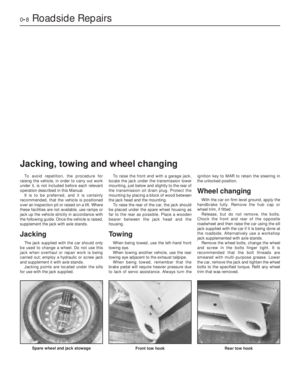 8
8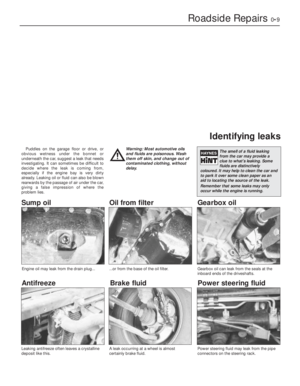 9
9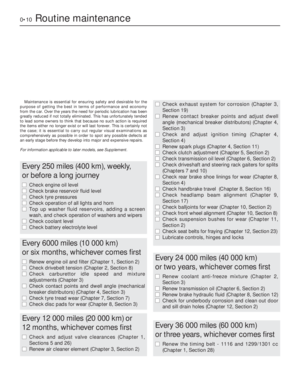 10
10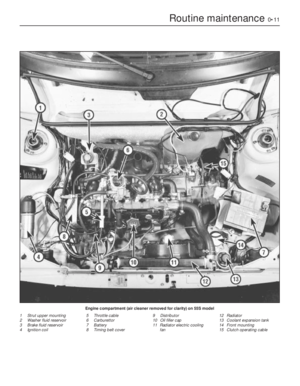 11
11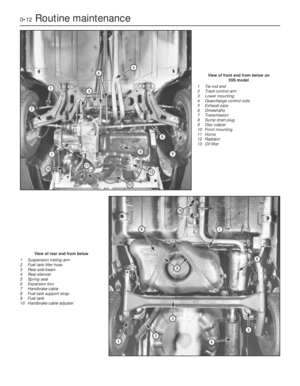 12
12 13
13 14
14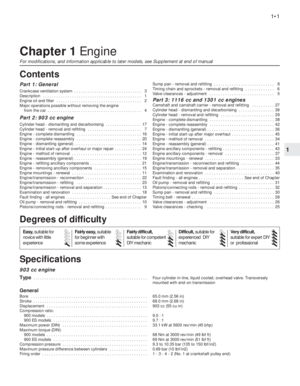 15
15 16
16 17
17 18
18 19
19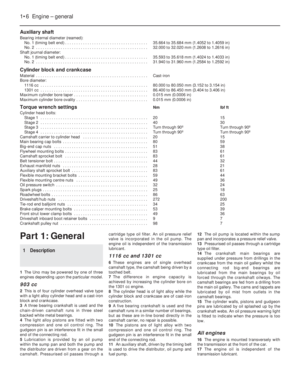 20
20 21
21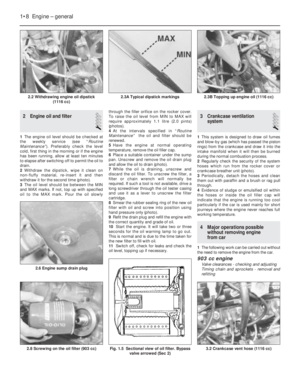 22
22 23
23 24
24 25
25 26
26 27
27 28
28 29
29 30
30 31
31 32
32 33
33 34
34 35
35 36
36 37
37 38
38 39
39 40
40 41
41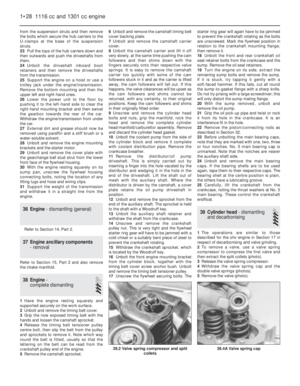 42
42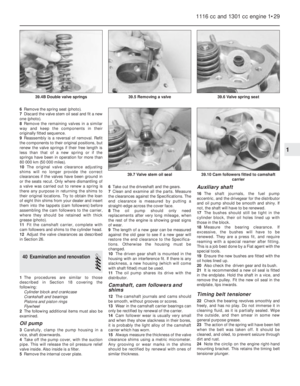 43
43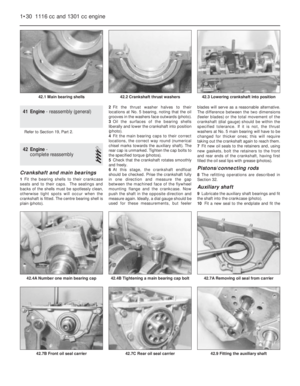 44
44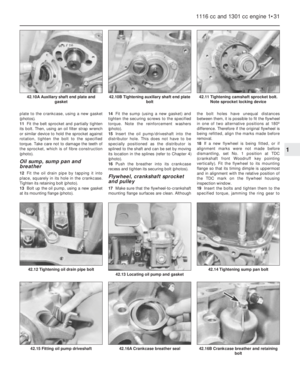 45
45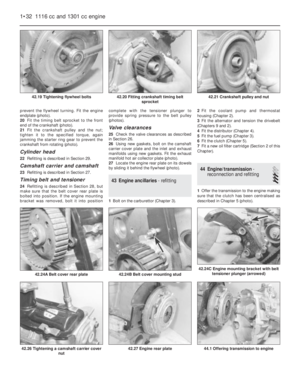 46
46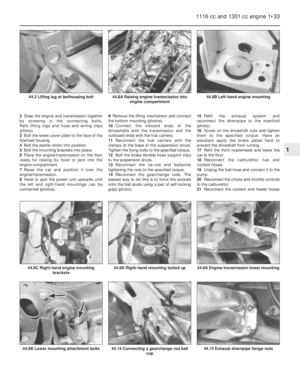 47
47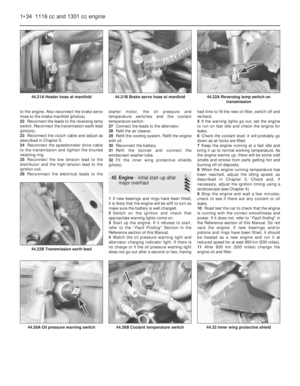 48
48 49
49 50
50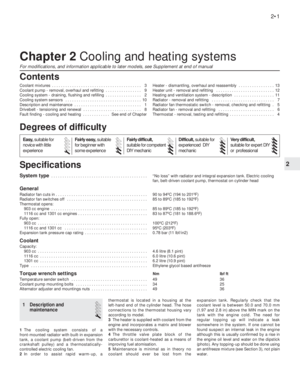 51
51 52
52 53
53 54
54 55
55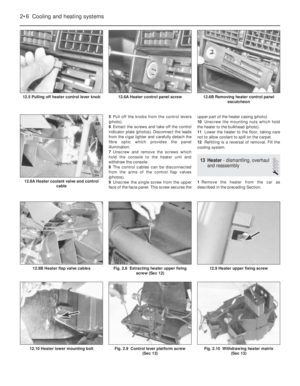 56
56 57
57 58
58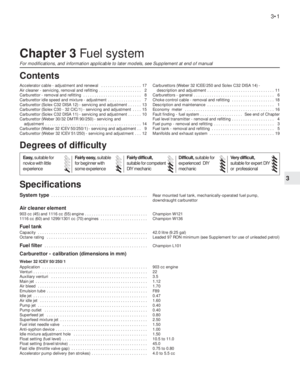 59
59 60
60 61
61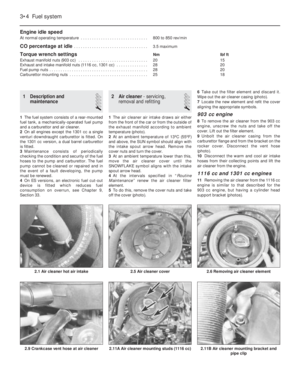 62
62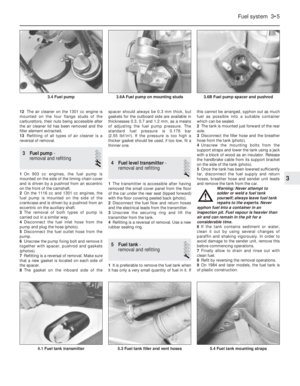 63
63 64
64 65
65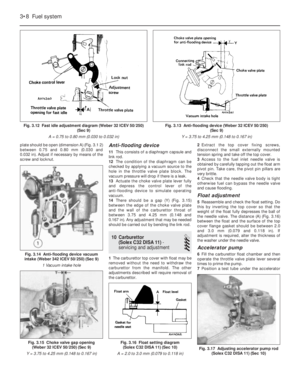 66
66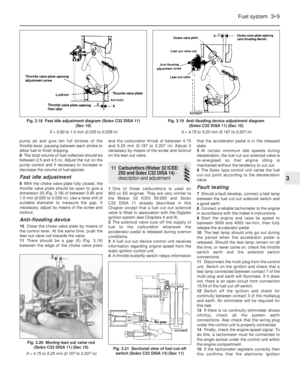 67
67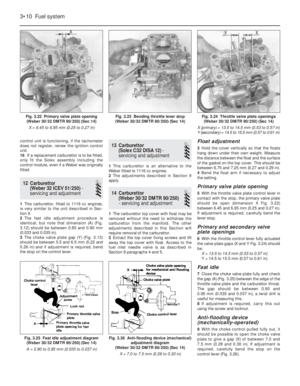 68
68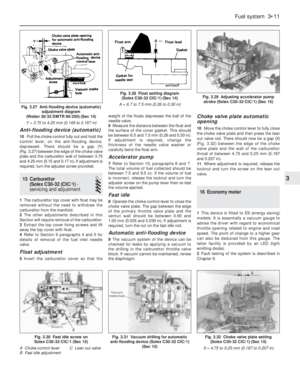 69
69 70
70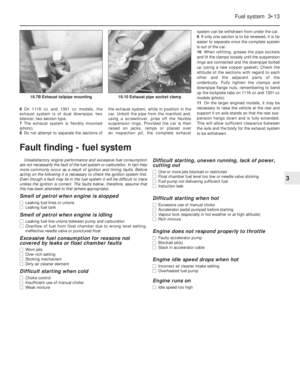 71
71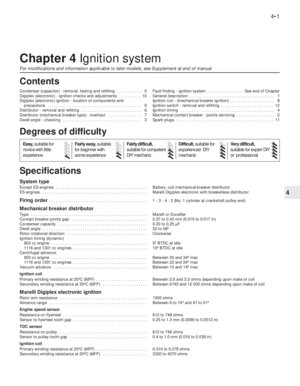 72
72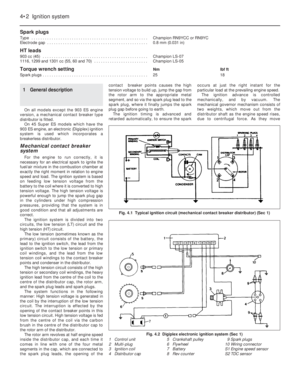 73
73 74
74 75
75 76
76 77
77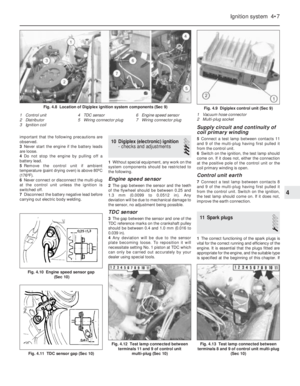 78
78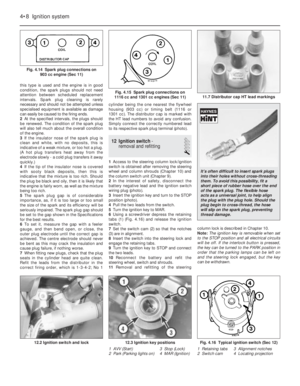 79
79 80
80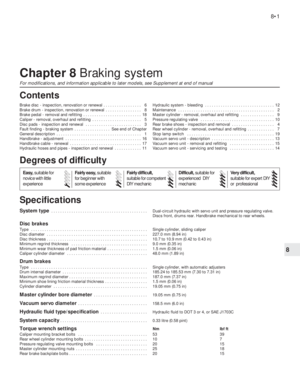 81
81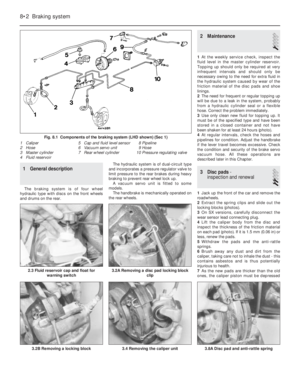 82
82 83
83 84
84 85
85 86
86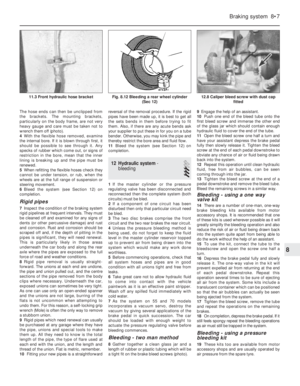 87
87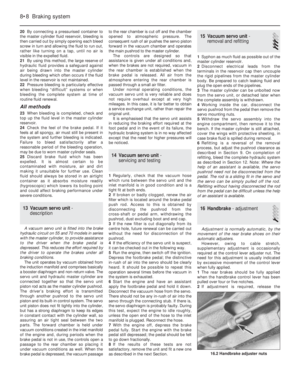 88
88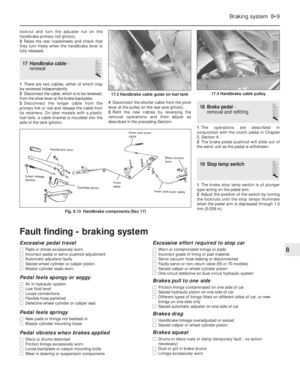 89
89 90
90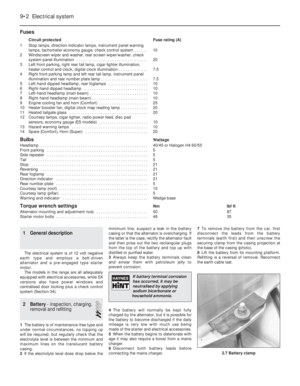 91
91 92
92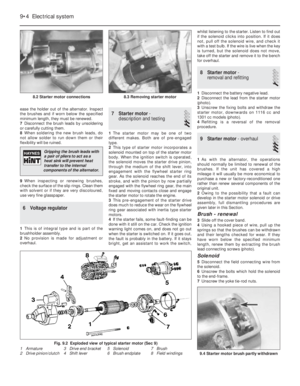 93
93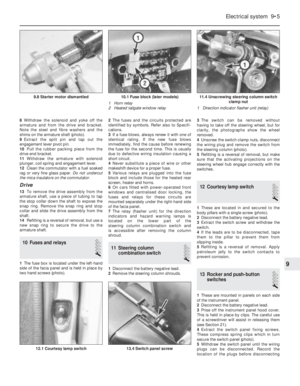 94
94 95
95 96
96 97
97 98
98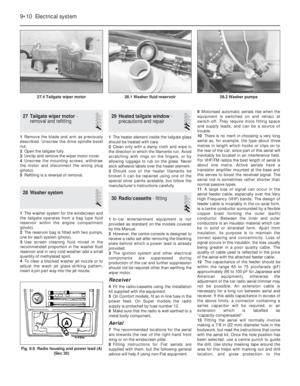 99
99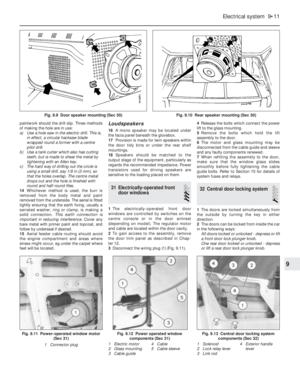 100
100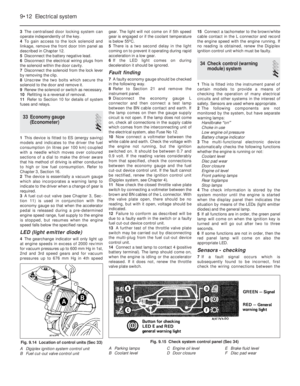 101
101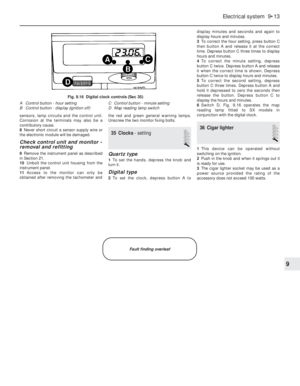 102
102 103
103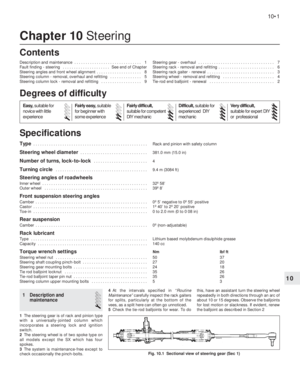 104
104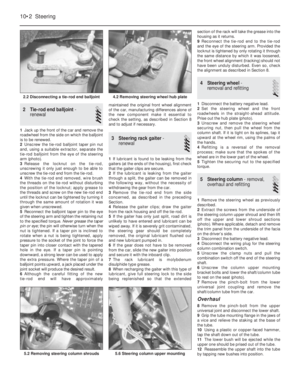 105
105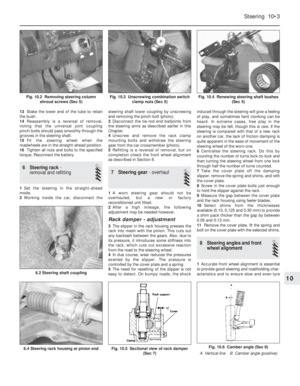 106
106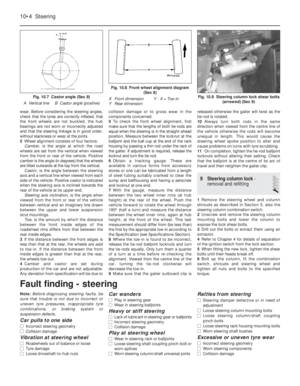 107
107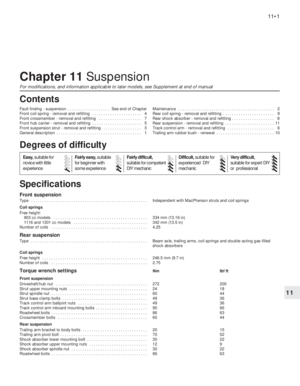 108
108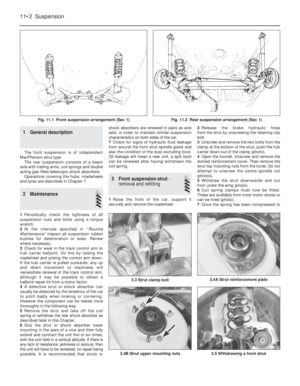 109
109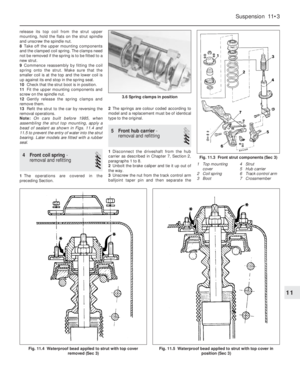 110
110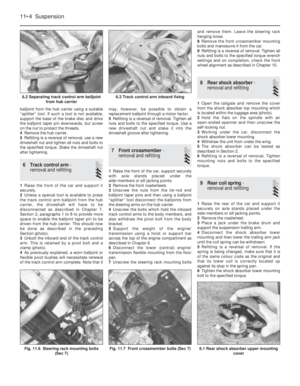 111
111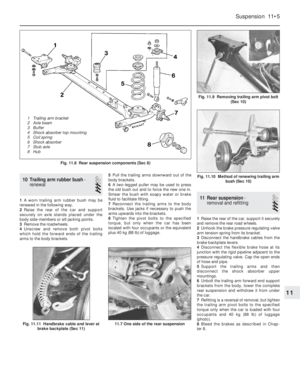 112
112 113
113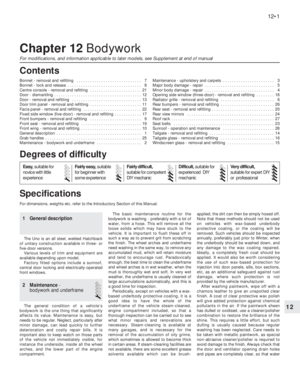 114
114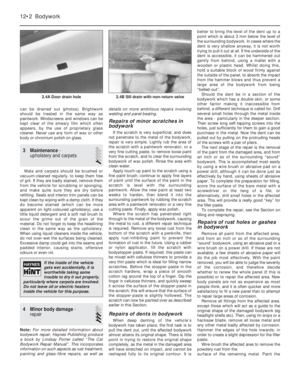 115
115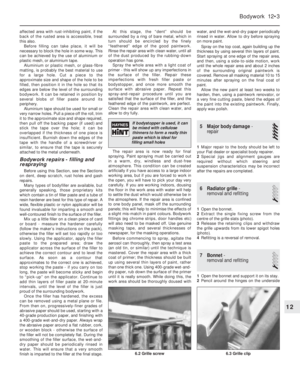 116
116 117
117 118
118 119
119 120
120 121
121 122
122 123
123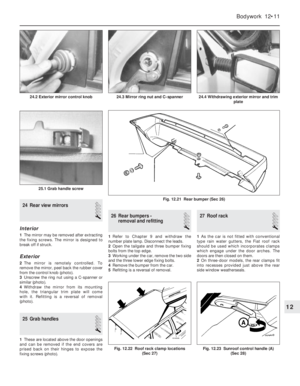 124
124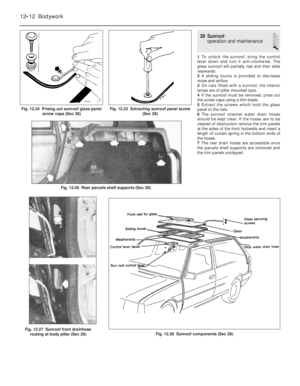 125
125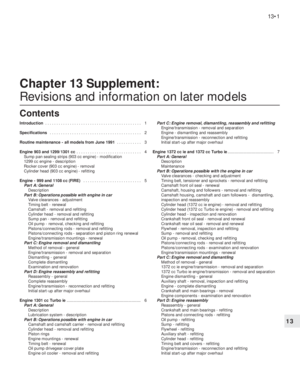 126
126 127
127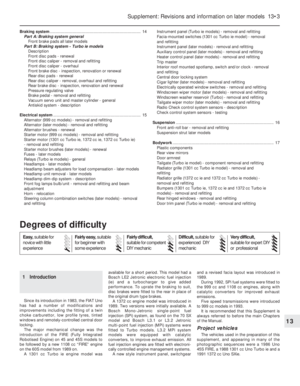 128
128 129
129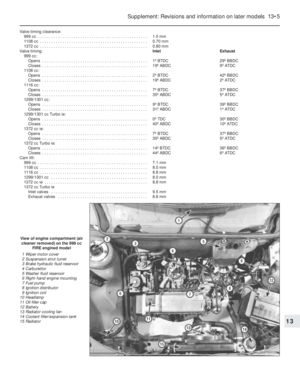 130
130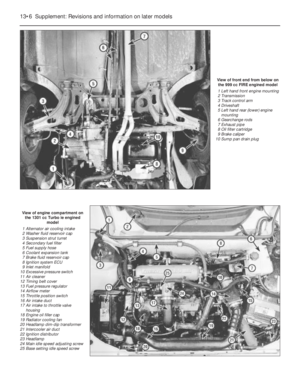 131
131 132
132 133
133 134
134 135
135 136
136 137
137 138
138 139
139 140
140 141
141 142
142 143
143 144
144 145
145 146
146 147
147 148
148 149
149 150
150 151
151 152
152 153
153 154
154 155
155 156
156 157
157 158
158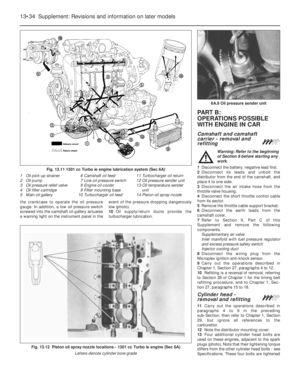 159
159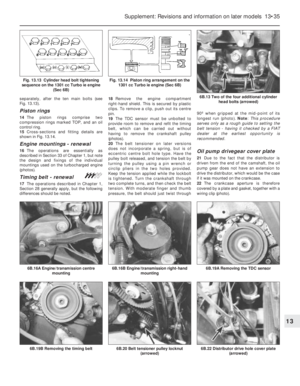 160
160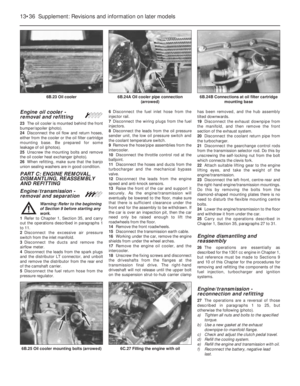 161
161 162
162 163
163 164
164 165
165 166
166 167
167 168
168 169
169 170
170 171
171 172
172 173
173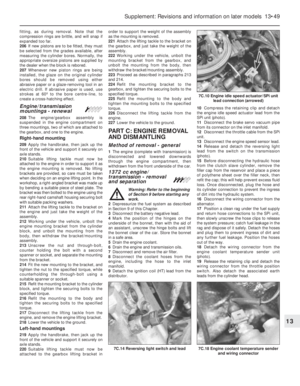 174
174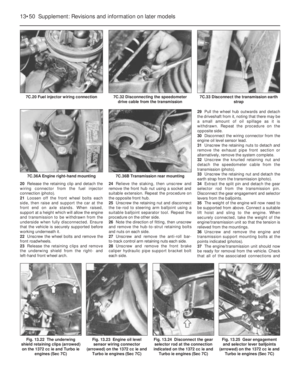 175
175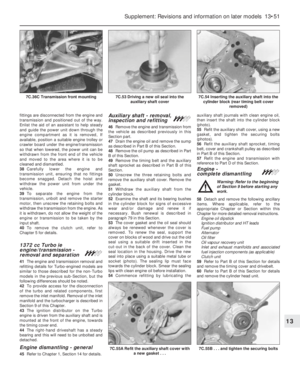 176
176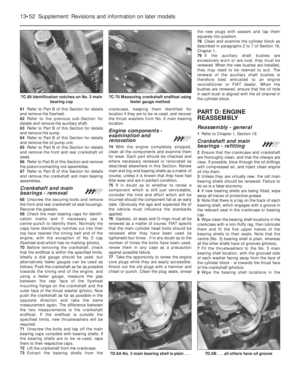 177
177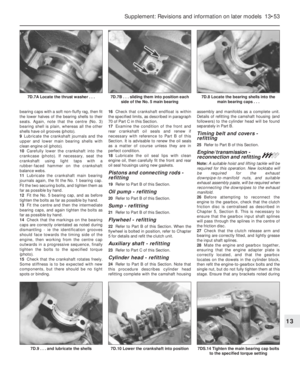 178
178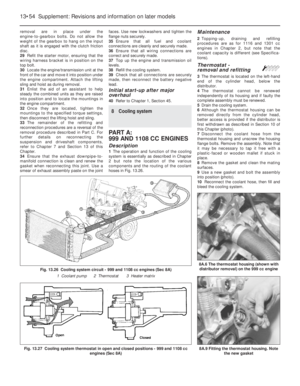 179
179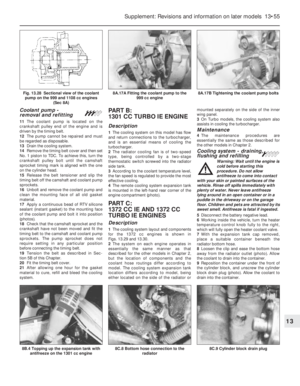 180
180 181
181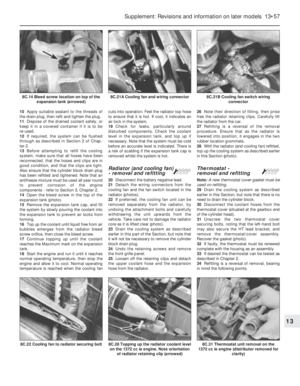 182
182 183
183 184
184 185
185 186
186 187
187 188
188 189
189 190
190 191
191 192
192 193
193 194
194 195
195 196
196 197
197 198
198 199
199 200
200 201
201 202
202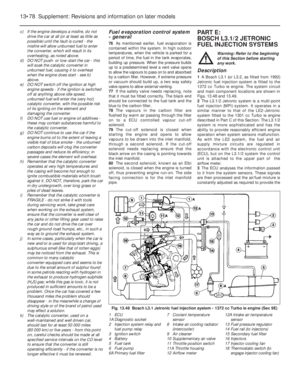 203
203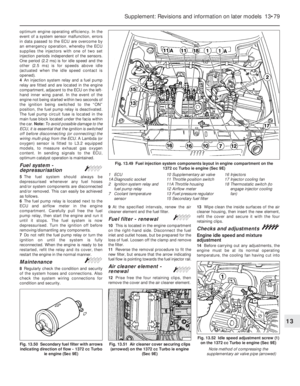 204
204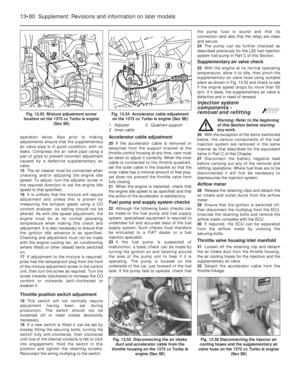 205
205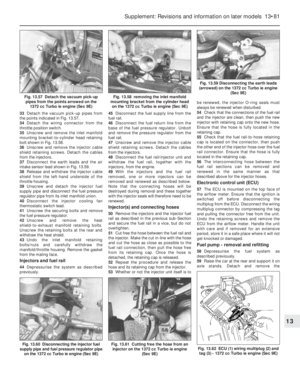 206
206 207
207 208
208 209
209 210
210 211
211 212
212 213
213 214
214 215
215 216
216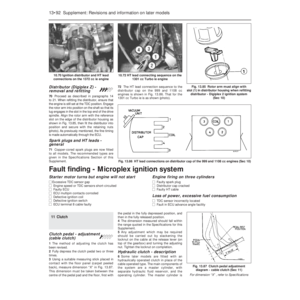 217
217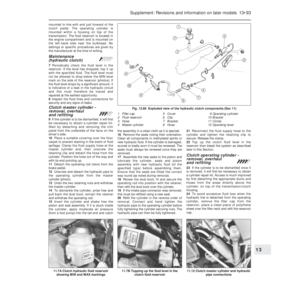 218
218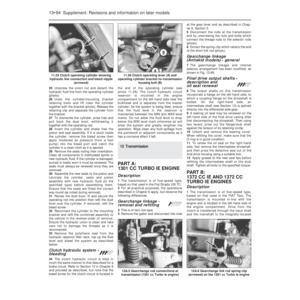 219
219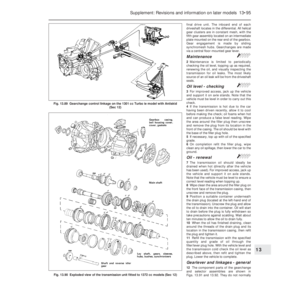 220
220 221
221 222
222 223
223 224
224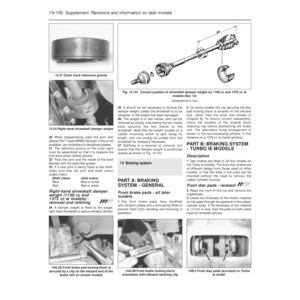 225
225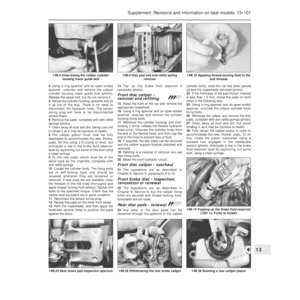 226
226 227
227 228
228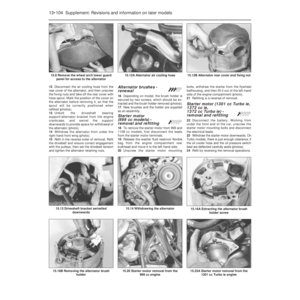 229
229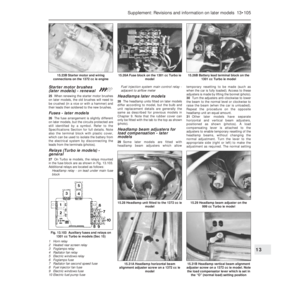 230
230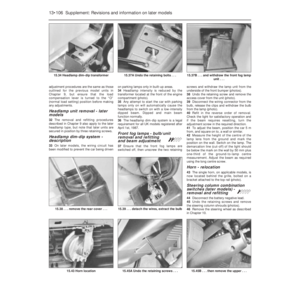 231
231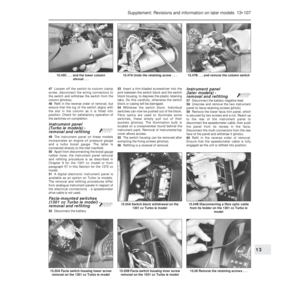 232
232 233
233 234
234 235
235 236
236 237
237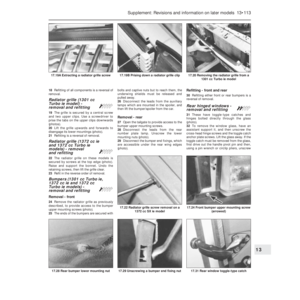 238
238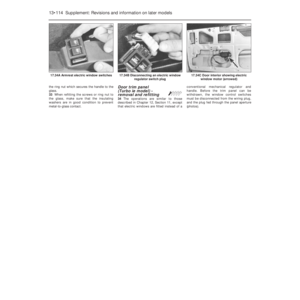 239
239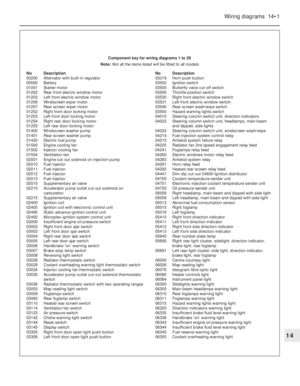 240
240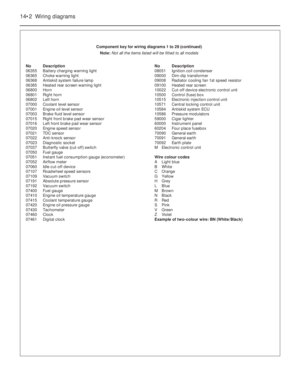 241
241 242
242 243
243 244
244 245
245 246
246 247
247 248
248 249
249 250
250 251
251 252
252 253
253 254
254 255
255 256
256 257
257 258
258 259
259 260
260 261
261 262
262 263
263 264
264 265
265 266
266 267
267 268
268 269
269 270
270 271
271 272
272 273
273 274
274 275
275 276
276 277
277 278
278 279
279 280
280 281
281 282
282 283
283 284
284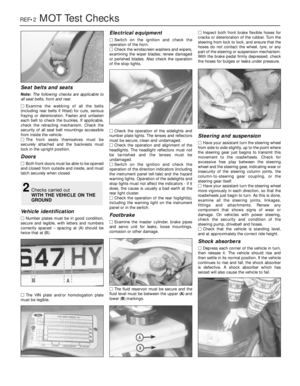 285
285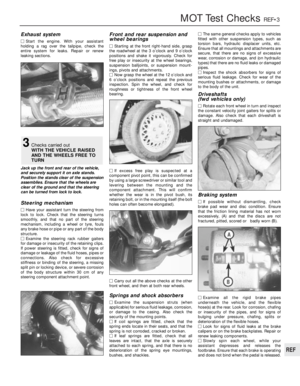 286
286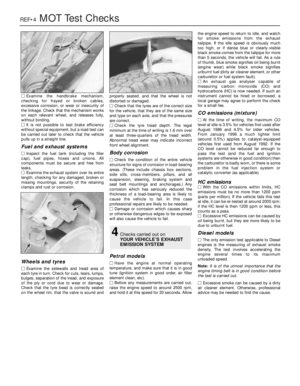 287
287 288
288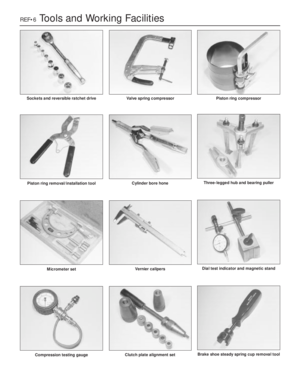 289
289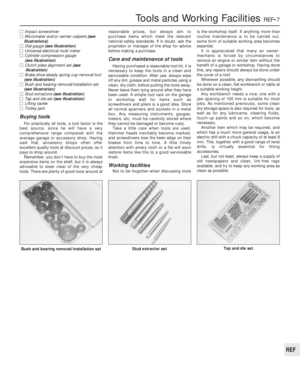 290
290 291
291 292
292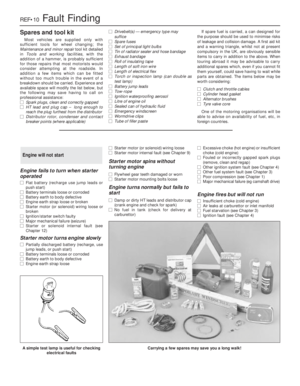 293
293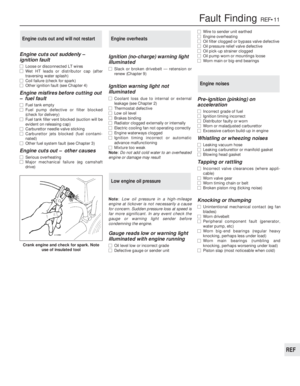 294
294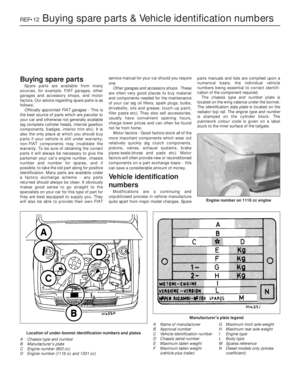 295
295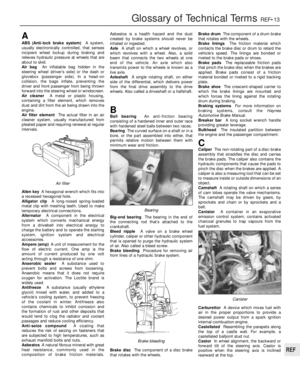 296
296 297
297 298
298 299
299 300
300 301
301 302
302