1973 DATSUN B110 transmission oil
[x] Cancel search: transmission oilPage 43 of 513
18
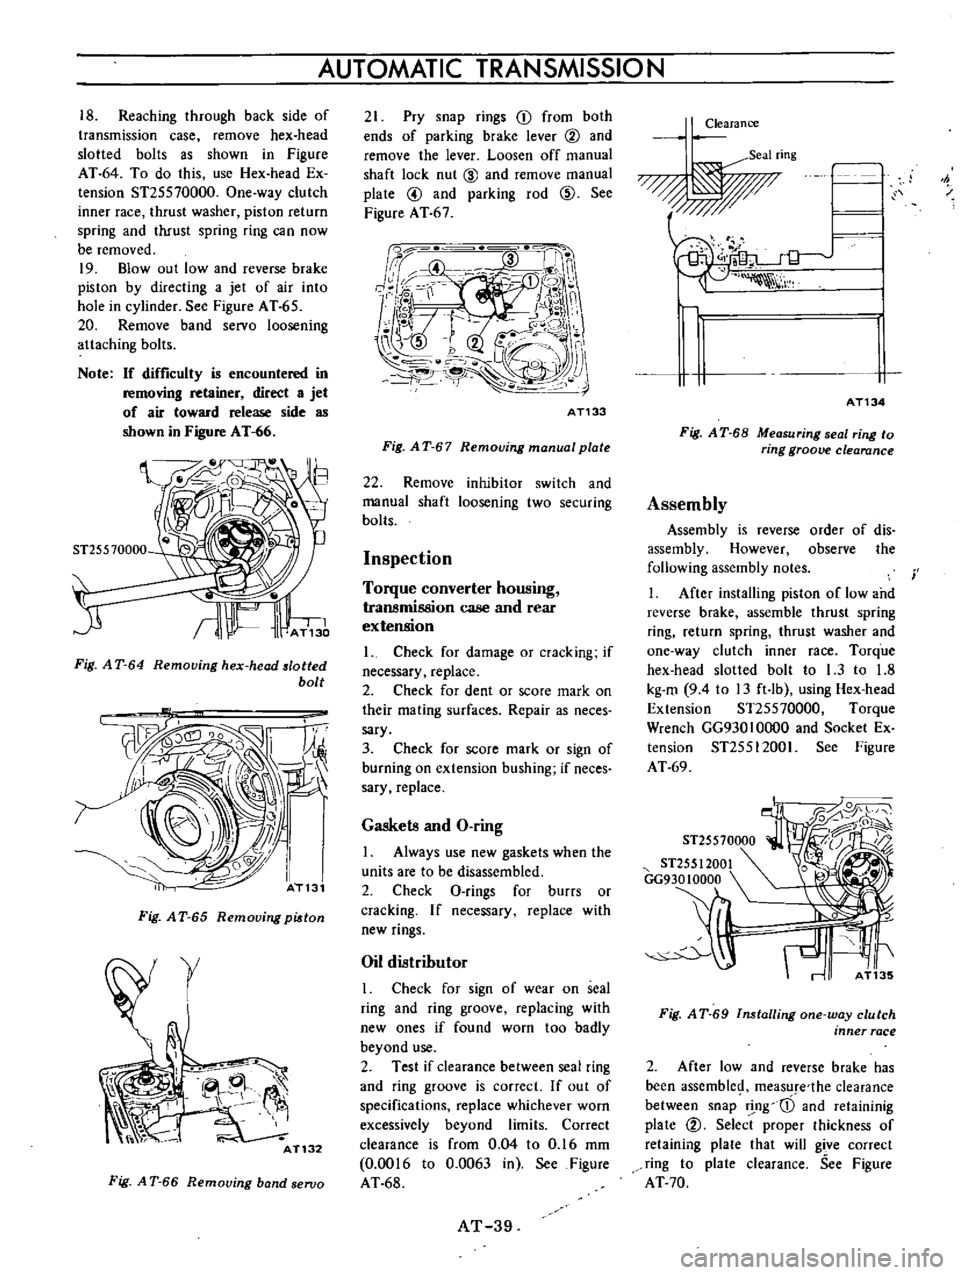
Reaching
through
back
side
of
transmission
case
remove
hex
head
slotted
bolts
as
shown
in
Figure
AT
64
To
do
this
use
Hex
head
Ex
tension
ST25570000
One
way
clutch
inner
race
thrust
washer
piston
return
spring
and
thrust
spring
ring
can
now
be
removed
19
Blowout
low
and
reverse
brake
piston
by
directing
a
jet
of
air
into
hole
in
cylinder
See
Figure
A
T
65
20
Remove
band
servo
loosening
attaching
bolts
Note
If
difficulty
is
encountered
in
removIng
retainer
direct
a
jet
of
air
toward
release
side
as
shown
in
Figure
AT
66
ST25570000
Fig
A
T
64
Removing
hex
head
lotted
bolt
Fig
A
T
65
Removing
pi
ton
r
AT132
Fig
A
T
66
Removing
band
seroo
AUTOMATIC
TRANSMISSION
21
Pry
snap
rings
CD
from
both
ends
of
parking
brake
lever
@
and
remove
the
lever
Loosen
off
manual
shaft
lock
nut
CID
and
remove
manual
plate
@
and
parking
rod
@
See
Figure
AT
67
Qd
i
f
W
II
4
i
n
n
r
1
K
j
e
0
H
o
i
j
j
I
j
l
m
r
JlII
2
U
r
K
F
J
r
0
f
1
r
AT133
Fig
A
T
67
Removing
manual
plate
22
Remove
inhibitor
switch
and
manual
shaft
loosening
two
securing
bolts
Inspection
Torque
converter
housing
transmission
case
and
rear
extension
1
Check
for
damage
or
cracking
if
necessary
replace
2
Check
for
dent
or
score
mark
on
their
mating
surfaces
Repair
as
neees
sary
3
Check
for
score
mark
or
sign
of
burning
on
extension
bushing
if
neces
sary
replace
Gaskets
and
O
ring
1
Always
use
new
gaskets
when
the
units
are
to
be
disassembled
2
Check
O
rings
for
burrs
or
cracking
If
necessary
replace
with
new
rings
Oil
distributor
I
Check
for
sign
of
wear
on
seal
ring
and
ring
groove
replacing
with
new
ones
if
found
worn
too
badly
beyond
use
2
Test
if
clearance
between
seal
ring
and
ring
groove
is
correct
If
out
of
specifications
replace
whichever
worn
excessively
beyond
limits
Correct
clearance
is
from
0
04
to
0
16
mm
0
0016
to
0
0063
in
See
Figure
AT
68
AT
39
Clearance
Seal
ring
F
1
I
i
h
AT134
Fig
A
T
68
Measuring
seal
ring
to
ring
groove
clearance
Assembly
Assembly
is
reverse
order
of
dis
assembly
However
observe
the
following
assembly
notes
1
After
installing
piston
of
low
and
reverse
brake
assemble
thrust
spring
ring
return
spring
thrust
washer
and
one
way
clutch
inner
race
Torque
hex
head
slotted
bolt
to
1
3
to
1
8
kg
m
94
to
13
ft
Ib
using
Hex
head
Extension
ST25570000
Torque
Wrench
GG930
1
0000
and
Socket
Ex
tension
ST25512001
See
Figure
AT
69
i
ST25570000
ST255
1
2001
GG93010000
0
rr
l
f
r
Fig
A
T
69
Installing
one
way
clutch
inner
race
2
After
low
and
reverse
brake
has
been
assemble
measure
the
clearance
between
snap
r
ng
cD
and
retaininig
plate
@
Select
proper
thickness
of
retaining
plate
that
will
gi
ve
correct
ring
to
plate
clearance
See
Figure
AT
70
Page 44 of 513
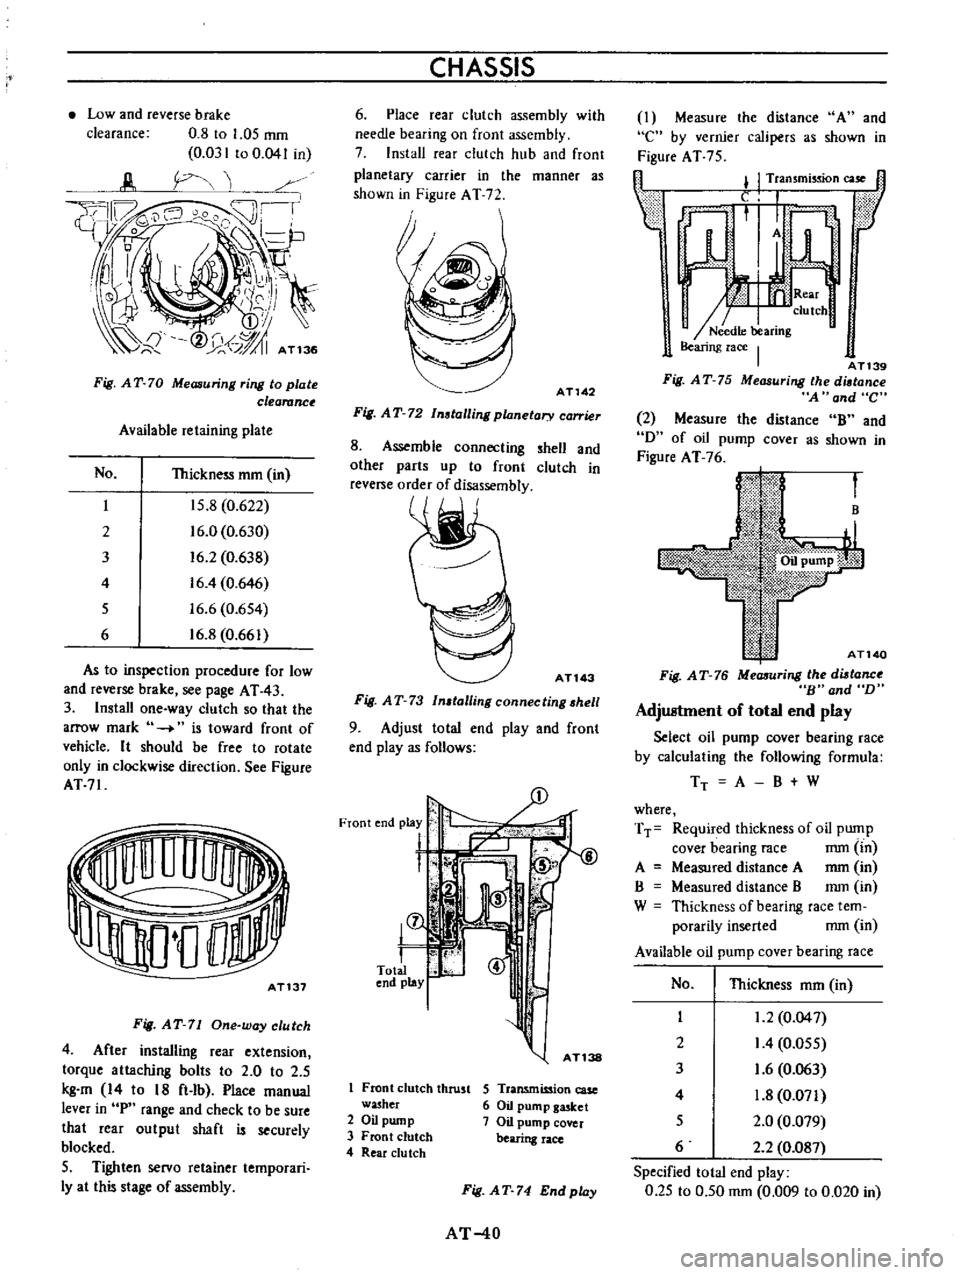
Low
and
reverse
brake
clearance
0
8
to
1
05
mm
0
031
to
0
041
in
Fig
AT
70
Measuring
ring
to
plate
clearanc
Available
retaining
plate
No
Thickness
mm
in
I
15
8
0
622
2
16
0
0
630
3
16
2
0
638
4
16
4
0
646
5
16
6
0
654
6
16
8
0
661
As
to
inspection
procedure
for
low
and
reverse
brake
see
page
AT
43
3
Install
one
way
clutch
so
that
the
arrow
mark
is
toward
front
of
vehicle
It
should
be
free
to
rotate
only
in
clockwise
direction
See
Figure
AT71
AT131
Fig
AT
71
One
way
clutch
4
After
installing
rear
extension
torque
attaching
bolts
to
2
0
to
2
5
kg
m
14
to
18
ft
lb
Place
manual
lever
in
P
range
and
check
to
be
sure
that
rear
output
shaft
is
securely
blocked
5
Tighten
servo
retainer
temporari
Iy
at
this
stage
of
assembly
CHASSIS
6
Place
rear
clutch
assembly
with
needle
bearing
on
front
assembly
7
Install
rear
clutch
hub
and
front
planetary
carrier
in
the
manner
as
shown
in
Figure
AT
72
AT142
Fig
AT
72
Installing
planetary
carrier
8
Assemble
connecting
shell
and
other
parts
up
to
front
clutch
in
reve
e
order
of
disassembly
ATl43
Fig
AT
73
In
talling
connecting
hell
9
Adjust
total
end
play
and
front
end
playas
follows
L
@
8
S
I
fT
15
l
r
1
Front
clutch
thrust
washer
2
Oil
pump
3
Front
clutch
4
Rear
du
tch
S
Transmission
case
6
Oil
pump
gasket
7
Oil
pump
cover
bearing
race
Fig
AT
74
Endplay
AT
40
I
Measure
the
distance
A
and
e
by
vernier
calipers
as
shown
in
Figure
AT
75
fl
l
I
Transmission
case
1l
Lf
ar
n
h
AT139
Fig
AT
75
Measuring
the
diltance
A
and
C
2
Measure
the
distance
B
and
D
of
oil
pump
COVer
as
shown
in
Figure
AT
76
B
AT140
Fig
AT
76
MeaJIuring
the
diltanc
B
and
D
Adjustment
of
total
end
play
Select
oil
pump
cover
bearing
race
by
calculating
the
following
formula
TT
A
B
W
where
TT
Required
thickness
of
oil
pump
cover
bearing
race
mm
in
A
Measured
distance
A
mm
in
B
Measured
distance
B
mm
in
W
Thickness
of
bearing
race
tem
porarily
inserted
mm
in
Available
oil
pump
cover
bearing
race
No
Thickness
mm
in
I
1
2
0
04
7
2
I
4
0
055
3
1
6
0
063
4
1
8
0
071
5
2
0
0
079
6
2
2
0
087
Specified
total
end
play
0
25
to
0
50
mm
0
009
to
0
020
in
Page 45 of 513
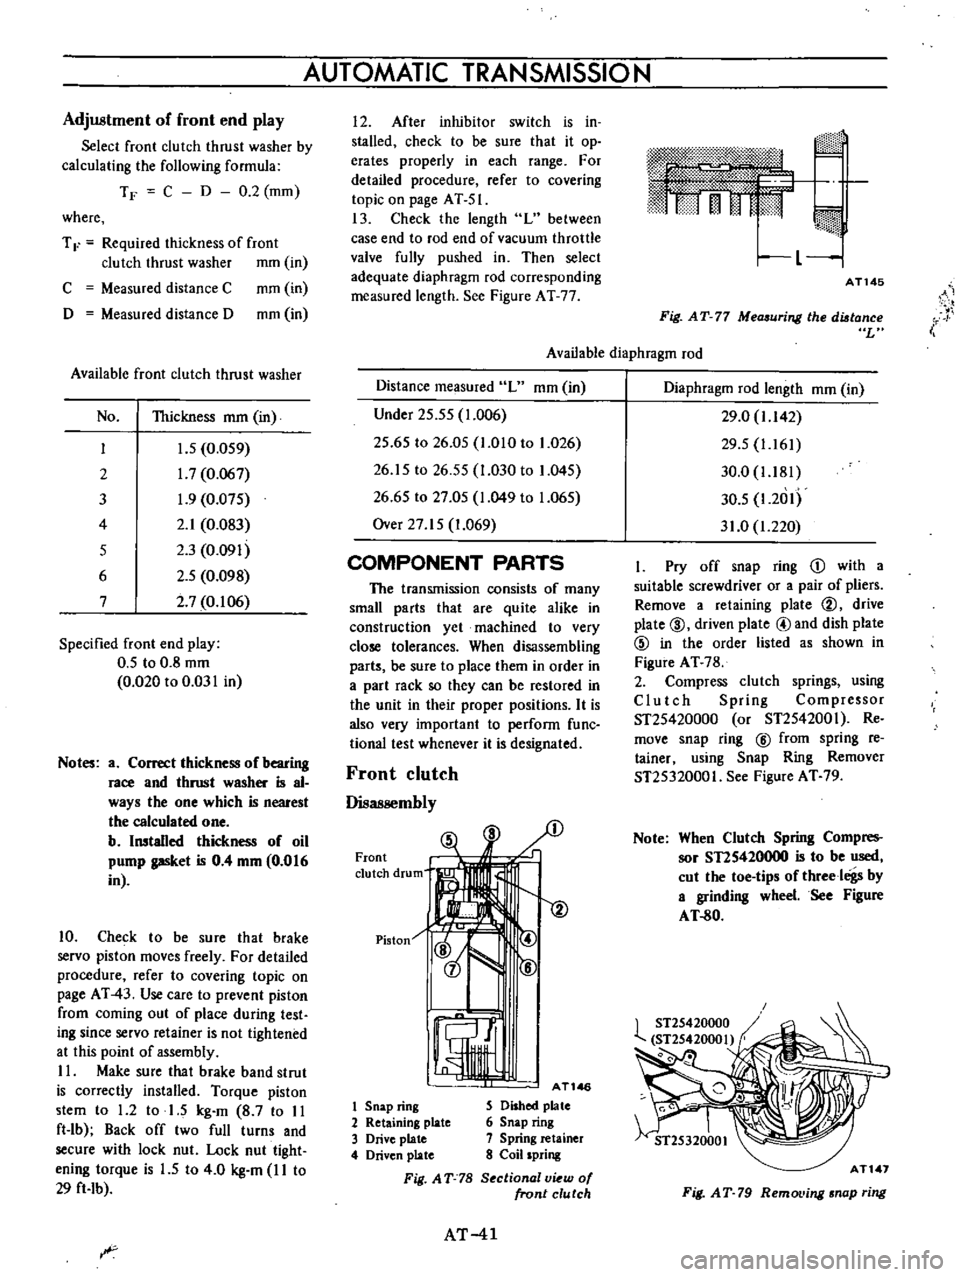
Adjustment
of
front
end
play
Select
front
clutch
thrust
washer
by
calculating
the
following
formula
TF
C
D
0
2
mm
where
T
F
Required
thickness
of
front
clutch
thrust
washer
mm
in
C
Measured
distance
C
mm
in
D
Measured
distance
D
mm
in
Available
front
clutch
thrust
washer
No
Thickness
mm
in
I
J
5
0
059
2
1
7
0
067
3
1
9
0
075
4
2
1
0
083
5
2
3
0
091
6
2
5
0
098
7
2
7
0
106
Specified
front
end
play
0
5
to
0
8
mm
0
020
to
0
031
in
Notes
a
Correct
thickness
of
bearing
race
and
thrust
washer
is
al
ways
the
one
which
is
nearest
the
calculated
one
b
Installed
thickness
of
oil
pump
gasket
is
0
4
mm
0
016
in
10
Check
to
be
sure
that
brake
servo
piston
moves
freely
For
detailed
procedure
refer
to
covering
topic
on
page
AT
43
Use
care
to
prevent
piston
from
coming
out
of
place
during
test
ing
since
servo
retainer
is
not
tightened
at
this
point
of
assembly
II
Make
sure
that
brake
band
strut
is
correctly
installed
Torque
piston
stem
to
1
2
to
1
5
kg
m
8
7
to
II
ft
lb
Back
off
two
full
turns
and
secure
with
lock
nut
Lock
nut
tight
ening
torque
is
1
5
to
4
0
kg
m
I
I
to
29
ft
Ib
AUTOMATIC
TRANSMISSION
I
2
After
inhibitor
switch
is
in
stalled
check
to
be
sure
that
it
op
erates
properly
in
each
range
For
detailed
procedure
refer
to
covering
topic
on
page
AT
51
13
Check
the
length
L
between
case
end
to
rod
end
of
vacuum
throttle
valve
fully
pushed
in
Then
select
adequate
diaphragm
rod
corresponding
measured
length
See
Figure
AT
77
m
rj
I
L
1
AT145
i
Fig
AT
77
Measuring
the
distance
L
Available
diaphragm
rod
Distance
measured
L
mm
in
Under
25
55
1
006
25
65
to
26
05
1
010
to
1
026
26
15
to
26
55
1
030
to
1
045
26
65
to
27
05
1
049
to
1
065
Over
27
15
1
069
COMPONENT
PARTS
The
transmission
consists
of
many
small
parts
that
are
quite
alike
in
construction
yet
machined
to
very
close
tolerances
When
disassembling
parts
be
sure
to
place
them
in
order
in
a
part
rack
so
they
can
be
restored
in
the
unit
in
their
proper
positions
It
is
also
very
important
to
perform
func
tional
test
whenever
it
is
designated
Front
clutch
Disassembly
Front
clutch
drum
Piston
1
AT146
1
Snap
ring
S
Dished
plate
2
Retaining
plate
6
Snap
ring
3
Drive
plate
7
Spring
retainer
4
Driven
plate
8
Coil
spring
Fig
AT
78
S
ctional
v
w
of
front
clutch
AT
41
Diaphragm
rod
length
mm
in
29
0
1
142
29
5
1
161
30
0
1
181
30
5
1
2
1I
31
0
1
220
I
Pry
off
snap
ring
D
with
a
suitable
screwdriver
or
a
pair
of
pliers
Remove
a
retaining
plate
@
drive
plate
@
driven
plate
@and
dish
plate
@
in
the
order
listed
as
shown
in
Figure
AT
78
2
Compress
clutch
springs
using
Clutch
Spring
Compressor
ST25420000
or
ST2542001
Re
move
snap
ring
@
from
spring
re
tainer
using
Snap
Ring
Remover
ST25320001
See
Figure
AT
79
Note
When
Clutch
Spring
Compres
sor
STIS420000
is
to
be
used
cut
the
toe
tips
of
threeloigs
by
a
grinding
wheel
See
Figure
AT
80
AT
1
Fig
AT
79
RemoL
ing
snap
ring
Page 46 of 513

L
J
i
C
E
Ee
1f
20mm
8
0
079
in
AT148
Cut
off
hatched
portion
Fig
A
T
80
Modifying
of
coil
spring
compres
or
3
Take
out
spring
retainer
j
and
spring@
See
Figure
AT
7
4
Blowout
piston
by
directing
a
iet
of
air
into
hole
in
clutch
drum
See
Figure
AT
I
Fig
AT
81
Blowing
out
pi3ton
Inspection
I
Check
for
sign
of
wear
or
damage
to
clutch
drive
plate
facing
If
found
worn
or
damaged
excessively
discard
See
Service
Data
for
limits
2
Check
for
wear
on
snap
ring
and
for
weakened
or
broken
coil
spring
If
necessary
replace
with
new
ones
Spring
retainer
should
also
be
in
spected
for
warpage
Assembly
I
Assembly
is
reverse
order
of
disas
sembly
Dip
aU
parts
in
clean
auto
matic
transmission
fluid
before
they
can
be
installed
2
Line
up
driven
plates
so
that
stripped
arcs
are
properly
aligned
pay
iog
particular
attention
to
the
location
of
oil
holes
in
clutch
drum
See
Figure
AT
82
Note
The
number
of
drive
and
driven
plates
varies
with
the
type
of
vehicles
For
detailed
informa
tion
also
see
Service
Data
Specifications
CHASSIS
AT150
Lubrication
hole
Fig
A
T
82
Inserting
clutch
plate
3
After
clutch
is
assembled
make
sure
that
clearance
between
snap
ring
CD
and
retaining
plate
@
is
held
within
specified
limits
If
necessary
try
with
other
plates
having
different
thickness
until
correct
clearance
is
obtained
See
Figure
AT
3
Specified
clearance
1
6
to
1
mm
0
063
to
0
071
in
Available
retaining
plate
No
Thickness
mm
in
I
10
6
0
417
2
10
0
425
3
11
0
0
433
4
11
2
0
441
5
II
4
0
449
6
11
6
0
457
AT151
Fig
A
T
83
MeOJluring
ring
to
plate
clearance
4
Testing
front
clutch
With
front
clutch
assembled
on
oil
pump
cover
direct
a
jet
of
air
into
hole
in
clutch
drum
See
Figure
AT
4
AT
42
Fig
A
T
84
Tesling
front
clutch
Rear
clutch
Disassembly
CD
ID
@
f
@
@
I
J
L
@
@
@
AT269
I
Rear
clutch
drum
6
Retaining
plate
2
Piston
7
Spring
retainer
3
Di
ed
plate
8
Drive
plate
4
Coil
spring
9
Driven
plate
5
Snap
ring
Fig
A
T
85
Sectional
view
of
Tear
clutch
I
Take
out
snap
ring
@
retaining
plate
@
drive
plate
l
driven
plate
@
and
dished
plate
j
Same
tech
nique
can
be
applied
as
in
disassem
bling
front
clutch
See
Figure
A
T
5
2
Remove
snap
ring
from
coil
spring
retainer
See
Figure
AT
6
ST25420000
ST2542000l
Ii
Removing
snap
ring
Page 47 of 513

3
Blowout
piston
by
directing
a
jet
of
air
into
hole
in
clutch
drum
See
Figure
AT
S
7
AT155
Fig
AT
87
Blowing
out
piston
Inspection
Refer
to
covering
topic
under
Front
Clutch
Assembly
Assembly
is
reverse
order
of
disas
sembly
Dip
all
parts
in
clean
auto
malic
transmission
fluid
before
as
sembling
Note
that
the
number
of
drive
and
driven
plates
varies
with
types
of
vehicles
For
details
refer
to
Service
Data
Specifications
I
After
rear
clutch
is
assembled
check
to
be
sure
that
clearance
be
tween
snap
ring
CD
and
retaining
plate
CV
is
held
within
prescribed
tolerances
See
Figure
A
T
S8
Specified
clearance
1
0
to
1
5
mm
0
039
to
0
059
in
AT1S6
Fig
A
T
88
Measuring
ring
to
plate
clearance
2
Testing
rear
clutch
Install
rear
clutch
on
oil
pump
cover
Blow
air
under
pressure
into
oil
hole
to
listen
for
definite
clutch
opera
tion
as
shown
in
Figure
AT
S9
AUTOMATIC
TRANSMISSION
AT157
Fig
AT
89
Testing
rear
clutch
Low
reverse
brake
Disassembly
I
Follow
steps
as
per
instructed
on
page
AT
38
2
Blowout
piston
by
directing
a
jet
of
air
into
oil
hole
in
clutch
piston
Inspection
I
Check
drive
plate
facing
for
wear
or
damage
if
necessary
replace
Refer
to
Service
Data
Specifications
for
limits
2
Test
if
piston
return
spring
is
not
weakened
Discard
if
weakened
too
badly
beyond
use
3
Replace
any
defective
parts
with
new
ones
Assembly
1
After
low
reverse
piston
is
installed
assemble
thrust
spring
ring
return
spring
thrust
washer
and
one
way
clutch
inner
race
With
the
aid
of
Hex
head
Extension
ST25570000
tighten
hex
head
slotted
bolt
1
3
to
1
8
kg
m
9
4
to
13
ft
Ib
2
Enter
dished
plate
driven
plate
drive
plate
and
retaining
plate
into
transmission
case
in
this
written
order
Install
snap
ring
to
secure
the
instal
lation
Note
The
number
of
drive
and
driven
plates
varies
with
types
of
vehi
cles
For
detailed
information
refer
to
Service
Data
Specifi
cations
AT
43
3
Without
disturbing
the
above
setting
check
to
be
sure
that
clearance
between
snap
ring
and
retaining
plate
is
held
within
specified
limits
If
nec
essary
try
with
other
plates
having
different
thickness
until
correct
clear
ance
is
obtained
Specified
clearance
O
SO
to
1
05
mm
0
031
to
0
041
in
4
Blow
under
pressure
air
into
oil
hole
in
low
reverse
brake
to
listen
for
definite
brake
operation
as
shown
in
Figure
AT
90
0j
L
J
1
1
I
1
I
Y
1
If
lY
v
A
we
1
a
II
I
7
r
AT158
Fig
AT
90
Testing
low
reverse
brake
Servo
piston
Disassembly
1
Blowout
piston
by
directing
a
jet
of
air
into
hole
in
release
side
of
piston
2
Remove
servo
piston
return
spring
Inspection
Check
piston
for
wear
damage
or
any
other
defects
which
might
inter
fere
with
proper
brake
operation
AT159
Fig
A
T
91
Removing
piston
Page 48 of 513
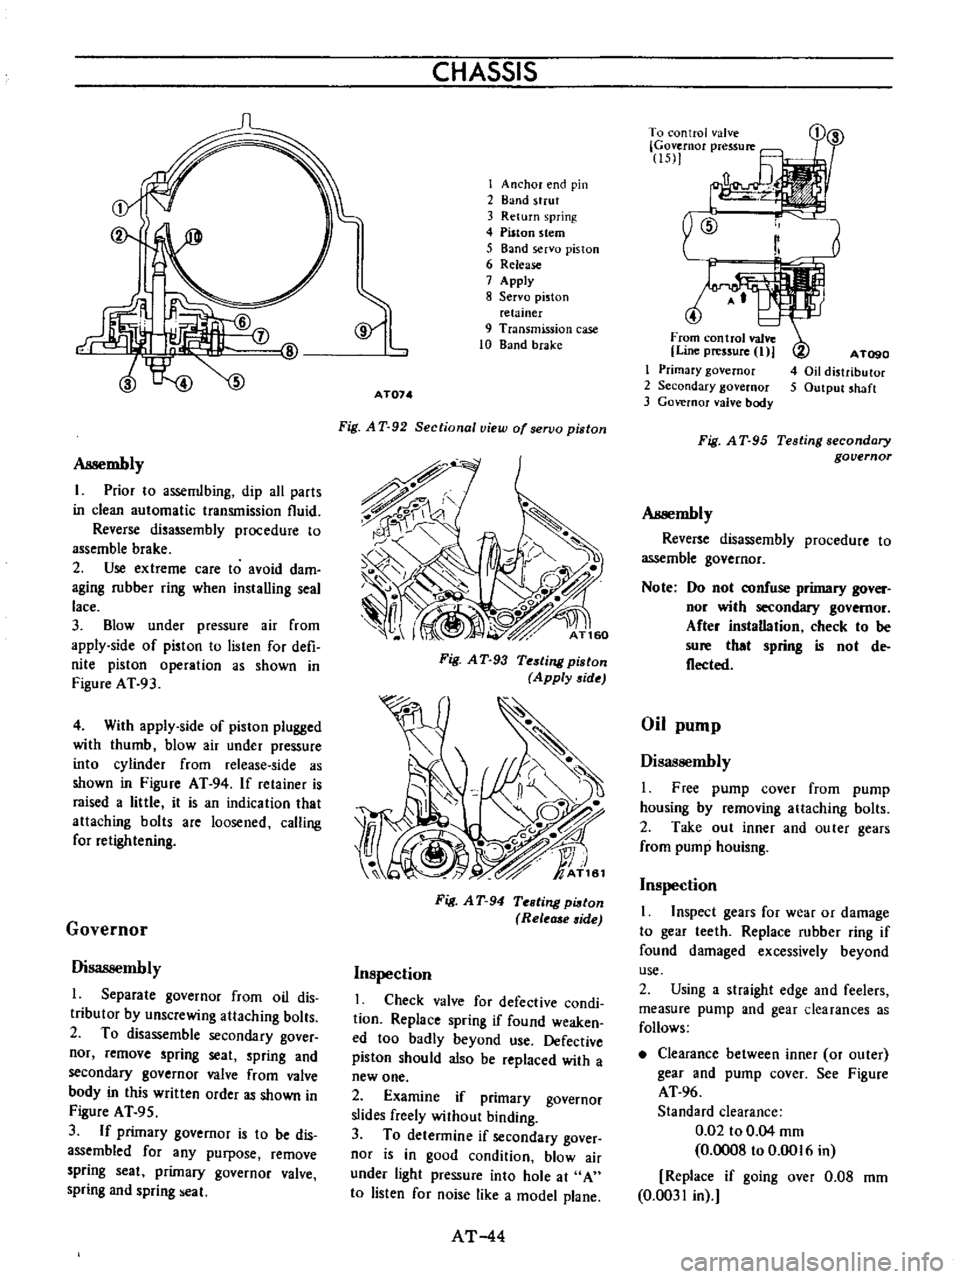
Assembly
I
Prior
10
assemlbing
dip
all
parts
in
clean
automatic
transmission
fluid
Reverse
disassembly
procedure
to
assemble
brake
2
Use
extreme
care
to
avoid
dam
aging
rubber
ring
when
installing
seal
lace
3
Blow
under
pressure
air
from
apply
side
of
piston
to
lislen
for
defi
nite
piston
operation
as
shown
in
Figure
AT
93
4
With
appIy
side
of
piston
plugged
with
thumb
blow
air
under
pressure
into
cylinder
from
release
side
as
shown
in
Figure
AT
94
If
retainer
is
raised
a
little
it
is
an
indication
that
attaching
bolts
are
loosened
calling
for
retightening
Governor
Disassembly
l
Separate
governor
from
oil
dis
tributor
by
unscrewing
attaching
bolts
2
To
disassemble
secondary
gover
nor
remove
spring
seat
spring
and
secondary
governor
valve
from
valve
body
in
this
written
order
as
shown
in
Figure
AT
95
3
If
primary
governor
is
to
be
dis
assembled
for
any
purpose
remove
spring
seat
primary
governor
valve
spring
and
spring
eal
CHASSIS
I
Anchor
end
pin
2
Band
strut
3
Return
spring
4
Piston
stem
5
Band
servo
piston
6
Release
7
Apply
8
Servo
piston
relainer
9
Transmission
case
10
Band
brake
AT074
Fig
A
T
92
Sectional
view
of
servo
piston
Fig
A
T
93
Testing
piston
Apply
side
Fig
A
T
94
Testing
pi8ton
Rele
side
Inspection
I
Check
valve
for
defective
condi
tion
Replace
spring
if
found
weaken
ed
too
badly
beyond
use
Defective
piston
should
also
be
replaced
with
a
new
one
2
Examine
if
primary
governor
slides
freely
without
binding
3
To
determine
if
secondary
gover
nor
is
in
good
condition
blow
air
under
light
pressure
into
hole
at
A
to
listen
for
noise
like
a
model
plane
AT
44
r
To
control
valve
Governor
pressure
15
1
4
From
control
valve
Line
pressure
I
I
Primary
governor
2
Secondary
governor
3
Governor
valve
body
A
TogO
4
Oil
distributor
5
Output
shaft
Fig
A
T
95
Testing
secondary
governor
Assembly
Reverse
disassembly
procedure
to
assemble
governor
Note
Do
nol
confuse
primary
gover
nor
wilh
secondary
governor
After
instaDation
check
to
be
sure
that
spring
is
nol
de
flecled
Oil
pump
Disassembly
I
Free
pump
cover
from
pump
housing
by
removing
attaching
bolts
2
Take
out
inner
and
outer
gears
from
pump
houisng
Inspection
1
Inspect
gears
for
wear
or
damage
to
gear
leeth
Replace
rubber
ring
if
found
damaged
excessively
beyond
use
2
Using
a
straight
edge
and
feelers
measure
pump
and
gear
clearances
as
follows
Clearance
between
inner
or
outer
gear
and
pump
cover
See
Figure
AT
96
Standard
clearance
0
02
to
0
04
mm
0
0008
to
0
0016
in
Replace
if
going
over
0
08
mm
0
0031
in
Page 49 of 513
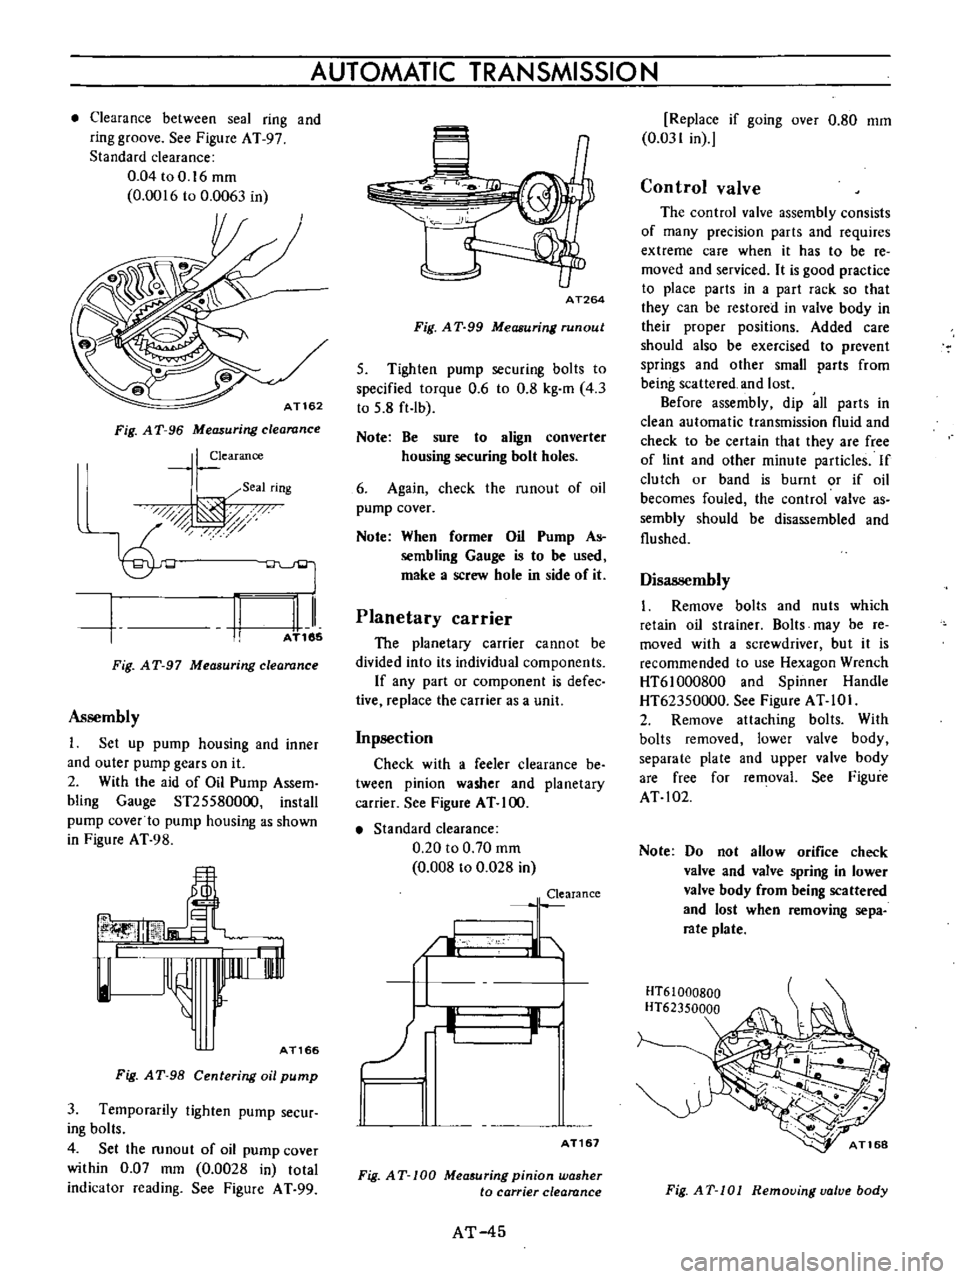
Clearance
between
seal
ring
and
ring
groove
See
Figure
AT
97
Standard
clearance
0
04toO
16mm
0
0016
to
0
0063
in
AT162
Fig
A
T
96
Measuring
clearance
I
earance
I
Seal
rIng
0d
t
AT185
II
Fig
AT
97
Measuring
clearance
Assembly
1
Set
up
pump
housing
and
inner
and
outer
pump
gears
on
it
2
With
the
aid
of
Oil
Pump
Assem
bling
Gauge
ST255800oo
install
pump
cover
to
pump
housing
as
shown
in
Figure
AT
98
lnnrr
i
rnl
l
AT166
Fig
A
T
98
Centering
oil
pump
3
Temporarily
tighten
pump
secur
ing
bolts
4
Set
the
runout
of
oil
pump
cover
within
0
07
mm
0
0028
in
total
indicator
reading
See
Figure
A
T
99
AUTOMATIC
TRANSMISSION
AT264
Fig
A
T
99
Measuring
run
out
5
Tighten
pump
securing
bolts
to
specified
torque
0
6
to
0
8
kg
m
4
3
to
5
8
ft
Ib
Note
Be
sure
to
align
converter
housing
securing
bolt
holes
6
Again
check
the
runout
of
oil
pump
cover
Note
When
former
Oil
Pump
As
sembling
Gauge
is
to
be
used
make
a
screw
hole
in
side
of
it
Planetary
carrier
The
planetary
carrier
cannot
be
divided
into
its
individual
components
If
any
part
or
component
is
defec
tive
replace
the
carrier
as
a
unit
Inpsection
Check
with
a
feeler
clearance
be
tween
pinion
washer
and
planetary
carrier
See
Figure
AT
100
Standard
clearance
0
20
to
0
70
mm
0
008
to
0
028
in
Clearance
I
LJ
b
II
I
AT161
Fig
AT
100
Mea
uring
pinion
washer
to
carrier
clearance
AT
45
Replace
if
going
over
0
80
mm
0
031
in
Control
valve
The
control
valve
assembly
consists
of
many
precision
parts
and
requires
extreme
care
when
it
has
to
be
re
moved
and
serviced
It
is
good
practice
to
place
parts
in
a
part
rack
so
that
they
can
be
restored
in
valve
body
in
their
proper
positions
Added
care
should
also
be
exercised
to
prevent
springs
and
other
small
parts
from
being
scattered
and
lost
Before
assembly
dip
all
parts
in
clean
automatic
transmission
nuid
and
check
to
be
certain
that
they
are
free
of
lint
and
other
minute
particles
If
clutch
or
band
is
burnt
or
if
oil
becomes
fouled
the
control
valve
as
sembly
should
be
disassembled
and
flushed
Disassembly
1
Remove
bolts
and
nuts
which
retain
oil
strainer
Bolts
may
be
re
moved
with
a
screwdriver
but
it
is
recommended
to
use
Hexagon
Wrench
HT61000800
and
Spinner
Handle
HT62350000
See
Figure
AT
10
I
2
Remove
attaching
bolts
With
bolts
removed
lower
valve
body
separate
plate
and
upper
valve
body
are
free
for
removal
See
Figure
AT
102
Note
Do
not
allow
orifice
check
valve
and
valve
spring
in
lower
valve
body
from
being
scattered
and
lost
when
removing
sepa
rate
plate
HT61000BOO
HT62350000
Fig
AT
101
Removing
valve
body
Page 51 of 513
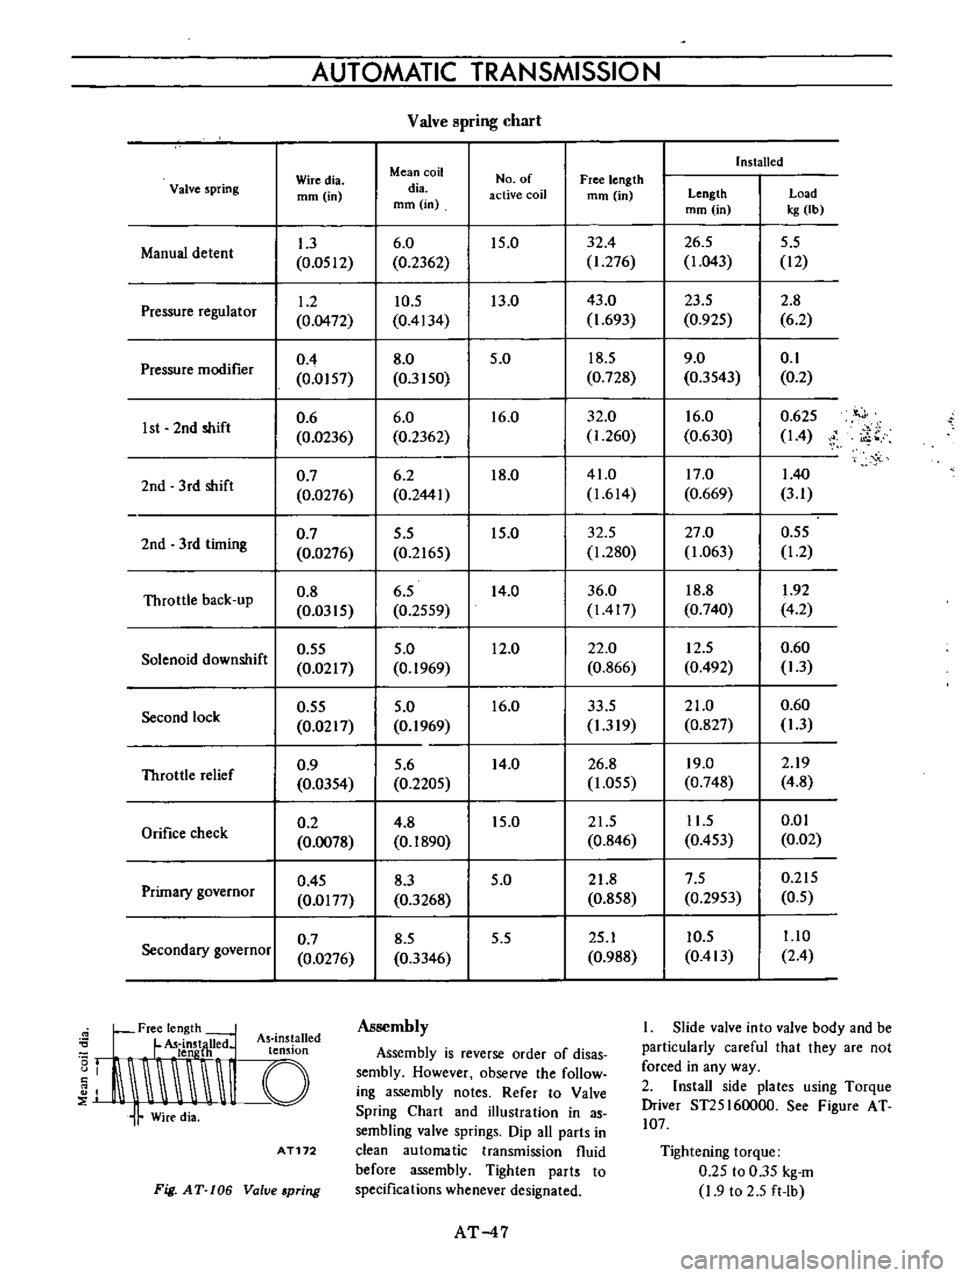
AUTOMATIC
TRANSMISSIO
N
Valve
pring
chart
Installed
Wiredia
Mean
coil
No
of
Free
length
Valve
spring
mm
in
dia
active
coil
mm
in
Length
Load
mm
in
mm
in
kg
Ib
1
3
6
0
15
0
32
4
26
5
5
5
Manual
detent
0
0512
0
2362
1
276
1
043
12
1
2
10
5
13
0
43
0
23
5
2
8
Pressure
regulator
0
0472
0
4134
1
693
0
925
6
2
0
4
8
0
5
0
18
5
9
0
0
1
Pressure
modifier
0
0157
0
3150
0
728
0
3543
0
2
0
6
6
0
16
0
32
0
16
0
0
625
it
J
1st
2nd
shift
0
0236
0
2362
1
260
0
630
14
i
o
0
7
6
2
18
0
41
0
17
0
140
2nd
3
rd
shift
0
0276
0
2441
1
614
0
669
3
1
0
7
5
5
15
0
32
5
27
0
0
55
2nd
3rd
timing
0
0276
0
2165
1
280
1
063
1
2
Throttle
back
up
0
8
6
5
14
0
36
0
18
8
1
92
0
0315
0
2559
1417
0
740
4
2
0
55
5
0
12
0
22
0
12
5
0
60
Solenoid
downshift
0
0217
0
1969
0
866
0
492
1
3
0
55
5
0
16
0
33
5
21
0
0
60
Second
lock
0
0217
0
1969
1
319
0
827
1
3
0
9
5
6
14
0
26
8
19
0
2
19
Throttle
relief
0
0354
0
2205
1
055
0
748
4
8
0
2
4
8
15
0
21
5
11
5
0
01
Orifice
check
0
0078
0
1890
0
846
0
453
0
02
0
45
8
3
5
0
21
8
7
5
0
215
Primary
governor
0
0177
0
3268
0
858
0
2953
0
5
0
7
8
5
5
5
25
1
10
5
1
10
Secondary
governor
0
0276
0
3346
0
988
0
413
2
4
Free
length
L
U
d
As
ins
alled
I
t
LldnstjH
e
t
n
Ion
J
I
I
Assembly
Assembly
is
reverse
order
of
disas
sembly
However
observe
the
follow
ing
assembly
notes
Refer
to
Valve
Spring
Chart
and
illustration
in
as
sembling
valve
springs
Dip
all
parts
in
clean
automatic
transmission
fluid
before
assembly
Tighten
parts
to
specifications
whenever
designated
AT172
Fig
AT
106
Value
pring
AT
47
I
Slide
valve
into
valve
body
and
be
particularly
careful
that
they
are
not
forced
in
any
way
2
Install
side
plates
using
Torque
Driver
ST25I60000
See
Figure
AT
107
Tightening
torque
0
25
to
0
35
kg
m
1
9
to
2
5
ft
Ib