Page 249 of 320
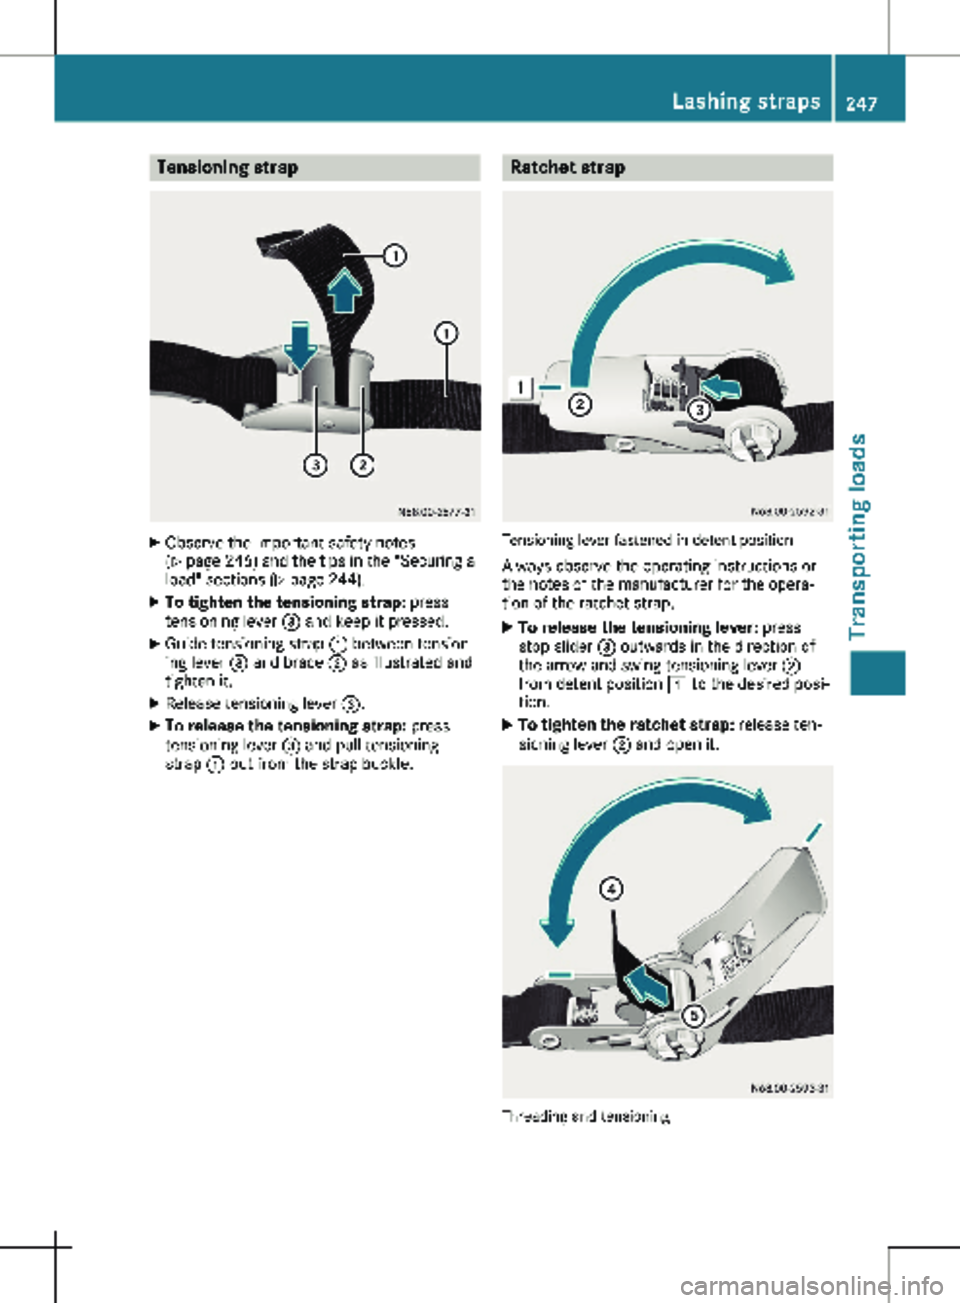
Tensioning strap
X
Observe the important safety notes
(Y page
246) and the tips in the "Securing a
load" sections (Y page 244).
X To tighten the tensioning strap: press
tensioning lever = and keep it pressed.
X Guide tensioning strap : between tension-
ing lever = and brace ; as illustrated and
tighten it.
X Release tensioning lever =.
X To release the tensioning strap: press
tensioning lever = and pull tensioning
strap : out from the strap buckle. Ratchet strap
Tensioning lever fastened in detent position
Always observe the operating instructions or
the notes of the manufacturer for the opera-
tion of the ratchet strap.
X To release the tensioning lever: press
stop slider = outwards in the direction of
the arrow and swing tensioning lever ;
from detent position 1 to the desired posi-
tion.
X To tighten the ratchet strap: release ten-
sioning lever ; and open it. Threading and tensioning Lashing straps
247
Transporting loads Z
Page 250 of 320

X
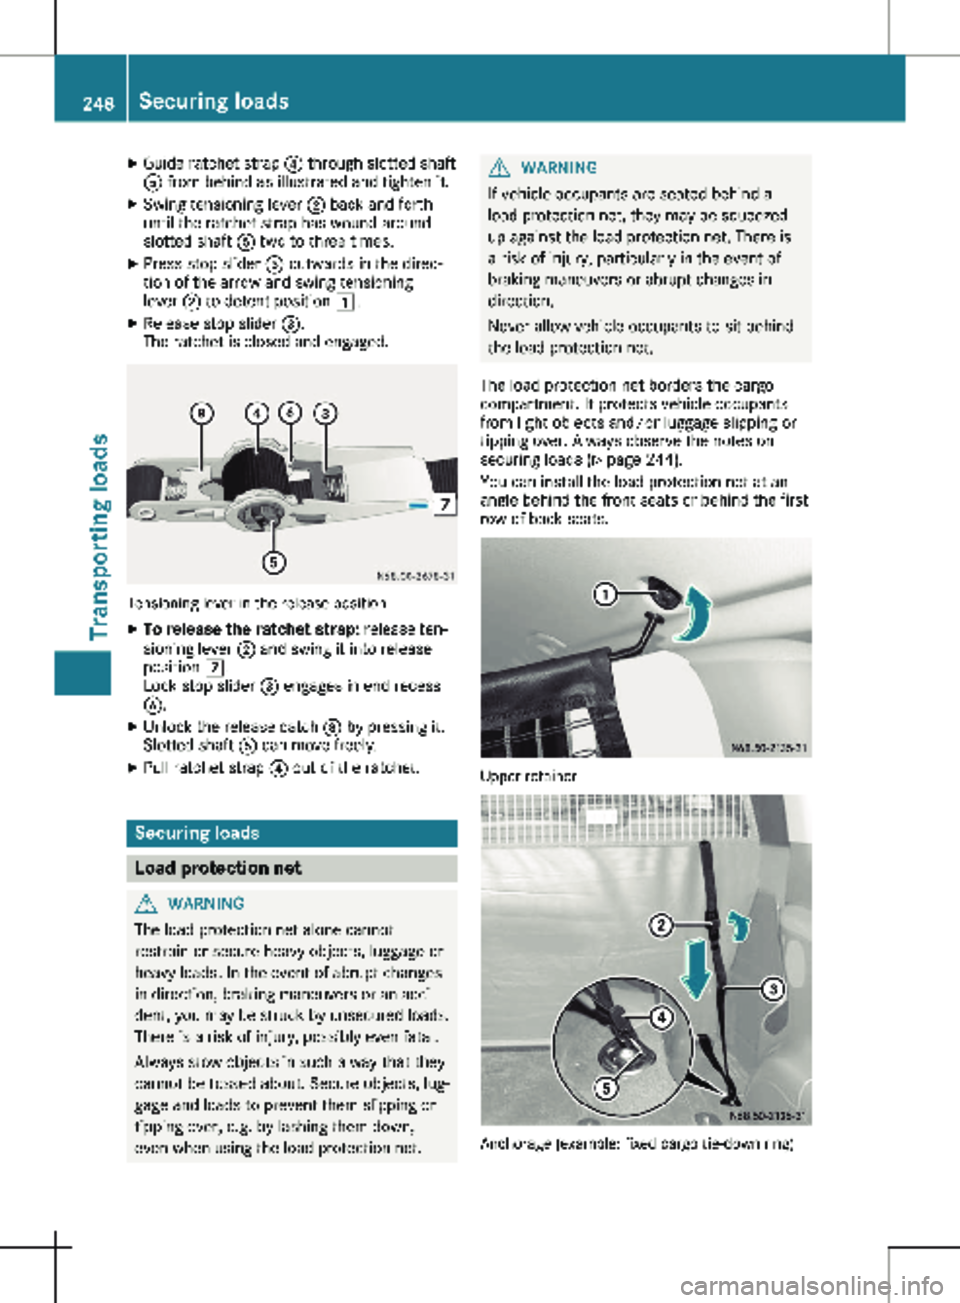
Guide ratchet strap ? through slotted shaft
A from behind as illustrated and tighten it.
X Swing tensioning lever ; back and forth
until the ratchet strap has wound around
slotted shaft A two to three times.
X Press stop slider = outwards in the direc-
tion of the arrow and swing tensioning
lever ; to detent position 1.
X Release stop slider =.
The ratchet is closed and engaged. Tensioning lever in the release position
X To release the ratchet strap: release ten-
sioning lever ; and swing it into release
position 7.
Lock stop slider = engages in end recess
B.
X Unlock the release catch D by pressing it.
Slotted shaft A can move freely.
X Pull ratchet strap ? out of the ratchet. Securing loads
Load protection net
G
WARNING
The load protection net alone cannot
restrain or secure heavy objects, luggage or
heavy loads. In the event of abrupt changes
in direction, braking maneuvers or an acci-
dent, you may be struck by unsecured loads.
There is a risk of injury, possibly even fatal.
Always stow objects in such a way that they
cannot be tossed about. Secure objects, lug-
gage and loads to prevent them slipping or
tipping over, e.g. by lashing them down,
even when using the load protection net. G
WARNING
If vehicle occupants are seated behind a
load protection net, they may be squeezed
up against the load protection net. There is
a risk of injury, particularly in the event of
braking maneuvers or abrupt changes in
direction.
Never allow vehicle occupants to sit behind
the load protection net.
The load protection net borders the cargo
compartment. It protects vehicle occupants
from light objects and/or luggage slipping or
tipping over. Always observe the notes on
securing loads
(Y page 244).
You can install the load protection net at an
angle behind the front seats or behind the first
row of back seats. Upper retainer
Anchorage (example: fixed cargo tie-down ring)248
Securing loads
Transporting loads
Page 251 of 320

Installing
X Clip the load protection net into upper
retainers : in such a way that tensioning
straps = face the rear of the vehicle.
X Pull tensioning straps = of the load protec-
tion net tightly.
X Clip hook ? on tensioning straps = into
cargo tie-down rings A.
X Fold tensioning element ; up.
X Pull the loose ends of tensioning straps =
down in the direction of the arrow until ten-
sioning straps = are tight.
X Fold tensioning element ; down to achieve
the final tension on the straps.
X After traveling a short distance, check that
the load protection net is taut.
X Retighten, if necessary.
Removing X Fold tensioning element ; up.
Tensioning straps = are slack.
X Unclip hook ? of tensioning straps = from
cargo tie-down rings A at the bottom.
X Unclip the load protection net from upper
retainers :.
X Roll up the load protection net and fasten it,
still rolled up, using the Velcro fasteners.
Adjusting the front seat with the load pro-
tection net installed
X Fold tensioning element ; on straps =
upwards.
The load protection net slackens.
X Correctly adjust the front seat.
X Re-tension the load protection net. Carrier systems
G
WARNING
When you load the roof, the center of gravity
of the vehicle rises and the usual driving
characteristics, as well as steering and brak-
ing, change. The vehicle tilts more severely
when cornering and may react more slug-
gishly to steering input.
If you exceed the maximum roof load, the
driving characteristics, as well as the steer- ing and braking, will be greatly impaired.
There is a risk of an accident.
Adjust your driving style and never exceed
the maximum roof load.
You will find information about the maximum
roof load under "Cargo tie-down points and
carrier systems"
(Y page 313).
! Make sure that:
R the screws of the roof carrier are tight-
ened to a maximum torque of 7.4 lb-ft
(10 Nm) in the threaded holes provided
and
R there is a minimum bolt penetration of
4 turns.
Only install roof carriers and rear racks that
have been approved or recommended for
Mercedes-Benz vehicles. This will help avoid
damage to the vehicle.
You can install a roof carrier on the roof and,
for example, a rear-mounted cycle rack on the
tailgate.
Install the protective caps on the securing
threads after you have removed the roof car-
rier.
If you have installed a rear rack on the tailgate,
the additional weight reduces the assistance
provided by the gas pressure springs when the
tailgate is opened. You will then need more
force to open the tailgate. At low outside tem-
peratures below freezing you will need to pro-
vide extra support for the tailgate to prevent it
from sinking unintentionally. Carrier systems
249
Transporting loads Z
Page 252 of 320

Useful information
This Operator's Manual describes all models
as well as standard and optional equipment of
your vehicle that were available at the time of
going to print. Country-specific variations are
possible. Note that your vehicle may not be
equipped with all of the described functions.
This also applies to systems and functions rel-
evant to safety.
Read the information on qualified specialist
workshops (Y page
32).Engine compartment
Hood
Important safety notes G
WARNING
If the hood is unlatched, it may open up
when the vehicle is in motion and block your
view. There is a risk of an accident.
Never unlatch the hood while driving. Before
every trip, ensure that the hood is locked. G
WARNING
Opening the hood when the engine is over-
heated or when there is a fire in the engine
compartment could expose you to hot gases
or other service products. There is a risk of
injury.
Let an overheated engine cool down before
opening the hood. If there is a fire in the
engine compartment, keep the hood closed
and contact the fire department. G
WARNING
The engine compartment contains moving
components. Certain components, such as
the radiator fan, may continue to run or start
again suddenly when the ignition is off.
There is a risk of injury. If you need to do any work inside the engine
compartment:
R switch off the ignition
R never reach into the area where there is a
risk of danger from moving components,
such as the fan rotation area
R remove jewelry and watches
R keep items of clothing and hair, for exam-
ple, away from moving parts G
WARNING
The ignition system operates with a high
voltage. If you touch the live components,
you could receive an electric shock. There is
an increased risk of injury.
Never touch components of the ignition sys-
tem if:
R the engine is running or being started
R the key is in radio position or drive posi-
tion in the ignition lock
The live components of the ignition system
are, for example:
R ignition coils
R spark plug connectors
R diagnostic sockets G
WARNING
Certain components in the engine compart-
ment, such as the engine, radiator and parts
of the exhaust system, can become very
hot. Working in the engine compartment
poses a risk of injury.
Where possible, let the engine cool down
and touch only the components described in
the following.
If you have to carry out work in the engine
compartment, only touch the following compo-
nents:
R hood
R oil dipstick
R engine oil filler neck cap
R washer fluid reservoir cap
R coolant expansion tank cap250
Engine compartment
Maintenance and care
Page 253 of 320

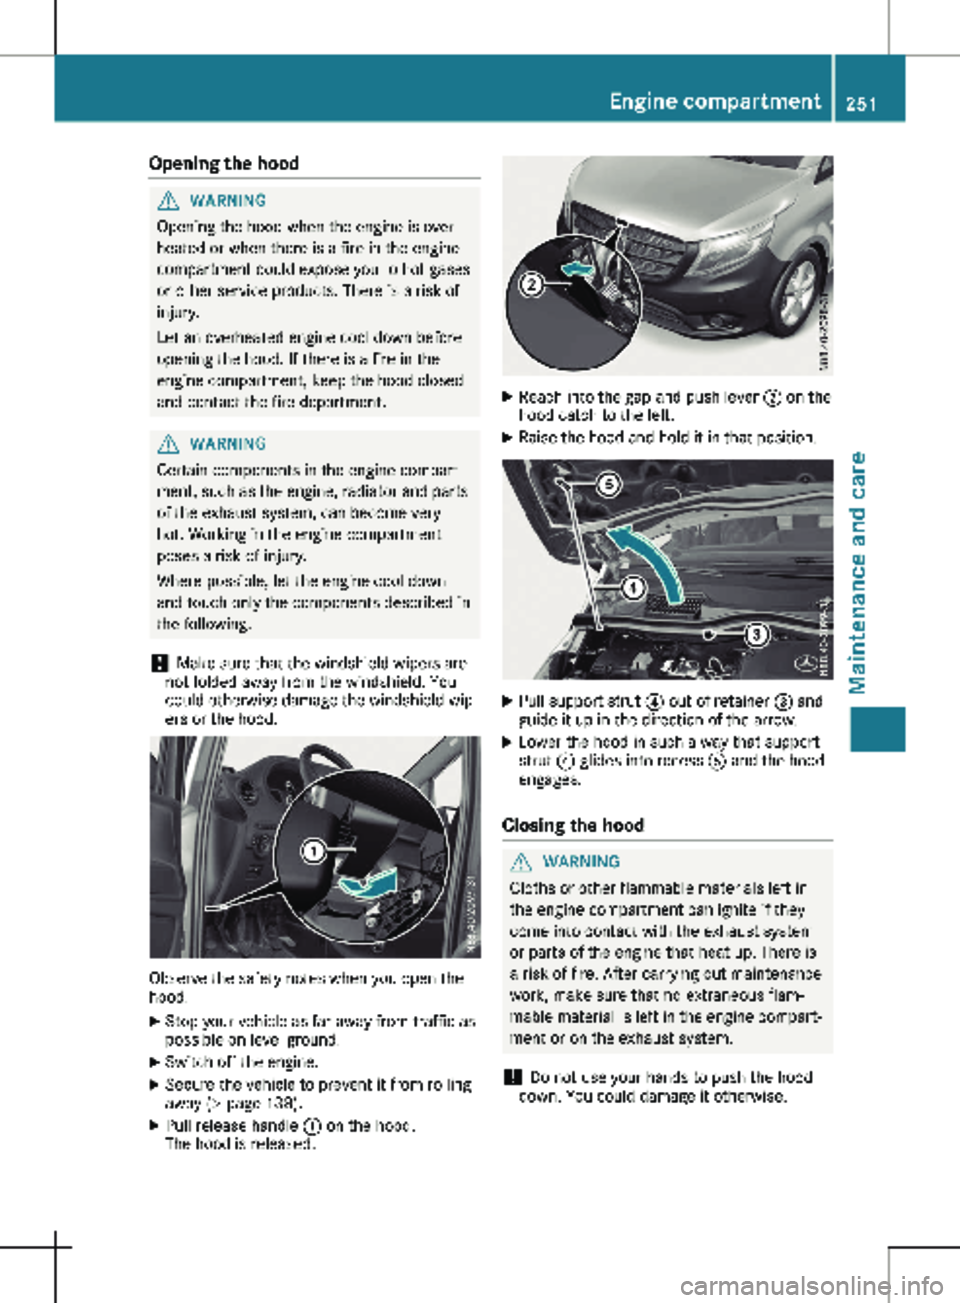
Opening the hood
G
WARNING
Opening the hood when the engine is over-
heated or when there is a fire in the engine
compartment could expose you to hot gases
or other service products. There is a risk of
injury.
Let an overheated engine cool down before
opening the hood. If there is a fire in the
engine compartment, keep the hood closed
and contact the fire department. G
WARNING
Certain components in the engine compart-
ment, such as the engine, radiator and parts
of the exhaust system, can become very
hot. Working in the engine compartment
poses a risk of injury.
Where possible, let the engine cool down
and touch only the components described in
the following.
! Make sure that the windshield wipers are
not folded away from the windshield. You
could otherwise damage the windshield wip-
ers or the hood. Observe the safety notes when you open the
hood.
X Stop your vehicle as far away from traffic as
possible on level ground.
X Switch off the engine.
X Secure the vehicle to prevent it from rolling
away
(Y page 138).
X Pull release handle : on the hood.
The hood is released. X
Reach into the gap and push lever ; on the
hood catch to the left.
X Raise the hood and hold it in that position. X
Pull support strut ? out of retainer = and
guide it up in the direction of the arrow.
X Lower the hood in such a way that support
strut ? glides into recess A and the hood
engages.
Closing the hood G
WARNING
Cloths or other flammable materials left in
the engine compartment can ignite if they
come into contact with the exhaust system
or parts of the engine that heat up. There is
a risk of fire. After carrying out maintenance
work, make sure that no extraneous flam-
mable material is left in the engine compart-
ment or on the exhaust system.
! Do not use your hands to push the hood
down. You could damage it otherwise. Engine compartment
251
Maintenance and care Z
Page 254 of 320

X
Hold support strut ? and lift the hood
slightly.
X Guide support strut ? towards retainer =
and apply slight pressure to make it engage.
X Lower the hood and allow it to fall with
momentum from a height of approximately
1 ft (30 cm
).
The hood locks audibly.
X Check that the hood is correctly locked.
If the hood can be raised slightly, it is not
properly engaged. If the hood is not cor-
rectly engaged, open the hood again. Let
the hood fall with a little more momentum. Overview of the engine compart-
ment
Engine compartment (example)
:
Engine oil filler neck cap (Y page
252)
; Brake fluid reservoir cap (Y page
255)
= Coolant expansion tank cap ( Y page
253)
? Washer fluid reservoir cap (Y page
256)
Regularly check the fluid level and the assem-
bly for leaks. If you detect fluid loss, e.g. oil
stains on the vehicle parking space, consult a
qualified specialist workshop immediately. Engine oil
General notes !
Engine oil gets dirty in the course of opera-
tion and its quality and volume are gradually
diminished. Regularly check the oil level,
and top up or have it replaced as needed.
Observe the information on approved engine
oils and oil consumption under "Service prod-
ucts and capacities" ( Y page
308).You can check the oil level in the engine:
R with the oil dipstick
Checking the oil level using the oil dip-
stick G
WARNING
Opening the hood when the engine is over-
heated or when there is a fire in the engine
compartment could expose you to hot gases
or other service products. There is a risk of
injury.
Let an overheated engine cool down before
opening the hood. If there is a fire in the
engine compartment, keep the hood closed
and contact the fire department. G
WARNING
Certain components in the engine compart-
ment, such as the engine, radiator and parts
of the exhaust system, can become very
hot. Working in the engine compartment
poses a risk of injury.
Where possible, let the engine cool down
and touch only the components described in
the following. Oil dipstick and engine oil filler neck
Only check the oil level when the engine is at
normal operating temperature. X Stop your vehicle as far away from traffic as
possible on level ground.
X Secure the vehicle to prevent it from rolling
away.
X Switch off the engine.
X Wait for five minutes.252
Engine compartment
Maintenance and care
Page 255 of 320

X
Open the hood (Y page 251).
X Pull out oil dipstick :.
X Wipe oil dipstick : using a lint-free cloth.
X Insert oil dipstick : back into the guide
tube as far as it will go and remove it again.
If the level is between MIN mark = and
MAX mark ;, the oil level is adequate.
X If the oil level has dropped to or below mini-
mum mark =, open cap ? and add engine
oil
(Y page 253).
The difference in quantity between
marks ; and = is approximately
2 US quarts (2 liters).
X Close the hood.
Adding engine oil G
WARNING
Opening the hood when the engine is over-
heated or when there is a fire in the engine
compartment could expose you to hot gases
or other service products. There is a risk of
injury.
Let an overheated engine cool down before
opening the hood. If there is a fire in the
engine compartment, keep the hood closed
and contact the fire department. G
WARNING
Certain components in the engine compart-
ment, such as the engine, radiator and parts
of the exhaust system, can become very
hot. Working in the engine compartment
poses a risk of injury.
Where possible, let the engine cool down
and touch only the components described in
the following. G
WARNING
If engine oil comes into contact with hot
components in the engine compartment, it
may ignite. There is a risk of fire and injury.
Make sure that engine oil is not spilled next
to the filler neck. Let the engine cool down
and thoroughly clean the engine oil off the
components before starting the engine. H
Environmental note
When adding oil, take care not to spill any. If
oil enters the soil or waterways, it is harmful
to the environment.
! Do not add too much oil. adding too much
engine oil can result in damage to the
engine or to the catalytic converter. Have
excess engine oil siphoned off.
! Do not use any additives in the engine oil.
This could damage the engine. Engine oil filler neck (example)
Observe the information regarding approved
motor oil under "Service products and capaci-
ties" (Y page
308).
i When releasing the hood, the key must be
inserted in the ignition lock and in position 0
– ignition off.
X Open the hood (Y page
251).
X Unscrew and remove cap :.
X Add engine oil.
X Replace cap : on the filler neck and
tighten.
When doing so, make sure that the cap
engages correctly.
X Check the oil level with the oil dipstick
(Y page
252).
X Close the hood. Coolant
G
WARNING
Service products may be poisonous and haz-
ardous to health. There is a risk of injury. Engine compartment
253
Maintenance and care
Z
Page 256 of 320

Comply with instructions on the use, storage
and disposal of service products on the
labels of the respective original containers.
Always store service products sealed in their
original containers. Always keep service
products out of the reach of children. G
WARNING
Opening the hood when the engine is over-
heated or when there is a fire in the engine
compartment could expose you to hot gases
or other service products. There is a risk of
injury.
Let an overheated engine cool down before
opening the hood. If there is a fire in the
engine compartment, keep the hood closed
and contact the fire department. G
WARNING
Certain components in the engine compart-
ment, such as the engine, radiator and parts
of the exhaust system, can become very
hot. Working in the engine compartment
poses a risk of injury.
Where possible, let the engine cool down
and touch only the components described in
the following.
Coolant contains glycol and is therefore poi-
sonous. Also observe the safety notes under
"Service products and capacities"
(Y page
305). G
WARNING
The cooling system is pressurized, particu-
larly when the motor is warm. If you open
the cap, you could be scalded if hot coolant
sprays out. There is a risk of injury.
Let the engine cool down before you open
the cap. Wear protective gloves and protec-
tive eyewear when opening. Open the cap
slowly to release pressure.
Only check the coolant level and/or fill the
coolant if the vehicle is on a level surface and
the engine has cooled down. The coolant tem-
perature must be below
122 ‡ (50 †). The
coolant temperature gauge must no longer reach the first line after the letter
C on the
scale and/or the bar display.
! Check the engine cooling and heating sys-
tem regularly for leaks.
If a large quantity of coolant is lost, have the
cause traced and rectified at a qualified spe-
cialist workshop. G
WARNING
If antifreeze comes into contact with hot
components in the engine compartment, it
may ignite. There is a risk of fire and injury.
Let the engine cool down before you add
antifreeze. Make sure that antifreeze is not
spilled next to the filler neck. Thoroughly
clean the antifreeze from components
before starting the engine.
! Take care not to spill any coolant on pain-
ted surfaces. You could otherwise damage
the paintwork. Example: cap and coolant expansion tank
Checking the coolant level
X Stop your vehicle as far away from traffic as
possible on level ground.
X Switch off the engine.
X Secure the vehicle to prevent it from rolling
away.
X Open the hood (Y page
251).
X Allow the engine to cool down.
X Unscrew cap : slowly about half a turn
counter-clockwise and allow excess pres-
sure to escape. 254
Engine compartment
Maintenance and care