Page 265 of 320

thawed battery checked at a qualified special-
ist workshop.
G
WARNING
During charging and jump-starting, explosive
gases can escape from the battery. There is
a risk of an explosion.
Particularly avoid fire, open flames, creating
sparks and smoking. Ensure there is suffi-
cient ventilation while charging and jump-
starting. Do not lean over a battery. G
WARNING
Battery acid is caustic. There is a risk of
injury.
Avoid contact with skin, eyes or clothing. Do
not inhale any battery gases. Do not lean
over the battery. Keep children away from
batteries. Wash away battery acid immedi-
ately with plenty of clean water and seek
medical attention.
! Charge the installed battery only with a
charger approved for Mercedes-Benz. This
device allows the battery to be charged
while it is installed in the vehicle. The vehi-
cle's electronics system may otherwise be
damaged.
! Only charge the battery using the jump-
starting connection point.
A battery charger unit specially adapted for
Mercedes-Benz vehicles and tested and
approved by Mercedes-Benz is available as an
accessory. Only this device permits the charg-
ing of the battery in its installed position. Con-
tact an authorized Mercedes-Benz Commercial
Van Center for information and availability.
Read the operating instructions for your
charger before charging the battery.
Recharge the battery more frequently if you
use the vehicle mainly for short trips and/or
drive at low outside temperatures.
Only charge the installed battery with a battery
charger that has been tested and approved by
Mercedes-Benz, using the jump-start connec-
tion point in the engine compartment.
X Connect the battery charger to the positive
terminal and ground terminal in the same
order as when connecting the donor battery in the jump-starting procedure
(Y page
272).
i If a battery is not installed and not in ser-
vice, you should charge it every three
months. This will counter self-discharging
and prevent battery damage. Care
12 V battery !
Dirty battery clamps and battery surfaces
cause leak currents which lead to the bat-
teries discharging.
! Do not use cleaning agents containing
fuel. Cleaning agents containing fuel cor-
rode the battery housing.
! If dirt gets into the battery cell, battery
self-discharge will increase and the battery
may be damaged.
The following points on battery care must be
observed:
X Regularly check the battery terminals and
the fastening of the negative cable to the
chassis to ensure that they are firmly
seated.
X Always keep the battery terminals and bat-
tery surfaces clean and dry.
X Lightly grease the undersides of the battery
terminals with acid-resistant grease.
X Only clean the battery casing with a com-
mercially available cleaning product. Care
Notes on care
G
WARNING
If you use openings in the bodywork or
detachable parts as steps, you could:
R slip and/or fall
R damage the vehicle and cause yourself to
fall.
There is a risk of injury.
Always use secure climbing aids, e.g. a suit-
able ladder. Care
263
Maintenance and care Z
Page 266 of 320
 as a step. Otherwise, you could
damage the paneling and/or the sliding
door mechanism.
! When cleaning your car, do not use:
R dry, coarse or har")
!
Do not use the lower sliding door guide
(carriage) as a step. Otherwise, you could
damage the paneling and/or the sliding
door mechanism.
! When cleaning your car, do not use:
R dry, coarse or hard cloths
R abrasive cleaning agents
R solvents
R cleaning agents containing solvents
Do not scrub.
Do not touch the surfaces and films with
hard objects, e.g. rings or ice scrapers. Oth-
erwise, you may scratch or damage the sur-
faces and films.
! Do not park your vehicle for a long period
of time directly after cleaning, particularly
after cleaning the wheel rim with wheel
cleaner. Wheel cleaner can lead to the
increased corrosion of the brake discs and
pads. Therefore, drive for a few minutes
after cleaning. By heating up the brakes, the
brake discs and pads dry. The vehicle can
then be parked for a long period of time. H
Environmental note
Only clean your vehicle at specially designed
wash bays. Dispose of empty containers and
used cleaning products in an environmen-
tally responsible manner. H
Environmental note
Dispose of empty packaging and cleaning
cloths in an environmentally responsible
manner.
Regular care of your vehicle is a condition for
retaining the quality in the long term.
Use care products and cleaning agents recom-
mended and approved by Mercedes-Benz. Washing the vehicle and cleaning
the paintwork
Automatic car wash G
WARNING
Braking efficiency is reduced after washing
the vehicle. There is a risk of an accident. After the vehicle has been washed, brake
carefully while paying attention to the traffic
conditions until full braking power is
restored.
! Make sure that the automatic car wash is
suitable for the size of the vehicle.
Before washing the vehicle in an automatic
car wash, fold in the exterior mirrors and
remove any additional antennas. Otherwise,
the exterior mirror, antenna or the vehicle
itself could be damaged.
Make sure that the exterior mirrors are fully
folded out again and that any additional
antennas are re-installed when you leave the
automatic car wash.
! Make sure that:
R the side windows and roof are completely
closed
R the climate control blower is switched off
R the windshield wiper switch is in position
0
The vehicle may otherwise be damaged.
You can wash the vehicle in an automatic car
wash from the very start.
Wash off excess dirt before cleaning the vehi-
cle in an automatic car wash.
After putting the vehicle through an automatic
car wash, wipe off wax from:
R the windshield
R the windshield wiper blades
This will prevent smears and reduce wiping
noises caused by residue on the windshield.
R on vehicles with rear-end doors, from the
rear view camera lens in the top of the
license plate molding
(Y page 267)
Washing by hand In some countries, washing by hand is only
allowed at specially equipped washing bays.
Observe the legal requirements of the country
you are currently in when washing by hand.
X Do not use hot water and do not wash the
vehicle in direct sunlight.
X Use a soft car sponge.
X Use a mild cleaning agent, e.g. a Mercedes-
Benz approved car shampoo.264
Care
Maintenance and care
Page 267 of 320

X
Thoroughly hose down the vehicle with a
gentle jet of water.
X Do not point the water jet directly towards
the air inlet grilles.
X Use plenty of water and rinse out the
sponge frequently.
X Rinse the vehicle with clean water and dry
thoroughly with a chamois.
X Do not let the cleaning agents dry on the
paintwork.
When using the vehicle in winter, remove all
traces of road salt deposits carefully and as
soon as possible.
Power washers G
WARNING
The water jet from a circular jet nozzle (dirt
blasters) can cause invisible exterior dam-
age to the tires or chassis components.
Components damaged in this way may fail
unexpectedly. There is a risk of an accident.
Do not use power washers with circular jet
nozzles to clean the vehicle. Have damaged
tires or chassis components replaced imme-
diately.
! Under no circumstances use power wash-
ers in the vehicle interior. The pressurized
water and associated spray produced by the
power washer could cause extensive dam-
age to the vehicle.
! When using high-pressure cleaning equip-
ment, maintain a minimum distance of
approx. 1 ft (30 cm
) between the spray noz-
zle and the vehicle parts. Do not use a
power washer with a round-jet nozzle. You
could damage the vehicle or engine parts.
! Keep the water jet moving constantly
while cleaning. This will avoid causing dam-
age to the vehicle.
Do not point the water jet at:
R door joints
R rear view camera
R air bellows
R brake hoses
R wheel balance weights
R electrical components
R electrical connections R
seals
R drive train, especially not at the inter-
mediate bearing of the propeller shaft
Cleaning the engine !
Water must not enter intake or ventilation
openings. When cleaning with high pressure
water or steam cleaners, the spray must not
be aimed directly at electrical components
or the terminals of electrical lines.
Preserve the engine after the engine has
been cleaned. Protect the belt drive system
from exposure to the preservative agent.
Also observe the information under "Power
washers"
(Y page 265).
Cleaning the paintwork !
Do not affix:
R stickers
R films
R magnetic plates or similar items
to painted surfaces. You could otherwise
damage the paintwork.
Scratches, corrosive deposits, areas affected
by corrosion and damage caused by inade-
quate care cannot always be completely
repaired. In such cases, visit a qualified spe-
cialist workshop.
X Remove impurities immediately, where pos-
sible, whilst avoiding rubbing too hard.
X Soak insect remains with insect remover
and rinse off the treated areas afterwards.
X Soak bird droppings with water and rinse off
the treated areas afterwards.
X Remove coolant, brake fluid, tree resin, oils,
fuels and greases by rubbing gently with a
cloth soaked in petroleum ether or lighter
fluid.
X Use tar remover to remove tar stains.
X Use silicone remover to remove wax.
Cleaning the windows G
WARNING
You could become trapped by the wind-
shield wipers if they start moving while
cleaning the windshield or wiper blades.
There is a risk of injury. Care
265
Maintenance and care
Z
Page 268 of 320

Always switch off the windshield wipers and
the ignition before cleaning the windshield
or wiper blades.
! Do not fold the windshield wipers away
from the windshield unless the hood is
closed. Otherwise, you could damage the
hood.
! Hold the wiper arm securely when folding
back. The windshield could be damaged if
the wiper arm smacks against it suddenly.
! Do not use dry cloths, abrasive products,
solvents or cleaning agents containing sol-
vents to clean the inside of the windows. Do
not touch the insides of the windows with
hard objects, e.g. an ice scraper or ring.
There is otherwise a risk of damaging the
windows.
! Clean the water drainage channels of the
windshield and the rear window at regular
intervals. Deposits such as leaves, petals
and pollen may under certain circumstances
prevent water from draining away. This can
lead to corrosion damage and damage to
electronic components.
X Clean the inside and outside of the windows
with a damp cloth and a cleaning agent that
is recommended and approved by
Mercedes-Benz. Exterior
Cleaning the wheels !
Do not use any acidic or alkaline cleaning
agents. They can cause corrosion on the
wheel bolts or the retainer springs for the
wheel-balancing weights.
! Do not park your vehicle for a long period
of time directly after cleaning, particularly
after cleaning the wheel rim with wheel
cleaner. Wheel cleaner can lead to the
increased corrosion of the brake discs and
pads. Therefore, drive for a few minutes
after cleaning. By heating up the brakes, the
brake discs and pads dry. The vehicle can
then be parked for a long period of time.
If you clean the wheels with a power washer,
observe the safety notes for the power washer (Y page 265). You could otherwise damage
the tires.
Cleaning the wiper blades G
WARNING
You could become trapped by the wind-
shield wipers if they start moving while
cleaning the windshield or wiper blades.
There is a risk of injury.
Always switch off the windshield wipers and
the ignition before cleaning the windshield
or wiper blades.
! Do not fold the windshield wipers away
from the windshield unless the hood is
closed. Otherwise, you could damage the
hood.
! Do not pull the wiper blade. Otherwise, the
wiper blade could be damaged.
! Do not clean wiper blades too often and
do not rub them too hard. Otherwise, the
graphite coating could be damaged. This
could cause wiper noise.
! Hold the wiper arm securely when folding
back. The windshield could be damaged if
the wiper arm smacks against it suddenly.
X Turn the SmartKey to position 0 in the igni-
tion lock or remove the SmartKey.
X Fold the windshield wiper arms away from
the windshield until you feel them engage.
X Carefully clean the wiper blades with a
damp cloth.
X Fold back the wiper arms before switching
on the ignition.
Cleaning the exterior lighting !
Only use cleaning agents or cleaning
cloths that are suitable for plastic lenses.
Caustic, irritant or otherwise unsuitable
cleaning agents or cleaning cloths could
scratch or damage the exterior lighting plas-
tic lenses.
i Inquire about suitable cleaning agents or
cleaning cloths at a specialist workshop.
X Clean the plastic lenses of the exterior light-
ing with a damp sponge and a mild cleaning266
Care
Maintenance and care
Page 269 of 320

agent, e.g. car shampoo, or with cleaning
cloths.
Cleaning the sensors !
Do not use dry, coarse or hard cloths and
do not scrub. You will otherwise scratch or
damage the sensors.
If you clean the sensors with a power
washer or steam cleaner, observe the infor-
mation provided by the manufacturer
regarding the distance to be maintained
between the vehicle and the nozzle of the
power washer. X
Clean drive system sensors : with water,
car shampoo and a soft cloth.
Cleaning the rear view camera !
Do not use dry, coarse or hard cloths and
do not scrub. You could otherwise scratch
or damage the lens of the rear view camera.
When cleaning the vehicle with a high-pres-
sure or steam cleaner, observe a minimum
distance of 1.6 ft
(50 cm) to the rear view
camera. Do not aim directly at the rear view
camera. You could otherwise damage the
rear view camera.
Make sure that you do not apply any wax to
camera lens when waxing the vehicle. If neces-
sary, remove the wax using water, shampoo
and a soft cloth. Vehicles with rear-end doors
X Clean camera lens : with clean water and
a soft cloth. Vehicles with a tailgate
X Make sure that the engine is switched off
and the key is in position 2 in the ignition
lock.
X Engage reverse gear or shift the transmis-
sion to position k.
The rear view camera flap opens.
X Clean camera lens : with clean water and
a soft cloth.
Cleaning the sliding door The care instructions do not apply to electric
sliding doors. Care
267
Maintenance and care Z
Page 270 of 320

X
Remove foreign objects from the vicinity of
contact surfaces ; and contact pins : of
the sliding door.
X Clean contact surfaces ; and contact
pins : with a mild cleaning agent and a
soft cloth.
Do not oil or grease contact plates ; or
contact pins :.
Cleaning the trailer tow hitch H
Environmental note
Dispose of rags soaked in oil and grease in
an environmentally responsible manner.
! Do not clean the ball coupling with a
power washer. Do not use solvents.
! Observe the notes on additional care for
the trailer tow hitch (see the manufacturer's
operating instructions).
You can also have the maintenance work on
the ball coupling and the trailer tow hitch car-
ried out by a qualified specialist workshop. Interior
Cleaning the interior !
When using liquids to clean the vehicle
interior, observe the following points:
R Under no circumstances use power wash-
ers.
R Make sure that no fluids enter or remain
in gaps and cavities.
R Ensure sufficient ventilation when clean-
ing.
R Make sure that the vehicle interior is com-
pletely dry after cleaning. Cleaning the display !
For cleaning, do not use any of the follow-
ing:
R alcohol-based thinner or gasoline
R abrasive cleaning agents
R commercially-available household clean-
ing agents
These may damage the display surface. Do
not put pressure on the display surface
when cleaning. This could lead to irreparable
damage to the display.
X Switch off the display and let it cool down.
X Clean the display surface with a commer-
cially available microfiber cloth and cleaner
for TFT/LCD displays.
X Dry the display surface using a dry micro-
fiber cloth.
Cleaning the plastic trim G
WARNING
Care products and cleaning agents contain-
ing solvents cause surfaces in the cockpit to
become porous. As a result, plastic parts
may come loose in the event of air bag
deployment. There is a risk of injury.
Do not use any care products and cleaning
agents to clean the cockpit.
! Never attach the following to plastic surfa-
ces:
R stickers
R films
R perfume oil container or similar
You could otherwise damage the plastic.
! Do not allow cosmetics, insect repellent or
sunscreen to come into contact with the
plastic trim. This maintains the high-quality
look of the surfaces.
X Wipe the plastic trim and the cockpit with a
damp, lint-free cloth, e.g. a microfiber cloth.
X Heavy soiling: use mild soapy water or care
products and cleaning agents recommended
and approved by Mercedes-Benz. 268
CareMaintenance and care
Page 271 of 320

Cleaning the steering wheel and selec-
tor lever
X
Thoroughly wipe with a damp cloth.
X Vehicles with leather upholstery: after
cleaning, use leather care agents that have
been recommended and approved by
Mercedes-Benz.
Cleaning the trim elements !
Do not use solvent-based cleaning agents
such as tar remover, wheel cleaners, pol-
ishes or waxes. There is otherwise a risk of
damaging the surface.
X Wipe the trim elements with a damp, lint-
free cloth, e.g. a microfiber cloth.
X Heavy soiling: use care products and
cleaning agents recommended and
approved by Mercedes-Benz.
Cleaning the seat covers !
Do not use microfiber cloths to clean gen-
uine leather or artificial leather covers. If
used often, a microfiber cloth can damage
the cover.
! Clean:
R artificial leather covers with a cloth mois-
tened with a solution containing 1% deter-
gent, e.g. dish washing liquid.
R cloth covers with a microfiber cloth mois-
tened with a solution containing 1% deter-
gent, e.g. dish washing liquid. Wipe entire
seat sections carefully to avoid leaving
visible lines. Leave the seat to dry after-
wards. Cleaning results depend on the
type of dirt and how long it has been
there.
R genuine leather covers carefully with a
damp cloth, then wipe the covers down
with a dry cloth. Make sure that the
leather does not become soaked. Other-
wise, the leather could become rough or
cracked. Only use leather care agents
that have been tested and approved by
Mercedes-Benz. You can obtain these
from a qualified specialist workshop.
i Please keep in mind that:
R leather covers are a natural product and,
as such, are subject to a natural aging process. Leather may react differently,
e.g. increased wrinkling, to certain envi-
ronmental influences (such as high
humidity or intense heat).
R regular care is essential to make sure that
the appearance and comfort of the covers
are retained over time.
To clean genuine leather covers: X Remove any dust, crumbs etc. If necessary,
carefully vacuum-clean the seat covers.
X Carefully wipe the leather seat covers with a
damp cloth.
X Wipe over again with a dry cloth.
Make sure that the leather does not become
soaked, especially perforated parts.
X Then treat the leather seats with a leather
care foam.
Only use leather care agents that have been
tested and approved by Mercedes-Benz.
Observe the manufacturer's instructions.
Cleaning the seat belts G
WARNING
Seat belts can become severely weakened if
bleached or dyed. This could cause the seat
belts to tear or fail, for instance, in the event
of an accident. This poses an increased risk
of injury or fatal injury.
Never bleach or dye the seat belts.
! Do not clean the seat belts using chemical
cleaning agents. Do not dry the seat belts
by heating at temperatures above
176 ‡
(80 †) or in direct sunlight.
Remove any stains or dirt immediately. This
will avoid residue or damage. X Use clean, lukewarm water and soap solu-
tion.
Cleaning the headliner and carpets X
Headliner: if it is very dirty, use a soft brush
or dry shampoo.
X Carpets: use the carpet and textile cleaning
agents recommended and approved by
Mercedes-Benz. Care
269
Maintenance and care Z
Page 272 of 320

Useful information
This Operator's Manual describes all models
as well as standard and optional equipment of
your vehicle that were available at the time of
going to print. Country-specific variations are
possible. Note that your vehicle may not be
equipped with all of the described functions.
This also applies to systems and functions rel-
evant to safety.
Read the information on qualified specialist
workshops (Y page
32).Where will I find...?
Vehicle tool kit
General notes Depending on the equipment version of the
vehicle, the vehicle tool kit is:
R in the seat base of the left front seat
R in the rear compartment stowage compart-
ment
R in the tool holder in the cargo compartment
Apart from some country-specific variants,
vehicles without a spare wheel are not equip-
ped with tire-changing tools. If your vehicle is
equipped with tire-changing tools, these are in
the vehicle tool kit. If the vehicle tool kit is
stowed in the driver's seat base, the jack is in
a separate holder in the cargo compartment
on the right-hand side of the vehicle next to
the tailgate/rear-end door
(Y page 272).
Some tools for changing a wheel are specific
to the vehicle. For more information on which
tools are required and approved to perform a
wheel change on your vehicle, consult a quali-
fied specialist workshop.
Necessary tire-changing tools can include, for
example:
R Jack
R Lug wrench
R Ratchet wrench
i The jack has a maximum weight of 7.5 kg
depending on the vehicle's equipment.
The maximum payload of the jack can be
found on the sticker on the jack itself. The jack is maintenance-free. In the event of
a malfunction, please contact a qualified
specialist workshop.
Stowage compartment in the seat
base Stowage compartment in the seat base of the left
front seat
X To open: press both latching springs :
down and release cover ; upwards from
the seat base.
X Remove cover ; by pulling upwards at an
angle from the seat base.
X Remove the clamping strap and remove the
vehicle tool kit.
For vehicles equipped with tire-changing
tools, the jack is in a separate holder in the
cargo compartment on the right-hand side
of the vehicle next to the tailgate/rear-end
door (Y page
272).
X To close: after stowing the vehicle tool bag,
insert cover ; in front of the stowage com-
partment in the seat base and fold shut.
Latching springs : of cover ; must
engage audibly. 270
Where will I find...?
Breakdown assistance
 1
1 2
2 3
3 4
4 5
5 6
6 7
7 8
8 9
9 10
10 11
11 12
12 13
13 14
14 15
15 16
16 17
17 18
18 19
19 20
20 21
21 22
22 23
23 24
24 25
25 26
26 27
27 28
28 29
29 30
30 31
31 32
32 33
33 34
34 35
35 36
36 37
37 38
38 39
39 40
40 41
41 42
42 43
43 44
44 45
45 46
46 47
47 48
48 49
49 50
50 51
51 52
52 53
53 54
54 55
55 56
56 57
57 58
58 59
59 60
60 61
61 62
62 63
63 64
64 65
65 66
66 67
67 68
68 69
69 70
70 71
71 72
72 73
73 74
74 75
75 76
76 77
77 78
78 79
79 80
80 81
81 82
82 83
83 84
84 85
85 86
86 87
87 88
88 89
89 90
90 91
91 92
92 93
93 94
94 95
95 96
96 97
97 98
98 99
99 100
100 101
101 102
102 103
103 104
104 105
105 106
106 107
107 108
108 109
109 110
110 111
111 112
112 113
113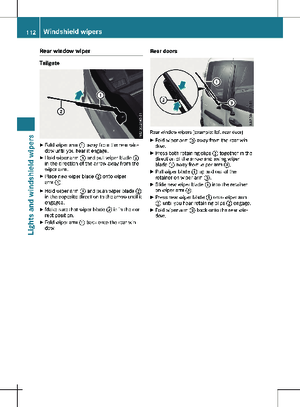 114
114 115
115 116
116 117
117 118
118 119
119 120
120 121
121 122
122 123
123 124
124 125
125 126
126 127
127 128
128 129
129 130
130 131
131 132
132 133
133 134
134 135
135 136
136 137
137 138
138 139
139 140
140 141
141 142
142 143
143 144
144 145
145 146
146 147
147 148
148 149
149 150
150 151
151 152
152 153
153 154
154 155
155 156
156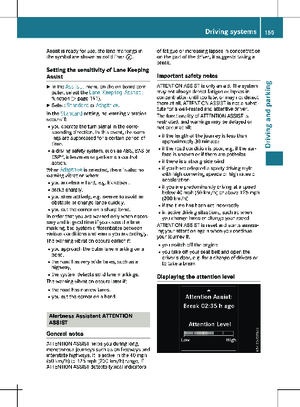 157
157 158
158 159
159 160
160 161
161 162
162 163
163 164
164 165
165 166
166 167
167 168
168 169
169 170
170 171
171 172
172 173
173 174
174 175
175 176
176 177
177 178
178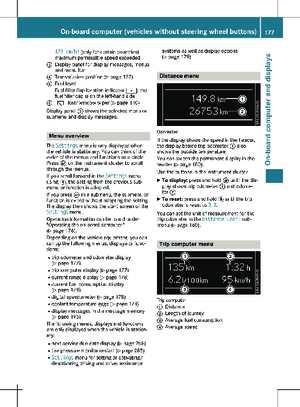 179
179 180
180 181
181 182
182 183
183 184
184 185
185 186
186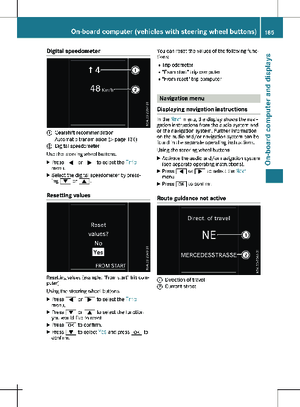 187
187 188
188 189
189 190
190 191
191 192
192 193
193 194
194 195
195 196
196 197
197 198
198 199
199 200
200 201
201 202
202 203
203 204
204 205
205 206
206 207
207 208
208 209
209 210
210 211
211 212
212 213
213 214
214 215
215 216
216 217
217 218
218 219
219 220
220 221
221 222
222 223
223 224
224 225
225 226
226 227
227 228
228 229
229 230
230 231
231 232
232 233
233 234
234 235
235 236
236 237
237 238
238 239
239 240
240 241
241 242
242 243
243 244
244 245
245 246
246 247
247 248
248 249
249 250
250 251
251 252
252 253
253 254
254 255
255 256
256 257
257 258
258 259
259 260
260 261
261 262
262 263
263 264
264 265
265 266
266 267
267 268
268 269
269 270
270 271
271 272
272 273
273 274
274 275
275 276
276 277
277 278
278 279
279 280
280 281
281 282
282 283
283 284
284 285
285 286
286 287
287 288
288 289
289 290
290 291
291 292
292 293
293 294
294 295
295 296
296 297
297 298
298 299
299 300
300 301
301 302
302 303
303 304
304 305
305 306
306 307
307 308
308 309
309 310
310 311
311 312
312 313
313 314
314 315
315 316
316 317
317 318
318 319
319