Page 89 of 320

Useful information
This Operator's Manual describes all models
as well as standard and optional equipment of
your vehicle that were available at the time of
going to print. Country-specific variations are
possible. Note that your vehicle may not be
equipped with all of the described functions.
This also applies to systems and functions rel-
evant to safety.
Read the information on qualified specialist
workshops (Y page
32).Seats
Driver's and co-driver's seat
Important safety notes G
WARNING
Children could become trapped if they
adjust the seats, particularly when unatten-
ded. There is a risk of injury.
When leaving the vehicle, always take the
SmartKey with you and lock the vehicle.
Never leave children unsupervised in the
vehicle. G
WARNING
You could lose control of your vehicle if you
do the following while driving:
R adjust the driver's seat, head restraint,
steering wheel or mirrors
R fasten the seat belt
There is a risk of an accident.
Adjust the driver's seat, head restraint,
steering wheel and mirror and fasten your
seat belt before starting the engine. G
WARNING
When you adjust a seat, you or other vehicle
occupants could become trapped, e.g. on
the seat guide rail. There is a risk of injury.
When adjusting a seat, make sure that no
one has any body parts in the sweep of the
seat. G
WARNING
If the driver's seat is not engaged, it could
move unexpectedly while the vehicle is in
motion. This could cause you to lose control
of the vehicle. There is a risk of an accident.
Always make sure that the driver's seat is
engaged before starting the vehicle. G
WARNING
The front-air bags for could also injure the
vehicle occupants in the front If the front
seats are positioned too close to the dash-
board or steering wheel. This poses an
increased risk of injury or even fatal injury.
Always adjust the front seats so that they
are as far from the front air bags as possi-
ble. Also observe the notes on the correct
adjustment of the seats. G
WARNING
The seat belt does not offer the intended
level of protection if you have not moved the
backrest to an almost vertical position.
When braking or in the event of an accident,
you could slide underneath the seat belt and
sustain abdomen or neck injuries, for exam-
ple. This poses an increased risk of injury or
even fatal injury.
Adjust the seat properly before beginning
your journey. Always ensure that the back-
rest is in an almost vertical position and that
the shoulder section of your seat belt is
routed across the center of your shoulder. G
WARNING
If the head restraints are not installed or not
adjusted correctly, they cannot provide pro-
tection as intended. There is an increased
risk of injury in the head and neck area, e.g.
in the event of an accident or when braking.
Always drive with the head restraints instal-
led. Before driving off, make sure for every
vehicle occupant that the center of the head
restraint supports the back of the head at
about eye level. Seats
87
Seats, steering wheel and mirrors Z
Page 90 of 320

!
To prevent damage to the seats and the
seat heating, observe the following notes:
R Do not spill liquids onto the seats. Dry the
seats as soon as possible if liquid does
get spilled on the seats.
R If the seat covers are damp or wet, do not
switch on the seat heating. Also, do not
use the seat heating to dry the seats.
R Clean the seat covers as recommended;
see the "Interior care" section.
R Do not transport heavy loads on the
seats. Do not place pointed objects on
the seat cushions such as knives, nails or
tools. Where possible, use the seats only
for carrying passengers.
R When operating the seat heating, do not
cover the seats with insulating materials,
e.g. blankets, coats, bags, protective cov-
ers, child seats or booster seats.
R When the seat heating is switched on, the
seat surface can be damaged as a result
of objects being placed on the seats, for
example, seat cushions, child seats and
protective covers not approved by
Mercedes-Benz.
Your seat must be adjusted in such a way that
you can wear the seat belt correctly.
Observe the following points:
R Position the backrest in an almost vertical
position so that you are sitting virtually
upright. Do not drive with the backrest
reclined too far back.
R Your arms should be slightly bent when you
are holding the steering wheel.
R Avoid seat positions that prevent the seat
belt from being correctly routed. The shoul-
der section of the belt must be routed over
the middle of your shoulder and be pulled
tight against your upper body. The lap belt
must always pass across your lap as low
down as possible, i.e. over your hip joints.
R Adjust the head restraint so that it supports
the back of the head at eye level.
R The distance from the pedals should be
such that you can depress them fully.
Please also observe the important safety notes
on "Air bags"
(Y page 51), "Seat belts"
(Y page 48) and "Child restraint systems" ( Y page 62). Adjusting the seat manually
:
Seat fore-and-aft adjustment
; Seat cushion angle adjustment
= Seat height adjustment
? Seat backrest adjustment
X To adjust the seat fore-and-aft position:
pull lever
: up.
X Slide the seat forward or back until you can
depress the pedals.
X Release lever :.
X Slide the seat forward or back until you hear
it engage.
X To adjust the seat height: press or pull
lever = repeatedly until you have reached
the desired seat height.
X To adjust the backrest: turn handwheel ?
towards the front.
The seat backrest moves to a vertical posi-
tion.
X Turn handwheel ? towards the rear.
The seat backrest tilts towards the rear.
X To adjust the seat angle: turn hand-
wheel ; towards the front.
The front of the seat cushion tilts down.
X Turn handwheel ; towards the rear.
The front of the seat cushion tilts up.
Adjusting the seat electrically G
WARNING
Children could become trapped if they
adjust the seats, particularly when unatten-
ded. There is a risk of injury.
When leaving the vehicle, always take the
SmartKey with you and lock the vehicle. 88
Seats
Seats, steering wheel and mirrors
Page 91 of 320

Never leave children unsupervised in the
vehicle.
The seats can be adjusted when the key is
removed and the door is open. Buttons for electric seat adjustment on the door
trim
:
Head restraint height adjustment
; Seat backrest adjustment
= Seat height adjustment
? Seat cushion angle adjustment
A Seat fore-and-aft adjustment
X Turn the key to position 2 in the ignition
lock.
or X Open the door.
X Adjust the seat using the buttons on the
door trim.
If the ignition is not switched on, you can
adjust the seat within 30 seconds of unlocking
the vehicle.
If you wish to adjust the seat electrically after
30 seconds:
X Pull the key out of the ignition lock and
press the % button.
X Adjust the seat using the buttons on the
door trim.
i You can save the settings for the seats
with the memory function (Y page
97).
Adjusting lumbar support To support the lumbar region, you can set the
backrest contour of each front seat (4-way
lumbar support) electrically. Electrically adjustable lumbar support
:
To raise the backrest contour
; To soften the backrest contour
= To lower the backrest contour
? To harden the backrest contour Rear bench seats
General notes For a variable configuration of the vehicle inte-
rior in the rear compartment, you can:
Rear bench seat
R remove the rear bench seat by releasing the
quick-locking mechanism (Y page
91)
Bench seat anchorage G
WARNING
If the rear bench seat is not fully engaged, it
may be thrown about while the vehicle is
moving. There is a risk of an accident and
injury.
Always make sure that the rear bench seat
is fully engaged as described. Seats
89
Seats, steering wheel and mirrors Z
Page 92 of 320

Example: seat rail system with quick-locking
mechanism
Guide rails : of the seat rail system allow you
to:
R anchor rear bench seats in up to two rear
seat rows
The only way to ensure that the rear bench
seats will engage securely is to always keep
the seat anchorages clean and free of foreign
objects.
i Vehicles with seat rail system: when
removing a passenger bench seat, the seat
sliders may be displaced in a guide rail. The
seat sliders are then no longer parallel in the
guide rails. In this case, you can no longer
install the passenger bench seat. Displacing
the seat sliders is possible only with a tool –
the grip for seat sliders – or in a qualified
specialist workshop without the risk of dam-
age. The tool is available as a Mercedes-
Benz accessory.
Seating variants G
WARNING
If the rear bench seats are not installed as
described, the safety precautions integrated
into the rear bench seats cannot protect as
intended. There is an increased risk of
injury.
Only install the rear bench seats as descri-
bed. Only use rear bench seats approved for
the vehicle.
You can install rear bench seats with two or
three seats.
The seating variants shown are only permitted
if the conditions named below for safe rear seating are met. Other seating variants are not
permitted and can endanger the occupants.
Seating variants facing forwards
EE
EASY-ENTRY/EXIT feature
If a rear bench seat is marked with EE in the
illustrations, a rear bench seat must be instal-
led with the EASY-ENTRY/EXIT feature in the
position indicated.
If a rear bench seat is not marked, a rear
bench seat without an EASY-ENTRY/EXIT sec-
tion must be installed in the position indicated.
Please observe the following conditions for
safe rear seating:
R Only use rear bench seats approved for the
vehicle.
R A rear bench seat with three seats without
EASY-ENTRY/EXIT feature may only be
installed if there is no other row of rear
seats behind it.
R Passengers may only use the seats if the
rear bench seat has engaged correctly
( Y page
91).
EASY-ENTRY/EXIT feature G
WARNING
If the rear bench seat is not fully engaged, it
may be thrown about while the vehicle is
moving. There is a risk of an accident and
injury.
Always make sure that the rear bench seat
is fully engaged as described. G
WARNING
When you adjust a seat, you or other vehicle
occupants could become trapped, e.g. on
the seat guide rail. There is a risk of injury. 90
Seats
Seats, steering wheel and mirrors
Page 93 of 320

When adjusting a seat, make sure that no
one has any body parts in the sweep of the
seat. G
WARNING
The rear bench seat will not engage when
folded forward. The rear bench seat may
inadvertently fold backward while accelerat-
ing, braking, changing direction suddenly or
in the event of an accident, for example.
People within the sweep of the rear bench
seat may become trapped. There is a risk of
injury.
Before driving off, always fold back the rear
bench seat if it is folded forward. Make sure
that the rear bench seat is fully engaged.
The only way to ensure that the rear bench
seat will engage securely is to always keep the
seat anchorages clean and free of foreign
objects.
The rear seat leg is only engaged when the red
indicator tab is no longer visible and is fully
retracted into the seat leg. Rear bench seat with EASY-ENTRY
:
Handle
; EASY-ENTRY release handle
= Indicator tab for seat legs locking mecha-
nism
? Release handle for front seat legs
If you fold the EASY-ENTRY section of the rear
bench seat forward, it is simpler and easier to
get into or out of the second row of seats.
X To fold the EASY-ENTRY section forward:
pull EASY-ENTRY release handle ; up.
X Fold the EASY-ENTRY section forward with
the aid of release handle ;.X
To fold the EASY-ENTRY section back:
fold the EASY-ENTRY section back until it
engages in the seat anchorages.
Indicator tab = is no longer visible.
The EASY-ENTRY section has engaged cor-
rectly if:
R the seat legs engages audibly
R indicator tab = is no longer visible and is
fully retracted into the seat leg
X To remove the EASY-ENTRY section: pull
EASY-ENTRY release handle ; up.
X Fold the EASY-ENTRY section forward.
X Pull the release handle ? for front seat legs
upwards.
X Fold the EASY-ENTRY section further
forward.
X Lift the EASY-ENTRY section up and out of
the anchorage.
X To install the EASY-ENTRY section: place
the front seat leg of the EASY-ENTRY sec-
tion on the seat anchorage and allow to
engage.
X Fold the EASY-ENTRY section back.
The rear seat leg of the EASY-ENTRY section
engages audibly. Indicator tab = on the
seat leg is no longer visible.
The EASY-ENTRY section has engaged cor-
rectly if:
R the seat legs engages audibly
R indicator tab = is no longer visible and is
fully retracted into the seat leg
If the EASY-ENTRY section has not engaged
correctly: X Fold the EASY-ENTRY section forward.
X Fold the EASY-ENTRY section back again
and check the locking mechanism.
Removing/installing the rear bench
seat Standard rear bench seat:
G
WARNING
If the rear bench seat is not fully engaged, it
may be thrown about while the vehicle is
moving. There is a risk of an accident and
injury.
Always make sure that the rear bench seat
is fully engaged as described. Seats
91Seats, steering wheel and mirrors Z
Page 94 of 320

G
WARNING
If the rear bench seat is not installed as
described or an unsuitable rear bench seat
is installed, the seat belts may not provide
protection as intended. There is an
increased risk of injury.
Install the rear bench seat as described.
Only use rear bench seats that are approved
for your vehicle by the distributor named on
the inside cover page.
The only way to ensure that the rear bench
seat will engage securely is to always keep the
seat anchorages clean and free of foreign
objects.
Always observe the notes about the seating
variants (Y page
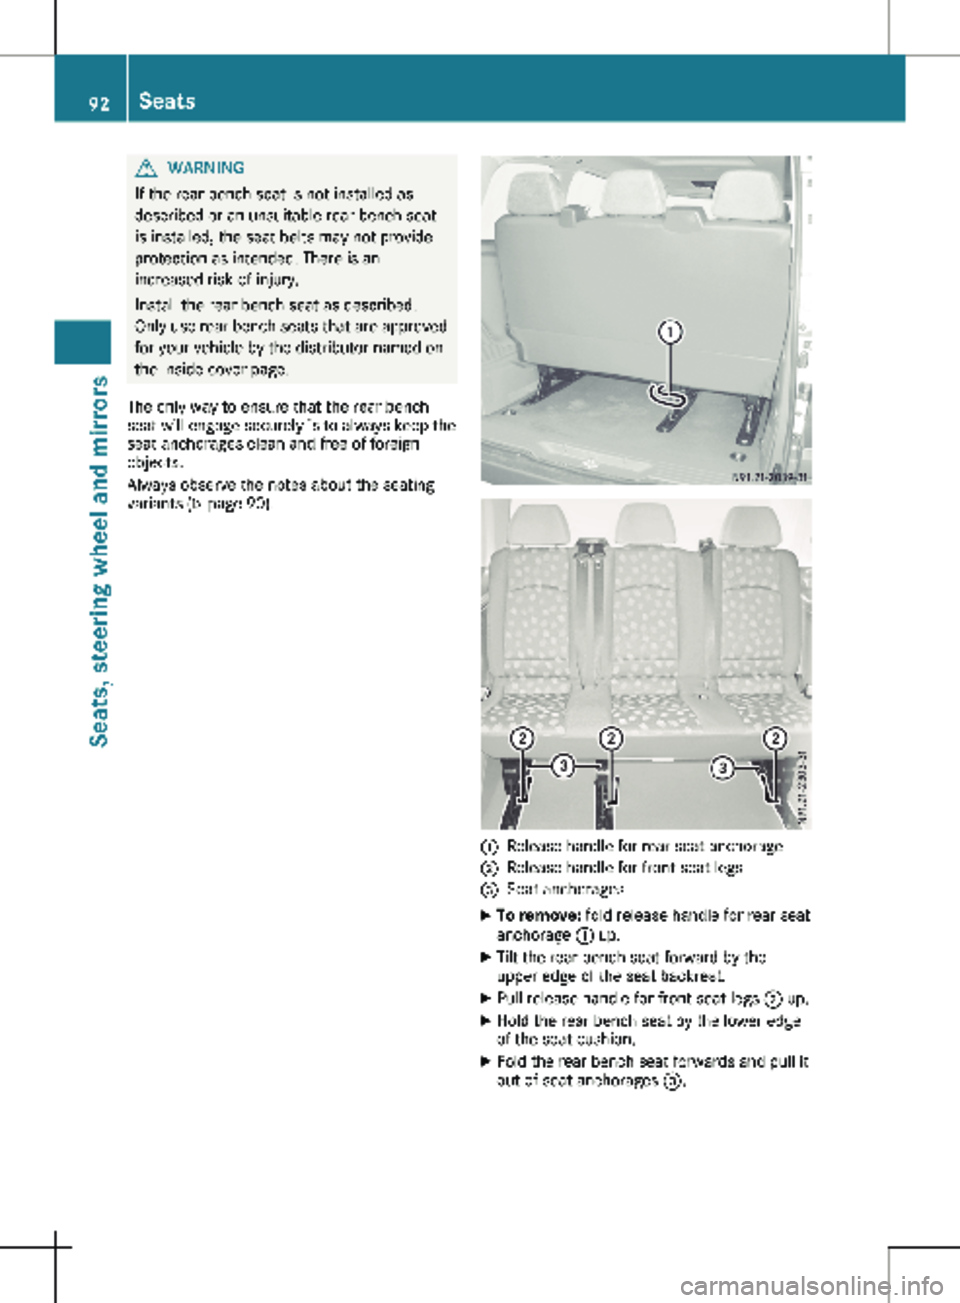
90). :
Release handle for rear seat anchorage
; Release handle for front seat legs
= Seat anchorages
X To remove: fold release handle for rear seat
anchorage : up.
X Tilt the rear bench seat forward by the
upper edge of the seat backrest.
X Pull release handle for front seat legs ; up.
X Hold the rear bench seat by the lower edge
of the seat cushion.
X Fold the rear bench seat forwards and pull it
out of seat anchorages =.92
Seats
Seats, steering wheel and mirrors
Page 95 of 320

X
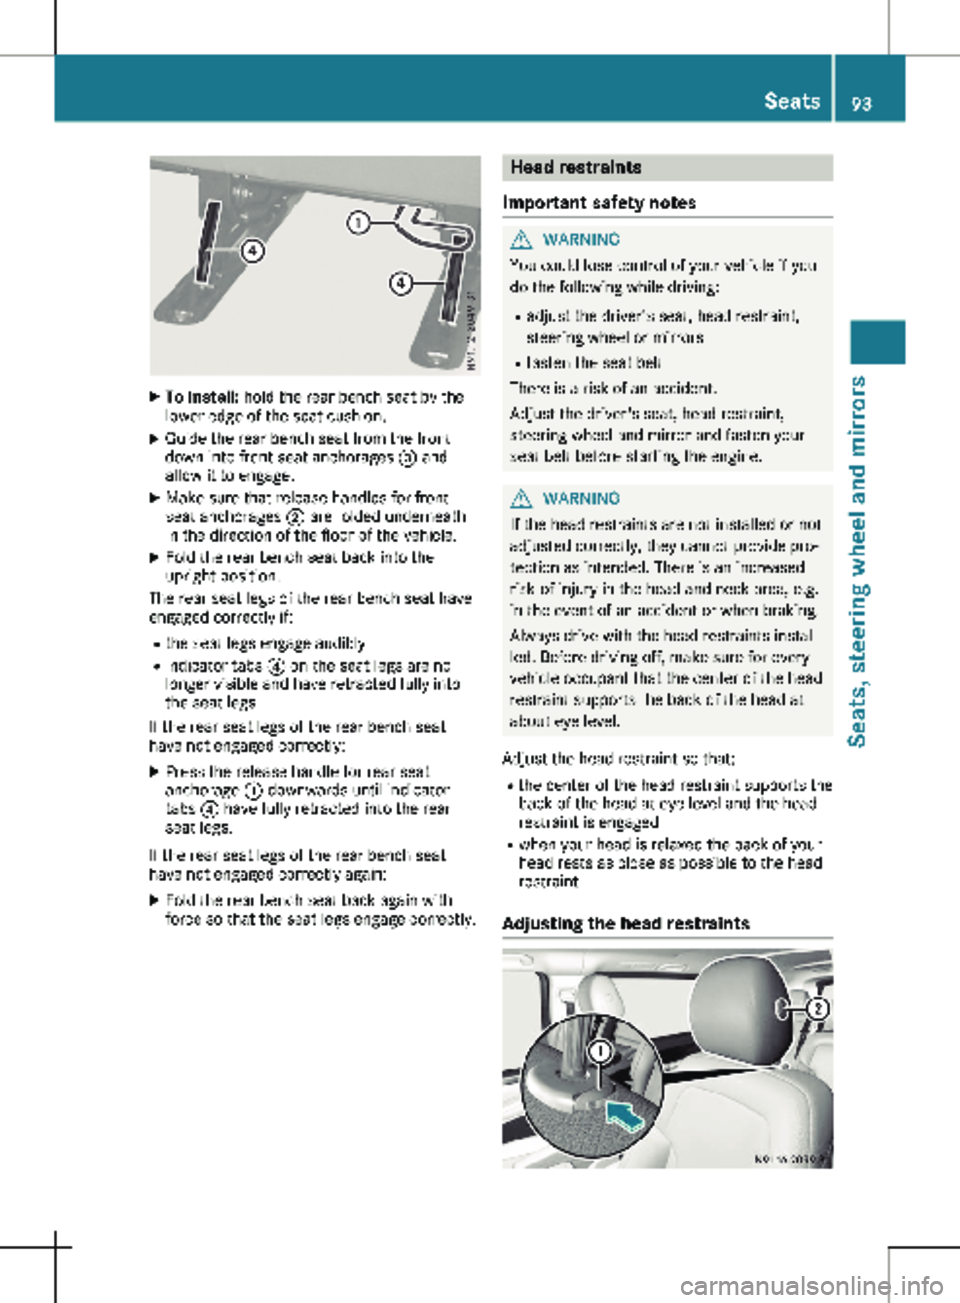
To install: hold the rear bench seat by the
lower edge of the seat cushion.
X Guide the rear bench seat from the front
down into front seat anchorages = and
allow it to engage.
X Make sure that release handles for front
seat anchorages ; are folded underneath
in the direction of the floor of the vehicle.
X Fold the rear bench seat back into the
upright position.
The rear seat legs of the rear bench seat have
engaged correctly if:
R the seat legs engage audibly
R indicator tabs ? on the seat legs are no
longer visible and have retracted fully into
the seat legs
If the rear seat legs of the rear bench seat
have not engaged correctly:
X Press the release handle for rear seat
anchorage : downwards until indicator
tabs ? have fully retracted into the rear
seat legs.
If the rear seat legs of the rear bench seat
have not engaged correctly again: X Fold the rear bench seat back again with
force so that the seat legs engage correctly. Head restraints
Important safety notes G
WARNING
You could lose control of your vehicle if you
do the following while driving:
R adjust the driver's seat, head restraint,
steering wheel or mirrors
R fasten the seat belt
There is a risk of an accident.
Adjust the driver's seat, head restraint,
steering wheel and mirror and fasten your
seat belt before starting the engine. G
WARNING
If the head restraints are not installed or not
adjusted correctly, they cannot provide pro-
tection as intended. There is an increased
risk of injury in the head and neck area, e.g.
in the event of an accident or when braking.
Always drive with the head restraints instal-
led. Before driving off, make sure for every
vehicle occupant that the center of the head
restraint supports the back of the head at
about eye level.
Adjust the head restraint so that: R the center of the head restraint supports the
back of the head at eye level and the head
restraint is engaged
R when your head is relaxed the back of your
head rests as close as possible to the head
restraint
Adjusting the head restraints Seats
93Seats, steering wheel and mirrors Z
Page 96 of 320

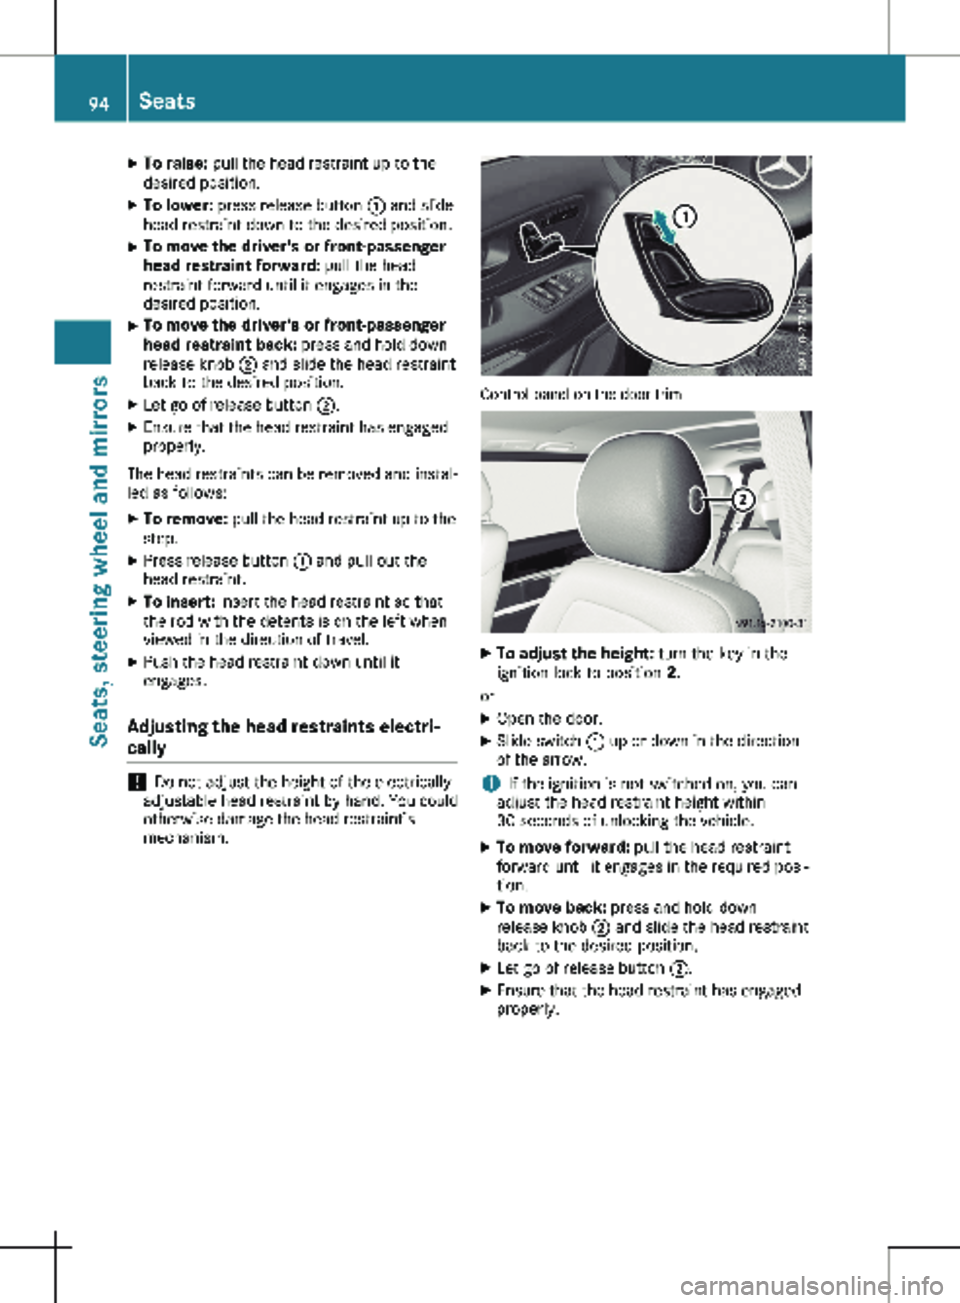
X
To raise: pull the head restraint up to the
desired position.
X To lower: press release button : and slide
head restraint down to the desired position.
X To move the driver's or front-passenger
head restraint forward: pull the head
restraint forward until it engages in the
desired position.
X To move the driver's or front-passenger
head restraint back: press and hold down
release knob ; and slide the head restraint
back to the desired position.
X Let go of release button ;.
X Ensure that the head restraint has engaged
properly.
The head restraints can be removed and instal-
led as follows:
X To remove: pull the head restraint up to the
stop.
X Press release button : and pull out the
head restraint.
X To insert: insert the head restraint so that
the rod with the detents is on the left when
viewed in the direction of travel.
X Push the head restraint down until it
engages.
Adjusting the head restraints electri-
cally !
Do not adjust the height of the electrically
adjustable head restraint by hand. You could
otherwise damage the head restraint’s
mechanism. Control panel on the door trim
X
To adjust the height: turn the key in the
ignition lock to position 2.
or X Open the door.
X Slide switch : up or down in the direction
of the arrow.
i If the ignition is not switched on, you can
adjust the head restraint height within
30 seconds of unlocking the vehicle.
X To move forward: pull the head restraint
forward until it engages in the required posi-
tion.
X To move back: press and hold down
release knob ; and slide the head restraint
back to the desired position.
X Let go of release button ;.
X Ensure that the head restraint has engaged
properly.94
SeatsSeats, steering wheel and mirrors