Page 73 of 200
■Do not adjust the seat back while driving - There is a risk of injury and ac-
cidents!■
When moving the seat backrest, keep limbs out of the area between the
seat and seat back")
WARNING (Continued)■Do not adjust the seat back while driving - There is a risk of injury and ac-
cidents!■
When moving the seat backrest, keep limbs out of the area between the
seat and seat backrest – risk of injury!
■
Never transport the following items on the seat backrest when folded
forwards. ■ Objects that could restrict the driver's view.
■ Objects which make it impossible for the driver to control the vehicle
(e.g. if they roll under the pedals, or protrude into the driver's zone).
■ Objects which could lead to injury to passengers (e.g. if accelerating
sharply, braking or changing direction).
Armrest setting
Fig. 59
Adjust armrest
Read and observe on page 68 first.
›
To adjust the height , lift the armrest in the direction of the arrow
A
into one
of the six locking positions » Fig. 59.
›
To close , lift the armrest in the direction of arrow
A
until the stop and then
fold down again.
›
To longitudinally adjust move the armrest in the direction of arrow
B
to the
desired position.
Rear seats
Introduction
This chapter contains information on the following subjects:
Adjusting seats in forward/back direction
71
Adjusting the angle of the seat backrest
71Folding the seat backrest forwards and folding the seat fully forwards72Unlock and removing the seat72
Adjusting seats in crosswise direction
73
Folding back seats
73
Adjusting seats in forward/back direction
Fig. 60
Adjusting seats in forward/back
direction
›
Pull lever
A
in the direction of arrow
1
and move the seat to the desired po-
sition in the direction of arrow
2
» Fig. 60 .
Adjusting the angle of the seat backrest
Fig. 61
Adjusting the seat backrest
›
Pull lever
A
lever on the bottom in the direction of the arrow
1
pull and set
the desired tilt of the seat back in the direction of arrow
2
» Fig. 61 .
›
Check for yourself that the seat backrest is engaged by pulling on it.
71Seats and head restraints
Page 74 of 200

Folding the seat backrest forwards and folding the seat fullyforwardsFig. 62
Safety position of seat belt / folding the seat completely forward
Fig. 63
Lock forward folded seats
Folding the seat backrest forwards
›
Insert the belt buckle
A
of the seat belt into the opening in the side pan-
el » Fig. 62 .
›
Remove the head restraint from the rear middle seat.
›
Push the outer rear seats towards the rear as far as they will go » Fig. 60 on
page 71 .
›
Fold the outer rear seat backrests and the center seat to the stop on the
seat surface » Fig. 61 on page 71 .
›
Then pull the lever
A
» Fig. 61 on page 71 again and push the seat back
down until it clicks into place in a lower position.
Folding seats fully forwards and locking them
›
If the outer rear seat is fully folded forward, push it towards the rear as far as
it can go.
›
Pull the lever
B
» Fig. 62 in the direction of the arrow
1
and push the seat
completely forward in the direction of arrow
2
.
› Secure the folded forward seat with the aid of the fixing belt B to a guide rod
of the head restraint in the front seat » Fig. 63.WARNING■
The seat backs in occupied rear seats must be properly engaged.■When transporting objects in the luggage compartment that has been en-
larged by folding the backrest forward, ensure the safety of the passengers
transported on the other rear seats.■
The seat backrests must be securely locked in position so that no objects
in the luggage compartment can slide into the passenger compartment on
sudden braking – There is a risk of injury.
CAUTION
When moving the seat backrest, the seat belts should not be trapped - there is
a risk of damage to the seat belts.
CAUTION
■ Before folding the rear middle seat forward, make sure that the storage com-
partment, the ashtray and the cup holder in the rear part of the centre console
are closed - risk of damage.■
Only keep the seats in the folded forward position for as long as necessary to
transport cargo - there is a risk of damaging the front seat backrests. The
seats must be folded back once the cargo has been transported.
■
If the outer seat is not in the rear end position when folding forward, damage
can occur to the locking bolts when unlocking the seat.
Unlock and removing the seat
Fig. 64
Unlocking the folded forward
seat and carrying handles on the
seat surface
›
Unlock the folded seat by pressing seat locks » Fig. 62 on page 72
A
in the
direction of arrow » Fig. 64.
›
Remove the seat on the carrying handle
B
or
C
.
72Using the system
Page 75 of 200

NoteThe outer seats are not mutually interchangeable. In the rear area the left seat
is marked with the letter L and the right seat with the letter R.
Adjusting seats in crosswise direction
Fig. 65
Locking seats
›
Remove the middle seat » Fig. 64 on page 72 .
›
Fold the outer seat forwards and unlock » Fig. 64 on page 72 .
›
Move outer seat on the guide towards the middle of the vehicle up to the
stop.
›
Lock the folded forward seat by pressing the seat locks
A
in the direction of
arrow » Fig. 65 .
Folding back into the starting position is accomplished in the reverse order.
Folding back seats
Fig. 66
Folding the seat backrest back
into position
›
If the seat has been removed, first position it on the guide and lock it in place
using seat locking
A
» Fig. 65 on page 73 . Pull the seat upwards to ensure
that the seat is locked correctly.
›
Fold the seat in the horizontal position until it audibly click in place. Check
that the seat can no longer be lifted by pulling it up.
› Press the lever in direction of arrow 1
» Fig. 66 and fold back the seat back-
rest in the direction of arrow 2. Check this by pulling on the seat backrest.
Headrests
Introduction
This chapter contains information on the following subjects:
Setting the height
73
Removing/installing
74
Note
The middle rear head restraint is only adjustable in two positions.
Setting the height
Fig. 67
Setting the height of the headrest
›
Grasp the restraint and move upwards in the direction of
1
» Fig. 67 .
›
To move the headrest down, press the securing button
A
in the direction of
arrow
2
and hold it down while pressing the headrest in the direction of ar-
row
3
.
73Seats and head restraints
Page 76 of 200

Removing/installingFig. 68
Removing/installing the headrest
›
To remove the headrest, pull it out of the seat backrest up to the latch.
›
Press locking button
A
in the direction of arrow
1,
and pull out the head re-
straint in the direction of arrow
2
» Fig. 68 .
›
To insert the headrest, push the headrest into the seat backrest in the direc-
tion of arrow
3
until the locking button clicks into place.
Front seat heating
Fig. 69
Buttons for heating the front
seats
The seat backrests and seats can be heated electrically.
Seat heating buttons » Fig. 69
Left seat heating
Right seat heating
›
To turn on the heating with maximum heat , press the key
or
button.
By repeatedly pressing the button, the heat is turned down until it is com-
pletely switched off . The level of the seat heating is indicated by the number
of illuminated warning lights in the switch.
The seat heating only operates when the engine is running.WARNINGIf you are sensitive to pain and/or temperature, e.g. through medication,
paralysis or because of chronic illness (e.g. diabetes), we recommend not to
use the seat heating. If the seat heating is used, we recommend to make
regular breaks in your journey when driving long distances, so that the
body can recuperate from the stress of the journey. Please consult your
doctor, who can evaluate your specific condition.
CAUTION
The following instructions should be observed to avoid damage to the seats.■Do not kneel on the seats or otherwise apply concentrated pressure to them.■
Do not switch on the heating for unoccupied seats.
■
Do not switch on the heating for seats which have objects on them (e.g. a
child seat, bag or similar).
■
Do not switch on the heating for seats which have seat covers or protective
covers on them.
Note
If the on-board voltage decreases, the seat heating switches off automatically
» page 147 , Automatic shutdown of consumers - vehicle battery discharge
protection .74Using the system
Page 77 of 200

Useful features
Interior fittings
Introduction
This chapter contains information on the following subjects:
Ticket holder
75
Storage compartment on the dash panel
76
stowage compartments in the doors
76
Storage compartment in the front centre console
76
USB and AUX input
77
Cup holders
77
Cigarette lighter
78
Ashtray
78
12-volt socket
79
Waste container
80
Multimedia holder
80
Storage compartment under the front arm rest
81
storage net in the front centre console
81
Glasses compartment
81
Storage compartment on the front passenger side
82
Storage compartment for umbrella
82
Clothes hook
82
Storage pockets on the backs of the front seats
83
Storage compartment in the rear centre console
83
Folding table on the front seat backrest
83
Folding table on the middle seat backrest
84
Removable through-loading bag
84WARNING■ Do not place anything on the dashboard. These objects might slide or fall
down when driving and may distract you from concentrating on the traffic –
risk of accident!■
Make sure that while driving no objects can enter the driver's footwell -
There is a risk of an accident!
WARNING (Continued)■ Do not carry any objects on the front passenger seat except objects de-
signed for this purpose (e.g. child seats) – risk of accident!■
No objects should be placed in the storage compartments nor in the
drinks holders; the vehicle occupants could be endangered if there is sud-
den braking or the vehicle collides with something.
■
For safety reasons, lockable storage compartments should be closed
while driving - there is a risk of injury from the opened lid or through the
loose objects in the compartment.
■
Make sure no objects protrude from the storage compartments - There is
a risk of injury!
■
Do not exceed the permissible loads for the storage compartments, pock-
ets and nets - There is a risk of injury and a risk of damage to the compart-
ments, pockets and nets!
■
Ash, cigarettes, cigars and the like should only be stored in the ashtray -
There is a risk of fire/burns!
■
The storage compartments, multimedia holder and waste container are
not a substitute for the ashtray and must not be used for such purposes –
There is a risk of fire!
CAUTION
Do not place any large or sharp objects in the storage compartments, pockets
and nets -There is a risk of damage to the compartments, pockets and nets.
Ticket holder
Fig. 70
Ticket holder
Read and observe and on page 75 first.
The ticket holder » Fig. 70 is provided for the holding and displaying e.g. car
park tickets.
75Useful features
Page 78 of 200

Storage compartment on the dash panelFig. 71
Opening the storage compart-
ment
Read and observe and on page 75 first.
›
To the Open press the button » Fig. 71, the cover opens in the direction of
arrow.
›
To close , swing the lid against the direction of the arrow until it audibly clicks
into place.
Certain models do not have a storage compartment lid.
CAUTION
Do not put any heat-sensitive objects in the storage compartment - in the
event of high temperatures there is risk of damage.
stowage compartments in the doors
Fig. 72
Storage compartments: in the front door/in the rear door
Read and observe and on page 75 first.
Storage compartments » Fig. 72
Storage compartment
Bottle holder with a capacity of max. 1 l
Bottle holder with a capacity of max. 0.5 l
WARNINGThe storage compartment A » Fig. 72 is to be used exclusively for storing
objects which do not stick out - There is a risk of restricting the effective-
ness of the side airbags.
Storage compartment in the front centre console
Fig. 73
Non-lockable compartment
Read and observe and on page 75 first.
The storage compartment is in the front of the centre console » Fig. 73.
ABC76Using the system
Page 79 of 200

USB and AUX inputFig. 74
AUX input: underneath the armrest / above the storage compart-
ment
Fig. 75
USB input
Read and observe and on page 75 first.
Depending on equipment fitted, the AUX input is located below the armrest » Fig. 74 -
or above the storage compartment
» Fig. 74 -
.
The USB input (marked with
and
) is located above the storage compart-
ment » Fig. 75 .
Information on use » Owner's Manual infotainment or » The Radio Owner's
Manual .
Cup holdersFig. 76
Cup holders: in the front centre console / on the folding table in
the centre backrest
Fig. 77
Cup holders in the rear centre console: Open / Adjust size
Read and observe
and on page 75 first.
In the cup holders
A
and
B
two drinks containers can be placed in each
» Fig. 76 .
Cup holder
D
in rear centre console
›
To Open Press the holder in the area
C
» Fig. 77 . The holder slides out.
›
Pull the holder up to the stop in the arrow direction
1
resize by moving the
plate
E
in direction of arrow
2
.
›
To close , push in the holder against the direction of arrow
1
.
A 1.5 litre bottle (max. capacity) can be stored in the holder
D
.
77Useful features
Page 80 of 200
. This could lead to injuries in the event of an accident.■
Never put hot beverage containers in th")
WARNING■Do not use any cups or beakers which are made of brittle material (e.g.
glass, porcelain). This could lead to injuries in the event of an accident.■
Never put hot beverage containers in the cup holder. If the vehicle moves,
they may spill – There is a risk of scalding!
CAUTION
■ Do not leave open beverage containers in the cup holders during the journey.
There is a risk of spilling e.g. when braking which may cause damage to the
electrical components or seat upholstery.■
Before folding the rear centre seat, the holder
D
» Fig. 77 must be closed -
otherwise there is risk of damage.
Cigarette lighter
Fig. 78
Cigarette lighter
Read and observe and on page 75 first.
›
To use the lighter, push it in as far as the stop and wait until the glowing
lighter clicks out again » Fig. 78.
›
Take out the glowing lighter instantly, use it and insert it back into the sock-
et.
WARNING■ The cigarette lighter also works if the ignition is switched off. When leav-
ing the vehicle, never leave people who are not completely independent,
such as children, unattended in the vehicle - there is a risk of burning, fire
or damage to the vehicle interior.■
Be careful when using the cigarette lighter - There is a risk of burns.
Note
The cigarette lighter socket can also be used as a 12 volt socket.AshtrayFig. 79
Removing and opening front ashtray and / Low centre console:
Open rear ashtray/ remove rear ashtray
Fig. 80
High centre console: Open rear ashtray / Removing rear ashtray
insert
Read and observe
and on page 75 first.
The ashtray can be used for ash, cigarettes, cigars and the like.
Removable front ashtray
›
Remove the ashtray in the direction of the arrow
A
» Fig. 79 .
Insertion takes place in reverse order.
›
To the Openturn the ashtray cover in the direction of arrow
B
.
Closing takes place in reverse order.
78Using the system
 1
1 2
2 3
3 4
4 5
5 6
6 7
7 8
8 9
9 10
10 11
11 12
12 13
13 14
14 15
15 16
16 17
17 18
18 19
19 20
20 21
21 22
22 23
23 24
24 25
25 26
26 27
27 28
28 29
29 30
30 31
31 32
32 33
33 34
34 35
35 36
36 37
37 38
38 39
39 40
40 41
41 42
42 43
43 44
44 45
45 46
46 47
47 48
48 49
49 50
50 51
51 52
52 53
53 54
54 55
55 56
56 57
57 58
58 59
59 60
60 61
61 62
62 63
63 64
64 65
65 66
66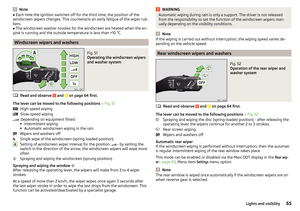 67
67 68
68 69
69 70
70 71
71 72
72 73
73 74
74 75
75 76
76 77
77 78
78 79
79 80
80 81
81 82
82 83
83 84
84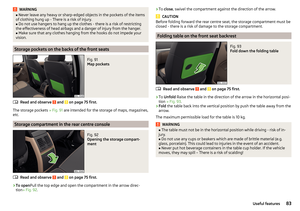 85
85 86
86 87
87 88
88 89
89 90
90 91
91 92
92 93
93 94
94 95
95 96
96 97
97 98
98 99
99 100
100 101
101 102
102 103
103 104
104 105
105 106
106 107
107 108
108 109
109 110
110 111
111 112
112 113
113 114
114 115
115 116
116 117
117 118
118 119
119 120
120 121
121 122
122 123
123 124
124 125
125 126
126 127
127 128
128 129
129 130
130 131
131 132
132 133
133 134
134 135
135 136
136 137
137 138
138 139
139 140
140 141
141 142
142 143
143 144
144 145
145 146
146 147
147 148
148 149
149 150
150 151
151 152
152 153
153 154
154 155
155 156
156 157
157 158
158 159
159 160
160 161
161 162
162 163
163 164
164 165
165 166
166 167
167 168
168 169
169 170
170 171
171 172
172 173
173 174
174 175
175 176
176 177
177 178
178 179
179 180
180 181
181 182
182 183
183 184
184 185
185 186
186 187
187 188
188 189
189 190
190 191
191 192
192 193
193 194
194 195
195 196
196 197
197 198
198 199
199