Page 97 of 200

Adjust the blower speed
▶ Increase speed
▶ Decrease speed
Switching the airflow to the windscreen on and off
Air flow to the windows
Air flow to the upper body
Air flow in the footwell Switch the automatic recirculation on/off » page 96
Switch on/off the rear window heater » page 63
Switching automatic mode on » page 95
Switch the Climatronic system off
Switching the cooling system on/off Switch the temperature setting in Dual mode on/off
When the function is switched on, the indicator light in the button lights up.
After the cooling system is switched off, only the ventilation function remains
active whereby the minimum temperature that can be reached is the outside
temperature.
Setting temperature
The interior temperature for the left and right side can be set separately or to-
gether.
The temperature for both sides, is set by turning the knob A
» Fig. 116 (the
indicator light in the button is not illuminated).
The temperature for the right side is adjusted by turning the knob
D
(the in-
dicator light in the button is lit).
The temperature for the left side is adjusted by turning the knob
A
(the indi-
cator light in the button is lit).
At a temperature setting below 18 ° C at the start of the numerical scale, the
symbol will illuminate, Climatronic is using
Maximum cooling performance.
At a temperature setting above 26 ° C at the end of the numerical scale, the
symbol will illuminate, Climatronic is using
maximum heat output.
There is no automatic temperature control in the two end positions. In the
range between 18 °C to 26 °C, an automatic temperature control takes place.
Controlling blower
The Climatronic system controls the blower stages automatically in line with
the interior temperature. However, the blower stages can be manually adap-
ted to suit your particular needs.
If the blower speed is reduced to a minimum, Climatronic is switched off.
The set blower speed is displayed above the button
when the respective
number of indicator lights come on.
CAUTION
Do not cover the interior temperature sensor H » Fig. 116 - the function of the
Climatronic could be impaired.
Note
■ If the windscreen mists up, press the button . Press the button once
the windscreen has demisted.■
In order to ensure adequate thermal comfort, there may be an increase in en-
gine idle speed during operation of the Climatronic in some circumstances.
Climatronic - automatic operation
Read and observe
on page 94 first.
The automatic mode is used in order to maintain a constant temperature and
to demist the windows in the interior of the car.
If the warning light in the top right corner of the button
lights up, the Cli-
matronic operates in “HIGH”-mode.
Upon pressing the
button again, the Climatronic switches to “LOW”-mode
and the indicator light in the top left corner lights up. The Climatronic uses on-
ly in this mode the lower blower speed. However taking into account the noise
level, this is more comfortable, yet be aware that the effectiveness of the air
conditioning system is reduced particularly if the vehicle is fully occupied.
By pressing the button
again, it is changed to “HIGH”-mode.
Automatic mode can be switched off by pressing one of the buttons for the air
distribution or by increasing/decreasing the blower speed. The temperature
regulation is continued.
Note
Climatronic is set to the “HIGH” mode at the factory.95Heating and ventilation
Page 98 of 200

Air distribution controlRead and observe
on page 94 first.
The recirculation mode prevents contaminated outside air getting into the in-
terior of the vehicle. In recirculated air mode air is sucked out of the interior of
the vehicle and then fed back into the interior.
Heating and manual air conditioning system
›
To switch on press the
button.
›
To switch off , press the
button again.
If the air distribution control is set to position
when the recirculation modes
is switched on, the recirculated-air mode is switched off.
By pressing the button, the air recirculation also in this position can be
switched on again.
Climatronic (automatic air conditioning)
›
To turn the recirculation mode on, press the Symbol key
repeatedly until
the indicator light is lit on the left side of the button.
›
To activate the automatic recirculation mode, press the Symbol key
re-
peatedly until the indicator light is lit on the right side of the button.
The Climatronic can have a sensor that measures the air recirculation mode
and automatically turns on if there is an increased concentration of pollutants
in the incoming air.
When the pollutant concentration decreases to the normal level, the recircula-
ted air mode is automatically switched off.
If the air quality sensor does not automatically switch on the recirculated air mode, you can switch it on yourself by pressing the button . The indicator
light lights up in the button on the left side.
To turn off the air recirculation or to deactivate the automatic air recircula-
tion , press the
button of press the
symbol button repeatedly until the
warning lights in the button go out.
WARNINGThe recirculation system cannot be switched on for a longer period of time,
because no fresh air is fed through from the outside. “Stale air” may result
in fatigue in the driver and occupants, reduce attention levels and also
cause the windows to mist up. As soon as windows mist up, turn on the re-
circulation system immediately - There is a risk of accident!CAUTIONWe recommend not smoking in the vehicle when the recirculating air operation
is switched on. The smoke sucked from the interior is deposited on the evapo-
rator of the air conditioner. This produces a permanent odour when the air
conditioning system is operating which can only be eliminated through consid-
erable effort and expense (replacement of compressor).
Note
The Climatronic automatic air distribution control operates only if the outside
temperature is higher than approx. 2 °C.
Air outlet vents
Fig. 117
Air vents at the front
96Using the system
Page 99 of 200

Fig. 118
Air vents at the rear
Read and observe
on page 94 first.
The direction of airflow can be adjusted using the air outlet vents 3, 4 » Fig. 117
and 6 » Fig. 118 – the outlets can be opened and closed individually.
Setting the airflow direction from the air outlet nozzles 3 and 4 takes place by
moving the adjusting units
A
» Fig. 117 in the desired direction.
Setting the airflow direction from the air outlet nozzles 6 takes place by turn-
ing the controller
C
or.
D
» Fig. 118 in the desired direction.
›
To open / close the air outlet nozzles 3 and 4 the Turn the controller
B
into
position /
0 » Fig. 117 .
›
To open / close the air outlet nozzles 6,
C
turn the controller between the
end positions / in the final position » Fig. 118.
Depending on the setting for air distribution, the air will flow from the follow- ing air vents.
Set the direction of the air outletAir vents » Fig. 117 and » Fig. 1181. 2 . 41. 2 . 4 . 5 . 73 . 4 . 64 . 5 . 7
CAUTION
Do not cover the air vents - the air distribution could be compromised.NoteThe air outlet vents 6 » Fig. 118 are only fitted on vehicles with the higher cen-
tre console.
Auxiliary heating (auxiliary heating and ventilation)
Introduction
This chapter contains information on the following subjects:
Switch on / off
98
System settings
98
Remote control
99
The aux. heating heats the vehicle interior as well as the engine. For heating,
fuel is consumed from the fuel tank.
The auxiliary ventilation enables fresh air to flow into the vehicle interior with
the engine switched off, whereby the interior temperature is effectively de-
creased (e.g. with the vehicle parked in the sun).
The aux. heating (aux. heating and ventilation) (referred to just as aux. heating in the following) ensures the heating / ventilation depending on the setting of the air conditioning and the air outlet vents before switching off the ignition.
WARNING■ The auxiliary heating must never be operated in closed rooms (e.g. garag-
es) – There is a risk of poisoning!■
The auxiliary heating must not be allowed to run during refuelling – risk
of fire.
■
The exhaust pipe of the auxiliary heating is located on the underside of
the vehicle. If you want to use the auxiliary heating, do not park the car in
places where the exhaust fumes can come into contact with flammable
materials such as dry grass, undergrowth, leaves, spilled fuel etc. - risk of
fire.
CAUTION
The air inlet in front of the windscreen must be free (e.g. of ice, snow or
leaves) to ensure that the auxiliary heating operates properly. 97Heating and ventilation
Page 100 of 200

Note■The aux. heating only switches the blower on, if it has achieved a coolant
temperature of approx. 50 °C.■
In the engine compartment, water vapour may form during the operation of
the aux. heating.
Switch on / off
Fig. 119
Button for directly switching the operating part of the manual air
conditioning/Climatronic on/off
Read and observe
and on page 97 first.
Functional requirements of the aux. heating. The charge state of the vehicle battery is sufficient.
The fuel supply is adequate (the warning light is not illuminated in the
instrument cluster).
Direct switching on/off
The aux. heating can be directly switched on or off at any time using the but-
ton
» Fig. 119 on the operating part of the air-conditioning system, or the Cli-
matronic or via the radio remote control » page 99.
Automatic on / off ▶ Over a set and activated preset time in the MAXI DOTDisplay.
▶ According to the environmental conditions.
If the auxiliary heating has not already been switched off, it switches off auto-
matically after the running time set in the
Running time
menu.
Switching off the auxiliary heating takes place automatically when there is a
lack of fuel (warning light in the instrument cluster lights up).
After switching off the system, the coolant pump and the aux. heating will
continue running a little while longer in order to burn the remaining fuel in the
heating.
For vehicles with gasoline engines, the automatic switching on and off of the
heater can be disabled in a specialist workshop.
System settings
Read and observe
and on page 97 first.
The following menu items can be selected from the
Aux. heating
menu item in
the MAXI DOT display (depending on the vehicle equipment). ■
Day of the wk.
- set the current day of the week
■
Running time
- Set the required running time in 5 minute increments. The run-
ning time can be 10 to 60 minutes.
■
Mode
- Set the desired heating/ventilation mode
■
Starting time 1
,
Starting time 2
,
Starting time 3
- for each pre-set time, the day and
the time (hour and minute) can be set for switching on the auxiliary heating.
An empty position can be found between Sunday and Monday when select-
ing the day. If this empty position is selected, the activation is performed
without taking into account the day.
■
Activate
- Activate pre-set mode
■
Deactivate
- Deactivate pre-set mode
■
Factory setting.
- Restore factory setting
■
Back
- return to main menu.
Only one programmed pre-set time can be active.
The last programmed pre-set time remains active.
After the auxiliary heating activates at the set time, it is necessary to pre-set a time again.
If the pre-set menu is closed by selecting the
Back
menu item or if no changes
are made on the display for more than 10 seconds, the set values are stored,
but the pre-set time is not activated.
An indicator light on the button is illuminated when the system is running.
The system in operation switches off on expiration of the operating duration
or can be deactivated earlier by pressing the direct on/off button or by using
the radio remote control.
98Using the system
Page 101 of 200

Remote controlFig. 120
Radio remote control
Read and observe and on page 97 first.
Description of the remote control » Fig. 120
Aerial
Warning light
Switch on the auxiliary heating
Switch off the auxiliary heating
To switch the remote control on or off, hold the remote control vertically, with
the aerial
B
» Fig. 120 pointing upwards. The antenna must not be covered
with the fingers or the palm of the hand during this process.
The auxiliary heating can only be switched on/off safely using the remote con-
trol if the distance between the radio remote control and the vehicle is at least
2 m.
Display warning light BMeaningLights up green for 2 seconds.The auxiliary heating has been
switched on.Lights up red for 2 seconds.The auxiliary heating has been
switched off.Slowly flashes green for 2 seconds.The ignition signal was not received.Quickly flashes green for 2 seconds.The aux. heating is blocked, e.g. be-
cause the tank is nearly empty or
there is a fault in the aux. heating.Flashes red for 2 seconds.The switch off signal was not re-
ceived.ABDisplay warning light BMeaningLights up orange for 2 seconds, then
green or red.The battery is weak, however the
switching on or off signal was re-
ceived.Lights up orange for 2 seconds, then
flashes green or red.The battery is weak, however the
switching on or off signal was not re-
ceived.Flashes orange for 5 seconds.The battery is discharged, however
the switching on or off signal was not
received.
Replace the battery » page 164.
CAUTION
■
The remote control must be protected against moisture, severe shocks and
direct sunlight - there is a risk of damage to the remote control.■
The range of the remote control with a charged battery is a few hundred me-
tres (depending on obstructions between the remote control and the vehicle,
weather conditions, the battery condition etc.).
99Heating and ventilation
Page 102 of 200

Driving
Starting-off and Driving
Starting and stopping the engine
Introduction
This chapter contains information on the following subjects:
Electronic immobiliser and steering lock
100
Switch on/off ignition
101
Starting / stopping the engine
101
Problems with the engine start - vehicles with starter button
102
Depending on equipment fitted, it is possible to switch the ignition on/off and
start/stop the engine with the key in the ignition or using the starter button .
WARNING■
Never switch off the engine before the vehicle is stationary – There is a
risk of accident!■
While driving with the engine stopped the ignition must always be
switched on. Otherwise, the steering may lock - There is a risk of an acci-
dent!
■
Do not withdraw the ignition key from the ignition lock until the vehicle
has come to a stop » page 105, Parking . Otherwise, the steering may lock -
danger of an accident!
■
Never leave the vehicle unattended with the engine running - there is a
risk of theft etc!
■
Never (e.g. in garages) run the engine in a closed place - there is a risk of
poisoning and death!
CAUTION
■ Only start the engine when the engine and the vehicle are stationary - there
is a risk of starter and engine damage!■
Do not push-start the engine – There is a risk of damaging the engine and
the catalytic converter! The battery from another vehicle can be used as a
jump-start aid.
■
On vehicles with the starter button, pay attention to where the key is loca-
ted. The system can recognize the valid key, even if it has been accidentally
left on the vehicle roof - there is danger of loss or damage to the key!
NoteDo not warm up the engine while the vehicle is stationary. If possible, start
your journey as soon as the engine has started. Through this, the engine rea-
ches its operating temperature faster.
Electronic immobiliser and steering lock
Read and observe
and on page 100 first.
The electronic immobilizer (hereafter referred to as immobilizer) makes the
theft or unauthorised use of your vehicle more difficult.
Immobilizer
The immobilizer allows the engine to start provided an original vehicle key only
is used.
Malfunction of the immobilizer
If a component in the immobiliser key fails, it is not possible to start the en-
gine. A corresponding message appears in the display of the instrument clus-
ter to explain the immobiliser is active.
To start, use the other vehicle key or seek help from a specialist garage.
Steering lock - lock
›
On vehicles with ignition lock, remove the key and turn the steering wheel
until the steering lock engages.
›
On vehicles with a starter button, switch off the ignition and open the driv-
er's door. If the driver's door is opened and the ignition is switched off after-
wards, the steering is only locked automatically after the vehicle has been
locked.
Steering lock - unlock
›
On vehicles with ignition lock, insert the key into the ignition and turn on the
ignition. If this is not possible, then move the steering wheel slightly back
and forth, as a result of which the steering lock should unlock.
›
On vehicles with starter button, get into the car and close the driver's door.
Under certain circumstances, the steering lock can be unlocked only when
the ignition is switched on or the engine is started.
WARNINGNever let the vehicle roll with locked steering lock - there is a risk of acci-
dent!100Driving
Page 103 of 200

Switch on/off ignitionFig. 121
Positions of the vehicle key in the ignition lock / starter button
Read and observe
and on page 100 first.
Positions of the vehicle key in the ignition lock » Fig. 121 -
Ignition switched off, engine switched off
Ignition switched on
Starting engine
Switching on /off ignition in vehicles with starter button
›
Press the » Fig. 121 -
button, the ignition is turned on / off.
On vehicles with manual transmission , the pedal must not be depressed to
switch on / off the ignition, otherwise the engine will start.
On vehicles with automatic transmission , the brake pedal must not be de-
pressed to switch on / off the ignition, otherwise the engine will start.
Starting / stopping the engine
Read and observe
and on page 100 first.
Before starting the engine
›
Firmly apply the handbrake.
›
For vehicles with manual transmission , shift gear stick to neutral, depress
the clutch pedal and hold it there until the engine starts.
›
For vehicles with automatic transmission , place the selector lever in position
P or N and » depress the brake pedal until the engine starts.
123Starting engine›On vehicles with ignition lock, turn the key to position 3 and the engine
starts » Fig. 121 on page 101
. Then release the key, the engine will start au-
tomatically.
If the engine does not start within 10 seconds, turn the key to position 1
. Re-
peat the start-up process after 30 s.
›
On vehicles with starter button, press the button briefly » Fig. 121 on
page 101 -
, the motor will start automatically.
On vehicles with diesel engines the glow plug warning light
goes on during
starting. The engine can be started after the indicator light goes out.
Switching off the engine
›
Stop the vehicle.
›
On vehicles with ignition lock, turn the key to position
1
» Fig. 121 on
page 101
.
›
On vehicles with
starter button, press the button » Fig. 121 on page 101 -
,
the engine and the ignition will be switched off simultaneously.
For vehicles with automatic transmission, the ignition key can only be removed
if the selector lever is in position P.
Do not switch the engine off immediately at the end of your journey if the en-
gine has been working at high revs over a prolonged period, but leave it to run
at an idling speed for about 1 minute. This prevents any possible accumulation
of heat when the engine is switched off.
Emergency shutdown of the engine in vehicles with starter button
The system is equipped with a protective device against accidental switching
off, the engine can only be shut off while driving in the event of an emergency.
›
Keep the knob pressed » Fig. 121 on page 101 -
or press it twice within 1
second.
After the emergency stop of the engine, the steering lock will remain un-
locked.
CAUTION
When the outdoor temperature is below -10 ° C, the selector lever when start-
ing must always be in P mode. 101Starting-off and Driving
Page 104 of 200

Note■The engine running noises may be louder at first for a short time after start-
ing the cold engine.■
You should not switch on any major electrical components during the heat-
ing period, otherwise the vehicle battery will be drained unnecessarily.
■
After switching off the ignition, the radiator fan may (also intermittently)
continue to operate for approx. 10 minutes.
Problems with the engine start - vehicles with starter button
Fig. 122
Starting the engine - Press the
button with the key
Read and observe and on page 100 first.
If no engine start is possible and the display of the instrument cluster shows a message that the key could not be detected by the system or there is a system
fault, then try to start the engine as follows.
›
Press the starter button with the key » Fig. 122.
If the engine does not start, the help of a specialist garage is required.
CAUTION
The key may not be detected by the system if the battery in the key is running
out of charge or the signal fails (strong electromagnetic field) or is shielded
(e.g. in an aluminium case).
START-STOPsystem
Introduction
This chapter contains information on the following subjects:
Operation
102
Manually deactivating/activating the system
103The START STOPsystem (hereinafter referred to as the system) reduces
CO 2emissions and harmful emissions, and saves fuel.
If the system determine that the engine is not needed when the vehicle stops
(e.g. at the traffic lights), it turns off the engine and starts it again when mov-
ing off.
The system function depends on many factors. Some of them are down to the
driver, the others are systemic and can neither be influenced nor identified.
Therefore the system may react differently in situations which seem identi-
cal from the driver's perspective.
The system is automatically activated every time the ignition is switched on
(even where this has previously been manually deactivated with the button ).
Note
If the engine has stopped due to the system, the ignition remains on.
Operation
Fig. 123
Prompt in the MAXI DOT display
Vehicles with manual transmission
The engine is automatically switched off as soon as the vehicle comes to a
halt, the shift lever is moved into neutral and the clutch pedal is released.
The engine is automatically started as soon as the clutch pedal is depressed.
Vehicles with automatic transmission
The engine is automatically switched off as soon as the vehicle comes to a halt
and the brake pedal is operated.
The engine is automatically started as soon as the brake pedal is released.
102Driving
 1
1 2
2 3
3 4
4 5
5 6
6 7
7 8
8 9
9 10
10 11
11 12
12 13
13 14
14 15
15 16
16 17
17 18
18 19
19 20
20 21
21 22
22 23
23 24
24 25
25 26
26 27
27 28
28 29
29 30
30 31
31 32
32 33
33 34
34 35
35 36
36 37
37 38
38 39
39 40
40 41
41 42
42 43
43 44
44 45
45 46
46 47
47 48
48 49
49 50
50 51
51 52
52 53
53 54
54 55
55 56
56 57
57 58
58 59
59 60
60 61
61 62
62 63
63 64
64 65
65 66
66 67
67 68
68 69
69 70
70 71
71 72
72 73
73 74
74 75
75 76
76 77
77 78
78 79
79 80
80 81
81 82
82 83
83 84
84 85
85 86
86 87
87 88
88 89
89 90
90 91
91 92
92 93
93 94
94 95
95 96
96 97
97 98
98 99
99 100
100 101
101 102
102 103
103 104
104 105
105 106
106 107
107 108
108 109
109 110
110 111
111 112
112 113
113 114
114 115
115 116
116 117
117 118
118 119
119 120
120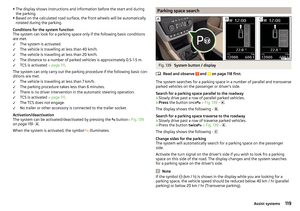 121
121 122
122 123
123 124
124 125
125 126
126 127
127 128
128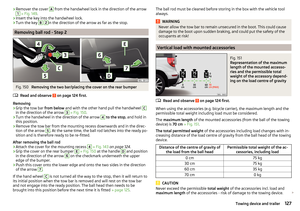 129
129 130
130 131
131 132
132 133
133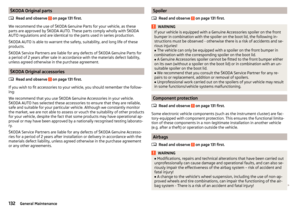 134
134 135
135 136
136 137
137 138
138 139
139 140
140 141
141 142
142 143
143 144
144 145
145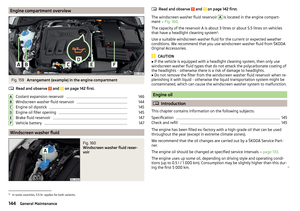 146
146 147
147 148
148 149
149 150
150 151
151 152
152 153
153 154
154 155
155 156
156 157
157 158
158 159
159 160
160 161
161 162
162 163
163 164
164 165
165 166
166 167
167 168
168 169
169 170
170 171
171 172
172 173
173 174
174 175
175 176
176 177
177 178
178 179
179 180
180 181
181 182
182 183
183 184
184 185
185 186
186 187
187 188
188 189
189 190
190 191
191 192
192 193
193 194
194 195
195 196
196 197
197 198
198 199
199