Page 145 of 200
■Firmly apply the handbrake.■For vehicles with manual transmission the lever into the neutral position.
For vehicles with automatic transmission , place the selector lever in")
WARNING (Continued)■Firmly apply the handbrake.■For vehicles with manual transmission the lever into the neutral position.
For vehicles with automatic transmission , place the selector lever in the P
position.■
Allow the engine to cool.
■
Never open the bonnet if you can see steam or coolant flowing out of the
engine compartment – There is a risk of scalding! Wait until the steam or
coolant has stopped escaping.
WARNINGInformation for working in the engine room■Keep everyone away from the engine compartment.■
Do not touch any hot engine parts – risk of burns!
■
Never touch the radiator fan. The radiator fan may still turn suddenly
about 10 minutes after switching off the ignition!
■
Do not smoke in the vicinity of the engine and avoid the use of open
flames or sparks.
■
Do not leave any items (e.g. cloths or tools) in the engine compartment.
This presents a fire hazard and the risk of engine damage.
■
Read and observe the information and warning instructions on the fluid
containers.
WARNINGInformation for working in the engine compartment with the engine run-
ning■
If it is necessary to work on the engine with the engine running, beware
of rotating engine parts and electrical plants - There is a risk to life!
■
Never touch the electric wiring on the ignition system.
■
Avoid short circuits in the electrical system, particularly on the vehicle's
battery.
CAUTION
Only refill using fluids with the proper specification - There is a risk of damage
to the vehicle!
Note
■ Fluids with the proper specifications can be purchased from the ŠKODA Origi-
nal Accessories or from the ŠKODA Genuine Parts ranges.■
We recommend you have the operating fluids replaced by a specialist garage.
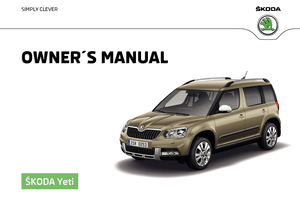
Opening and closing the bonnetFig. 158
Opening the bonnet
Read and observe
and on page 142 first.
Open flap
›
Ensure that the windscreen wipers are not raised away from the windscreen
-There is a risk of damage to the bonnet.
›
Open the front door and pull the release lever below the dash panel in the
direction of arrow
1
» Fig. 158 .
›
Press the release lever in the direction of the arrow
2
and the bonnet is un-
locked.
›
Raise the bonnet in the direction of the arrow
3
.
›
Remove the lid prop in the direction of arrow
4
from the holder.
›
Secure the open flap inserting the end of the post into the opening in the di-
rection of arrow
5
.
Close the flap
›
Lift the bonnet.
›
Decouple the bonnet support and press into the holder designed to hold it.
›
Drop down the bonnet lid from a height of about 20 cm applying light pres-
sure until it clicks safely into place.
WARNING■ Never drive with the bonnet lid not properly closed - There is a risk of ac-
cident!■
Make sure that when closing the bonnet, no body parts are crushed -
there is danger of injury!
143Inspecting and replenishing
Page 146 of 200
 in the engine compartment
Read and observe
and on page 142 first.
Coolant expansion reservoir
146
Windscreen washer fluid reservoir
144
En")
Engine compartment overviewFig. 159
Arrangement (example) in the engine compartment
Read and observe
and on page 142 first.
Coolant expansion reservoir
146
Windscreen washer fluid reservoir
144
Engine oil dipstick
145
Engine oil filler opening
145
Brake fluid reservoir
147
Vehicle battery
147
Windscreen washer fluid
Fig. 160
Windscreen washer fluid reser-
voir
ABCDEFRead and observe and on page 142 first.
The windscreen washer fluid reservoir
A
is located in the engine compart-
ment » Fig. 160 .
The capacity of the reservoir A is about 3 litres or about 5.5 litres on vehicles
that have a headlight cleaning system 1)
.
Use a suitable windscreen washer fluid for the current or expected weather
conditions. We recommend that you use windscreen washer fluid from ŠKODA
Original Accessories.
CAUTION
■ If the vehicle is equipped with a headlight cleaning system, then only use
windscreen washer fluid types that do not attack the polycarbonate coating of
the headlights - otherwise there is a risk of damage to headlights.■
Do not remove the filter from the windscreen washer fluid reservoir when re-
plenishing it with liquid - otherwise the liquid transportation system might be
contaminated, which can cause the windscreen washer system to malfunction.
Engine oil
Introduction
This chapter contains information on the following subjects:
Specification
145
Check and refill
145
The engine has been filled ex-factory with a high-grade oil that can be used
throughout the year (except in extreme climate zones).
We recommend that the oil changes are carried out by a ŠKODA Service Part- ner.
The engine oil should be changed at specified service intervals » page 133.
The engine uses up some oil, depending on driving style and operating condi-
tions (up to 0.5 l / 1 000 km). Consumption may be slightly higher than this dur-
ing the first 5 000 km.
1)
In some countries, 5.5 ltr. applies for both variants.
144General Maintenance
Page 147 of 200

WARNINGThe following instructions must be followed at all times when working on
the engine compartment » page 142.
CAUTION
Do not add any additives to the engine oil - There is a risk of engine damage.
Note
We recommend that you use oils from ŠKODA Original Accessories.
Specification
Read and observe
and on page 145 first.
The specifications (VW standards) stated in the following can be indicated sep-arately or together with other specifications on the bottle.
Vehicles with variable service intervals
Petrol enginesSpecification1.2 l/81 kW TSI
VW 504 00
1.4 l/92, 110 kW TSI1.8 ltr./112 kW TSIDiesel enginesSpecification2.0 l/81, 103, 110 kW TDI CRVW 507 00
Vehicles with fixed service intervals
Petrol enginesSpecification1.2 l/81 kW TSI
VW 502 00
1.4 l/92, 110 kW TSI1.6 l./81 kW MPI
1.8 ltr./112 kW TSI
VW 502 00applies to Russia
SAE 0W-30 VW 502 00 / 505 00Diesel enginesSpecification2.0 l/81, 103, 110 kW TDI CRVW 507 00
Engine oil VW 505 01 can optionally be used in diesel engines without a DPF.
CAUTION■
If no prescribed engine oil is available, then max. 0.5 l oil of the following
specifications can be refilled. ■Petrol engines: ACEA A3/ACEA B4 or API SN, (API SM);
■ Diesel engines: ACEA C3 or API CJ-4.
Check and refill
Fig. 161
Dipstick variants
Read and observe
and on page 145 first.
Check and refill oil under the following conditions. The vehicle is standing on a horizontal surface.
The engine operating temperature is reached.
The engine is turned off.
Checking the level
›
Wait a few minutes until the engine oil flows back into the oil trough.
›
Pull the dipstick out and wipe with a clean cloth.
›
Push the dipstick back to the stop and then pull it out again.
›
Read the oil level and push the dipstick back in.
The oil level must lie in range
A
» Fig. 161 . If the oil level is below range
A
, oil
must be added.
Refilling
›
Unscrew the cap of the engine oil filler opening
D
» Fig. 159 on page 144 .
›
Add oil of the correct specification in portions of 0.5 litres » page 145.
›
Check the oil level.
›
Screw the lid of the engine oil filler closed carefully.
145Inspecting and replenishing
Page 148 of 200

CAUTION■The oil level must never be below range A » Fig. 161 – risk of damage to the
engine as well as to the exhaust system.■
If a top up with oil is not possible or the oil level is above range
A
,
Stop
driving! Switch off the engine and seek assistance from a specialist garage.
Note
Too low engine oil level is shown in the instrument cluster by the warning
light illuminating and also indicated by the message » page 33. Nevertheless,
we recommend checking the oil level on a regular basis using the dipstick.
Coolant
Introduction
This chapter contains information on the following subjects:
Checking and refilling
146
The coolant helps to keep the engine temperature down, and consists of wa- ter and coolant additive (with additives that protect the cooling system against
corrosion and prevent furring).
The proportion of coolant additive in the coolant must be 40 to 60 %.
The correct mix of water and coolant additive should be checked and if neces-
sary corrected by a specialist garage.
WARNING■ The following instructions must be followed at all times when working on
the engine compartment » page 142.■
Never open the end cover of the coolant expansion reservoir while the
engine is still warm. The cooling system is pressurised -There is a risk of
scalding or injury from splashes of coolant!
■
To protect against the coolant splashing, cover the cap with a cloth when
opening.
■
Coolant and coolant fumes are harmful - avoid contact with the coolant. If
the coolant comes into contact with the eye or skin, wash the affected area
with plenty of water for several minutes, and where appropriate seek medi-
cal help.
CAUTIONDo not cover the radiator and install any parts (e.g auxiliary lights.) in front of
the air intakes - There is a risk of the engine overheating.
Checking and refilling
Fig. 162
Coolant expansion reservoir
Read and observe and on page 146 first.
Check and refill coolant under the following conditions.
The vehicle is on a horizontal surface.
The engine is not warm (if the engine is warm the result of the check may
be wrong).
The engine is turned off.
Check the coolant level - the coolant level must lie between the marks
A
and
B
» Fig. 162. If the coolant level is below the mark
B
, top up with coolant.
Refilling
The reservoir must always contain a small amount of coolant »
.
›
Place a cloth over the cap of the coolant expansion tank and unscrew the
cap carefully .
›
Always top up using coolant of the correct specification.
›
Turn the cap until it clicks into place.
The specification for the coolant is shown in the coolant expansion reservoir
» Fig. 162 .
If the specified coolant is not available, then refilling only with distilled or dem-
ineralised water, and get a specialist garage to correct the water-coolant addi-
tive mix as soon as possible.
146General Maintenance
Page 149 of 200

CAUTION■If the expansion tank is empty, do not top up with coolant. The system could
aerate - There is a risk of engine damage! Stop driving! Switch off the en-
gine and seek assistance from a specialist garage.■
Do not fill the coolant above the mark
A
» Fig. 162 . The coolant could, when
heated, be expelled from the cooling system - There is a risk of damage to the
engine parts.
■
If it is not possible to add coolant,
stop driving! Switch off the engine and
seek assistance from a specialist garage.
■
A coolant additive which does not correspond to the correct specification can
reduce the anti-corrosion effect of the cooling system - risk of damage to the
cooling system and the engine.
■
If non-distilled (non-demineralised) water has been used to top up, the cool-
ant should be replaced by a specialist garage - There is a risk of engine dam-
age.
■
A loss of coolant indicates leaks in the cooling system -There is a risk of en-
gine damage. Top up with coolant and then seek assistance from a specialist
garage.
Note
Too low coolant level is indicated in the instrument cluster by the warning
light and shown by the message » page 32. We still recommend inspecting
the coolant level directly at the reservoir from time to time.
Brake fluid
Fig. 163
Brake fluid reservoir
Check the brake fluid under the following conditions.
The vehicle is on a horizontal surface.
The engine is turned off.
Check brake fluid level - the brake fluid level must lie between the markings
“MIN” and “MAX” » Fig. 163.
Specification - the brake fluid must comply with the standard VW 501 14 (this
standard meets the requirements of FMVSS 116 DOT4).WARNING■ The following instructions must be followed at all times when working on
the engine compartment » page 142.■
If the fluid level drops significantly within a short time or if it drops below
the “MIN” » Fig. 163mark, this may be an indication of a leak in the brake
system.
Stop driving - There is a risk of an accident! Seek help from a
specialist garage.
Note
■ The brake fluid is changed as part of a compulsory inspection service.■Too low brake fluid level is indicated by the warning light being shown on
the display of the instrument cluster as well as the corresponding message
» page 32 . We still recommend inspecting the brake fluid level in the reservoir
from time to time.
Vehicle battery
Introduction
This chapter contains information on the following subjects:
Check condition
148
Charging
149
Disconnect/reconnect and change
149
The vehicle battery represents a power source for the motor to start and for the supply of electrical consumers in the car.
Automatic shutdown of consumers - vehicle battery discharge protection
The on-board power supply system tries to prevent the vehicle battery from
discharging in the following ways when it is subject to heavy loading. ▶ By increasing the engine idle speed.
▶ Through the power limitation of certain consumers.
▶ By switching off some loads(heated seats, heated rear window) for as long
as necessary.
147Inspecting and replenishing
Page 150 of 200

Warning symbols on the vehicle batterySymbolMeaningAlways wear eye protection.Battery acid is severely caustic. Always wear gloves and eye pro-
tection.Keep fire, sparks, open flames and lit cigarettes well clear of the
vehicle battery.When charging the vehicle battery, a highly explosive gas mixture
is produced.Keep children away from the vehicle battery.WARNINGBattery acid is highly corrosive - There is a risk of injury, chemical burns or
poisoning! Corrosive vapours in the air irritate and damage the respiratory
tract and the eyes. The following guidelines must be observed.■
Always wear protective gloves, eye and skin protection when handling
the vehicle battery.
■
If your eyes or skin come into contact with the electrolytic fluid, immedi-
ately wash the affected area for a few minutes long with a lot of water.
Seek medical assistance without delay.
■
Keep the vehicle battery away from people who are not completely inde-
pendent (e.g. children).
■
Do not tilt the battery otherwise battery electrolyte may flow out of the
battery vent openings.
WARNINGWorking on the car battery may cause an explosion, fire, injury or chemical
burns! The following guidelines must be observed.■
Do not smoke, use open flames or light or transmitting devices.
■
A discharged vehicle battery may freeze slightly. Never charge up a fro-
zen or thawed vehicle battery. Replace a frozen vehicle battery.
■
Never use a damaged vehicle battery.
■
Do not connect the battery terminals, bridging the two poles will cause a
short circuit.
CAUTIONEnsure that battery acid does not come into contact with the bodywork –
There is a risk of damage to the paintwork.
Note
■ We recommend having all work on the vehicle battery carried out by a spe-
cialist garage.■
You should replace batteries older than 5 years.
Check condition
Fig. 164
Vehicle battery: Open the cover / acid level indicator
Read and observe
and on page 148 first.
The battery condition is checked regularly by a specialist garage as part of the
inspection service.
Check the acid level
For car batteries with acid level indicator, acidity can be checked on the basis
of a colour display. In vehicle batteries with the label “AGM” there is no acid
level examination.
Depending on the equipment, the vehicle battery may be provided with a cov-
er, this can be opened in the direction of arrow » Fig. 164 -
.
Air bubbles can influence the colour of the indicator. Therefore, carefully knock
on the display » Fig. 164 -
.
Black colour - electrolyte level is correct.
Colourless or light yellow colour - electrolyte level too low, the battery must be replaced.
148General Maintenance
Page 151 of 200

Battery discharge
If frequent short journeys are made, the vehicle battery does not recharge suf-
ficiently.
The battery capacity decreases at low temperatures.
If the vehicle is not used for longer than 3 to 4 weeks, disconnect the negative
terminal
of the battery or charge the battery completely with a very low
charging current.
Charging
Read and observe
and on page 148 first.
Only charge the battery when the ignition and all consumers are switched off.
Refer to the instructions of the charger manufacturer.
Charging
›
For vehicles withthe START-STOPsystem or aux. heating, connect the
ter-
minal of the charger on the battery’s pole, the
terminal of the charger to
the earth point of the engine » page 161.
›
For vehicles without the START-STOPsystem or aux. heating, connect the
charger terminals to the corresponding battery poles ( to
,
to
).
›
Plug the mains cable of the charger into the power socket and switch on the
device.
›
After charging has been successful: Switch off the charger and remove the
mains cable from the power socket.
›
Disconnect the terminals of the charger from the vehicle battery.
A charging current of 0.1 multiple of the total vehicle battery capacity (or low-
er) must be used until full charging is achieved.
WARNING■ When charging the vehicle battery, hydrogen is released - risk of explo-
sion. An explosion can be caused through sparking while unclamping or
loosening the cable plug.■
So-called“quick-charging” of the vehicle battery is dangerous and re-
quires a special charger and specialist knowledge. Therefore, have“Quick
loading” carried out by a specialist garage.
Disconnect/reconnect and change
Read and observe
and on page 148 first.
The new vehicle battery must have the same capacity, voltage, current and the
same size as the original Battery.
We recommend you have the battery replaced by a specialist garage.
›
To disconnect , switch off the ignition and disconnect the negative terminal
first
, then disconnect the positive terminal
.
›
When reconnecting the battery, reconnect the positive terminal
first, then
connect the negative terminal
.
After disconnecting and re-connecting the vehicle battery, the following func- tions or devices are partially or completely inoperative.
Function / deviceOperating measureWindows» page 55Panorama sliding/tilting roof» page 57Sun screen» page 57Time settings» page 39
CAUTION
■ Disconnect the battery only with the ignition and consumers turned off -
There is a risk of damaging the electrical system of the vehicle.■
Before disconnecting the battery, always close the electric windows and the
tilt/slide sunroof - otherwise the fitting units for these may malfunction.
■
Under no circumstances mix up the charging cables – There is a risk of fire.
Note
After disconnecting and reconnecting the vehicle battery, we recommend hav-
ing the vehicle checked by a specialist to ensure that the full functionality of
the vehicle is guaranteed.149Inspecting and replenishing
Page 152 of 200

Wheels
Wheels and tyres
Introduction
This chapter contains information on the following subjects:
Advice on tyre/wheel usage
150
Tyre pressure
151
Tyre wear and wheel change
151
Spare wheel
152
Tyre marking
152
Advice on tyre/wheel usage
During the first 500 km, new tyres do not offer optimum grip; appropriate care
should therefore be taken when driving.
Tyres with the deeper profiles should always be fitted to the front wheels.
Rims and wheel bolts are matched to each other in terms of design. We rec-
ommend that you use rims and wheel bolts from ŠKODA Original Accessories.
Wheels and tyres should always be stored in a cool, dry and dark place. The
tyres themselves should be stored vertically.
Tyre life
Tyres age and lose their original characteristics, even if they are not being
used. We recommend that you do not use tyres that are more than 6 years old.
The manufacturing date is indicated on the tyre sidewall (possibly on the in-
side ). For example, DOT ... 10 16...means, for example, that the tyre was manu-
factured in the 10. week of 2016.
Tyre damage
We recommend checking your tyres and wheel rims for damage (punctures,
cuts, splits and bulges etc.) on a regular basis.
Remove any foreign objects in the tyre’s profile immediately (e.g. small stones).
Foreign bodies which have penetrated into the tyre (e.g. screws or nails)
should not be removed and help should be sought from a specialist garage.
Fitting new tyres
Only fit approved radial tyres of the same type, size (rolling circumference) and
the same tread pattern on one axle on all four wheels.
When mounting new tires the tires have to be replaced axle by axle.
Unidirectional tyres
The direction of rotation of the tyres is marked by arrows on the wall of the
tyre .
The specified running direction must be strictly adhered to, otherwise the fol-
lowing tyre characteristics may be degraded. ▶ Driving stability.
▶ Traction.
▶ Tyre noise and tyre wear.WARNING■Never use tyres if you do not know anything about their condition and
age There is a risk of accidents.■
Never drive with damaged tyres – risk of accident.
CAUTION
■ The tyres must be protected from contact with substances (e.g. oil, grease
and fuel) which could damage them. If the tyres come into contact with these
substances, then we recommend you have this checked out in a specialist
workshop.■
Do not use rims with ground or polished surfaces in winter conditions - there
is a risk of rim damage (e.g through salt spreading).
Note
■ We recommend that any work on the wheels or tyres be carried out by a spe-
cialist garage.■
We recommend that you use tyres, snow chains and full wheel trims from
ŠKODA Original Accessories.
150General Maintenance
 1
1 2
2 3
3 4
4 5
5 6
6 7
7 8
8 9
9 10
10 11
11 12
12 13
13 14
14 15
15 16
16 17
17 18
18 19
19 20
20 21
21 22
22 23
23 24
24 25
25 26
26 27
27 28
28 29
29 30
30 31
31 32
32 33
33 34
34 35
35 36
36 37
37 38
38 39
39 40
40 41
41 42
42 43
43 44
44 45
45 46
46 47
47 48
48 49
49 50
50 51
51 52
52 53
53 54
54 55
55 56
56 57
57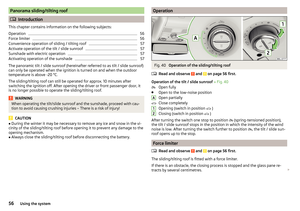 58
58 59
59 60
60 61
61 62
62 63
63 64
64 65
65 66
66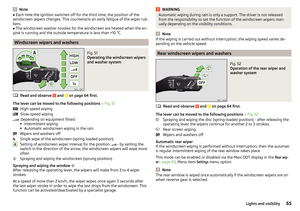 67
67 68
68 69
69 70
70 71
71 72
72 73
73 74
74 75
75 76
76 77
77 78
78 79
79 80
80 81
81 82
82 83
83 84
84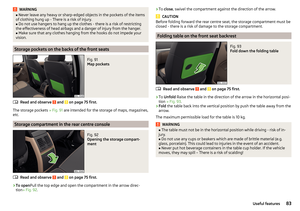 85
85 86
86 87
87 88
88 89
89 90
90 91
91 92
92 93
93 94
94 95
95 96
96 97
97 98
98 99
99 100
100 101
101 102
102 103
103 104
104 105
105 106
106 107
107 108
108 109
109 110
110 111
111 112
112 113
113 114
114 115
115 116
116 117
117 118
118 119
119 120
120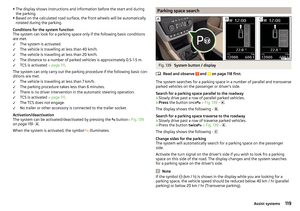 121
121 122
122 123
123 124
124 125
125 126
126 127
127 128
128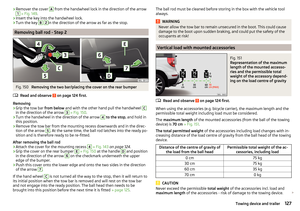 129
129 130
130 131
131 132
132 133
133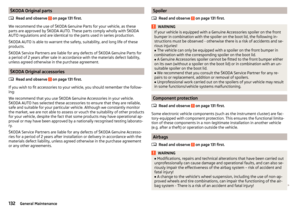 134
134 135
135 136
136 137
137 138
138 139
139 140
140 141
141 142
142 143
143 144
144 145
145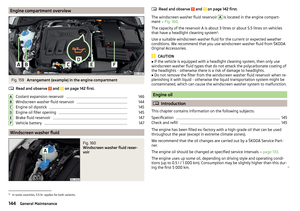 146
146 147
147 148
148 149
149 150
150 151
151 152
152 153
153 154
154 155
155 156
156 157
157 158
158 159
159 160
160 161
161 162
162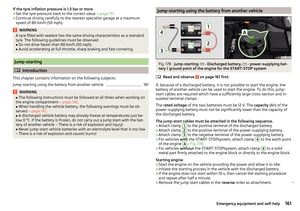 163
163 164
164 165
165 166
166 167
167 168
168 169
169 170
170 171
171 172
172 173
173 174
174 175
175 176
176 177
177 178
178 179
179 180
180 181
181 182
182 183
183 184
184 185
185 186
186 187
187 188
188 189
189 190
190 191
191 192
192 193
193 194
194 195
195 196
196 197
197 198
198 199
199