Page 41 of 200
.
The change of the displayed value.")
Setting the timeFig. 22
Buttons in the instrument clus-
ter
Use buttons
A
and
B
to set the time » Fig. 22.
The choice to change the display (hours or minutes).
The change of the displayed value.
In vehicles equipped with the MAXI DOT display, it is also possible to set the
Time
in the Time menu » page 43, Menu item
Settings
.
Display of the second speedometer
The display can show the current speed in mph 1)
. This feature is provided for
driving in countries with different speed units.
MAXI DOT display
The display of the second speedometer can be set in the
Alt. speed dis.
menu
item » page 43 , Menu item
Settings
.
Segment display
›
Press button
A
» Fig. 22 on page 39 repeatedly, until the odometer display
flashes.
›
Press the
B
button while the display flashes.
The second speedometer is displayed instead of the odometer. The display of the second speedometer is switched offin the same manner as it is switched
on.
Display of AdBlue range
The display shows the distance in km that can still be driven with the remain-
ing AdBlue tank capacity.
ABMAXI DOT display
The display of AdBlue range is part of the multi-function display » page 41,
Information overview .
Segment display›
Press button
A
» Fig. 22 on page 39 repeatedly until instead of total kilome-
tres travelled, the AdBlue Range is displayed.
›
Wait around 5 seconds - the system switches to the initial setting.
Gear recommendation
Fig. 23
Information on the selected gear / Gear recommendation
A suitable engaged gear or, where appropriate, a recommended gear is dis-
played, with the aim of conserving the life of the engine and increasing driving
efficiency.
For vehicles with automatic transmission the recommended gear will be
shown provided the mode for manual switching (Tiptronic) is selected.
Display
MAXI DOT display » Fig. 23
Optimal gear engaged
Gear recommendation (e.g.
means that it is advantageous to switch
from 3. to 4. gear)
Segment display » Fig. 23
Optimal gear engaged
Recommended gear
- Recommends that you change up to a
higher gear
1)
For models with the speedometer in mph, the second speedometer is displayed in km/h.
39Information system
Page 42 of 200

- Recommends that you change down to a lower gear
▶ On vehicles with a manual gearbox, the recommended gear and an ar-
row symbol is displayed (e.g.
means that it is advantageous to
change up from a lower gear to 4. gear).
▶ On vehicles with an automatic gearbox in manual shifting mode (Tip-
tronic), gear currently engaged and an arrow symbol is displayed, (e.g.
means that it is advantageous to change up from 4 to a higher gear).WARNINGThe driver is always responsible for selecting the correct gear in different
driving situations (e.g. when overtaking).
Operation of the information system
Operation via the operating lever
Fig. 24
Buttons on the control lever
Operating the multifunction display
Press (up or down) - select data / Setting values
Press - show / confirm entry
Operating the MAXI DOT display Press (up or down) - move to the selected menu
Hold (up or down) - display main menu
Press - confirm selected menu item
ABABOperation via the multifunction steering wheelFig. 25
Buttons/dials on the multifunction steering wheel
Buttons/dials on the multifunction steering wheel Press - Change frequency range (e.g. FM/AM/DAB) / Switch audio source
(e.g. SD card/USB input)
Turn - sets the volume
Press - sound on / off
Skip to next track/station
Switch to previous track/station
Switch on/off voice control
Press - display the phone menu; accept/end the call; select contact
Hold - repeat last call; reject call
Operating the multifunction display Turn - select data / set values
Press - show / confirm entry
Operating the MAXI DOT display Hold - display main menu
Press - return to a previous level in the menu
Turn - move in the selected menu
Press - confirm selected menu item
Note
Depending on equipment not all functions may be available. The system indi-
cates this through a text message on the display.ABB40Using the system
Page 43 of 200

Introduction
This chapter contains information on the following subjects:
Information overview
41
Warning when exceeding the set speed
41
Memory
42
The driving data is d")
Multifunction display (MFD)
Introduction
This chapter contains information on the following subjects:
Information overview
41
Warning when exceeding the set speed
41
Memory
42
The driving data is displayed in the multifunction display when is ignition is
switched on. After the ignition is switched on, the function that was last selec-
ted before switching off the ignition is displayed.
If vehicles with MAXI DOTdisplay do not show the driving data after switching
on the ignition, select the menu item
MFD
in the main menu and confirm
» page 42 , MAXI DOT display .
On vehicles with a MAXI DOT display, there is an option to fade out the units
and some of the information » page 43, Menu item
Settings
.
Note
If the display of the second speed is activated in mph, the current speed is not
indicated in km/h on the display.
Information overview
Overview of driving data (depending on the vehicle equipment fitted).
Exterior temperature - For vehicles with a MAXI DOT display this information
is always shown.
Driving time - driving time since last clearing the memory.
Current fuel consumption - when the vehicle is stationary or moving slowly,
the fuel consumption is displayed in l/h (in models in some countries the fol-
lowing appears --,- km/l).
Average fuel consumption - is calculated continuously since the last clearing
of the memory. After erasing the memory, no data will appear for the first 300
m driven.
Range - drive distance in km which can be covered with the existing tank ca-
pacity and with the same driving style. If you drive more efficiently this value
can increase.
AdBlue ®
range - drive distance in km which can be covered with the existing
AdBlue ®
tank capacity and with the same driving style. If you drive more effi-
ciently this value can increase.
Distance driven - distance driven since the memory was last cleared.
Average speed - value constantly recalculated, for distance since last clearing
the memory. After erasing the memory, no data will appear for the first 300 m
driven.
Current Speed - digital speedometer.
Oil temperature - if the temperature is lower than 50 °C or if there is a fault in
the system for checking the oil temperature, the
symbols are displayed.
Warning when the preset speed is exceeded - allows the setting of a speed
limit where, if exceeded, an acoustic warning signal and a warning message
appears on the display of the instrument cluster.
Warning when exceeding the set speed
The system offers the possibility to set a speed limit beyond which an acoustic
warning signal will sound and the following warning message (MAXI DOT Dis-
play) and the symbol appears in the display of the instrument cluster.
Adjust the speed limit while the vehicle is stationary
›
Select the menu item
Speed warning
at ( ) or
(
) and confirm.
›
Set the desired speed limit.
›
Confirm the set value, or wait several seconds; your settings will be saved
automatically.
Adjusting the speed limit while the vehicle is moving
›
Select the menu item
Speed warning
at ( ) or
(
) and confirm.
›
Drive at the desired speed.
›
Confirm the current speed as the speed limit.
The set speed limit can be manually adjusted later if needed.
Reset speed limit
›
Select the menu item
Speed warning
at ( ) or
(
) and confirm.
›
By confirming the speed stored in the memory, the speed limit is reset.
The set driving mode remains stored even after switching the ignition on and
off.
41Information system
Page 44 of 200

MemoryFig. 26
Multi-function display - memory display
The system stores data from the two memories described below, which are
then displayed at position
A
» Fig. 26 .
“1” - Single-trip memory
Drive data is stored from when the ignition is switched on to when it is switch-
ed off. If the trip is continued within 2 hours after switching off the ignition,
new data will also flow into the calculation of the current driving information.
If the trip is interrupted for more than 2 hours, the memory is automatically
erased.
“2” - Long-term memory
The memory saves data from any number of individual journeys up to a total of
19 hours and 59 minutes or 1999 kilometres driven ( ), and up to a total of
99 hours and 59 minutes or 9999 kilometres driven ( ).
The indicator is automatically set back to zero if one of the indicated values is
exceeded.
›
For the Storage choice , repeatedly confirm the selected indication and select
the desired memory.
›
For Deleting the memory for the selected information, hold down the button
confirming the specification.
The following driving data is stored in different memory banks.
▶ Average fuel consumption.
▶ Distance driven.
▶ Average speed.
▶ Driving time
Note
Disconnecting the vehicle battery will delete all memory data.MAXI DOT display
Introduction
This chapter contains information on the following subjects:
Menu item
Navigation42
Menu item
Audio43
Menu item
Phone43
Menu item
Assistants43
Menu item
Settings43
The MAXI DOT display is a user interface which, depending on the equipment
configuration, provides information about the Infotainment, the multifunction
display, the assistance systems etc. Furthermore, it enables some other func-
tions of your vehicle to be set.
The menus with details can be operated and displayed using the buttons on
the operating lever or the multifunction steering wheel » page 40.
Main menu items (depending on vehicle equipment) ■
MFD
(Multifunction display) » page 41
■
Audio
» page 43
■
Navigation
» page 42
■
Phone
» page 43 ;
■
Aux. heating
» page 97
■
Assist systems
» page 43
■
Vehicle status
» page 30
■
Settings
» page 43
Note
■
If warning messages are displayed, these messages must be verified to ac-
cess the main menu.■
The menu chosen always shifts to one of the higher levels after 10 seconds if
the display is not currently active.
Menu item
Navigation
The following information is displayed in the
Navigation
menu item.
▶ Driving recommendations
▶ Compass
▶ Last destinations
42Using the system
Page 45 of 200
.
▶ The selected frequency range (e.g. FM) optionally with the num")
Menu itemAudio
The following information is displayed in the
Audio
menu item.
Radio
▶ Currently playing station (name/frequency).
▶ The selected frequency range (e.g. FM) optionally with the number of the sta-
tion button (e.g. FM 3), if the station is stored in the memory list.
▶ List of available stations (if more than 5 stations can be received).
▶ TP traffic announcements.
Media
▶ Name of the track being played, if necessary, further information regarding
title (e.g. artist, album name), if this information is stored as a so called ID3
tag on the audio source.
Menu item
Phone
The call list with the following symbols is displayed in the
Telephone
menu item.
Incoming call
Outgoing call
Missed call
Symbols in the display Charge status of the telephone battery 1)
Signal strength 1)
A telephone is connected to the unit
Missed calls (if there are several missed calls, the number of calls is shown
next to the symbol)
Menu item
Assistants
In the
Assistants
menu item, the fatigue detection can be enabled/disabled
» page 122 .
Menu item
Settings
There is an option to change certain settings using the display. The following
information can be selected (depending on the equipment installed in the ve-
hicle).
Language Setting the language for the texts shown on the display.MFD data
Switching on/off certain information of the multifunction display.
Comfort
-Turn on / off or adjust the following functions.
ATA confirmSwitch on/off the audible signal indicating activation
of the anti-theft alarm system » page 51, Anti-theft
alarm system .Central lockingSwitch on/off the central locking and automatic lock-
ing function » page 50, Individual settings .Window op.Setting the comfort controls for the driver window or
for all windows » page 55, Window convenience op-
eration .Mirror downActivate/deactivate the function for lowering the mir-
ror on the front passenger side when in reverse
gear » page 67 , Tilting the mirror area of the front
passenger mirror (vehicles with electrically adjustable
driver's seat) .Mirror adjust.Activation / deactivation of the synchronous exterior
mirror function settings » page 67, Setting the mir-
ror surfaces synchronously .Factory setting.Resetting the Comfort menu to the factory setting.Lights & Vision
- Turn on / off or adjust the following functions.
Coming HomeActivate/deactivate and adjust the light duration of
the COMING HOME function » page 61.Leaving HomeSwitch on/off and adjust the light duration of the
LEAVING HOME function » page 61.Dayt. r. lightActivate/deactivate the daylight driving
light » page 59 , Daylight running lights (DAY LIGHT) .Rear wiperActivate/deactivate the function of the automatic
rear window wiping » page 65, Automatic rear wip-
er .Lane ch. flashActivate/deactivate the Comfort Indicating func-
tion » page 59 , Comfort signalling . 1)
This function is only supported by some mobile phones.
43Information system
Page 46 of 200

Travel modeActivate/deactivate the travel mode fea-
ture » page 62 .Factory setting.Resetting Lights & Visionmenu item to the factory set-
ting.Coasting
-Enable / disable the idle position (coasting) for vehicles with automat-
ic transmission » page 108, Driving in neutral (“coasting”) .
Time
- Setting the time, the time format (24 or 12 hour) and the change-over to
summer/winter time.
Winter tyres
- Setting the speed and the switching on and off of the acoustic sig-
nals when exceeding this speed. This function is, for example, used for winter
tyres where the maximum permissible speed is lower than the maximum
speed of the vehicle » page 150, Wheels and tyres . If the set speed is excee-
ded, an audible signal sounds and the following message appears in the infor-
mation display.
Units
- Setting the units for temperature, consumption and distance travelled.
Assistants
- Adjustment of the sound in Park Assist » page 114, Parking aid
(ParkPilot) .
Alt. speed dis.
Turn on / off the display of the second speedometer in
mph 1)
» page 39 , Display of the second speedometer .
Service
Display the distance travelled and the days until the next service
date » page 44 , Service interval display .
Factory setting.
- Resetting the display functions to factory settings.
Service interval display
Introduction
This chapter contains information on the following subjects:
Prompt in the MAXI DOT display
44
Prompt in the segment display
44
Resetting the service interval display
45
The service interval display shows the kilometres or days until the next service
event.
Information regarding the service intervals » page 133.
Prompt in the MAXI DOT display
Messages before reaching the scheduled service date
Before the next service date has been reached, the symbol as well as a mes-
sage about the mileage or days until the next service event appears in the dis-
play after switching on the ignition.
Messages upon reaching scheduled service date
Once the service appointment is reached, a message appears in the display af-
ter switching on the ignition.
Displaying the distance and days until the next service interval
Messages about the remaining kilometres and days until the next service date can be displayed at any time when the ignition is switched on by going to the
Service
menu item » page 43, Menu item
Settings
or from the
Vehicle status
in the
main menu of the Maxi DOTdisplay. » page 42.
Prompt in the segment display
Fig. 27
Segment display: Example of a
message
Image description » Fig. 27
Service due
Differentiating between types of service
▶ - Oil change service
▶ - Inspection
- Days remaining until the next service interval
Kilometres remaining until the next service interval
ABC1)
For models with the speedometer in mph, the second speedometer is displayed in km/h.
44Using the system
Page 47 of 200

Messages before reaching the scheduled service date
Before the next service date has been reached, the symbol » Fig. 27 as well as
a message about the mileage or days until the next service event appears in
the display for approx. 10 seconds after switching on the ignition.
Messages upon reaching scheduled service date
As soon as the service date is reached, the flashing
icon and the message
appears in the display for about 20 seconds after the ignition is switched on.
Displaying the distance and days until the next service interval
Messages regarding kilometres and days until the next service date can be dis-
played at any time with the ignition switched on by pressing the button againA
» Fig. 22 on page 39 .
The following is shown in the displayed » Fig. 27 (First information on the Oil
Change Service , By pressing the key again
A
» Fig. 22 on page 39 Information
on Inspection ).
Resetting the service interval display
We recommend that the display reset is completed by a specialist garage.
We recommend that you do not reset the service interval display yourself. In-
correctly setting the service interval display could cause problems to the vehi-
cle.
Variable service interval
For vehicles with variable service intervals, after resetting the oil change serv-
ice display in a specialist garage, the values of the new service interval are dis-
played, which are based on the previous operating conditions of the vehicle.
These values are then continuously matched according to the actual operating
conditions of the vehicle.
SmartGate
Introduction to the subject
Fig. 28
QR code with reference to the
ŠKODA websites
SmartGate is a system that transmits certain driving data (such as fuel con-
sumption, speed or similar) via Wi-Fi and Wi-Fi Direct.
The ŠKODA applications installed in a supported external device (e.g. phone,
tablet) give the option to further transmit the received data.
Some ŠKODA applications can be displayed in the Infotainment display by
means of a SmartLinkconnection » Owner's Manual Infotainment .
Read in the QR code » Fig. 28 using the respective application on your external
device or enter the following address in the web browser to open the website
with an overview of the available applications, compatible devices and other
information about SmartGate.
http://go.skoda.eu/connectivity-smartgate
CAUTION
■ To increase the access security to the transmitted vehicle data, once the
ŠKODA application has been started, you are requested to change the pass-
word/PIN code if the default password/PIN code has not yet been changed
» page 47 , Password/PIN code . It is not possible to start the ŠKODA applica-
tion without changing it.■
ŠKODA accepts no responsibility for any problems caused by incompatibility
or improper functioning of the external devices.
45Information system
Page 48 of 200

connection to SmartGate using Wi-Fi
This type of connection is intended for external devices running Android and
iOS operating systems.
Connecting to an Android external device›
Switch on the ignition.
›
Switch on Wi-Fi in the external device that is to be connected and search for
available Wi-Fi networks (see Owner's Manual for the external device).
›
In the menu of the detected networks, select the “SmartGate_...” 1)
menu item.
›
Enter the password (vehicle identification number using uppercase let-
ters » page 47 ).
›
In the external device that is to be connected to, start the SmartGate appli-
cation.
›
Then follow the instructions in the manual, which is included in the
SmartGate application.
With SmartGate, a maximum of four external devices can be connected simul-
taneously using Wi-Fi, with as many launched ŠKODA applications as required.
Connecting to an external iOS device
›
Switch on the ignition.
›
Switch on Wi-Fi in the external device that is to be connected and search for
available Wi-Fi networks (see Owner's Manual for the external device).
›
In the menu of the detected networks, select the “SmartGate_...” 1 )
menu item.
›
Enter the password (vehicle identification number using uppercase let-
ters » page 47 ).
With SmartGate, a maximum of four external devices can be connected simul-
taneously using Wi-Fi. In these external devices, up to four ŠKODA applications
can be started simultaneously.
Disconnection
The connection can be switched off in one of the following ways.
›
Switch off the ignition for longer than 5 seconds (for vehicles with a starter
button, switch off the engine and open the driver's door).
›
End the connection in the SmartGate application.
›
Switch off Wi-Fi in the connected external device.
Automatic connection
If the communication device has already had a connection with SmartGate,
then the connection is automatically restored under the following conditions.
The ignition is switched on.
Wi-Fi is switched on in the external device that is to be connected to.
The external device that is to be connected to stores the password re-
quired for the connection check.
Connection to SmartGate using Wi-Fi direct
This type of connection is intended for external devices running the Android
operating system.
Connection set-up
›
Switch on the ignition.
›
In the external device that is to be connected to, start the SmartGate appli- cation.
›
In the application, change the connection type to Wi-Fi direct.
›
Then follow the instructions in the manual, which is included in the
SmartGate application.
The password for the connection to SmartGate _... 1 )
includes the last six digits
of the vehicle identification number » page 47.
With SmartGate, a maximum of two external devices can be connected simul-
taneously using Wi-Fi direct, with as many launched ŠKODA applications as re-
quired.
If you want to connect to SmartGate in a different vehicle, you must make a
new connection in the SmartGate application.
Disconnection
The connection can be switched off in one of the following ways.
›
Switch off the ignition for longer than 5 seconds (for vehicles with a starter
button, switch off the engine and open the driver's door).
›
End the connection in the SmartGate application.
›
Switch off Wi-Fi in the connected external device.
Automatic connection
If the external device once had a connection with SmartGate, then the connec-
tion is automatically restored after the ignition is started.
1)
The last 6 characters of the VIN vehicle identification number of your vehicle are displayed at position ....
46Using the system
 1
1 2
2 3
3 4
4 5
5 6
6 7
7 8
8 9
9 10
10 11
11 12
12 13
13 14
14 15
15 16
16 17
17 18
18 19
19 20
20 21
21 22
22 23
23 24
24 25
25 26
26 27
27 28
28 29
29 30
30 31
31 32
32 33
33 34
34 35
35 36
36 37
37 38
38 39
39 40
40 41
41 42
42 43
43 44
44 45
45 46
46 47
47 48
48 49
49 50
50 51
51 52
52 53
53 54
54 55
55 56
56 57
57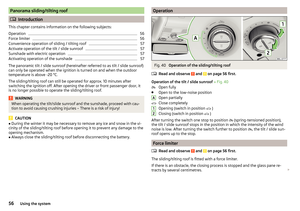 58
58 59
59 60
60 61
61 62
62 63
63 64
64 65
65 66
66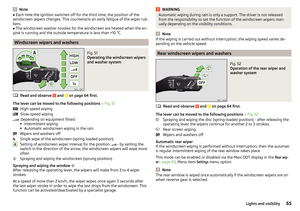 67
67 68
68 69
69 70
70 71
71 72
72 73
73 74
74 75
75 76
76 77
77 78
78 79
79 80
80 81
81 82
82 83
83 84
84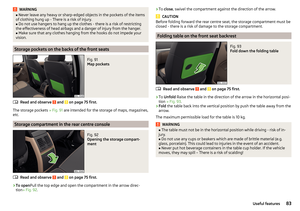 85
85 86
86 87
87 88
88 89
89 90
90 91
91 92
92 93
93 94
94 95
95 96
96 97
97 98
98 99
99 100
100 101
101 102
102 103
103 104
104 105
105 106
106 107
107 108
108 109
109 110
110 111
111 112
112 113
113 114
114 115
115 116
116 117
117 118
118 119
119 120
120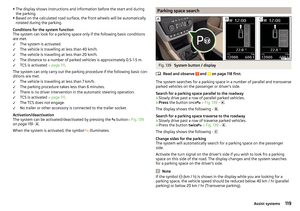 121
121 122
122 123
123 124
124 125
125 126
126 127
127 128
128 129
129 130
130 131
131 132
132 133
133 134
134 135
135 136
136 137
137 138
138 139
139 140
140 141
141 142
142 143
143 144
144 145
145 146
146 147
147 148
148 149
149 150
150 151
151 152
152 153
153 154
154 155
155 156
156 157
157 158
158 159
159 160
160 161
161 162
162 163
163 164
164 165
165 166
166 167
167 168
168 169
169 170
170 171
171 172
172 173
173 174
174 175
175 176
176 177
177 178
178 179
179 180
180 181
181 182
182 183
183 184
184 185
185 186
186 187
187 188
188 189
189 190
190 191
191 192
192 193
193 194
194 195
195 196
196 197
197 198
198 199
199