Page 65 of 200
 » Fig. 48
Switching on
Automatic operation (centre position) 1)
Switching off
Visibility
Introducti")
Interior lighting, rearFig. 48
Interior lights at the rear
Operation (by moving the lens
A
) » Fig. 48
Switching on
Automatic operation (centre position) 1)
Switching off
Visibility
Introduction
This chapter contains information on the following subjects:
Windscreen and rear window heating
63
Front sun visors
64WARNINGNo objects should be attached to the sun visor that could restrict the view
or endanger the vehicle occupants during sudden braking or in a collision.Windscreen and rear window heatingFig. 49
Buttons for rear and front window heating: Manual air condition-
ing / Climatronic
Read and observe
on page 63 first.
The heating for quick defrosting and ventilation of the front /and rear window.
The heating only works when the engine is running.
Buttons for the heating (depending on vehicle equipment) » Fig. 49
Switching the rear window heater on/off Switching the windscreen heater on/off
When the heater is switched on, a lamp lights up inside the button.
The heating automatically switches off after 10 minutes.
Note
■ If the on-board voltage decreases, the heating switches off automatically
» page 147 , Automatic shutdown of consumers - vehicle battery discharge
protection .■
If the light is flashing inside the button, the heater will not function due to
low battery.
■
The location of the button can be different depending on the equipment fit-
ted.
1)
In this position, the same rules apply to the rear interior light as for the front interior light » page 62,
Front interior light .
63Lights and visibility
Page 66 of 200

Front sun visorsFig. 50
Fold down the cover / fold up cover / fold down secondary visor /
make-up mirror and tape
Read and observe
on page 63 first.
Operation and description of the sun visor » Fig. 50
Swivel cover towards the windscreen
Swivel cover towards the door
Swivel the assist cover towards the windscreen
Make-up mirror with cover (the cover can be pushed in the direction of the
arrow)
Tape for storage of small light objects
123ABWindscreen wipers and washers
Introduction
This chapter contains information on the following subjects:
Windscreen wipers and washers
65
Rear windscreen wipers and washers
65
Headlight cleaning system
66
The windscreen wipers and the wash system only operate if the ignition is
switched on and the bonnet and boot are closed 1)
.
WARNINGDo not use the windscreen washer system at low temperatures, without
heating the windscreen beforehand. The window washer fluid could other-
wise freeze on the windscreen and restrict the view to the front.
CAUTION
■ If the windscreen wipers are in rest position, they cannot be folded out from
the windscreen. The wipers must be set to the service position to raise them
off the windscreen » page 166.■
In cold temperatures and during the winter, check before switching on the
ignition that the wiper blades are not frozen to the windscreen. If the wind-
screen wipers are switched on when the blades are frozen to the windscreen,
this may damage both the blades and windscreen wiper motor!
■
Carefully separate frozen windscreen wiper blades from the windscreen and
free from snow and ice.
■
Handle the windscreen wipers with care - there is a risk of damage to the
windscreen by the windscreen wiper arms.
■
Do not switch on the ignition when the wiper arm is raised from the wind-
screen - there is a risk of damage to the bonnet by the wiper arms.
■
If there is an obstacle on the windscreen, the wipers will try to push away
the obstacle five times. The wipers then stop to prevent themselves from be-
ing damaged. Only switch the wipers on again after the obstacle has been re-
moved.
1)
On vehicles which do not have a contact switch for the bonnet, the windshield wiper and wash system
operates also when the bonnet is opened.
64Using the system
Page 67 of 200

Note■Each time the ignition switches off for the third time, the position of the
windscreen wipers changes. This counteracts an early fatigue of the wiper rub-
bers.■
The windscreen washer nozzles for the windscreen are heated when the en-
gine is running and the outside temperature is less than +10 °C.
Windscreen wipers and washers
Fig. 51
Operating the windscreen wipers
and washer system
Read and observe and on page 64 first.
The lever can be moved to the following positions » Fig. 51
High-speed wiping Slow-speed wiping Depending on equipment fitted:
▶ Intermittent wiping
▶ Automatic windscreen wiping in the rain
Wipers and washers off
Single wipe of the windscreen (spring-loaded position)
Setting of windscreen wiper interval for the position
- by setting the
switch in the direction of the arrow, the windscreen wipers will wipe more
often
Spraying and wiping the windscreen (sprung position)
Spraying and wiping the window
After releasing the operating lever, the wipers will make from 3 to 4 wiper
strokes.
At a speed of more than 2 km/h, the wiper wipes once again 5 seconds after
the last wiper stroke in order to wipe the last drops from the windscreen. This
function can be activated/deactivated by a specialist garage.
AWARNINGAutomatic wiping during rain is only a support. The driver is not released
from the responsibility to set the function of the windscreen wipers man-
ually depending on the visibility conditions.
Note
If the wiping is carried out without interruption, the wiping speed varies de-
pending on the vehicle speed.
Rear windscreen wipers and washers
Fig. 52
Operation of the rear wiper and
washer system
Read and observe and on page 64 first.
The lever can be moved to the following positions » Fig. 52
Spraying and wiping the disc (spring-loaded position) - after releasing the
operating lever the wipers continue for another 2 to 3 strokes.
Rear screen wiping
Wipers and washers off
Automatic rear wiper
If the windscreen wiping is performed without interruption, then the automat-
ic regular intermittent wiping of the rear window takes place.
This mode can be enabled or disabled via the Maxi DOT display in the
Rear wip-er
» page 43 , Menu item
Settings
menu option.
Note
The rear window is wiped once automatically if the windscreen wipers are on
when reverse gear is selected.65Lights and visibility
Page 68 of 200

Headlight cleaning systemRead and observe
and on page 64 first.
The headlights are cleaned with every first and after every fifth spraying of the
windscreen under the following conditions.
The ignition is switched on.
The low beam is switched on.
The outside temperature is about -12° C to +39° C.
To ensure the correct functioning of the system, even in winter, this needs to be regularly cleared of snow and ice (e.g. using the de-icing spray).
Rear view mirror
Introduction
This chapter contains information on the following subjects:
Interior mirror dimming
66
Mirrors
67WARNINGExterior mirrors increase the field of view, however, they make objects ap-
pear smaller and further away. Therefore, use the interior mirror whenever
possible, for assessing the distances to the vehicles following behind.WARNING■ The mirrors with automatic dimming contain electrolyte fluid which may
leak if the mirror glass is broken - this can irritate skin, eyes and the respi-
ratory system.■
If your eyes or skin come into contact with the electrolytic fluid, immedi-
ately wash the affected area for a few minutes long with a lot of water. If
necessary get medical assistance.
Interior mirror dimmingFig. 53
Interior mirror: manual dimming/auto-darkening
Read and observe
on page 66 first.
Mirrors with manual dimming » Fig. 53 -
Basic mirror position (not darkened)
Mirror blackout
Mirror with automatic dimming
The mirror dimming » Fig. 53 -
is automatically controlled after the engine
start.
When the interior lights are switched on or the reverse gear is engaged, the
mirror moves back into the basic position (not dimmed).
WARNING■ Attach external devices (e.g. navigation system) not in the vicinity of the
mirror with automatic dimming . The illuminated display of an external de-
vice can affect the function of the rear-view mirror -There is a risk of an ac-
cident.■
Automatic mirror dimming only operates correctly if the light striking the
sensor is not affected by other objects. The sensors are located on the
front and back of the mirror.
1266Using the system
Page 69 of 200
 have a manual orelectric fold-in function, automatic dimming and")
MirrorsFig. 54
Exterior mirror operation
Read and observe on page 66 first.
The exterior mirrors can (depending on vehicle equipment) have a manual orelectric fold-in function, automatic dimming and memory function.
The rotary knob can be moved into the following positions (depending on ve- hicle equipment)
Adjust the left-hand exterior mirror
Switch off mirror control
Adjust the right-hand exterior mirror
Exterior mirror heater (only operates when the engine is running)
Folding in the mirrors electrically (to fold back, move the rotary knob to an-
other position) »
Setting the mirror area
›
Move the rotary knob in the direction of arrows » Fig. 54.
If the mirror setting fails at any time, the mirrors can be adjusted manually by
pressing on the edge of the mirror area.
Setting the mirror surfaces synchronously
This function allows the simultaneous adjustment of the two mirror areas. This
mode can be enabled or disabled via the Maxi DOT display in the
Adjust mir-rors
» page 43 , Menu item
Settings
menu item.
›
Turn the knob for the mirror control to the position for the driver mirror ad-
justment.
›
Adjust the mirror areas to the desired position.
Manual folding mirrors
The mirror can be manually folded in towards the side window. To put it back
into its original position, it should be folded back from the side window until it
audibly clicks into place.
Folding-in both of the exterior mirrors using the remote control key›
Close all windows and hold the button
on the remote control key.
The exterior mirror is folded back into the driving position when the ignition is
switched on.
Mirror with automatic dimming
The exterior mirror dimming is controlled together with the automatic rear-
view mirror dimming » page 66.
Memory function for mirror (vehicles with electrically adjustable driver's
seat)
It is possible to save the current setting of the exterior mirror when saving the
driver's seat position with » page 69, Memory Function of the electrically ad-
justable seat or » page 70 , Memory function of the remote control key .
Tilting the mirror area of the front passenger mirror (vehicles with
electrically adjustable driver's seat)
The front passenger mirror area can be tilted to the stored position to improve the view to the curb when reversing.
Operating conditions. The function is activated via the MAXI DOT display in the menu item
Mirrordown
» page 43 , Menu item
Settings
.
The setting of the mirror area has been previously stored » page 69,
Memory Function of the electrically adjustable seat or. » page 70 , Memo-
ry function of the remote control key .
The reverse gear is engaged.
The knob for the mirror control is in the position for the passenger mirror
adjustment.
The mirror area returns to its initial position after the rotary knob is set to an-
other position or if the speed is greater than 15 km/h.
WARNINGDo not touch the exterior mirror surfaces, if the exterior mirror heating is
switched on - hazard of burning. 67Lights and visibility
Page 70 of 200

CAUTION■Never manually fold in/out the electrically folding exterior mirrors - there is a
risk of damage to the mirror!■
When the mirror is swung by external influences (due to impact during ma-
noeuvring, for example), then first fold-in the mirror by turning the knob and
wait for a loud clapping noise.
Seats and head restraints
Front seats
Introduction
This chapter contains information on the following subjects:
Manual adjustment
68
Electrical adjustment
69
Memory Function of the electrically adjustable seat
69
Memory function of the remote control key
70
Folding front passenger seat
70
Armrest setting
71WARNING■ Only adjust the driver's seat when the vehicle is stationary – otherwise
there is a risk of accident!■
Caution when adjusting the seat! You may suffer injuries or bruises as a
result of adjusting the seat without paying proper attention.
Manual adjustment
Fig. 55
Control elements on the seat
Read and observe on page 68 first.
The seats can be adjusted by the respective operating element being pulled,
pressed or turned in the direction of the arrows » Fig. 55.
Adjusting the seat in the longitudinal direction (after releasing the control
lever, locking must be audible)
Adjusting the seat height
AB68Using the system
Page 71 of 200

Setting the extent of the curvature of the lumbar support
Note
After a certain time, play can develop within the adjus")
Adjusting the tilt of the backrest (do not lean on the backrest when ad-
justing)
Setting the extent of the curvature of the lumbar support
Note
After a certain time, play can develop within the adjustment mechanism of the
backrest angle.
Electrical adjustment
Fig. 56
Control elements on the seat
Read and observe
on page 68 first.
The seats can be adjusted by the respective operating element being pressed in the direction of area of the arrow » Fig. 56.
seat adjustment
▶ 1 - Move in the longitudinal direction
▶ 2 - Change in inclination
▶ 3 - Change in height
Adjusting the seat backrest
▶ 4 - Change in inclination
Adjusting lumbar support
▶ 5 - Change curvature
▶ 6 - The degree of curvature change
WARNINGThe electric front seat adjustment is functional even with the ignition off.
Therefore, when leaving the vehicle, never leave people who are not com-
pletely independent, such as children, unattended in the vehicle - there is a
risk of injury!CDABCNoteIf the inclination angle of the seat backrest relative to the seat surface is
greater than 102 °, then it is not possible for safety reasons to save this setting
in the memory of the electrically adjustable seats or the remote control key.
Memory Function of the electrically adjustable seat
Fig. 57
SET button and memory buttons
Read and observe on page 68 first.
Among the memory buttons
B
on the driver's seat, a setting for the driver´s
seat and exterior mirror position can be saved » Fig. 57.
Storing driver's seat and exterior mirror settings for the forwards drive
›
Switch on the ignition, adjust the seat and the exterior mirrors.
›
Hold down the
A
» Fig. 57 button and within 10 seconds press the de-
sired memory button
B
at the same time. Storing is confirmed by an acous-
tic signal.
Storing front passenger´s exterior mirror settings for reversing
Above the MAXI DOT display in the
Mirror down
menu item, the lowering func-
tion for the mirror on the passenger side must be enabled for reversing
» page 43 , Menu item
Settings
.
›
Turn on the ignition and press the desired memory button
B
» Fig. 57 .
›
Turn the rotary knob for the exterior mirror control to the position for the
front passenger mirror area » page 67.
›
Engage reverse gear.
›
Adjust the front passenger's mirror to the desired position.
›
Disengage reverse gear. The set position of the exterior mirror is stored.
69Seats and head restraints
Page 72 of 200

Retrieving the saved setting
The retrieval is possible when turned the ignition is switched on and the vehi-
cle speed is less than 5 km/h or when the ignition key is inserted in the igni-
tion lock.›
Hold the desired memory button
B
» Fig. 57 .
Stopping the ongoing adjustment
›
Press any button on the driver's seat or the
button on the remote control
key.
Note
Every time you save new seat and exterior mirror settings for driving forwards,
you must also save the front passenger mirror setting for reversing again.
Memory function of the remote control key
Read and observe
on page 68 first.
Every time the vehicle is locked, the driver´s seat and exterior mirror settingsare saved and assigned to the key with which the vehicle was locked.
After the following unlocking of the vehicle with the same key, the driver´s
seat and exterior mirrors that are saved to this key will be adopted.
Activating the function
›
Unlock the vehicle with the corresponding remote control key and open the
driver door.
›
Press and hold any memory button
B
» Fig. 57 on page 69 .
›
After the seat has assumed the position stored under this button, at the
same time press the button on the remote control key within 10 seconds.
Activation is confirmed by an acoustic signal.
Storing front passenger´s exterior mirror settings for reversing
Above the MAXI DOT display in the
Mirror down
menu item, the lowering func-
tion for the mirror on the passenger side must be enabled for reversing
» page 43 , Menu item
Settings
.
›
Unlock the vehicle with the remote control key and switch on the ignition.
›
Turn the rotary knob for the exterior mirror control to the position for the
front passenger mirror area » page 67.
›
Engage reverse gear.
›
Adjust the front passenger's mirror to the desired position.
›
Disengage reverse gear. The adjusted position of the exterior mirror is stored
in the remote control key memory.
Deactivating the function›Unlock the vehicle with the remote control key.›
Press and hold down the
A
» Fig. 57 on page 69 button. At the same time,
press the
button on the remote control key within 10 seconds. Deactivation
is confirmed by an acoustic signal.
Stopping the ongoing adjustment
›
Press any button on the driver's seat or the
button on the remote control
key.
Folding front passenger seat
Fig. 58
Folding the front passenger seat
forward
Read and observe on page 68 first.
The front passenger seat can, depending on specification, be folded forward into a horizontal position.
›
To fold the seat down, pull the lever in the direction of arrow
1
and fold
down the seat back in the direction of arrow
2
» Fig. 58 . The locking mecha-
nism must audibly snap into place.
›
To fold back , pull the lever in the direction of arrow
1
pull and fold back the
seat back in the direction of arrow
2
. The locking mechanism must audibly
snap into place.
›
Check this by pulling on the seat backrest.
WARNING■ If the seat backrest is folded down, only the seat behind the driver´s seat
can be used to transport passengers.■
The front passenger airbag should be switched off when transporting ob-
jects on the seat which was folded forwards » page 20, Deactivating the
front passenger airbag .
70Using the system
 1
1 2
2 3
3 4
4 5
5 6
6 7
7 8
8 9
9 10
10 11
11 12
12 13
13 14
14 15
15 16
16 17
17 18
18 19
19 20
20 21
21 22
22 23
23 24
24 25
25 26
26 27
27 28
28 29
29 30
30 31
31 32
32 33
33 34
34 35
35 36
36 37
37 38
38 39
39 40
40 41
41 42
42 43
43 44
44 45
45 46
46 47
47 48
48 49
49 50
50 51
51 52
52 53
53 54
54 55
55 56
56 57
57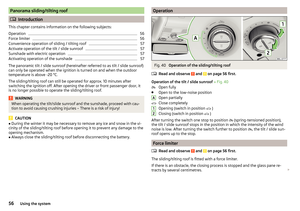 58
58 59
59 60
60 61
61 62
62 63
63 64
64 65
65 66
66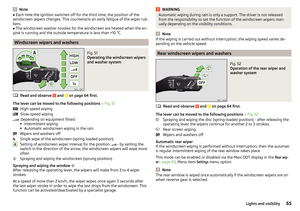 67
67 68
68 69
69 70
70 71
71 72
72 73
73 74
74 75
75 76
76 77
77 78
78 79
79 80
80 81
81 82
82 83
83 84
84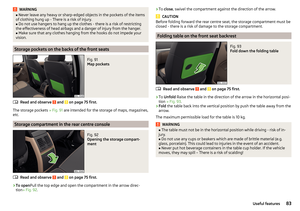 85
85 86
86 87
87 88
88 89
89 90
90 91
91 92
92 93
93 94
94 95
95 96
96 97
97 98
98 99
99 100
100 101
101 102
102 103
103 104
104 105
105 106
106 107
107 108
108 109
109 110
110 111
111 112
112 113
113 114
114 115
115 116
116 117
117 118
118 119
119 120
120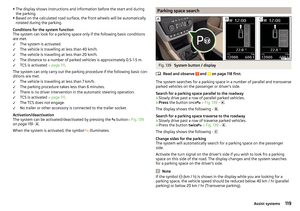 121
121 122
122 123
123 124
124 125
125 126
126 127
127 128
128 129
129 130
130 131
131 132
132 133
133 134
134 135
135 136
136 137
137 138
138 139
139 140
140 141
141 142
142 143
143 144
144 145
145 146
146 147
147 148
148 149
149 150
150 151
151 152
152 153
153 154
154 155
155 156
156 157
157 158
158 159
159 160
160 161
161 162
162 163
163 164
164 165
165 166
166 167
167 168
168 169
169 170
170 171
171 172
172 173
173 174
174 175
175 176
176 177
177 178
178 179
179 180
180 181
181 182
182 183
183 184
184 185
185 186
186 187
187 188
188 189
189 190
190 191
191 192
192 193
193 194
194 195
195 196
196 197
197 198
198 199
199