Page 137 of 200

WARNINGThe brake fluid must always be changed after the first 3 years and then ev-
ery 2 years. Longer intervals between changing the brake fluid can cause
vapour bubbles to form in the brake system when braking sharply. This can
impair the efficiency of the brakes – risk of accident!
Digital Service Plan
A specialist garage will not record the work carried out in a service evidence in
this Owner's Manual, but in the service information system called the Digital
Service Plan.
We therefore recommend that you always have the record of work carried out
in a service printed out for you.
Benefits of the Digital Service Plan
▶ High level of security preventing manipulation of the entries.
▶ Transparent documentation of service work carried out.
▶ Protection against loss or damage of the entries, you receive a complete re-
cord of the work carried out, if required.
▶ Option to receive the record in electronic form.
▶ The vehicle can be serviced in any specialist garage (also abroad) – the data-
base is accessible worldwide.
▶ Increased transparency when purchasing a used vehicle due to entries being
stored centrally.
▶ The system entries support you in making a claim on the ŠKODA extended
warranty and mobility guarantees.
Cleaning and care
Introduction
This chapter contains information on the following subjects:
Car washing
135
Exterior car care
136
Caring for the interior
138
Regular and thorough care helps to retain the value of your vehicle.
The instructions for use on the packaging must be observed when using care
products. We recommend that you use ŠKODA Original Accessories care prod-
ucts.
WARNING■ Vehicle care products may be harmful to your health if not used according
to the instructions.■
Always keep the vehicle care products safe from people who are not com-
pletely independent, e.g. children - danger of poisoning!
CAUTION
■ Do not use any insect sponges, rough kitchen sponges or similar cleaning
products – risk of damaging the paintwork surface.■
Do not use aggressive cleaning agents or chemical solvents - There is a dan-
ger of damaging the surface to be cleaned.
Note
We recommend that the vehicle is cleaned and maintained at a ŠKODA service
partner.
Car washing
Read and observe
and on page 135 first.
The best way to protect your vehicle against harmful environmental influences
is frequent washing.
The longer insect residues, bird droppings, road salt and other aggressive de-
posits remain on the paintwork of your vehicle, the more detrimental their de-
structive effect can be. High temperatures, such as those caused by intensive
sun's rays, accentuate this caustic effect.
It is also essential to thoroughly clean the underside of the vehicle at the end
of the winter.
Washing by hand
Wash the vehicle from top to bottom, with a soft sponge or a wash mitt and
plenty of water, and, if necessary, with the appropriate detergents. Wash out
the sponge or washing glove thoroughly at short intervals.
For wheels, door sills and lower areas of the vehicle use a different sponge.
Give the vehicle a good rinse after washing it and dry it off using a chamois
leather.
Automatic Car Washes
The usual precautionary measures must be taken before washing the vehicle
(e.g. closing the windows and the tilt/slide roof etc.).
135Care and maintenance
Page 138 of 200
 it is best to consult the operator of the car wash system be-
forehand.
After an automatic wa")
If your vehicle is fitted with any particular attached parts (e.g. spoiler, roof rack
system, aerial etc.) it is best to consult the operator of the car wash system be-
forehand.
After an automatic wash with wax treatment, the wiper blades should be
cleaned with cleaning agents specially designed for the purpose, and then de-
greased.
Pressure Washers
When washing the vehicle with a high-pressure cleaner, the instructions for
use of the equipment must be observed. This particularly applies to instruc-
tions regarding the pressure and spraying distance from the vehicle surface.WARNING■
When washing your vehicle in the winter: Water and ice in the braking
system can affect the braking efficiency – risk of accident!■
Take care when cleaning the underbody or the inside of the wheel wells -
there is a risk of injury from sharp metal parts!
CAUTION
■ Do not wash the vehicle in direct sunlight, do not exert pressure on the body
while washing. The temperature of the washing water should be no more than
60 °C max. - otherwise there is a risk of damaging the vehicle paint.■
Before driving through a car wash fold in the exterior mirrors - There is a risk
of damage.
■
For vehicles with roof antenna the antenna rod should be unscrewed before
driving through a car wash - there is a risk of damage.
CAUTION
Washing the vehicle with high-pressure cleaners■Films should not be washed with any high-pressure cleaners - There is a risk
of damage.■
Do not aim the water jet directly at the lock cylinders or the door or opening
joints when washing the vehicle in the winter – there is a risk of freezing.
■
Hold a large spraying distance to the rear camera lens, to plastic parts (e.g.
Roof racks, spoilers, protective strips and the like), as well as soft materials
such as rubber hoses or insulation material.
■
The sensors of the parking aid can be sprayed only for a short time and there
must be a minimum distance of 10 cm - there is a risk of damage.
Exterior car care
Read and observe
and on page 135 first.
Vehicle compo- nentsCircumstancesRemedy
Paint
Spilled fuelClear water, cloth, (clean as soon as
possible)No water drop-
lets form on the
paintUse hard wax preserve (at least twice a
year), apply wax to clean and dry bodyPaint has gone
mattUse polish, then wax (if the polish does
not contain any preservative ingredi-
ents)Plastic partsSoilingClear water, cloth / sponge, cleaning
agents provided for this purpose where
appropriateChrome
and anodised
partsSoiling
clear water, cloth, cleaning agents pro-
vided for this purpose where appropri-
ate, clean then polish with a soft dry
clothFilmsSoilingSoft sponge and mild soap solution a)Windows
and door mirrorsSoilingWash with clean water and dry with a
wipe specifically for that purposeHead / taillightsSoilingSoft sponge and mild soap solution a)
Reversing cameraSoilingWash with clean water and dry with a
soft clothSnow/iceHand brush / de-icerDoor lock cylin-
dersSnow/iceDe-icing fluid specifically for that pur-
poseWipers / wiper
bladesSoilingWindscreen cleaner, sponge or clothWheelsSoilingClear water, then apply appropriate
substancea)
Mild soap solution = 2 tablespoons of natural soap to 1 litre of lukewarm water.
The jack is maintenance-free. If necessary, the moving parts of the jack should
be lubricated with a suitable lubricant.
136General Maintenance
Page 139 of 200

The towing device is maintenance-free. Coat the ball head of the towing de-
vice with a suitable grease whenever necessary.
Protection of cavities
All the cavities of your vehicle which are at risk from corrosion are protected by
a layer of long-lasting protective wax applied in the factory.
If any small amount of wax flow out of the cavities at high temperatures, these
must be removed with a plastic scraper and the stains cleaned using a petrole-
um cleaner.
Underbody
The underside of your vehicle is already permanently protected by the factory
against chemical and mechanical influences.
We recommend having the protective coating checked — preferably before the
beginning of winter and at the end of winter.
Product life of the films
Environmental influences (e.g. sunlight, humidity, air pollution, rockfall) affect
the life of the films. Films will age and become brittle – this is entirely normal;
this is not a fault.
Sunlight may also affect the strength of the film colour.
When transporting a load on the roof rack (e.g. roof box or similar), there is an
increased risk of film damage (e.g. of chipping from the secured load).
CAUTION
■ Vehicle paint
■ Repair damaged areas as soon as possible.
■ Matt-painted parts should not be treated with polishes or hard waxes.
■ Do not polish in a dusty environment - risk of paint scratches.
■ Do not apply any paint care products to door seals or window guides.■
Plastic parts
■ Do not use paint polish.
■
Chromed and anodised parts
■ Do not polish in a dusty environment - There is a risk of surface scratches.
■
Films
The following instructions must be observed, otherwise there is a risk of film
damage. ■ Do not use dirty cloths or sponges for cleaning.
■ Do not use a scraper or other means to remove ice and snow.
■ Do not polish the films.
■ Do not use a high pressure cleaner on the films.
■
Rubber seals
■ Do not treat the door seals and window guides deal with anything - the
protective varnish coating could be damaged.■
Windows and door mirrors ■ Do not clean the insides of the windows/mirrors with sharp objects - risk of
damage to the filaments or the antenna. ■ Do not use a cloth which has been used to polish the body - this could dirty
the window and impair visibility.
■
Head / taillights
■ Do not wipe head/taillights dry, do not use any sharp objects - There is a
risk of damage to the protective coating and of cracks forming on the head-
light glass covers.
■
Reversing camera
The following instructions must be observed, otherwise there is a risk of camera damage. ■ Do not remove snow / ice with warm / hot water.
■ To wash, never use a pressure washer or steam jet.
■ For cleaning, do not use abrasive cleaners.
■
Door lock cylinders
■ Make sure that as little water as possible gets into the locking cylinder
when washing the vehicle - there is a risk of freezing the lock cylinder!
■
Wheels ■ Heavy soiling of the wheels can affect the balance of the wheels - the re-
sult can be a vibration, which can cause premature wear of the steering.
137Care and maintenance
Page 140 of 200

Caring for the interiorRead and observe
and on page 135 first.
Vehicle compo- nentsCircumstancesRemedy
Natural leather /
Artificial leather /
Alcantara ®
/
Material
Dust, surface
soilingVacuum cleanerSoiling (fresh)Water, slightly damp cotton / wool
cloth, if necessary, mild soap solution a)
,
then wipe off with a soft clothStubborn stainsCleaning fluid specifically for this taskCare (natural
leather)Treat the leather periodically with a
leather protecting fluid / use a care
cream with light blocker and impregna-
tion after each cleaningCare (Alcan-
tara ®
/ material)Remove stubborn hair using a “cleaning
glove”
Remove pills from materials with a
brushPlastic partsSoilingWater, slightly damp cloth or sponge, if
necessary cleaners specifically for this
purposeWindowsSoilingWash with clean water and dry with a
wipe specifically for that purposeCovers on electri-
cally heated seatsSoilingCleaners specifically for this purposeSeat belts » Soilingsoft cloth and mild soap solution a)a)
Mild soap solution = 2 tablespoons of natural soap to 1 litre of lukewarm water.
WARNING■
Never clean the seat belts chemically as chemical cleaning products could
destroy the fabric.■
Air fresheners and scents can be hazardous to heath when the tempera-
ture inside the vehicle is high.
CAUTION■ Natural leather /Faux leather / Alcantara ®
/ material
■ Avoid standing for lengthy periods in bright sunlight, and protect the mate-
rials by covering to prevent them from fading.
■ Remove fresh stains (e.g. from pens, lipstick, shoe polish and similar) as
soon as possible.
■ Ensure that no part of the leather is soaked through during cleaning and
that no water gets into the seams - There is a risk of damaging the leather!
■ Do not clean the roof panelling with a brush – There is a risk of damage to
the surface of the panelling. ■ Do not use leather cleaners, floor wax, shoe cream, stain remover or similar
agents on Alcantara ®
seat upholstery.
■ Some clothing fabrics (e.g. dark denim) do not have sufficient colour fast-
ness - this could lead to clearly visible discolouration on the upholstery. This
is not a defect in the fabric. ■ Sharp objects on garments (e.g. zips, rivets, sharp- edged belts) can dam-
age the upholstery fabrics in the vehicle. Such damage will not be recognised
as a justified complaint.■
Plastic parts ■ Do not attach scents or air fresheners to the dashboard – There is a risk of
damage to the dashboard.
■
Windows
■ Do not attach any stickers to the filaments or glass antenna - there is risk
of damage.
■
Covers on electrically heated seats ■ Do not clean either with water or with other liquids - There is a risk of dam-
age to the heating system. ■ Do not dry by switching on the heating.
■
Seat belts
■ After cleaning the belts, allow them to dry before retracting them.
Note
During vehicle use, some minor changes may become visible on the leather
and Alcantara ®
(due to e.g. folds, discolouration).138General Maintenance
Page 141 of 200

Inspecting and replenishing
Fuel
Introduction
Fig. 154
Stickers showing the prescribed
fuel
This chapter contains information on the following subjects:
Petrol and diesel refuelling
139
Unleaded petrol
140
Diesel fuel
140
The correct fuel for your vehicle is specified on the inside of the fuel filler
flap » Fig. 154 .
The fuel capacity for vehicles with front wheel drive is about 55 litres, and for
vehicles with four-wheel drive about 60 litres, with about 9 litres as reserve.
WARNINGFuel vapours are explosive - can be fatal!
CAUTION
■
Never drive until the fuel tank is completely empty! Irregular supply of fuel
can cause misfiring, which can result in damage to parts of the engine and the
exhaust system.■
Immediately remove any fuel that has spilled onto the vehicle's paintwork –
risk of paint damage.
■
If you would like to operate your vehicle in a country other than the one for
which it was intended, please talk to a ŠKODA Partner. They will tell you
whether the fuel specified by the manufacturer is offered in that country
and/or whether the manufacturer will sanction operating the vehicle with an-
other fuel.
Petrol and diesel refuellingFig. 155
Open fuel filler flap / unscrew tank cap / place the tank cap on
the fuel filler flap
Read and observe
and on page 139 first.
Perform the refuelling under the following conditions. The vehicle is unlocked.
The ignition is switched off.
The aux. heating and ventilation is switched off.
›
Press the fuel filler flap in direction of arrow
1
and fold in the direction of
arrow
2
» Fig. 155 .
›
Unscrew the tank cap in the direction of arrow
3
.
›
Remove the tank cap and place on top of the fuel filler flap in direction of ar-
row
4
.
›
Insert the pump nozzle into the fuel filler tube as far as it will go.
The fuel tank is full as soon as the pump nozzle switches off for the first time.
Not continue refuelling.
›
Remove the pump nozzle from the fuel filler neck and put it back in the
pump.
›
Place the filler cap onto the fuel filler neck and turn it in the opposite direc-
tion to the arrow until it securely engages
3
.
›
Close the fuel filler flap until it clicks into place.
139Inspecting and replenishing
Page 142 of 200

Unleaded petrolRead and observe
and on page 139 first.
The correct fuel for your vehicle is specified on the inside of the fuel filler
flap » Fig. 154 on page 139 .
The vehicle can only operate with unleaded petrol that meets standard EN
228 1)
, and contains maximum 10% bioethanol (E10).
Unleaded petrol 95/91 or 92 or 93 RON/ROZ
We recommend using petrol 95 ROZ.
Optionally, the petrol 91 ,92 or. 93 ROZ can be used (slight power loss, a slight-
ly increased fuel consumption).
Specified petrol is unleaded, min. 95 RON / ROZ
Use petrol min. 95 ROZ.
In an emergency , 91 . 92 or 93 ROZ petrol can be used (slight loss of power,
slightly increased fuel consumption) »
.
Prescribed petrol 98/(95) RON / ROZ
We recommend using petrol 98 ROZ.
Optionally, petrol 95 ROZ can be used (slight power loss, a slightly increased
fuel consumption).
In an emergency , 91 . 92 or 93 ROZ petrol can be used (slight loss of power,
slightly increased fuel consumption) »
.
CAUTION
The following instructions must be observed, otherwise there is a risk of dam-
age to the engine and to the exhaust system.■
When petrol with a lower than the prescribed octane is used, only continue
driving at mid-range engine speeds and with minimal strain on the engine. Re-
fuel using petrol of the prescribed octane number as soon as possible.
■ Lower than 91 octane petrol should not be used, even in an emergency!■If a fuel other than unleaded fuel which complies to the above mentioned
standards (e.g. leaded petrol) is put in the tank by mistake, do not start the en-
gine or switch on the ignition.
CAUTION
Petrol additives (additives)■Unleaded petrol complying with the EN 228 standard 1)
meets all the condi-
tions for problem-free engine operation. We therefore do not recommend mix-
ing fuel additives into the petrol - risk of engine damage or damage to the ex-
haust system.■
The following additives may not be used - There is a risk of engine damage
or damage to the exhaust system! ■ Additives with metal components (metallic additives), in particular with
manganese and iron content.
■ Fuels with metallic content (e.g. LRP - lead replacement petrol).
Note
■Unleaded petrol that has a higher octane number than that required by the
engine can be used without limitations.■
On vehicles with prescribed unleaded petrol 95/91, 92 or 93 ROZ, the use of
petrol with a higher octane number than 95 ROZ does not result in a noticea-
ble power increase or a lower fuel consumption.
■
On vehicles using the prescribed petrol of min. 95 ROZ, the use of petrol with
a higher octane number than 95 ROZ can lead to an increase in power and re-
duction in fuel consumption.
Diesel fuel
Read and observe
and on page 139 first.
The correct fuel for your vehicle is specified on the inside of the fuel filler
flap » Fig. 154 on page 139 .
The vehicle can only be operated using diesel fuel that complies with the
standard EN 5902)
and contains a maximum 7% biodiesel (B7)3)
.
1)
In Germany also DIN 51626-1 or E10 for unleaded petrol with octane number 91 or 95 or DIN 51626-2 or E5
for unleaded petrol with octane number 95 and 98.
2)
In Germany DIN 51628, in Austria ÖNORM C 1590, in Russia GOST R 52368-2005 / EN 590: 2004, in India
IS 1460 / Bharat IV or in an emergency IS 1460 / Bharat III.
3)
In Germany according to the DIN 52638 standard, in Austria ÖNORM C 1590, in France EN 590.
140General Maintenance
Page 143 of 200

Operating under different weather conditions
Use only diesel in accordance with the current or expected weather conditions.
Ask the petrol station personnel whether the diesel fuel offered corresponds
to these conditions.
CAUTION
The following instructions must be observed, otherwise there is a risk of dam-
age to the engine and to the exhaust system.■
If a different fuel other than diesel fuel, which complies to the above men-
tioned standards (e.g. petrol) is put into the tank, do not start the engine or
switch on the ignition!
■
The biofuel RME must not be used!
CAUTION
Diesel fuel additives■The diesel fuel in accordance with the prescribed standards meets all the
conditions for a smooth running engine. Therefore, we recommend that you do
not add any fuel additives to the diesel - there is a risk of engine damage or
damage to the exhaust system.
AdBlue ®
And its refilling
Introduction
This chapter contains information on the following subjects:
Check level
141
AdBlue ®
refill
142
In order to reduce pollutant emissions from vehicles with diesel engines and
the SCR catalyst, a urea - AdBlue ®
solution is injected into the exhaust system.
Only use AdBlue ®
that corresponds to the standard ISO 22241-1. Do not add
additives to AdBlue ®
.
The AdBlue ®
consumption is approx. 1.2 l - 1.6 l/1000 km, depending on driving
style, the operating temperature of the system and on the weather conditions.
AdBlue ®
-tank filling level is about 8.5 litres.
WARNINGAdBlue®
can cause skin, eye and respiratory irritation. If your eyes or skin
come into contact with the AdBlue ®
fluid, immediately wash the affected
area for a few minutes with a lot of water. If necessary get medical assis-
tance.
CAUTION
AdBlue ®
attacks the surface of some materials (e.g. as painted parts, plastics,
fabrics). Clean the areas affected with AdBlue ®
using a damp cloth and plenty
of cold water. Remove any dried AdBlue ®
with warm water and a sponge.
Note
■ The AdBlue ®
solution freezes at a temperature of -11 °C and below. The sys-
tem has a heater to ensure the operability at low temperatures.■
We recommend purchasing AdBlue ®
refill bottles from the ŠKODA original
parts.
■
The working life of the AdBlue ®
solution is 4 years. After this time, the solu-
tion must be replaced by a specialist garage.
■
AdBlue ®
is a registered trademark of the VDA. AdBlue ®
is also known as AUS
32 (Aqueous Urea Solution) or DEF (Diesel Exhaust Fluid).
Check level
Read and observe
and on page 141 first.
The filler neck of AdBlue ®
Tank is located in the luggage compartment under
the symbol and the cap marked with the lettering “AdBlue ®
” » Fig. 156 on
page 142 .
The AdBlue ®
level is automatically monitored.
If the available travel distance that can be completed with the remaining AdBl- ue ®
tank capacity drops to about 2400 km, the warning appears on the in-
strument cluster and a request for replenishment of AdBlue ®
appears.
An indication also appears in the instrument cluster showing the maximum
and minimum AdBlue ®
tank capacity.
If the available travel distance that can be driven with the existing AdBlue ®
tank capacity drops down to 0 km, then no motor start is possible.
The distance which can still be driven with the remaining AdBlue ®
, can be de-
termined using the travel data » page 30.
141Inspecting and replenishing
Page 144 of 200

AdBlue®
refillFig. 156
Raise flooring / remove box / cover lid
Fig. 157
Open the cover lid / rotate the fuel filler cap / filler neck
Read and observe
and on page 141 first.
We recommend AdBlue ®
to be refilled by a specialized workshop. If necessary,
it can refill itself using a refill.
We recommend when refilling using refill bottles that you use refill bottles
from ŠKODA Original Accessories.
When adding AdBlue ®
take note of the minimum and maximum AdBlue ®
tank
capacity shown in the display of the instrument cluster » page 30.
Refill AdBlue ®
under the following conditions.
The vehicle is on a horizontal surface.
The ignition is switched off.
Refilling›Fold up the flooring in the luggage compartment in the arrow direction 1
» Fig. 156 .
›
Remove the box for the vehicle tools in the direction of arrow
2
.
›
Open the filler cap in the direction of the arrow
3
» Fig. 157 .
›
Unscrew the tank cap in the direction of arrow
4
.
›
Fill the AdBlue ®
through the filler
A
according to the instructions on the re-
fill bottle.
›
After filling AdBlue ®
put the tank cap on the fuel filler neck and turn in the
opposite direction of the arrow
4
until it reaches the stop.
›
Close the filler cap in the opposite direction to the arrow
3
.
›
Store the box for the vehicle tools in the same place again.
›
Fold back the floor in the luggage compartment.
Before continuing your journey , switch on just the ignition for 30 s so that the
refilling can be recognized by the system. Only then start the engine.
Engine compartment
Introduction
This chapter contains information on the following subjects:
Opening and closing the bonnet
143
Engine compartment overview
144
Windscreen washer fluid
144WARNINGNever cover the engine with additional insulation material (e.g. with a cov-
er) – risk of fire!WARNINGWhen working in the engine compartment, the following instructions must
be observed - otherwise there is a risk of injury or fire. The engine compart-
ment of your car is a hazardous area!WARNINGInstructions before beginning work in the engine compartment■Stop the engine and remove the ignition key, on vehicles with the KESSY
system, open the driver's door. 142General Maintenance
 1
1 2
2 3
3 4
4 5
5 6
6 7
7 8
8 9
9 10
10 11
11 12
12 13
13 14
14 15
15 16
16 17
17 18
18 19
19 20
20 21
21 22
22 23
23 24
24 25
25 26
26 27
27 28
28 29
29 30
30 31
31 32
32 33
33 34
34 35
35 36
36 37
37 38
38 39
39 40
40 41
41 42
42 43
43 44
44 45
45 46
46 47
47 48
48 49
49 50
50 51
51 52
52 53
53 54
54 55
55 56
56 57
57 58
58 59
59 60
60 61
61 62
62 63
63 64
64 65
65 66
66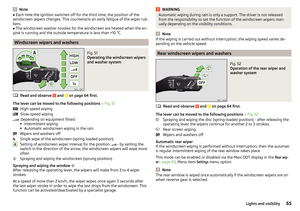 67
67 68
68 69
69 70
70 71
71 72
72 73
73 74
74 75
75 76
76 77
77 78
78 79
79 80
80 81
81 82
82 83
83 84
84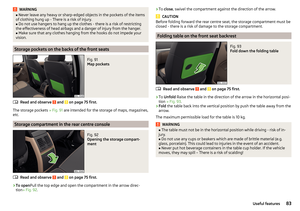 85
85 86
86 87
87 88
88 89
89 90
90 91
91 92
92 93
93 94
94 95
95 96
96 97
97 98
98 99
99 100
100 101
101 102
102 103
103 104
104 105
105 106
106 107
107 108
108 109
109 110
110 111
111 112
112 113
113 114
114 115
115 116
116 117
117 118
118 119
119 120
120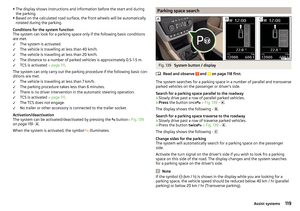 121
121 122
122 123
123 124
124 125
125 126
126 127
127 128
128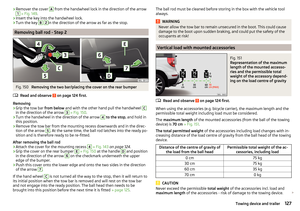 129
129 130
130 131
131 132
132 133
133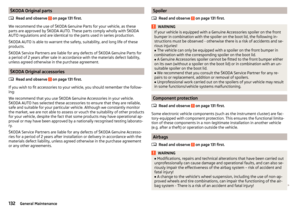 134
134 135
135 136
136 137
137 138
138 139
139 140
140 141
141 142
142 143
143 144
144 145
145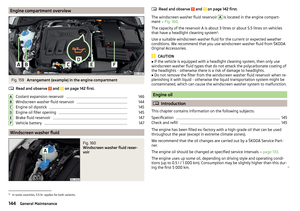 146
146 147
147 148
148 149
149 150
150 151
151 152
152 153
153 154
154 155
155 156
156 157
157 158
158 159
159 160
160 161
161 162
162 163
163 164
164 165
165 166
166 167
167 168
168 169
169 170
170 171
171 172
172 173
173 174
174 175
175 176
176 177
177 178
178 179
179 180
180 181
181 182
182 183
183 184
184 185
185 186
186 187
187 188
188 189
189 190
190 191
191 192
192 193
193 194
194 195
195 196
196 197
197 198
198 199
199