2007 TOYOTA SIENNA relay
[x] Cancel search: relayPage 2501 of 3000
BRAKE CONTROL – VEHICLE STABILITY CONTROL SYSTEMBC–139
BC
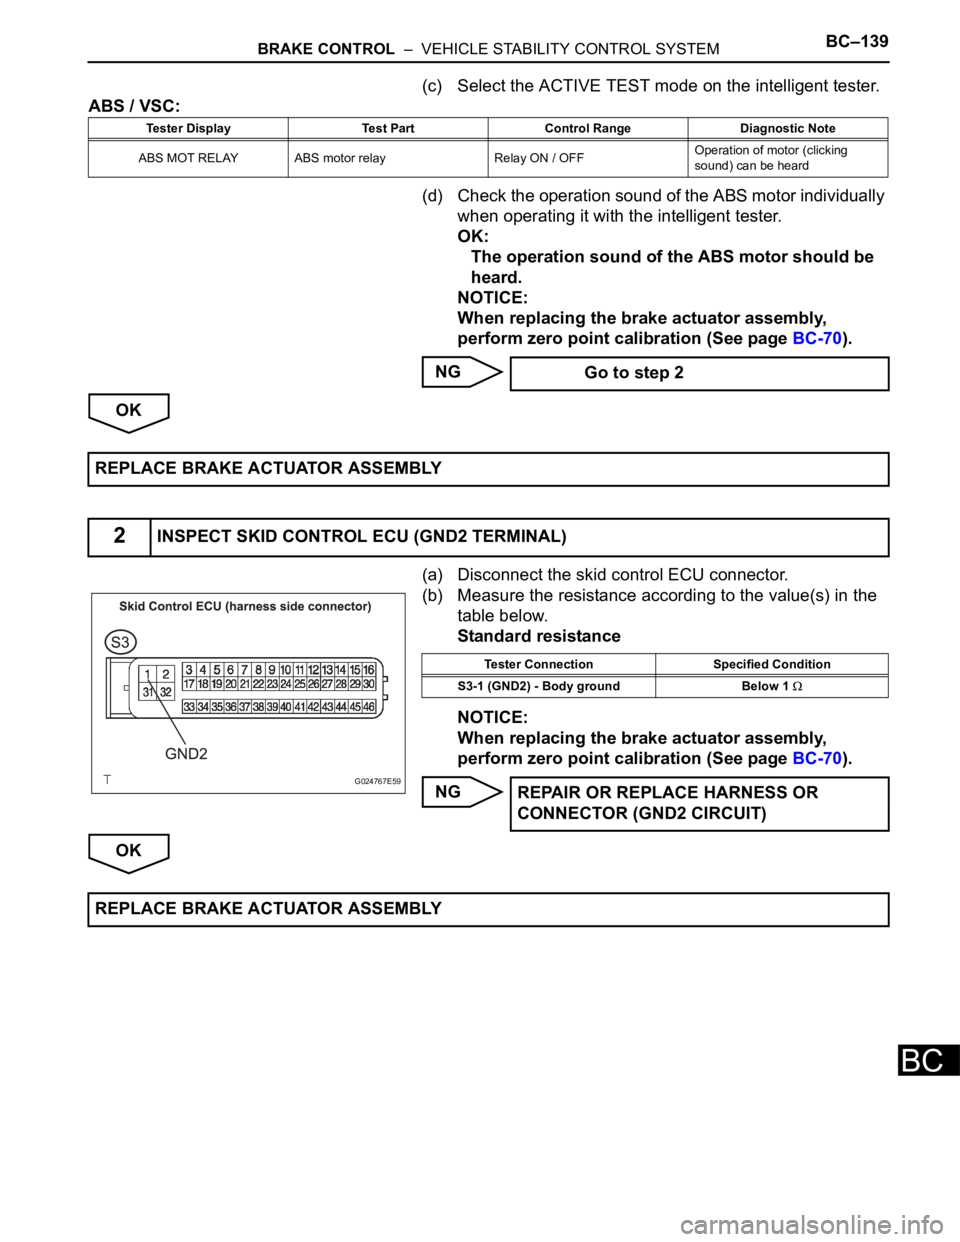
(c) Select the ACTIVE TEST mode on the intelligent tester.
ABS / VSC:
(d) Check the operation sound of the ABS motor individually
when operating it with the intelligent tester.
OK:
The operation sound of the ABS motor should be
heard.
NOTICE:
When replacing the brake actuator assembly,
perform zero point calibration (See page BC-70).
NG
OK
(a) Disconnect the skid control ECU connector.
(b) Measure the resistance according to the value(s) in the
table below.
Standard resistance
NOTICE:
When replacing the brake actuator assembly,
perform zero point calibration (See page BC-70).
NG
OK
Tester Display Test Part Control Range Diagnostic Note
ABS MOT RELAY ABS motor relay Relay ON / OFFOperation of motor (clicking
sound) can be heard
Go to step 2
REPLACE BRAKE ACTUATOR ASSEMBLY
2INSPECT SKID CONTROL ECU (GND2 TERMINAL)
G024767E59
Tester Connection Specified Condition
S3-1 (GND2) - Body ground Below 1
REPAIR OR REPLACE HARNESS OR
CONNECTOR (GND2 CIRCUIT)
REPLACE BRAKE ACTUATOR ASSEMBLY
Page 2541 of 3000

BRAKE CONTROL – ANTI-LOCK BRAKE SYSTEMBC–17
BC
DIAGNOSTIC TROUBLE CODE CHART
HINT:
• If a trouble code is displayed during the DTC check, check
the circuit indicated by the DTC. For details of each code,
turn to the page for the respective DTC Code. in the DTC
chart.
• Inspect the fuse and relay before investigating the trouble
areas as shown in the table below.
DTC chart of ABS:
DTC Code Detection Item Trouble Area See page
C0200/31 Front Speed Sensor RH Circuit1. Front speed sensor RH
2. Front speed sensor RH circuit
3. Speed sensor rotor
4. Sensor installation
5. Brake actuator assemblyBC-17
C0205/32 Front Speed Sensor LH Circuit1. Front speed sensor LH
2. Front speed sensor LH circuit
3. Speed sensor rotor
4. Sensor installation
5. Brake actuator assemblyBC-17
C0210/33 Rear Speed Sensor RH Circuit1. Rear speed sensor RH
2. Rear speed sensor RH circuit
3. Speed sensor rotor
4. Sensor installation
5. Brake actuator assemblyBC-23
C0215/34 Rear Speed Sensor LH Circuit1. Rear speed sensor LH
2. Rear speed sensor LH circuit
3. Speed sensor rotor
4. Sensor installation
5. Brake actuator assemblyBC-23
C0226/21 SFR Solenoid Circuit1. SFRH or SFRR circuit
2. Brake actuator assemblyBC-29
C0236/22 SFL Solenoid Circuit1. SFLH or SFLR circuit
2. Brake actuator assemblyBC-29
C0246/23 SRR Solenoid Circuit1. SRRH or SRRR circuit
2. Brake actuator assemblyBC-29
C0256/24 SRL Solenoid Circuit1. SRLH or SRLR circuit
2. Brake actuator assemblyBC-29
C0273/13 Open in ABS Motor Relay Circuit1. ABS 1 fuse
2. ABS motor relay
3. ABS motor relay circuit
4. Brake actuator assemblyBC-31
C0274/14Short to B+ in ABS Motor Relay
Circuit1. ABS 1 fuse
2. ABS motor relay
3. ABS motor relay circuit
4. Brake actuator assemblyBC-31
C0278/11Open in ABS Solenoid Relay
Circuit1. ABS 2 fuse
2. ABS solenoid relay
3. ABS solenoid relay circuit
4. Brake actuator assemblyBC-34
C0279/12Short to B+ in ABS Solenoid
Relay Circuit1. ABS 2 fuse
2. ABS solenoid relay
3. ABS solenoid relay circuit
4. Brake actuator assemblyBC-34
C1235/35Foreign Object is Attached on Tip
of Front Speed Sensor RH1. Front speed sensor RH
2. Speed sensor rotor
3. Sensor installation
4. Brake actuator assemblyBC-17
Page 2544 of 3000

BC–178BRAKE CONTROL – BRAKE ACTUATOR (w/ VSC)
BC
ON-VEHICLE INSPECTION
1. CONNECT INTELLIGENT TESTER
(a) Connect the intelligent tester to the DLC3.
(b) Start the engine and run at idle.
(c) Select the ACTIVE TEST mode on the intelligent
tester.
HINT:
Please refer to the intelligent tester operator's
manual for further details.
2. INSPECT ACTUATOR MOTOR OPERATION
(a) With the motor relay on, check the actuator motor
operation noise.
(b) Turn the motor relay off.
(c) Depress the brake pedal and hold it for
approximately 15 seconds. Check that the brake
pedal cannot be depressed.
(d) With the motor relay on, check that the pedal does
not pulsate.
NOTICE:
Do not keep the motor relay turned on for more
than 5 seconds continuously. When operating it
continuously, set an interval of more than 20
seconds.
(e) Turn the motor relay off and release the brake
pedal.
3. INSPECT RIGHT FRONT WHEEL OPERATION
NOTICE:
Never turn on the solenoids in a manner different to
those described below.
(a) With the brake pedal depressed, perform the
following operations.
(b) Turn the SFRH and SFRR solenoids on
simultaneously, and check that the pedal cannot be
depressed.
NOTICE:
Do not keep the solenoid turned on for more
than 10 seconds continuously. When operating
it continuously, set an interval of more than 20
seconds.
(c) Turn the SFRH and SFRR solenoids off
simultaneously, and check that the pedal can be
depressed.
(d) Turn the motor relay on, and check that the pedal
returns.
NOTICE:
Do not keep the motor relay turned on for more
than 5 seconds continuously. When operating it
continuously, set an interval of more than 20
seconds.
(e) Turn the motor relay off and release the brake
pedal.
A080036E03
Page 2555 of 3000

BRAKE CONTROL – BRAKE ACTUATOR (w/o VSC)BC–183
BC
ON-VEHICLE INSPECTION
1. CONNECT INTELLIGENT TESTER
(a) Connect the intelligent tester to the DLC3.
(b) Start the engine and run at idle.
(c) Select the ACTIVE TEST mode on the intelligent
tester.
HINT:
Please refer to the intelligent tester operator's
manual for further details.
2. INSPECT ACTUATOR MOTOR OPERATION
(a) With the motor relay on, check the actuator motor
operation noise.
(b) Turn the motor relay off.
(c) Depress the brake pedal and hold it for
approximately 15 seconds. Check that the brake
pedal cannot be depressed.
(d) With the motor relay on, check that the pedal does
not pulsate.
NOTICE:
Do not keep the motor relay turned on for more
than 5 seconds continuously. When operating it
continuously, set an interval of more than 20
seconds.
(e) Turn the motor relay off and release the brake
pedal.
3. INSPECT RIGHT FRONT WHEEL OPERATION
NOTICE:
Never turn on the solenoids in a manner different to
those described below.
(a) With the brake pedal depressed, perform the
following operations.
(b) Turn the SFRH and SFRR solenoids on
simultaneously, and check that the pedal cannot be
depressed.
NOTICE:
Do not keep the solenoid turned on for more
than 10 seconds continuously. When operating
it continuously, set an interval of more than 20
seconds.
(c) Turn the SFRH and SFRR solenoids off
simultaneously, and check that the pedal can be
depressed.
(d) Turn the motor relay on, and check that the pedal
returns.
NOTICE:
Do not keep the motor relay turned on for more
than 5 seconds continuously. When operating it
continuously, set an interval of more than 20
seconds.
(e) Turn the motor relay off and release the brake
pedal.
A080036E03
Page 2567 of 3000
BRAKE CONTROL – ANTI-LOCK BRAKE SYSTEMBC–31
BC
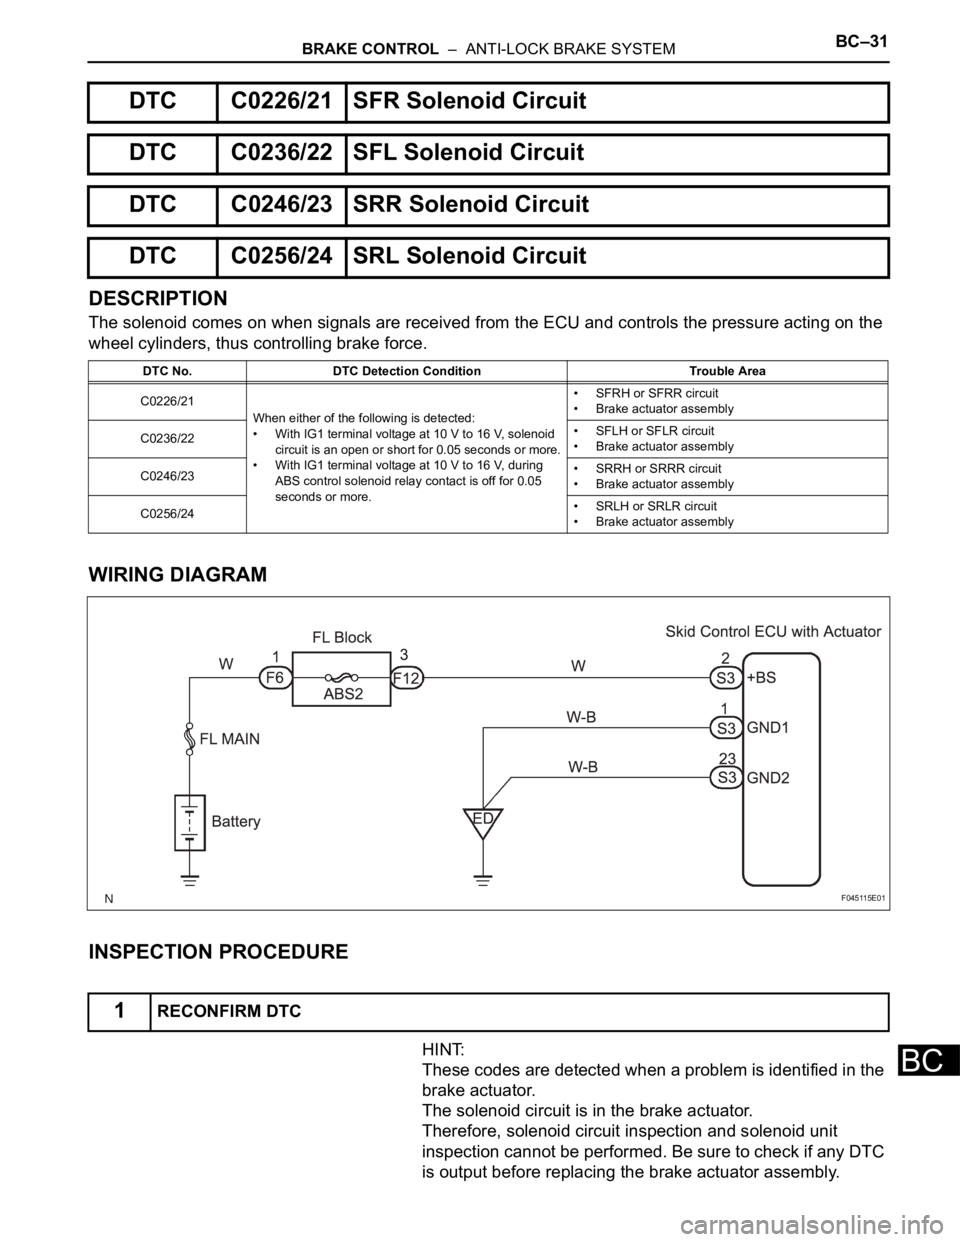
DESCRIPTION
The solenoid comes on when signals are received from the ECU and controls the pressure acting on the
wheel cylinders, thus controlling brake force.
WIRING DIAGRAM
INSPECTION PROCEDURE
HINT:
These codes are detected when a problem is identified in the
brake actuator.
The solenoid circuit is in the brake actuator.
Therefore, solenoid circuit inspection and solenoid unit
inspection cannot be performed. Be sure to check if any DTC
is output before replacing the brake actuator assembly.
DTC C0226/21 SFR Solenoid Circuit
DTC C0236/22 SFL Solenoid Circuit
DTC C0246/23 SRR Solenoid Circuit
DTC C0256/24 SRL Solenoid Circuit
DTC No. DTC Detection Condition Trouble Area
C0226/21
When either of the following is detected:
• With IG1 terminal voltage at 10 V to 16 V, solenoid
circuit is an open or short for 0.05 seconds or more.
• With IG1 terminal voltage at 10 V to 16 V, during
ABS control solenoid relay contact is off for 0.05
seconds or more.• SFRH or SFRR circuit
• Brake actuator assembly
C0236/22• SFLH or SFLR circuit
• Brake actuator assembly
C0246/23• SRRH or SRRR circuit
• Brake actuator assembly
C0256/24• SRLH or SRLR circuit
• Brake actuator assembly
1RECONFIRM DTC
F045115E01
Page 2571 of 3000
BRAKE CONTROL – ANTI-LOCK BRAKE SYSTEMBC–33
BC
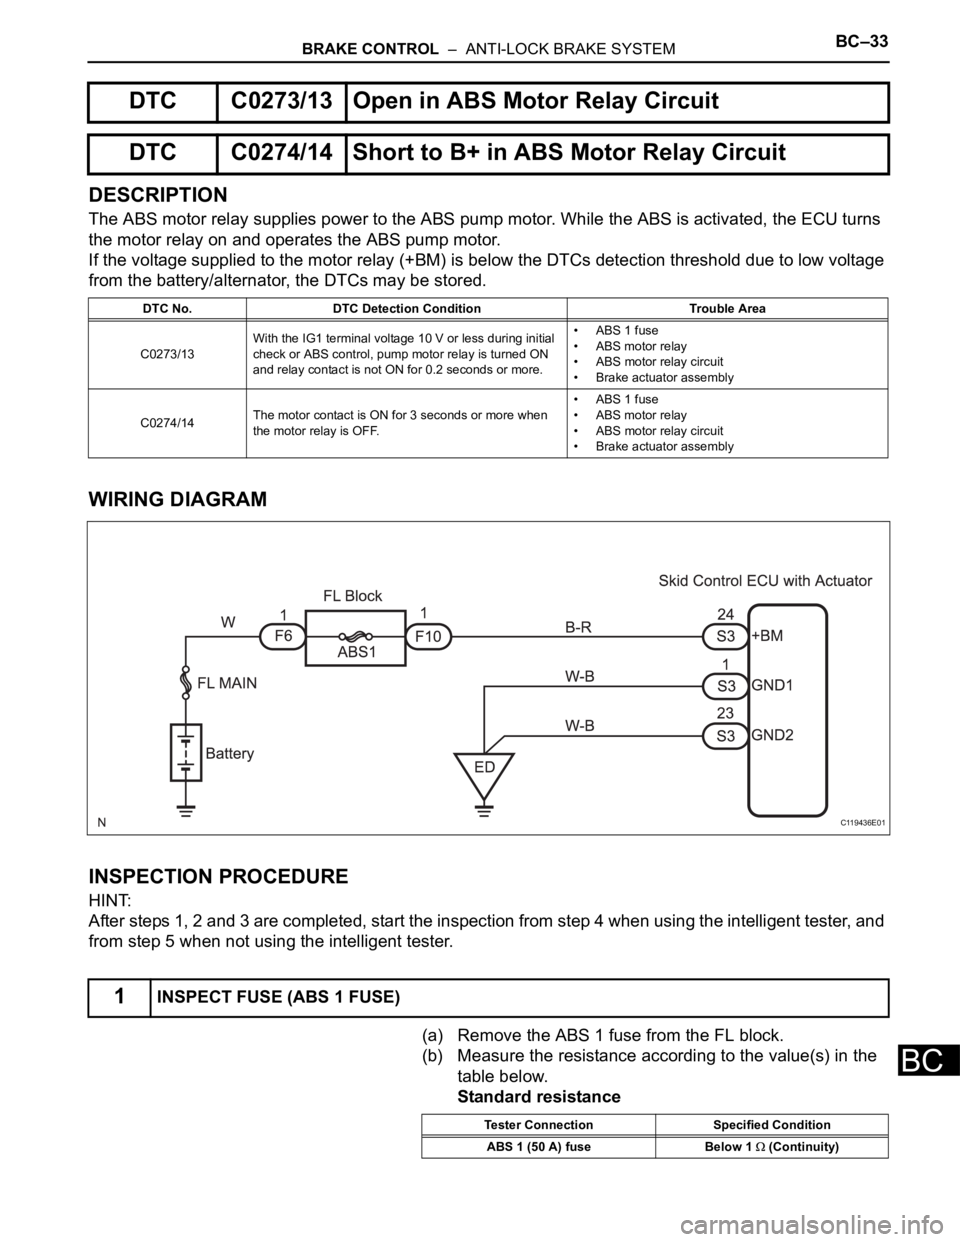
DESCRIPTION
The ABS motor relay supplies power to the ABS pump motor. While the ABS is activated, the ECU turns
the motor relay on and operates the ABS pump motor.
If the voltage supplied to the motor relay (+BM) is below the DTCs detection threshold due to low voltage
from the battery/alternator, the DTCs may be stored.
WIRING DIAGRAM
INSPECTION PROCEDURE
HINT:
After steps 1, 2 and 3 are completed, start the inspection from step 4 when using the intelligent tester, and
from step 5 when not using the intelligent tester.
(a) Remove the ABS 1 fuse from the FL block.
(b) Measure the resistance according to the value(s) in the
table below.
Standard resistance
DTC C0273/13 Open in ABS Motor Relay Circuit
DTC C0274/14 Short to B+ in ABS Motor Relay Circuit
DTC No. DTC Detection Condition Trouble Area
C0273/13With the IG1 terminal voltage 10 V or less during initial
check or ABS control, pump motor relay is turned ON
and relay contact is not ON for 0.2 seconds or more.• ABS 1 fuse
• ABS motor relay
• ABS motor relay circuit
• Brake actuator assembly
C0274/14The motor contact is ON for 3 seconds or more when
the motor relay is OFF.• ABS 1 fuse
• ABS motor relay
• ABS motor relay circuit
• Brake actuator assembly
1INSPECT FUSE (ABS 1 FUSE)
C119436E01
Tester Connection Specified Condition
ABS 1 (50 A) fuse Below 1
(Continuity)
Page 2572 of 3000
BC–34BRAKE CONTROL – ANTI-LOCK BRAKE SYSTEM
BC
NG
OK
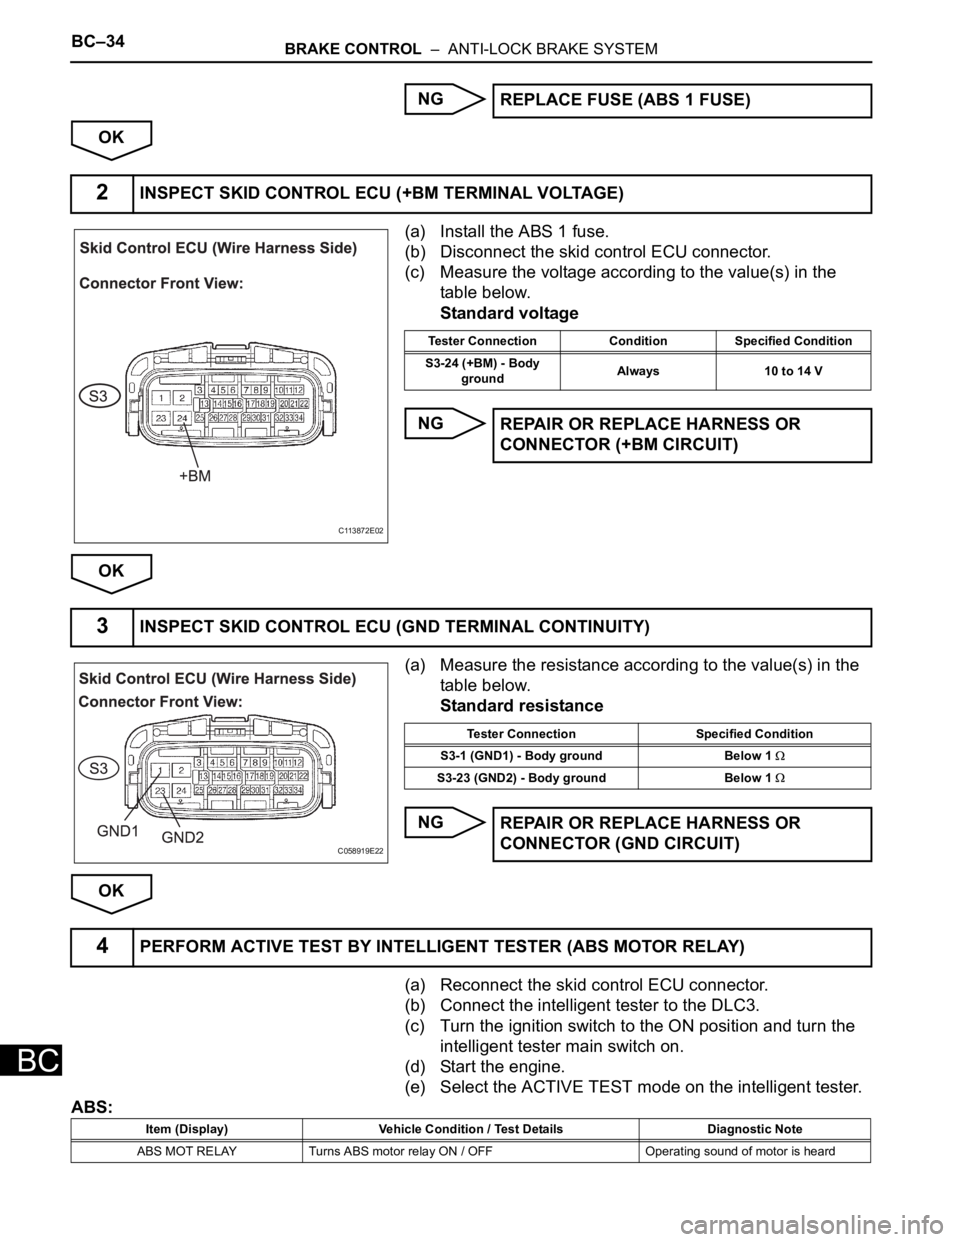
(a) Install the ABS 1 fuse.
(b) Disconnect the skid control ECU connector.
(c) Measure the voltage according to the value(s) in the
table below.
Standard voltage
NG
OK
(a) Measure the resistance according to the value(s) in the
table below.
Standard resistance
NG
OK
(a) Reconnect the skid control ECU connector.
(b) Connect the intelligent tester to the DLC3.
(c) Turn the ignition switch to the ON position and turn the
intelligent tester main switch on.
(d) Start the engine.
(e) Select the ACTIVE TEST mode on the intelligent tester.
ABS:REPLACE FUSE (ABS 1 FUSE)
2INSPECT SKID CONTROL ECU (+BM TERMINAL VOLTAGE)
C113872E02
Tester Connection Condition Specified Condition
S3-24 (+BM) - Body
groundAlways 10 to 14 V
REPAIR OR REPLACE HARNESS OR
CONNECTOR (+BM CIRCUIT)
3INSPECT SKID CONTROL ECU (GND TERMINAL CONTINUITY)
C058919E22
Tester Connection Specified Condition
S3-1 (GND1) - Body ground Below 1
S3-23 (GND2) - Body ground Below 1
REPAIR OR REPLACE HARNESS OR
CONNECTOR (GND CIRCUIT)
4PERFORM ACTIVE TEST BY INTELLIGENT TESTER (ABS MOTOR RELAY)
Item (Display) Vehicle Condition / Test Details Diagnostic Note
ABS MOT RELAY Turns ABS motor relay ON / OFF Operating sound of motor is heard
Page 2576 of 3000
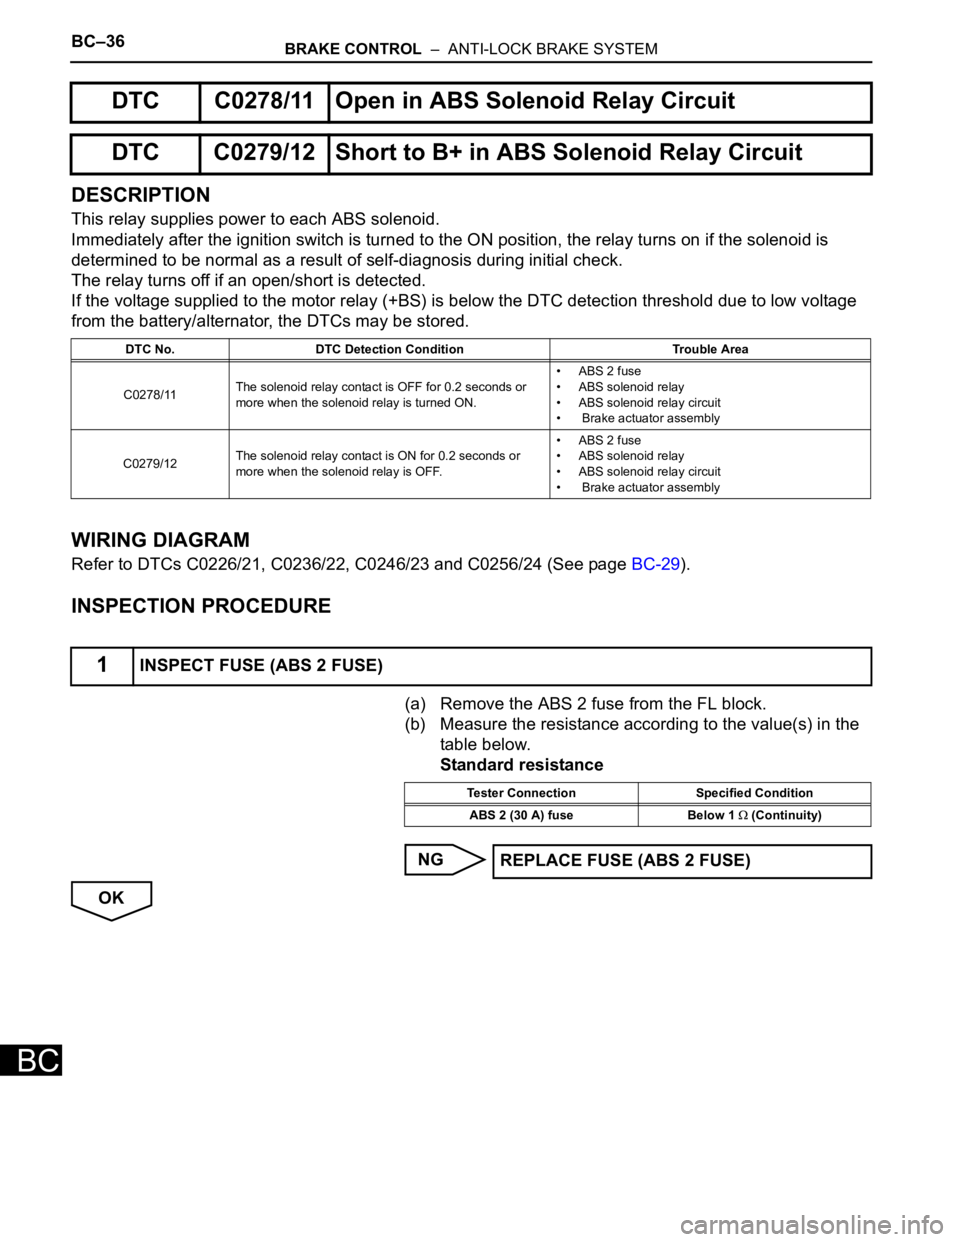
BC–36BRAKE CONTROL – ANTI-LOCK BRAKE SYSTEM
BC
DESCRIPTION
This relay supplies power to each ABS solenoid.
Immediately after the ignition switch is turned to the ON position, the relay turns on if the solenoid is
determined to be normal as a result of self-diagnosis during initial check.
The relay turns off if an open/short is detected.
If the voltage supplied to the motor relay (+BS) is below the DTC detection threshold due to low voltage
from the battery/alternator, the DTCs may be stored.
WIRING DIAGRAM
Refer to DTCs C0226/21, C0236/22, C0246/23 and C0256/24 (See page BC-29).
INSPECTION PROCEDURE
(a) Remove the ABS 2 fuse from the FL block.
(b) Measure the resistance according to the value(s) in the
table below.
Standard resistance
NG
OK
DTC C0278/11 Open in ABS Solenoid Relay Circuit
DTC C0279/12 Short to B+ in ABS Solenoid Relay Circuit
DTC No. DTC Detection Condition Trouble Area
C0278/11The solenoid relay contact is OFF for 0.2 seconds or
more when the solenoid relay is turned ON.• ABS 2 fuse
• ABS solenoid relay
• ABS solenoid relay circuit
• Brake actuator assembly
C0279/12The solenoid relay contact is ON for 0.2 seconds or
more when the solenoid relay is OFF.• ABS 2 fuse
• ABS solenoid relay
• ABS solenoid relay circuit
• Brake actuator assembly
1INSPECT FUSE (ABS 2 FUSE)
Tester Connection Specified Condition
ABS 2 (30 A) fuse Below 1
(Continuity)
REPLACE FUSE (ABS 2 FUSE)