2007 INFINITI QX56 display
[x] Cancel search: displayPage 2192 of 3061
![INFINITI QX56 2007 Factory Service Manual TROUBLE DIAGNOSIS
LAN-61
< SERVICE INFORMATION >[CAN]
C
D
E
F
G
H
I
J
L
MA
B
LAN
N
O
P
Component Parts LocationINFOID:0000000003533637
Harness LayoutINFOID:0000000003533638
Refer to PG-39, "Harness La INFINITI QX56 2007 Factory Service Manual TROUBLE DIAGNOSIS
LAN-61
< SERVICE INFORMATION >[CAN]
C
D
E
F
G
H
I
J
L
MA
B
LAN
N
O
P
Component Parts LocationINFOID:0000000003533637
Harness LayoutINFOID:0000000003533638
Refer to PG-39, "Harness La](/manual-img/42/57029/w960_57029-2191.png)
TROUBLE DIAGNOSIS
LAN-61
< SERVICE INFORMATION >[CAN]
C
D
E
F
G
H
I
J
L
MA
B
LAN
N
O
P
Component Parts LocationINFOID:0000000003533637
Harness LayoutINFOID:0000000003533638
Refer to PG-39, "Harness Layout".
Malfunction Area ChartINFOID:0000000003533639
MAIN LINE
BRANCH LINE
1. ECM E16 2. IPDM E/R E122 3. ICC sensor E42
4. Display control unit M95 5. Combination meter M24 6. ABS actuator and electric unit (con-
trol unit) E125
7. BCM M18 8. Data link connector M22 9. Steering angle sensor M47
10. Driver seat control unit P2 11. ICC unit B13 12. Air bag diagnosis sensor unit M35
13. A/T assembly F9 14. Front air control M50 15. Transfer control unit E142
BKIA0189E
Malfunction Area Reference
Main line between TCM and driver seat control unitLAN-62, "
Main Line Between TCM and Driver Seat Control Unit"
Main line between TCM and ICC sensorLAN-63, "Main Line Between TCM and ICC Sensor"
Main line between ICC sensor and ICC unitLAN-64, "Main Line Between ICC Sensor and ICC Unit"
Main line between ICC unit and driver seat control unitLAN-65, "Main Line Between ICC Unit and Driver Seat Control
Unit"
Main line between driver seat control unit and data link connectorLAN-65, "Main Line Between Driver Seat Control Unit and Data
Link Connector"
Main line between data link connector and ABS actuator and
electric unit (control unit)LAN-66, "Main Line Between Data Link Connector and ABS Ac-
tuator and Electric Unit (Control Unit)"
Malfunction Area Reference
ECM branch line circuit LAN-67, "
ECM Branch Line Circuit"
TCM branch line circuit LAN-67, "TCM Branch Line Circuit"
ICC sensor branch line circuit LAN-68, "ICC Sensor Branch Line Circuit"
ICC unit branch line circuit LAN-69, "ICC Unit Branch Line Circuit"
Driver seat control unit branch line circuitLAN-69, "Driver Seat Control Unit Branch Line Circuit"
Page 2193 of 3061
![INFINITI QX56 2007 Factory Service Manual LAN-62
< SERVICE INFORMATION >[CAN]
TROUBLE DIAGNOSIS
SHORT CIRCUIT
Main Line Between TCM and Driver Seat Control UnitINFOID:0000000003533640
INSPECTION PROCEDURE
1.CHECK CONNECTOR
1. Turn the ignitio INFINITI QX56 2007 Factory Service Manual LAN-62
< SERVICE INFORMATION >[CAN]
TROUBLE DIAGNOSIS
SHORT CIRCUIT
Main Line Between TCM and Driver Seat Control UnitINFOID:0000000003533640
INSPECTION PROCEDURE
1.CHECK CONNECTOR
1. Turn the ignitio](/manual-img/42/57029/w960_57029-2192.png)
LAN-62
< SERVICE INFORMATION >[CAN]
TROUBLE DIAGNOSIS
SHORT CIRCUIT
Main Line Between TCM and Driver Seat Control UnitINFOID:0000000003533640
INSPECTION PROCEDURE
1.CHECK CONNECTOR
1. Turn the ignition switch OFF.
2. Disconnect the battery cable from the negative terminal.
3. Check the following terminals and connectors for damage, bend and loose connection (connector side
and harness side).
- Harness connector F14
- Harness connector E5
- Harness connector E34
- Harness connector B40
OK or NG
OK >> GO TO 2.
NG >> Repair the terminal and connector.
2.CHECK HARNESS CONTINUITY (OPEN CIRCUIT)
1. Disconnect the connector of A/T assembly and the harness connectors F14 and E5.
2. Check the continuity between the A/T assembly harness connector and the harness connector.
OK or NG
OK >> GO TO 3.
NG >> Repair the main line between the A/T assembly and the harness connector F14.
3.CHECK HARNESS CONTINUITY (OPEN CIRCUIT)
1. Disconnect the harness connectors E34 and B40.
2. Check the continuity between harness connectors.
BCM branch line circuit LAN-70, "BCM Branch Line Circuit"
Display control unit branch line circuit LAN-70, "Display Control Unit Branch Line Circuit"
Data link connector branch line circuit LAN-71, "Data Link Connector Branch Line Circuit"
Front air control branch line circuitLAN-71, "Front Air Control Branch Line Circuit"
Combination meter branch line circuit LAN-72, "Combination Meter Branch Line Circuit"
Steering angle sensor branch line circuit LAN-72, "Steering Angle Sensor Branch Line Circuit"
Transfer control unit branch line circuitLAN-73, "Transfer Control Unit Branch Line Circuit"
ABS actuator and electric unit (control unit) branch line circuit LAN-74, "ABS Actuator and Electric Unit (Control Unit) Branch
Line Circuit"
IPDM E/R branch line circuit LAN-74, "IPDM E/R Branch Line Circuit"
Malfunction Area Reference
Malfunction Area Reference
CAN communication circuitLAN-75, "
CAN Communication Circuit"
A/T assembly harness connector Harness connector
Continuity
Connector No. Terminal No. Connector No. Terminal No.
F93
F145Yes
815Yes
Harness connector Harness connector
Continuity
Connector No. Terminal No. Connector No. Terminal No.
Page 2201 of 3061
![INFINITI QX56 2007 Factory Service Manual LAN-70
< SERVICE INFORMATION >[CAN]
TROUBLE DIAGNOSIS
OK or NG
OK >> GO TO 3.
NG >> Repair the driver seat control unit branch line.
3.CHECK POWER SUPPLY AND GROUND CIRCUIT
Check the power supply and INFINITI QX56 2007 Factory Service Manual LAN-70
< SERVICE INFORMATION >[CAN]
TROUBLE DIAGNOSIS
OK or NG
OK >> GO TO 3.
NG >> Repair the driver seat control unit branch line.
3.CHECK POWER SUPPLY AND GROUND CIRCUIT
Check the power supply and](/manual-img/42/57029/w960_57029-2200.png)
LAN-70
< SERVICE INFORMATION >[CAN]
TROUBLE DIAGNOSIS
OK or NG
OK >> GO TO 3.
NG >> Repair the driver seat control unit branch line.
3.CHECK POWER SUPPLY AND GROUND CIRCUIT
Check the power supply and the ground circuit of the driver seat control unit. Refer to SE-13, "
Schematic".
OK or NG
OK >> • Present error: Replace the driver seat control unit. Refer to SE-74, "Removal and Installation".
• Past error: Error was detected in the driver seat control unit branch line.
NG >> Repair the power supply and the ground circuit.
BCM Branch Line CircuitINFOID:0000000003533651
INSPECTION PROCEDURE
1.CHECK CONNECTOR
1. Turn the ignition switch OFF.
2. Disconnect the battery cable from the negative terminal.
3. Check the terminals and connectors of the BCM for damage, bend and loose connection (unit side and
connector side).
OK or NG
OK >> GO TO 2.
NG >> Repair the terminal and connector.
2.CHECK HARNESS FOR OPEN CIRCUIT
1. Disconnect the connector of BCM.
2. Check the resistance between the BCM harness connector terminals.
OK or NG
OK >> GO TO 3.
NG >> Repair the BCM branch line.
3.CHECK POWER SUPPLY AND GROUND CIRCUIT
Check the power supply and the ground circuit of the BCM. Refer to BCS-8, "
Schematic".
OK or NG
OK >> • Present error: Replace the BCM. Refer to BCS-24, "BCM".
• Past error: Error was detected in the BCM branch line.
NG >> Repair the power supply and the ground circuit.
Display Control Unit Branch Line CircuitINFOID:0000000003533652
INSPECTION PROCEDURE
1.CHECK CONNECTOR
1. Turn the ignition switch OFF.
2. Disconnect the battery cable from the negative terminal.
3. Check the terminals and connectors of the display control unit for damage, bend and loose connection
(unit side and connector side).
OK or NG
OK >> GO TO 2.
NG >> Repair the terminal and connector.
2.CHECK HARNESS FOR OPEN CIRCUIT
1. Disconnect the connector of display control unit.
BCM harness connector
Resistance (Ω)
Connector No. Terminal No.
M18 39 40 Approx. 54 – 66
Page 2202 of 3061
![INFINITI QX56 2007 Factory Service Manual TROUBLE DIAGNOSIS
LAN-71
< SERVICE INFORMATION >[CAN]
C
D
E
F
G
H
I
J
L
MA
B
LAN
N
O
P
2. Check the resistance between the display control unit harness connector terminals.
OK or NG
OK >> GO TO 3.
NG INFINITI QX56 2007 Factory Service Manual TROUBLE DIAGNOSIS
LAN-71
< SERVICE INFORMATION >[CAN]
C
D
E
F
G
H
I
J
L
MA
B
LAN
N
O
P
2. Check the resistance between the display control unit harness connector terminals.
OK or NG
OK >> GO TO 3.
NG](/manual-img/42/57029/w960_57029-2201.png)
TROUBLE DIAGNOSIS
LAN-71
< SERVICE INFORMATION >[CAN]
C
D
E
F
G
H
I
J
L
MA
B
LAN
N
O
P
2. Check the resistance between the display control unit harness connector terminals.
OK or NG
OK >> GO TO 3.
NG >> Repair the display control unit branch line.
3.CHECK POWER SUPPLY AND GROUND CIRCUIT
Check the power supply and the ground circuit of the display control unit. Refer to AV-85, "
Schematic".
OK or NG
OK >> • Present error: Replace the display control unit. Refer to AV-145, "Removal and Installation".
• Past error: Error was detected in the display control unit branch line.
NG >> Repair the power supply and the ground circuit.
Data Link Connector Branch Line CircuitINFOID:0000000003533653
INSPECTION PROCEDURE
1.CHECK CONNECTOR
1. Turn the ignition switch OFF.
2. Disconnect the battery cable from the negative terminal.
3. Check the terminals and connectors of the data link connector for damage, bend and loose connection
(connector side and harness side).
OK or NG
OK >> GO TO 2.
NG >> Repair the terminal and connector.
2.CHECK HARNESS FOR OPEN CIRCUIT
Check the resistance between the data link connector terminals.
OK or NG
OK >> • Present error: Check the following items again.
- Decision of CAN system type.
- Not received CONSULT-II data (SELECT SYSTEM, SELF-DIAG RESULTS, CAN DIAG SUP-
PORT MNTR).
- Not copied from on-board diagnosis.
- Procedure for detecting root cause.
• Past error: Error was detected in the data link connector branch line circuit.
NG >> Repair the data link connector branch line.
Front Air Control Branch Line CircuitINFOID:0000000003533654
INSPECTION PROCEDURE
1.CHECK CONNECTOR
1. Turn the ignition switch OFF.
2. Disconnect the battery cable from the negative terminal.
3. Check the terminals and connectors of the front air control for damage, bend and loose connection (unit
side and connector side).
OK or NG
OK >> GO TO 2.
NG >> Repair the terminal and connector.
Display control unit harness connector
Resistance (Ω)
Connector No. Terminal No.
M95 25 26 Approx. 54 – 66
Data link connector
Resistance (Ω)
Connector No. Terminal No.
M22 6 14 Approx. 54 – 66
Page 2219 of 3061

LT-12
< SERVICE INFORMATION >
HEADLAMP (FOR USA)
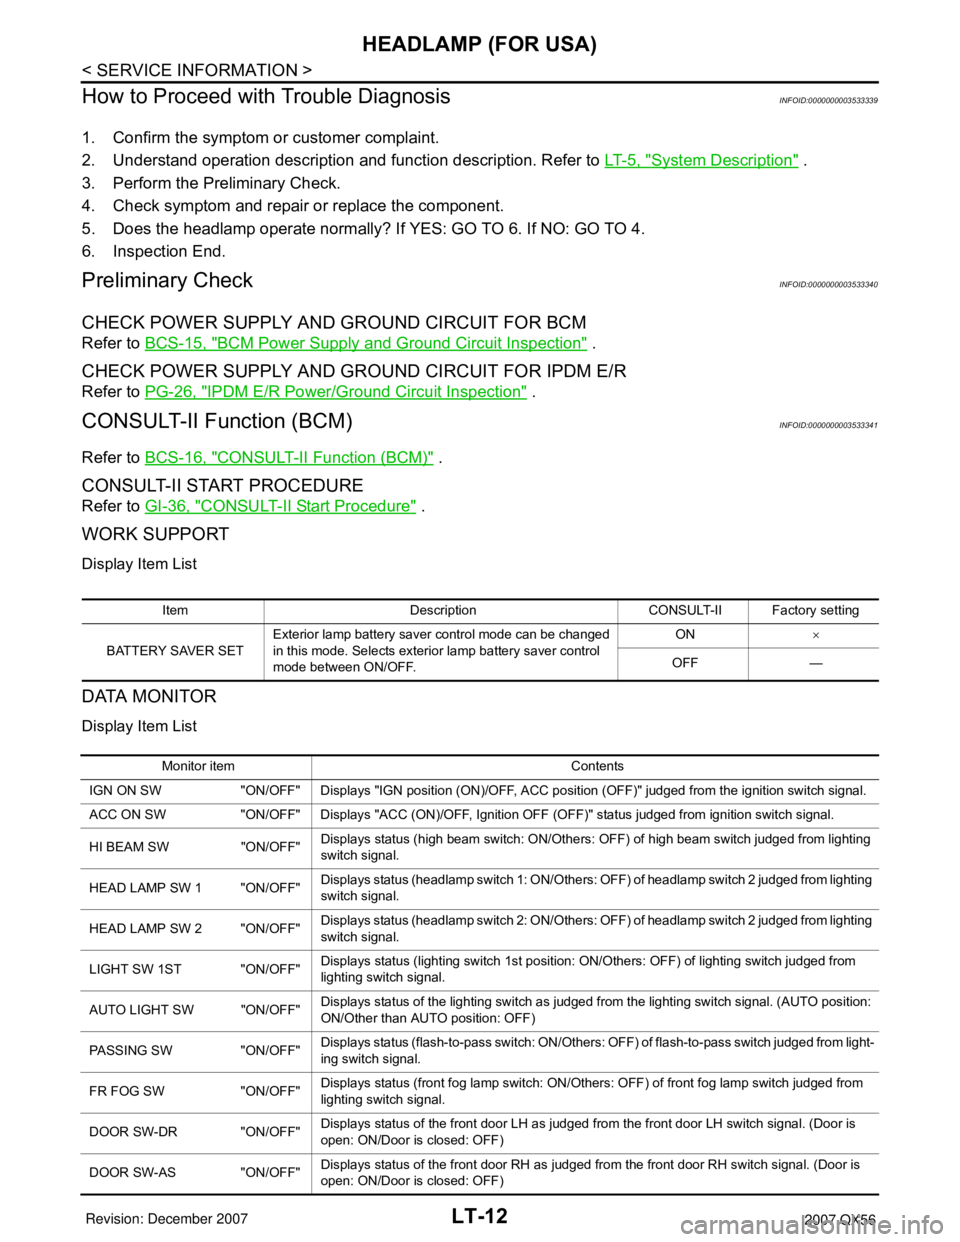
How to Proceed with Trouble Diagnosis
INFOID:0000000003533339
1. Confirm the symptom or customer complaint.
2. Understand operation description and function description. Refer to LT- 5 , "
System Description" .
3. Perform the Preliminary Check.
4. Check symptom and repair or replace the component.
5. Does the headlamp operate normally? If YES: GO TO 6. If NO: GO TO 4.
6. Inspection End.
Preliminary CheckINFOID:0000000003533340
CHECK POWER SUPPLY AND GROUND CIRCUIT FOR BCM
Refer to BCS-15, "BCM Power Supply and Ground Circuit Inspection" .
CHECK POWER SUPPLY AND GROUND CIRCUIT FOR IPDM E/R
Refer to PG-26, "IPDM E/R Power/Ground Circuit Inspection" .
CONSULT-II Function (BCM)INFOID:0000000003533341
Refer to BCS-16, "CONSULT-II Function (BCM)" .
CONSULT-II START PROCEDURE
Refer to GI-36, "CONSULT-II Start Procedure" .
WORK SUPPORT
Display Item List
DATA MONITOR
Display Item List
Item Description CONSULT-II Factory setting
BATTERY SAVER SETExterior lamp battery saver control mode can be changed
in this mode. Selects exterior lamp battery saver control
mode between ON/OFF.ON×
OFF —
Monitor item Contents
IGN ON SW "ON/OFF" Displays "IGN position (ON)/OFF, ACC position (OFF)" judged from the ignition switch signal.
ACC ON SW "ON/OFF" Displays "ACC (ON)/OFF, Ignition OFF (OFF)" status judged from ignition switch signal.
HI BEAM SW "ON/OFF"Displays status (high beam switch: ON/Others: OFF) of high beam switch judged from lighting
switch signal.
HEAD LAMP SW 1 "ON/OFF"Displays status (headlamp switch 1: ON/Others: OFF) of headlamp switch 2 judged from lighting
switch signal.
HEAD LAMP SW 2 "ON/OFF"Displays status (headlamp switch 2: ON/Others: OFF) of headlamp switch 2 judged from lighting
switch signal.
LIGHT SW 1ST "ON/OFF"Displays status (lighting switch 1st position: ON/Others: OFF) of lighting switch judged from
lighting switch signal.
AUTO LIGHT SW "ON/OFF"Displays status of the lighting switch as judged from the lighting switch signal. (AUTO position:
ON/Other than AUTO position: OFF)
PASSING SW "ON/OFF"Displays status (flash-to-pass switch: ON/Others: OFF) of flash-to-pass switch judged from light-
ing switch signal.
FR FOG SW "ON/OFF"Displays status (front fog lamp switch: ON/Others: OFF) of front fog lamp switch judged from
lighting switch signal.
DOOR SW-DR "ON/OFF"Displays status of the front door LH as judged from the front door LH switch signal. (Door is
open: ON/Door is closed: OFF)
DOOR SW-AS "ON/OFF"Displays status of the front door RH as judged from the front door RH switch signal. (Door is
open: ON/Door is closed: OFF)
Page 2220 of 3061

HEADLAMP (FOR USA)
LT-13
< SERVICE INFORMATION >
C
D
E
F
G
H
I
J
L
MA
B
LT
N
O
P
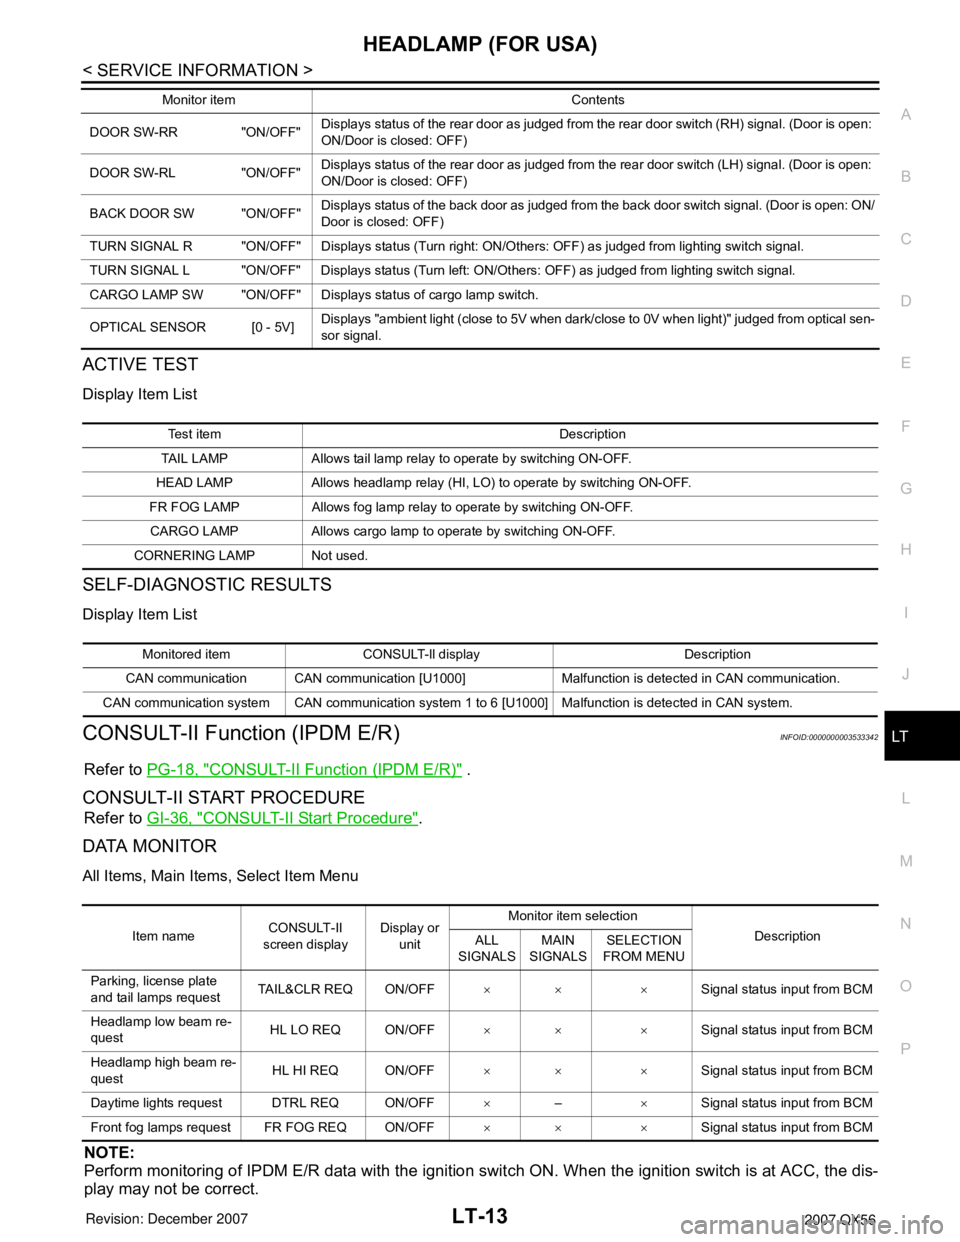
ACTIVE TEST
Display Item List
SELF-DIAGNOSTIC RESULTS
Display Item List
CONSULT-II Function (IPDM E/R)INFOID:0000000003533342
Refer to PG-18, "CONSULT-II Function (IPDM E/R)" .
CONSULT-II START PROCEDURE
Refer to GI-36, "CONSULT-II Start Procedure".
DATA MONITOR
All Items, Main Items, Select Item Menu
NOTE:
Perform monitoring of IPDM E/R data with the ignition switch ON. When the ignition switch is at ACC, the dis-
play may not be correct.
DOOR SW-RR "ON/OFF"Displays status of the rear door as judged from the rear door switch (RH) signal. (Door is open:
ON/Door is closed: OFF)
DOOR SW-RL "ON/OFF"Displays status of the rear door as judged from the rear door switch (LH) signal. (Door is open:
ON/Door is closed: OFF)
BACK DOOR SW "ON/OFF"Displays status of the back door as judged from the back door switch signal. (Door is open: ON/
Door is closed: OFF)
TURN SIGNAL R "ON/OFF" Displays status (Turn right: ON/Others: OFF) as judged from lighting switch signal.
TURN SIGNAL L "ON/OFF" Displays status (Turn left: ON/Others: OFF) as judged from lighting switch signal.
CARGO LAMP SW "ON/OFF" Displays status of cargo lamp switch.
OPTICAL SENSOR [0 - 5V] Displays "ambient light (close to 5V when dark/close to 0V when light)" judged from optical sen-
sor signal. Monitor item Contents
Te s t i t e m D e s c r i p t i o n
TAIL LAMP Allows tail lamp relay to operate by switching ON-OFF.
HEAD LAMP Allows headlamp relay (HI, LO) to operate by switching ON-OFF.
FR FOG LAMP Allows fog lamp relay to operate by switching ON-OFF.
CARGO LAMP Allows cargo lamp to operate by switching ON-OFF.
CORNERING LAMP Not used.
Monitored item CONSULT-ll display Description
CAN communication CAN communication [U1000] Malfunction is detected in CAN communication.
CAN communication system CAN communication system 1 to 6 [U1000] Malfunction is detected in CAN system.
Item nameCONSULT-II
screen displayDisplay or
unitMonitor item selection
Description
ALL
SIGNALSMAIN
SIGNALSSELECTION
FROM MENU
Parking, license plate
and tail lamps requestTAIL&CLR REQ ON/OFF×× ×Signal status input from BCM
Headlamp low beam re-
questHL LO REQ ON/OFF×× ×Signal status input from BCM
Headlamp high beam re-
questHL HI REQ ON/OFF×× ×Signal status input from BCM
Daytime lights request DTRL REQ ON/OFF×–×Signal status input from BCM
Front fog lamps request FR FOG REQ ON/OFF×× ×Signal status input from BCM
Page 2221 of 3061

LT-14
< SERVICE INFORMATION >
HEADLAMP (FOR USA)
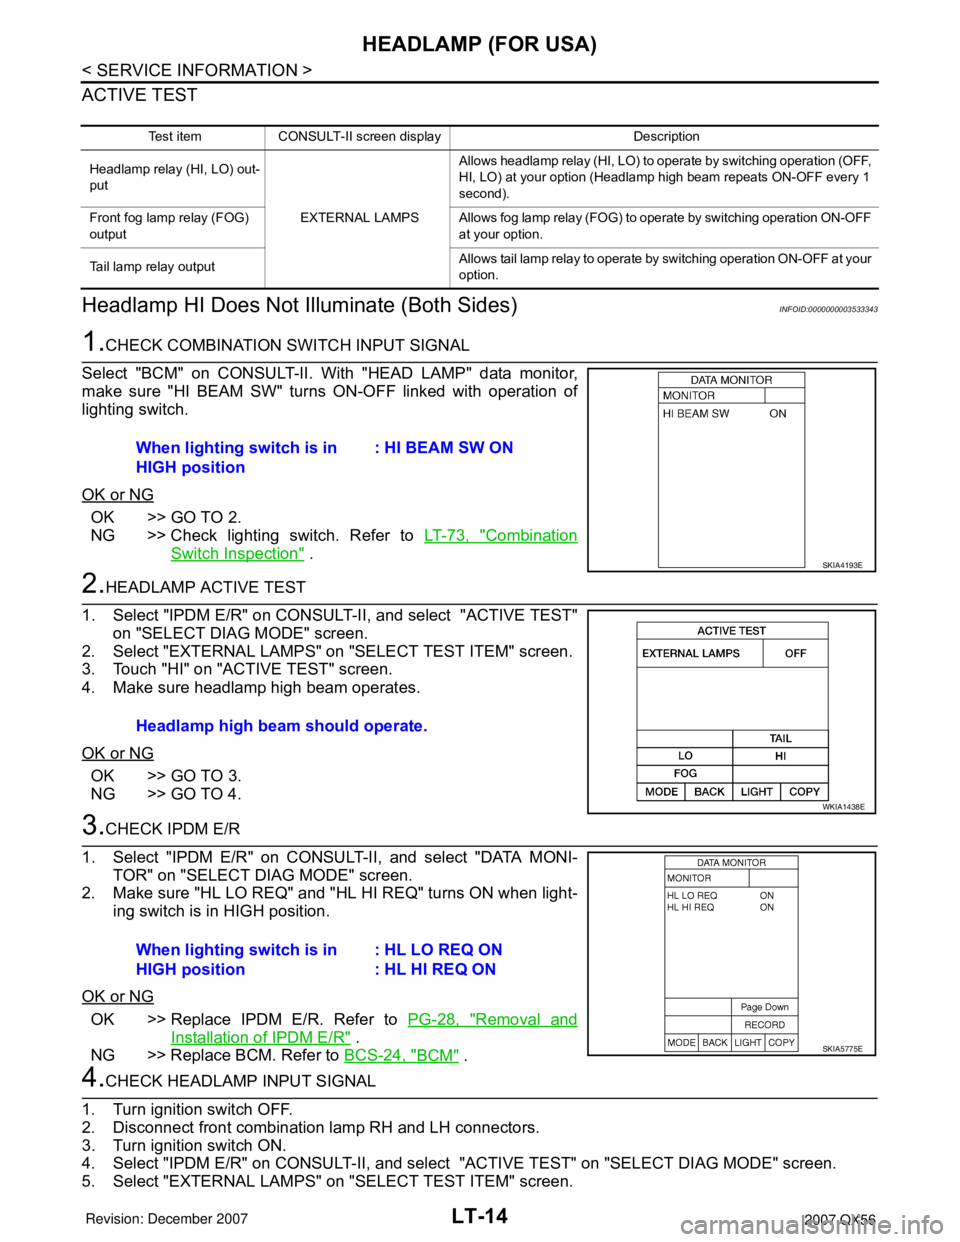
ACTIVE TEST
Headlamp HI Does Not Illuminate (Both Sides)INFOID:0000000003533343
1.CHECK COMBINATION SWITCH INPUT SIGNAL
Select "BCM" on CONSULT-II. With "HEAD LAMP" data monitor,
make sure "HI BEAM SW" turns ON-OFF linked with operation of
lighting switch.
OK or NG
OK >> GO TO 2.
NG >> Check lighting switch. Refer to LT-73, "
Combination
Switch Inspection" .
2.HEADLAMP ACTIVE TEST
1. Select "IPDM E/R" on CONSULT-II, and select "ACTIVE TEST"
on "SELECT DIAG MODE" screen.
2. Select "EXTERNAL LAMPS" on "SELECT TEST ITEM" screen.
3. Touch "HI" on "ACTIVE TEST" screen.
4. Make sure headlamp high beam operates.
OK or NG
OK >> GO TO 3.
NG >> GO TO 4.
3.CHECK IPDM E/R
1. Select "IPDM E/R" on CONSULT-II, and select "DATA MONI-
TOR" on "SELECT DIAG MODE" screen.
2. Make sure "HL LO REQ" and "HL HI REQ" turns ON when light-
ing switch is in HIGH position.
OK or NG
OK >> Replace IPDM E/R. Refer to PG-28, "Removal and
Installation of IPDM E/R" .
NG >> Replace BCM. Refer to BCS-24, "
BCM" .
4.CHECK HEADLAMP INPUT SIGNAL
1. Turn ignition switch OFF.
2. Disconnect front combination lamp RH and LH connectors.
3. Turn ignition switch ON.
4. Select "IPDM E/R" on CONSULT-II, and select "ACTIVE TEST" on "SELECT DIAG MODE" screen.
5. Select "EXTERNAL LAMPS" on "SELECT TEST ITEM" screen.
Test item CONSULT-II screen display Description
Headlamp relay (HI, LO) out-
put
EXTERNAL LAMPSAllows headlamp relay (HI, LO) to operate by switching operation (OFF,
HI, LO) at your option (Headlamp high beam repeats ON-OFF every 1
second).
Front fog lamp relay (FOG)
outputAllows fog lamp relay (FOG) to operate by switching operation ON-OFF
at your option.
Tail lamp relay outputAllows tail lamp relay to operate by switching operation ON-OFF at your
option.
When lighting switch is in
HIGH position: HI BEAM SW ON
SKIA4193E
Headlamp high beam should operate.
WKIA1438E
When lighting switch is in
HIGH position: HL LO REQ ON
: HL HI REQ ON
SKIA5775E
Page 2227 of 3061

LT-20
< SERVICE INFORMATION >
HEADLAMP (FOR USA)
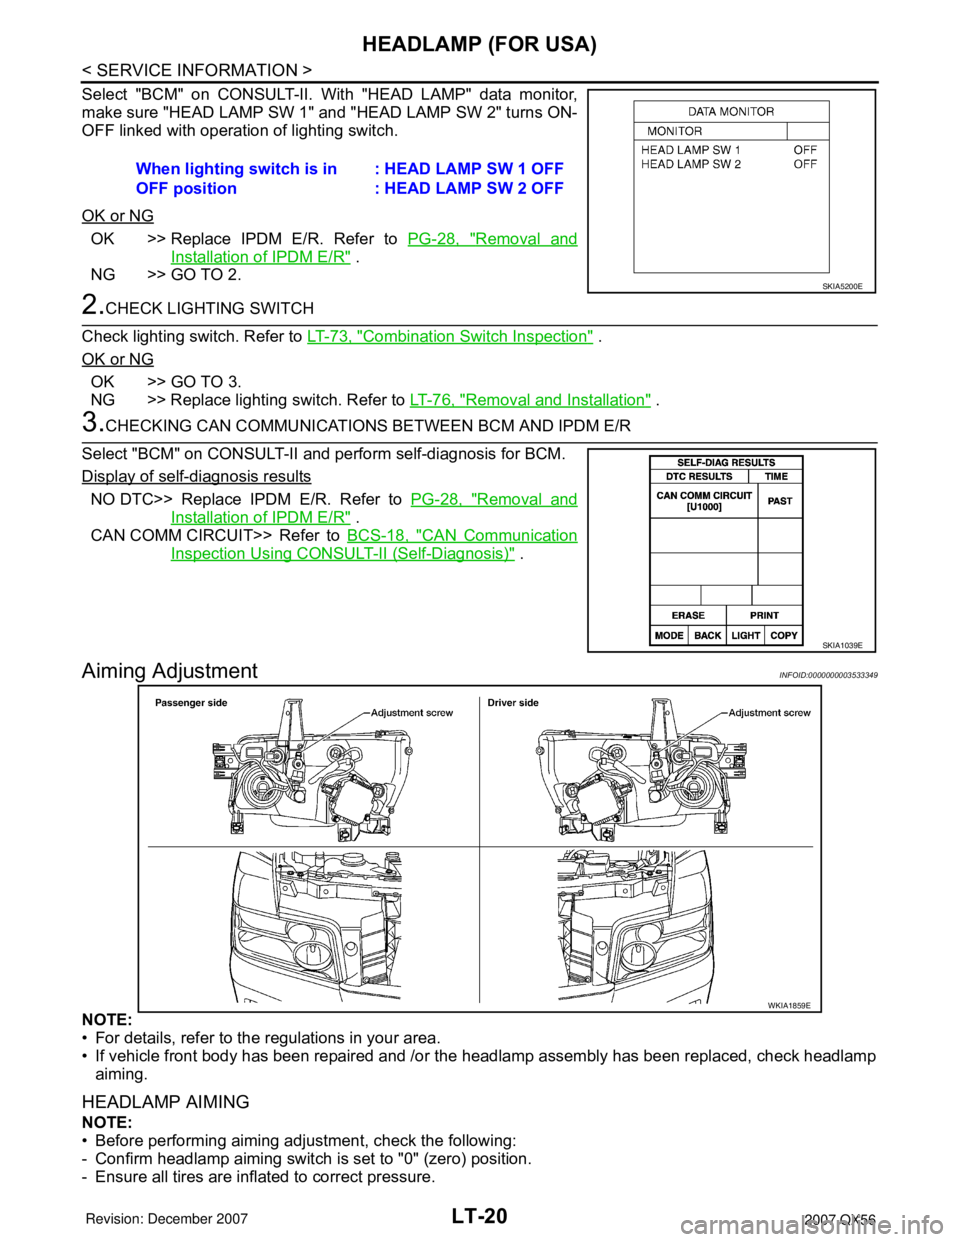
Select "BCM" on CONSULT-II. With "HEAD LAMP" data monitor,
make sure "HEAD LAMP SW 1" and "HEAD LAMP SW 2" turns ON-
OFF linked with operation of lighting switch.
OK or NG
OK >> Replace IPDM E/R. Refer to PG-28, "Removal and
Installation of IPDM E/R" .
NG >> GO TO 2.
2.CHECK LIGHTING SWITCH
Check lighting switch. Refer to LT-73, "
Combination Switch Inspection" .
OK or NG
OK >> GO TO 3.
NG >> Replace lighting switch. Refer to LT-76, "
Removal and Installation" .
3.CHECKING CAN COMMUNICATIONS BETWEEN BCM AND IPDM E/R
Select "BCM" on CONSULT-II and perform self-diagnosis for BCM.
Display of self-diagnosis results
NO DTC>> Replace IPDM E/R. Refer to PG-28, "Removal and
Installation of IPDM E/R" .
CAN COMM CIRCUIT>> Refer to BCS-18, "
CAN Communication
Inspection Using CONSULT-II (Self-Diagnosis)" .
Aiming AdjustmentINFOID:0000000003533349
NOTE:
• For details, refer to the regulations in your area.
• If vehicle front body has been repaired and /or the headlamp assembly has been replaced, check headlamp
aiming.
HEADLAMP AIMING
NOTE:
• Before performing aiming adjustment, check the following:
- Confirm headlamp aiming switch is set to "0" (zero) position.
- Ensure all tires are inflated to correct pressure.When lighting switch is in
OFF position: HEAD LAMP SW 1 OFF
: HEAD LAMP SW 2 OFF
SKIA5200E
SKIA1039E
WKIA1859E