Page 654 of 3229
Publi s hed: 11-May-2011
Engine - I6 3.2L Petrol - Valve Clearance Check
General Procedures
Special T ool(s) 303-1235
Hol der, Camshaft
• NOTE: Only the exhaus t cam shaft has adjus t abl e t appet s. 1. W ARNING: Make sure t o s upport the vehicle wit h axle
s tands .
Rais e and s upport t he vehi cl e.
1.
Remove t he cover and dis connect the bat tery ground cabl e.
Refer t o: Specificati ons (414-00 Bat tery and Charging Sys tem -
General Informat ion, Specificati ons).
2.
Remove t he camshaft bearing housi ng.
Refer t o: Val ve Cover (303-01A Engine - I6 3.2L Pet rol , Removal and
Inst all at ion).
3. Us ing t he s peci al t ools , posi ti on and s ecure the
exhaus t cams haft.
Speci al Tool (s ): 303-1235 4.
Us ing t he original bol t, i nst all t he camshaft sprocket and li ght ley
t ighten.
5.
For val ve cl earance dat a, refer t o s peci fi cat ions .
Refer t o: Specificati ons (303-01A Engine - I6 3.2L Petrol ,
Speci fi cat ions ).
6.
Page 656 of 3229
Publi s hed: 11-May-2011
Engine - I6 3.2L Petrol - Hydraulic Lash Adjuster Priming
General Procedures
• NOTE: Hydrauli c las h adjus ters are fi tt ed t o the intake cams haft only.
Check the engine oi l level .1.
If las h adjus ter nois e occurs when t he engi ne is st art ed, al low theengine t o warm at i dl e for 1 mi nut e (at -20 degrees cels ius al low theengine t o warm for 5 mi nut es).
2.
Run t he engi ne at 3500 RPM for 1 minut e.3.
All ow t he engine t o idl e for 30 seconds .4.
If the valve trai n nois e i s s ti ll pres ent, repeat t he above up to amaximum of 6 t imes .5.
Page 672 of 3229

Publi s hed: 11-May-2011
Engine - I6 3.2L Petrol - Camshafts
Removal and Inst all ati on
Removal
1. W ARNING: Make sure t o s upport the vehicle wit h axles tands .
Rais e and s upport t he vehi cl e.
1.
Remove t he cover and dis connect the bat tery ground cabl e.
Refer t o: Specificati ons (414-00 Bat tery and Charging Sys tem -General Informat ion, Specificati ons).
2.
Remove t he camshaft bearing housi ng.
Refer t o: Val ve Cover (303-01A Engine - I6 3.2L Pet rol , Removal andInst all at ion).
3.
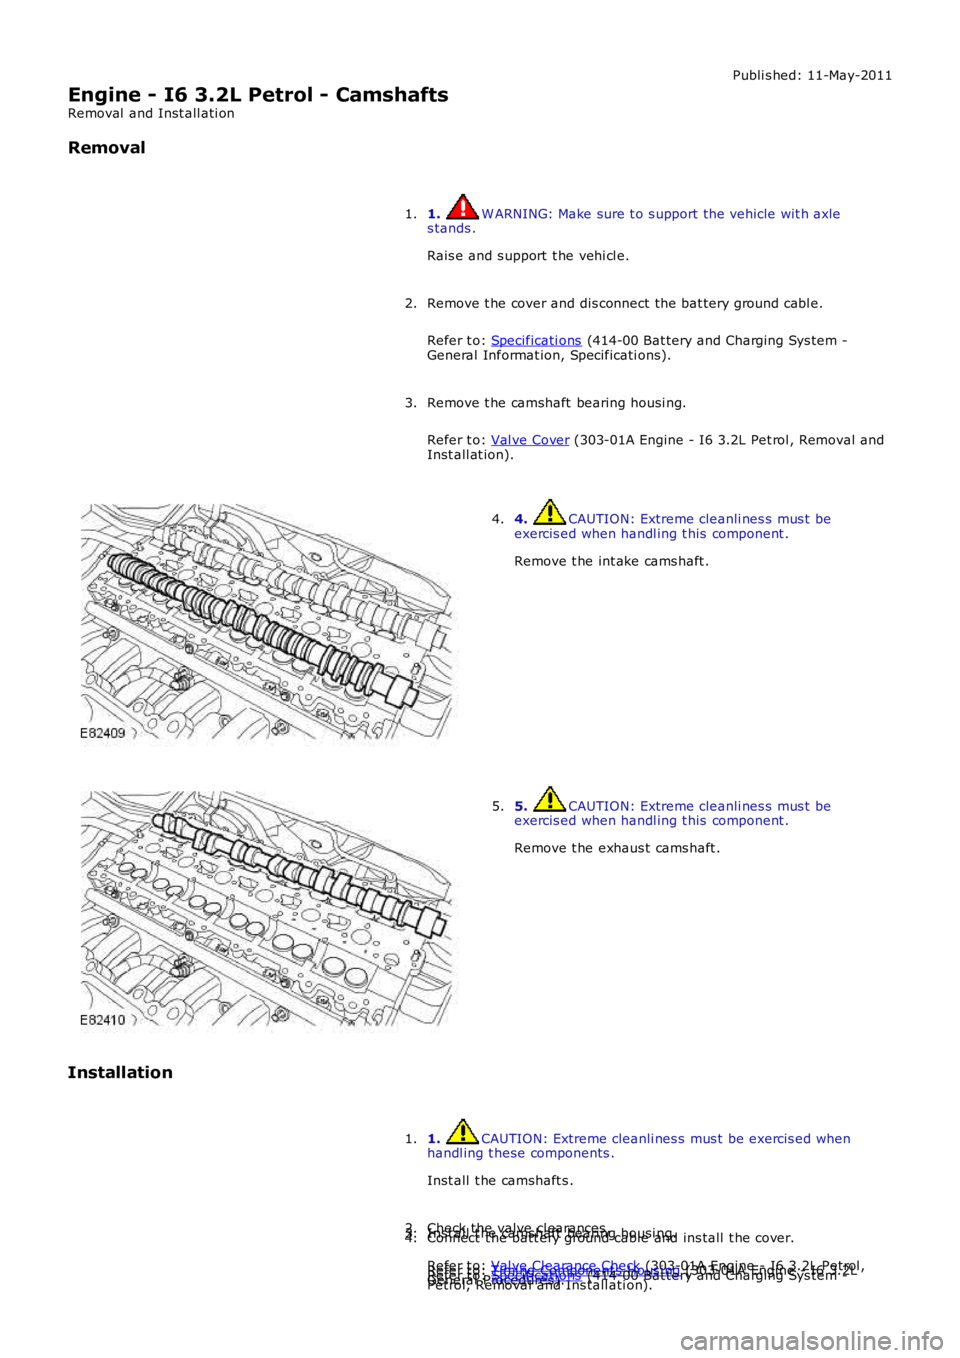
4. CAUTION: Extreme cleanli nes s mus t beexercis ed when handl ing t his component .
Remove t he int ake cams haft .
4.
5. CAUTION: Extreme cleanli nes s mus t beexercis ed when handl ing t his component .
Remove t he exhaus t cams haft .
5.
Installation
1. CAUTION: Extreme cleanli nes s mus t be exercis ed whenhandl ing t hese components .
Inst all t he camshaft s .
1.
Check the valve cl earances .
Refer t o: Val ve Clearance Check (303-01A Engine - I6 3.2L Petrol ,General Procedures).
2.Inst all t he camshaft bearing housi ng.
Refer t o: Timi ng Component s Hous i ng (303-01A Engine - I6 3.2LPetrol, Removal and Ins tall ati on).
3.Connect t he batt ery ground cable and ins tall t he cover.
Refer t o: Specificati ons (414-00 Bat tery and Charging Sys tem -
4.
Page 684 of 3229

Installation
Inst all t he dowel s .
1.
Clean and i nspect the cyli nder head and cylinder block.
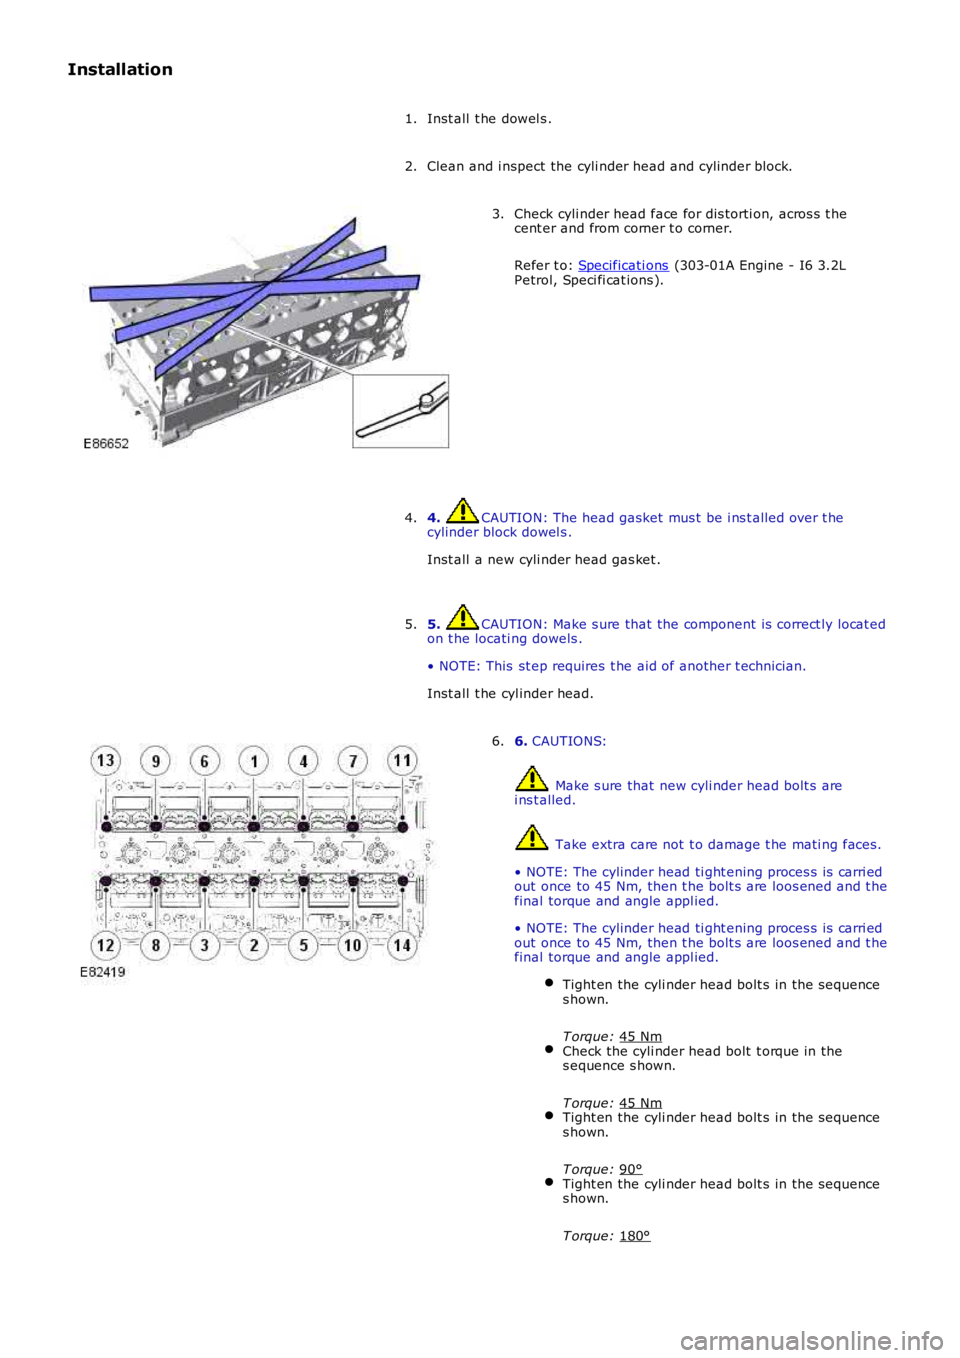
2. Check cyli nder head face for dis torti on, acros s t he
cent er and from corner t o corner.
Refer t o: Specificati ons (303-01A Engine - I6 3.2L
Petrol, Speci fi cat ions ).
3.
4. CAUTION: The head gasket mus t be i ns t alled over t he
cylinder block dowel s .
Inst all a new cyli nder head gas ket .
4.
5. CAUTION: Make s ure that the component is correct ly locat ed
on t he locati ng dowels .
• NOTE: This st ep requires t he aid of another t echnician.
Inst all t he cyl inder head.
5. 6.
CAUTIONS: Make s ure that new cyli nder head bolt s are
i ns t alled. Take extra care not t o damage t he mati ng faces .
• NOTE: The cylinder head ti ght ening proces s is carri ed
out once to 45 Nm, then t he bolt s are loos ened and t he
final torque and angle appl ied.
• NOTE: The cylinder head ti ght ening proces s is carri ed
out once to 45 Nm, then t he bolt s are loos ened and t he
final torque and angle appl ied.
Tight en the cyli nder head bolt s in the sequence
s hown.
T orque: 45 Nm Check the cyli nder head bolt t orque in the
s equence s hown.
T orque: 45 Nm Tight en the cyli nder head bolt s in the sequence
s hown.
T orque: 90° Tight en the cyli nder head bolt s in the sequence
s hown.
T orque: 180° 6.
Page 690 of 3229
Apply a bead of s ealant, 2.5 mm diamet er, t o t he area
i ndi cat ed.
3.
Inst all t he oil pan.
T orque: M7 17 Nm M10
45 Nm 4.
Secure t he cool ant rail .
T orque: 10 Nm 5.
Inst all t he int ake mani fol d.
T orque: 10 Nm 6.
7. CAUTION: Make s ure that new s ealing was hers are i nst all ed.
Inst all t he lubri cant drai n plug.
T orque: 38 Nm 7.
Fil l the engine wit h oil .
8.
Inst all t he s tart er mot or.
Refer t o: Start er Motor (303-06A Starti ng Sys t em - I6 3.2L Pet rol ,
Removal and Ins tall ati on).
9.
Check and top-up the engine oi l.
10.
Connect t he batt ery ground cable and ins tall t he cover.
Refer t o: Specificati ons (414-00 Bat tery and Charging Sys tem -
General Informat ion, Specificati ons).
11.
Inst all t he dips ti ck tube.
T orque: 10 Nm 12.
Page 696 of 3229
Remove and dis card t he 2 gas ket s .
11.
Installation
Inst all new gas ket s .
1.
Inst all t he engi ne oil cool er.
T orque: 10 Nm 2.
Inst all t he hos e.
T orque: 10 Nm 3.
Inst all and t ighten t he engine oi l fil ter.
T orque: 5 Nm 4.
Inst all t he cool ant hos e.
5.
Inst all t he new gasket .
6.
Inst all t he dips ti ck tube.
T orque: 10 Nm 7.
Inst all t he int ake mani fol d as sembl y.
Refer t o: Int ake Mani fol d (303-01A Engi ne - I6 3.2L Petrol, Removal
and Inst all at ion).
8.
Fil l and bl eed the cooli ng s ys t em.
Refer t o: Cool ing Sys tem Drai ni ng, Fi lli ng and Bleeding (303-03A
Engine Cooli ng - I6 3.2L Petrol, General Procedures).
9.
Check and top-up the engine oi l if required.
10.
Page 697 of 3229
Publi s hed: 11-May-2011
Engine - I6 3.2L Petrol - Oil Filter Element
Removal and Inst all ati on
Removal
Releas e t he PAS fl uid reservoi r from t he bracket and ti e as ide.
1. Loosen t he element cover 4 compl ete t urns t o al low
engine oil t o drai n from the fil ter cover.
2. 3.
Installation Inst all t he oil fi lt er element.
1.
Inst all t he engi ne oil filt er.
T orque: 25 Nm 2.
Secure t he res ervoir.
3.
Check and top-up the engine oi l.
4.
Page 717 of 3229
Publi s hed: 11-May-2011
Engine - I6 3.2L Petrol - Engine Front Seal
Removal and Inst all ati on
Removal
1. W ARNING: Do not work on or under a vehi cle s upported onl yby a jack. Al ways support t he vehi cl e on s afet y s tands .
Rais e and s upport t he vehi cl e.
1.
Remove t he front wheel .
Refer t o: W heel and Ti re (204-04 W heel s and Tires, Removal andInst all at ion).
2.
Remove t he fender spl as h shi el d extens ion panel.3.
Remove t he cranks haft front oil s eal.4.
Installation
1. CAUTION: The oil s eal must be ins tal led dry.
Inst all t he cranks haft front oil s eal.
1.
Inst all t he fender spl as h shi el d extens ion panel.2.
Inst all t he front wheel .
Refer t o: W heel and Ti re (204-04 W heel s and Tires, Removal andInst all at ion).
3.
Check and top-up the engine oi l.4.