2006 LAND ROVER FRELANDER 2 reset
[x] Cancel search: resetPage 2864 of 3229
Fuel and refuelling
144
L
RUNNING OUT OF FUEL
Note: If the vehicle does run out of fuel, a
minimum of 4 litres (0 .8 gallons) will be
required to restart the engine. The vehicle will
need to be driven 1.6-5 km (1-3 miles) in order
to reset the engine management and
monitoring systems.
Note: If the vehicle does run out of fuel,
seeking qualified assistance is advisable.
FUEL CUT-OFF
The fuel system cut-off forms part of the
Supplementary Restraint System (SRS) fitted
to your vehicle. Following an impact, and
depending on the severity, the fuel pump may
be switched off.
Resetting the fuel cut-off
1. Switch the ignition off and wait for one
minute.
2. Turn the ignition on for 30 seconds.
3. Check the vehicle thor oughly for fuel leaks.
If a leak is detected switch the ignition off
immediately.
• Do not start the vehicle if a leak is
present. Seek qualifi ed advice, and have
the vehicle recovered.
4. If no leaks are detected, start the vehicle.
FUEL FILLER FLAP
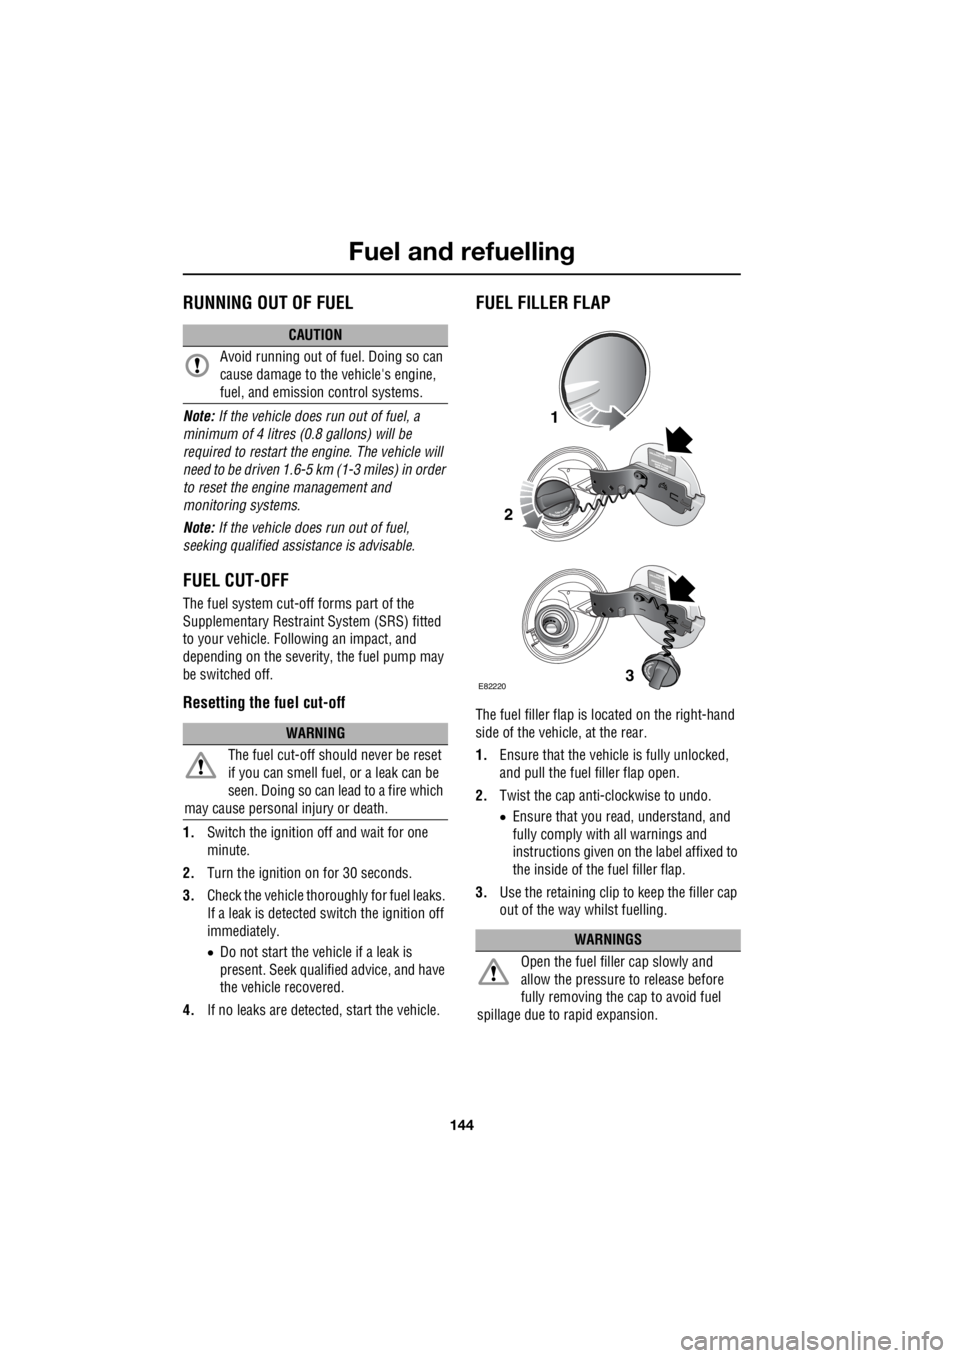
The fuel filler flap is located on the right-hand
side of the vehicle, at the rear.
1. Ensure that the vehicle is fully unlocked,
and pull the fuel filler flap open.
2. Twist the cap anti-clockwise to undo.
• Ensure that you re ad, understand, and
fully comply with all warnings and
instructions given on the label affixed to
the inside of the fuel filler flap.
3. Use the retaining clip to keep the filler cap
out of the way whilst fuelling.
CAUTION
Avoid running out of fuel. Doing so can
cause damage to the vehicle's engine,
fuel, and emission control systems.
WARNING
The fuel cut-off s hould never be reset
if you can smell fuel , or a leak can be
seen. Doing so can lead to a fire which
may cause personal injury or death.
WARNINGS
Open the fuel filler cap slowly and
allow the pressure to release before
fully removing the cap to avoid fuel
spillage due to rapid expansion.
1
2
3E82220
Page 2895 of 3229
175
Vehicle battery
R
Effects of disconnecting
Disconnecting the battery can affect a number
of vehicle systems, especially if there is
insufficient battery power prior to
disconnection. For example, the alarm may
trigger depending on it's state when the battery
was disconnected. If the alarm does sound,
use the remote control in the normal way to
disarm the security system. The windows may
need resetting to enable the one-shot feature to
operate correctly. See ELECTRIC WINDOWS
(page 93).
Replacement batteries
Battery disposal
Note: Used batteries must be disposed of
correctly as they contain a number of harmful
substances. Seek advice on disposal from your
Land Rover Dealer/Authoris ed Repairer, and/or
your local authority.
Refitting
A new battery should be supplied with plastic
terminal covers. Leave the covers in place
when fitting the battery, and remove them one
at a time to fit the battery cable clamps.
Refitting is an exact reversal of the removal
procedure. If you are in any doubt about fitting
a battery seek qualified assistance before
attempting to fit the battery.
WARNING
Only fit a battery of the correct type and
rating. Fitting an in correct battery may
result in a fire, or damage to the electrical
system. If you are in any doubt when fitting a
battery seek qualified assistance.
WARNING
When refitting the battery ensure that
no metal objects , or vehicle
components, come into contact with the
battery terminals. Metal objects can cause a
spark or short circuit, both of which may result
in an explosion.
CAUTIONS
Ensure that when fitting a battery to the
vehicle, the terminals and battery clamps
are clean, and lightly coated with petroleum
jelly. This will ensure good electrical
connections are made, and help to prevent
corrosion.
Always follow the battery manufacturers
instructions. Failure to do so may result
in damage to the vehicl e and/or the electrical
system.
Page 2925 of 3229
205
Status after a collision
R
Status after a collisionDRIVING AFTER A COLLISION
Before starting or driving
If the vehicle has been involved in an accident
it should be checke d thoroughly before
attempting to start the engine or drive the
vehicle.
Check for :-
• Fuel leaks.
• Fluid leaks.
• Battery damage.
• Damage to wiring.
• Damage to lights.
• Damage to steering, suspension, wheels
or tyres.
• Sharp or protruding bodywork.
• Operation of doors and locks.
• Condition and operation of seat belts and
SRS components.
• Condition of chil d seats and their
mounting/attach ment points.
Note: This list is not exhaustive.
Resetting the fuel cut-off
The fuel system cut-off forms part of the Safety
and Restraint System (SRS) fitted to your
vehicle. Following an im pact, and depending on
the severity, the fuel pump may be switched
off.
1. Switch the ignition off, and wait for one
minute.
2. Turn the ignition on for 30 seconds.
3. Check the vehicle thoroughly for fuel leaks.
If a leak is detected switch the ignition off
immediately.
• The vehicle must not be started if a leak
is present. Seek qualified advice, and
have the vehicle recovered.
4. If no leaks are detected, start the vehicle.
When driving
When driving a vehicle which has been
involved in a collision use caution and pay extra
attention to the operation of the vehicle. If any
changes in vehicle operati on after the collision
are noted when compared to it's operation
before the collision, do not continue to drive
the vehicle. Stop the vehicle as soon as it is
safe to do so, and have the vehicle recovered.
Pay particular attent ion to changes in :-
• Steering.
• Braking.
• Unusual noises.
• Warning lights or messages displayed.
• Problems with electrical systems.
WARNING
If the vehicle is involved in a collision it
should be checked by a Land Rover
Dealer/Authorised repairer, or suitably
qualified persons before starting or driving.
WARNING
The fuel cut-off s hould never be reset
if you can smell fuel , or a leak can be
seen. Doing so can lead to a fire which
may cause personal injury or death.
Page 2941 of 3229
221
Audio unit overview
R
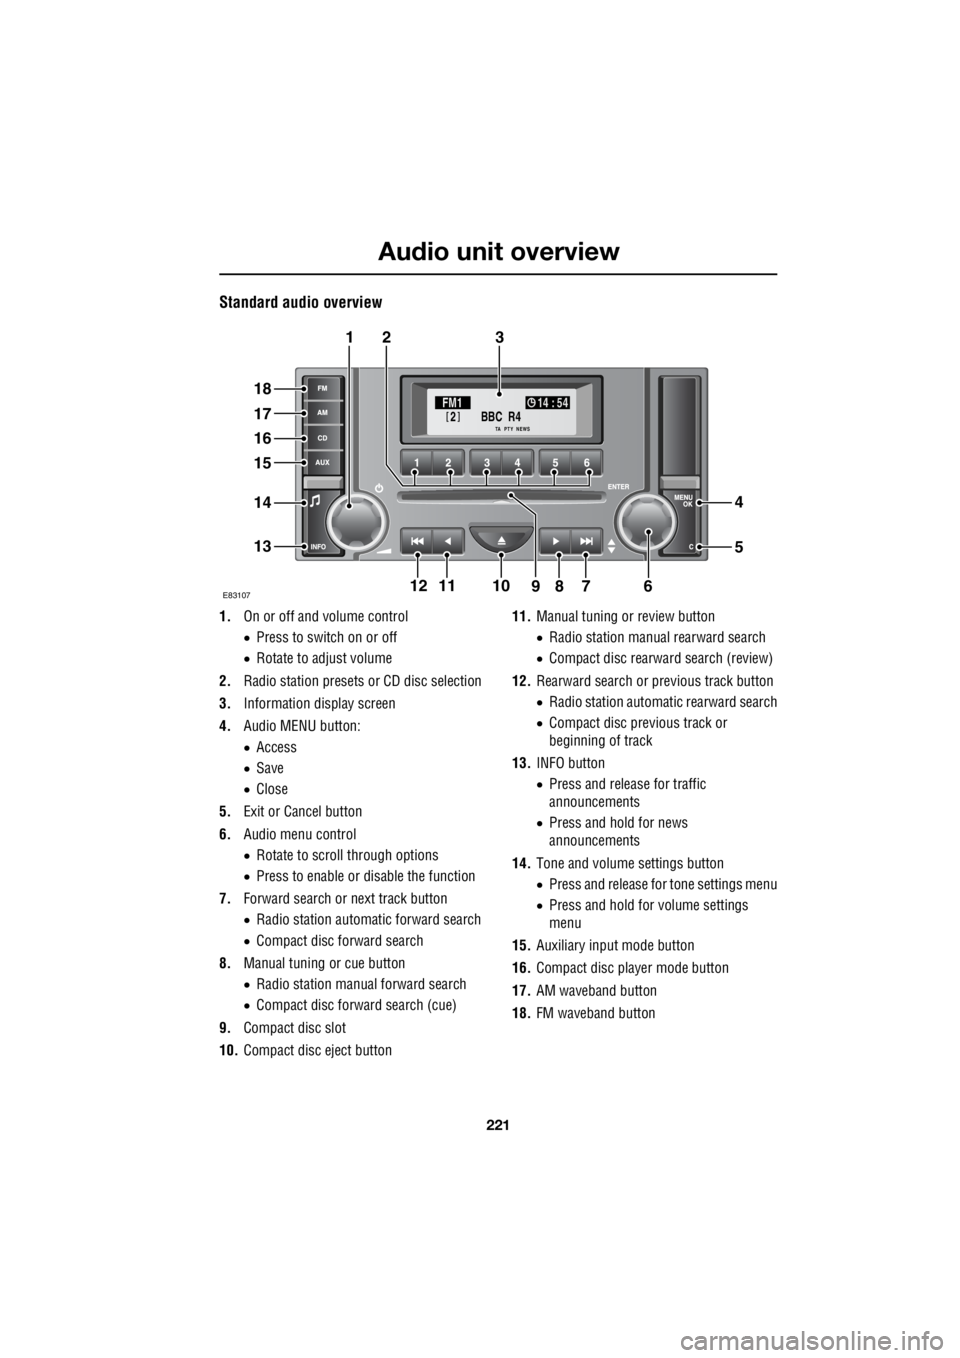
Standard audio overview
1. On or off and volume control
• Press to switch on or off
• Rotate to adjust volume
2. Radio station presets or CD disc selection
3. Information display screen
4. Audio MENU button:
• Access
• Save
• Close
5. Exit or Cancel button
6. Audio menu control
• Rotate to scroll through options
• Press to enable or disable the function
7. Forward search or next track button
• Radio station automatic forward search
• Compact disc forward search
8. Manual tuning or cue button
• Radio station manual forward search
• Compact disc forward search (cue)
9. Compact disc slot
10. Compact disc eject button 11.
Manual tuning or review button
• Radio station manua l rearward search
• Compact disc rearward search (review)
12. Rearward search or previous track button
• Radio station automatic rearward search
• Compact disc previous track or
beginning of track
13. INFO button
• Press and release for traffic
announcements
• Press and hold for news
announcements
14. Tone and volume settings button
• Press and release for tone settings menu
• Press and hold for volume settings
menu
15. Auxiliary input mode button
16. Compact disc player mode button
17. AM waveband button
18. FM waveband button
BBC R4
2FM1 14 : 54
TA NEWSPTY
E8310711
321
18
17
16
15
14
13
4
5
67891210
Page 2943 of 3229

223
Audio unit operation
R
Audio unit operationON OR OFF CONTROL
Press the on or off control to switch the audio
unit on. Press again to switch off.
VOLUME CONTROL
Rotate the volume control to increase or
decrease the audio unit volume. The volume
can be set between 0 and 35.
When the audio unit is turned on, the
previously set volume level will be
implemented.
Note: The standard audio unit can be used with
the engine off, but the maximum volume level
will be restricted.
Automatic Volume Control (AVC)
The AVC feature adjusts the volume level to
compensate for the changes in road noise as
the vehicle speed increases or decreases.
Note: The AVC setting represents the volume
increase and not the volume level.
If the AVC level is set to Off, there will be no
volume increase. With a low level setting, the
volume increase at speed will be minimal. If a
high level setting is used, there will be a
noticeable increase of volume at speed.
The AVC setting required will depend upon the
expected speed and the expected road
conditions.
Use the following proce dure to set the AVC
level.
1. Press and hold the tone button to access
the volume settings menu.
2. Press the tone button repeatedly until AVC
Level is displayed.
3. Rotate the volume control to select the
required AVC setting.
Reset volume settings
The following procedure will reset all of the
volume settings to the original factory values.
1. Press and hold the tone button to access
the volume settings menu.
2. Repeatedly press the tone button to scroll
through the menu until the Reset volume
settings message is displayed.
3. Rotate the volume control to highlight YES
or NO as required.
4. On premium audio un its, press the tone
button to confirm your choice and exit the
menu. On standard audio units, your
choice is confirme d by pressing the MENU
button.
AUDIO CONTROL
Depending on the specification of the audio
system fitted to your vehicle, the following
audio control settings are available from the
tone menu.
Surround sound settings
1. Press and release th e tone button to
display the current surround sound
setting.
2. Rotate the volume control to highlight 3
Channel or Stereo as required.
Bass response adjustment
1.Press the tone button repeatedly until the
current Bass setting is displayed.
2. Rotate the volume control to increase or
decrease the level.
Treble response adjustment
1. Press the tone button repeatedly until the
current Treble setting is displayed.
2. Rotate the volume control to increase or
decrease the level.
Page 2944 of 3229

Audio unit operation
224
L
Balance adjustment
1. Press the tone button repeatedly until the
current Balance setting is displayed.
2. Rotate the volume control to adjust sound
level to the right or left.
Fader adjustment
1. Press the tone button repeatedly until the
current Fader setting is displayed.
2. Rotate the volume control to adjust the
sound level to the front or rear.
Subwoofer settings
1. Press the tone button repeatedly until the
current Subwoofer setting is displayed.
2. Rotate the volume control to increase or
decrease the setting.
Centre speaker settings
1. Press the tone button repeatedly until the
current Centre setting is displayed.
2. Rotate the volume control to increase or
decrease the setting.
Resetting tone values
Use the following procedur e to return the tone
settings to the factory defaults.
1. Press the tone button repeatedly until the
Reset tone settings message is displayed.
2. Rotate the volume control to highlight YES
or NO as required.
3. On premium audio units, press the tone
button to confirm your choice. On
standard audio units, use the MENU
button.
All settings will be reset to the neutral (central)
value.
WAVEBAND BUTTON
To select the FM waveband, press and release
the FM button. Repeated presses will scroll
between FM1 and FM2. On standard audio
units FMa is also available. The selection will
be shown in the top left-hand corner of the
information display.
To select the AM waveband, press and release
the AM button. The selection will be shown in
the top left-hand corner of the information
display. On standard audio units, repeated
presses of the AM button will scroll through
MW1 , MWa , LW1 and LWa.
Page 2945 of 3229
225
Audio unit operation
R
AUTOSTORE CONTROL
Autostoring radio stations - Premium
audio
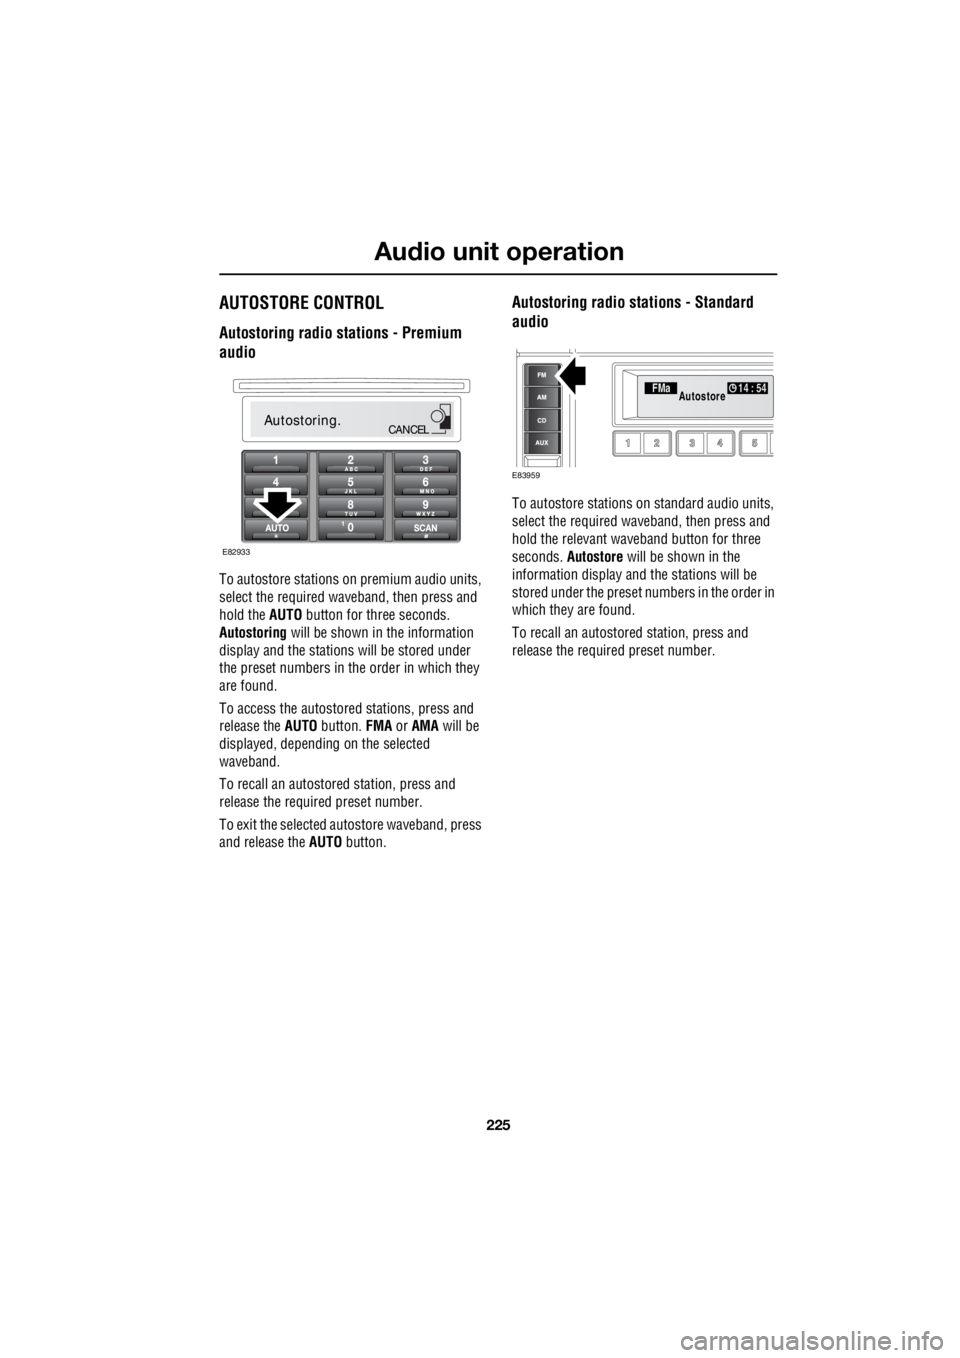
To autostore stations on premium audio units,
select the required wave band, then press and
hold the AUTO button for three seconds.
Autostoring will be shown in the information
display and the stations will be stored under
the preset numbers in the order in which they
are found.
To access the autostored stations, press and
release the AUTO button. FMA or AMA will be
displayed, depending on the selected
waveband.
To recall an autostored station, press and
release the required preset number.
To exit the selected autostore waveband, press
and release the AUTO button.
Autostoring radio stations - Standard
audio
To autostore stations on standard audio units,
select the required waveband, then press and
hold the relevant waveband button for three
seconds. Autostore will be shown in the
information display and the stations will be
stored under the preset num bers in the order in
which they are found.
To recall an autostored station, press and
release the required preset number.
Autostoring.CANCEL
E82933
FMa 14 : 54Autostore
E83959
Page 2946 of 3229
Audio unit operation
226
L
STATION PRESET BUTTONS
Premium audio
Standard audio
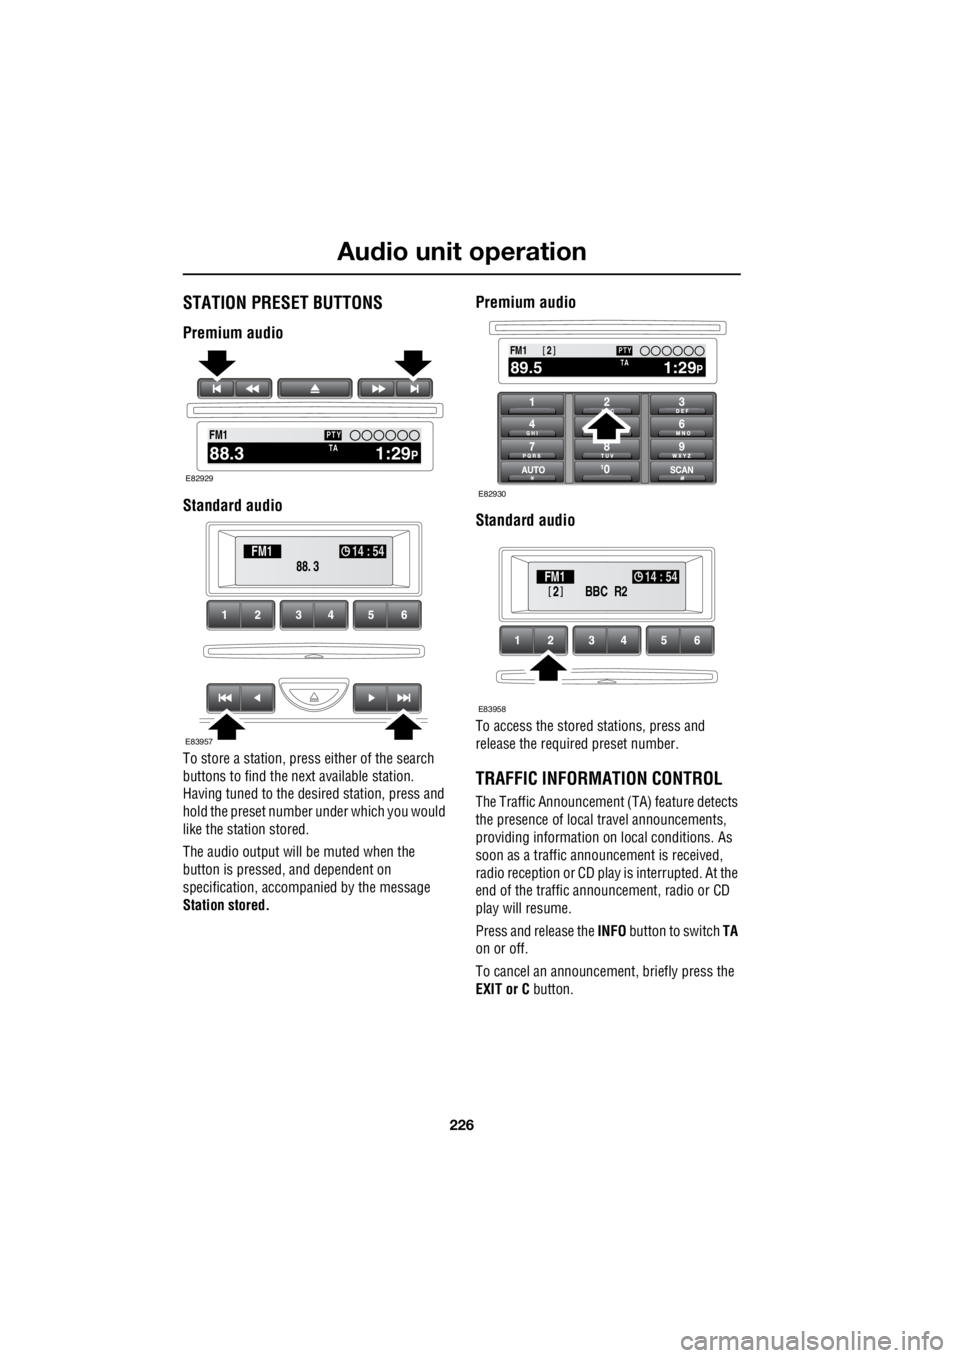
To store a station, press either of the search
buttons to find the next available station.
Having tuned to the desi red station, press and
hold the preset number under which you would
like the station stored.
The audio output will be muted when the
button is pressed, and dependent on
specification, accompanied by the message
Station stored.
Premium audio
Standard audio
To access the stored stations, press and
release the required preset number.
TRAFFIC INFORMATION CONTROL
The Traffic Announcement (TA) feature detects
the presence of local travel announcements,
providing information on local conditions. As
soon as a traffic announcement is received,
radio reception or CD play is interrupted. At the
end of the traffic announcement, radio or CD
play will resume.
Press and release the INFO button to switch TA
on or off.
To cancel an announcement, briefly press the
EXIT or C button.
2100.71234 6
NEWS
FM1
1:29PTA88.3
PTY
E82929
88. 3
FM1
14 : 54
E83957
100.71234 6
NEWS
FM1
1:29PTA89.5
PTY2
E82930
BBC R2
2FM1 14 : 54
E83958