2006 LAND ROVER FRELANDER 2 reset
[x] Cancel search: resetPage 2375 of 3229
1
1
2
1
2
3
4
1
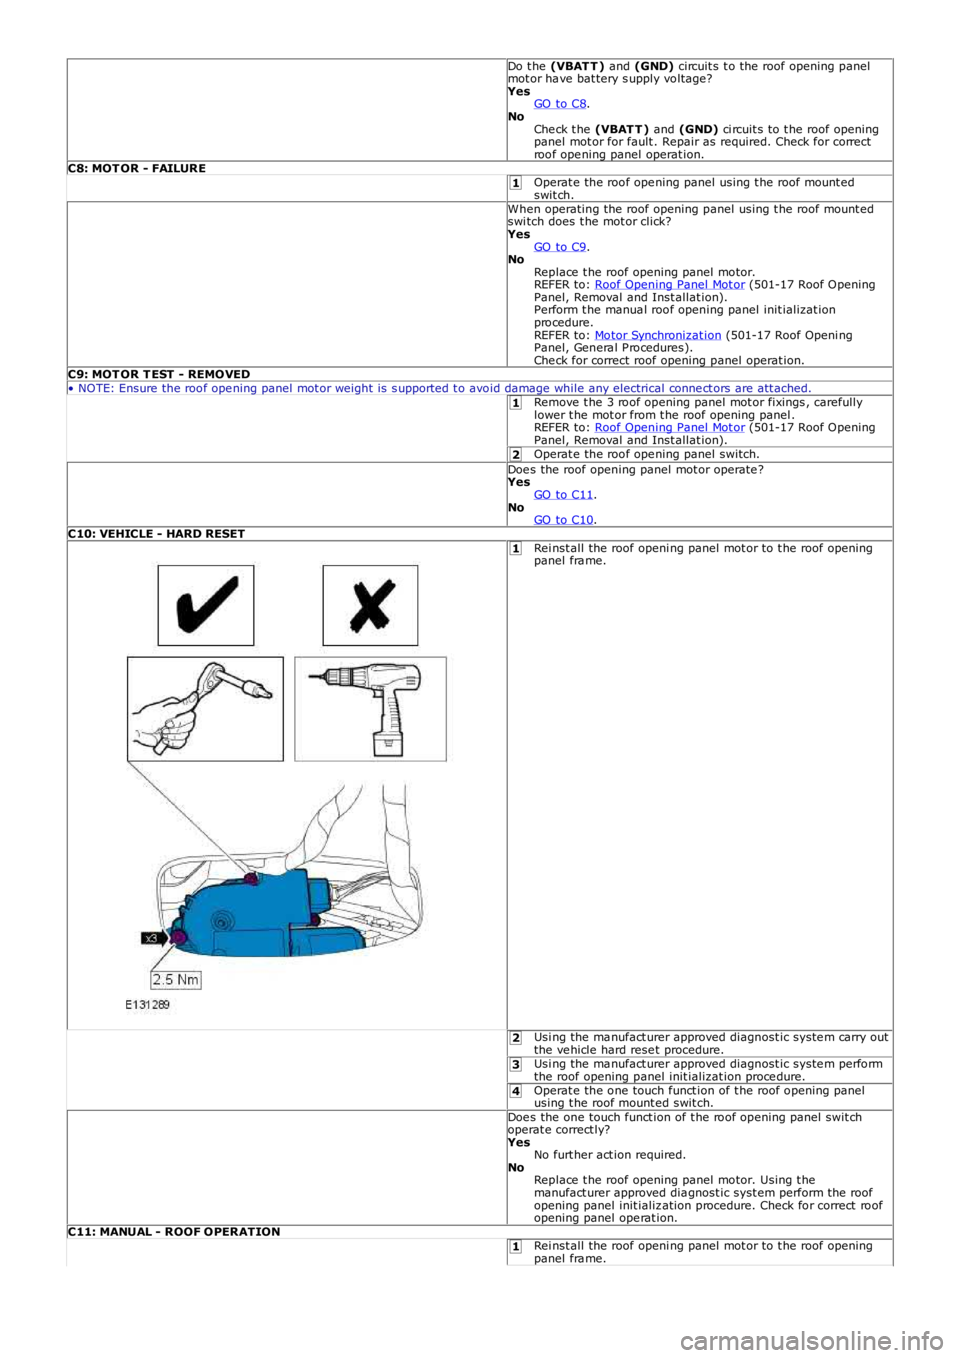
Do t he (VBAT T ) and (GND) circuit s t o the roof opening panelmot or ha ve bat tery s upply voltage?YesGO to C8.NoChe ck t he (VBAT T ) and (GND) ci rcuit s to t he roof openingpanel mot or for fault . Repair as required. Check for correctroof ope ning panel operat ion.C8: MOT OR - FAILUREOperat e the roof ope ning panel using t he roof mount edswit ch.When operating the roof opening panel using t he roof mount edswi tch does t he mot or click?YesGO to C9.NoReplace t he roof opening panel motor.REFER to: Roof Opening Panel Mot or (501-17 Roof OpeningPanel, Removal and Inst allat ion).Perform t he manua l roof opening panel init ializat ionprocedure.REFER to: Motor Synchronizat ion (501-17 Roof Openi ngPanel, Genera l P rocedures).Che ck for correct roof opening panel operat ion.C9: MOT OR T EST - REMOVED• NOTE: Ensure the roof ope ning panel mot or weight is s upported t o avoid damage while any electrical conne ct ors are att ached.Remove t he 3 roof opening panel mot or fixings , carefullylower t he mot or from t he roof opening panel .REFER to: Roof Opening Panel Mot or (501-17 Roof OpeningPanel, Removal and Inst allat ion).Operat e the roof ope ning panel switch.Doe s the roof opening panel mot or operate ?YesGO to C11.NoGO to C10.C10: VEHICLE - HARD RESETRei nst all the roof openi ng panel mot or to t he roof openingpanel fra me.
Usi ng the ma nufact urer approved diagnost ic syste m carry outthe ve hicle hard rese t procedure.Usi ng the ma nufact urer approved diagnost ic syste m performthe roof opening panel init ializat ion proce dure.Operat e the one touch funct ion of t he roof opening panelusing t he roof mount ed swit ch.Doe s the one touch funct ion of t he roof opening panel swit choperat e correct ly?YesNo furt her act ion required.NoReplace t he roof opening panel motor. Using t hemanufact urer approved dia gnost ic syst em perform the roofopening panel init ializ ation procedure. Check for correct roofopening panel ope rat ion.C11: MANUAL - ROOF OPERATIONRei nst all the roof openi ng panel mot or to t he roof openingpanel fra me.
Page 2725 of 3229

Contents
5
R
ENGINE COOLANT CHECK ............................ 163
BRAKE AND CLUTCH FLUID CHECK ............. 165
POWER STEERING FLUID CHECK ................ 166
WASHER FLUID CHECK ................................ 167
TECHNICAL SPECIFICATIONS ...................... 169
Vehicle battery
BATTERY WARNING SYMBOLS ................... 171
BATTERY CARE ............................................ 171
USING BOOSTER CABLES ............................ 173
CHARGING THE VE HICLE BATTERY ............. 174
CHANGING THE VE HICLE BATTERY ............. 174
Wheels and tyres
GENERAL INFORMATION ............................. 176
TYRE CARE ................................................... 177
USING WINTER TYRES................................. 183
CHANGING A ROAD WHEEL ......................... 183
TYRE REPAIR KIT ......................................... 187
USING SNOW CHAINS.................................. 192
TYRE GLOSSARY.......................................... 193
TECHNICAL SPECIFICATIONS ...................... 194
Fuses
FUSE BOX LOCATIONS ................................. 195
CHANGING A FUSE ....................................... 195
FUSE SPECIFICATION CHART....................... 196
Emergency equipment
HAZARD WARNING FLASHERS .................... 204
WARNING TRIANGLE ................................... 204
Status after a collision
DRIVING AFTER A COLLISION...................... 205
INSPECTING SAFETY SYSTEM COMPONENTS ...
206
Vehicle recovery
TOWING POINTS .......................................... 207
LASHING POINTS ......................................... 208
TRANSPORTING THE VEHICLE..................... 208
TOWING THE VEHICLE ON FOUR WHEELS .. 208
Vehicle identification
VEHICLE IDENTIFICATION PLATE................. 210
VEHICLE IDENTIFI CATION NUMBER (VIN) ... 210
VEHICLE BUILD DATE PLATE ....................... 210
Technical specifications
ENGINE SPECIFICATIONS ............................ 211
WEIGHTS...................................................... 212
DIMENSIONS................................................ 213
Type approval
Declarations of conformity ........................... 215
Audio introduction
RADIO RECEPTION....................................... 218
Audio unit overview
AUDIO UNIT OVERVIEW............................... 219
Audio unit operation
ON OR OFF CONTROL .................................. 223
VOLUME CONTROL ...................................... 223
AUDIO CONTROL ......................................... 223
WAVEBAND BUTTON ................................... 224
AUTOSTORE CONTROL ................................ 225
STATION PRESET BUTTONS ........................ 226
TRAFFIC INFORMATION CONTROL .............. 226
Audio unit menus
RADIO DATA SYSTEM (RDS) ....................... 228
REGIONAL MODE (REG) .............................. 228
ENHANCED OTHER NETWORK (RDS-EON).. 229
ALTERNATIVE FREQUENCIES ...................... 229
NEWS BROADCASTS ................................... 230
PRIORITY PROGRAMME TYPE (PTY) .......... 231
RESETTING THE AUDIO UNIT ...................... 233
Digital audio broadcasting
GENERAL INFORMATION ............................. 234
AUDIO CONTROLS ....................................... 235
DISPLAY OPTIONS ....................................... 236
CHANNEL AUTOMATIC TUNING................... 236
CHANNEL OPTIONS ..................................... 236
PRESET BUTTONS ....................................... 238
SETTINGS..................................................... 240
Compact disc player
LOADING COMPACT DISCS ......................... 245
EJECTING COMPACT DISCS ........................ 246
EJECTING MULTIPLE CO MPACT DISCS....... 246
COMPACT DISC SELECTION ........................ 246
COMPACT DISC PLAYBACK ......................... 246
Page 2730 of 3229
10
Quick start
L
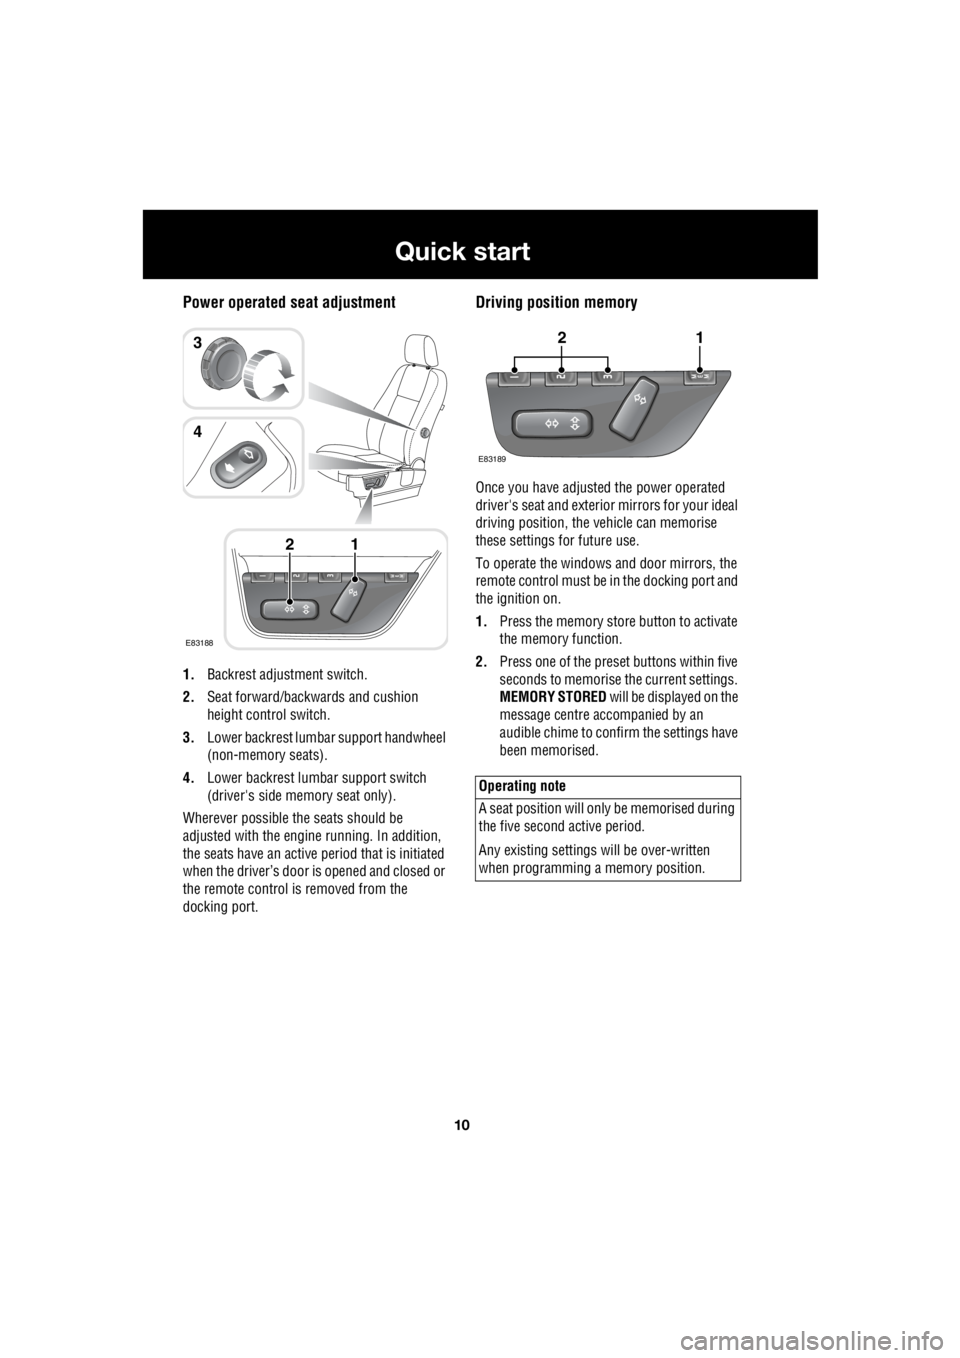
Power operated seat adjustment
1. Backrest adjustment switch.
2. Seat forward/backwards and cushion
height control switch.
3. Lower backrest lumbar support handwheel
(non-memory seats).
4. Lower backrest lumbar support switch
(driver's side memory seat only).
Wherever possible the seats should be
adjusted with the engine running. In addition,
the seats have an active period that is initiated
when the driver’s door is opened and closed or
the remote control is removed from the
docking port.
Driving position memory
Once you have adjusted the power operated
driver's seat and exterior mirrors for your ideal
driving position, the vehicle can memorise
these settings for future use.
To operate the windows and door mirrors, the
remote control must be in the docking port and
the ignition on.
1. Press the memory store button to activate
the memory function.
2. Press one of the preset buttons within five
seconds to memorise the current settings.
MEMORY STORED will be displayed on the
message centre accompanied by an
audible chime to confirm the settings have
been memorised.
E83188
12
3
4
Operating note
A seat position will onl y be memorised during
the five second active period.
Any existing settings w ill be over-written
when programming a memory position.
E83189
12
Page 2735 of 3229
15
Quick start
R
The air distribution and blower controls can be
operated to override the automatic settings.
This will extinguish the appropriate LED in the
AUTO control.
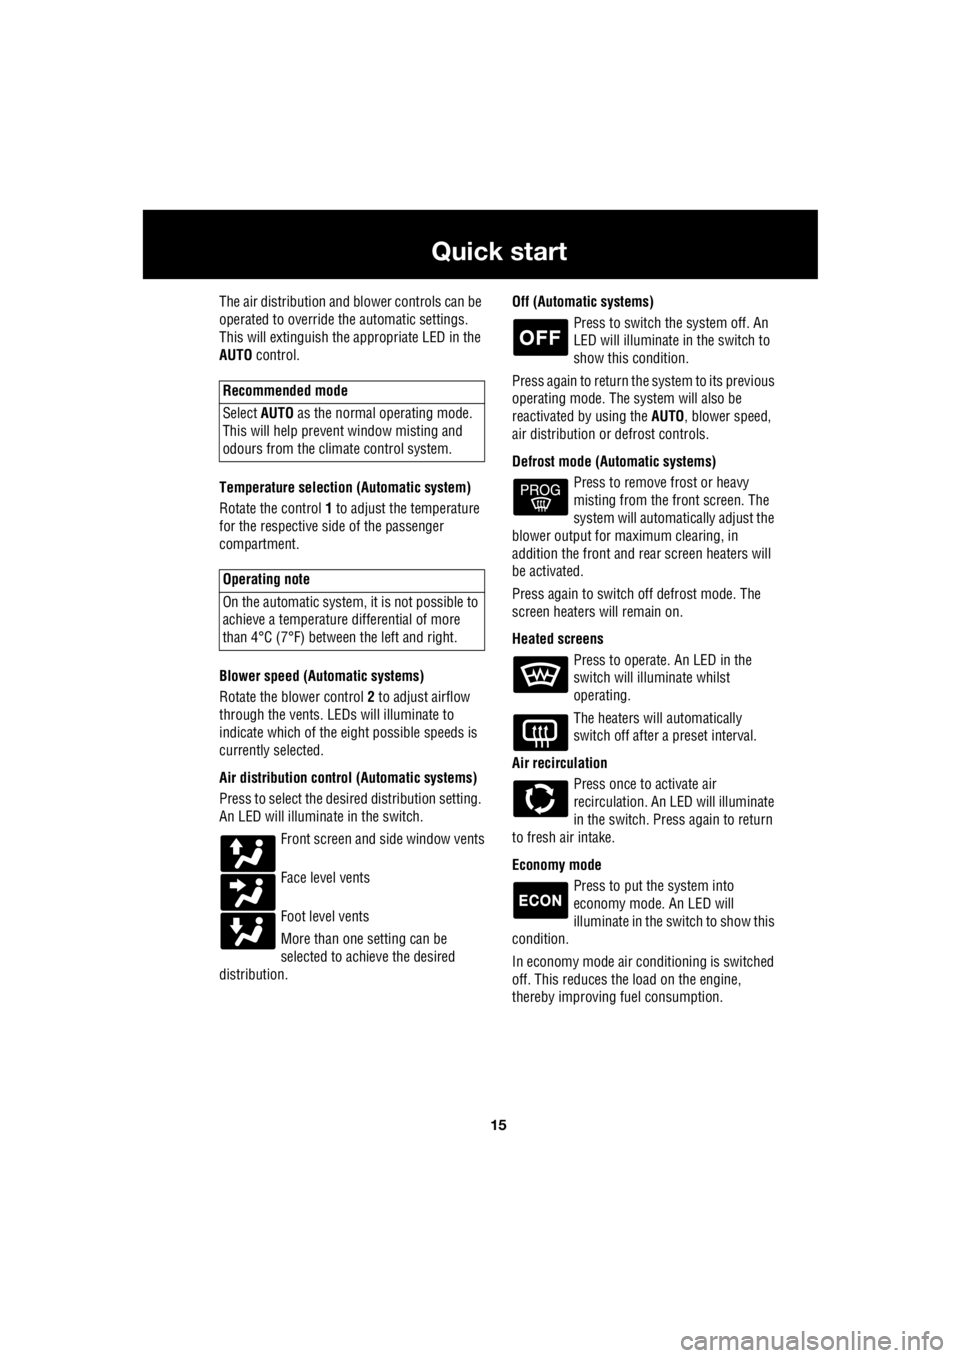
Temperature selection (Automatic system)
Rotate the control 1 to adjust the temperature
for the respective side of the passenger
compartment.
Blower speed (Automatic systems)
Rotate the blower control 2 to adjust airflow
through the vents. LEDs will illuminate to
indicate which of the ei ght possible speeds is
currently selected.
Air distribution contro l (Automatic systems)
Press to select the desi red distribution setting.
An LED will illumina te in the switch.
Front screen and side window vents
Face level vents
Foot level vents
More than one setting can be
selected to achieve the desired
distribution. Off (Automat
ic systems)
Press to switch the system off. An
LED will illuminate in the switch to
show this condition.
Press again to return the system to its previous
operating mode. The system will also be
reactivated by using the AUTO, blower speed,
air distribution or defrost controls.
Defrost mode (Automatic systems) Press to remove frost or heavy
misting from the front screen. The
system will automatically adjust the
blower output for maximum clearing, in
addition the front and rear screen heaters will
be activated.
Press again to switch off defrost mode. The
screen heaters will remain on.
Heated screens Press to operate. An LED in the
switch will illuminate whilst
operating.
The heaters will automatically
switch off after a preset interval.
Air recirculation Press once to activate air
recirculation. An LED will illuminate
in the switch. Press again to return
to fresh air intake.
Economy mode Press to put the system into
economy mode. An LED will
illuminate in the switch to show this
condition.
In economy mode air conditioning is switched
off. This reduces the load on the engine,
thereby improving fuel consumption.
Recommended mode
Select AUTO as the normal operating mode.
This will help prevent window misting and
odours from the climate control system.
Operating note
On the automatic system, it is not possible to
achieve a temperature differential of more
than 4°C (7°F) betwee n the left and right.
Page 2739 of 3229
19
Quick start
R
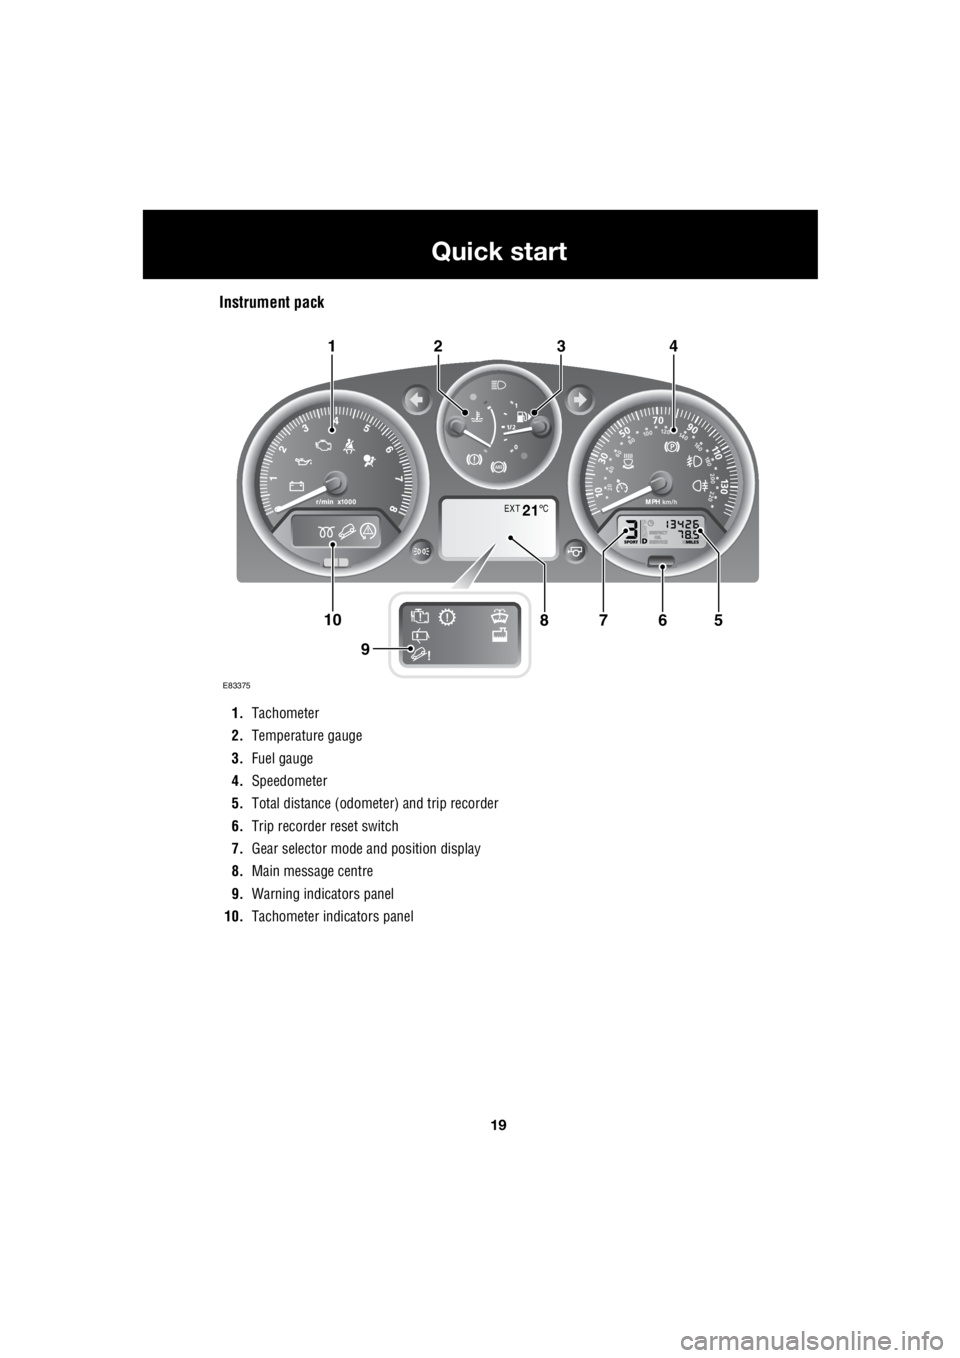
Instrument pack
1. Tachometer
2. Temperature gauge
3. Fuel gauge
4. Speedometer
5. Total distance (odometer) and trip recorder
6. Trip recorder reset switch
7. Gear selector mode and position display
8. Main message centre
9. Warning indicators panel
10. Tachometer indi cators panel
EXT C21
E83375
567108
9
1423
Page 2740 of 3229
20
Quick start
L
Tachometer
Indicates engine spee d in revolutions per
minute (x 1 000). In normal driving conditions
the engine is most fuel efficient between 2 000
and 3 000 rev/min.
Temperature gauge
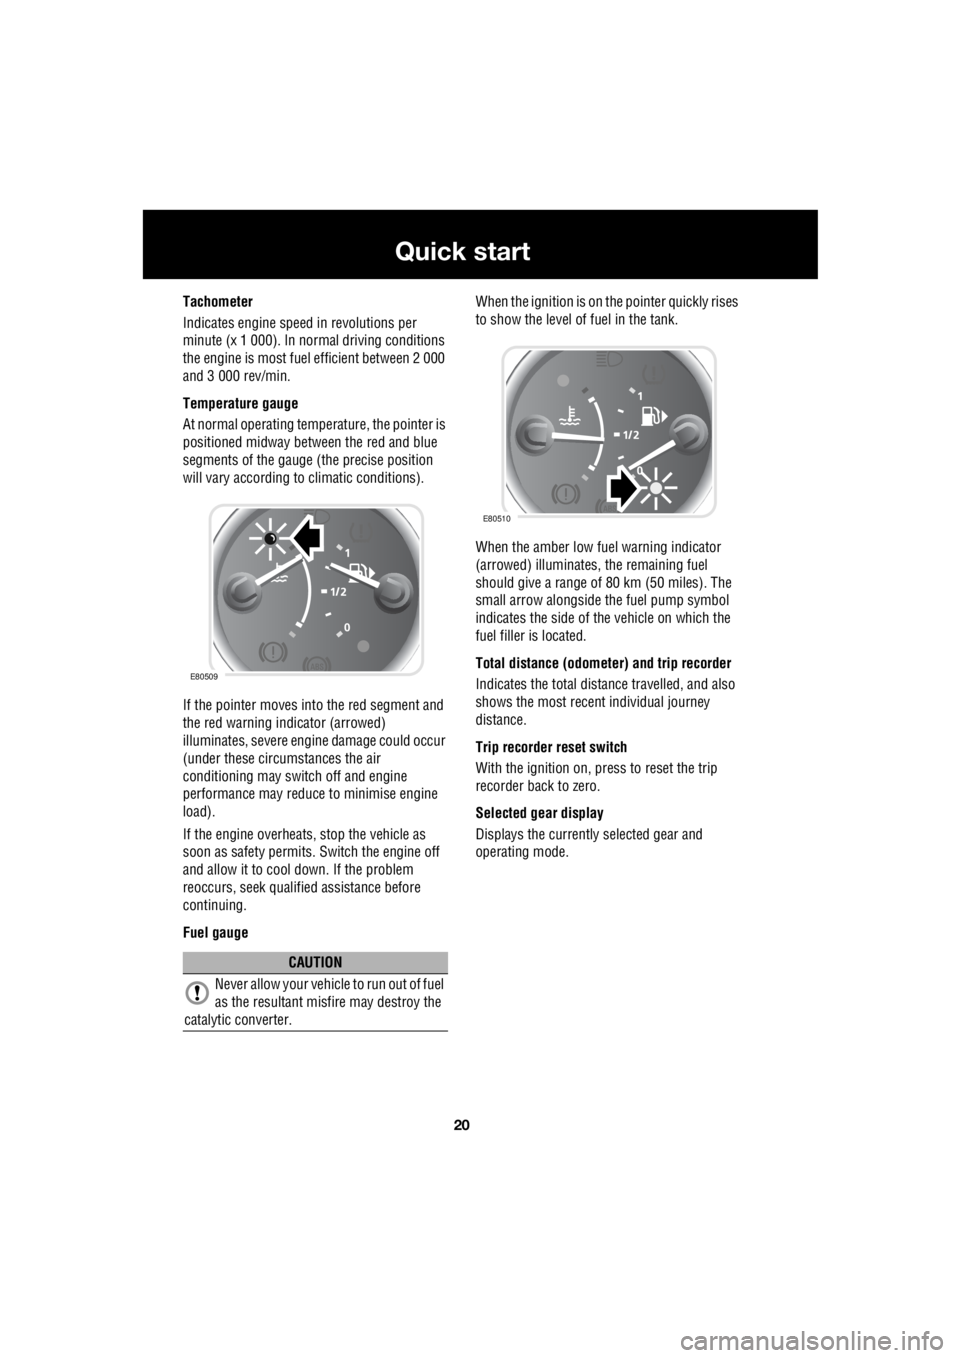
At normal operating temperature, the pointer is
positioned midway between the red and blue
segments of the gauge (the precise position
will vary according to climatic conditions).
If the pointer moves into the red segment and
the red warning indicator (arrowed)
illuminates, severe engi ne damage could occur
(under these circumstances the air
conditioning may switch off and engine
performance may reduce to minimise engine
load).
If the engine overheats, stop the vehicle as
soon as safety pe rmits. Switch the engine off
and allow it to cool down. If the problem
reoccurs, seek qualified assistance before
continuing.
Fuel gauge When the ignition is on the pointer quickly rises
to show the level of fuel in the tank.
When the amber low fuel warning indicator
(arrowed) illuminates, the remaining fuel
should give a range of 80 km (50 miles). The
small arrow alongside th e fuel pump symbol
indicates the side of the vehicle on which the
fuel filler is located.
Total distance (odometer) and trip recorder
Indicates the total distance travelled, and also
shows the most recent individual journey
distance.
Trip recorder reset switch
With the ignition on, press to reset the trip
recorder back to zero.
Selected gear display
Displays the currently selected gear and
operating mode.
CAUTION
Never allow your vehicl e to run out of fuel
as the resultant misfire may destroy the
catalytic converter.
E80509
E80510
Page 2747 of 3229
27
Quick start
R
Audio system
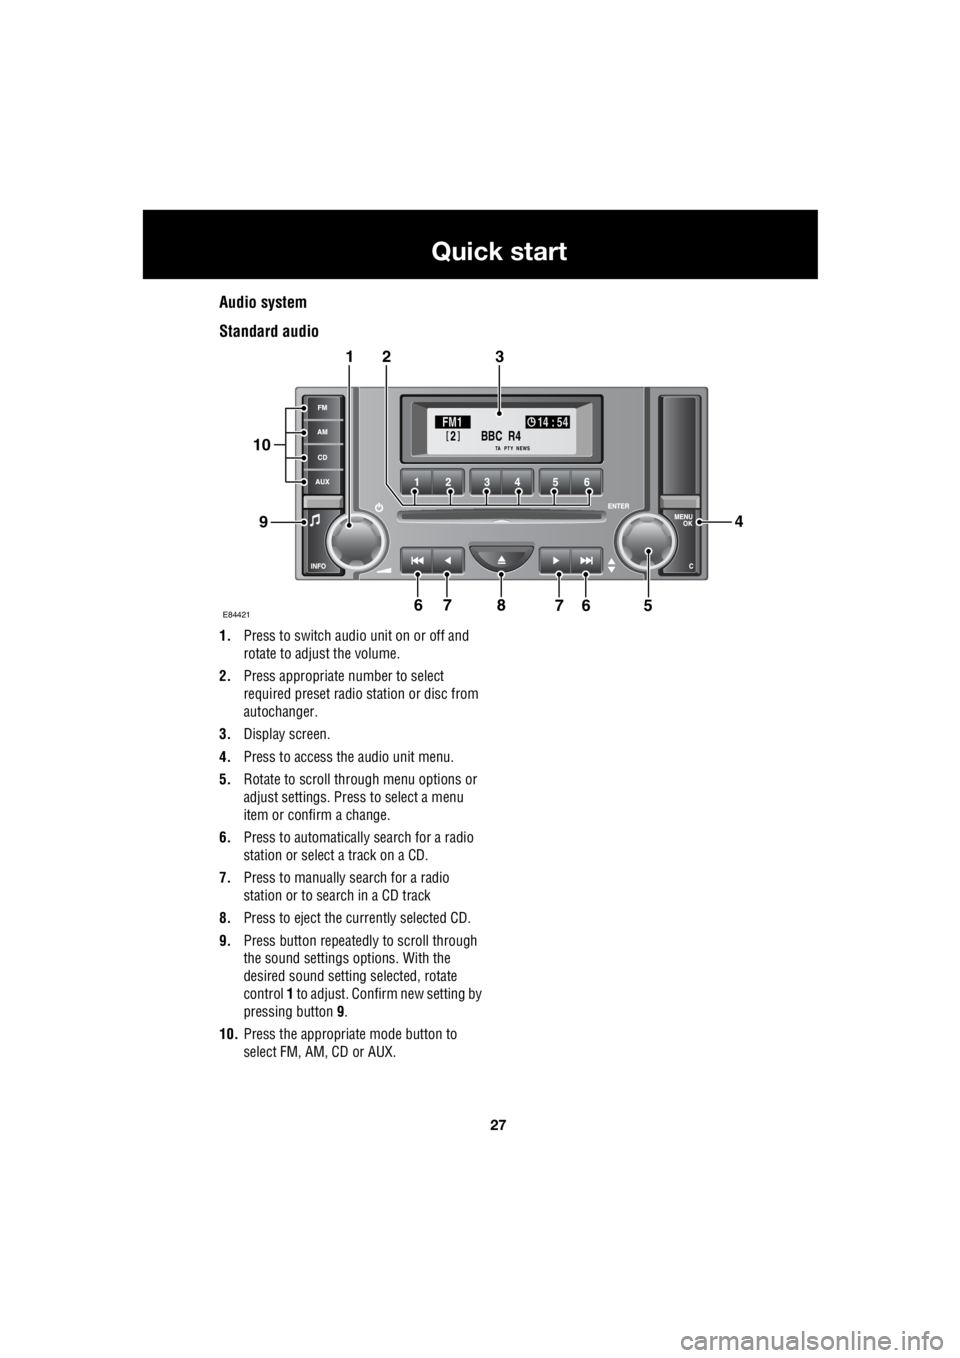
Standard audio
1. Press to switch audio unit on or off and
rotate to adjust the volume.
2. Press appropriate number to select
required preset radio station or disc from
autochanger.
3. Display screen.
4. Press to access the audio unit menu.
5. Rotate to scroll through menu options or
adjust settings. Press to select a menu
item or confirm a change.
6. Press to automatically search for a radio
station or select a track on a CD.
7. Press to manually search for a radio
station or to search in a CD track
8. Press to eject the currently selected CD.
9. Press button repeatedly to scroll through
the sound settings options. With the
desired sound setting selected, rotate
control 1 to adjust. Confirm new setting by
pressing button 9.
10. Press the appropriate mode button to
select FM, AM, CD or AUX.
BBC R4
2FM1 14 : 54
TA NEWSPTY
E844217
321
94
56768
10
Page 2748 of 3229
28
Quick start
L
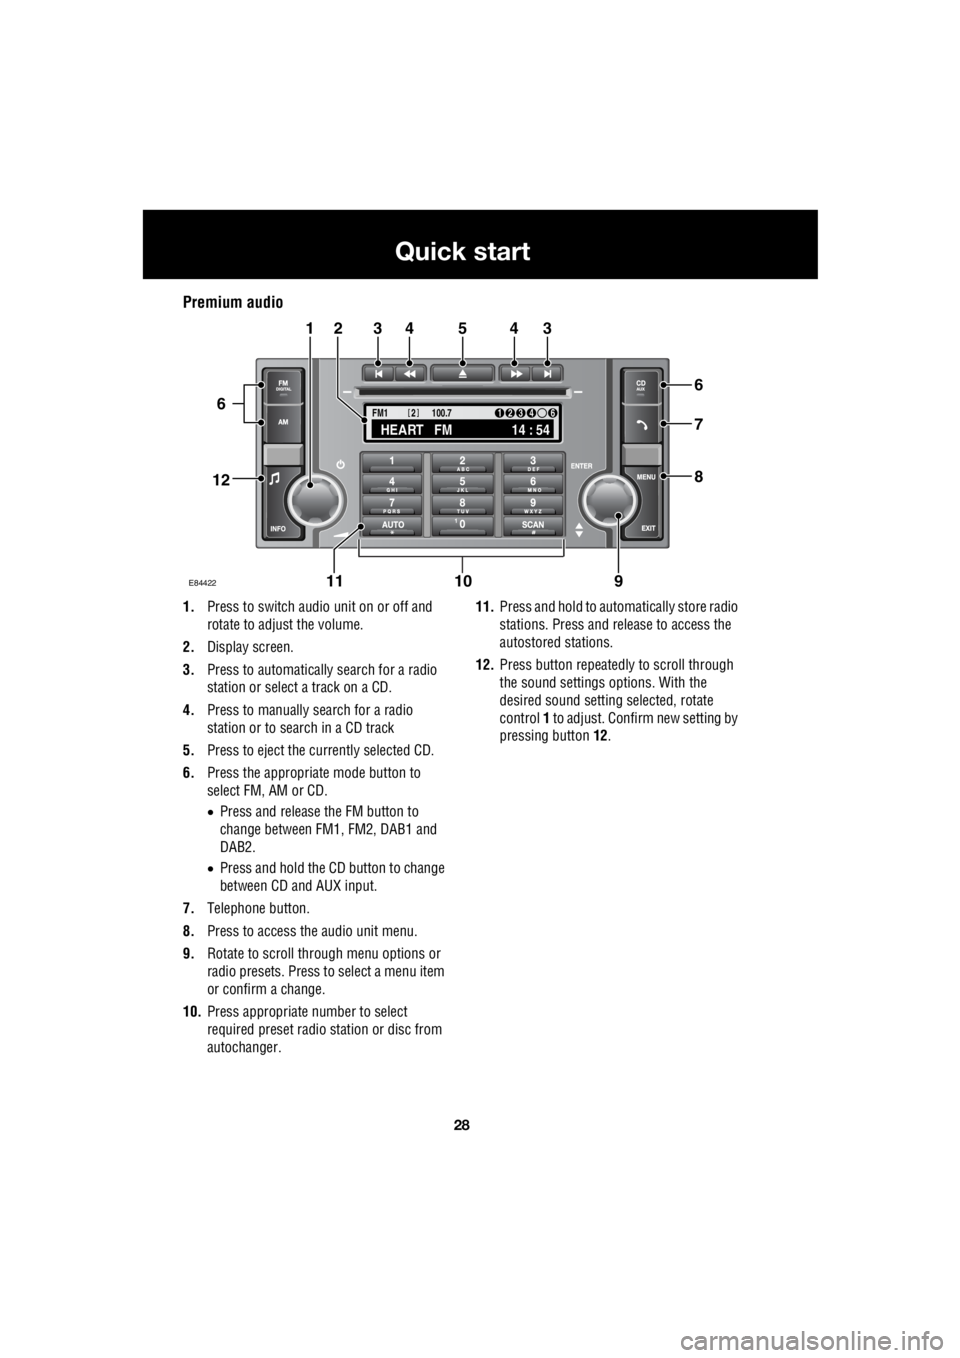
Premium audio
1. Press to switch audio unit on or off and
rotate to adjust the volume.
2. Display screen.
3. Press to automatically search for a radio
station or select a track on a CD.
4. Press to manually search for a radio
station or to search in a CD track
5. Press to eject the currently selected CD.
6. Press the appropriate mode button to
select FM, AM or CD.
• Press and release the FM button to
change between FM1, FM2, DAB1 and
DAB2.
• Press and hold the CD button to change
between CD and AUX input.
7. Telephone button.
8. Press to access the audio unit menu.
9. Rotate to scroll through menu options or
radio presets. Press to select a menu item
or confirm a change.
10. Press appropriate number to select
required preset radio station or disc from
autochanger. 11.
Press and hold to automatically store radio
stations. Press and release to access the
autostored stations.
12. Press button repeatedly to scroll through
the sound settings options. With the
desired sound setti ng selected, rotate
control 1 to adjust. Confir m new setting by
pressing button 12.
TA
NEWSPTY100.7
FM1
14 : 54
HEART FM
1234 6
2
E84422
34543
6
7
8
21
91011
12
6