Page 2749 of 3229

29
Quick start
R
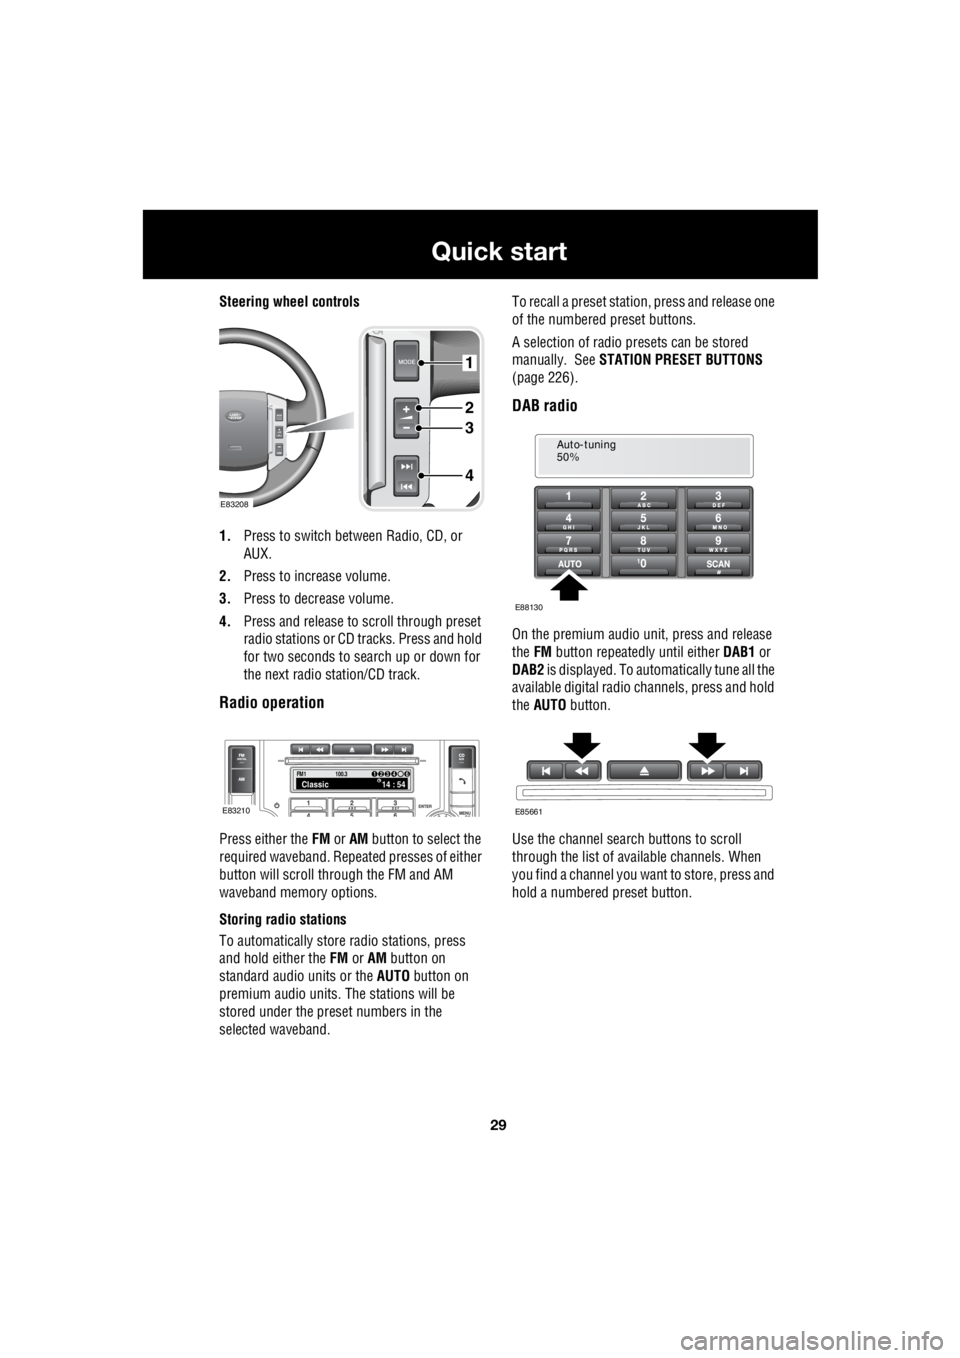
Steering wheel controls
1. Press to switch between Radio, CD, or
AUX.
2. Press to increase volume.
3. Press to decrease volume.
4. Press and release to scroll through preset
radio stations or CD tracks. Press and hold
for two seconds to search up or down for
the next radio station/CD track.
Radio operation
Press either the FM or AM button to select the
required waveband. Repeat ed presses of either
button will scroll through the FM and AM
waveband memory options.
Storing radio stations
To automatically store radio stations, press
and hold either the FM or AM button on
standard audio units or the AUTO button on
premium audio units. The stations will be
stored under the preset numbers in the
selected waveband. To recall a preset stati
on, press and release one
of the numbered preset buttons.
A selection of radio pr esets can be stored
manually. See STATION PRESET BUTTONS
(page 226).
DAB radio
On the premium audio unit, press and release
the FM button repeatedly until either DAB1 or
DAB2 is displayed. To auto matically tune all the
available digital radio channels, press and hold
the AUTO button.
Use the channel search buttons to scroll
through the list of available channels. When
you find a channel you want to store, press and
hold a numbered preset button.
1
2
3
4
E83208
FM114 : 54Classic1234 6
100.3
E83210
Auto-tuning
50%
E88130
E85661
Page 2770 of 3229
Seats
50
L
To adjust the seats, the remote control must be
inserted in the starter control unit and the
ignition on. On those ve hicles equipped with
the memory driver's seat, the seat has a 10
minute active peri od, initiated when the driver's
door is opened/closed or the remote control is
removed from the starter control unit.
Driving position memory
Once you have adjusted the power operated
driver's seat and exterior mirrors for your ideal
driving position, the vehicle can memorise
these settings for future use.
1. Press the memory stor e button to activate
the memory function.
2. Press one of the preset buttons within five
seconds to memorise the current settings.
MEMORY STORED will be displayed on the
message centre accompanied by an
audible chime to conf irm the settings have
been memorised.
A seat position will only be memorised during
the five second active period.
Any existing settings will be over-written when
programming a memory position.
E83189
12
Page 2790 of 3229
Steering wheel
70
L
Steering wheelADJUSTING THE STEERING WHEEL
To adjust the steering wheel :-
1. Release the locking mechanism by pulling
the lever down.
2. Adjust the steering wheel to the desired
position.
3. Push the locking lever back up, and ensure
that it's fully home.
AUDIO CONTROL
1. Press to switch between radio, CD, or AUX.
2. Press to increase volume.
3. Press to decrease volume.
4. Press and release to scroll through preset
radio stations or CD tracks. Press to
search up or down for the next or previous
radio station/CD track.WARNINGS
Never adjust the steering wheel
position whilst the ve hicle is in motion.
Doing so will reduce control of the
vehicle, and may cause unpredictable steering
movements.
After adjusting the steering wheel
position, ensure that the locking lever
is returned to the fully up position.
Failure to do so will reduce control of the
vehicle, and may cause unpredictable steering
movements.
E82965
3
1
2
1
2
3
4
E83208
Page 2813 of 3229

93
Windows and mirrors
R
Windows and mirrorsELECTRIC WINDOWS
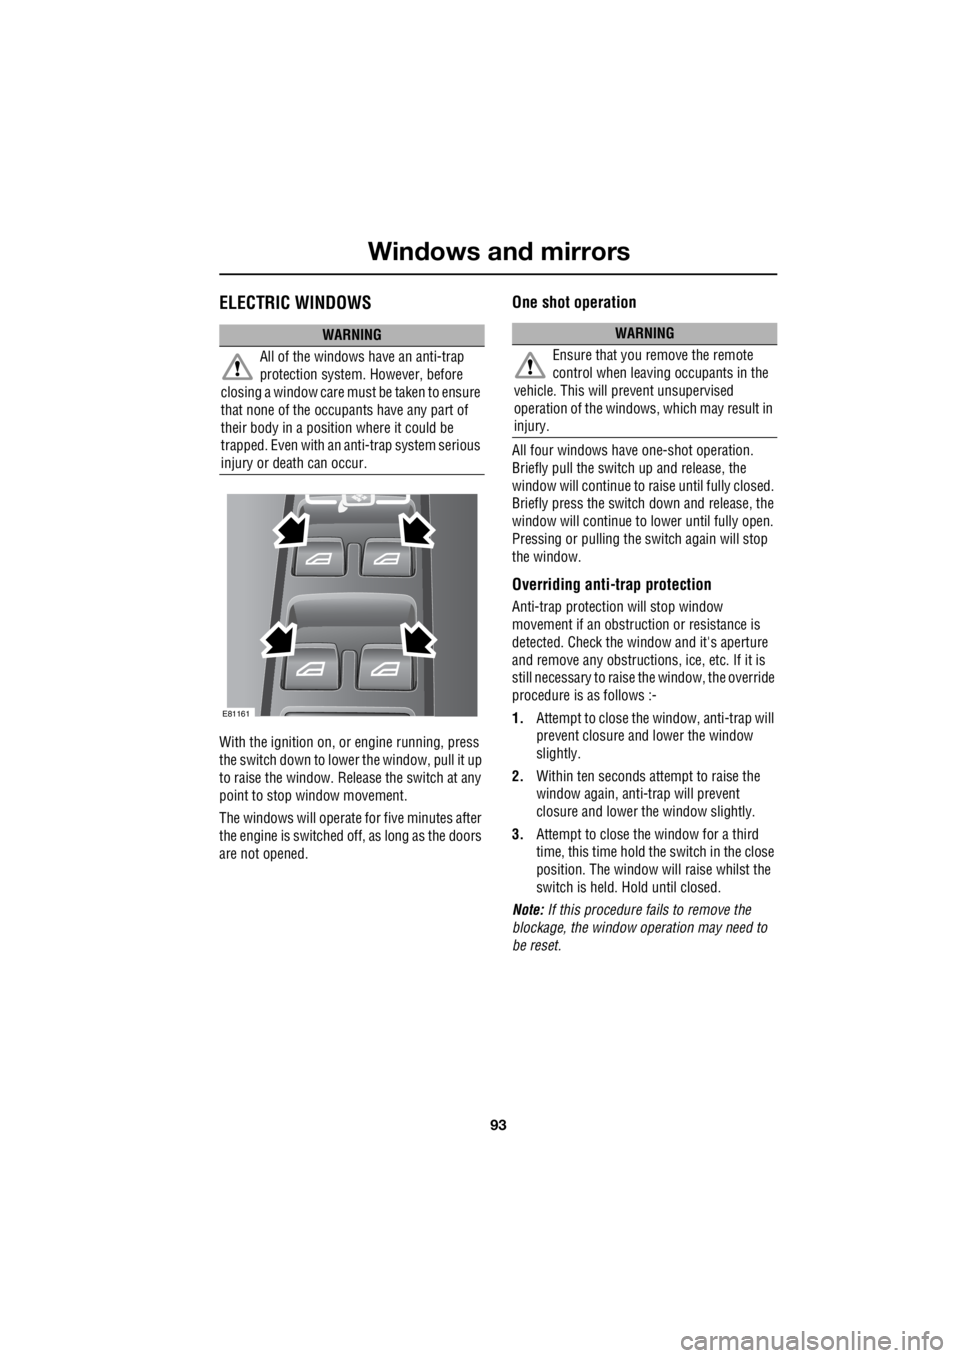
With the ignition on, or engine running, press
the switch down to lower the window, pull it up
to raise the window. Release the switch at any
point to stop window movement.
The windows will operate for five minutes after
the engine is switched off, as long as the doors
are not opened.
One shot operation
All four windows have one-shot operation.
Briefly pull the switch up and release, the
window will continue to raise until fully closed.
Briefly press the switch down and release, the
window will continue to lower until fully open.
Pressing or pulling the switch again will stop
the window.
Overriding anti-trap protection
Anti-trap protection will stop window
movement if an obstruction or resistance is
detected. Check the window and it's aperture
and remove any obstructions , ice, etc. If it is
still necessary to raise the window, the override
procedure is as follows :-
1. Attempt to close the window, anti-trap will
prevent closure and lower the window
slightly.
2. Within ten seconds attempt to raise the
window again, anti-trap will prevent
closure and lower the window slightly.
3. Attempt to close the window for a third
time, this time hold the switch in the close
position. The window will raise whilst the
switch is held. Hold until closed.
Note: If this procedure fails to remove the
blockage, the window operation may need to
be reset.
WARNING
All of the windows have an anti-trap
protection system. However, before
closing a window care must be taken to ensure
that none of the occupa nts have any part of
their body in a position where it could be
trapped. Even with an anti-trap system serious
injury or death can occur.
E81161
WARNING
Ensure that you remove the remote
control when leaving occupants in the
vehicle. This will prevent unsupervised
operation of the windows, which may result in
injury.
Page 2814 of 3229

Windows and mirrors
94
L
Window reset
The windows will need to be reset if the battery
is disconnected, beco mes discharged, or
power supply is interrupted.
Reset as follows :-
1. Close the window fully.
2. Release the switch, then lift it to the close
position and hold for two seconds.
3. Open the window fully.
4. Release the switch, then push it to the
open position and hold for two seconds.
5. Lift and release the switch to operate the
one touch function.
6. Repeat the procedure on each window.
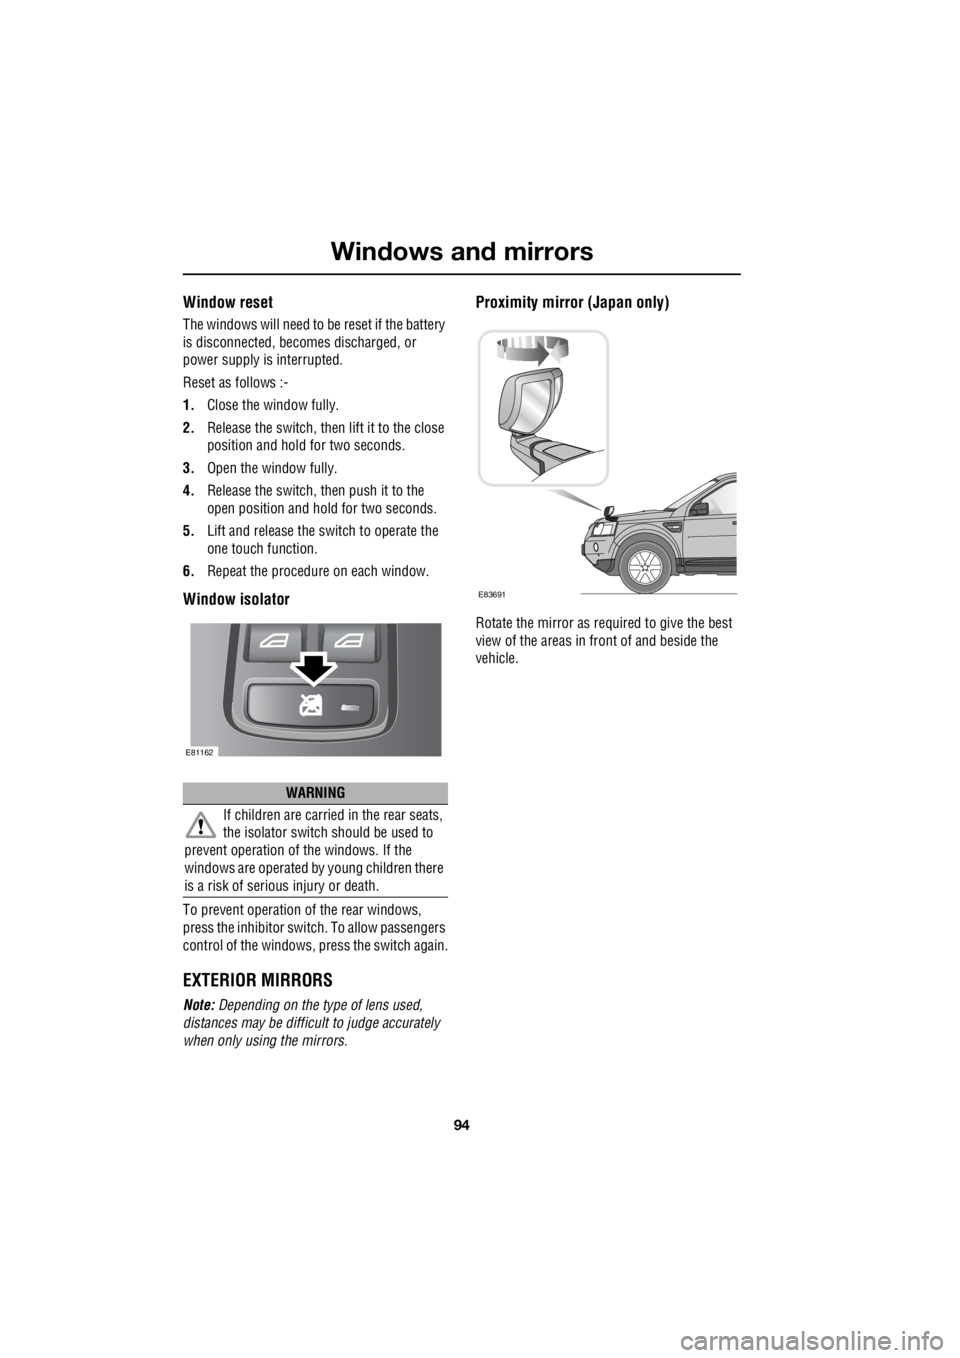
Window isolator
To prevent operation of the rear windows,
press the inhibitor switch. To allow passengers
control of the windows, press the switch again.
EXTERIOR MIRRORS
Note: Depending on the type of lens used,
distances may be difficu lt to judge accurately
when only using the mirrors.
Proximity mirror (Japan only)
Rotate the mirror as required to give the best
view of the areas in front of and beside the
vehicle.
WARNING
If children are carried in the rear seats,
the isolator switch should be used to
prevent operation of the windows. If the
windows are operated by young children there
is a risk of serious injury or death.
E81162
E83691
Page 2817 of 3229
97
Instruments
R
InstrumentsINSTRUMENT PANEL OVERVIEW
Instrument panel
1. Tachometer.
2. Temperature gauge.
3. Fuel gauge.
4. Speedometer.
5. Odometer and trip recorder.
6. Trip recorder reset button.
7. Gear selector mode and position display.
8. Main message centre.
9. Warning indicator panel (fitted in place of
main message centre).
10. Warning indicator panel.
EXT C21
E83004
567108
9
1423
2
3
Page 2818 of 3229

Instruments
98
L
Tachometer
Indicates engine spee d in revolutions per
minute (RPM) x 1000.
Temperature gauge
If the pointer moves onto the red line and the
red warning indicator illu minates severe engine
damage can occur.
If the engine overheats, stop the vehicle as
soon as safety pe rmits. Switch the engine off
and allow it to cool down. If the problem
reoccurs, seek qualified assistance before
continuing.
Note: If engine temperatur e rises to the point
where overheating may occur, there may be a
noticeable reduction in engine power, and the
air conditioning may cease operation. This is a
normal operating strate gy to reduce load on
the engine and assist with cooling.
Fuel gauge
Once the fuel level has dropped to the point
where the range is approximately 80 km (50
miles) the low fuel warning indicator will
illuminate.
As a reminder for the location of the fuel filler,
there is an arrow next to the fuel pump symbol
which points to the releva nt side of the vehicle.
Speedometer
Indicates road speed. Odometer
Indicates the total distance which the vehicle
has travelled.
Trip recorder
Indicates the distance travelled since the last
reset, and can be used to measure the distance
of individual journeys.
Trip recorder reset button
Resets the distance shown on the trip recorder
to zero.
Note: Once the trip recorder has been reset to
zero, the previously recorded distance will be
lost.
Gear selector mode and positiondisplay
Displays the currently selected gear on
vehicle's fitted with automatic transmission.
Main message centre
Displays warning, and information messages.
See INFORMATION MESSAGES (page 99).
Warning indicator panel (fitted in place of
main message centre)
If a main message centre is not fitted, the
warning indicator pane l will provide system
status information.
Warning indicator panel
The warning indicator panel will provide
system status information.
CAUTION
Serious engine damage can occur if the
vehicle is driven whilst the engine is
overheating.
CAUTION
Never allow the vehicle to run out of
fuel. The resulting mis-fire may cause
serious damage to the catalytic
convertor.
Page 2819 of 3229

99
Information displays
R
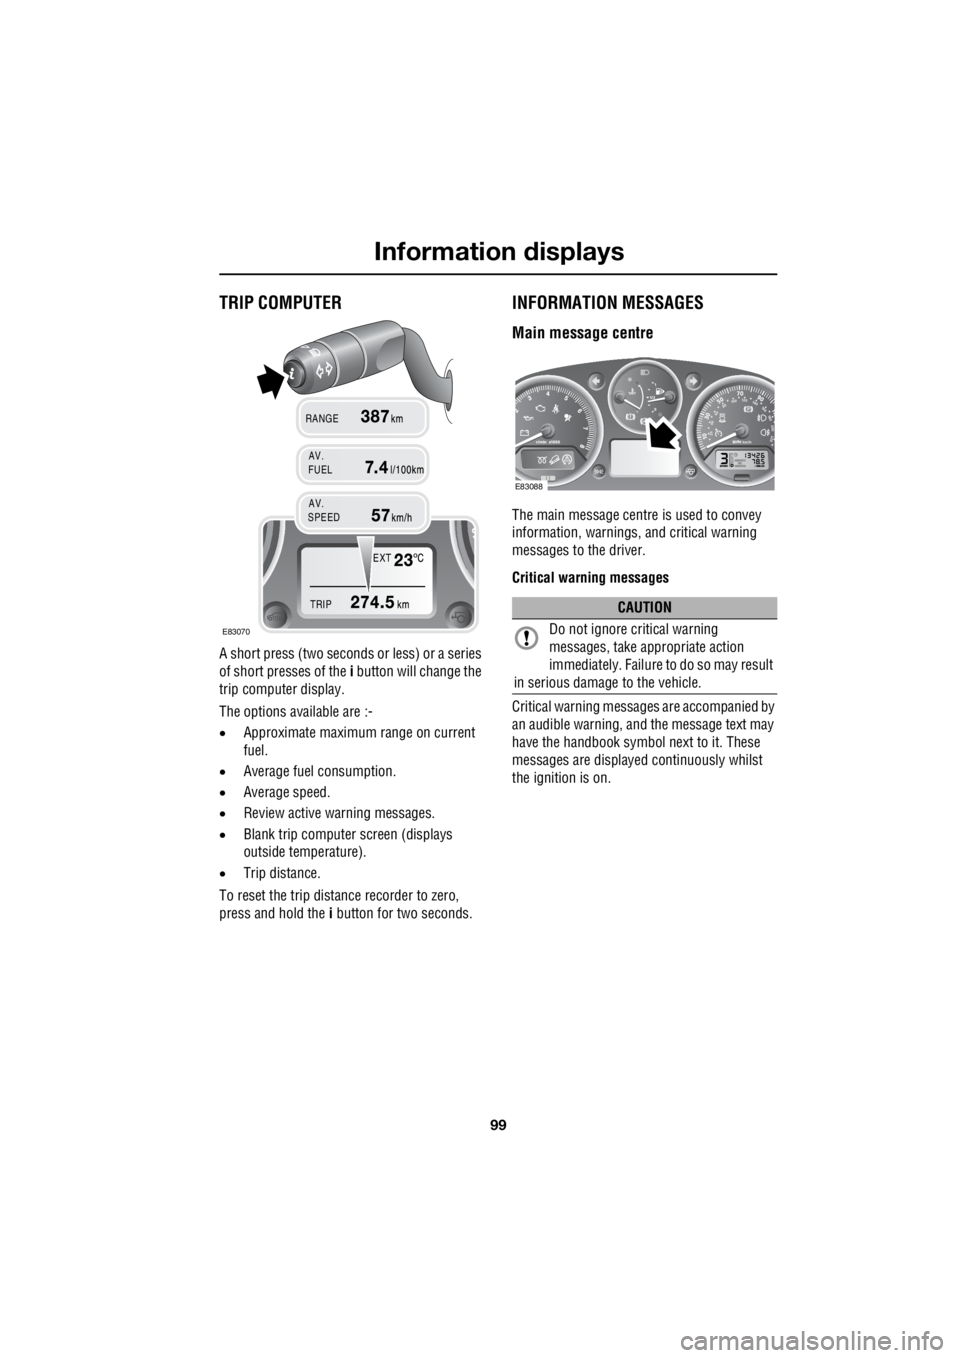
Information displaysTRIP COMPUTER
A short press (two seconds or less) or a series
of short presses of the i button will change the
trip computer display.
The options available are :-
• Approximate maximu m range on current
fuel.
• Average fuel consumption.
• Average speed.
• Review active warning messages.
• Blank trip computer screen (displays
outside temperature).
• Trip distance.
To reset the trip distance recorder to zero,
press and hold the i button for two seconds.
INFORMATION MESSAGES
Main message centre
The main message centre is used to convey
information, warnings, and critical warning
messages to the driver.
Critical warning messages
Critical warning messages are accompanied by
an audible warning, and the message text may
have the handbook symbol next to it. These
messages are displaye d continuously whilst
the ignition is on.
EXT
TRIP
AV.
RANGE
FUEL
AV.
SPEED
E83070
CAUTION
Do not ignore critical warning
messages, take a ppropriate action
immediately. Failure to do so may result
in serious damage to the vehicle.
E83088