2006 LAND ROVER FRELANDER 2 check engine light
[x] Cancel search: check engine lightPage 44 of 3229
Publi s hed: 11-May-2011
General Information - Road/Roller Testing
Des cript ion and Operat ion
Road or roll ing road t es t ing may be carri ed out for various reasons and a procedure det ail ing pre-t es t checks , throughengi ne s tarti ng and s topping, pre-driving checks , on-t es t checks to final checks on complet ion of t he tes t are given.
Unles s complete vehi cl e performance is bei ng checked, t he ful l road t est procedure need not be carried out . Ins tead, t hos eit ems part icularly relevant t o t he s yst em(s) bei ng checked can be ext racted.
Pre-Test Checks
W ARNING: If t he brake s yst em hydraul ic fluid level i s l ow, pedal travel i s exces si ve or a hydraulic leak is found, donot att empt to road t est t he vehicle unt il t he reas on for t he low fl ui d l evel, excess ive pedal travel or hydraulic leak isfound and rect ified.
It is s ugges t ed that pre-t es t and funct ional t es ts of t hose sys tems/circuit s whi ch affect t he safe and l egal operati ons oft he vehi cl e, s uch as brakes , light s and s teeri ng, should al ways be carri ed out before the road or roll ing road tes t .
Engi ne oil l evelEngi ne cool ant levelTires, for correct pres sure, compat ible types and tread patt erns , and wear wi thi n limi ts .There i s s ufficient fuel in the t ank to compl ete the t est .Check al l around the engine, t rans mis s ion and under the vehicle for oil , coolant , hydraul ic and fuel l eaks . Make anote of any apparent leaks and wipe off t he surrounding areas t o make it easi er to identi fy t he extent of the leakon complet ion of t he tes t.
Starting the Engine
• NOTE: On i nit ial dri ve away from cold and wit hi n t he fi rs t 1.5 km (1 mile), do not depress accelerat or pedal beyond halft ravel unt il t he vehi cl e has att ained a minimum s peed of 25 km/h (15 mil es /h). Never operat e at high engi ne speed or wi tht he accelerat or pedal at ful l travel whil st the engine i s cold.
With the ignition off, check:
The parking brake is appli ed.Automatic transmission: The s el ect or lever is i n 'P' - PARK.Manual transmission: The gear l ever i s in NEUTRAL.All i ns t rument gauges read zero.
With the ignition on, check:
Igni ti on cont roll ed warni ng li ght s come on.Engi ne t emperature gauge regis t ers a readi ng compat ibl e wi th t he engine t emperat ure.Fuel gauge regi st ers a reading appropriate to the fuel l evel i n t he tank.The operati on of the parki ng brake warning l ight and fl ui d l evel warni ng indicator light.
On Road Test Check:
CAUTION: At commencement of road tes ti ng, check the brake operati on while s ti ll travel li ng at low speed beforecont inuing wit h t he tes t. If t he brakes pul l to one si de, or appear to be ot herwi se fault y, do not cont inue wit h t he roadt es t unti l the fault has been found and rect ified.
The parking brake releas es completel y.Gear changing i s s mooth, and t here are no abnormal noi s es or vi brati ons from t he t rans mis s ion.The engi ne power out put is s ati s factory, accel erati on is smoot h and accel erator pedal operat ion is not s ti ff orheavy, and engi ne s peed ret urns t o idl e correctl y.There i s no exces s ive or abnormall y colored s moke from t he engi ne under normal driving, heavy l oad or overruncondi ti ons .Steering operat ion i s s moot h, accurat e, not exces s ively heavy or wit h exces s ive free pl ay or vibrat ion. Does not pul lt o one s ide and s elf centres smoot hly after corneri ng.All i ns t rument s regis t er the correct readi ngs and operate correctl y.Swit ches and controls operat e s moothl y and posi ti vel y, warning or i ndi cat or light s operate correctl y and thedirect ion i ndi cat or cont rol s elf cancels when the s t eering i s ret urned t o t he s traight ahead pos it ion.Heati ng and vent il at ion sys tems work correct ly and effect ively.Brakes operate efficientl y.
Brake Testing
Avoi d brake t es ti ng on busy roads where i t can caus e i nconveni ence or danger t o ot her road users.
CAUTION: Brake t es ti ng which i ncludes heavy brake appl icati ons should not be carri ed out wit h new brake pads /dis csunti l the component s have bedded-i n. New brake fri ct ion component s wi ll not reach ful l efficiency unt il t he beddi ng-inprocess is complet e. Not e t hat when new parking brake shoes or rear brake di scs have been ins t al led, it i s es sent ial thatt he 'beddi ng-in' procedure i s carri ed out.For addit ional informat ion, refer t o: Parking Brake Shoes Bedding-In (206-05 Parking Brake and Actuati on, GeneralProcedures).
Test t he brakes at s everal speeds wit hin the normal operat ing range usi ng both light and heavy pedal pres s ure. Note anyt endency to snat ch, pull or drag, and any undue del ay in appli cat ion or release.
Page 416 of 3229
brake boos ter.
5. Operate the engine for a minimum of 10 s econds at a fast i dle. Stop the engine and al low t he vehicle t o s t andfor 10 mi nut es. Then, appl y the brake pedal wi th approxi mately 89 N (20lb) of force. The pedal feel (brakeappli cat ion) s houl d be t he s ame as t hat not ed wit h t he engine runni ng. If the brake pedal feel s hard (no poweras s is t), ins t al l a new valve and t hen repeat t he tes t. If t he brake pedal s t ill feels hard, i ns t all a new brakeboos ter. If t he brake pedal movement feel s s pongy, bleed t he brake s ys t em.REFER t o: Brake Syst em Bl eedi ng (206-00 Brake Syst em - General Informati on, General Procedures ) /Brake Sys t em Pres s ure Bl eedi ng (206-00 Brake Syst em - General Informati on, General Procedures ).
5.
Brake Master Cylinder
Us ual ly, t he fi rs t and s tronges t indicat or of anything wrong i n t he brake s ys t em i s a feeling through t he brake pedal. Indiagnosi ng the condit ion of t he brake mas t er cyli nder, check pedal feel as evidence of a brake concern. Check for brakewarni ng lamp ill uminat ion and t he brake fluid level i n t he brake mas t er cyli nder reservoi r.
Normal Condit ions
The fol lowing condit ions are cons idered normal and are not i ndi cat ions t hat t he brake mast er cyl inder i s i n need of repair.
Modern brake sys tems are des igned t o produce a pedal effort that is not as hard as in the pas t . Compl aint s of lightpedal effort s s houl d be compared t o t he pedal efforts of another vehi cl e of t he s ame model and year.The fl uid l evel wi ll fal l wit h brake pad wear.
Abnormal Condi ti ons
Changes i n t he brake pedal feel or brake pedal travel are indicators t hat s omet hi ng coul d be wrong in the brake sys tem.The diagnost ic procedure and techni ques us e brake pedal feel , warning i ndi cat or il lumi nat ion and l ow brake flui d level asindicat ors t o diagnosi ng brake s yst em concerns . The foll owing condi ti ons are consi dered abnormal and indi cat e t hat t hebrake mas t er cyli nder i s in need of repai r:
• NOTE: Pri or to carrying out any diagnosi s , ens ure the brake sys tem warni ng indicator i s functi onal .
Brake pedal goes down fast . This could be caus ed by an external or int ernal leak.Brake pedal goes down s l owl y. Thi s coul d be caused by an int ernal or external l eak.Brake pedal is l ow or feels spongy. Thi s condit ion may be caus ed by no fl ui d i n the brake mas ter cylinder, reservoi rcap vent holes cl ogged or air i n t he hydraul ic s ys tem.Brake pedal effort is excess ive. This may be caus ed by a bi nd or obs t ructi on in the pedal/li nkage, a faul tynon-ret urn val ve, boost er or ins ufficient boos t er vacuum.Rear brakes lock up during light pedal force. Thi s may be caus ed by damaged brake pads , a parti ally appl ied parkingbrake, a damaged ABS s ens or or bearing fail ure.Brake pedal effort errat ic. This condit ion could be caus ed by the brake boos t er or incorrectl y ins tal led brake pads .Brake warning i ndi cat or is on. This may be caus ed by low fl uid l evel or fl oat as s embly damaged.
Non Pressure Leaks
Any reduced fl uid volume in t he brake mast er cyl inder res ervoi r may be caused by two types of none pres sure externalleaks .
Type 1: An ext ernal leak may occur at the brake mast er cyl inder res ervoir cap because of incorrect posi ti oning of t hegasket and cap. Repos it ion cap and gasket .
Type 2: An ext ernal leak may occur at the brake mast er cyl inder res ervoir mounti ng seal s. Repair s uch a l eak by ins tall ingnew s eals and make s ure that t he brake mas t er cyli nder reservoi r ret ai ning bolt i s correct ly i nst all ed.
Page 500 of 3229
1
2
Publi s hed: 11-May-2011
Anti-Lock Control - Anti-Lock Control
Diagnosi s and Tes ti ng
Principles of Operation
For a detail ed descripti on of the Ant i-lock Braking Sys t em (ABS), refer to the relevant Des cri pt ion and Operati on s ect ion i nt he works hop manual . REFER t o: Anti -Lock Cont rol - St abi li ty As s is t (206-09C Anti -Lock Cont rol - St abi lit y As s is t,Des cript ion and Operat ion).
Inspection and Verification
CAUTION: Di agnos is by s ubs ti tut ion from a donor vehicle is NO T acceptabl e. Subs ti tut ion of cont rol modules doesnot guarant ee confirmat ion of a faul t, and may als o caus e addit ional fault s i n t he vehi cl e being t est ed and/or t he donorvehi cl e.
• NOTE: Pri or to any t es ti ng or ins pect ion, the vehicle should be check for any relevant warning l amps bei ng il lumi nat ed. Ifa warning l amp is ill uminat ed, check for DTCs and refer to t he relevant DTC Index, if no warni ng lamp is i ll uminated,cont inue wi th diagnos t ic procedures below.
1. Verify t he cus t omer concern.1.
2. Vis ually ins pect for obvious s igns of damage and s ys t em i ntegri ty.
Visual InspectionMechanicalElectrical
Brake flui d levelVacuum s ys t emW heel s peed sens or ins tall ati onW heel s peed sens or ai r gapSt eering wheel rot ati on sens orAccel erometer/s ens or clus t er i nst all ati onIncorrect wheel or t ire s ize
W arning light operat ionFus esW heel s peed s ens orsConnect ors /Pi nsHarnes s esSt eering wheel rot ati on s ens orAccel eromet er/sens or cl ust erHydraul ic Control Uni t (HCU)
2.
3. If an obvious cause for an obs erved or report ed concern is found, correct t he caus e (if pos s ible) beforeproceeding t o t he next s t ep3.
4. If t he caus e is not vis ually evi dent , check t he ant i-lock braking sys tem and s teering rot ati on s ens or modules forDi agnos ti c Trouble Codes (DTCs) and refer t o t he rel evant DTC Index.4.
DTC Index
• NOTE: If the control modul e or a component i s s us pect and the vehicle remains under manufacturer warrant y, refer t o theW arranty Pol icy and Procedures manual (s ect ion B1.2), or determine i f any pri or approval programme is in operat ion, pri ort o the ins tall ati on of a new module/component.
• NOTE: Generic scan t ool s may not read the codes li st ed, or may read only fi ve digit codes . Mat ch the five di git s from t hes can tool to the firs t fi ve di git s of the seven digi t code l is ted to ident ify t he faul t (t he las t t wo digi ts gi ve addi ti onalinformat ion read by the manufact urer approved diagnos t ic s ys tem).
• NOTE: W hen performing volt age or res is t ance t est s , always use a digi tal mult imeter (DMM) accurat e t o t hree deci malplaces, and wi th an up-t o-date cal ibrat ion cert ificate. W hen tes ti ng res is t ance al ways take t he res is t ance of t he DMMleads i nt o account .
• NOTE: Check and recti fy bas ic faul ts before beginni ng diagnos t ic rout ines i nvol vi ng pinpoint t es t s.
• NOTE: Ins pect connect ors for s igns of water ingres s , and pins for damage and/or corros ion.
• NOTE: If DTCs are recorded and, aft er performi ng the pi npoi nt tes ts , a fault is not present , an int ermi tt ent concern maybe t he caus e. Always check for loose connect ions and corroded terminals .
For a compl ete lis t of all Di agnos ti c Trouble Codes (DTCs) t hat could be logged on this vehicle, pleas e refer to Sect ion100-00.REFER t o: Di agnos t ic Trouble Code (DTC) Index - DTC: Ant i-Lock Braki ng Sys t em (ABS) (100-00 GeneralInformat ion, Des cript ion and Operat ion).
Pinpoint Tests
PINPOINT TEST A : BRAKE VACUU M ASSIST FU NCTION
T ESTCONDIT IONSDET AILS/RESULT S/ACT IO NS
A1: CHECK T HE BRAKE PEDAL T R AVEL WIT H T HE ENGINE OFF
Set i gnit ion s wit ch t o OFF.
Pump t he brake pedal s ix ti mes and hold firm press ure on t he pedal .
Did t he pedal t ravel decreas e and t he pedal go hard as i t was pumped?YesGO t o A2.NoCHECK the vacuum circui t to the brake boos t er. Start the engine and idle for three mi nut es, s wi tchignit ion OFF t hen repeat t he tes t. If t he pedal t ravel does not decreas e, s uspect the brake boos t er.
A2: CHECK T HE BRAKE PEDAL T R AVEL WIT H T HE ENGINE RUNNING
Page 1772 of 3229
il lumi nat ed for t he remaining 2 s econds of the bulb check, this indicates t hat faults are st ored in t he ABS module memory.
If the warning i ndi cat or was il luminat ed due to a wheel speed s ensor faul t, t he i ndicat or will remain ill uminat ed at thenext i gnit ion cycl e, even i f the fault is recti fi ed. W hen the vehicle is driven above a s peed of 20 km/h (12.5 mph) theindicat or wi ll be ext ingui s hed. This al lows t he ABS module to perform a thorough check of t he s yst em and to es t abl is h t hatt he out put from t he repl aced s ensor i s correct .
Low Fuel Level Indicator
The low fuel level indicator is cont roll ed by t he fuel level gage s oftware (s ee above). W hen t he vehicle ent ers power mode6, the low fuel i ndicat or is ill uminat ed in an amber color for a 3 s econd bulb check. If t he fuel level gage softwaredetermines t he low fuel indicator s houl d be i ll uminated, it flas hes t he indicator at a rate of 2 Hz for 5 seconds . The firstfl ash is accompani ed by a chime from t he ins t rument clus ter s ounder. After t he 5 s econd fl as hing period t he indi cat or willremai n i llumi nated unt il fuel is added t o t he t ank or t he vehi cle i gni ti on is swi tched off.
Parking Brake Indicator
The red parking brake i ndi cat or is i ll uminated on receipt of a medium s peed CAN bus s ignal from t he CJB. The s ignalori ginates i n t he parking brake micros wit ch, whi ch is hardwired to the CJB. The parking brake indicator wil l onl y i llumi nateif t he parking brake is appli ed and t he vehi cl e is in power mode 6.
Rear Fog Lamp Indicator
The rear fog lamp indicator is il luminat ed on receipt of a medi um s peed CAN bus s ignal from t he CJB. The i ndicat or isil lumi nat ed i n an amber col or if t he vehi cl e is in power mode 6 and rear fog l amp operat ion has been reques ted.
Front Fog Lamp Indicator
The front fog l amp i ndi cat or is i ll uminated on recei pt of a medium s peed CAN bus si gnal from the CJB. The indi cat or i sil lumi nat ed i n a green color i f the vehicle is i n power mode 6 and front fog lamp operat ion has been reques ted.
Adaptive Front Lighting System Indicator
The Adapt ive Front l ight ing Syst em (AFS) indicator i s cont rol led by t he AFS module. The AFS module i s hardwi red t o t heCJB, whi ch relays s ignals to the i nst rument clus ter over the medi um s peed CAN bus . When t he vehi cl e enters power mode6, the AFS indicator is ill uminat ed in an amber color for a 3 s econd bul b check. If duri ng AFS operati on a faul t is det ect ed,t he AFS indicator wi ll fl ash at a frequency of 2 Hz.
Speed Control Indicator
The s peed control indicator i s cont roll ed by t he ECM, which t rans mit s a s peed cont rol acti ve si gnal t o t he ins t rumentclus ter via the CJB. The indicator wi ll il lumi nat e i n an amber col or when the vehicle is i n power mode 6 and s peed cont rolis act ive.
Trailer Indicator
The t rail er indicator is cont roll ed by t he ins trument cl ust er on receipt of medium speed CAN bus si gnal s from the CJB.W hen a trailer i s connected t o t he vehi cle el ect ri cal s ys t em and t he t urn s i gnal indicat or s wi tch i s operated, t he CJBt ransmit s a s ignal to the ins trument cl us t er to operat e t he t rail er indicator. The inst rument clus t er s oftware cont rol s thefl ash rat e of the indicator which flas hes in a green color. The t rai ler indi cat or flas hes s lowly, at t he s ame rat e as t he t urns ignal indicators .
Low Washer Fluid Indicator
The low washer fluid indicator is il luminat ed on receipt of a medi um s peed CAN bus signal from t he CJB. The s i gnalori ginates i n t he low washer fl uid l evel s wit ch, whi ch is hardwired to the CJB.
The amber low was her fl uid i ndi cat or is s ubject t o a 3 second bul b check when the vehicle ent ers power mode 6. If a lowwas her fluid level is detect ed for more t han 15 seconds when the vehicle is i n power mode 6, the ins trument cl us t er wil lil lumi nat e t he indi cat or.
Low Engine Coolant Level Warning Ind icator
The low engi ne cool ant l evel warni ng indicat or i s il lumi nat ed on recei pt of a medium speed CAN bus s i gnal from the CJBwhen t he vehi cl e is in power mode 6. The s ignal origi nat es in the ECM, whi ch trans mits the s i gnal t o t he CJB over t he highs peed CAN bus.
W hen t he vehicle ent ers power mode 6, the amber l ow engine coolant level warning i ndi cat or is i ll uminated for a 3 secondbulb check. If the warning i ndi cat or remai ns ill uminat ed aft er this period, the engine cooli ng s yst em s hould be checked forleaks and t opped up as necess ary.
Transmission Warning Indicator
The t ransmis s ion warni ng indi cat or di spl ays aut omati c transmis s ion and acti ve-on demand coupli ng warni ngs . The warni ngindicat or i s il lumi nat ed on recei pt of medi um s peed CAN bus s ignals from t he CJB. The s ignals origi nat e i n theTrans mis s ion Cont rol Modul e (TCM) and the act ive-on demand coupl ing control modul e res pect ively and are t rans mi tt ed tot he CJB over t he high s peed CAN bus .
The t ransmis s ion warni ng indi cat or i s a dual col or indicator, whi ch is subject t o a 3 second bulb check when the vehicleenters power mode 6. For t he fi rs t 1.5 seconds of the bulb check t he indicator i llumi nates i n an amber col or, fol lowed by1.5 seconds ill uminat ed in a red color.
The t abl e below det ails warning i ndicat or col or agai ns t mes s age cent er mess age.
Page 1773 of 3229
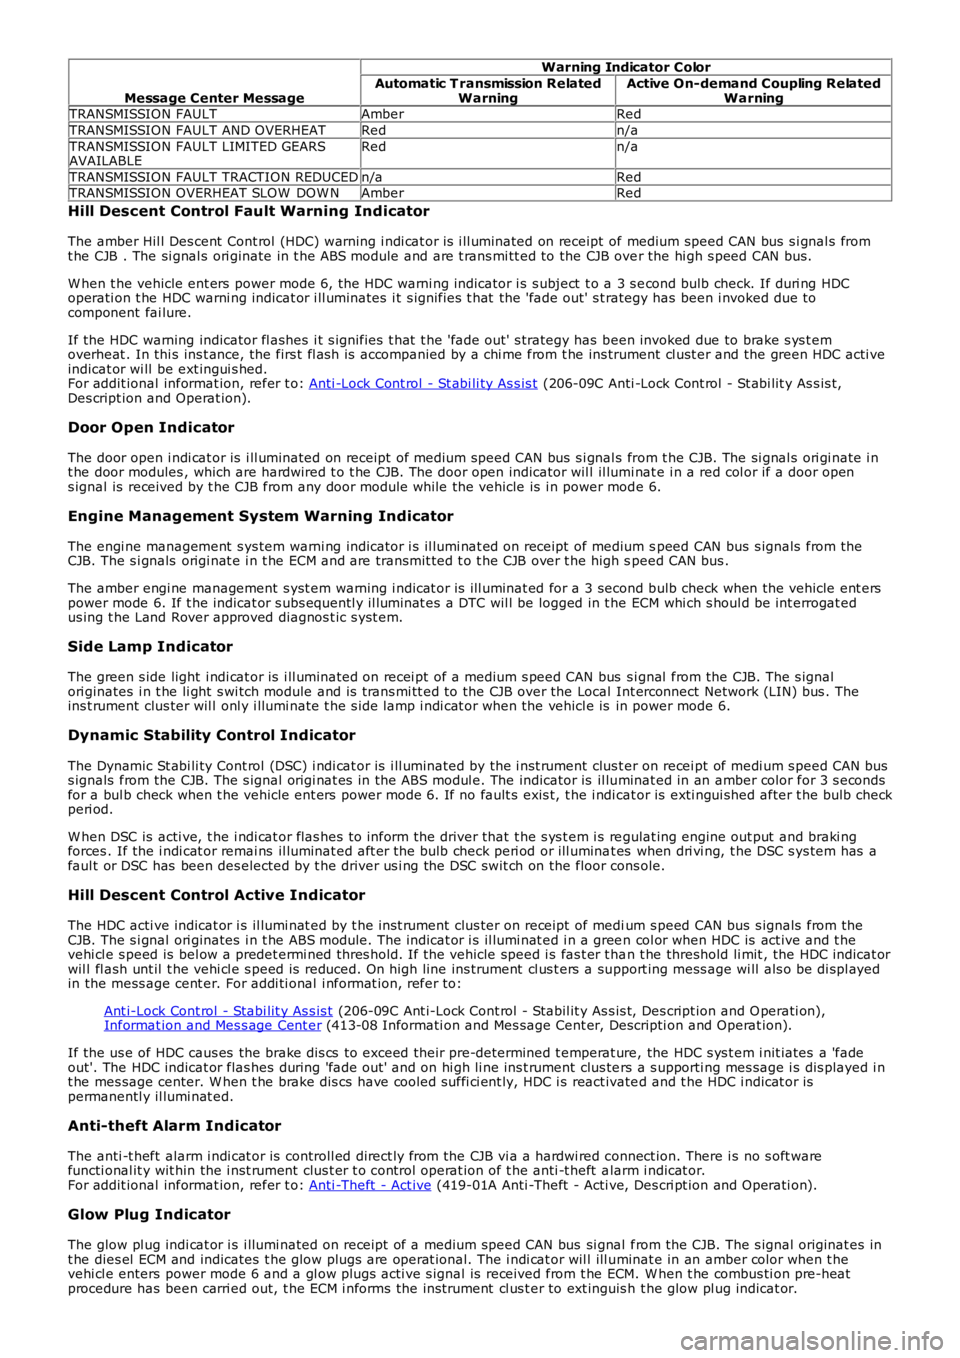
Message Center Message
Warning Indicator Color
Automatic T ransmission RelatedWarningActive On-demand Coupling RelatedWarningTRANSMISSION FAULTAmberRed
TRANSMISSION FAULT AND OVERHEATRedn/a
TRANSMISSION FAULT LIMITED GEARSAVAILABLERedn/a
TRANSMISSION FAULT TRACTION REDUCEDn/aRedTRANSMISSION OVERHEAT SLOW DOW NAmberRed
Hill Descent Control Fault Warning Ind icator
The amber Hil l Des cent Cont rol (HDC) warning i ndi cat or is i ll uminated on receipt of medium speed CAN bus s i gnal s fromt he CJB . The si gnal s ori ginate in t he ABS module and are t rans mi tt ed to the CJB over the hi gh s peed CAN bus.
W hen t he vehicle ent ers power mode 6, the HDC warni ng indicator i s s ubject t o a 3 s econd bulb check. If duri ng HDCoperati on t he HDC warni ng indicat or i ll uminates i t s ignifies t hat the 'fade out' s t rategy has been i nvoked due tocomponent fai lure.
If the HDC warning indicator fl ashes i t s ignifies t hat t he 'fade out' s trategy has been invoked due to brake s ys t emoverheat . In thi s ins t ance, the firs t fl as h is accompanied by a chi me from t he ins trument cl ust er and the green HDC acti veindicat or wi ll be ext ingui s hed.For addit ional informat ion, refer t o: Anti -Lock Cont rol - St abi li ty As s is t (206-09C Anti -Lock Cont rol - St abi lit y As s is t,Des cript ion and Operat ion).
Door Open Indicator
The door open i ndi cat or is i ll uminated on receipt of medium speed CAN bus s i gnal s from t he CJB. The si gnal s ori gi nate i nt he door modules , which are hardwired t o t he CJB. The door open indicator wil l il lumi nat e i n a red col or if a door opens ignal is received by t he CJB from any door module while the vehicle is i n power mode 6.
Engine Management System Warning Indicator
The engi ne management s ys tem warni ng indicator i s il lumi nat ed on receipt of medium speed CAN bus s ignals from theCJB. The s i gnals origi nat e i n t he ECM and are transmit ted t o t he CJB over t he high speed CAN bus .
The amber engi ne management s yst em warning i ndicat or is ill uminat ed for a 3 second bulb check when the vehicle ent erspower mode 6. If t he indicat or s ubs equentl y il lumi nat es a DTC wil l be logged in t he ECM whi ch s houl d be int errogat edus ing t he Land Rover approved diagnos t ic s yst em.
Side Lamp Indicator
The green s ide light i ndi cat or is i ll uminated on recei pt of a medium s peed CAN bus si gnal from the CJB. The s ignalori ginates i n t he li ght s wi tch module and is t rans mi tt ed to the CJB over the Local Int erconnect Network (LIN) bus . Theins t rument clus ter wil l onl y i llumi nate t he s ide lamp i ndi cat or when the vehicl e is in power mode 6.
Dynamic Stability Control Indicator
The Dynamic St abi li ty Cont rol (DSC) i ndi cat or is i ll uminated by the i nst rument clus ter on recei pt of medi um s peed CAN buss ignals from the CJB. The s ignal origi nat es in the ABS modul e. The indicator is il luminat ed in an amber color for 3 s econdsfor a bul b check when t he vehicle ent ers power mode 6. If no fault s exis t, t he i ndi cat or is exti ngui shed after t he bulb checkperi od.
W hen DSC is acti ve, t he i ndi cat or flas hes t o inform the driver that t he s ys t em i s regulat ing engine out put and braki ngforces . If the i ndi cat or remai ns il luminat ed aft er the bulb check peri od or ill uminat es when dri vi ng, t he DSC s ys tem has afaul t or DSC has been des elected by t he driver us i ng the DSC swit ch on the floor cons ole.
Hill Descent Control Active Indicator
The HDC acti ve indicat or i s il lumi nat ed by t he ins t rument clus ter on receipt of medium s peed CAN bus s ignals from theCJB. The s i gnal ori ginates i n t he ABS module. The indicat or i s il lumi nat ed i n a green col or when HDC is act ive and t hevehi cl e s peed is bel ow a predet ermi ned thres hold. If the vehicle speed i s fas t er t han t he threshold li mit , the HDC indicat orwil l fl ash unt il t he vehi cl e s peed is reduced. On high line ins trument cl us t ers a support ing mess age wi ll als o be di spl ayedin the mess age cent er. For addi ti onal i nformat ion, refer to:
Ant i-Lock Cont rol - Stabi lit y As s is t (206-09C Ant i-Lock Cont rol - Stabil it y As s is t, Des cript ion and O perati on),Informat ion and Mes s age Cent er (413-08 Informati on and Mes sage Cent er, Descripti on and Operat ion).
If the us e of HDC caus es the brake di s cs to exceed their pre-determined t emperat ure, the HDC s ys t em i nit iates a 'fadeout'. The HDC indicat or flas hes during 'fade out ' and on hi gh li ne ins t rument clus ters a s upporti ng mes sage i s dis played i nt he mes sage center. W hen t he brake dis cs have cooled suffi ci ent ly, HDC i s react ivated and t he HDC i ndicat or ispermanentl y il lumi nat ed.
Anti-theft Alarm Indicator
The anti -t heft alarm i ndi cat or is controll ed direct ly from the CJB vi a a hardwi red connect ion. There i s no s oft warefuncti onal it y wit hin the i nst rument clus t er t o control operat ion of t he anti -t heft alarm i ndicat or.For addit ional informat ion, refer t o: Anti -Theft - Act ive (419-01A Anti -Theft - Acti ve, Des cri pt ion and Operati on).
Glow Plug Indicator
The glow pl ug indi cat or i s i llumi nated on recei pt of a medium speed CAN bus si gnal from the CJB. The s ignal originat es int he dies el ECM and indicates t he glow plugs are operat ional. The i ndi cat or wil l ill uminat e in an amber color when t hevehi cl e enters power mode 6 and a gl ow plugs acti ve s ignal is received from t he ECM. W hen t he combus ti on pre-heatprocedure has been carri ed out, t he ECM i nforms the ins trument cl us t er to ext inguis h t he glow pl ug indicat or.
Page 1791 of 3229
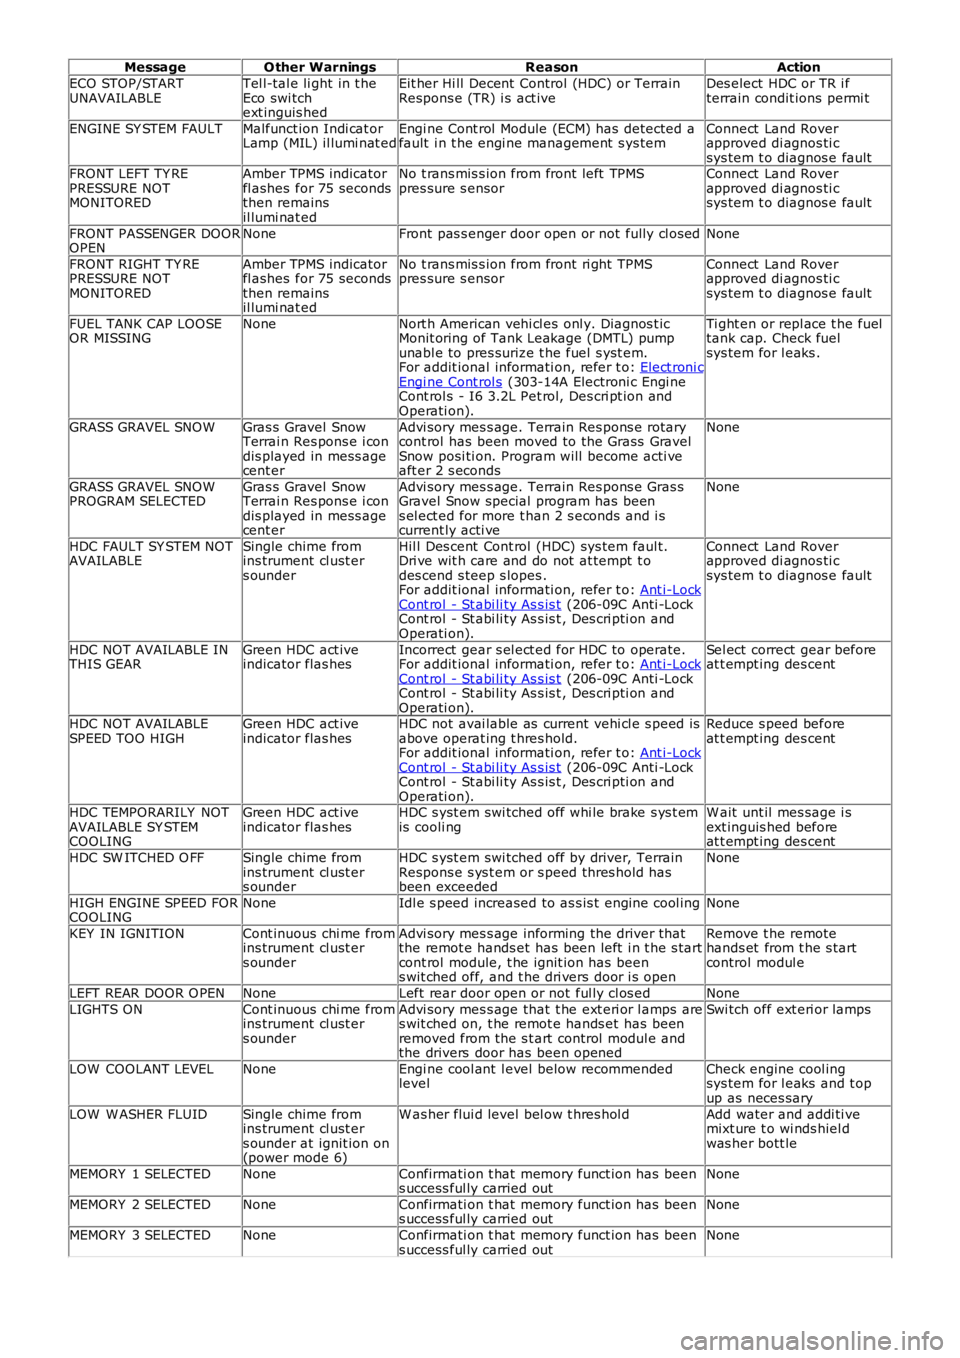
MessageO ther WarningsReasonAction
ECO STOP/STARTUNAVAILABLETel l-tal e li ght in t heEco swi tchext inguis hed
Eit her Hi ll Decent Control (HDC) or TerrainRespons e (TR) i s act iveDes elect HDC or TR i fterrain condit ions permi t
ENGINE SY STEM FAULTMalfunct ion Indi cat orLamp (MIL) il lumi nat edEngi ne Cont rol Module (ECM) has detected afault i n t he engi ne management s ys temConnect Land Roverapproved di agnos ti csys tem t o diagnos e faultFRONT LEFT TY REPRESSURE NOTMONITORED
Amber TPMS indicatorfl ashes for 75 secondsthen remainsil lumi nat ed
No t rans mis s ion from front left TPMSpres sure s ensorConnect Land Roverapproved di agnos ti csys tem t o diagnos e fault
FRONT PASSENGER DOOROPENNoneFront pas s enger door open or not fully cl osedNone
FRONT RIGHT TY REPRESSURE NOTMONITORED
Amber TPMS indicatorfl ashes for 75 secondsthen remainsil lumi nat ed
No t rans mis s ion from front ri ght TPMSpres sure s ensorConnect Land Roverapproved di agnos ti csys tem t o diagnos e fault
FUEL TANK CAP LOOSEOR MISSINGNoneNort h American vehi cl es onl y. Diagnos t icMonit oring of Tank Leakage (DMTL) pumpunabl e to pres surize t he fuel s yst em.For addit ional informati on, refer t o: Elect roni cEngi ne Cont rol s (303-14A Electroni c Engi neCont rol s - I6 3.2L Pet rol, Des cri pt ion andOperati on).
Ti ght en or repl ace t he fueltank cap. Check fuelsys tem for l eaks .
GRASS GRAVEL SNOWGras s Gravel SnowTerrai n Res pons e i condis played in mess agecent er
Advi sory mes s age. Terrain Res pons e rotarycont rol has been moved to the Grass GravelSnow posi ti on. Program will become acti veaft er 2 s econds
None
GRASS GRAVEL SNOWPROGRAM SELECTEDGras s Gravel SnowTerrai n Res pons e i condis played in mess agecent er
Advi sory mes s age. Terrain Res pons e Gras sGravel Snow special program has beens el ect ed for more t han 2 s econds and i scurrent ly acti ve
None
HDC FAULT SY STEM NOTAVAILABLESingle chime fromins trument cl ust ers ounder
Hil l Des cent Cont rol (HDC) sys tem faul t.Dri ve wit h care and do not at tempt t odes cend s teep s lopes .For addit ional informati on, refer t o: Ant i-LockCont rol - St abi li ty As s is t (206-09C Anti -LockCont rol - St abi li ty As s is t , Des cri pti on andOperati on).
Connect Land Roverapproved di agnos ti csys tem t o diagnos e fault
HDC NOT AVAILABLE INTHIS GEARGreen HDC act iveindicator flas hesIncorrect gear s el ect ed for HDC to operate.For addit ional informati on, refer t o: Ant i-LockCont rol - St abi li ty As s is t (206-09C Anti -LockCont rol - St abi li ty As s is t , Des cri pti on andOperati on).
Sel ect correct gear beforeat t empt ing des cent
HDC NOT AVAILABLESPEED TOO HIGHGreen HDC act iveindicator flas hesHDC not avai lable as current vehi cl e s peed isabove operat ing t hres hold.For addit ional informati on, refer t o: Ant i-LockCont rol - St abi li ty As s is t (206-09C Anti -LockCont rol - St abi li ty As s is t , Des cri pti on andOperati on).
Reduce s peed beforeat t empt ing des cent
HDC TEMPORARILY NOTAVAILABLE SY STEMCOOLING
Green HDC act iveindicator flas hesHDC s yst em swi tched off whi le brake s ys t emis cooli ngW ait unt il mes sage i sext inguis hed beforeat t empt ing des cent
HDC SW ITCHED O FFSingle chime fromins trument cl ust ers ounder
HDC s yst em swi tched off by driver, TerrainRespons e s ys t em or s peed thres hold hasbeen exceeded
None
HIGH ENGINE SPEED FORCOOLINGNoneIdl e s peed increased to as s is t engine cool ingNone
KEY IN IGNITIONCont inuous chi me fromins trument cl ust ers ounder
Advi sory mes s age informing the driver thatthe remot e hands et has been left i n t he s tartcont rol module, t he ignit ion has beens wit ched off, and t he dri vers door i s open
Remove t he remotehands et from t he s tartcontrol modul e
LEFT REAR DOOR O PENNoneLeft rear door open or not ful ly cl os edNone
LIGHTS ONCont inuous chi me fromins trument cl ust ers ounder
Advi sory mes s age that t he ext eri or l amps ares wit ched on, t he remot e hands et has beenremoved from the s t art control modul e andthe drivers door has been opened
Swi tch off ext eri or lamps
LOW COOLANT LEVELNoneEngi ne cool ant l evel below recommendedlevelCheck engine cool ingsys tem for l eaks and t opup as neces sary
LOW W ASHER FLUIDSingle chime fromins trument cl ust ers ounder at ignit ion on(power mode 6)
W as her flui d level bel ow t hres hol dAdd water and addi ti vemixt ure t o wi nds hiel dwas her bott le
MEMORY 1 SELECTEDNoneConfirmati on t hat memory funct ion has beens uccess ful ly carried outNone
MEMORY 2 SELECTEDNoneConfirmati on t hat memory funct ion has beens uccess ful ly carried outNone
MEMORY 3 SELECTEDNoneConfirmati on t hat memory funct ion has beens uccess ful ly carried outNone
Page 1826 of 3229
1
2
1
2
3
4
5
1
Is the bat tery warning lamp i ll uminated?YesGO t o Pi npoint Tes t C.NoThe generat or output is wit hi n t he expected range, Do not replace the generator. If cus tomerconcern i s s ti ll evident cont act dealer t echnical support
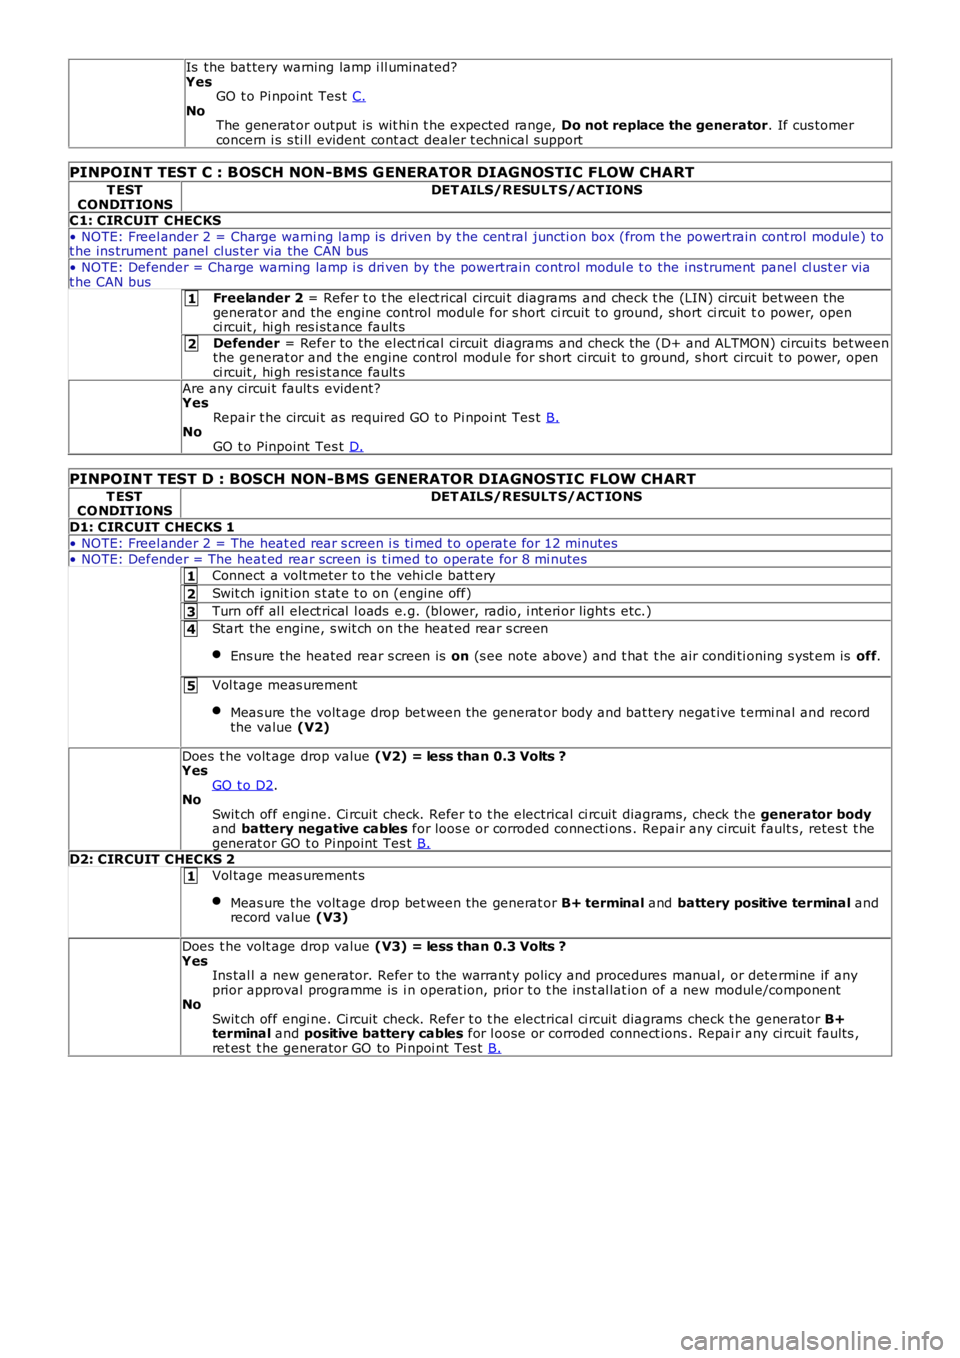
PINPOINT TEST C : BOSCH NON-BMS G ENERATOR DIAG NOSTIC FLOW CHART
T ESTCONDIT IONSDET AILS/RESULT S/ACT IONS
C1: CIRCUIT CHECKS
• NOTE: Freel ander 2 = Charge warni ng lamp is driven by t he cent ral juncti on box (from t he powert rain cont rol module) tot he ins trument panel clus ter via the CAN bus
• NOTE: Defender = Charge warning lamp i s dri ven by the powertrain control modul e t o the ins trument panel cl ust er viat he CAN busFreelander 2 = Refer t o t he elect rical circui t diagrams and check t he (LIN) ci rcuit bet ween thegenerat or and the engine control modul e for s hort ci rcuit t o ground, short ci rcuit to power, openci rcuit , hi gh res i st ance fault s
Defender = Refer to the el ect ri cal circuit di agrams and check the (D+ and ALTMON) circui ts bet weenthe generat or and t he engine control modul e for s hort circui t to ground, s hort circui t t o power, openci rcuit , hi gh res i st ance fault s
Are any circui t fault s evident?YesRepair t he circui t as required GO t o Pi npoi nt Tes t B.NoGO t o Pinpoint Tes t D.
PINPOINT TEST D : BOSCH NON-BMS GENERATOR DIAGNOSTIC FLOW CHART
T ESTCO NDIT IONSDET AILS/RESULT S/ACT IONS
D1: CIRCUIT CHECKS 1
• NOTE: Freel ander 2 = The heat ed rear s creen i s ti med t o operat e for 12 minutes• NOTE: Defender = The heat ed rear s creen is t imed to operate for 8 mi nutes
Connect a volt meter t o t he vehi cl e batt ery
Swit ch ignit ion s t at e t o on (engine off)
Turn off al l elect rical l oads e.g. (bl ower, radio, i nt eri or light s etc.)
Start the engine, s wit ch on the heat ed rear s creen
Ens ure the heated rear s creen is on (s ee note above) and t hat t he air condi ti oning s yst em is off.
Vol tage meas urement
Meas ure the volt age drop bet ween the generat or body and bat tery negat ive t ermi nal and recordthe value (V2)
Does t he volt age drop value (V2) = less than 0.3 Volts ?YesGO t o D2.NoSwit ch off engi ne. Ci rcuit check. Refer t o t he electrical ci rcuit diagrams, check the generator bodyand battery negative cables for loos e or corroded connecti ons . Repair any circuit fault s, retes t t hegenerat or GO t o Pi npoint Tes t B.D2: CIRCUIT CHECKS 2
Vol tage meas urement s
Meas ure the volt age drop bet ween the generat or B+ terminal and battery positive terminal andrecord value (V3)
Does t he volt age drop value (V3) = less than 0.3 Volts ?YesIns tal l a new generator. Refer to the warrant y policy and procedures manual, or determine if anyprior approval programme is i n operat ion, prior t o t he ins t al lat ion of a new modul e/componentNoSwit ch off engi ne. Ci rcuit check. Refer t o t he electrical ci rcuit diagrams check t he generator B+terminal and positive battery cables for l oose or corroded connect ions . Repai r any ci rcuit faul ts ,ret es t t he generator GO to Pi npoi nt Tes t B.
Page 2557 of 3229
Publ is hed: 11-May-2011
Front End Sheet Metal Repairs - Front Side Member Section
Removal and Installation
Removal
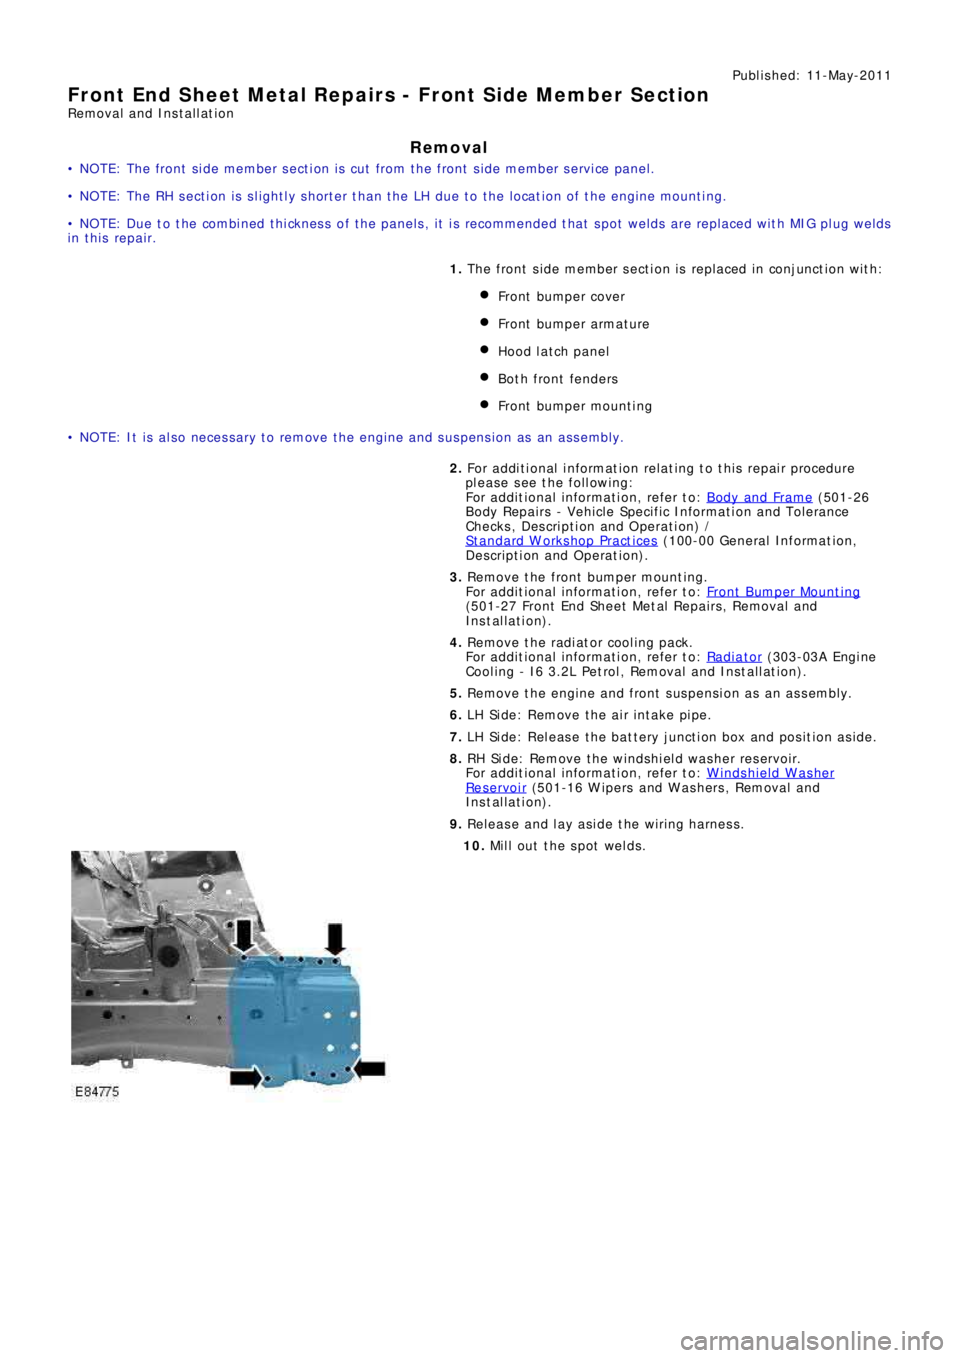
• NOTE: The front side member section is cut from the front side member service panel.
• NOTE: The RH section is slightly shorter than the LH due to the location of the engine mounting.
• NOTE: Due to the combined thickness of the panels, it is recommended that spot welds are replaced with MIG plug welds
in this repair.
1. The front s ide member s ect ion is replaced in conjunct ion wit h:
Front bumper cover
Front bumpe r a rma t ure
Hood lat ch panel
Both front fenders
Front bumpe r mount i ng
• NOTE: It is also necessary to remove the engine and suspension as an assembly.
2. Fo r a d d i t i o na l i nf o rma t i o n re l a t i ng t o t hi s re p a i r p ro ce d ure
please see the following:
Fo r a d d i t i o na l i nf o rma t i o n, re f e r t o : Body and Frame
(501-26
Body Repairs - Vehicle Specific Information and Tolerance
Checks, Description and Operation) /
St a nd a rd W o rks ho p P ra ct i ce s
(100-00 Ge ne ra l I nf o rma t i o n,
Description and Operation).
3. Re move t he f ront bumpe r mount i ng.
Fo r a d d i t i o na l i nf o rma t i o n, re f e r t o : Front Bumper Mount ing
(501-27 Front End Sheet Met al Re pai rs , Removal and
Installation).
4. Remove the radiator cooling pack.
Fo r a d d i t i o na l i nf o rma t i o n, re f e r t o : Radiator
(303-03A Engi ne
Cooling - I6 3.2L Petrol, Removal and Installation).
5. Remove the engine and front suspension as an assembly.
6. LH Side: Remove the air intake pipe.
7. LH Side: Release the battery junction box and position aside.
8. RH Side: Remove the windshield washer reservoir.
Fo r a d d i t i o na l i nf o rma t i o n, re f e r t o : Windshield Washer
Res ervoi r (501-16 W i pers and W as hers , Removal and
Installation).
9. Release and lay aside the wiring harness.
10. Mill out the spot welds.