2006 LAND ROVER FRELANDER 2 check engine light
[x] Cancel search: check engine lightPage 2724 of 3229

Contents
4
L
Climate control
AIR VENTS ................................................... 101
MANUAL CLIMATE CONTROL ...................... 102
AUTOMATIC CLIMATE CONTROL ................. 103
HEATED WINDOWS AND MIRRORS ............ 104
AUXILIARY HEATER ..................................... 104
ELECTRIC SUNROOF .................................... 105
Convenience features
SUN VISORS ................................................ 107
CLOCK .......................................................... 107
CIGAR LIGHTER ........................................... 109
ASHTRAY ..................................................... 109
AUXILIARY POWER SOCKETS ..................... 110
CUP HOLDERS ............................................. 111
STORAGE COMPARTMENTS ........................ 112
Starting the engine
GENERAL INFORMATION ............................. 113
STARTING A PETROL ENGINE ..................... 114
STARTING A DIESEL ENGINE ....................... 115
DIESEL PARTICULATE FILTER (DPF) ........... 116
Transmission
MANUAL TRANSMISSION ............................ 118
AUTOMATIC TRANSMISSION ...................... 118
TECHNICAL SPECIFICATIONS ...................... 122
Brakes
PRINCIPLE OF OPERATION .......................... 123
HINTS ON DRIVING WITH ABS .................... 123
PARKING BRAKE .......................................... 124
Parking aid
PRINCIPLE OF OPERATION .......................... 126
USING THE PARKING AID ............................ 127
Driving hints
GENERAL DRIVING POINTS ......................... 128
REDUCED ENGINE PERFORMANCE ............. 128
RUNNING-IN ................................................ 128
ECONOMICAL DRIVING ................................ 129
Cruise control
PRINCIPLE OF OPERATION .......................... 130
USING CRUISE CONTROL ............................ 130
Terrain response
PRINCIPLE OF OPERATION .......................... 132
USING TERRAIN RESPONSE ........................ 132
Hill descent control (HDC)
PRINCIPLE OF OPERATION .......................... 136
USING HDC ................................................... 137
Traction control
USING TRACTION CONTROL ........................ 139
Stability control
PRINCIPLE OF OPERATION .......................... 140
USING STABILITY CONTROL ........................ 141
Fuel and refuelling
SAFETY PRECAUTIONS................................. 142
FUEL QUALITY .............................................. 142
RUNNING OUT OF FUEL................................ 144
FUEL CUT-OFF............................................... 144
FUEL FILLER FLAP ........................................ 144
REFUELLING ................................................. 145
TECHNICAL SPECIFICATIONS ....................... 146
Load carrying
GENERAL INFORMATION.............................. 147
LUGGAGE ANCHOR POINTS ......................... 148
LUGGAGE COVERS ....................................... 149
Towing
TOWING A TRAILER...................................... 150
LEVELLING.................................................... 151
ESSENTIAL TOWING CHECKS ...................... 151
RECOMMENDED TOWING WEIGHTS ............ 152
TOW BAR ...................................................... 153
Vehicle care
CLEANING THE ALLOY WHEELS................... 154
CLEANING THE EXTERIOR ............................ 154
CLEANING THE INTERIOR ............................ 155
REPAIRING MINOR PAINT DAMAGE ............ 156
Maintenance
GENERAL INFORMATION.............................. 157
OPENING AND CLOSING THE BONNET......... 160
ENGINE COMPARTMENT OVERVIEW ........... 161
ENGINE OIL CHECK....................................... 162
Page 2741 of 3229
21
Quick start
R
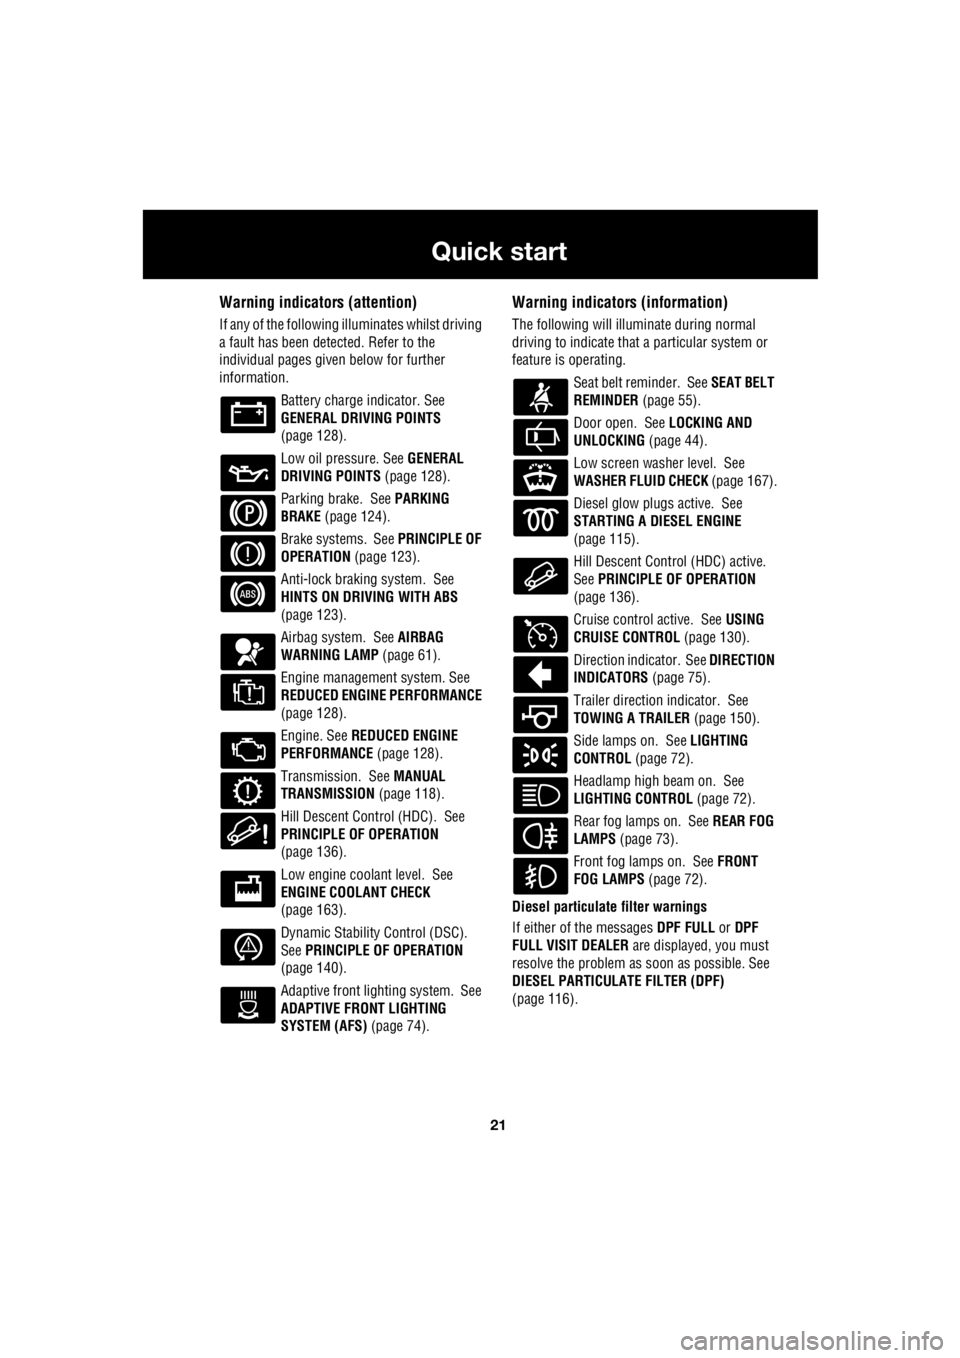
Warning indicators (attention)
If any of the following illuminates whilst driving
a fault has been detected. Refer to the
individual pages give n below for further
information.
Battery charge indicator. See
GENERAL DRIVING POINTS
(page 128).
Low oil pressure. See GENERAL
DRIVING POINTS (page 128).
Parking brake. See PARKING
BRAKE (page 124).
Brake systems. See PRINCIPLE OF
OPERATION (page 123).
Anti-lock braking system. See
HINTS ON DRIVING WITH ABS
(page 123).
Airbag system. See AIRBAG
WARNING LAMP (page 61).
Engine management system. See
REDUCED ENGINE PERFORMANCE
(page 128).
Engine. See REDUCED ENGINE
PERFORMANCE (page 128).
Transmission. See MANUAL
TRANSMISSION (page 118).
Hill Descent Control (HDC). See
PRINCIPLE OF OPERATION
(page 136).
Low engine coolant level. See
ENGINE COOLANT CHECK
(page 163).
Dynamic Stability Control (DSC).
See PRINCIPLE OF OPERATION
(page 140).
Adaptive front lighting system. See
ADAPTIVE FRONT LIGHTING
SYSTEM (AFS) (page 74).
Warning indicators (information)
The following will illuminate during normal
driving to indicate that a particular system or
feature is operating.
Seat belt reminder. See SEAT BELT
REMINDER (page 55).
Door open. See LOCKING AND
UNLOCKING (page 44).
Low screen washer level. See
WASHER FLUID CHECK (page 167).
Diesel glow plugs active. See
STARTING A DIESEL ENGINE
(page 115).
Hill Descent Control (HDC) active.
See PRINCIPLE OF OPERATION
(page 136).
Cruise control active. See USING
CRUISE CONTROL (page 130).
Direction indicator. See DIRECTION
INDICATORS (page 75).
Trailer direction indicator. See
TOWING A TRAILER (page 150).
Side lamps on. See LIGHTING
CONTROL (page 72).
Headlamp high beam on. See
LIGHTING CONTROL (page 72).
Rear fog lamps on. See REAR FOG
LAMPS (page 73).
Front fog lamps on. See FRONT
FOG LAMPS (page 72).
Diesel particulate filter warnings
If either of the messages DPF FULL or DPF
FULL VISIT DEALER are displayed, you must
resolve the problem as soon as possible. See
DIESEL PARTICULATE FILTER (DPF)
(page 116).
Page 2813 of 3229
93
Windows and mirrors
R
Windows and mirrorsELECTRIC WINDOWS
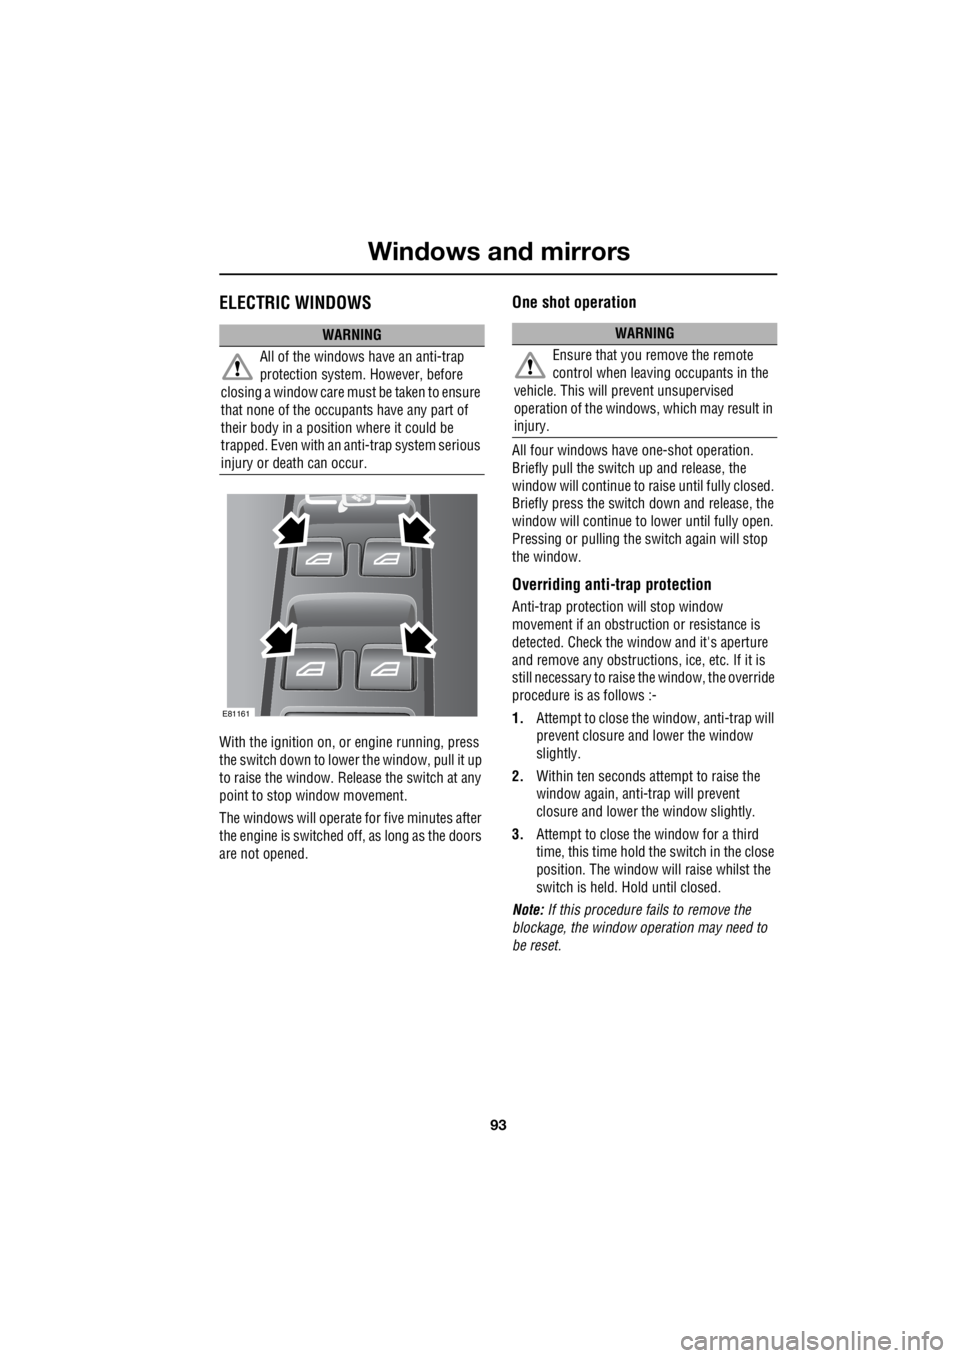
With the ignition on, or engine running, press
the switch down to lower the window, pull it up
to raise the window. Release the switch at any
point to stop window movement.
The windows will operate for five minutes after
the engine is switched off, as long as the doors
are not opened.
One shot operation
All four windows have one-shot operation.
Briefly pull the switch up and release, the
window will continue to raise until fully closed.
Briefly press the switch down and release, the
window will continue to lower until fully open.
Pressing or pulling the switch again will stop
the window.
Overriding anti-trap protection
Anti-trap protection will stop window
movement if an obstruction or resistance is
detected. Check the window and it's aperture
and remove any obstructions , ice, etc. If it is
still necessary to raise the window, the override
procedure is as follows :-
1. Attempt to close the window, anti-trap will
prevent closure and lower the window
slightly.
2. Within ten seconds attempt to raise the
window again, anti-trap will prevent
closure and lower the window slightly.
3. Attempt to close the window for a third
time, this time hold the switch in the close
position. The window will raise whilst the
switch is held. Hold until closed.
Note: If this procedure fails to remove the
blockage, the window operation may need to
be reset.
WARNING
All of the windows have an anti-trap
protection system. However, before
closing a window care must be taken to ensure
that none of the occupa nts have any part of
their body in a position where it could be
trapped. Even with an anti-trap system serious
injury or death can occur.
E81161
WARNING
Ensure that you remove the remote
control when leaving occupants in the
vehicle. This will prevent unsupervised
operation of the windows, which may result in
injury.
Page 2865 of 3229
145
Fuel and refuelling
R
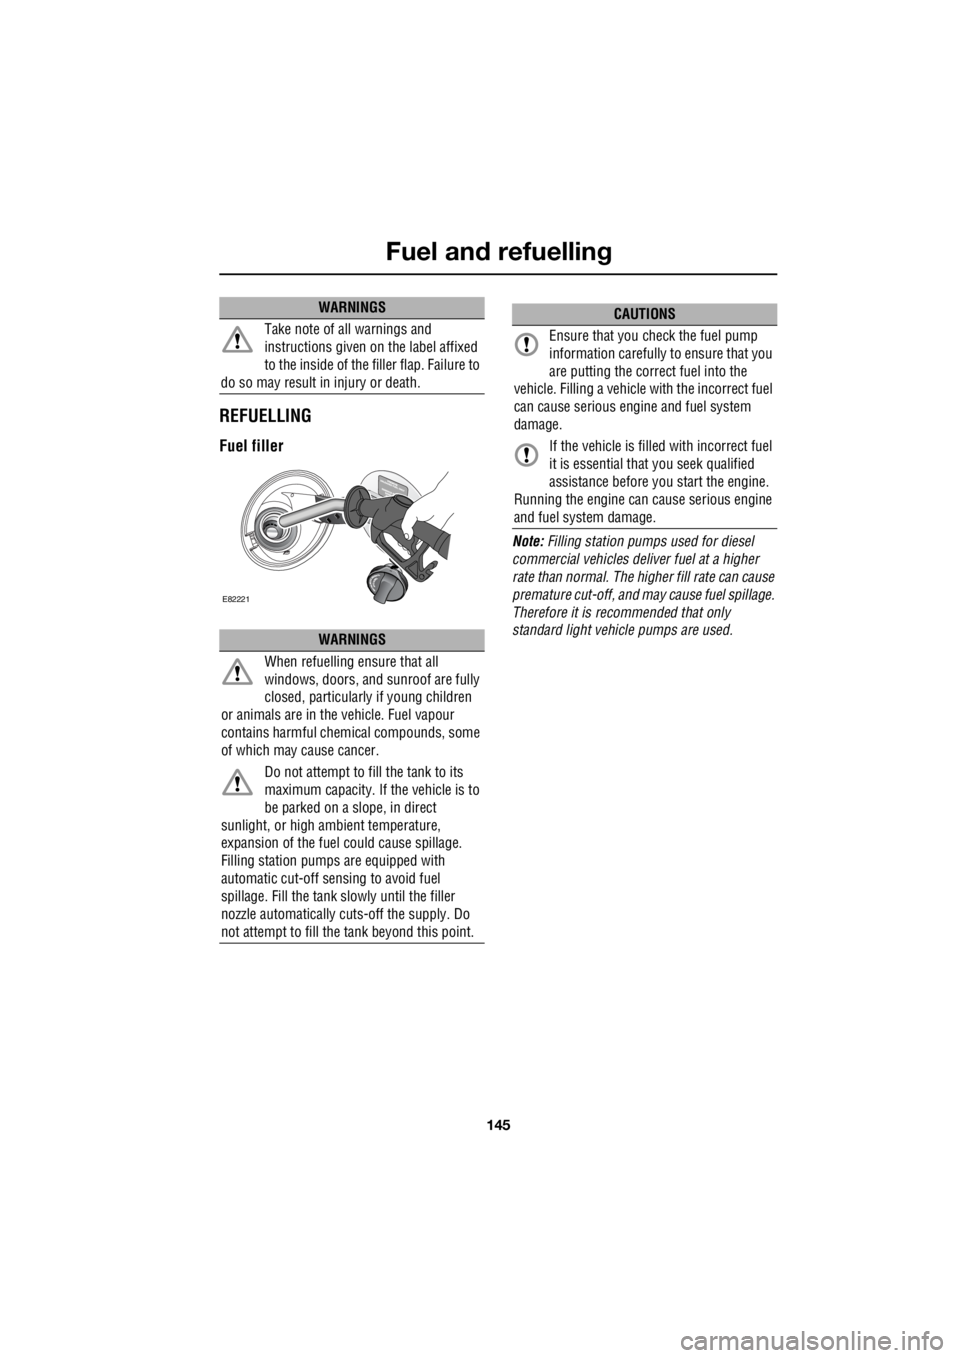
REFUELLING
Fuel filler
Note: Filling station pumps used for diesel
commercial vehicles deliver fuel at a higher
rate than normal. The hi gher fill rate can cause
premature cut-off, and may cause fuel spillage.
Therefore it is recommended that only
standard light vehicle pumps are used.
Take note of all warnings and
instructions given on the label affixed
to the inside of the filler flap. Failure to
do so may result in injury or death.
WARNINGS
When refuelling ensure that all
windows, doors, and sunroof are fully
closed, particularly if young children
or animals are in the vehicle. Fuel vapour
contains harmful chem ical compounds, some
of which may cause cancer.
Do not attempt to fill the tank to its
maximum capacity. If the vehicle is to
be parked on a slope, in direct
sunlight, or high ambient temperature,
expansion of the fuel could cause spillage.
Filling station pumps are equipped with
automatic cut-off sensing to avoid fuel
spillage. Fill the tank sl owly until the filler
nozzle automatically cuts -off the supply. Do
not attempt to fill the tank beyond this point.
WARNINGS
E82221
CAUTIONS
Ensure that you check the fuel pump
information carefully to ensure that you
are putting the correct fuel into the
vehicle. Filling a vehicle with the incorrect fuel
can cause serious engi ne and fuel system
damage.
If the vehicle is filled with incorrect fuel
it is essential that you seek qualified
assistance before you start the engine.
Running the engine can cause serious engine
and fuel system damage.
Page 2882 of 3229
Maintenance
162
L
ENGINE OIL CHECK
The oil consumption of an engine is influenced
by many factors. Under high loads an engine
will consume more oil than usual. Diesel
engines consume slightly more oil than petrol
engines.
Check the oil level weekly, when the engine is
cold and with the vehicle resting on level
ground.
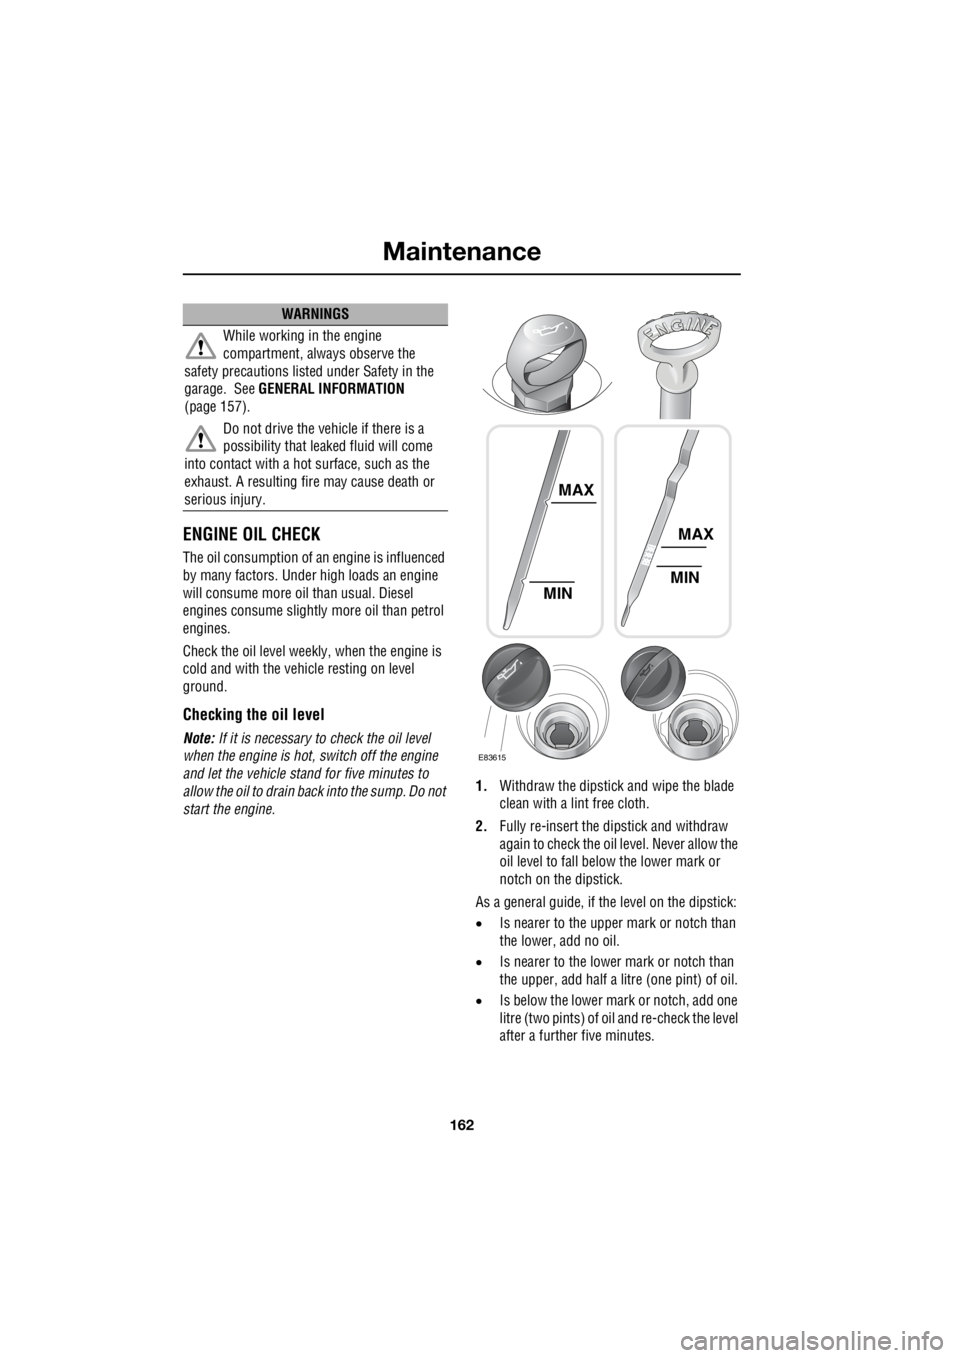
Checking the oil level
Note: If it is necessary to check the oil level
when the engine is hot, switch off the engine
and let the vehicle stand for five minutes to
allow the oil to drain back into the sump. Do not
start the engine. 1.
Withdraw the dipstick and wipe the blade
clean with a lint free cloth.
2. Fully re-insert the dipstick and withdraw
again to check the oil level. Never allow the
oil level to fall belo w the lower mark or
notch on the dipstick.
As a general guide, if th e level on the dipstick:
• Is nearer to the upper mark or notch than
the lower, add no oil.
• Is nearer to the lower mark or notch than
the upper, add half a li tre (one pint) of oil.
• Is below the lower mark or notch, add one
litre (two pints) of oil and re-check the level
after a further five minutes.
WARNINGS
While working in the engine
compartment, always observe the
safety precautions liste d under Safety in the
garage. See GENERAL INFORMATION
(page 157).
Do not drive the vehicle if there is a
possibility that leaked fluid will come
into contact with a hot surface, such as the
exhaust. A resulting fi re may cause death or
serious injury.
MAX
MIN
E83615
MAX
MIN
Page 2886 of 3229
Maintenance
166
L
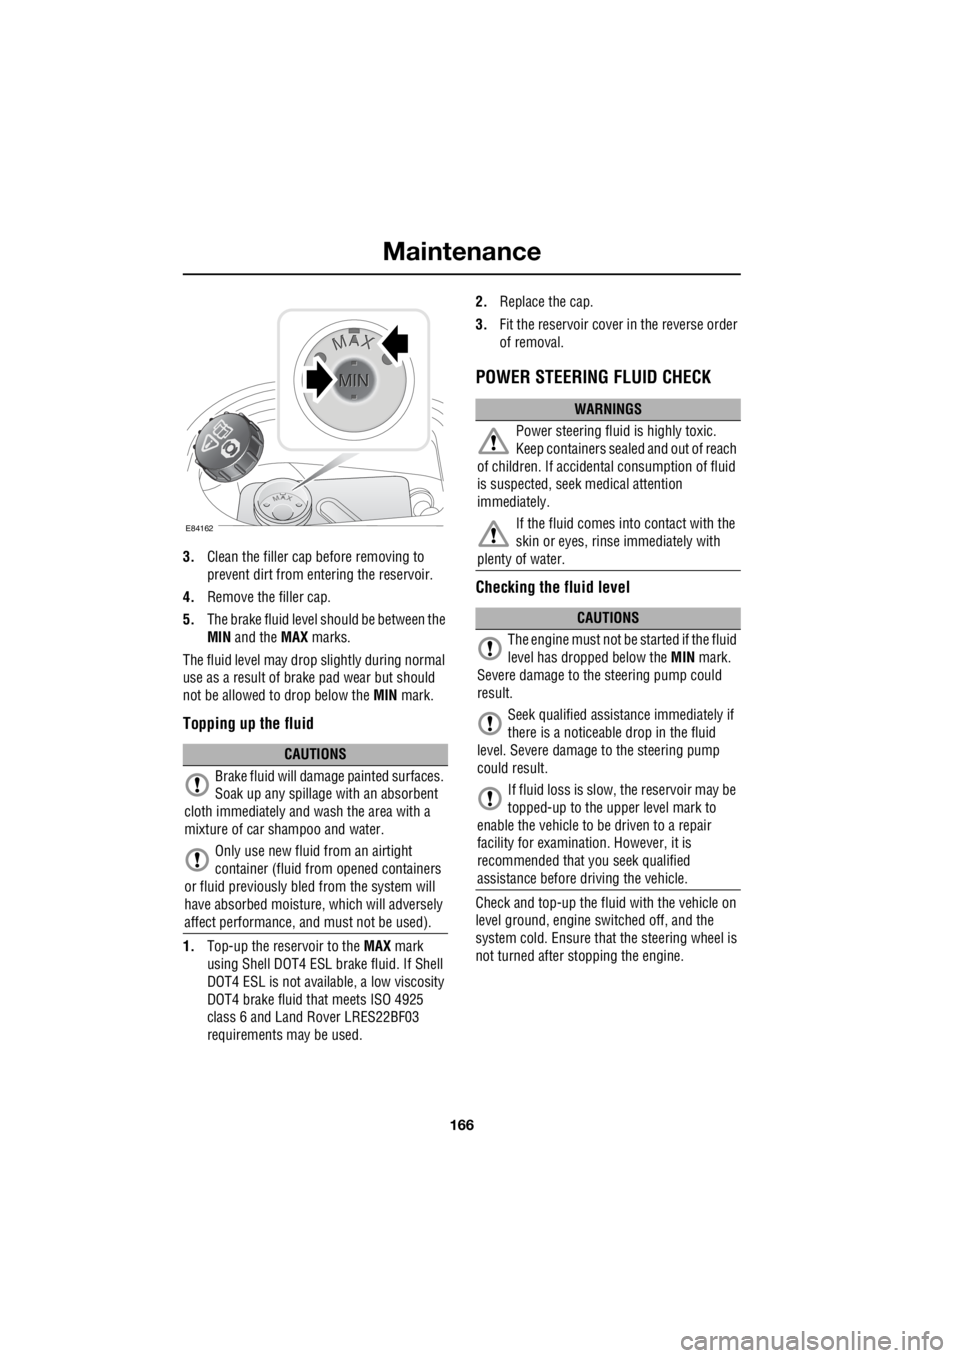
3. Clean the filler cap before removing to
prevent dirt from entering the reservoir.
4. Remove the filler cap.
5. The brake fluid level should be between the
MIN and the MAX marks.
The fluid level may drop slightly during normal
use as a result of brake pad wear but should
not be allowed to drop below the MIN mark.
Topping up the fluid
1.Top-up the reservoir to the MAX mark
using Shell DOT4 ESL brake fluid. If Shell
DOT4 ESL is not availa ble, a low viscosity
DOT4 brake fluid that meets ISO 4925
class 6 and Land Rover LRES22BF03
requirements ma y be used. 2.
Replace the cap.
3. Fit the reservoir cover in the reverse order
of removal.
POWER STEERING FLUID CHECK
Checking the fluid level
Check and top-up the fluid with the vehicle on
level ground, engine switched off, and the
system cold. Ensure that the steering wheel is
not turned after stopping the engine.
CAUTIONS
Brake fluid will damage painted surfaces.
Soak up any spillage with an absorbent
cloth immediately and wash the area with a
mixture of car sh ampoo and water.
Only use new fluid from an airtight
container (fluid from opened containers
or fluid previously bled from the system will
have absorbed moisture, which will adversely
affect performance, and must not be used).
E84162
WARNINGS
Power steering fluid is highly toxic.
Keep containers sealed and out of reach
of children. If accidental consumption of fluid
is suspected, seek medical attention
immediately.
If the fluid comes into contact with the
skin or eyes, rinse immediately with
plenty of water.
CAUTIONS
The engine must not be started if the fluid
level has dropped below the MIN mark.
Severe damage to th e steering pump could
result.
Seek qualified assistance immediately if
there is a noticeable drop in the fluid
level. Severe damage to the steering pump
could result.
If fluid loss is slow, the reservoir may be
topped-up to the uppe r level mark to
enable the vehicle to be driven to a repair
facility for examinatio n. However, it is
recommended that you seek qualified
assistance before driving the vehicle.
Page 2925 of 3229
205
Status after a collision
R
Status after a collisionDRIVING AFTER A COLLISION
Before starting or driving
If the vehicle has been involved in an accident
it should be checke d thoroughly before
attempting to start the engine or drive the
vehicle.
Check for :-
• Fuel leaks.
• Fluid leaks.
• Battery damage.
• Damage to wiring.
• Damage to lights.
• Damage to steering, suspension, wheels
or tyres.
• Sharp or protruding bodywork.
• Operation of doors and locks.
• Condition and operation of seat belts and
SRS components.
• Condition of chil d seats and their
mounting/attach ment points.
Note: This list is not exhaustive.
Resetting the fuel cut-off
The fuel system cut-off forms part of the Safety
and Restraint System (SRS) fitted to your
vehicle. Following an im pact, and depending on
the severity, the fuel pump may be switched
off.
1. Switch the ignition off, and wait for one
minute.
2. Turn the ignition on for 30 seconds.
3. Check the vehicle thoroughly for fuel leaks.
If a leak is detected switch the ignition off
immediately.
• The vehicle must not be started if a leak
is present. Seek qualified advice, and
have the vehicle recovered.
4. If no leaks are detected, start the vehicle.
When driving
When driving a vehicle which has been
involved in a collision use caution and pay extra
attention to the operation of the vehicle. If any
changes in vehicle operati on after the collision
are noted when compared to it's operation
before the collision, do not continue to drive
the vehicle. Stop the vehicle as soon as it is
safe to do so, and have the vehicle recovered.
Pay particular attent ion to changes in :-
• Steering.
• Braking.
• Unusual noises.
• Warning lights or messages displayed.
• Problems with electrical systems.
WARNING
If the vehicle is involved in a collision it
should be checked by a Land Rover
Dealer/Authorised repairer, or suitably
qualified persons before starting or driving.
WARNING
The fuel cut-off s hould never be reset
if you can smell fuel , or a leak can be
seen. Doing so can lead to a fire which
may cause personal injury or death.
Page 2995 of 3229

Index
275
R
Preset buttons . . . . . . . . . . . . . . . . . . . . . 238 Recalling a preset channel . . . . . . . . . 239
Scrolling through presets . . . . . . . . . . 239
Storing channels as presets . . . . . . . . 238
Principle of operation Airbag deployment effects . . . . . . . . . . 61
Airbag operation . . . . . . . . . . . . . . . . . . 60
Airbags . . . . . . . . . . . . . . . . . . . . . . . . . 59
Before driving off-road . . . . . . . . . . . . 136
Brake pads . . . . . . . . . . . . . . . . . . . . . 123
Deployment and deflation . . . . . . . . . . . 60
Dynamic Stability Control (DSC) . . . . . 140
Gradient release control (GRC) . . . . . . 136
Introduction . . . . . . . . . . . . . . . . . . . . . 58
Roll stability control (RSC) . . . . . . . . . 140
Seat belt checks . . . . . . . . . . . . . . . . . . 55
Seat belt safety . . . . . . . . . . . . . . . . . . . 54
Seat belts . . . . . . . . . . . . . . . . . . . . . . . 54
Wet conditions . . . . . . . . . . . . . . . . . . 123
Priority programme type (PTY) . . . . . . . . 231 PTY search - Premium audio . . . . . . . 232
PTY seek - Standard audio . . . . . . . . . 233
PTY selection - Premium audio . . . . . 231Q
Quick start . . . . . . . . . . . . . . . . . . . . . . . . . . 7 Audio system . . . . . . . . . . . . . . . . . . . . . 27
Automatic transmission . . . . . . . . . . . . . 23
Bonnet . . . . . . . . . . . . . . . . . . . . . . . . . . . 9
CD autochanger . . . . . . . . . . . . . . . . . . . 30
CD OPERATION . . . . . . . . . . . . . . . . . . . 30
Clock setting . . . . . . . . . . . . . . . . . . . . . 31
Cruise control . . . . . . . . . . . . . . . . . . . . 24
DAB radio. . . . . . . . . . . . . . . . . . . . . . . . 29
Driving position memory . . . . . . . . . . . . 10
Engine starting . . . . . . . . . . . . . . . . . . . . . 8
Exterior lighting . . . . . . . . . . . . . . . . . . . 22
Facia. . . . . . . . . . . . . . . . . . . . . . . . . . . . 17
Gearshift interlocks . . . . . . . . . . . . . . . . 23
Heating and ventilation. . . . . . . . . . . . . . 14
Hill Descent Control (HDC) . . . . . . . . . . 25
Instrument pack . . . . . . . . . . . . . . . . . . . 19
Manual seat adjustment . . . . . . . . . . . . . 11
Master lock and unlock switches . . . . . . . 9
Overhead console . . . . . . . . . . . . . . . . . 12
Parking aid . . . . . . . . . . . . . . . . . . . . . . . 26
Passenger airbag deactivation . . . . . . . . 13
Power operated seat adjustment . . . . . . 10
Radio operation . . . . . . . . . . . . . . . . . . . 29
Remote control . . . . . . . . . . . . . . . . . . . . 7
Seat belts and Child restraints . . . . . . . . 13
Single CD player. . . . . . . . . . . . . . . . . . . 30
Steering column adjustment . . . . . . . . . 12
Steering column lock . . . . . . . . . . . . . . . 12
Tailgate . . . . . . . . . . . . . . . . . . . . . . . . . . 9
Telephone - Bluetooth system . . . . . . . . 31
Terrain Response system. . . . . . . . . . . . 25
Warning indicators (attention) . . . . . . . . 21
Warning indicators (information) . . . . . . 21
Windows and Door mirrors . . . . . . . . . . 11
Wipers and washers. . . . . . . . . . . . . . . . 22
R
Radio data system (RDS) . . . . . . . . . . . . . 228 Selecting RDS . . . . . . . . . . . . . . . . . . . 228
Radio reception . . . . . . . . . . . . . . . . . . . . 218
Rain sensor . . . . . . . . . . . . . . . . . . . . . . . . 87
Operation . . . . . . . . . . . . . . . . . . . . . . . . 88
Rear fog lamps . . . . . . . . . . . . . . . . . . . . . . 73