2006 LAND ROVER FRELANDER 2 engine oil
[x] Cancel search: engine oilPage 634 of 3229
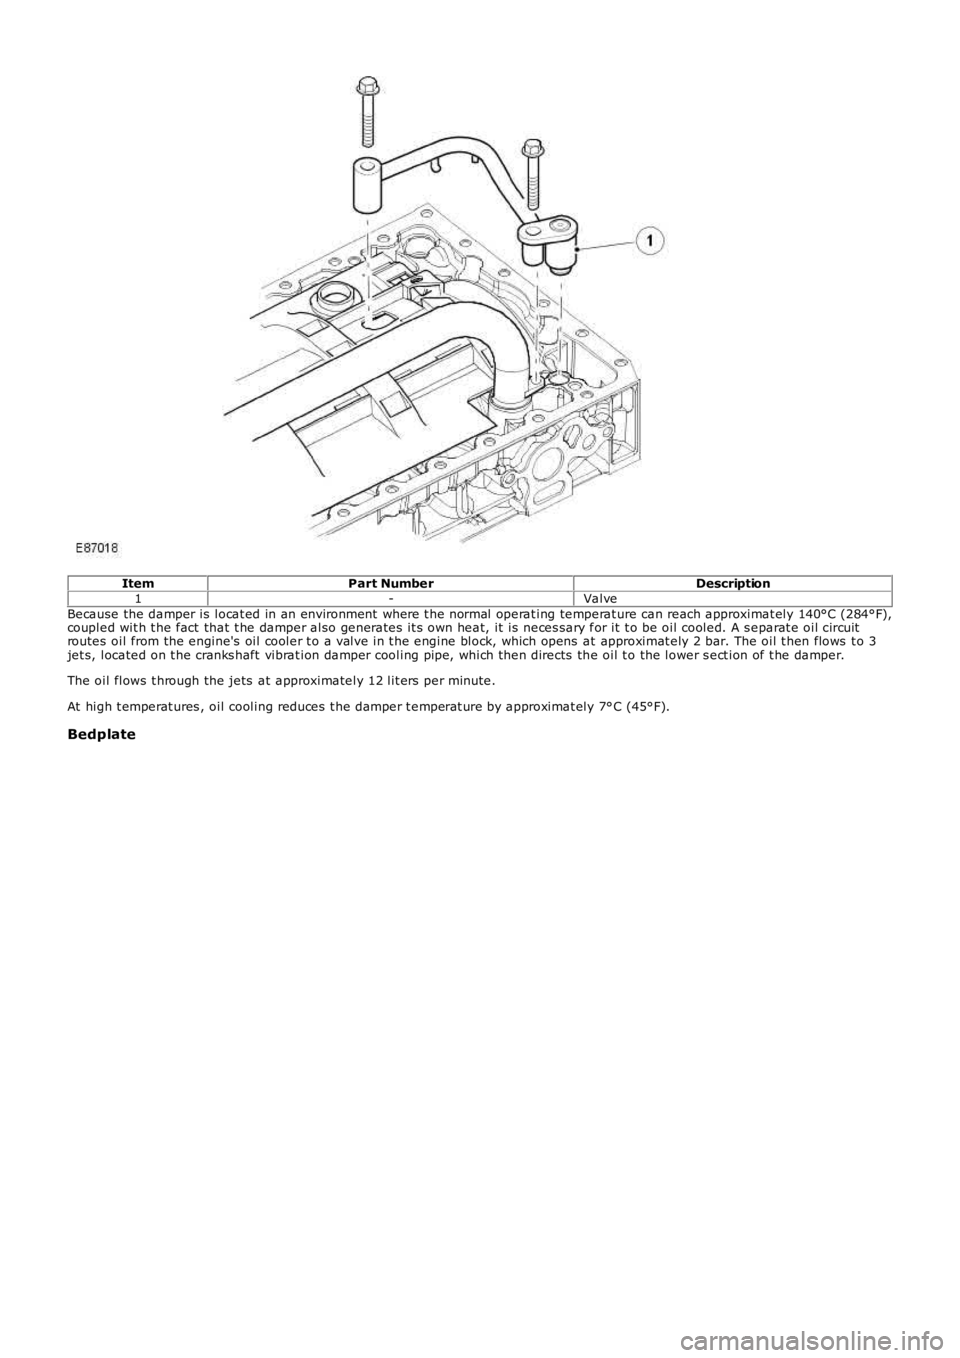
ItemPart NumberDescription1-ValveBecause the damper is locat ed in an environment where t he normal operat ing temperat ure can reach approximat ely 140°C (284°F),coupled wit h t he fact that t he damper also generates it s own heat, it is neces sary for it t o be oil cooled. A s eparat e oil circuitroutes oil from the engine's oil cooler t o a valve in t he engine block, which opens at approximat ely 2 bar. The oil t hen flows t o 3jet s, located on t he cranks haft vibrat ion damper cooling pipe, which then directs the oil t o the lower s ect ion of t he damper.
The oil flows t hrough the jets at approximately 12 lit ers per minute.
At high t emperat ures , oil cooling reduces t he damper t emperat ure by approximat ely 7°C (45°F).
Bedplate
Page 636 of 3229
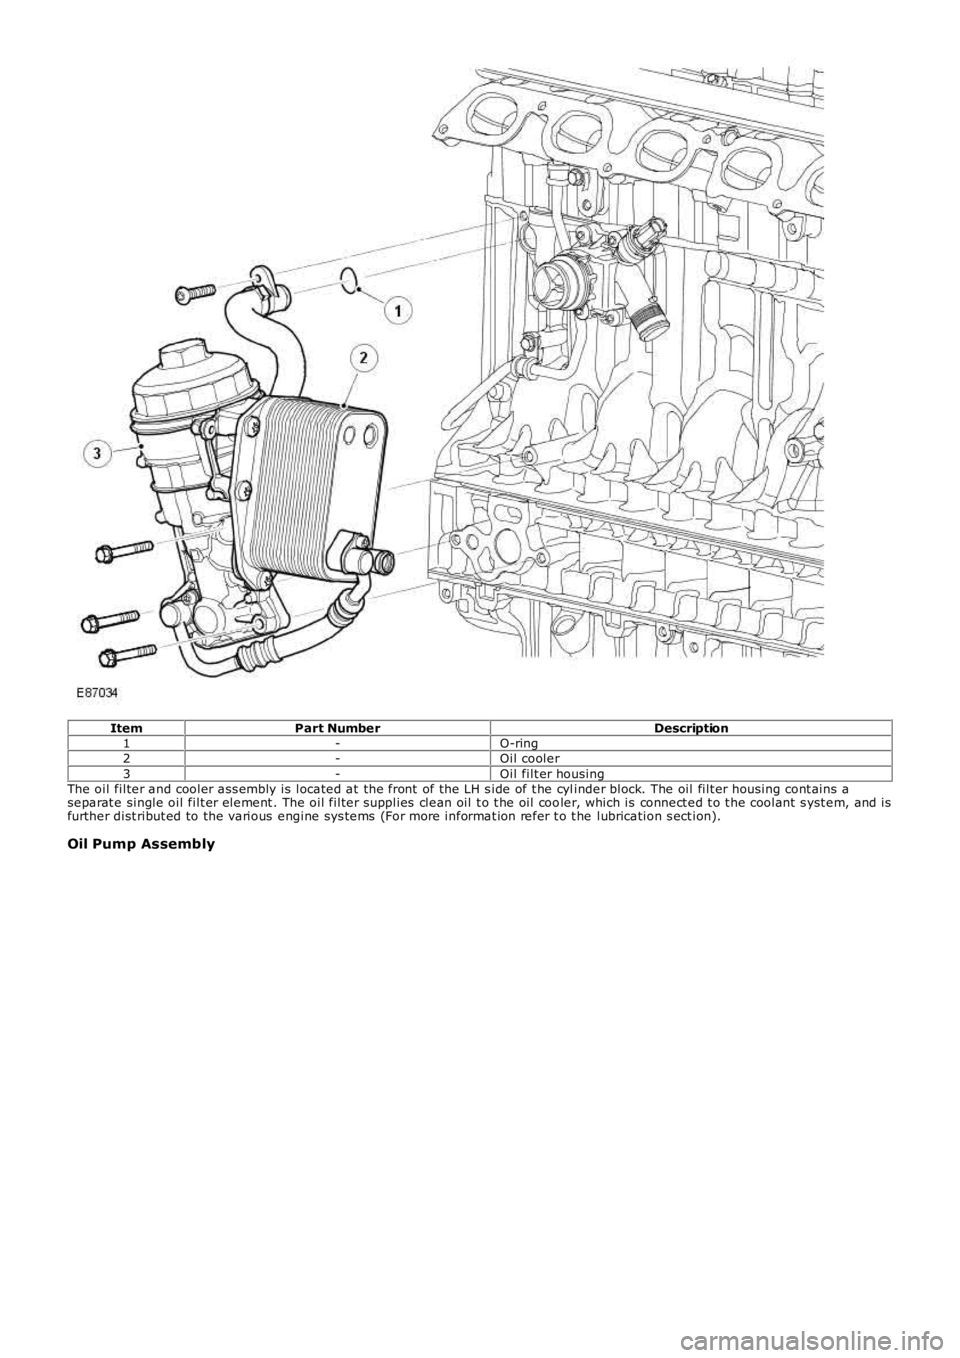
ItemPart NumberDescription1-O-ring2-Oil cooler3-Oil filt er housingThe oil filter and cooler ass embly is located at the front of the LH s ide of t he cylinder block. The oil filt er housing cont ains aseparat e single oil filt er element . The oil filter supplies clean oil t o t he oil cooler, which is connect ed t o t he coolant s yst em, and isfurther dist ribut ed to the various engine sys tems (For more informat ion refer t o t he lubrication s ect ion).
Oil Pump Assembly
Page 639 of 3229
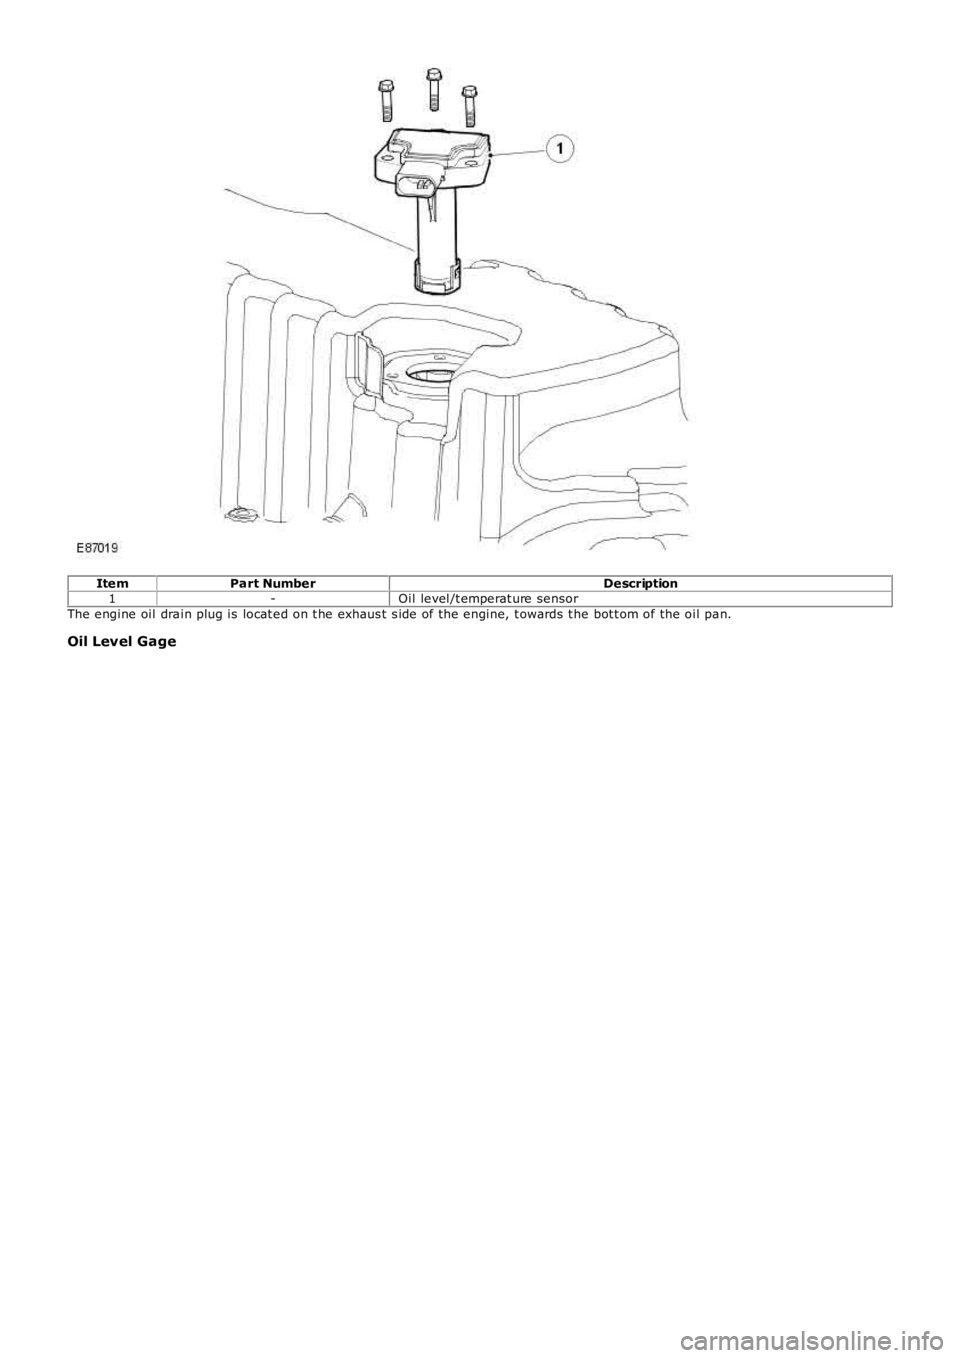
ItemPart NumberDescription1-Oil level/t emperat ure sensorThe engine oil drain plug is locat ed on t he exhaus t s ide of the engine, t owards t he bot t om of the oil pan.
Oil Level Gage
Page 640 of 3229
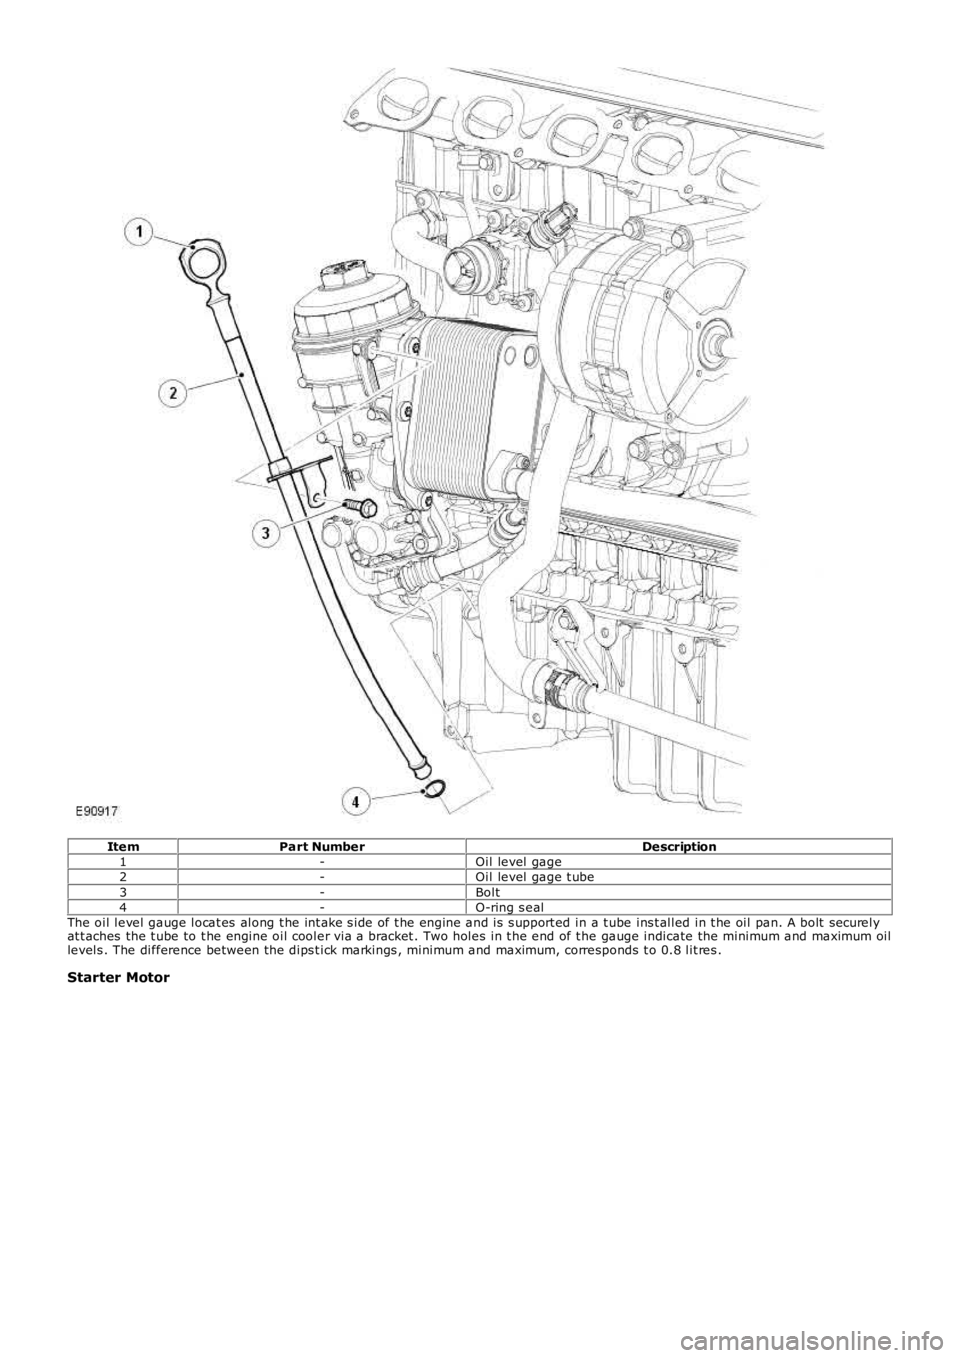
ItemPart NumberDescription1-Oil level gage2-Oil level gage t ube3-Bolt4-O-ring s ealThe oil level gauge locat es along t he int ake s ide of t he engine and is s upport ed in a t ube ins t alled in t he oil pan. A bolt s ecurelyat t aches the t ube to t he engine oil cooler via a bracket . Two holes in t he end of t he gauge indicate the minimum and maximum oillevels . The difference between the dips t ick markings , minimum and maximum, corresponds t o 0.8 lit res .
Starter Motor
Page 644 of 3229
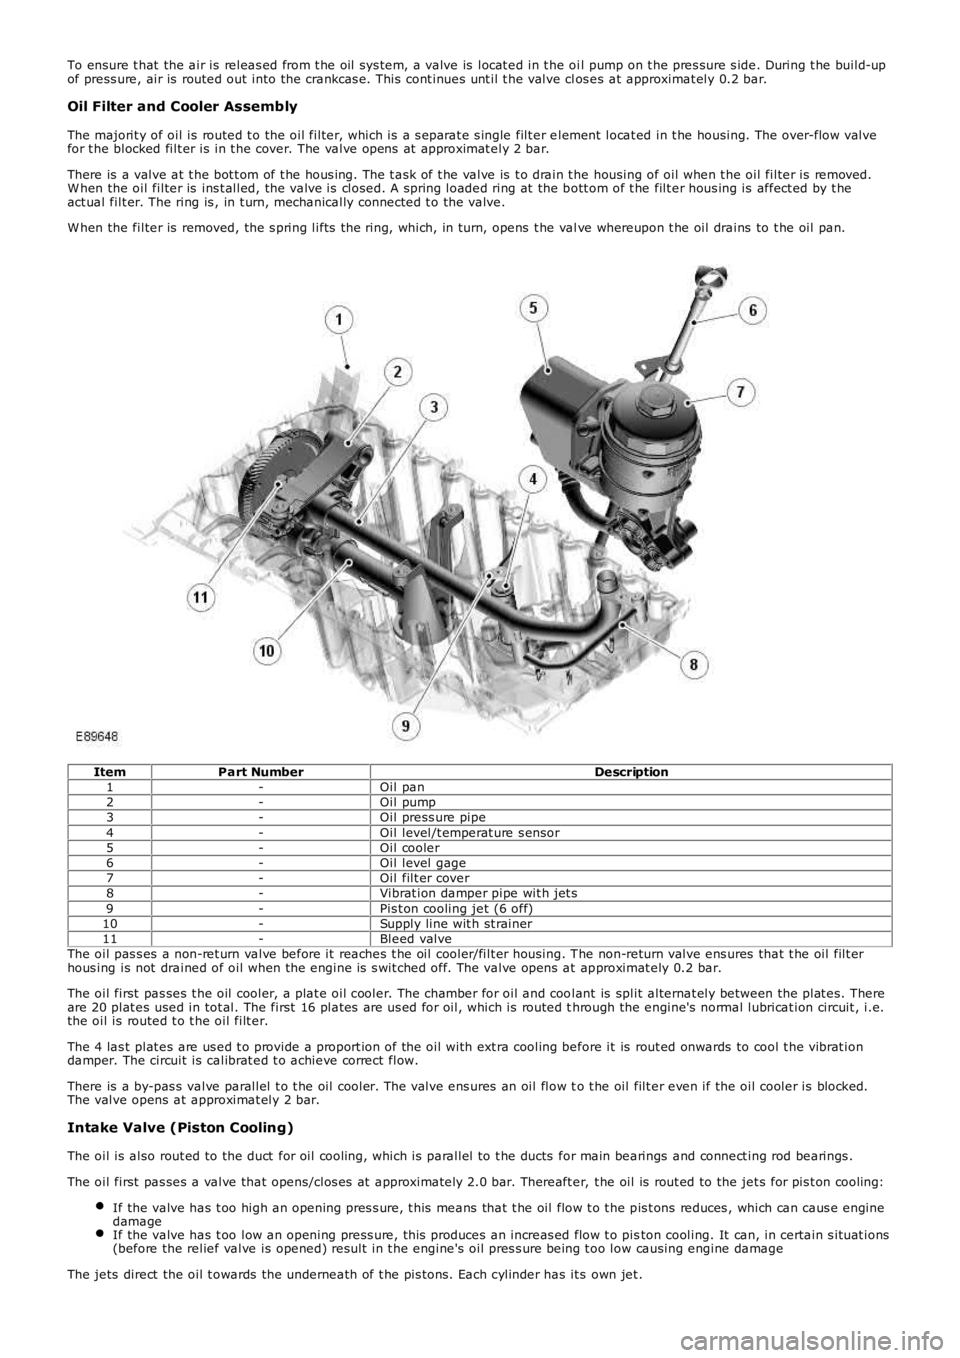
To ensure t hat the air is releas ed from t he oil sys tem, a valve is locat ed in t he oil pump on t he pres sure s ide. During t he build-upof press ure, air is routed out into the crankcas e. This cont inues unt il t he valve clos es at approximat ely 0.2 bar.
Oil Filter and Cooler Assembly
The majorit y of oil is routed t o the oil filter, which is a s eparat e s ingle filt er element locat ed in t he housing. The over-flow valvefor t he blocked filt er is in t he cover. The valve opens at approximat ely 2 bar.
There is a valve at t he bot t om of t he hous ing. The t ask of t he valve is t o drain t he housing of oil when t he oil filter is removed.W hen the oil filter is ins t alled, the valve is closed. A spring loaded ring at the bott om of t he filt er hous ing is affect ed by t heact ual filt er. The ring is , in t urn, mechanically connected t o the valve.
W hen the filter is removed, the s pring lifts the ring, which, in turn, opens t he valve whereupon t he oil drains to t he oil pan.
ItemPart NumberDescription1-Oil pan2-Oil pump3-Oil press ure pipe4-Oil level/t emperat ure s ensor5-Oil cooler6-Oil level gage7-Oil filt er cover8-Vibrat ion damper pipe wit h jet s9-Pis t on cooling jet (6 off)10-Supply line wit h st rainer11-Bleed valveThe oil pas s es a non-ret urn valve before it reaches t he oil cooler/filt er housing. The non-return valve ens ures that t he oil filt erhous ing is not drained of oil when the engine is s wit ched off. The valve opens at approximat ely 0.2 bar.
The oil first pas ses t he oil cooler, a plat e oil cooler. The chamber for oil and coolant is split alternat ely between the plat es. Thereare 20 plat es used in tot al. The first 16 plat es are us ed for oil, which is routed through the engine's normal lubricat ion circuit , i.e.the oil is routed t o t he oil filt er.
The 4 las t plat es are us ed t o provide a proport ion of the oil with ext ra cooling before it is rout ed onwards to cool t he vibrat iondamper. The circuit is calibrat ed t o achieve correct flow.
There is a by-pas s valve parallel t o t he oil cooler. The valve ens ures an oil flow to t he oil filt er even if the oil cooler is blocked.The valve opens at approximat ely 2 bar.
Intake Valve (Piston Cooling)
The oil is also rout ed to the duct for oil cooling, which is parallel to t he ducts for main bearings and connect ing rod bearings .
The oil first pas ses a valve that opens/clos es at approximately 2.0 bar. Thereaft er, t he oil is rout ed to the jet s for pis t on cooling:
If the valve has t oo high an opening pres s ure, t his means that t he oil flow t o t he pis t ons reduces , which can caus e enginedamageIf the valve has t oo low an opening press ure, this produces an increas ed flow t o piston cooling. It can, in certain s ituat ions(before the relief valve is opened) result in t he engine's oil pres s ure being t oo low causing engine damage
The jets direct the oil t owards the underneath of t he pis tons. Each cylinder has it s own jet .
Page 647 of 3229
SymptomAction
- Pos it ive readi ngs of bet ween 10-20%: check for air leaks i n air i nt ake s ys t em- Negati ve readings of between 10-20%: check for over fuell ing e.g. leaki ngi njectors , high fuel pres sure- Readings above 20%: check for DTCs and refer t o DTC Index.REFER t o: El ect ronic Engi ne Cont rol s (303-14A El ect roni c Engi ne Cont rol s - I6 3.2LPet rol, Di agnos is and Tes ti ng).Carry out a vacuum gauge check. Refer to component t es ts i n t his s ecti on.
Oi l cons umpti onCarry out oil l eak check fol lowed by an oi l cons umpt ion tes t. Refer t o t he componentt est s i n t hi s s ect ionIf oil cons umpt ion i s exces si ve:Check the integrit y of the engine breat her sys t emCarry out general engi ne checks :- Compress ion tes t. Refer t o component t es ts i n t his s ect ion.- Val ve cl earances .REFER t o: Val ve Clearance Check (303-01A Engine - I6 3.2L Pet rol , GeneralProcedures ).- Spark pl ug condi ti on and col or
Nois eRefer t o t he Speci al Servi ce Mess ages on t he Electroni c Product Q ual it y Report (EPQR)s ys tem for s ound fi les . If t he s ympt om does NOT compare t o any of the s ound files ,contact Deal er Technical Support (DTS).
Component Tests
Engine Oil Leaks
• NOTE: Before ins t al li ng new gasket s or oil s eal s, make sure t hat t he faul t is cl early es t abl is hed.
If the oi l l eak cannot be ident ifi ed clearl y by a vi sual ins pect ion, carry out an Ult raviolet t est :
Fluorescent Oil Additive Method
1. Clean t he engi ne wit h a sui table cl eani ng fl uid (brake cleaner).1.
2. Drai n the engi ne oil and refil l wit h recommended oil , premixed wi th Dies el Engine Oil Dye or equi val ent . Us e aminimum 14.8 ml (0.5 ounce) t o a maxi mum 29.6 ml (1 ounce) of fl uores cent addit ive to all engines. If oil i s notpremixed, fl uorescent addi ti ve mus t fi rs t be added to the crankcas e.
2.
3. Run engi ne for 15 minutes . Stop the engine and i nspect all s eal and gas ket areas for leaks us ing a 12 Vol tMas t er UV Diagnost ic Ins pect ion Ki t or equivalent . A clear bri ght yell ow or orange area wil l i dent ify l eak. Forext remely smal l leaks, s everal hours may be required for t he leak t o appear.
3.
4. As neces s ary, pres surize t he main oil gallery s yst em t o l ocat e leaks due t o incorrect ly sealed, loos e or cockedpl ugs . If the flywheel bol ts l eak oil, l ook for s ealer on t he threads .4.
5. Repai r al l leaks as neces s ary.5.
Compression Test
General Remarks
• NOTE: Removing fuses and di sconnect ing elect rical components may caus e t he Engine Control Modul e (ECM) t o l ogDiagnost ic Troubl e Codes (DTCs ). Aft er t he meas urements have been carried out , DTCs should be cl eared from memory byconnecti ng to the Manufact urer Approved Diagnos t ic Sys tem.
• NOTE: Only check the compress ion pres sure wit h t he valves s et to the pres cri bed clearance (i f thi s can be adjus ted).
The compres si on pres s ure s hould be checked wi th the engine at operat ing temperat ure.
Check the Comp ression Pressure
W ARNING: Move gear s elector lever to 'P' pos i ti on. Fail ure t o follow thi s ins t ructi on may res ult i n pers onal injury.
1. Remove the fuel pump rel ay.1.
2. Start the engine - the engine wi ll s t art, run for a few seconds then s t op.2.
3. Remove the s park pl ugs.3.
4. Ins t al l the compres s ion t es ter.4.
5. Ins t al l an auxi li ary s tarter s wit ch in the st art ing circui t. W it h t he ignit ion swi tch O FF, us ing t he auxi li ary s t arters wi tch, crank the engine a mi ni mum of five compres s ion st rokes and record the hi ghest reading. Not e theapproximat e number of compress i on s trokes requi red t o obt ai n t he highest readi ng.
5.
6. Repeat t he tes t on each cyl inder, cranking t he engine approximat ely t he s ame number of compress i on st rokes .6.
7. Ins t al l the removed components in reverse order, obs erving t he s peci fi ed ti ght ening t orques.7.
8. Clear all DTCs from the ECM.8.
Page 648 of 3229
Interpretation of the Results
• NOTE: Due t o t he poss ibi li ty of l oos e carbon t hat has become t rapped between t he valve face and seat effect ing thepres s ure readi ngs , when carryi ng out a compres s ion t est and cyli nders are found to have low press ures , ins t al l the s parkplugs , road t est t he vehicle and re-t est the s us pect cyl inders . If the correct pressures are rest ored, no further acti on isrequired.
The indicat ed compress i on pres sures are cons idered wi thi n s pecificati on if t he l owest readi ng cyl inder is wi thi n 75% of t hehighest reading.
If the cyli nder pres s ures are found t o be l ow, carry out a l eakdown t est to det ermi ne the locat ion of t he faul t (i f anyleakback can be heard through t he engine breat her sys tem s uspect the pi st on rings , if any leakback can be heard throught he inlet s ys tem sus pect t he i nl et val ve or seat , if any leakback can be heard through the exhaus t mani fold sus pect t heexhaus t val ve or s eat . If t he meas urements for t wo cyl inders next t o each ot her are bot h t oo low then i t is very likely thatt he cyl inder head gas ket bet ween them is burnt t hrough. Thi s can als o be recognized by t races of engi ne oil in the coolantand/or cool ant i n t he engi ne oil ).
Oil Consump tion Test
The amount of oi l an engi ne uses will vary wit h t he way t he vehi cl e is driven i n addit ion t o normal engine-t o-enginevariat ion. This i s es pecial ly t rue during t he fi rs t 16,100 km (10,000 mil es) when a new engine i s bei ng broken i n or unt ilcert ai n i nt ernal components become condit ioned. Vehicles us ed i n heavy-dut y operati on may us e more oil . The fol lowingare exampl es of heavy-duty operat ion:
Trai ler towi ng appl icati onsSevere loading appli cat ionsSust ained high speed operat ion
Engi nes need oi l to lubri cat e t he fol lowing internal component s :
Cylinder block cyl inder wallsPis t ons and pi st on ringsInt ake and exhaus t val ve s temsInt ake and exhaus t val ve guidesAll i nt ernal engi ne component s
W hen t he pis t ons move downward, a t hi n film of oil i s left on the cyli nder wal ls . As t he vehi cl e is operated, s ome oil i sals o drawn int o t he combus t ion chambers pas t the i ntake and exhaus t valve s tem s eal s and burned.
The fol lowing are examples of condi ti ons that can affect oil consumpt ion rates :
Engi ne s izeOperat or driving habit sAmbient t emperaturesQuali ty and vi scos it y of oi lEngi ne is bei ng run in an overfil led condit ion (check t he oil level at least five minutes after a hot s hutdown wi th thevehi cl e parked on a level surface. The oi l level s hould not be above the top of t he cros s-hatched area and t he l et t er"F" i n FULL).
Operat ion under varyi ng condi ti ons can frequent ly be mi sl eadi ng. A vehi cl e t hat has been run for s everal t housand miles ons hort t rips or i n below-freezi ng ambient temperat ures may have cons umed a "normal" amount of oil . However, whenchecking t he engine oil l evel , it may meas ure up to the full mark on t he oil l evel indicator due t o dil uti on (condens ati onand fuel ) in t he engine crankcas e. The vehi cl e t hen might be driven at high s peeds on the hi ghway where t he condens at ionand fuel boil off. The next t ime t he engi ne oil is checked it may appear that a l it er of oi l was us ed i n about 160 km (100mi les ). Oi l cons umpti on rat e is about one l it er per 2,400 km (1,500 mil es).
Make s ure t he s elected engine oi l meets manufact urer s pecificati on and t he recommended API performance cat egory "SG"and SAE vis cos i ty grade as s hown in t he vehicle O wner's Gui de. It is al s o important t hat t he engine oi l i s changed at t heint ervals s peci fi ed for t he t ypi cal operati ng condi ti ons .
The fol lowing di agnos t ic procedure i s us ed to det ermi ne t he s ource of excess i ve oi l cons umpti on.
• NOTE: Oi l us e i s normal ly great er during the first 16,100 km (10,000 mi les ) of servi ce. As mil eage i ncreas es , oil us edecreas es . High s peed dri vi ng, towing, high ambi ent temperat ure and ot her factors may res ult in great er oil use.
1. Defi ne exces si ve cons umpti on, s uch as t he number of miles driven per li ter of oil used. Al so det ermine cust omersdriving habit s , such as s us tai ned hi gh s peed operat ion, t owing, ext ended i dle and other cons iderat ions.1.
2. Verify t hat the engine has no ext ernal oi l leaks as descri bed under Engine Oi l Leaks i n thi s s ect ion.2.
3. Carry out an oil cons umpti on t es t :
Run t he engi ne to normal operati ng t emperature. Swi tch engine OFF and al low oi l to drain back for at l eas tfi ve mi nut es .W i th vehi cl e parked on l evel s urface, check t he engi ne oil l evel.If required, add engine oil t o s et level exactl y t o t he FULL mark.Record t he vehi cl e mi leage.Ins t ruct the cus tomer t o return for a l evel check after driving t he vehi cle as us ual for 1,610 km (1000 mi les ).Check t he oil l evel under t he s ame condit ions and at the same locat ion as the i nit ial check.
3.
• NOTE: If the oi l cons umpti on rat e is unaccept abl e go t o St ep 4.
4. Check t he Posi ti ve Crankcas e Vent ilat ion (PCV) sys t em. Make sure t he s ys t em i s not pl ugged.4.
5. Check for pl ugged oi l drain-back holes i n t he cyl inder head and cyli nder bl ock.5.
6. Carry out a cyl inder compress ion tes t. Refer t o t he Compres s ion Tes t procedure in thi s s ect ion. Thi s can help6.
Page 649 of 3229
det ermi ne the source of oi l cons umpt ion such as valves , pi s ton rings or other areas .
7. Check valve guides for exces si ve gui de clearance. Ins tall new val ve st em seals aft er verifyi ng val ve guideclearance.7.
8. W orn or damaged i nternal engine component s can caus e exces s ive oi l cons umpti on. Small depos it s of oi l on t het ips of t he s park plugs can be a cl ue t o int ernal oi l cons umpti on.8.
Intake Manifold Vacuum Test
Bri ng t he engi ne to normal operati ng temperature. Connect a vacuum gauge or equi val ent t o t he i nt ake manifold. Run theengi ne at t he specified i dle s peed.
The vacuum gauge s hould read bet ween 51-74 kPa (15-22 i n-Hg) dependi ng upon the engine condit ion and t he alt it ude atwhich t he t es t i s performed. Subt ract 4.0193 kPa (1 in-Hg) from t he s peci fi ed reading for every 304.8 m (1,000 feet ) ofelevati on above s ea l evel .
The reading should be st eady. As necess ary, adjus t t he gauge damper cont rol (where us ed) if t he needl e is fl ut t eringrapi dl y. Adjust damper unti l needle moves eas il y wi thout exces si ve fl utt er.
Interpreting Vacuum G auge Readings
A careful s t udy of the vacuum gauge reading whi le t he engine i s idli ng wi ll help pi npoint t rouble areas. Al ways conductother appropri at e t es ts before arrivi ng at a final di agnos ti c deci s ion. Vacuum gauge readi ngs , alt hough hel pful, mus t beint erpret ed careful ly.
Mos t vacuum gauges have a normal band indicated on the gauge face.
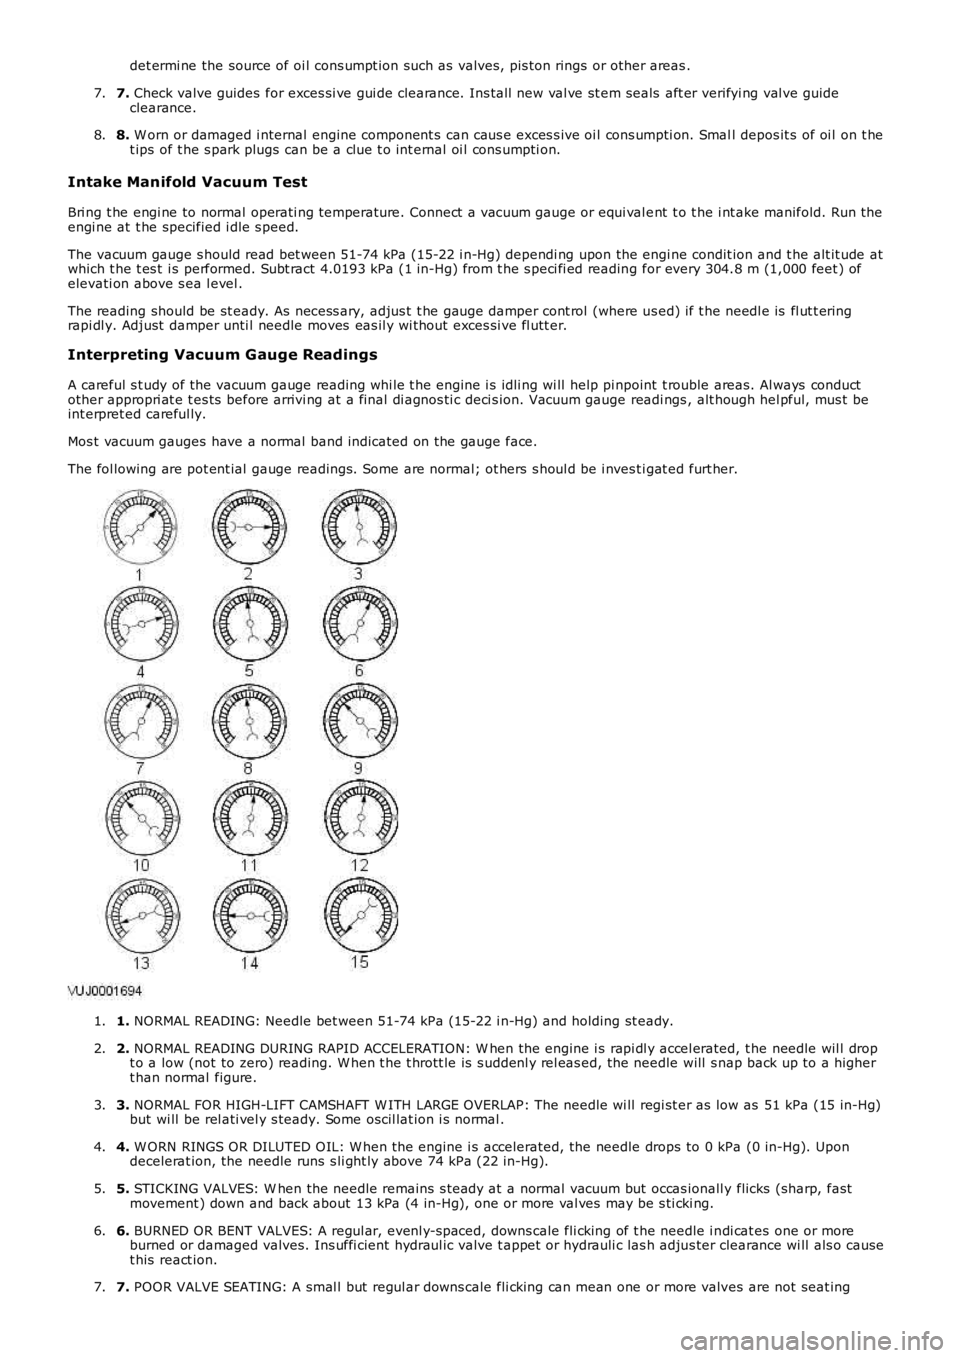
The fol lowing are pot ent ial gauge readings. Some are normal; ot hers s houl d be i nves ti gat ed furt her.
1. NORMAL READING: Needle bet ween 51-74 kPa (15-22 i n-Hg) and holding st eady.1.
2. NORMAL READING DURING RAPID ACCELERATION: W hen the engine i s rapi dl y accel erated, t he needle wil l dropt o a low (not to zero) reading. W hen t he t hrott le is s uddenl y rel eas ed, the needle will s nap back up to a highert han normal figure.
2.
3. NORMAL FOR HIGH-LIFT CAMSHAFT W ITH LARGE OVERLAP: The needle wi ll regi st er as low as 51 kPa (15 in-Hg)but wi ll be rel ati vel y s teady. Some oscil lat ion i s normal .3.
4. W ORN RINGS OR DILUTED OIL: W hen t he engine i s accelerated, the needle drops to 0 kPa (0 in-Hg). Upondecelerat ion, the needle runs s li ght ly above 74 kPa (22 in-Hg).4.
5. STICKING VALVES: W hen the needle remains s t eady at a normal vacuum but occas ionall y flicks (sharp, fastmovement ) down and back about 13 kPa (4 in-Hg), one or more val ves may be s ti cki ng.5.
6. BURNED OR BENT VALVES: A regul ar, evenl y-s paced, downs cale fli cking of t he needle i ndi cat es one or moreburned or damaged valves. Ins uffi cient hydraul ic valve t appet or hydrauli c las h adjus ter clearance wi ll als o causet his react ion.
6.
7. POOR VALVE SEATING: A smal l but regul ar downs cale fli cking can mean one or more valves are not seat ing7.