2006 LAND ROVER FRELANDER 2 lock
[x] Cancel search: lockPage 13 of 3229
Land Rover part s are manufact ured to t he s ame exact ing st andards as t he origi nal fact ory fit t ed components . For thisreas on, it is ess enti al t hat onl y genui ne Land Rover part s are used during mai ntenance or repai r.
Att enti on is parti cul arly drawn t o t he fol lowing poi nt s concerni ng repairs and t he fi tt ing of replacement parts andacces sories .
Safet y feat ures and corros ion prevent ion t reat ments embodied in t he vehicle may be impai red i f other than Land Roverrecommended part s are fi tt ed. In cert ain t errit ori es , l egi sl ati on prohibi ts t he fit ti ng of parts not t o manufact urer'ss pecificati on. Torque wrench s ett ing figures , where gi ven, mus t be adhered t o and l ocking devices , where s peci fi ed mus tbe us ed. If t he efficiency of a locki ng devi ce is impaired duri ng removal it mus t be repl aced.
Owners purchas ing acces s ori es whils t t ravell ing abroad mus t ens ure t hat the acces s ory and it s fi tt ed locati on on t hevehi cl e conform t o legal requirements .
The t erms of t he vehi cl e warranty may be i nvali dat ed by t he fit ti ng of parts ot her than t hos e recommended by Land Rover.
• NOTE: The fit ti ng of non-approved Land Rover parts and acces s ori es or the carrying out of non-approved al terati ons orconvers i ons may be dangerous . Any of the foregoing could affect t he s afety of t he vehicle and occupants ; al so, t he termsand condi ti ons of t he vehi cle warranty may als o be inval idated .
All Land Rover recommended part s have t he ful l backing of t he vehi cl e warranty.
Land Rover Dealers are obli ged to s upply onl y Land Rover recommended part s .
Specifications
Land Rover are cons tant ly s eeki ng t o improve the specificati on, des ign and producti on of their vehicles and al terat ionst ake pl ace accordingly. W hi ls t every effort i s made t o ens ure t he accuracy of t his Manual, i t should not be regarded as aninfalli ble guide to current s pecificati ons of any parti cular vehicle.
This Manual does not cons t it ute an offer for sal e of any part icul ar vehi cl e. Land Rover dealers are not agents of Land Roverand have no authori ty to bi nd the manufact urer by any expres sed or i mpli ed undertaking or repres ent ati on.
Page 15 of 3229
Clean bench and provide marking mat eri al s , labels and containers before di s as s embli ng components .
Disassembling
Obs erve s crupul ous cl eanl ines s when dis as sembl ing component s, parti cul arly when brake, fuel, air s us pens ion or hydrauli cs ys t em parts are dis as sembl ed. A part icle of dirt or cloth fragment could caus e a s eri ous malfunct ion i f trapped i n t hes es ys t ems .
Blow out al l tapped holes , crevi ces , oil ways and flui d pass ages wit h dry, compres s ed air.
W ARNING: Sui table eye protecti on mus t be worn.
Us e s uit abl e marker i nk to identi fy mat ing parts , do not us e a s cri ber or cent re punch as t hey coul d ini ti at e cracksor dis torti on.W i re or t ape mat ing part s t oget her where neces s ary t o prevent acci dent al i nterchange.Suit abl y identi fy parts which are to be renewed and t o thos e part s requi ri ng further ins pect ion. Keep thes e part ss eparate.To make s ure that t he correct replacement part has been obt ained, do not dis card a part due for renewal unt il aftercomparing i t wit h t he new part.
Cleaning Components
Always us e cleaning agents whi ch are s uit able for the work being undert aken and the component s being cleaned. NEVERus e gasol ine (pet rol ) as a cleaning agent (degreas er). Always make s ure that the component bei ng cleaned is compati blewit h t he cleaning agent.
Always follow the manufact urer's i ns t ructi ons regarding the us e of cleaning agents and make sure t hat t he envi ronment inwhich t he work is being undert aken is s uit able. See Healt h and Safet y Precaut ions for furt her informati on regardi ngcleaning.
General Inspection of Components
All component s s houl d be i ns pect ed for wear or damage before reas s embl ing.
Always make s ure that component t o be i ns pected i s clean and free from oil or greas e.W hen a component is t o be checked di mensi onal ly agains t desi gn s pecified values , use the appropriat e meas uringequi pment i.e. micromet ers , verniers, s urface plates , dial t es t i ndi cat ors (DTI).Always make s ure that all meas uri ng equi pment is correct ly cali brat ed before us e.Reject a component which i s not wit hin specified values /l imi ts or i f it appears t o be damaged.A component may be rei ns t alled if dimens ions obt ai ned during checki ng are at t he maximum t olerance l imi t and itis in an undamaged condi ti on.Bearing journal clearances should be checked where neces s ary us ing Pl ast igauge.
Joints and Joint Faces
All gas ket s s houl d be i ns t alled dry unles s s tat ed otherwis e. Always appl y t he s pecified l ubricant to O-rings and i nst allO-ri ngs us ing the fingers onl y.
Us e gasket removal s pray and/or plas t ic s crapers t o remove traces of old gas ket.
CAUTION: DO NOT us e met al s crapers or emery clot h as t hes e may damage the s eali ng s urfaces.
Many joi nts us e s ealants ins tead of gasket s as t he seal ing medium. W here t his is t he cas e, t he s eal ant t oget her wit h i tspart number wil l be found l is ted i n t he rel evant repair operat ion and al so in the s ealants table.
CAUTION: Always remove all t races of the ol d s eal ant prior t o reas s embly. Use plas tic s crapers, s pecifi ed s olvent swhere avail abl e or dry, l int free clot h. DO NOT us e met al scrapers or emery clot h as t hese may damage the seali ngs urfaces . Make sure t hat s eali ng s urfaces are free from oi l or greas e as sealant s wil l not adhere properly to contaminateds urfaces .
Do not all ow s ealant to ent er tapped holes or oil ways .
Locking Devices
Always repl ace locki ng devi ces wit h one of the s ame des ign and of t he correct s ize.
Tab washers
Always release locki ng t abs before l oos ening fixings , do not reus e t ab washers.
Locknuts
Always us e a backing s panner when l oos ening and t ighteni ng locknut s, brake and fuel pipe unions .
Roll pins
Always i ns t all new roll pins of t he correct s ize.
Circlips
Always i ns t all new circl ips ens uri ng that t hey are of t he correct s ize for t he groove.
Page 16 of 3229
Woodruff keys
W oodruff keys may be reus ed provided t here i s no i ndi cat ion of wear or dis torti on.
Remove any burrs from edges of keyways us ing a fine fil e.
Split pins
Never at tempt t o s t raight en and reus e a s pli t pin, always make s ure that repl acement pins are of the correct si ze for t hehole i n which t hey are to be ins tal led.
Screw Threads
Damaged nuts , bolt s and s crews mus t always be dis carded. Att empti ng to recut or repai r damaged threads wi th at ap or di e i mpai rs the s t rength and fi t of t he t hreads and is not recommended.
• NOTE: Duri ng cert ai n repai r operat ions , it may be neces sary t o remove t races of t hread locking agent s us ing a tap.W here thi s is neces sary, t he i ns t ructi on to do s o wi ll appear in the relevant operation and it i s ess enti al that a t ap of thecorrect s ize and t hread i s used.
Some bolt s are coat ed wit h a thread locki ng agent and unles s s tat ed otherwis e, they mus t not be reus ed. Newbolt s havi ng the same part number as the original mus t always be i nst all ed. W hen nuts or bolt s are to bedis carded, t he repai r operat ion and relevant torque chart will i ncl ude an ins truct ion to that effect . Do not usepropri etary thread locki ng agent s as t hey may not meet the specificati on required. See al so Encapsul at ed('Patched') Bol ts and Screws.Always make s ure that repl acement nuts and bol ts are at leas t equal i n s trengt h t o thos e t hat they are repl acing.Cast ell ated nut s mus t not be loosened t o accept a s pli t pin except in recommended cas es when thi s forms part ofan adjus tment .Do not all ow oil or greas e t o enter bli nd holes , the hydrauli c acti on res ult ing from ti ght ening t he bolt or s tud cans plit t he housi ng and als o gi ve a fal s e torque reading.Always t ighten a nut, bolt or s crew to t he s peci fi ed torque fi gure, damaged or corroded threads can give a fals et orque reading.Nut and bolt loos ening and t ightening sequences , where gi ven, mus t ALW AY S be foll owed. Di st ort ion ofcomponents or fault y s eal ing of joints wil l res ul t if t he s equences are not fol lowed. W here an ins t ructi on is gi ven tot ighten i n s tages , thes e s tages mus t be adhered t o; do not at t empt to combi ne st ages part icul arl y where cert ains tages involve t ight eni ng by degrees.To check or re-t ighten a fi xing t o a s peci fi ed t orque, firs t loosen a quart er of a turn, t hen ret ighten to the s peci fi edt orque fi gure.Unles s ins t ructed ot herwis e, do not lubricat e bolt or nut t hreads pri or t o i nst all ing.
W here it i s s tat ed t hat bolt s and s crews may be reus ed, t he fol lowi ng procedures must be carri ed out:
Check t hat threads are undamaged.Remove all t races of locki ng agent from the threads .
CAUTION: DO NOT us e a wi re brus h; take care t hat threads are not damaged.
Make s ure t hat threads are clean and free from oil or greas e.Apply t he s pecified locki ng agent t o t he bolt t hreads .
Bolt and Nut Identification
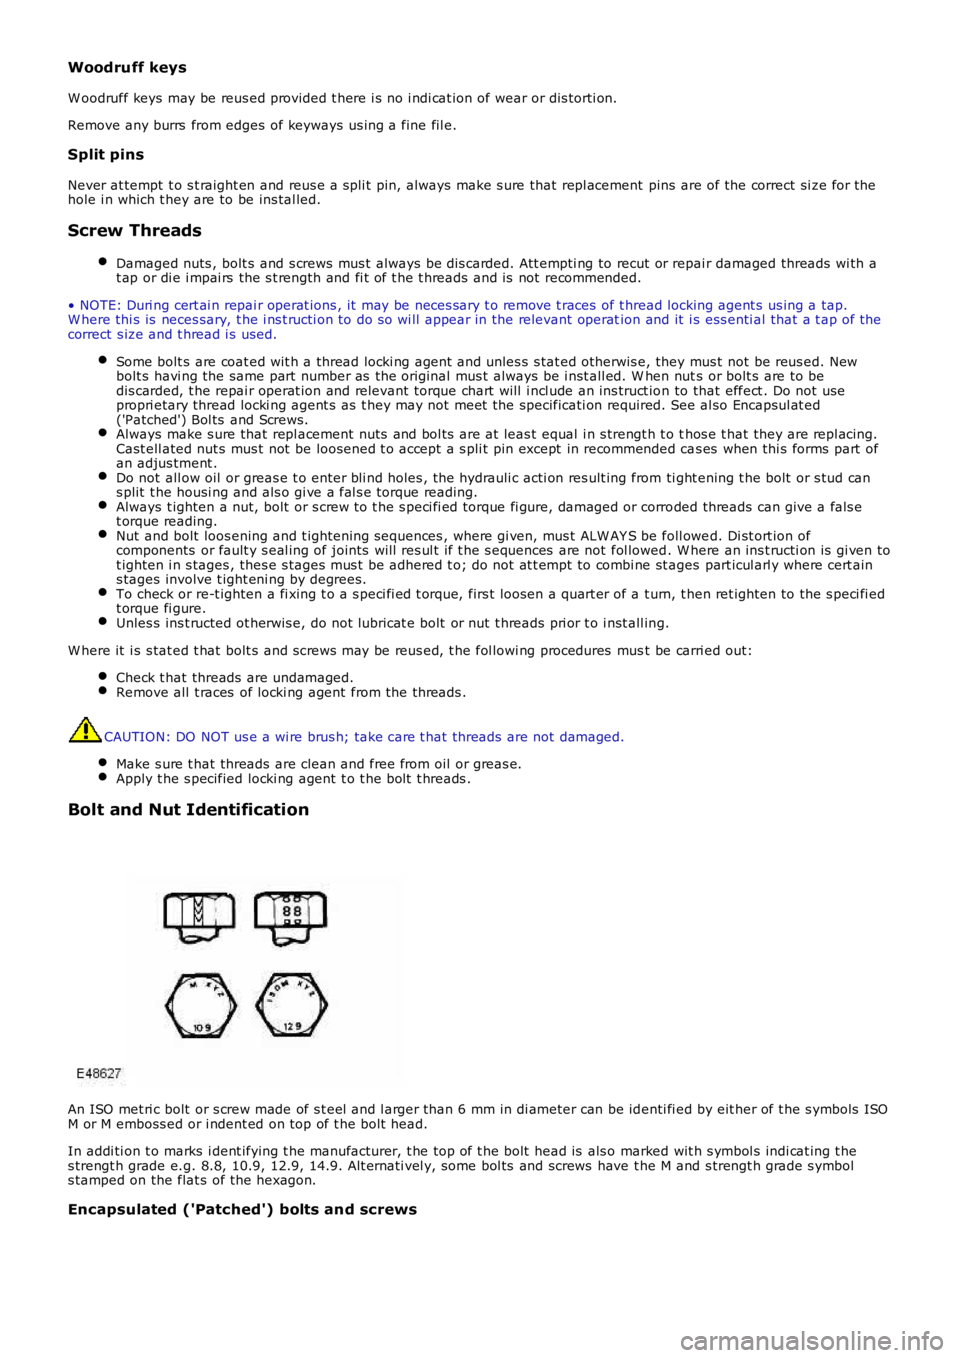
An ISO met ri c bolt or s crew made of s t eel and l arger than 6 mm in di ameter can be identi fi ed by eit her of t he s ymbols ISOM or M emboss ed or i ndent ed on top of t he bolt head.
In addi ti on t o marks i dent ifying t he manufacturer, t he top of t he bolt head is als o marked wit h s ymbol s indi cat ing t hes trengt h grade e.g. 8.8, 10.9, 12.9, 14.9. Alt ernati vel y, some bol ts and screws have t he M and s trengt h grade s ymbols tamped on the flat s of the hexagon.
Encapsulated ('Patched') bolts and screws
Page 17 of 3229
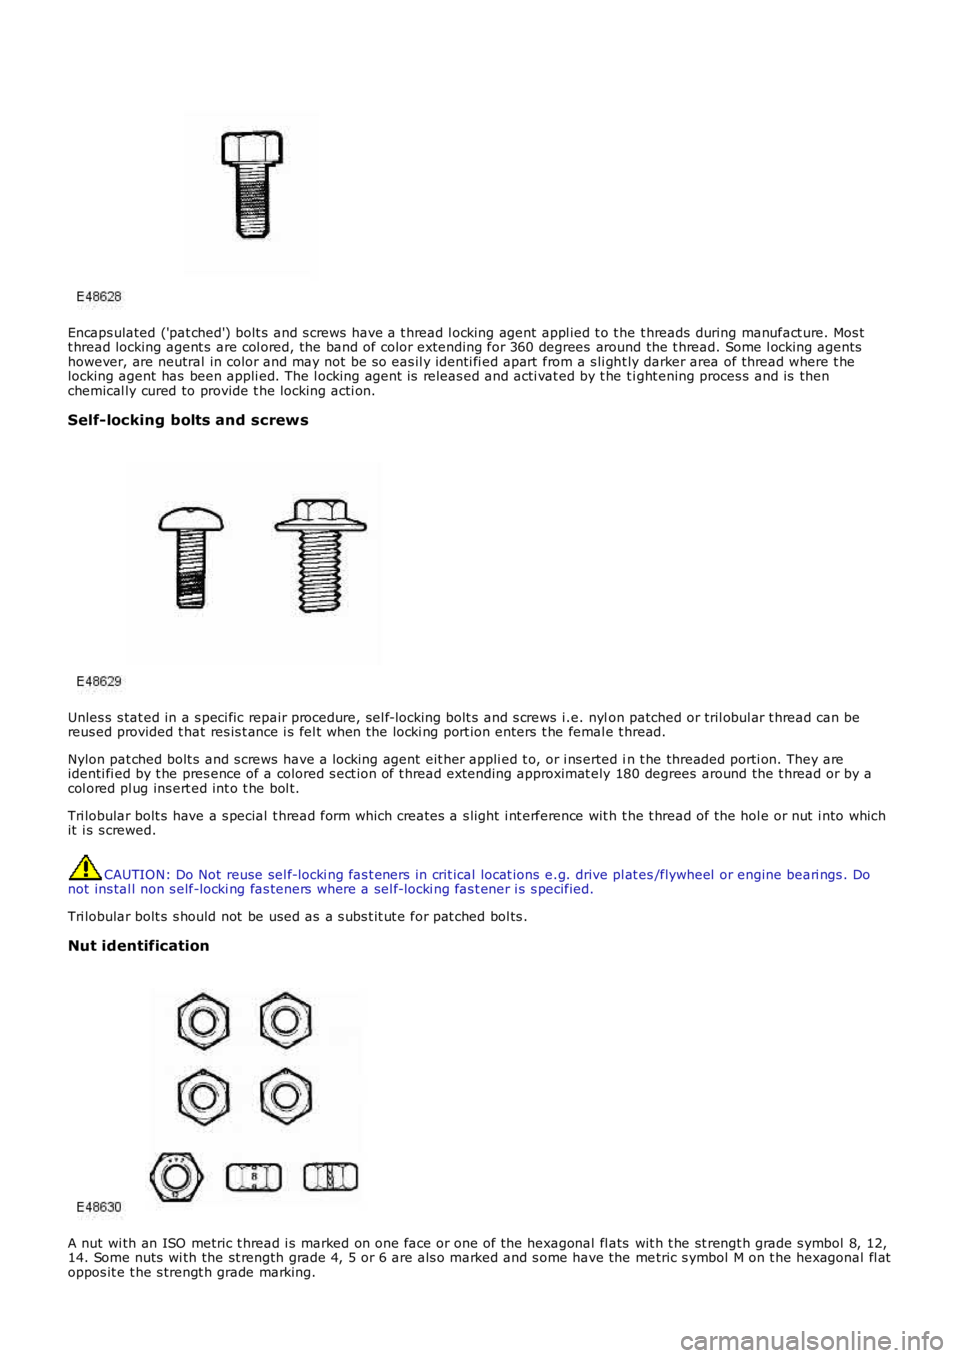
Encaps ulated ('pat ched') bolt s and s crews have a t hread l ocking agent appl ied t o t he t hreads during manufact ure. Mos tt hread locking agent s are col ored, the band of color extending for 360 degrees around the t hread. Some l ocking agentshowever, are neutral in color and may not be s o eas il y identi fi ed apart from a s li ght ly darker area of thread where t helocking agent has been appli ed. The l ocking agent is releas ed and acti vat ed by t he ti ght ening proces s and is thenchemical ly cured to provide t he locking acti on.
Self-locking bolts and screws
Unles s s tat ed in a s peci fic repair procedure, sel f-locki ng bolt s and s crews i.e. nylon patched or tril obul ar t hread can bereus ed provided t hat res is t ance i s fel t when the locki ng port ion enters t he femal e thread.
Nylon pat ched bolt s and s crews have a l ocking agent eit her appli ed t o, or i ns erted in t he threaded porti on. They areidenti fi ed by t he pres ence of a colored s ect ion of t hread extending approximat ely 180 degrees around the t hread or by acol ored pl ug ins ert ed int o t he bol t.
Tri lobular bolt s have a s pecial t hread form which creates a s light i nt erference wit h t he t hread of the hol e or nut i nto whichit i s s crewed.
CAUTION: Do Not reuse sel f-locki ng fas t eners in crit ical locat ions e.g. drive pl at es/flywheel or engine beari ngs . Donot ins tal l non s elf-locki ng fas teners where a sel f-locki ng fas t ener i s s pecified.
Tri lobular bolt s s hould not be used as a s ubs t it ut e for pat ched bol ts .
Nut identification
A nut wi th an ISO metric t hread i s marked on one face or one of the hexagonal fl ats wit h t he st rengt h grade s ymbol 8, 12,14. Some nuts wi th the st rength grade 4, 5 or 6 are als o marked and s ome have the metric s ymbol M on t he hexagonal fl atoppos it e t he s trengt h grade marking.
Page 18 of 3229
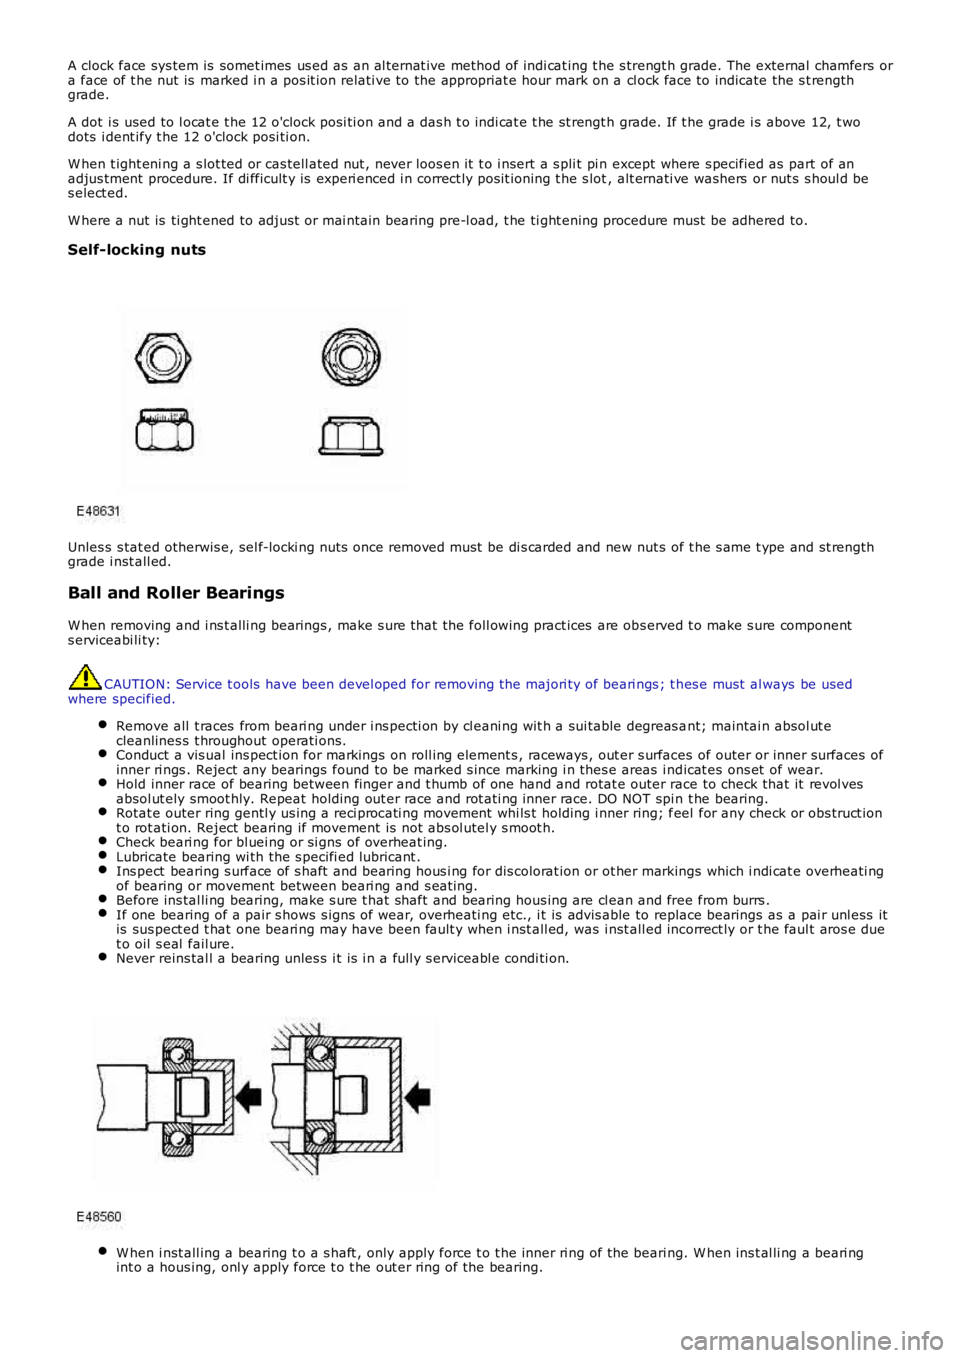
A clock face sys tem is somet imes us ed as an al ternat ive method of indi cat ing t he s trengt h grade. The external chamfers ora face of t he nut is marked i n a pos it ion relati ve to the appropriat e hour mark on a cl ock face to indicate the s t rengthgrade.
A dot i s used to l ocat e t he 12 o'clock posi ti on and a das h t o indi cat e t he st rengt h grade. If t he grade i s above 12, t wodots i dent ify t he 12 o'clock posi ti on.
W hen t ight eni ng a s lot ted or cas tell ated nut , never loos en it t o i nsert a s pli t pi n except where s pecified as part of anadjus tment procedure. If di fficult y is experi enced i n correct ly pos it ioning t he s lot, alt ernati ve washers or nut s s houl d bes elect ed.
W here a nut is ti ght ened to adjust or mai ntain bearing pre-l oad, t he ti ght ening procedure must be adhered to.
Self-locking nuts
Unles s s tat ed otherwis e, sel f-locki ng nuts once removed must be di s carded and new nut s of t he s ame t ype and st rengthgrade i nst all ed.
Ball and Roller Bearings
W hen removing and i ns t alli ng bearings , make s ure t hat the foll owing pract ices are obs erved t o make s ure components erviceabi li ty:
CAUTION: Service t ools have been devel oped for removing the majori ty of beari ngs ; t hes e must al ways be usedwhere specified.
Remove all t races from beari ng under i ns pecti on by cl eani ng wit h a sui table degreas ant; maintai n absol ut ecleanlines s t hroughout operati ons.Conduct a vis ual ins pect ion for markings on roll ing element s , raceways , out er s urfaces of outer or inner surfaces ofinner ri ngs . Reject any bearings found to be marked s ince marking i n thes e areas i ndicat es ons et of wear.Hold inner race of bearing between finger and t humb of one hand and rotat e outer race to check that it revol vesabsol ut ely smoot hly. Repeat holding out er race and rot ati ng inner race. DO NOT spi n t he bearing.Rotat e outer ring gentl y us ing a reci procati ng movement whi ls t holding i nner ring; feel for any check or obs truct iont o rot ati on. Reject beari ng if movement is not abs ol utel y s moot h.Check beari ng for bl uei ng or si gns of overheat ing.Lubricate bearing wi th the s pecifi ed lubricant .Ins pect bearing s urface of s haft and beari ng hous i ng for dis colorat ion or ot her markings which i ndi cat e overheati ngof bearing or movement between beari ng and s eat ing.Before ins tal li ng bearing, make s ure t hat shaft and bearing hous ing are cl ean and free from burrs .If one bearing of a pair s hows s igns of wear, overheati ng etc., i t is advis able to replace bearings as a pai r unl ess itis sus pect ed t hat one beari ng may have been fault y when i nst all ed, was i nst all ed incorrect ly or t he faul t aros e duet o oil s eal fail ure.Never reins tal l a bearing unles s i t is i n a full y s erviceabl e condi ti on.
W hen i nst all ing a bearing t o a s haft , only apply force t o t he inner ri ng of the beari ng. W hen ins t al li ng a beari ngint o a hous ing, onl y apply force t o t he out er ri ng of the bearing.
Page 22 of 3229
Do not t ouch t he glas s port ion of t he bulb.On no account s hould headlamps be s wi tched on wi th t he bulb removed from the headlamp.Bulb t es ti ng may only be carri ed out wit h the bul b ins t al led i n t he headl amp.Bulbs mus t be di spos ed of in accordance wit h the local aut horit y bye-laws .
Connectors and harnesses
The engi ne compart ment of a vehi cl e is a part icularl y host il e environment for el ect ri cal component s and connectors. Al waysobserve the foll owing:
Make s ure el ect ri cal ly related it ems are dry and oil free before di sconnect ing/connecti ng t es t equipment .Make s ure t hat dis connect ed mul ti pl ugs and s ens ors are prot ect ed from any pos s ibl e oil , coolant or other li qui dcont aminat ion. Any such contami nat ion could impair performance or l ead to component fail ure.Never force connectors apart or pull on t he wiring harnes s .Always make s ure locki ng t abs are dis engaged before di sconnect ing mul ti plugs etc. and make s ure that correctori ent ati on is achieved before connecti on.Make s ure t hat any protecti on covers, i nsul at ion et c. are replaced if dis t urbed.
Having confirmed t hat a component is fault y, carry out t he fol lowing:
Swit ch off t he ignit ion and di s connect t he batt ery.Remove the component and support t he dis connected harnes s .W hen replaci ng electrical components , keep oily hands away from electrical connect ions and make s ure that lockingt abs on connect ors are ful ly engaged.
Battery Disconnection/Connection
Always refer to the El ect ri cal Secti on of this manual - Bat tery Connecti on/Dis connecti on pri or t o at tempt ing t o connect ordis connect the bat tery.For addit ional informat ion, refer t o: Specificati ons (414-01 Bat t ery, Mount ing and Cables , Speci ficat ions).
Fuel Handling Precautions
The fol lowing informati on li s ts bas ic precauti ons which mus t be obs erved if fuel i s t o be handl ed s afely. It als o outl inesother areas of ris k which mus t not be i gnored. As t his informati on is is sued for basi c gui dance only, consul t your local Fi reDepart ment where any doubt as to personal and envi ronmental s afet y exi s ts - See al so Heal th and Safety Precaut ions .
General precaut ions
Always have t he correct type of fire ext inguis her cont aining Foam, CO2, Gas or powder acces s ible when handl ing ordrai ni ng fuel or dis mantl ing fuel s ys tems . Fire exti ngui shers mus t als o be l ocat ed in areas where fuel i s s tored.
Make s ure t hat sui table warning si gns are exhibit ed.
Keep all s ources of ignit ion wel l away from areas where fuel is bei ng handl ed.
Make s ure t hat any leadlamps are fl ameproof and kept clear of spi ll age.
• W ARNINGS:
Do not di sas s emble or reas s emble fuel sys tem components whils t vehicle is over a pit .
No one should be permi tt ed to repair component s as sociat ed wit h fuel wi thout fi rs t having s peci alis t t rai ni ng.
Always dis connect t he vehi cl e batt ery before carryi ng out dis ass embly, reas s embly or drai ning work on a fuel sys tem.
Fuel t ank and s ys t em drai ning
Drai ning mus t be carried out in accordance wit h t he procedures given in the relevant Fuel Syst em s ecti on of thi s manual .
• W ARNINGS:
Never drain fuel or work on a fuel sys t em whil e t he vehi cl e i s over a pi t. Ext raction or draining of fuel must becarri ed out in a well venti lated area.
Al ways at tach fuel vapor warning l abel s t o fuel t anks i mmediat ely after drai ni ng.
Contai ners us ed for s toring fuel must be cl early marked wit h t he cont ents and pl aced i n a safe s torage area whichmeets the requi rement s of the local authorit y.
CAUTION: Some fuel l ines are now i ns t alled wit h 'quick release' connectors. If a connect or i s damaged, no at t emptmus t be made t o repai r the connect or, a new fuel line and connect or(s ) as s embly must be ins tall ed.
Always release pipe cli ps full y before att empti ng t o dis connect fuel pipes.
Fuel tank repairs
CAUTION: No at tempt s hould be made to repair a pl ast ic fuel tank. If t he s truct ure of t he t ank is damaged, a new
Page 27 of 3229
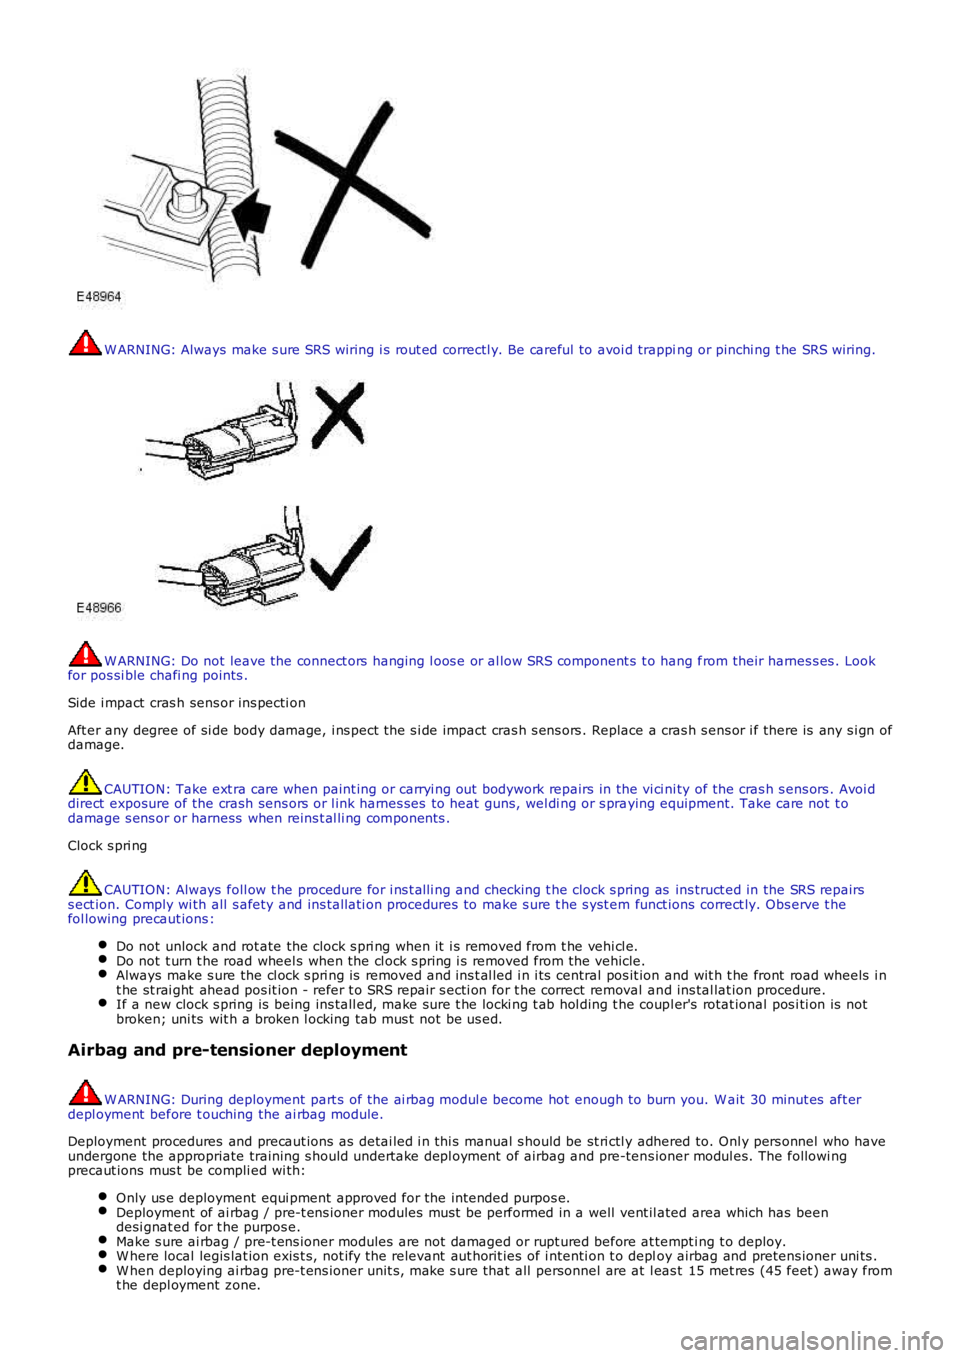
W ARNING: Always make s ure SRS wiring i s rout ed correctl y. Be careful to avoi d trapping or pinchi ng t he SRS wiring.
W ARNING: Do not leave the connect ors hanging l oos e or al low SRS component s t o hang from their harnes s es . Lookfor pos si ble chafi ng points .
Side i mpact cras h sens or ins pecti on
Aft er any degree of si de body damage, i ns pect the s i de impact cras h s ens ors . Replace a cras h s ens or i f there is any s i gn ofdamage.
CAUTION: Take ext ra care when paint ing or carryi ng out bodywork repairs in the vi ci ni ty of the cras h s ens ors . Avoi ddirect exposure of the crash sens ors or l ink harnes ses to heat guns, wel di ng or s praying equipment. Take care not t odamage s ens or or harness when reins t al li ng components .
Clock s pri ng
CAUTION: Always foll ow t he procedure for i ns t alli ng and checking t he clock s pring as ins truct ed in the SRS repairss ect ion. Comply wi th all s afety and ins tal lati on procedures to make s ure t he s yst em funct ions correct ly. Obs erve t hefol lowing precaut ions :
Do not unlock and rot ate the clock s pri ng when it i s removed from t he vehi cl e.Do not t urn t he road wheel s when the cl ock s pring i s removed from the vehicle.Always make s ure the cl ock s pri ng is removed and ins t al led i n i ts central pos it ion and wit h t he front road wheels i nt he st rai ght ahead pos it ion - refer t o SRS repair s ecti on for t he correct removal and ins tal lat ion procedure.If a new clock s pring is being ins tall ed, make sure t he locki ng t ab hol ding t he coupl er's rotat ional pos i ti on is notbroken; uni ts wit h a broken l ocking tab mus t not be us ed.
Airbag and pre-tensioner deployment
W ARNING: During deployment part s of the ai rbag modul e become hot enough to burn you. W ait 30 minut es aft erdepl oyment before t ouching the ai rbag module.
Deployment procedures and precaut ions as detai led i n thi s manual s hould be st ri ctl y adhered to. Onl y pers onnel who haveundergone the appropriate training s hould undert ake depl oyment of airbag and pre-tens ioner modul es. The followi ngprecaut ions mus t be compli ed wi th:
Only us e deployment equi pment approved for the intended purpos e.Deployment of ai rbag / pre-t ens ioner modules mus t be performed in a well vent il ated area which has beendesi gnat ed for t he purpos e.Make s ure ai rbag / pre-t ens ioner modules are not damaged or rupt ured before at tempt ing t o deploy.W here local legis lat ion exis t s, not ify the relevant aut horit ies of i ntenti on t o deploy airbag and pretens ioner uni ts .W hen deploying ai rbag pre-t ens ioner unit s, make s ure that all personnel are at l eas t 15 met res (45 feet ) away fromt he depl oyment zone.
Page 39 of 3229
Health Protection Precautions
Avoi d prol onged and repeat ed cont act wit h oil s, parti cularly us ed engine oi ls .W ear prot ect ive clot hing, including i mpervious gl oves where practi cable.Do not put oily rags i nt o pocket s .Avoi d contami nat ing cl ot hes, parti cularly underpants , wi th oi l.Heavi ly s oil ed clot hi ng and oil -i mpregnated foot wear s hould not be worn. Overall s mus t be cleaned regularly.First Ai d t reatment s hould be obt ained i mmediat el y for open cuts and wounds .Us e barrier creams , appl yi ng t hem before each work peri od, t o help the removal of oil from t he s ki n.W as h wi th soap and wat er to make s ure al l oi l is removed (s kin cl eans ers and nail brushes wi ll help). Preparati onscont aining lanol ine replace the nat ural s ki n oil s which have been removed.Do not us e gasol ine (pet rol ), keros ene (paraffin), di esel fuel (gas oi l), thi nners or s ol vent s for cleaning skin.If skin dis orders develop, obtain medical advice wi thout delay.W here practi cable, degreas e component s pri or t o handling.W here there is a ri s k of eye cont act , eye protecti on s houl d be worn, for exampl e chemical goggles or face s hiel ds ;in addi ti on an eye was h facil it y s houl d be provided.
Environmental Precautions
This s ecti on provides general informati on which can help t o reduce t he environment al i mpact s from the act ivit ies carriedout in workshops .
Emis s ions t o air
Many of the act ivit ies t hat are carried out i n works hops emit gas es and fumes whi ch can contribut e to global warmi ng,depl eti on of the ozone layer and/or the format ion of phot ochemical s mog at ground level. By cons ideri ng how t he works hopact ivi ti es are carried out , thes e gases and fumes can be mi nimi s ed, t hus reduci ng t he impact on t he envi ronment.
Exhaus t fumes
Runni ng car engines i s an es sent ial part of works hop act ivi ti es and exhaust fumes need t o be venti lated to at mos phere.However, the amount of t ime engi nes are runni ng and the pos it ion of t he vehi cle s hould be carefully cons idered at al lt imes , to reduce the releas e of poi s onous gas es and mini mis e t he i nconveni ence t o peopl e l iving nearby.
Solvent s
Some of t he cl eani ng agent s us ed are sol vent based and wil l evaporate rapidl y to atmos phere i f used carel ess l y, or i fcont ainers are l eft unseal ed. Al l contai ners mus t be firmly cl os ed when not requi red and s olvent should be used sparingly.W herever poss i bl e, sol vent s havi ng a l ow t oxi ci ty and flammabi li ty should be sel ect ed. Al ways foll ow t he ins t ructi onss uppl ied by t he s olvent manufact urer. Si mil arl y, many pai nt s are s olvent bas ed and the s pray s houl d be us ed in such away as t o reduce emi ss i ons t o a mini mum.
Refrigerant
It is i ll egal t o rel eas e any refrigerant int o t he atmos phere. Dis charge and repl acement of thes e mat eri al s from aircondi ti oni ng uni ts should onl y be carried out us ing t he appropri at e equipment .
Dis charges to water
Mos t works hops wi ll have t wo s ys t ems for di schargi ng wast e wat er - st orm drai ns and foul drains . Storm drains s houl d onlyreceive clean wat er i.e. rainwat er. Foul drai ns wil l accept many of the normal was t e wat er i .e. was hing wat er, detergent sand domest ic type was te BUT NOT oi l, petrol, s olvent , acids , hydraul ic fluid, anti freeze and si mil ar fl ui ds. If in doubt ,always cons ult the l ocal authori ty or wat er company.
Spill ages
Every precauti on mus t be taken t o prevent s pi ll age of oi l, fuel , sol vent s etc., reachi ng the drains . All handl ing of s uchmat erial s mus t take pl ace wel l away from drai ns and preferably i n an area wit h a s uit able contai ni ng wall t o preventdis charge int o drai ns or watercours es . If a spi llage occurs , it mus t be s oaked up immedi ately us i ng a s pil l ki t whereprovided.
Checkli s t
Spillage prevention:
Store li quids in a s ecure area.
Make s ure t hat taps on l iquid cont ai ners are s ecure and cannot be acci dent ally turned on.
Prot ect bulk st orage t anks from vandal is m by locki ng the val ves .
Trans fer li quids from one cont ai ner t o another i n an area away from open drai ns .
Ensure li ds are replaced s ecurel y on cont ainers .
Have s pi ll kit s availabl e near t o point s of s torage and liquid handl ing areas .
Spill Ki ts
Speci al mat eri als are avai lable to abs orb a number of di fferent subs tances. They can be in granular form, ready t o us e andare suppli ed in sui table cont ai ners . Dis posal of used spi ll absorbing mat eri al i s deal t wit h i n W as t e management .
Land contamination
Oil s , fuels and s olvents etc. can cont aminate any soi l wit h which t hey come int o cont act . Such materials MUST never bedis posed of by pouri ng on t o s oil and every precauti on mus t be t aken t o avoid s pil lage reaching s oil . W as te materials