2006 LAND ROVER FRELANDER 2 inflation pressure
[x] Cancel search: inflation pressurePage 2897 of 3229

177
Wheels and tyres
R
10. The number of plies in both the tread area,
and the sidewall area, indicates how many
layers of rubber coat ed material make up
the structure of the tyre. Information is
also provided on the type of materials
used.
11. Wear rate indicator. A tyre rated at 400 for
example, will last twice as long as a tyre
rated at 200.
12. The traction rating grades a tyres
performance when stopping on a wet road
surface. The higher the grade the better the
braking performance. The grades from
highest to lowest are, AA, A, B, and C.
13. The maximum load which can be carried
by the tyre.
14. Heat resistance grading. The tyre's
resistance to heat is grade A, B, or C, with
A indicating the greatest resistance to heat.
This grading is provided for a correctly
inflated tyre, which is being used within its
speed and loading limits.
15. The maximum inflation pressure for the
tyre. This pressure should not be used for
normal driving. See TECHNICAL
SPECIFICATIONS (page 194). † Speed ratings
TYRE CARE
Note:
Tyre condition should be checked after
the vehicle has been used off-road. As soon as
the vehicle returns to a normal, hard, road
surface stop the vehicle and check for damage
to the tyres. Rating Speed kmh (mph)
Q 160 (99)
R 170 (106) S 180 (112)
T 190 (118)
U 200 (124)
H 210 (130)
V 240 (149)
W 270 (168) Y 300 (186)
WARNINGS
Defective tyres are dangerous. Do not
drive the vehicle if a tyre is damaged,
excessively worn, or incorrectly inflated.
Doing so may lead to premature tyre failure.
Avoid contaminating the tyres with
vehicle fluids as they may cause
damage to the tyre.
Avoid spinning the wheels. The forces
released can damage the structure of
the tyre, and cause it to fail. Doing so may lead
to premature tyre failure.
If wheel spin is unavoidable due to a
loss of traction (in deep snow for
example) do not exceed the 50 km/h (30 mph)
point on the speedometer. Doing so may lead
to premature tyre failure.
Page 2900 of 3229
Wheels and tyres
180
L
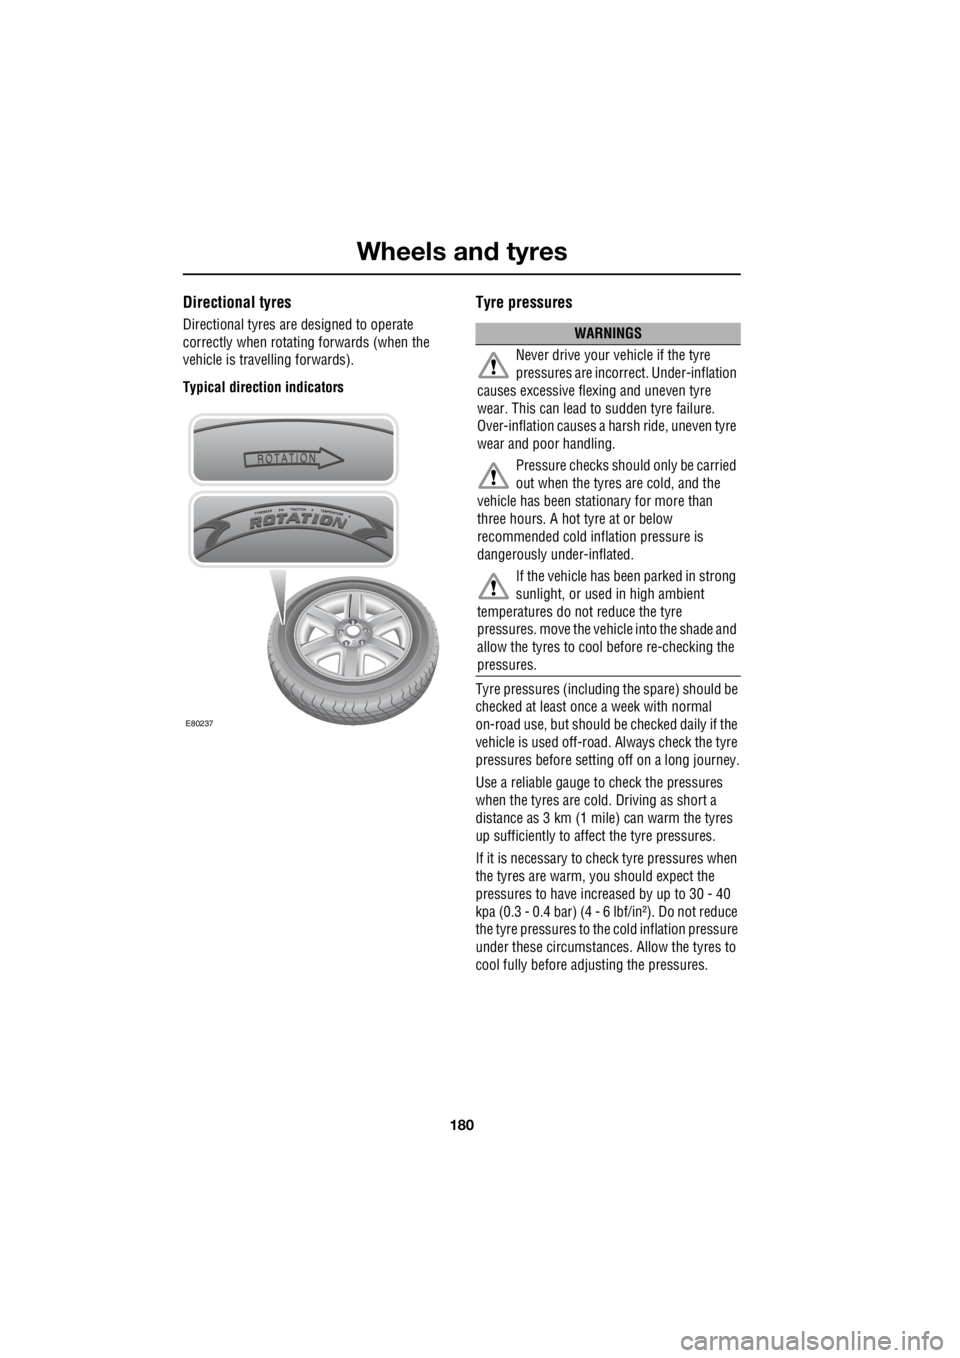
Directional tyres
Directional tyres are designed to operate
correctly when rotati ng forwards (when the
vehicle is travelling forwards).
Typical direction indicators
Tyre pressures
Tyre pressures (including the spare) should be
checked at least once a week with normal
on-road use, but should be checked daily if the
vehicle is used off-road. Always check the tyre
pressures before setti ng off on a long journey.
Use a reliable gauge to check the pressures
when the tyres are cold. Driving as short a
distance as 3 km (1 mile) can warm the tyres
up sufficiently to affect the tyre pressures.
If it is necessary to check tyre pressures when
the tyres are warm, you should expect the
pressures to have incr eased by up to 30 - 40
kpa (0.3 - 0.4 bar) (4 - 6 lbf/in²). Do not reduce
the tyre pressures to the cold inflation pressure
under these circumstances. Allow the tyres to
cool fully before ad justing the pressures.
E80237
WARNINGS
Never drive your vehicle if the tyre
pressures are incorrect. Under-inflation
causes excessive flex ing and uneven tyre
wear. This can lead to sudden tyre failure.
Over-inflation causes a ha rsh ride, uneven tyre
wear and poor handling.
Pressure checks shoul d only be carried
out when the tyres are cold, and the
vehicle has been stationary for more than
three hours. A hot tyre at or below
recommended cold inflation pressure is
dangerously under-inflated.
If the vehicle has been parked in strong
sunlight, or used in high ambient
temperatures do not reduce the tyre
pressures. move the vehicle into the shade and
allow the tyres to cool before re-checking the
pressures.
Page 2902 of 3229
Wheels and tyres
182
L
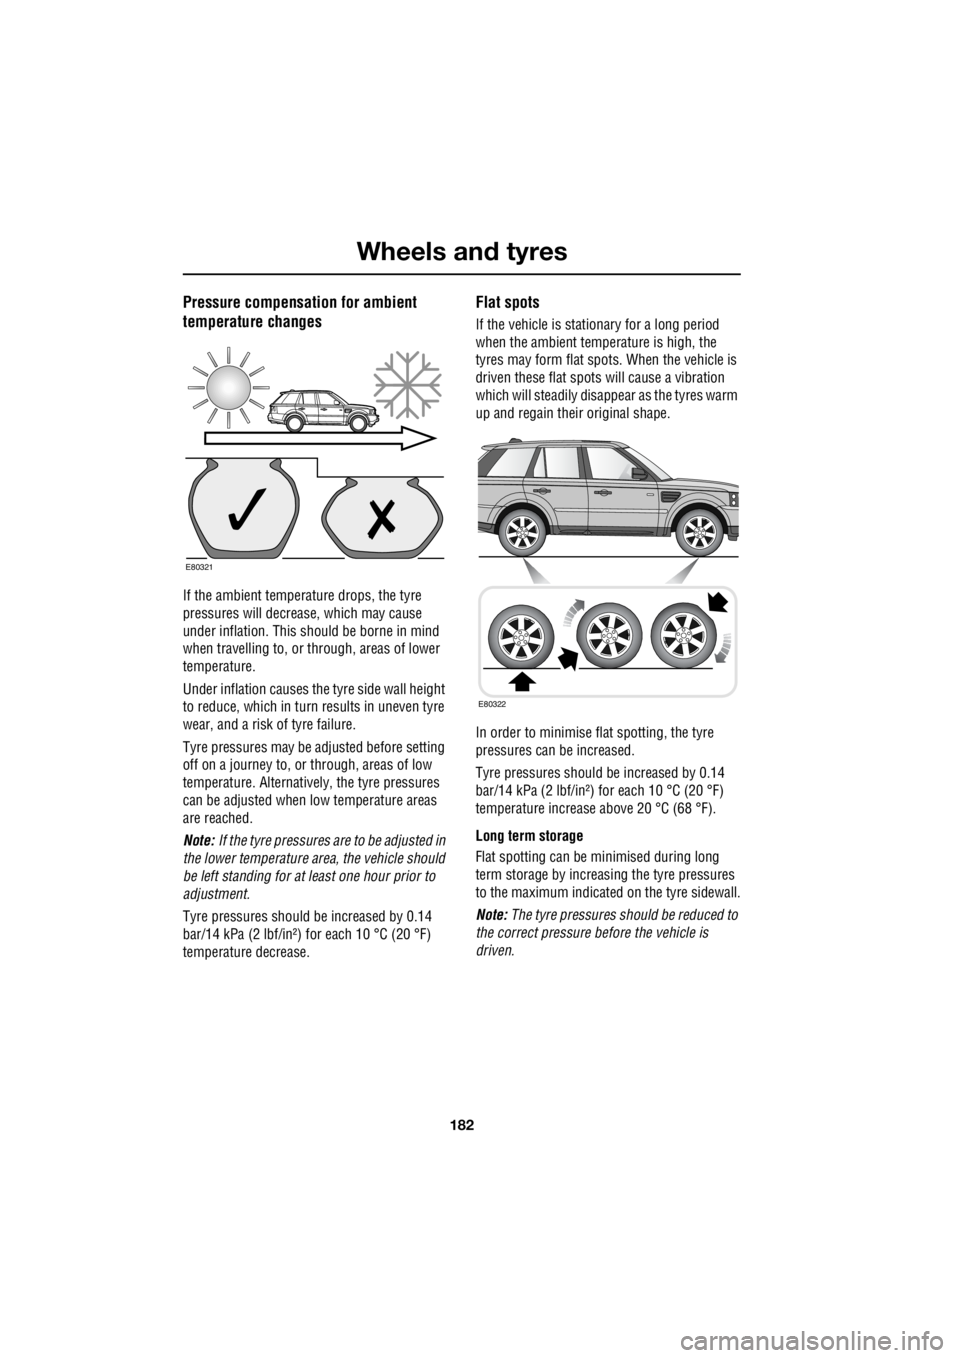
Pressure compensation for ambient
temperature changes
If the ambient temperature drops, the tyre
pressures will decrease, which may cause
under inflation. This should be borne in mind
when travelling to, or through, areas of lower
temperature.
Under inflation causes th e tyre side wall height
to reduce, which in turn results in uneven tyre
wear, and a risk of tyre failure.
Tyre pressures may be adjusted before setting
off on a journey to, or through, areas of low
temperature. Alternatively, the tyre pressures
can be adjusted when low temperature areas
are reached.
Note: If the tyre pressures are to be adjusted in
the lower temperature area, the vehicle should
be left standing for at least one hour prior to
adjustment.
Tyre pressures should be increased by 0.14
bar/14 kPa (2 lbf/in²) for each 10 °C (20 °F)
temperature decrease.
Flat spots
If the vehicle is stationary for a long period
when the ambient temperature is high, the
tyres may form flat spots. When the vehicle is
driven these flat spots will cause a vibration
which will steadily disappear as the tyres warm
up and regain their original shape.
In order to minimise fl at spotting, the tyre
pressures can be increased.
Tyre pressures should be increased by 0.14
bar/14 kPa (2 lbf/in²) for each 10 °C (20 °F)
temperature increase above 20 °C (68 °F).
Long term storage
Flat spotting can be minimised during long
term storage by increasing the tyre pressures
to the maximum indicated on the tyre sidewall.
Note: The tyre pressures s hould be reduced to
the correct pressure before the vehicle is
driven.
E80321
E80322
Page 2908 of 3229
Wheels and tyres
188
L
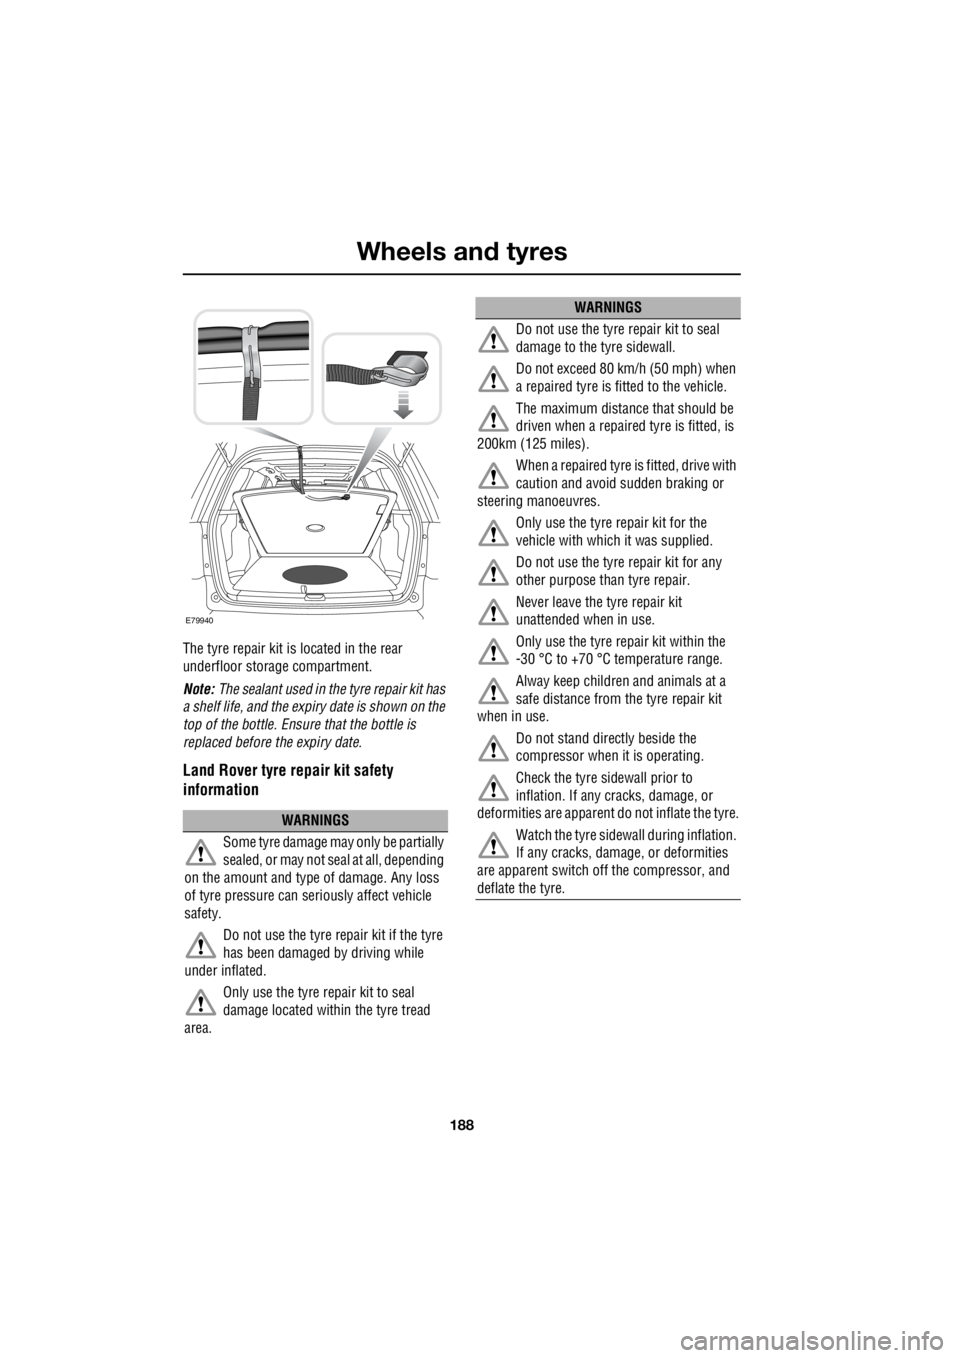
The tyre repair kit is located in the rear
underfloor storage compartment.
Note: The sealant used in the tyre repair kit has
a shelf life, and the expiry date is shown on the
top of the bottle. Ensur e that the bottle is
replaced before the expiry date.
Land Rover tyre repair kit safety
information
WARNINGS
Some tyre damage ma y only be partially
sealed, or may not seal at all, depending
on the amount and type of damage. Any loss
of tyre pressure can seriously affect vehicle
safety.
Do not use the tyre repair kit if the tyre
has been damaged by driving while
under inflated.
Only use the tyre repair kit to seal
damage located within the tyre tread
area.
E79940
Do not use the tyre repair kit to seal
damage to the tyre sidewall.
Do not exceed 80 km/h (50 mph) when
a repaired tyre is fitted to the vehicle.
The maximum distance that should be
driven when a repaired tyre is fitted, is
200km (125 miles).
When a repaired tyre is fitted, drive with
caution and avoid sudden braking or
steering manoeuvres.
Only use the tyre repair kit for the
vehicle with which it was supplied.
Do not use the tyre repair kit for any
other purpose than tyre repair.
Never leave the tyre repair kit
unattended when in use.
Only use the tyre repair kit within the
-30 °C to +70 °C temperature range.
Alway keep children and animals at a
safe distance from the tyre repair kit
when in use.
Do not stand dire ctly beside the
compressor when it is operating.
Check the tyre sidewall prior to
inflation. If any cracks, damage, or
deformities are a pparent do not inflate the tyre.
Watch the tyre sidewa ll during inflation.
If any cracks, damage, or deformities
are apparent switch off the compressor, and
deflate the tyre.
WARNINGS
Page 2909 of 3229
189
Wheels and tyres
R
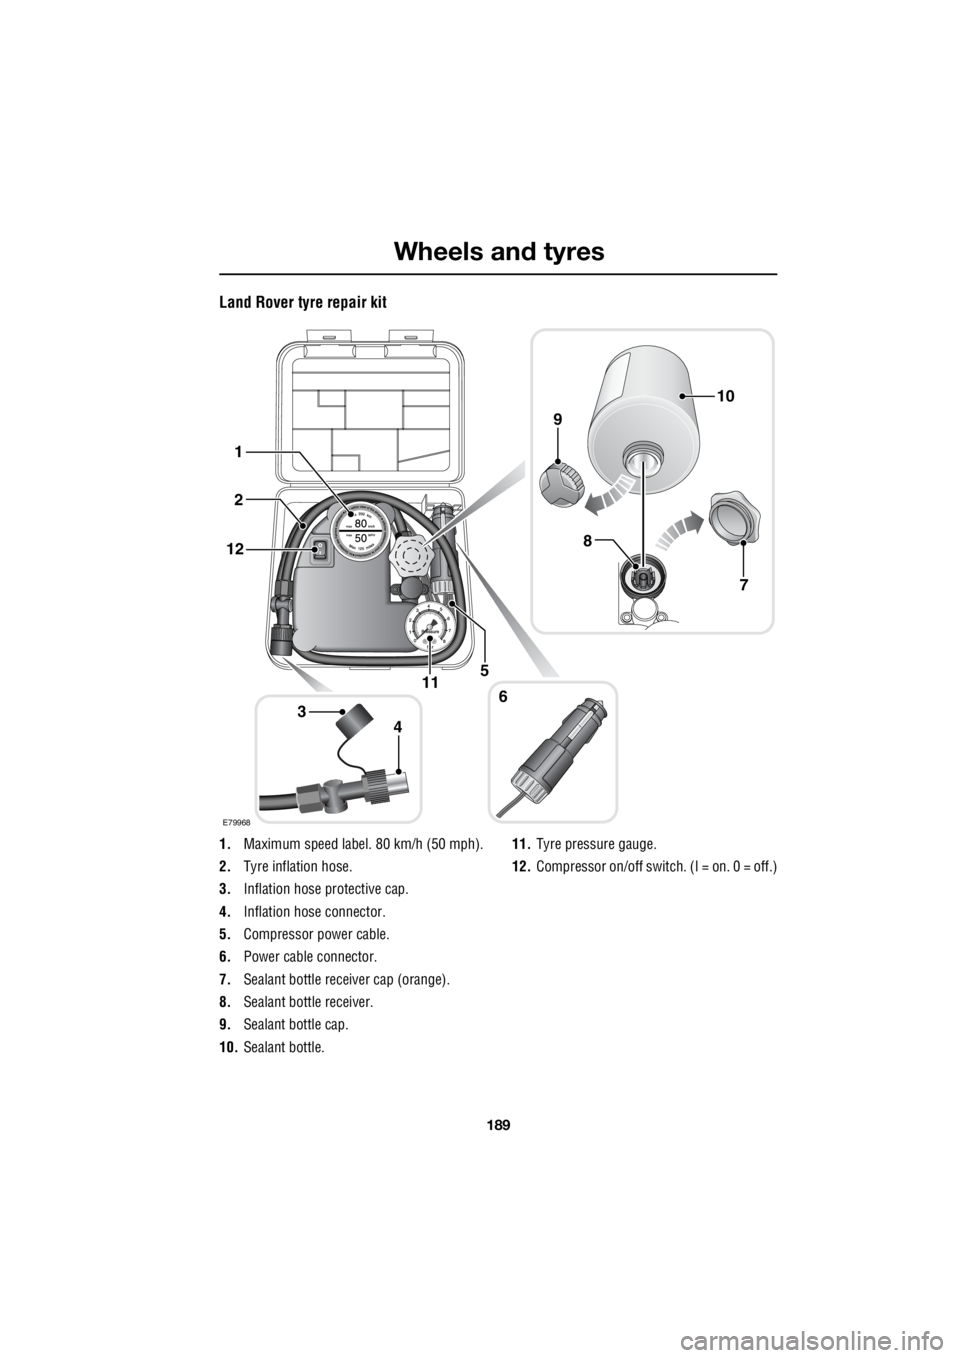
Land Rover tyre repair kit
1. Maximum speed label. 80 km/h (50 mph).
2. Tyre inflation hose.
3. Inflation hose protective cap.
4. Inflation hose connector.
5. Compressor power cable.
6. Power cable connector.
7. Sealant bottle receiver cap (orange).
8. Sealant bottle receiver.
9. Sealant bottle cap.
10. Sealant bottle. 11.
Tyre pressure gauge.
12. Compressor on/off switch. (I = on. 0 = off.)
E79968
34
2
6
5
1
12
11
8
9
10
7
Page 2910 of 3229

Wheels and tyres
190
L
Using the Land Rover tyre repair kit
Note: All vehicle drivers and occupants should
be made aware that a temporary repair has
been made to a tyre fitted to the vehicle. They
should also be made aware of the special
driving conditions im posed when using a
repaired tyre. Repair procedure
1. Open the tyre repair kit and peel off the
maximum speed label. Attach the label to
the facia in the driver's field of view. Take
care not to obstruct any of the instruments
or warning lights.
2. Uncoil the compressor power cable and
the inflation hose.
3. Unscrew the orange cap from the sealant
bottle receiver, and the sealant bottle cap.
4. Screw the sealant bottle into the receiver
(clockwise) until tight.
• Screwing the bottle onto the receiver will
pierce the bottle's se al. Do not unscrew
a full, or partly us ed bottle from the
receiver. Doing so will result in the
sealant leaking from the bottle.
5. Remove the valve cap from the damaged
tyre.
6. Remove the protective cap from the
inflation hose, and c onnect the inflation
hose to the tyre valve. Ensure that the hose
is screwed on firmly.
7. Ensure that the compressor switch is in
the off ( O) position.
8. Insert the power cable connector into an
auxiliary power socket. See AUXILIARY
POWER SOCKETS (page 110).
9. Unless the vehicle is in an enclosed or
poorly ventilated area , start the engine.
10. Set the compressor switch to the on ( l)
position.
11. Inflate the tyre to a minimum of 1.8 bar (26
lb/in²) and a maximum of 3.5 bar (51
lb/in²).
†
WARNINGS
Avoid skin contact with the sealant
which contains natu ral rubber latex.
Do not unscrew the sealant bottle from the
receiver until it is empty, as sealant will leak
out.
If the tyre inflation pressure does not
reach 1.8 bar (26 lb/in²) within seven
minutes, the tyre may have suffered excessive
damage. A temporary repair will not be
possible, and the vehicle should not be driven
until the tyre has been replaced.
CAUTIONS
Before attempting a tyre repair, ensure
that the vehicle is parked safely, as far
away from passing traffic as possible.
Ensure that the parki ng brake is applied,
and P is selected if an automatic
transmission is fitted.
Do not attempt to remove foreign objects
such as nails, screws, etc from the tyre.
Always run the engine when using the
compressor, unless the vehicle is in an
enclosed, or poorly ventilated space.
To prevent overheating do not operate
the compressor continuously for longer
than ten minutes.
Page 2911 of 3229

191
Wheels and tyres
R
12. During the inflation, switch the
compressor off briefly to check the tyre
pressure using the gauge mounted on the
compressor.
• It should not take longer than seven
minutes to inflate the tyre. If after seven
minutes the tyre ha s not reached the
minimum pressure, the tyre should not
be used.
13. Once the tyre has been inflated switch off
the compressor. If desired the engine may
be turned off after the compressor has
been turned off.
14. Remove the power connector from the
auxiliary power socket.
15. Remove the inflation hose from the tyre
valve by unscrewing it as quickly as
possible (anti-clockwise).
16. Replace the inflation hose protective cap,
and the tyre valve cap.
17. Do not remove the sealant bottle from the
receiver.
18. Ensure that the tyre repair kit (including
the bottle, and receiver caps) are placed
securely in the vehicle. You will need to
use the kit to check the tyre pressure after
3km (2 miles) so ensure they are easily
accessible.
19. Immediately drive the vehicle for 3 km (2
miles) to allow the sealant to coat the inner
surface of the tyre and form a seal at the
puncture.
†When pumping the sealant through the tyre
valve, the pressure may rise up to 6 bar (87
lb/in²). The pressure will drop again after
approximately 30 seconds.
Checking the tyre pressure after a repair
1. Drive the vehicle for 3 km (2 miles) then
stop in a safe place. Carry out a visual
examination of the tyres condition.
2. Remove the protective cap from the
inflation hose.
3. Screw the inflation hos e connector firmly
onto the tyre valve.
4. Read the tyre pressure from the gauge.
5. If the pressure of the sealant filled tyre is
above 1.3 bar (19 lb/in²) adjust the
pressure to the correct value. See
TECHNICAL SPECIFICATIONS (page 194).
6. Ensure that the compressor switch is in
the off position ( O), and insert the power
cable connector into an auxiliary power
socket. See AUXILIARY POWER
SOCKETS (page 110).
7. If the vehicle is in a well ventilated area,
start the engine.
8. Switch on the compressor ( I), and inflate
the tyre to the correct pressure.
WARNINGS
When driving the vehicle, if you
experience vibr ations, abnormal
steering, or noises, re duce speed immediately.
Drive with extreme caution and reduced speed
to the first safe place to stop the vehicle.
Visually examine the tyre, and check it's
pressure. If there are any signs of damage or
deformity to the tyre, or the tyre pressure is
below 1.3 bar (19 lb/i n²) do not continue
driving.
Consult a tyre repair centre, or your
Land Rover Dealer/Authorised repairer
for advice concerning the replacement of a
tyre after using a tyre repair kit.
Page 2912 of 3229

Wheels and tyres
192
L
9. To check the tyre pressure turn off the
compressor then read the pressure from
the gauge.
10. When the compressor is off, if the tyre
pressure is too high, release the required
amount of pressure using the pressure
relief valve.
11. Once the tyre is inflated to the correct
pressure, switch off the compressor and
remove the power plug from the auxiliary
socket.
12. Unscrew the inflation hose connector from
the tyre valve, replace the tyre valve cap
and the inflation hose connector protective
cap.
13. Do not remove the sealant bottle from the
receiver.
14. Ensure that the tyre repair kit (including
the bottle, and receiver caps) are placed
securely in the vehicle.
15. Drive to the nearest tyre repair centre, or
Land Rover Dealer/Autho rised repairer for
a replacement tyre to be fitted. Ensure that
you make the repair centre aware that the
tyre repair kit has been used before the tyre
is removed.
16. Both the tyre inflation hose, and the sealant
bottle should be replac ed once a new tyre
has been fitted.
Only sealant bottles which are
completely empty should be
disposed of with normal household
waste. Sealant bottles which contain some
sealant, and the tyre in flation hose, should be
disposed of by a tyre specialist, or your Land
Rover Dealer/Authorised repairer in
compliance with local waste disposal
regulations.USING SNOW CHAINS
Land Rover approved trac tion devices may be
used to improve traction on a hard road surface
in heavy snow conditions . They should not be
used in off-road conditions.
If it becomes necessary to fit traction devices,
the following points should be observed:-
• Single sided Spike-spyder traction devices
can only be fitted to the front wheels of
vehicles fitted with 17 or 18 inch diameter
wheels.
• The wheels and tyres fitted must
conform to the specifications of the
original equipment.
• No traction devices should be fitted to the
rear wheels.
• Only Land Rover approved traction devices
should be used on the vehicle. Only Land
Rover approved tracti on devices have been
tested to ensure that they do not cause
damage to the vehicl e. Contact your Land
Rover Dealer/Authorised repairer for
information.
• Always read, understa nd, and follow the
snow chain manufacturer's instructions.
Pay particular attention to the maximum
speed, and fitti ng instructions.
WARNING
Only use traction devices in heavy snow
conditions, on hard road surfaces.
Dynamic Stability Control (DSC) must be
switched off when using traction devices. DSC
limits wheel spin which is required to maintain
traction in deep snow conditions.
Never exceed 50 km/h (30 mph) when traction
devices are fitted.
Never fit traction devices to a temporary use
spare wheel.