Page 2069 of 5267

COVER(S)-CYLINDER HEAD
REMOVAL
LEFT CYLINDER HEAD COVER
NOTE: Care must be taken to protect the cylinder
head cover powder coating from scrapes and
abrasions.
1. Disconnect CCV hose from cylinder head cover.
2. Disconnect left side spark plug wires by pulling on
the boot straight out in line with plug. Dislodge
spark plug wire retainers from cylinder head cover
studs. Reposition spark plug wires aside.
3. Disconnect the power brake booster vacuum hose
at the intake manifold and set aside.
NOTE: For reassembly purposes, identify location
of cylinder head cover attaching studs and bolts.
4. Remove cylinder head cover fasteners. Remove
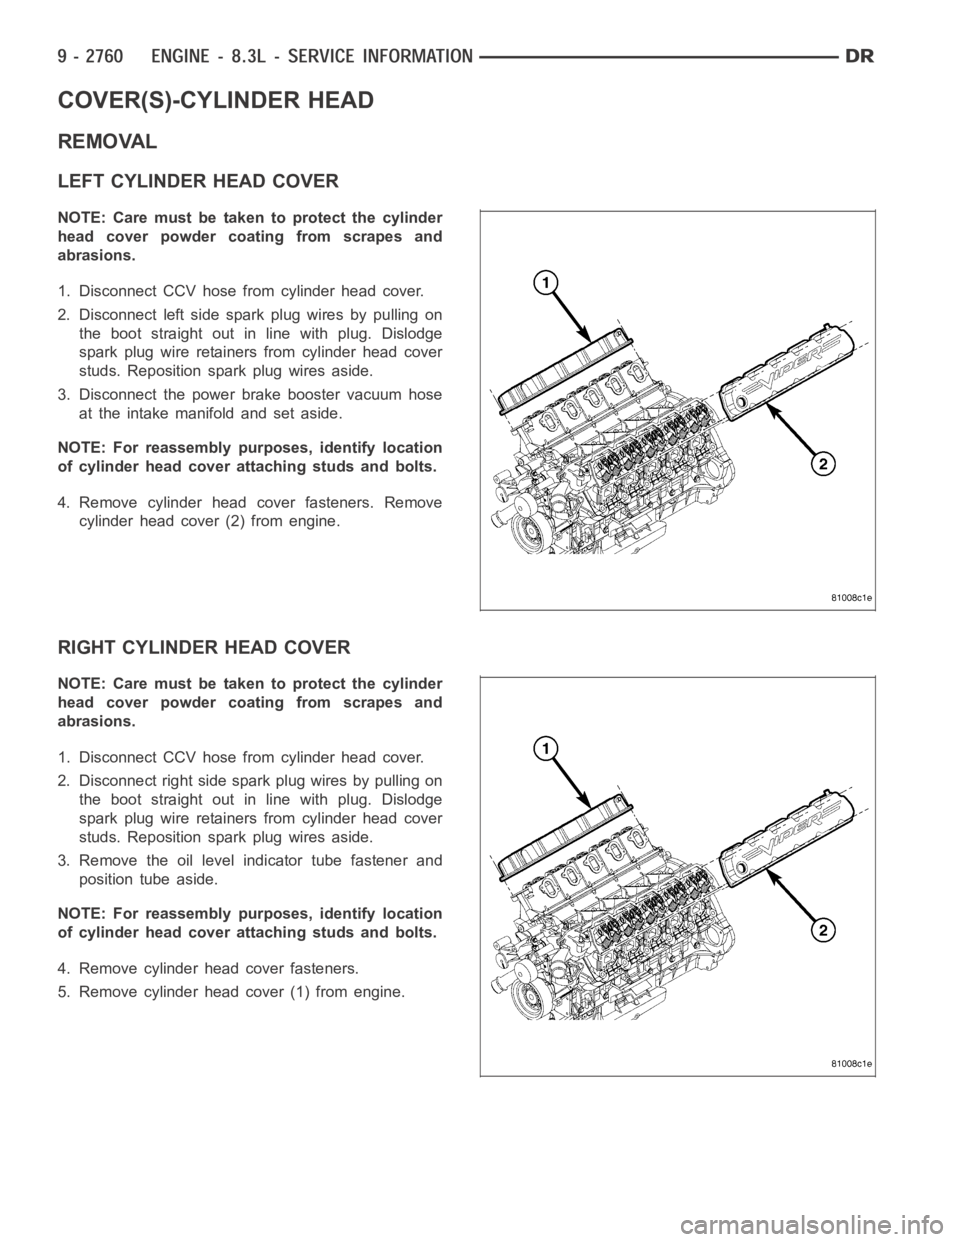
cylinder head cover (2) from engine.
RIGHT CYLINDER HEAD COVER
NOTE: Care must be taken to protect the cylinder
head cover powder coating from scrapes and
abrasions.
1. Disconnect CCV hose from cylinder head cover.
2. Disconnect right side spark plug wires by pulling on
the boot straight out in line with plug. Dislodge
spark plug wire retainers from cylinder head cover
studs. Reposition spark plug wires aside.
3. Remove the oil level indicator tube fastener and
position tube aside.
NOTE: For reassembly purposes, identify location
of cylinder head cover attaching studs and bolts.
4. Remove cylinder head cover fasteners.
5. Remove cylinder head cover (1) from engine.
Page 2070 of 5267

INSTALLATION
LEFT CYLINDER HEAD COVER
NOTE: Care must be taken to protect the cylinder
head covers powder coating from scrapes and
abrasions.
1. Inspect cylinder head cover gasket. Replace as
necessary.
2. Place cylinder head cover onto cylinder head.
Install and tighten cylinder head cover fasteners to
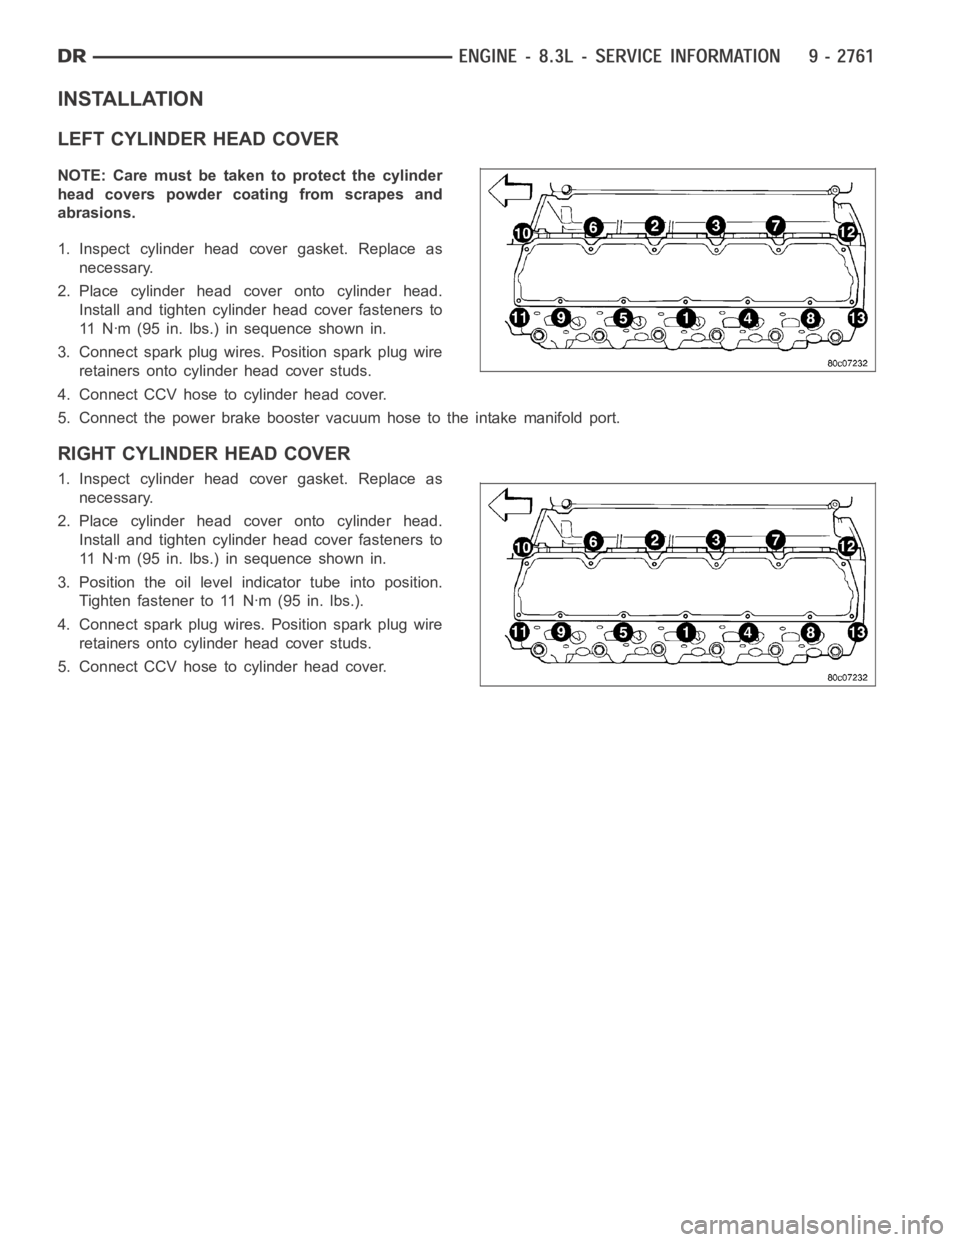
11 Nꞏm (95 in. lbs.) in sequence shown in.
3. Connect spark plug wires. Position spark plug wire
retainers onto cylinder head cover studs.
4. Connect CCV hose to cylinder head cover.
5. Connect the power brake booster vacuum hose to the intake manifold port.
RIGHT CYLINDER HEAD COVER
1. Inspect cylinder head cover gasket. Replace as
necessary.
2. Place cylinder head cover onto cylinder head.
Install and tighten cylinder head cover fasteners to
11 Nꞏm (95 in. lbs.) in sequence shown in.
3. Position the oil level indicator tube into position.
Tighten fastener to 11 Nꞏm (95 in. lbs.).
4. Connect spark plug wires. Position spark plug wire
retainers onto cylinder head cover studs.
5. Connect CCV hose to cylinder head cover.
Page 2082 of 5267
33. Raise and support the vehicle.
34. Connect the hydraulic lines to the fan assembly and steering rack then connect the A/C hose to the fan shroud.
35. Install aNewoil filter.
36. Lower the vehicle.
37. Install upper radiator hose and connect the ground wire at the thermostat housing.
38. Install air cleaner housing cover assembly, connect throttle body airinlet duct, IAT sensor and CCV hose. (Refer
to 9 - ENGINE/AIR INTAKE SYSTEM - INSTALLATION).
39. Fill and purge air from the power steering system.
40. Fill engine crankcase with proper oil to correct level.
41. Fill and purge air from the cooling system (Refer to 7 - COOLING/ENGINE -STANDARD PROCEDURE - FILL-
ING COOLING SYSTEM).
42. Connect negative battery cable.
43. Start the vehicle and inspect for leaks.
44. Install the lower engine shield.
Page 2088 of 5267

OIL
STANDARD PROCEDURE
CHECKING ENGINE OIL LEVEL
The best time to check engine oil level is after the
vehicle has sat overnight. If the engine has been run-
ning, allow the engine to be shut off for at least 5 min-
utes before checking oil level.
Checking the oil while the vehicle is on level ground
will improve the accuracy of the oil level reading.
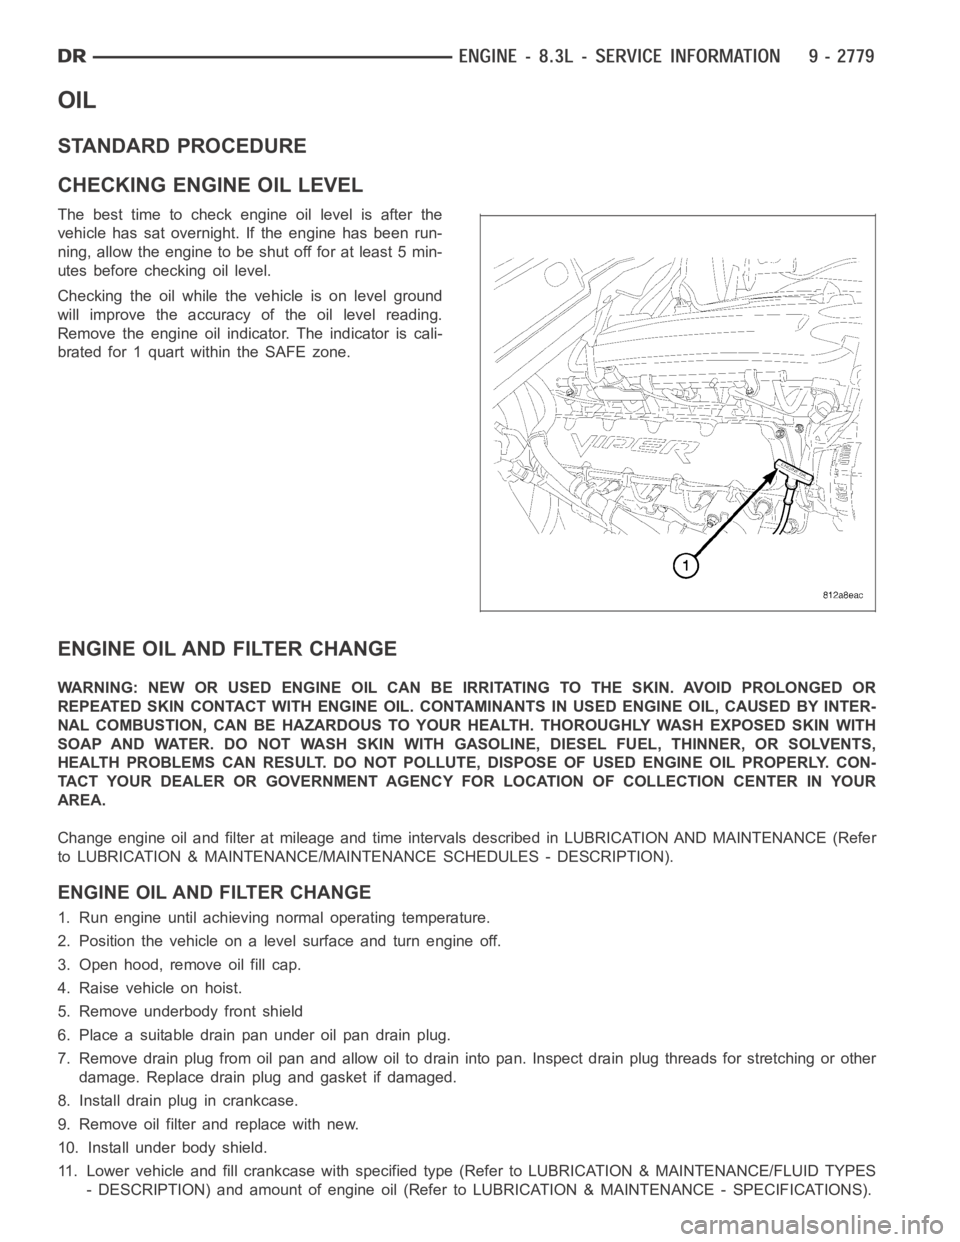
Remove the engine oil indicator. The indicator is cali-
brated for 1 quart within the SAFE zone.
ENGINE OIL AND FILTER CHANGE
WARNING: NEW OR USED ENGINE OIL CAN BE IRRITATING TO THE SKIN. AVOID PROLONGED OR
REPEATED SKIN CONTACT WITH ENGINE OIL. CONTAMINANTS IN USED ENGINE OIL, CAUSED BY INTER-
NAL COMBUSTION, CAN BE HAZARDOUS TO YOUR HEALTH. THOROUGHLY WASH EXPOSED SKIN WITH
SOAP AND WATER. DO NOT WASH SKIN WITH GASOLINE, DIESEL FUEL, THINNER, OR SOLVENTS,
HEALTH PROBLEMS CAN RESULT. DO NOT POLLUTE, DISPOSE OF USED ENGINE OIL PROPERLY. CON-
TACT YOUR DEALER OR GOVERNMENT AGENCY FOR LOCATION OF COLLECTION CENTER INYOUR
AREA.
Change engine oil and filter at mileage and time intervals described in LUBRICATION AND MAINTENANCE (Refer
to LUBRICATION & MAINTENANCE/MAINTENANCE SCHEDULES - DESCRIPTION).
ENGINE OIL AND FILTER CHANGE
1. Run engine until achieving normal operating temperature.
2. Position the vehicle on a level surface and turn engine off.
3. Open hood, remove oil fill cap.
4. Raise vehicle on hoist.
5. Remove underbody front shield
6. Place a suitable drain pan under oil pan drain plug.
7. Remove drain plug from oil pan and allow oil to drain into pan. Inspect drain plug threads for stretching or other
damage. Replace drain plug and gasket if damaged.
8. Install drain plug in crankcase.
9. Remove oil filter and replace with new.
10. Install under body shield.
11. Lower vehicle and fill crankcase with specified type (Refer to LUBRICATION & MAINTENANCE/FLUID TYPES
- DESCRIPTION) and amount of engine oil (Refer to LUBRICATION & MAINTENANCE - SPECIFICATIONS).
Page 2089 of 5267
12. Install oil fill cap.
13. Start engine and inspect for leaks.
14. Stop engine and inspect oil level. Adjust oil level as necessary.
OIL SPECIFICATION
DaimlerChrysler Corporation recommends a fully synthetic API certifiedengine oil of the proper viscosity grade for
refill. Viper engine factory fill is Mobil 1
10W-30 Synthetic.
OIL FILTER SPECIFICATION
All DaimlerChrysler Corporation engines are equipped with a high qualityfull-flow, disposable type oil filter.
DaimlerChrysler Corporation recommends a Mopar
or equivalent oil filter be used.
USED ENGINE OIL DISPOSAL
Care should be exercised when disposing used engine oil after it has been drained from a vehicle engine.
Page 2092 of 5267
INSTALLATION
1. Position oil cooler to mounting position.
2. Install oil cooler fasteners. Tighten to 12 Nꞏm (105
in. lbs.).
3. Connect oil supply (1) and return lines (2) to oil
cooler and.
4. Connect oil cooler coolant hoses (3).
5. Install air cleaner housing assembly, connect throt-
tle body air inlet hose (Refer to 9 - ENGINE/AIR
INTAKE SYSTEM/AIR CLEANER HOUSING -
INSTALLATION).
6. Fill cooling system (Refer to 7 - COOLING/ENGINE
- STANDARD PROCEDURE).
7. Start the engine to circulate and fill the oil cooler.
Shut off the engine and check the oil level. Add oil
as needed.
8. Inspect the oil cooler connections for leaks.
Page 2093 of 5267
PA N - O I L
REMOVAL
1. Disconnect the negative battery cable.
2. Disconnect engine oil indicator tube fastener from
the right cylinder head cover.
3. Install engine lifting fixture TOOL 9363 and support
TOOL.
4. Raise vehicle on hoist.
5. Remove the lower engine shield.
6. Drain engine oil.
7. Remove the front cross member (Refer to 13 -
FRAME & BUMPERS/FRAME/FRONT CROSS-
MEMBER - REMOVAL)
8. Remove flywheel inspection cover.
9. Loosen engine mount through bolts.
10. Wiggle and separate the oil level indicator tube
from the oil pan.
NOTE: Careful positioning of the jack stand is nec-
essary to prevent damage to other components
Page 2095 of 5267
2. Apply an 1/8 in. bead of Mopar Engine RTV at the two joints between the cylinder block to timing chain case
cover and the two joints between the rear main seal retainer and engine block.
3. Position oil pan and gasket to engine block, seat the oil level indicatortube in the oil pan and hand start all
fasteners.
4. Tighten the transmission to oil pan bolts in finger
tight.
5. Torque 5/16-18 oil pan bolts to 23 Nꞏm (200 in.
lbs.). Torque 1/4-20 oil pan bolts to 11 Nꞏm (95 in
lbs.).
6. Torque transmission to oil pan bolts to 23 Nꞏm (200
in. lbs.).
7. Lower the engine.
8. Install and tighten engine mount through bolts to
102 Nꞏm (75 ft. lbs.).
9. Install flywheel inspection cover.