Page 365 of 1897

H12205H12206H12660
Bench type:
Separate type:
H12207
- BODYFRONT SEAT (Power Adjuster Type)
BO-107
1892 Author�: Date�:
2001 AVALON (RM808U)
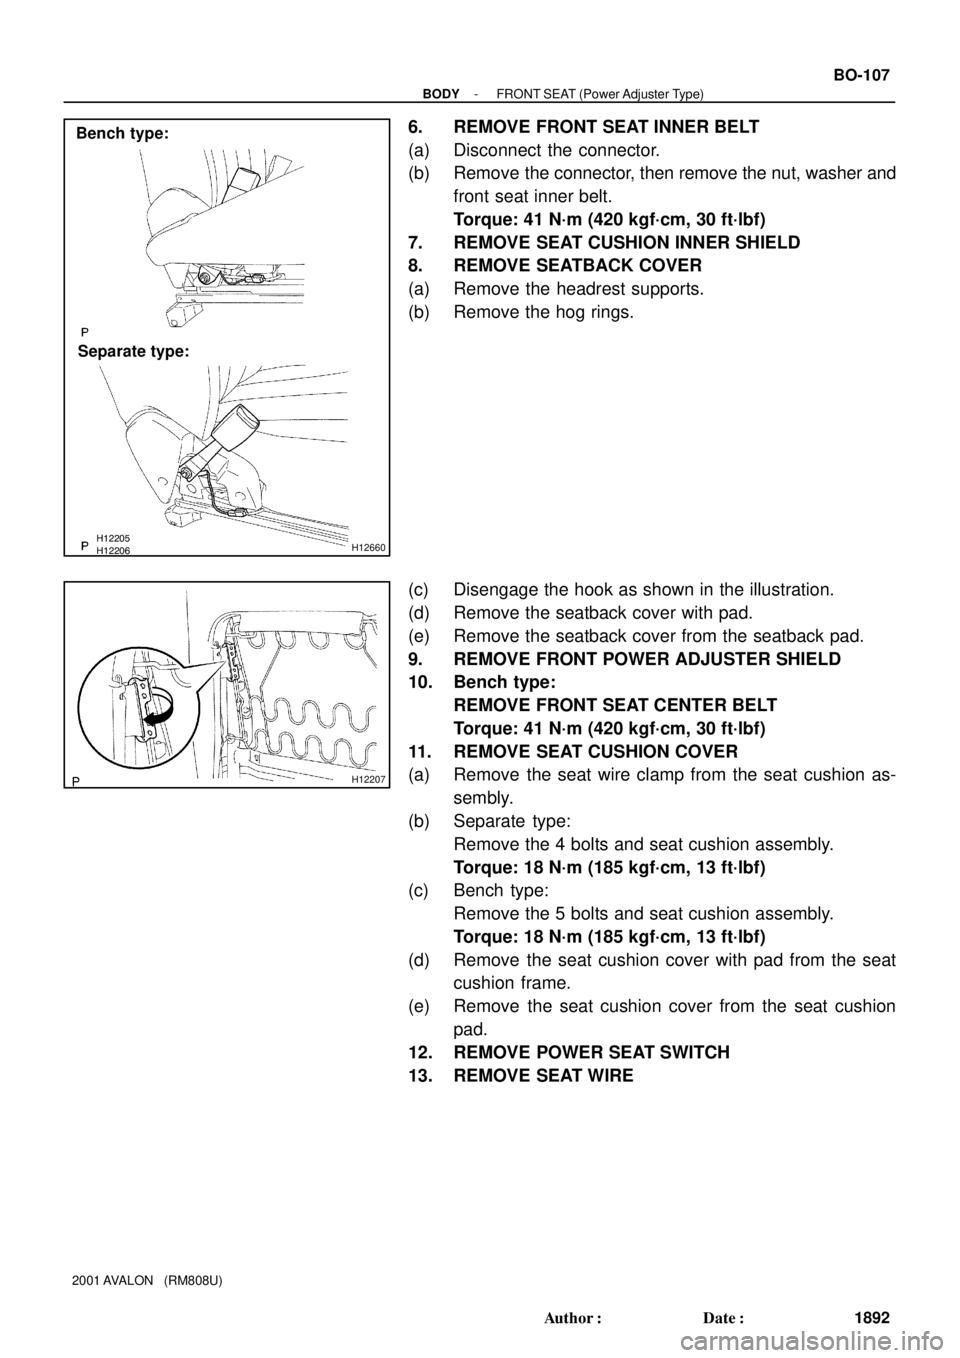
6. REMOVE FRONT SEAT INNER BELT
(a) Disconnect the connector.
(b) Remove the connector, then remove the nut, washer and
front seat inner belt.
Torque: 41 N´m (420 kgf´cm, 30 ft´lbf)
7. REMOVE SEAT CUSHION INNER SHIELD
8. REMOVE SEATBACK COVER
(a) Remove the headrest supports.
(b) Remove the hog rings.
(c) Disengage the hook as shown in the illustration.
(d) Remove the seatback cover with pad.
(e) Remove the seatback cover from the seatback pad.
9. REMOVE FRONT POWER ADJUSTER SHIELD
10. Bench type:
REMOVE FRONT SEAT CENTER BELT
Torque: 41 N´m (420 kgf´cm, 30 ft´lbf)
11. REMOVE SEAT CUSHION COVER
(a) Remove the seat wire clamp from the seat cushion as-
sembly.
(b) Separate type:
Remove the 4 bolts and seat cushion assembly.
Torque: 18 N´m (185 kgf´cm, 13 ft´lbf)
(c) Bench type:
Remove the 5 bolts and seat cushion assembly.
Torque: 18 N´m (185 kgf´cm, 13 ft´lbf)
(d) Remove the seat cushion cover with pad from the seat
cushion frame.
(e) Remove the seat cushion cover from the seat cushion
pad.
12. REMOVE POWER SEAT SWITCH
13. REMOVE SEAT WIRE
Page 366 of 1897
H12208
LH side:
RH side:
Lumber Support
Wire HarnessSide Airbag
Wire Harness
H12209
BO-108
- BODYFRONT SEAT (Power Adjuster Type)
1893 Author�: Date�:
2001 AVALON (RM808U)
14. REMOVE RECLINING ADJUSTER INSIDE COVERS
Remove the 4 screws and reclining adjuster inside covers.
15. REMOVE SEATBACK FRAME
Torque: 41 N´m (420 kgf´cm, 30 ft´lbf)
16. w/ Lumbar support:
REMOVE LUMBAR SUPPORT ASSEMBLY
17. REMOVE SLIDE MOTOR
(a) Remove the 2 screws, then disconnect the drive cable.
(b) Remove the slide motor from the power seat adjuster.
18. w/ 4 way-vertical:
REMOVE FRONT VERTICAL MOTOR
19. REMOVE REAR VERTICAL MOTOR
20. REMOVE RECLINING MOTOR
Page 369 of 1897
BO2Q3-01
- BODYFRONT SEAT (Power Adjuster Type)
BO-105
1890 Author�: Date�:
2001 AVALON (RM808U)
REMOVAL
REMOVE FRONT SEAT
(a) Using a screwdriver, remove the seat track covers.
HINT:
Tape the screwdriver tip before use.
(b) Remove the 4 bolts.
Torque: 37 N´m (375 kgf´cm, 27 ft´lbf)
(c) Disconnect the connectors.
NOTICE:
When disconnecting the side airbag connector take care not to damage the airbag wire harness.
(d) Remove the front seat.
NOTICE:
Be careful not to damage the body.
Page 371 of 1897
BO2P2-01
H12135
Hood To Cowl Top Seal
Wiper Arm
Cowl Top Ventilator Louver
Hood Insulator
x9
Window Washer Nozzle
Front Wiper Motor
7.0 (71, 62 in.´lbf)
Front Wiper Link
N´m (kgf´cm, ft´lbf) : Specified torque
24 (248, 18)
7.5 (76, 66 in.´lbf)
BO-38
- BODYFRONT WIPER AND WASHER
1823 Author�: Date�:
2001 AVALON (RM808U)
FRONT WIPER AND WASHER
COMPONENTS
Page 373 of 1897

BO2P6-01
H12130
3
24
1
H12134
A
BC
B BO-42
- BODYFRONT WIPER AND WASHER
1827 Author�: Date�:
2001 AVALON (RM808U)
INSTALLATION
1. INSTALL WINDOW WASHER NOZZLES
2. INSTALL HOOD INSULATOR
3. INSTALL WIPER MOTOR
(a) Install the wiper motor to the wiper link with the 3 bolts.
Torque: 7.5 kgf´cm (76 kgf´cm, 66 in.´lbf)
(b) Connect teh wiper link to the wiper motor.
4. INSTALL FRONT WIPER MOTOR & LINK ASSEMBLY
(a) Place the front wiper motor & link assembly into the cowl
panel.
HINT:
Snow clutch should be in the normal condition.
If snow clutch position is changed into the winter condition, re-
change it into the normal condition.
(b) Set the front wiper motor & link assembly aligning the
installation holes and tighten the bolts in the order shown
in the illustration.
Torque: 7.0 kgf´cm (71 kgf´cm, 62 in.´lbf)
(c) Install the wire harness clamp, then connect the connec-
tor.
5. INSTALL COWL TOP VENTILATOR LOUVER
6. INSTALL HOOD TO COWL TOP SEAL
7. INSTALL WIPER ARMS
(a) Operate the wiper motor once and turn the wiper switch
OFF.
(b) Install the wiper arms and tighten nuts by hand.
(c) Adjust the installation position of the wiper arms to the
position as shown in the illustration.
A: 52 mm (2.05 in.)
B: 30 ± 10 mm (1.18 ± 0.39 in.)
C: 21.3 mm (0.839 in.)
(d) Torque the 2 nuts.
Torque: 24 kgf´cm (248 kgf´cm, 18 ft´lbf)
(e) Install the 2 wiper arm head caps.
Page 375 of 1897
BO5235
Centering Bolt Bolt with Washer
BO0XL-03
H10149
N01360
H10148
BO-6
- BODYHOOD
1791 Author�: Date�:
2001 AVALON (RM808U)
HOOD
ADJUSTMENT
HINT:
Since the centering bolt is used as a hood hinge and lock set
bolt, the hood and lock cannot be adjusted with it on. Substitute
the bolt with washer for the centering bolts.
1. ADJUST HOOD IN FORWARD/REARWARD AND
LEFT/RIGHT DIRECTIONS
Adjust the hood by loosening the hood side hinge bolts.
Torque: 13 N´m (130 kgf´cm, 9 ft´lbf)
2. ADJUST FRONT EDGE OF HOOD IN VERTICAL
DIRECTION
Adjust the hood by turning the cushions.
3. ADJUST HOOD LOCK
Adjust the lock by loosening the 2 bolts and nut.
Torque: 6.9 N´m (70 kgf´cm, 61 in.´lbf)
Page 376 of 1897

BO0XM-03
H12101
150 mm (5.91 in.)
- BODYHOOD SUPPORT
BO-7
1792 Author�: Date�:
2001 AVALON (RM808U)
HOOD SUPPORT
REPLACEMENT
1. REMOVE SUPPORT FROM HOOD
Remove the bolt and support from the hood.
HINT:
While supporting the hood by hand, remove the support.
2. REMOVE SUPPORT FROM BODY
Remove the bolt and support.
3. IF NECESSARY, REPLACE HOOD SUPPORT
NOTICE:
Handling the hood support
�Do not disassemble the support because the cylinder
is filled with pressurized gas.
�If the support is to be replaced, drill a 2.0 - 3.0 mm
(0.079 - 0.118 in.) hole in the area shown in the il-
lustration to completely discharge the high-pressure
gas before disposing of it.
�When drilling, chips may fly out so work carefully.
�The gas is colorless, odorless and non-toxic.
�When working, handle the support carefully. Never
score or scratch the exposed part of the piston rod,
and allow any paint or oil to get on it.
�Do not turn the piston rod and cylinder with the sup-
port fully extended.
4. INSTALL HOOD SUPPORT
(a) Install the bolt and hood support to the body.
Torque: 17 N´m (175 kgf´cm, 13 ft´lbf)
(b) Install the bolts and hood support to the hood.
Torque: 17 N´m (175 kgf´cm, 13 ft´lbf)
Page 377 of 1897

BO2PU-02
H12194: Specified torqueN´m (kgf´cm, ft´lbf)
AA
KK
K
K
K
K
K
K
B
L
E
G
GG
G
GG
G
GGI
C
C
C
C
K
K
KKB Instrument Panel Reinforcement
No. 2 Instrument
Panel to Cowl BraceFront Pillar Garnish
Upper Cluster Finish Panel
Instrument Panel
Safety Pad Front Pillar GarnishNo. 1 Heater to
Register Duct
Instrument Panel
to Cowl BraceSpeaker Opening
Cover Assembly
H
H
H
H
H
H
III
G
D EDD
Steering Wheel
Floor shift:
Rear Console Box Floor shift:
Front Console Box
Combination Switch No. 1 Lower PanelLH Lower Insert
Column shift:
Finish Panel Hood Lock
Release LeverNo. 2 Under Cover
Floor shift:
Console Box
Plate
Steering Wheel Pad Steering Column
Cover
Floor shift:
Front Ash Receptacle
Floor shift:
Upper Console PanelLower Finish
Panel Column shift:
Lower Cover LH Register
TAIWAN:
Center Cluster
Finish Panel
TAIWAN:
Opening Covers with
Heater Control Assembly Radio Assembly with Heater
Control AssemblyLower Panel
Cluster Finish Panel
End Finish Panel Combination Meter Lower Cluster
Finish PanelGlove Compartment
Door Finish Plate
Speaker Opening
Cover Assembly
No. 2 Heater to
Register Duct
No. 1 Register
Floor shift:
Cup Holder
Multi Information
Display
Floor shift:
Under Rear
Console Panel
I
HH
50 (510, 37)
20 (204, 15)
N
JJJJConsole Box Hole Cover
Column shift:
Front Ash Receptacle
- BODYINSTRUMENT PANEL
BO-87
1872 Author�: Date�:
2001 AVALON (RM808U)
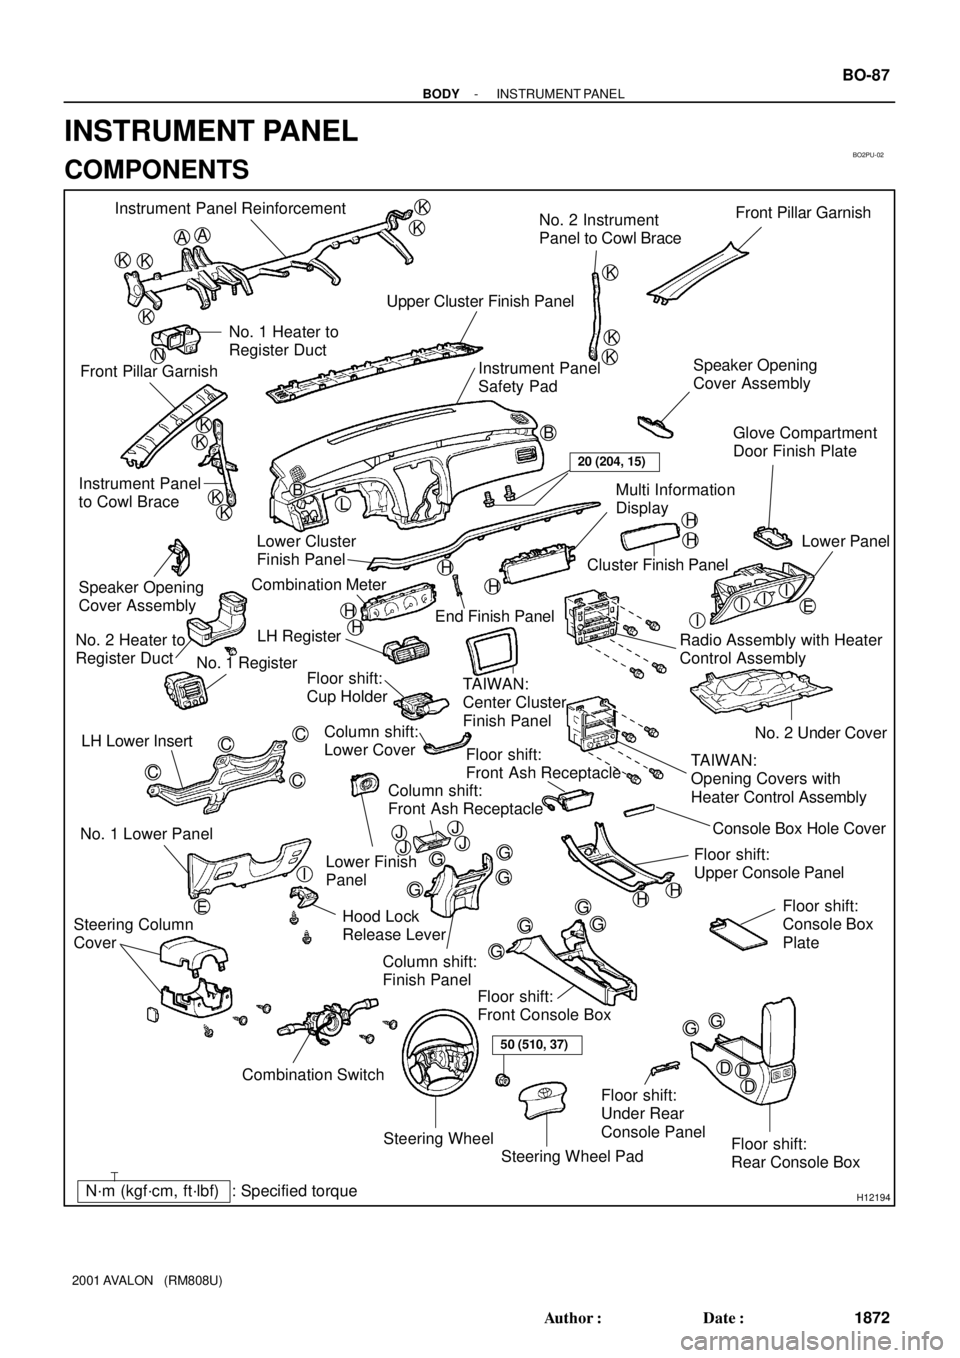
INSTRUMENT PANEL
COMPONENTS