Page 107 of 1897
AX0KB-01
D07772
Radio Assembly with Heater Control & Accessory Assembly Except Taiwan Spec.:
Lower Instrument Panel
Sub-assembly
Lower No. 4 Instrument
Panel Sub-assembly
Hood Lock
Release Lever
Radio Tuner Opening
Covers with Heater
Console & Accessory
Assembly Taiwan Spec.:Taiwan Spec.:
Center Instrument Cluster Finish Panel
Sub-assemblyNo. 2 Instrument Panel
Under Cover Sub-assembly
Front Ash Receptacle Assembly
Upper Console Panel
Sub-assembly
Console Box Plate
Front Console Box
Assembly
Upper Rear Console
Panel Sub-assembly
Clip
Shift Control
Cable
Floor Shift Lever Assembly
12 (120,9)
Rear Console Box Assembly
RH Cowl Side Trim
RH Scuff Plate
N´m (kgf´cm, ft´lbf) : Specified torqueRH Cowl Side Trim
RH Scuff Plate
AX-20
- AUTOMATIC TRANSAXLEFLOOR SHIFT ASSEMBLY
1310 Author�: Date�:
2001 AVALON (RM808U)
FLOOR SHIFT ASSEMBLY
COMPONENTS
Page 120 of 1897
AX0KB-01
D07772
Radio Assembly with Heater Control & Accessory Assembly Except Taiwan Spec.:
Lower Instrument Panel
Sub-assembly
Lower No. 4 Instrument
Panel Sub-assembly
Hood Lock
Release Lever
Radio Tuner Opening
Covers with Heater
Console & Accessory
Assembly Taiwan Spec.:Taiwan Spec.:
Center Instrument Cluster Finish Panel
Sub-assemblyNo. 2 Instrument Panel
Under Cover Sub-assembly
Front Ash Receptacle Assembly
Upper Console Panel
Sub-assembly
Console Box Plate
Front Console Box
Assembly
Upper Rear Console
Panel Sub-assembly
Clip
Shift Control
Cable
Floor Shift Lever Assembly
12 (120,9)
Rear Console Box Assembly
RH Cowl Side Trim
RH Scuff Plate
N´m (kgf´cm, ft´lbf) : Specified torqueRH Cowl Side Trim
RH Scuff Plate
AX-20
- AUTOMATIC TRANSAXLEFLOOR SHIFT ASSEMBLY
1310 Author�: Date�:
2001 AVALON (RM808U)
FLOOR SHIFT ASSEMBLY
COMPONENTS
Page 377 of 1897

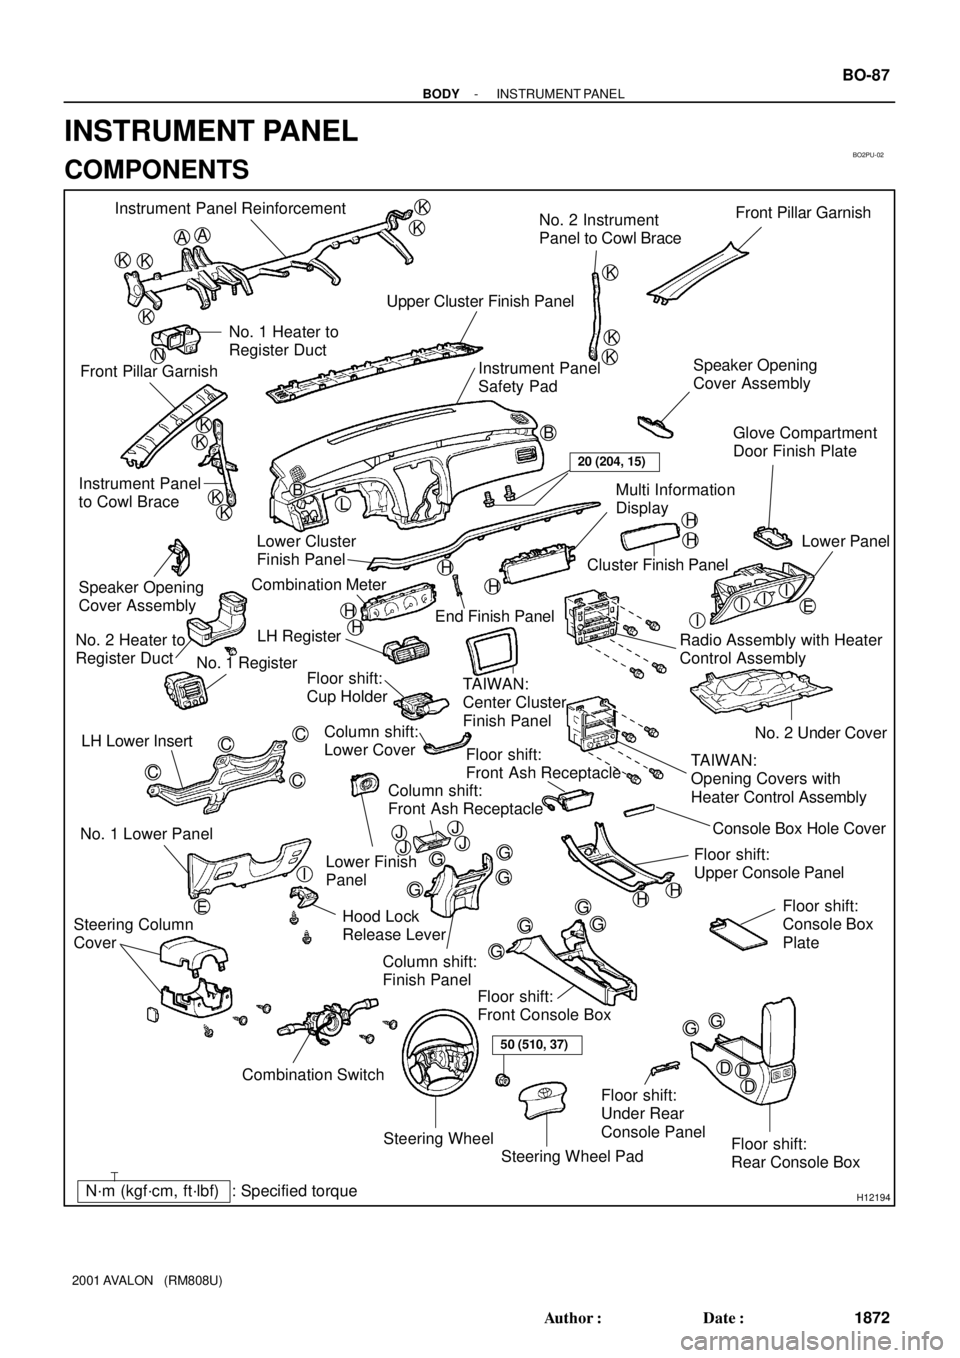
BO2PU-02
H12194: Specified torqueN´m (kgf´cm, ft´lbf)
AA
KK
K
K
K
K
K
K
B
L
E
G
GG
G
GG
G
GGI
C
C
C
C
K
K
KKB Instrument Panel Reinforcement
No. 2 Instrument
Panel to Cowl BraceFront Pillar Garnish
Upper Cluster Finish Panel
Instrument Panel
Safety Pad Front Pillar GarnishNo. 1 Heater to
Register Duct
Instrument Panel
to Cowl BraceSpeaker Opening
Cover Assembly
H
H
H
H
H
H
III
G
D EDD
Steering Wheel
Floor shift:
Rear Console Box Floor shift:
Front Console Box
Combination Switch No. 1 Lower PanelLH Lower Insert
Column shift:
Finish Panel Hood Lock
Release LeverNo. 2 Under Cover
Floor shift:
Console Box
Plate
Steering Wheel Pad Steering Column
Cover
Floor shift:
Front Ash Receptacle
Floor shift:
Upper Console PanelLower Finish
Panel Column shift:
Lower Cover LH Register
TAIWAN:
Center Cluster
Finish Panel
TAIWAN:
Opening Covers with
Heater Control Assembly Radio Assembly with Heater
Control AssemblyLower Panel
Cluster Finish Panel
End Finish Panel Combination Meter Lower Cluster
Finish PanelGlove Compartment
Door Finish Plate
Speaker Opening
Cover Assembly
No. 2 Heater to
Register Duct
No. 1 Register
Floor shift:
Cup Holder
Multi Information
Display
Floor shift:
Under Rear
Console Panel
I
HH
50 (510, 37)
20 (204, 15)
N
JJJJConsole Box Hole Cover
Column shift:
Front Ash Receptacle
- BODYINSTRUMENT PANEL
BO-87
1872 Author�: Date�:
2001 AVALON (RM808U)
INSTRUMENT PANEL
COMPONENTS
Page 388 of 1897

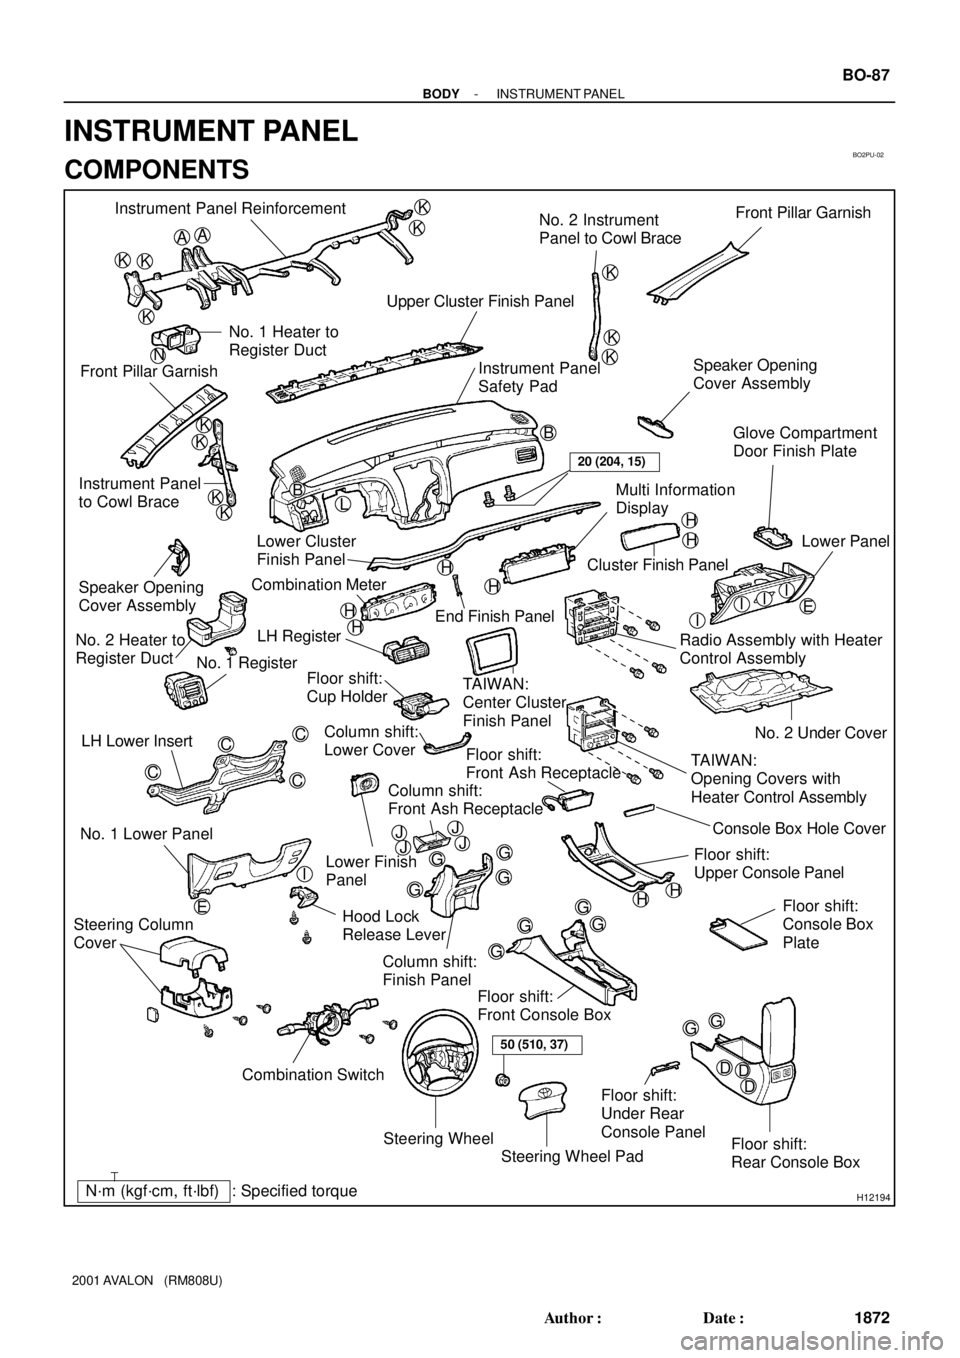
BO2PU-02
H12194: Specified torqueN´m (kgf´cm, ft´lbf)
AA
KK
K
K
K
K
K
K
B
L
E
G
GG
G
GG
G
GGI
C
C
C
C
K
K
KKB Instrument Panel Reinforcement
No. 2 Instrument
Panel to Cowl BraceFront Pillar Garnish
Upper Cluster Finish Panel
Instrument Panel
Safety Pad Front Pillar GarnishNo. 1 Heater to
Register Duct
Instrument Panel
to Cowl BraceSpeaker Opening
Cover Assembly
H
H
H
H
H
H
III
G
D EDD
Steering Wheel
Floor shift:
Rear Console Box Floor shift:
Front Console Box
Combination Switch No. 1 Lower PanelLH Lower Insert
Column shift:
Finish Panel Hood Lock
Release LeverNo. 2 Under Cover
Floor shift:
Console Box
Plate
Steering Wheel Pad Steering Column
Cover
Floor shift:
Front Ash Receptacle
Floor shift:
Upper Console PanelLower Finish
Panel Column shift:
Lower Cover LH Register
TAIWAN:
Center Cluster
Finish Panel
TAIWAN:
Opening Covers with
Heater Control Assembly Radio Assembly with Heater
Control AssemblyLower Panel
Cluster Finish Panel
End Finish Panel Combination Meter Lower Cluster
Finish PanelGlove Compartment
Door Finish Plate
Speaker Opening
Cover Assembly
No. 2 Heater to
Register Duct
No. 1 Register
Floor shift:
Cup Holder
Multi Information
Display
Floor shift:
Under Rear
Console Panel
I
HH
50 (510, 37)
20 (204, 15)
N
JJJJConsole Box Hole Cover
Column shift:
Front Ash Receptacle
- BODYINSTRUMENT PANEL
BO-87
1872 Author�: Date�:
2001 AVALON (RM808U)
INSTRUMENT PANEL
COMPONENTS
Page 476 of 1897
BO2PE-01
H12155
: Specified torqueN´m (kgf´cm, ft´lbf)
� Non-reusable partHood To Cowl Top Seal Cowl Top Ventilator LouverWiper Arm Windshield Upper Moulding
Windshield GlassFront Door
Opening Trim Front Pillar Garnish
24 (248, 18)
Roof Headlining
Assist Grip
DamInner Rear View Mirror
Sun Visor
Holder Sun Visor
Inner Rear View
Mirror Cover
Holder
Roof Console Box Front Pillar Garnish
Front Door
Opening Trim
Retainer
24 (248, 18)
� No. 1 Stopper
� No. 2 Stopper
� No. 2
Stopper
w/ Sliding roof:
Sliding Roof
Opening Trim
� �
�Dam �
Lens
� No. 1 Stopper
- BODYWINDSHIELD
BO-55
1840 Author�: Date�:
2001 AVALON (RM808U)
WINDSHIELD
COMPONENTS
Page 480 of 1897

BO2821
H00679
H12153
w/o Rain gutter:
H12154
a
b
b - b a - aa
b w/ Rain gutter: BO-62
- BODYWINDSHIELD
1847 Author�: Date�:
2001 AVALON (RM808U)
12. INSTALL WINDSHIELD GLASS AND MOULDING
(a) Install the glass, aligning the reference marks using a suc-
tion rubber.
HINT:
Check to see that the stoppers are attached to the body correct-
ly.
(b) Lightly press the glass front surface for close contact.
(c) Correct insufficient or protruded adhesive agent using a
spatula.
HINT:
Apply adhesive agent up to the windshield glass edge.
(d) Install a new windshield moulding to the windshield glass
before the adhesive agent hardens.
HINT:
Install the moulding, aligning the center of moulding with the
center of body.
(e) Remove any excessive adhesive agent before it hardens.
(f) Hold the glass and moulding in place securely with a pro-
tective tape or equivalent until the adhesive hardens.
NOTICE:
Take care not to drive the vehicle during the time described
in the table below.
TemperatureMinimum time prior to driving the vehicle
35 °C (95 °F)1.5 hours
20 °C (68 °F)5 hours
5 °C (41 °F)24 hours
13. INSPECT FOR LEAK AND REPAIR
NOTICE:
Conduct a leak test after the hardening time has elapsed.
14. w/ Sliding roof:
INSTALL SLIDING ROOF OPENING TRIM
15. INSTALL ASSIST GRIP
16. INSTALL COWL TOP VENTILATOR LOUVER
17. INSTALL HOOD TO COWL TOP SEAL
18. INSTALL WIPER ARMS
(a) Operate the wiper motor once and turn the wiper switch
OFF.
(b) Install the wiper arms and tighten nuts by hand.
Page 482 of 1897

BO2PF-01
H12143
H12144
H121452 Clips
H12129
BO-56
- BODYWINDSHIELD
1841 Author�: Date�:
2001 AVALON (RM808U)
REMOVAL
1. REMOVE INNER REAR VIEW MIRROR
(a) w/ Electrochromic rear view mirror:
Using a screwdriver, remove the inner rear view mirror
cover.
HINT:
Tape the screwdriver tip before use.
(b) w/ Electrochromic rear view mirror:
Disconnect the connector.
(c) Remove the inner rear view mirror as shown in the illustra-
tion.
2. REMOVE SUN VISORS AND HOLDERS
3. REMOVE ROOF CONSOLE BOX
(a) Using a screwdriver, remove the map light lens.
HINT:
Tape the screwdriver tip before use.
(b) Remove the 3 screws and roof console box, then discon-
nect the connector.
4. REMOVE FRONT DOOR OPENING TRIMS
5. REMOVE FRONT PILLAR GARNISH
(a) Remove the front pillar garnish.
(b) Employ the same manner described above to the other
side.
6. REMOVE WIPER ARMS
7. REMOVE HOOD TO COWL TOP SEAL
8. REMOVE COWL TOP VENTILATOR LOUVER
(a) Using a clip remover, remove the 2 clips.
(b) Remove the cowl top ventilator louver as shown in the il-
lustration.
9. REMOVE ASSIST GRIP
10. w/ Sliding roof:
REMOVE SLIDING ROOF OPENING TRIM
Page 1242 of 1897
I13628
Theft Deterrent ECU
DSWH 18
6
B
B 1 Engine Hood
Courtesy Switch
2
W-B
BIF3
BJ1
J/C
W-B
W-B 4
2D4
2F
EDE3T4
Engine Room J/B
- DIAGNOSTICSTHEFT DETERRENT SYSTEM
DI-547
703 Author�: Date�:
2001 AVALON (RM808U)
Engine Hood Courtesy Switch Circuit
CIRCUIT DESCRIPTION
The engine hood courtesy switch is built into the engine hood lock assembly and goes ON when the engine
hood is opened and goes OFF when the engine hood is closed.
WIRING DIAGRAM
DI6L4-01