1999 SUBARU LEGACY belt
[x] Cancel search: beltPage 796 of 1456

2. Power Steering System
A: LHD MODEL
B4M1149B
(1) Clamp
(2) Adapter
(3) Hose bracket
(4) Pipe C
(5) Pipe D
(6) Clamp E
(7) Cap
(8) Strainer
(9) Seal washer
(10) Tank
(11) O-ring
(12) Oil pump
(13) Pulley
(14) Bracket
(15) Bush(16) Belt cover
(17) Clamp plate
(18) Pipe F
(19) Pipe E
(20) Universal joint
(21) Dust seal
(22) C-ring
(23) Oil seal
(24) Valve housing
(25) Packing
(26) Seal ring
(27) Pinion and valve ASSY
(28) Oil seal
(29) Back-up washer
(30) Ball bearing(31) Snap ring
(32) Lock nut
(33) Adjusting screw
(34) Spring
(35) Sleeve
(36) Adapter
(37) Clamp
(38) Cotter pin
(39) Castle nut
(40) Dust seal
(41) Clip
(42) Tie-rod end
(43) Small clip
(44) Boot
(45) Large clip
5
[C2A0]4-3COMPONENT PARTS
2. Power Steering System
Page 798 of 1456

B: RHD MODEL
B4M1150B
(1) Clamp
(2) Adapter
(3) Hose bracket
(4) Pipe C
(5) Pipe D
(6) Clamp E
(7) Cap
(8) Strainer
(9) Seal washer
(10) Tank
(11) O-ring
(12) Oil pump
(13) Pulley
(14) Bracket
(15) Bush
(16) Belt cover
(17) Universal joint(18) Dust cover
(19) Valve housing
(20) Y-packing
(21) Ball bearing
(22) Spacer
(23) Pinion
(24) Shim
(25) Adapter
(26) Clamp
(27) Castle nut
(28) Cotter pin
(29) Dust seal
(30) Clip
(31) Tie-rod end
(32) Clip
(33) Boot
(34) Wire(35) Tie-rod
(36) Lock washer
(37) Holder
(38) Bush
(39) Y-packing
(40) Oil seal
(41) O-ring
(42) Rack
(43) Oil seal
(44) Back-up washer
(45) Housing ASSY
(46) Pipe A
(47) Pipe B
(48) Lock nut
(49) Adjusting screw
(50) Spring
(51) Sleeve
7
[C2B0]4-3COMPONENT PARTS
2. Power Steering System
Page 846 of 1456

4) Remove clamp E from pipes C and D.
G4M0162
5) Disconnect pipe C´D from pipe (on the gearbox
side).
CAUTION:
IWhen disconnecting pipe C´D, use two
wrenches to prevent deformities.
IBe careful to keep pipe connections free
from foreign matter.
G4M0101
6) Remove bolt A.
Disconnect pipe C from oil pump. Disconnect pipe
D from oil tank.
CAUTION:
IDo not allow fluid from the hose end to come
into contact with pulley belt.
ITo prevent foreign matter from entering the
hose and pipe, cover the open ends of them
with a clean cloth.
B4M1159A
2. RHD MODEL
1) Disconnect battery negative terminal.
2) Lift vehicle and remove jack-up plate.
G4M0098
53
[W7A2]4-3SERVICE PROCEDURE
7. Pipe Assembly (Power Steering System)
Page 847 of 1456
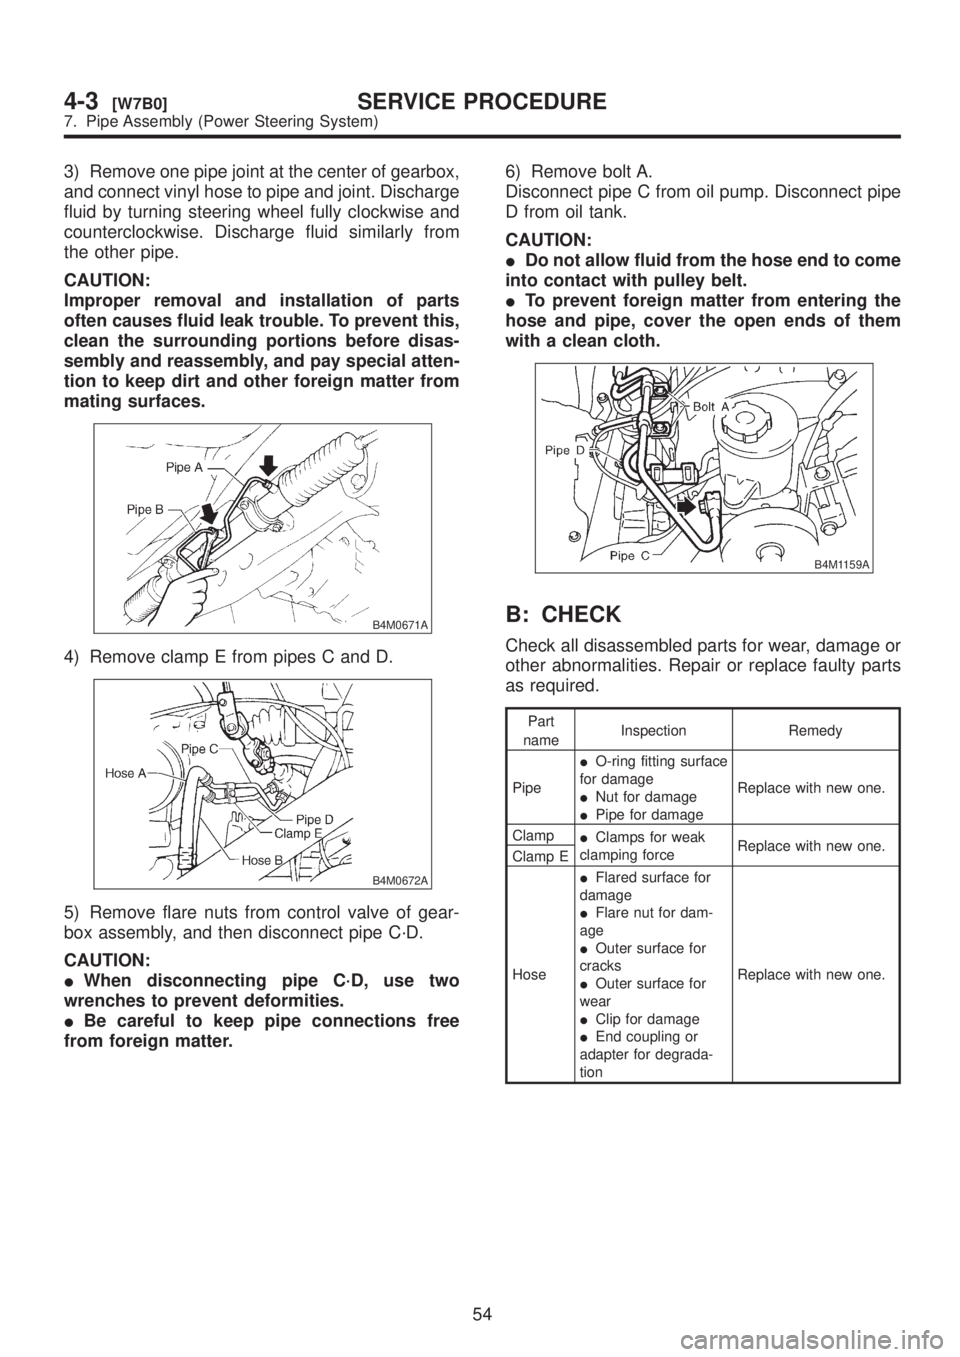
3) Remove one pipe joint at the center of gearbox,
and connect vinyl hose to pipe and joint. Discharge
fluid by turning steering wheel fully clockwise and
counterclockwise. Discharge fluid similarly from
the other pipe.
CAUTION:
Improper removal and installation of parts
often causes fluid leak trouble. To prevent this,
clean the surrounding portions before disas-
sembly and reassembly, and pay special atten-
tion to keep dirt and other foreign matter from
mating surfaces.
B4M0671A
4) Remove clamp E from pipes C and D.
B4M0672A
5) Remove flare nuts from control valve of gear-
box assembly, and then disconnect pipe C´D.
CAUTION:
IWhen disconnecting pipe C´D, use two
wrenches to prevent deformities.
IBe careful to keep pipe connections free
from foreign matter.6) Remove bolt A.
Disconnect pipe C from oil pump. Disconnect pipe
D from oil tank.
CAUTION:
IDo not allow fluid from the hose end to come
into contact with pulley belt.
ITo prevent foreign matter from entering the
hose and pipe, cover the open ends of them
with a clean cloth.
B4M1159A
B: CHECK
Check all disassembled parts for wear, damage or
other abnormalities. Repair or replace faulty parts
as required.
Part
nameInspection Remedy
PipeIO-ring fitting surface
for damage
INut for damage
IPipe for damageReplace with new one.
Clamp
IClamps for weak
clamping forceReplace with new one.
Clamp E
HoseIFlared surface for
damage
IFlare nut for dam-
age
IOuter surface for
cracks
IOuter surface for
wear
IClip for damage
IEnd coupling or
adapter for degrada-
tionReplace with new one.
54
4-3[W7B0]SERVICE PROCEDURE
7. Pipe Assembly (Power Steering System)
Page 852 of 1456
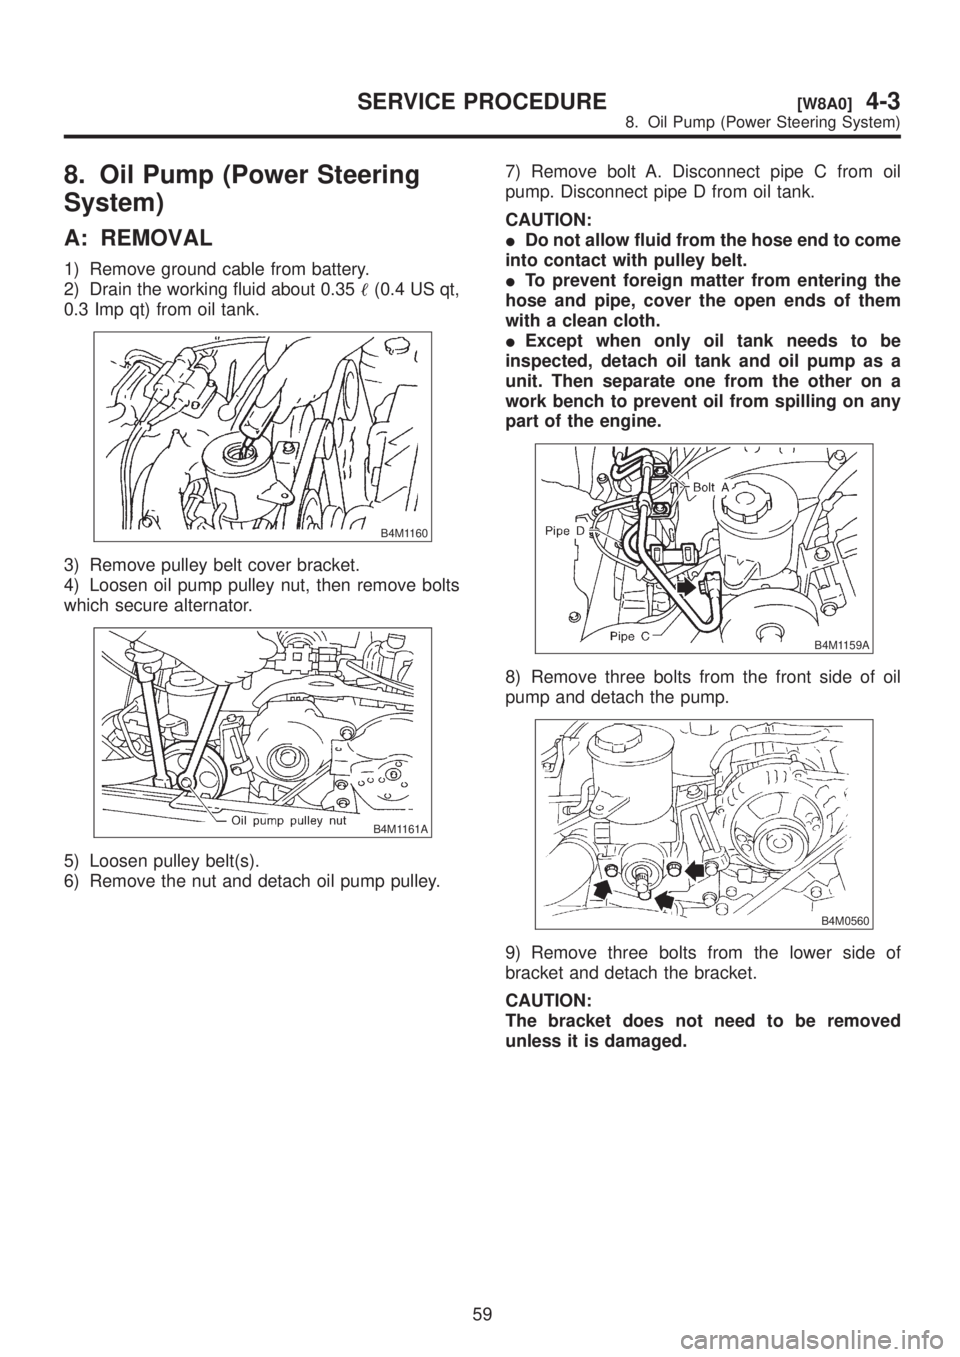
8. Oil Pump (Power Steering
System)
A: REMOVAL
1) Remove ground cable from battery.
2) Drain the working fluid about 0.35(0.4 US qt,
0.3 Imp qt) from oil tank.
B4M1160
3) Remove pulley belt cover bracket.
4) Loosen oil pump pulley nut, then remove bolts
which secure alternator.
B4M1161A
5) Loosen pulley belt(s).
6) Remove the nut and detach oil pump pulley.7) Remove bolt A. Disconnect pipe C from oil
pump. Disconnect pipe D from oil tank.
CAUTION:
IDo not allow fluid from the hose end to come
into contact with pulley belt.
ITo prevent foreign matter from entering the
hose and pipe, cover the open ends of them
with a clean cloth.
IExcept when only oil tank needs to be
inspected, detach oil tank and oil pump as a
unit. Then separate one from the other on a
work bench to prevent oil from spilling on any
part of the engine.
B4M1159A
8) Remove three bolts from the front side of oil
pump and detach the pump.
B4M0560
9) Remove three bolts from the lower side of
bracket and detach the bracket.
CAUTION:
The bracket does not need to be removed
unless it is damaged.
59
[W8A0]4-3SERVICE PROCEDURE
8. Oil Pump (Power Steering System)
Page 860 of 1456
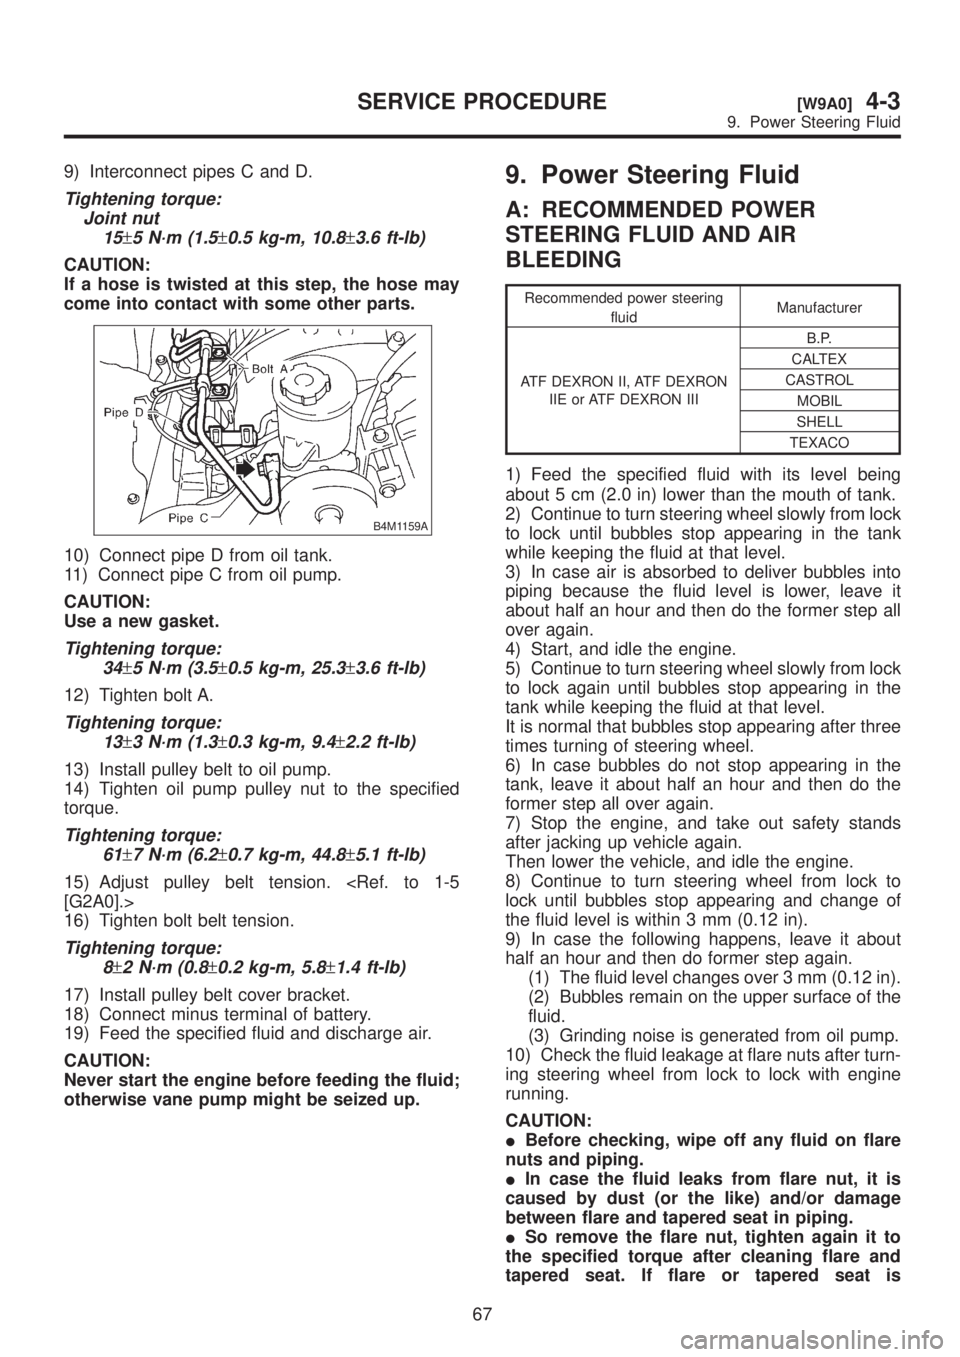
9) Interconnect pipes C and D.
Tightening torque:
Joint nut
15
±5 N´m (1.5±0.5 kg-m, 10.8±3.6 ft-lb)
CAUTION:
If a hose is twisted at this step, the hose may
come into contact with some other parts.
B4M1159A
10) Connect pipe D from oil tank.
11) Connect pipe C from oil pump.
CAUTION:
Use a new gasket.
Tightening torque:
34
±5 N´m (3.5±0.5 kg-m, 25.3±3.6 ft-lb)
12) Tighten bolt A.
Tightening torque:
13
±3 N´m (1.3±0.3 kg-m, 9.4±2.2 ft-lb)
13) Install pulley belt to oil pump.
14) Tighten oil pump pulley nut to the specified
torque.
Tightening torque:
61
±7 N´m (6.2±0.7 kg-m, 44.8±5.1 ft-lb)
15) Adjust pulley belt tension.
16) Tighten bolt belt tension.
Tightening torque:
8
±2 N´m (0.8±0.2 kg-m, 5.8±1.4 ft-lb)
17) Install pulley belt cover bracket.
18) Connect minus terminal of battery.
19) Feed the specified fluid and discharge air.
CAUTION:
Never start the engine before feeding the fluid;
otherwise vane pump might be seized up.
9. Power Steering Fluid
A: RECOMMENDED POWER
STEERING FLUID AND AIR
BLEEDING
Recommended power steering
fluidManufacturer
ATF DEXRON II, ATF DEXRON
IIE or ATF DEXRON IIIB.P.
CALTEX
CASTROL
MOBIL
SHELL
TEXACO
1) Feed the specified fluid with its level being
about 5 cm (2.0 in) lower than the mouth of tank.
2) Continue to turn steering wheel slowly from lock
to lock until bubbles stop appearing in the tank
while keeping the fluid at that level.
3) In case air is absorbed to deliver bubbles into
piping because the fluid level is lower, leave it
about half an hour and then do the former step all
over again.
4) Start, and idle the engine.
5) Continue to turn steering wheel slowly from lock
to lock again until bubbles stop appearing in the
tank while keeping the fluid at that level.
It is normal that bubbles stop appearing after three
times turning of steering wheel.
6) In case bubbles do not stop appearing in the
tank, leave it about half an hour and then do the
former step all over again.
7) Stop the engine, and take out safety stands
after jacking up vehicle again.
Then lower the vehicle, and idle the engine.
8) Continue to turn steering wheel from lock to
lock until bubbles stop appearing and change of
the fluid level is within 3 mm (0.12 in).
9) In case the following happens, leave it about
half an hour and then do former step again.
(1) The fluid level changes over 3 mm (0.12 in).
(2) Bubbles remain on the upper surface of the
fluid.
(3) Grinding noise is generated from oil pump.
10) Check the fluid leakage at flare nuts after turn-
ing steering wheel from lock to lock with engine
running.
CAUTION:
IBefore checking, wipe off any fluid on flare
nuts and piping.
IIn case the fluid leaks from flare nut, it is
caused by dust (or the like) and/or damage
between flare and tapered seat in piping.
ISo remove the flare nut, tighten again it to
the specified torque after cleaning flare and
tapered seat. If flare or tapered seat is
67
[W9A0]4-3SERVICE PROCEDURE
9. Power Steering Fluid
Page 861 of 1456
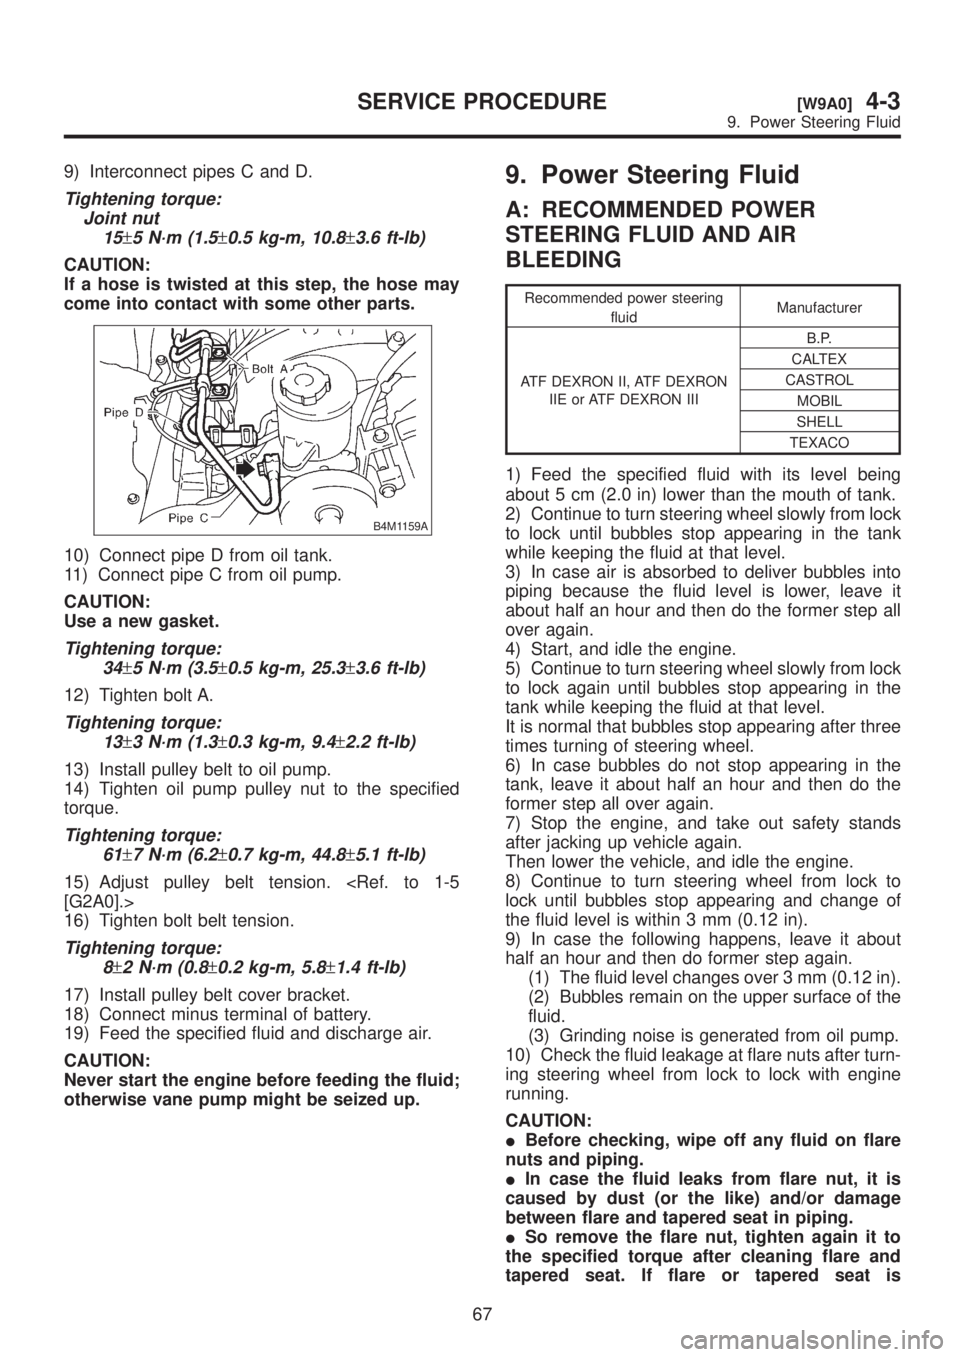
9) Interconnect pipes C and D.
Tightening torque:
Joint nut
15
±5 N´m (1.5±0.5 kg-m, 10.8±3.6 ft-lb)
CAUTION:
If a hose is twisted at this step, the hose may
come into contact with some other parts.
B4M1159A
10) Connect pipe D from oil tank.
11) Connect pipe C from oil pump.
CAUTION:
Use a new gasket.
Tightening torque:
34
±5 N´m (3.5±0.5 kg-m, 25.3±3.6 ft-lb)
12) Tighten bolt A.
Tightening torque:
13
±3 N´m (1.3±0.3 kg-m, 9.4±2.2 ft-lb)
13) Install pulley belt to oil pump.
14) Tighten oil pump pulley nut to the specified
torque.
Tightening torque:
61
±7 N´m (6.2±0.7 kg-m, 44.8±5.1 ft-lb)
15) Adjust pulley belt tension.
16) Tighten bolt belt tension.
Tightening torque:
8
±2 N´m (0.8±0.2 kg-m, 5.8±1.4 ft-lb)
17) Install pulley belt cover bracket.
18) Connect minus terminal of battery.
19) Feed the specified fluid and discharge air.
CAUTION:
Never start the engine before feeding the fluid;
otherwise vane pump might be seized up.
9. Power Steering Fluid
A: RECOMMENDED POWER
STEERING FLUID AND AIR
BLEEDING
Recommended power steering
fluidManufacturer
ATF DEXRON II, ATF DEXRON
IIE or ATF DEXRON IIIB.P.
CALTEX
CASTROL
MOBIL
SHELL
TEXACO
1) Feed the specified fluid with its level being
about 5 cm (2.0 in) lower than the mouth of tank.
2) Continue to turn steering wheel slowly from lock
to lock until bubbles stop appearing in the tank
while keeping the fluid at that level.
3) In case air is absorbed to deliver bubbles into
piping because the fluid level is lower, leave it
about half an hour and then do the former step all
over again.
4) Start, and idle the engine.
5) Continue to turn steering wheel slowly from lock
to lock again until bubbles stop appearing in the
tank while keeping the fluid at that level.
It is normal that bubbles stop appearing after three
times turning of steering wheel.
6) In case bubbles do not stop appearing in the
tank, leave it about half an hour and then do the
former step all over again.
7) Stop the engine, and take out safety stands
after jacking up vehicle again.
Then lower the vehicle, and idle the engine.
8) Continue to turn steering wheel from lock to
lock until bubbles stop appearing and change of
the fluid level is within 3 mm (0.12 in).
9) In case the following happens, leave it about
half an hour and then do former step again.
(1) The fluid level changes over 3 mm (0.12 in).
(2) Bubbles remain on the upper surface of the
fluid.
(3) Grinding noise is generated from oil pump.
10) Check the fluid leakage at flare nuts after turn-
ing steering wheel from lock to lock with engine
running.
CAUTION:
IBefore checking, wipe off any fluid on flare
nuts and piping.
IIn case the fluid leaks from flare nut, it is
caused by dust (or the like) and/or damage
between flare and tapered seat in piping.
ISo remove the flare nut, tighten again it to
the specified torque after cleaning flare and
tapered seat. If flare or tapered seat is
67
[W9A0]4-3SERVICE PROCEDURE
9. Power Steering Fluid
Page 863 of 1456
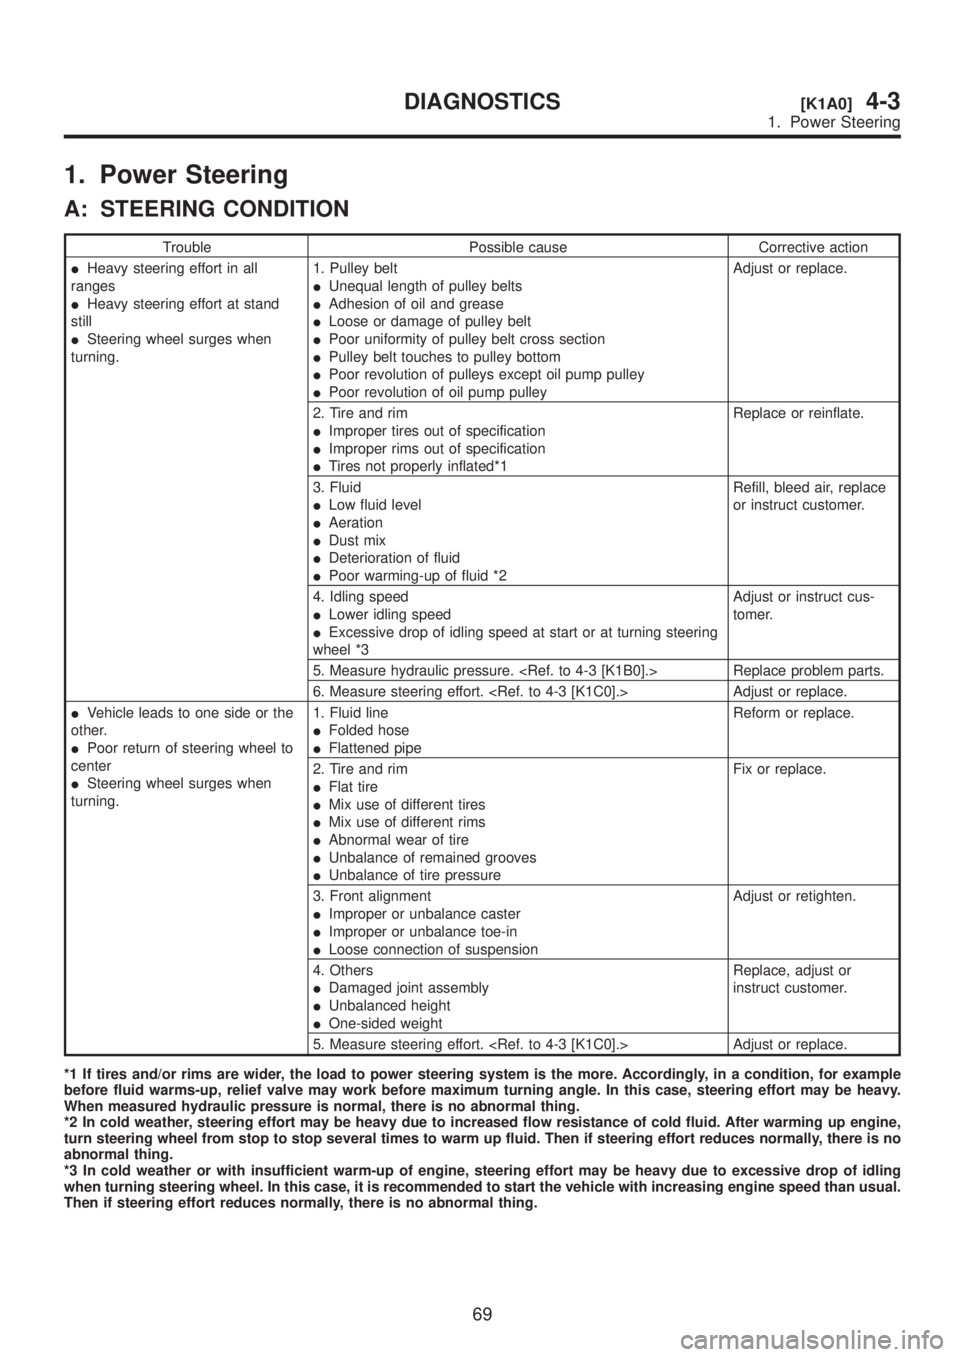
1. Power Steering
A: STEERING CONDITION
Trouble Possible cause Corrective action
IHeavy steering effort in all
ranges
IHeavy steering effort at stand
still
ISteering wheel surges when
turning.1. Pulley belt
IUnequal length of pulley belts
IAdhesion of oil and grease
ILoose or damage of pulley belt
IPoor uniformity of pulley belt cross section
IPulley belt touches to pulley bottom
IPoor revolution of pulleys except oil pump pulley
IPoor revolution of oil pump pulleyAdjust or replace.
2. Tire and rim
IImproper tires out of specification
IImproper rims out of specification
ITires not properly inflated*1Replace or reinflate.
3. Fluid
ILow fluid level
IAeration
IDust mix
IDeterioration of fluid
IPoor warming-up of fluid *2Refill, bleed air, replace
or instruct customer.
4. Idling speed
ILower idling speed
IExcessive drop of idling speed at start or at turning steering
wheel *3Adjust or instruct cus-
tomer.
5. Measure hydraulic pressure.
6. Measure steering effort.
IVehicle leads to one side or the
other.
IPoor return of steering wheel to
center
ISteering wheel surges when
turning.1. Fluid line
IFolded hose
IFlattened pipeReform or replace.
2. Tire and rim
IFlat tire
IMix use of different tires
IMix use of different rims
IAbnormal wear of tire
IUnbalance of remained grooves
IUnbalance of tire pressureFix or replace.
3. Front alignment
IImproper or unbalance caster
IImproper or unbalance toe-in
ILoose connection of suspensionAdjust or retighten.
4. Others
IDamaged joint assembly
IUnbalanced height
IOne-sided weightReplace, adjust or
instruct customer.
5. Measure steering effort.
*1 If tires and/or rims are wider, the load to power steering system is the more. Accordingly, in a condition, for example
before fluid warms-up, relief valve may work before maximum turning angle. In this case, steering effort may be heavy.
When measured hydraulic pressure is normal, there is no abnormal thing.
*2 In cold weather, steering effort may be heavy due to increased flow resistance of cold fluid. After warming up engine,
turn steering wheel from stop to stop several times to warm up fluid. Then if steering effort reduces normally, there is no
abnormal thing.
*3 In cold weather or with insufficient warm-up of engine, steering effort may be heavy due to excessive drop of idling
when turning steering wheel. In this case, it is recommended to start the vehicle with increasing engine speed than usual.
Then if steering effort reduces normally, there is no abnormal thing.
69
[K1A0]4-3DIAGNOSTICS
1. Power Steering